Ford Police Interceptor Sedan (2018 year). Manual — part 55

2. Full-size dissimilar spare with label
on wheel:
This spare tire has a label on
the wheel that states: THIS WHEEL AND
TIRE ASSEMBLY FOR TEMPORARY USE
ONLY.
When driving with one of the dissimilar
spare tires listed above, do not:
•
Exceed 50 mph (80 km/h).
•
Load the vehicle beyond maximum
vehicle load rating listed on the Safety
Compliance Label.
•
Tow a trailer.
•
Use snow chains on the end of the
vehicle with the dissimilar spare tire.
•
Use more than one dissimilar spare tire
at a time.
•
Use commercial car washing
equipment.
•
Try to repair the dissimilar spare tire.
Use of one of the dissimilar spare tires
listed above at any one wheel location can
lead to impairment of the following:
•
Handling, stability and braking
performance.
•
Comfort and noise.
•
Ground clearance and parking at curbs.
•
Winter weather driving capability.
•
Wet weather driving capability.
•
All-wheel driving capability.
3. Full-size dissimilar spare without
label on wheel
When driving with the full-size dissimilar
spare wheel and tire assembly, do not:
•
Exceed 70 mph (113 km/h).
•
Use more than one dissimilar spare
wheel and tire assembly at a time.
•
Use commercial car washing
equipment.
•
Use snow chains on the end of the
vehicle with the dissimilar spare wheel
and tire assembly.
The usage of a full-size dissimilar spare
wheel and tire assembly can lead to
impairment of the following:
•
Handling, stability and braking
performance.
•
Comfort and noise.
•
Ground clearance and parking at curbs.
•
Winter weather driving capability.
•
Wet weather driving capability.
•
All-wheel driving capability.
When driving with the full-size dissimilar
spare wheel and tire assembly additional
caution should be given to:
•
Towing a trailer.
•
Driving vehicles equipped with a
camper body.
•
Driving vehicles with a load on the
cargo rack.
Drive cautiously when using a full-size
dissimilar spare wheel and tire assembly
and seek service as soon as possible.
Tire Change Procedure
WARNINGS
When one of the front wheels is off
the ground, the transmission alone
will not prevent the vehicle from
moving or slipping off the jack, even if the
transmission is in park (P).
To help prevent your vehicle from
moving when changing a wheel, shift
the transmission into park (P), set
the parking brake and use an appropriate
block or wheel chock to secure the wheel
diagonally opposite to the wheel being
changed. For example, when changing the
front left wheel, place an appropriate block
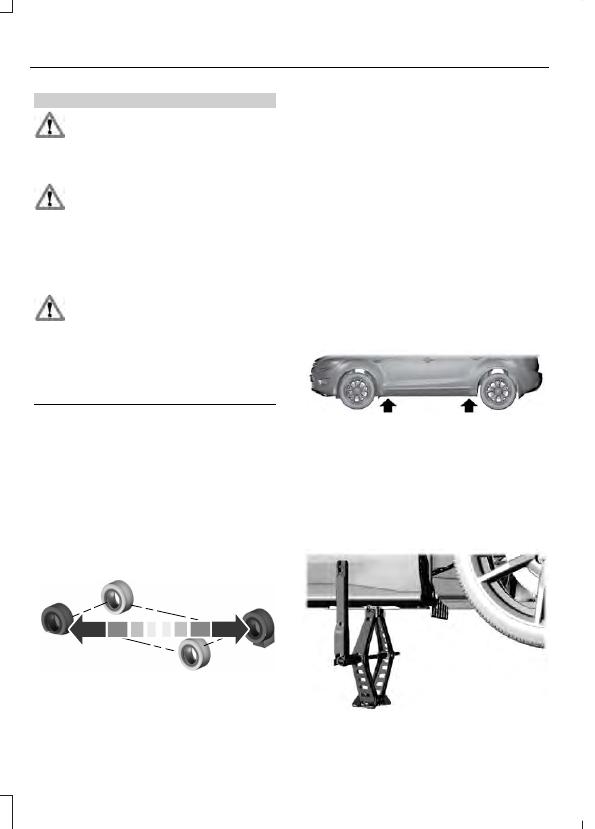
or wheel chock on the right rear wheel.
Do not work on your vehicle when
the jack is the only support. If the
vehicle slips off the jack, you or
someone else could be seriously injured.
WARNINGS
Do not attempt to change a tire on
the side of the vehicle close to
moving traffic. Pull far enough off the
road to avoid the danger of being hit when
operating the jack or changing the wheel.
Always use the jack provided as
original equipment with your vehicle.
If using a jack other than the one
provided, make sure the jack capacity is
adequate for the vehicle weight, including
any vehicle cargo or modifications. If you
are unsure if the jack capacity is adequate,
contact the authorized dealer.
To reduce the risk of possible serious
injury or death, do not remove the full
size spare tire from the factory
secured location. This location is necessary
to achieve police-rated 75 mph (120 km/h)
rear impact crash-test performance.
Removal increases the risk of fuel leak in
high-speed rear impacts.
Note:
Passengers should not remain in your
vehicle when the vehicle is being jacked.
Note:
Jack at the specified locations to
avoid damage to the vehicle.
1.
Park on a level surface, set the parking
brake and activate the hazard flashers.
2. Place the transmission in park (P) and
turn the engine off.
E142551
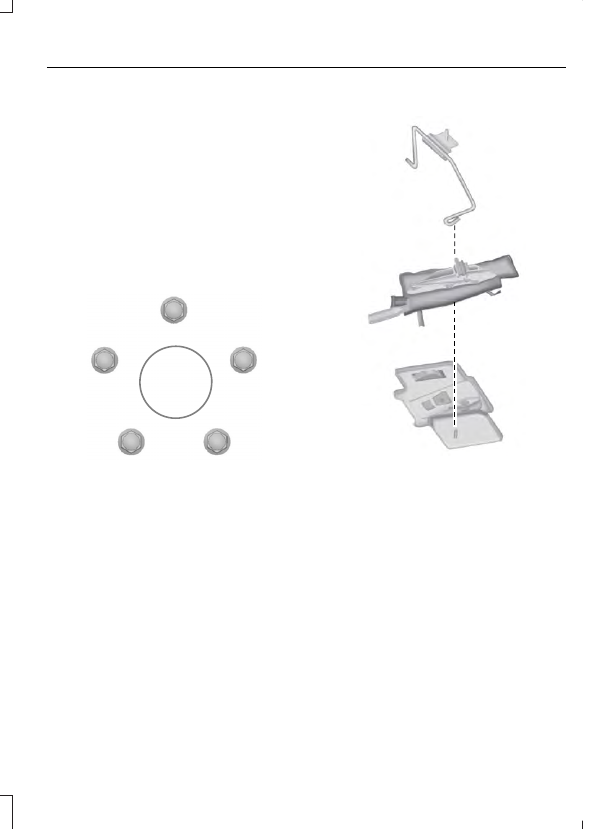
3. Block the diagonally opposite wheel.
4. Lift truck cargo cover, then remove the
wingnut that secures the spare tire by
turning counterclockwise.
5. Remove the spare tire from the spare
tire well.
6. Remove the wing nut bolt that secures
the jack kit by turning it
counterclockwise.
7.
Remove the jack and the wrench from
the bag. Fold down the wrench socket
to use to loosen the lug nuts and to
operate the jack.
8. Loosen each wheel lug nut one-half
turn counterclockwise, but do not
remove them until the wheel is raised
off the ground.
E145908
9. The vehicle jacking points are shown
here, and are depicted on the warning
label on the jack. Small arrow-shaped
marks on the sills show the location of
the jacking points.
E201156
10.
Raise the wheel by turning the jack
handle clockwise.
11.
Remove the lug nuts with the lug
wrench.
12.
Replace the flat tire with the spare
tire, marking sure the valve stem is
facing outward. Reinstall the lug nuts
until the wheel is snug against the
hub. Do not fully tighten the lug nuts
until the wheel has been lowered.
13.
Lower the wheel by turning the jack
handle counterclockwise.
1
2
3
4
5
E75442
14.
Remove the jack and fully tighten the
lug nuts in the order shown. See
Technical Specifications
Stowing the jack and flat tire
E211101
1.
Insert the straight end of the jack
retention bracket through the eyelet of
the angled bracket and swing the
retention bracket over the jack. With
the jack in place, place the end of the
retention bracket over the threaded
stud in the trunk floor and secure it with
the plastic wing nut.
2. Screw the extension bolt onto the
threaded stud of the jack retention
bracket.
E239129
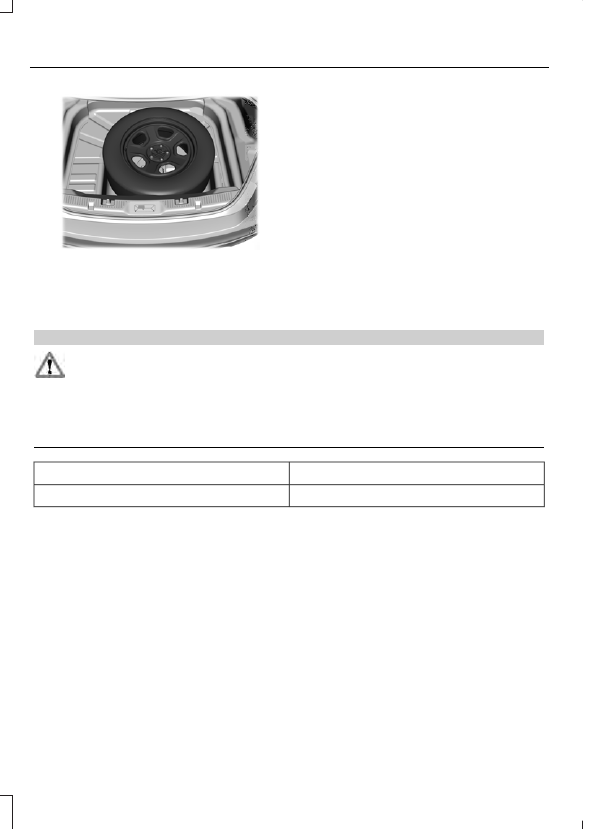
3. Place the flat tire in the spare tire well
with the wheel facing up.
4. Safely secure the wheel by screwing
the large wing nut onto the extension
bolt.
TECHNICAL SPECIFICATIONS
Wheel Lug Nut Torque Specifications
WARNING
When a wheel is installed, always remove any corrosion, dirt or foreign materials
present on the mounting surfaces of the wheel or the surface of the wheel hub,
brake drum or brake disc that contacts the wheel. Make sure that any fasteners
that attach the rotor to the hub are secured so they do not interfere with the mounting
surfaces of the wheel. Installing wheels without correct metal-to-metal contact at the
wheel mounting surfaces can cause the wheel nuts to loosen and the wheel to come off
while your vehicle is in motion, resulting in loss of control.
lb.ft (Nm)
Bolt size
110 lb.ft (150 Nm)
1/2-20 x 1.5
*
Torque specifications are for nut and bolt threads free of dirt and rust. Use only Ford
recommended replacement fasteners.
Retighten the lug nuts to the specified torque within 100 miles (160 kilometers) after any
wheel disturbance (such as tire rotation, changing a flat tire, wheel removal).
Нет комментариевНе стесняйтесь поделиться с нами вашим ценным мнением.
Текст