Ford Ranger (2022 year). Manual in english — page 17
OPENING AND CLOSING THE
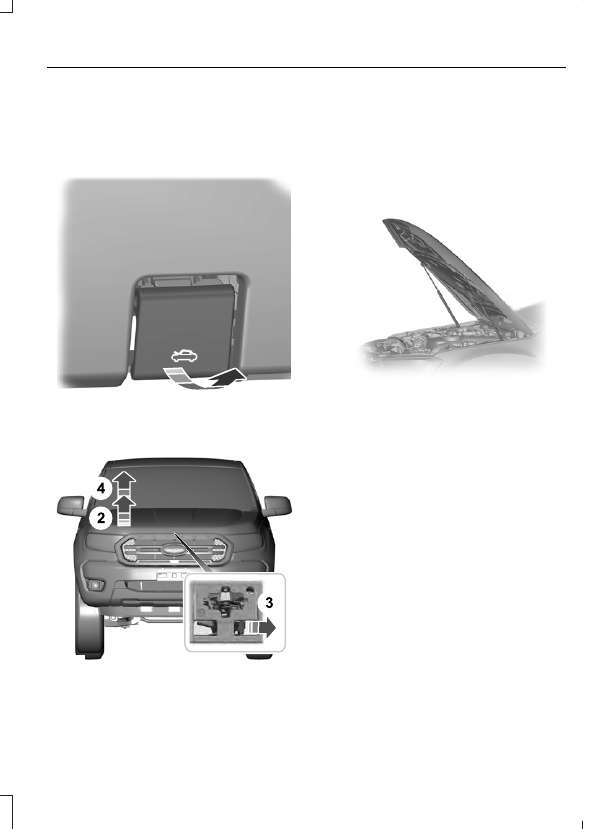
HOOD
Opening the Hood
E206129
1
1.
Pull the hood release lever.
E271769
2. Slightly lift the hood.
3. Move the catch to the left for vehicles
with left hand drive. Move the catch to
the right for vehicle with right hand
drive.
4. Open the hood.
E201861
5. The hood strut automatically supports
the hood.
Closing the Hood
1.
For vehicles with a prop rod, ensure you
fully stow it prior to lowering the hood.
2. Lower the hood and ensure you fully
latch it.
Note:
Make sure that you correctly close
the hood.
263
Maintenance
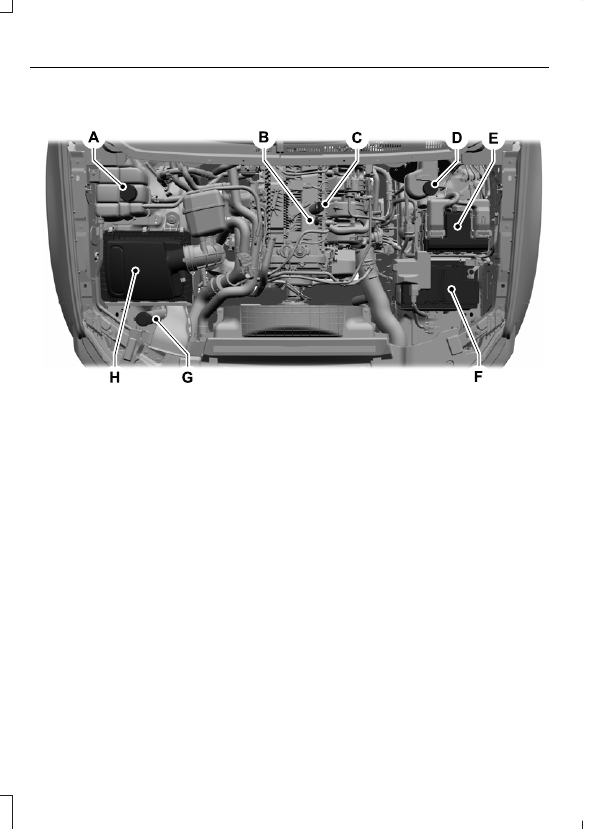
UNDER HOOD OVERVIEW
E276868
Engine coolant reservoir. See
A
Engine oil dipstick. See
B
Engine oil filler cap. See
C
Brake fluid reservoir. See
D
Engine compartment fuse box. See
E
Battery. See
F
Windshield washer fluid reservoir. See
G
Air filter assembly. See
Changing the Engine Air Filter
H
264
Maintenance
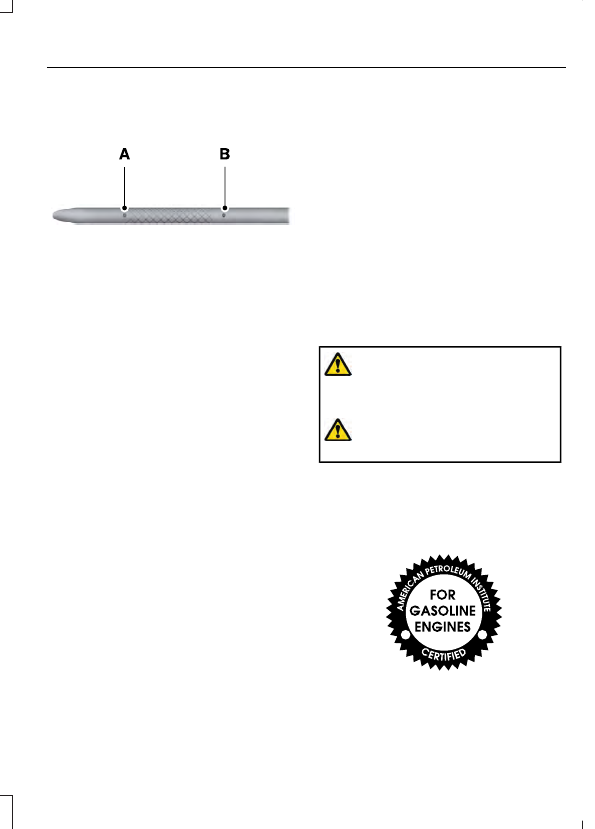
ENGINE OIL DIPSTICK
E161560
Minimum.
A
Maximum.
B
ENGINE OIL CHECK
To check the engine oil level consistently
and accurately, do the following:
1.
Make sure the parking brake is on. Make
sure the transmission is in park (P) or
neutral (N).
2. Run the engine until it reaches normal
operating temperature.
3. Make sure that your vehicle is on level
ground.
4. Switch the engine off and wait 15
minutes for the oil to drain into the oil
pan. Checking the engine oil level too
soon after you switch the engine off
may result in an inaccurate reading.
5. Open the hood. See
6. Remove the dipstick and wipe it with
a clean, lint-free cloth. See
7.
Reinstall the dipstick and remove it
again to check the oil level. See
8. Make sure that the oil level is between
the maximum and minimum marks. If
the oil level is at the minimum mark,
add oil immediately. See
9. If the oil level is correct, replace the
dipstick and make sure it is fully seated.
Note:
Do not remove the dipstick when the
engine is running.
Note:
If the oil level is between the
maximum and minimum marks, the oil level
is acceptable. Do not add oil.
Note:
The oil consumption of new engines
reaches its normal level after approximately
3,000 mi (5,000 km).
Adding Engine Oil
WARNING:
Do not add engine oil
when the engine is hot. Failure to follow
this instruction could result in personal
injury.
WARNING:
Do not remove the filler
cap when the engine is running.
Do not use supplemental engine oil
additives because they are unnecessary
and could lead to engine damage that may
not be covered by the vehicle Warranty.
E142732
265
Maintenance
Only use oils certified for gasoline engines
by the American Petroleum Institute (API).
An oil with this trademark symbol
conforms to the current engine and
emission system protection standards and
fuel economy requirements of the
International Lubricants Specification
Advisory Committee (ILSAC).
To top up the engine oil level do the
following:
1.
Clean the area surrounding the engine
oil filler cap before you remove it.
2. Remove the engine oil filler cap. See
Turn it counterclockwise and remove
it.
3. Add engine oil that meets our
specifications. See
(page 328). You may
have to use a funnel to pour the engine
oil into the opening.
4. Recheck the oil level.
5. If the oil level is correct, replace the
dipstick and make sure it is fully seated.
6. Replace the engine oil filler cap. Turn
it clockwise until you feel a strong
resistance.
Note:
Do not add oil further than the
maximum mark. Oil levels above the
maximum mark may cause engine damage.
Note:
Make sure you install the oil filler cap
correctly.
Note:
Soak up any spillage with an
absorbent cloth immediately.
CHANGING THE ENGINE AIR
FILTER
WARNING:
To reduce the risk of
vehicle damage and personal burn
injuries, do not start your engine with the
air cleaner removed and do not remove
it while the engine is running.
When changing the engine air filter, do not
allow debris or foreign material to enter
the air induction system. Engine
components are susceptible to damage
not covered by the vehicle Warranty.
Change the air filter element at the correct
interval. See
Incorrect component use can cause
damage not covered by the vehicle
Warranty. See
To replace the air filter element do the
following:
266
Maintenance
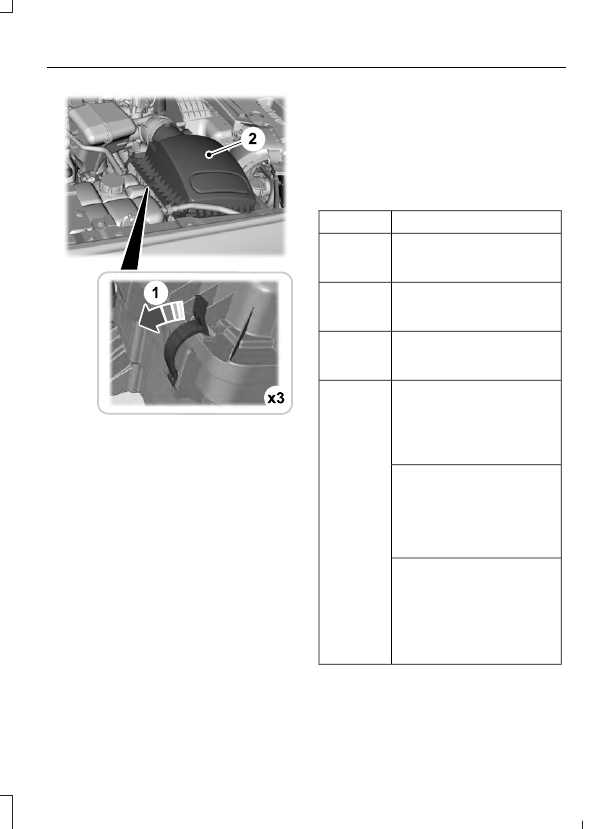
E276908
1.
Remove the clips that secure the air
filter housing cover.
2. Carefully lift the air filter housing cover.
3. Remove the air filter element from the
air filter housing.
4. Wipe any dirt or debris from the air filter
housing and cover to make sure no dirt
gets in the engine and that you have a
good seal.
5. Install a new air filter element. Be
careful not to crimp the filter element
edges between the air filter housing
and cover. This could cause filter
damage and allow unfiltered air to
enter the engine if it is not properly
seated.
6. Install the air filter housing cover.
7.
Engage the clips to secure the air filter
housing cover to the air filter housing.
OIL CHANGE INDICATOR
RESET
Use the information display controls on
the steering wheel to reset the oil change
indicator.
From the main menu scroll to:
Action and description
Message
Press the right arrow button,
then from this menu scroll
to the following message.
Settings
Press the right arrow button,
then from this menu scroll
to the following message.
Vehicle
Press the right arrow button,
then from this menu scroll
to the following message.
Oil Life
Press and hold the
OK
button until the instrument
cluster displays the
following message.
Hold OK to
Reset
Reset Successful
When the oil change indic-
ator resets the instrument
cluster displays 100%.
Remaining Life
{00}%
If the instrument cluster
displays one of the following
messages, repeat the
process.
Not Reset
Reset Cancelled
267
Maintenance
ENGINE COOLANT CHECK
WARNING:
Do not remove the
coolant reservoir cap when the engine is
on or the cooling system is hot. Wait 10
minutes for the cooling system to cool
down. Cover the coolant reservoir cap
with a thick cloth to prevent the
possibility of scalding and slowly remove
the cap. Failure to follow this instruction
could result in personal injury.
WARNING:
Do not dispose of
coolant in the household refuse or the
public sewage system. Use an authorized
waste disposal facility.
WARNING:
Do not put coolant in
the windshield washer reservoir. If
sprayed on the windshield, coolant could
make it difficult to see through the
windshield.
WARNING:
To reduce the risk of
personal injury, make sure the engine is
cool before unscrewing the coolant
pressure relief cap. The cooling system
is under pressure. Steam and hot liquid
can come out forcefully when you loosen
the cap slightly.
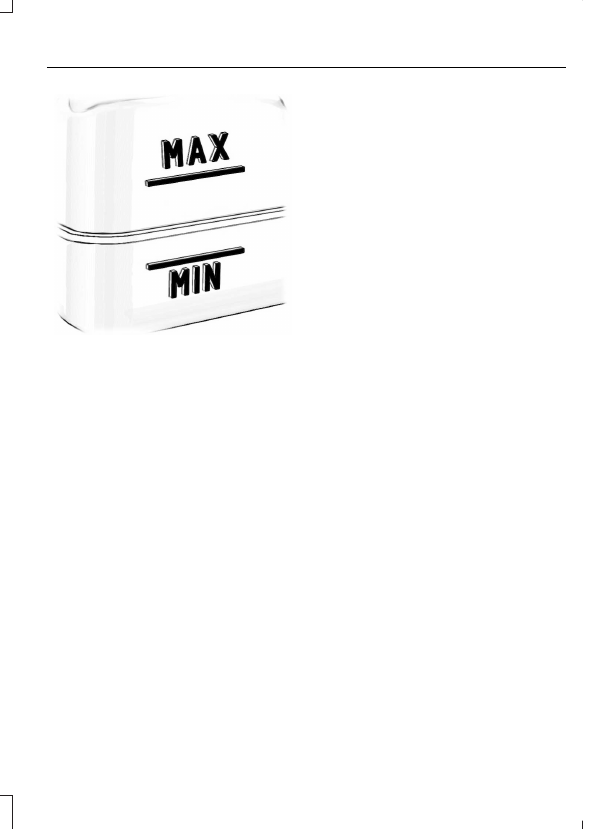
WARNING:
Do not add coolant
further than the
MAX
mark.
When the engine is cold, check the
concentration and level of the coolant at
the intervals listed in the scheduled
maintenance information. See
Note:
Make sure that the coolant level is
between the
MIN
and the
MAX
marks on
the coolant reservoir.
Note:
Coolant expands when it is hot. The
level may extend beyond the
MAX
mark.
Maintain coolant concentration within
48% to 50%, which equates to a freeze
point between -29°F (-34°C) and -35°F
(-37°C). Coolant concentration should be
checked using a refractometer. We do not
recommend the use of hydrometers or
coolant test strips for measuring coolant
concentration.
Adding Coolant
WARNING:
Do not remove the
coolant reservoir cap when the engine is
on or the cooling system is hot. Wait 10
minutes for the cooling system to cool
down. Cover the coolant reservoir cap
with a thick cloth to prevent the
possibility of scalding and slowly remove
the cap. Failure to follow this instruction
could result in personal injury.
WARNING:
Do not allow the fluid
to touch your skin or eyes. If this
happens, rinse the affected areas
immediately with plenty of water and
contact your physician.
WARNING:
Undiluted coolant is
flammable and may ignite if spilled on a
hot exhaust.
Note:
Automotive fluids are not
interchangeable. Take care not to put engine
coolant in the windshield washer fluid
reservoir or windshield washer fluid in the
engine coolant reservoir.
Note:
Do not use stop leak pellets, cooling
system sealants, or non-specified additives
as they can cause damage to the engine
cooling or heating systems. Resulting
component damage may not be covered by
the vehicle Warranty.
268
Maintenance
It is very important to use prediluted
coolant approved to the correct
specification in order to avoid plugging the
small passageways in the engine cooling
system. See
different colors or types of coolant in your
vehicle. Mixing of engine coolants or using
an incorrect coolant may harm the engine
or cooling system components and may
not be covered by the vehicle Warranty.
Note:
If prediluted coolant is not available,
use the approved concentrated coolant
diluting it to 50/50 with deionized or
distilled water. See
(page 324). Using water that
has not been deionised may contribute to
deposit formation, corrosion and plugging
of the small cooling system passageways.
Note:
Coolants marketed for all makes and
models may not be approved to our
specifications and may cause damage to
the cooling system. Resulting component
damage may not be covered by the vehicle
Warranty.
If the coolant level is at or below the
minimum mark, add prediluted coolant
immediately.
To top up the coolant level do the
following:
1.
Unscrew the cap slowly. Any pressure
escapes as you unscrew the cap.
2. Add prediluted coolant approved to
the correct specification. See
3. Add enough prediluted coolant to
reach the correct level.
4. Replace the coolant reservoir cap. Turn
the cap clockwise until it contacts the
hard stop.
5. Check the coolant level in the coolant
reservoir the next few times you drive
your vehicle. If necessary, add enough
prediluted engine coolant to bring the
coolant level to the correct level.
If you have to add more than 1.1 qt (1 L) of
engine coolant per month, have your
vehicle checked as soon as possible.
Operating an engine with a low level of
coolant can result in engine overheating
and possible engine damage.
In case of emergency, you can add a large
amount of water without engine coolant
in order to reach a vehicle service location.
In this instance, qualified personnel:
1.
Must drain the cooling system.
2. Chemically clean the coolant system.
3. Refill with engine coolant as soon as
possible.
Water alone, without engine coolant, can
cause engine damage from corrosion,
overheating or freezing.
Do not use the following as a coolant
substitute:
•
Alcohol.
•
Methanol.
•
Brine.
•
Any coolant mixed with alcohol or
methanol antifreeze.
Alcohol and other liquids can cause engine
damage from overheating or freezing.
Do not add extra inhibitors or additives to
the coolant. These can be harmful and
compromise the corrosion protection of
the coolant.
Recycled Coolant
We do not recommend the use of recycled
coolant as an approved recycling process
is not yet available.
269
Maintenance
Dispose of used engine coolant in an
appropriate manner. Follow your
community's regulations and standards
for recycling and disposing of automotive
fluids.
Severe Climates
If you drive in extremely cold climates:
•
It may be necessary to increase the
coolant concentration above 50%.
•
A coolant concentration of 60%
provides improved freeze point
protection. Coolant concentrations
above 60% decrease the overheat
protection characteristics of the
coolant and may cause engine
damage.
If you drive in extremely hot climates:
•
You can decrease the coolant
concentration to 40%.
•
Coolant concentrations below 40%
decrease the freeze and corrosion
protection characteristics of the
coolant and may cause engine
damage.
Vehicles driven year-round in non-extreme
climates should use prediluted coolant for
optimum cooling system and engine
protection.
Coolant Change
At specific mileage intervals, as listed in
the scheduled maintenance information,
the coolant should be changed. Add
prediluted coolant approved to the correct
specification. See
Fail-Safe Cooling
Fail-safe cooling allows you to temporarily
drive your vehicle before any incremental
component damage occurs. The fail-safe
distance depends on ambient
temperature, vehicle load and terrain.
How Fail-Safe Cooling Works
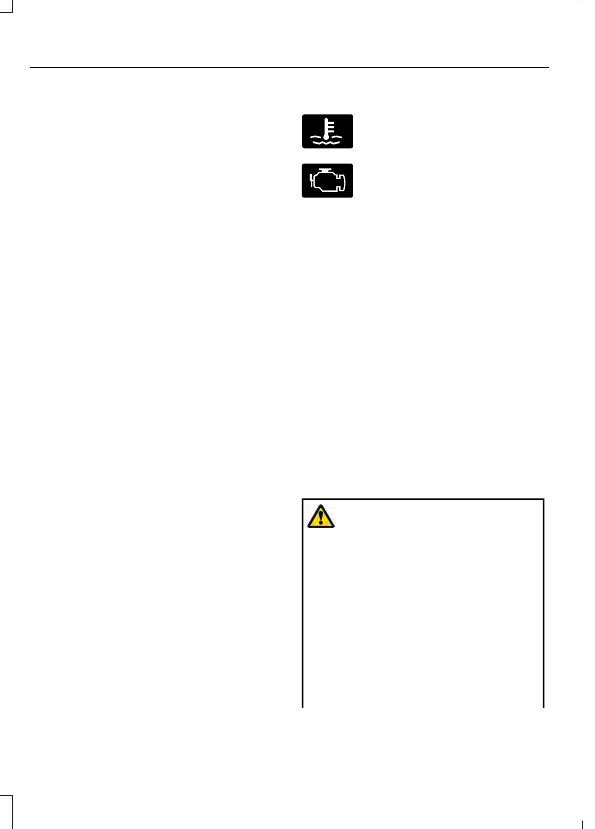
If the engine begins to overheat,
the coolant temperature gauge
moves toward the red zone:
A warning lamp illuminates and
a message may appear in the
information display.
If the engine reaches a preset
over-temperature condition, the engine
automatically switches to alternating
cylinder operation. Each disabled cylinder
acts as an air pump and cools the engine.
When this occurs, your vehicle still
operates, however:
•
Engine power is limited.
•
The air conditioning system turns off.
Continued operation increases the engine
temperature, causing the engine to
completely shut down. Your steering and
braking effort increases in this situation.
When the engine temperature cools, you
can re-start the engine. Have your vehicle
checked as soon as possible to minimize
engine damage.
When Fail-Safe Mode Is Activated
WARNING:
Fail-safe mode is for
use during emergencies only. Operate
your vehicle in fail-safe mode only as
long as necessary to bring your vehicle
to rest in a safe location and seek
immediate repairs. When in fail-safe
mode, your vehicle will have limited
power, will not be able to maintain
high-speed operation, and may
completely shut down without warning,
potentially losing engine power, power
steering assist, and power brake assist,
which may increase the possibility of a
crash resulting in serious injury.
270
Maintenance
WARNING:
Do not remove the
coolant reservoir cap when the engine is
on or the cooling system is hot. Wait 10
minutes for the cooling system to cool
down. Cover the coolant reservoir cap
with a thick cloth to prevent the
possibility of scalding and slowly remove
the cap. Failure to follow this instruction
could result in personal injury.
Your vehicle has limited engine power
when in the fail-safe mode, drive your
vehicle with caution. Your vehicle does not
maintain high-speed operation and the
engine may operate poorly.
Remember that the engine is capable of
automatically shutting down to prevent
engine damage. In this situation:
1.
Pull off the road as soon as safely
possible and switch the engine off.
2. If you are a member of a roadside
assistance program, we recommend
that you contact your roadside
assistance service provider.
3. If this is not possible, wait a short
period for the engine to cool.
4. Check the coolant level. If the coolant
level is at or below the minimum mark,
add prediluted coolant immediately.
5. When the engine temperature cools,
you can re-start the engine. Have your
vehicle checked as soon as possible to
minimize engine damage.
Note:
Driving your vehicle without repair
increases the chance of engine damage.
Engine Coolant Temperature
Management
(If Equipped)
WARNING:
To reduce the risk of
crash and injury, be prepared that the
vehicle speed may reduce and the
vehicle may not be able to accelerate
with full power until the coolant
temperature reduces.
If you tow a trailer with your vehicle, the
engine may temporarily reach a higher
temperature during severe operating
conditions, for example ascending a long
or steep grade in high ambient
temperatures.
At this time, you may notice the coolant
temperature gauge moves toward the red
zone and a message may appear in the
information display.
You may notice a reduction in vehicle
speed caused by reduced engine power in
order to manage the engine coolant
temperature. Your vehicle may enter this
mode if certain high-temperature and
high-load conditions take place. The
amount of speed reduction depends on
vehicle loading, grade and ambient
temperature. If this occurs, there is no
need to stop your vehicle. You can
continue to drive.
The air conditioning may automatically
turn on and off during severe operating
conditions to protect the engine from
overheating. When the coolant
temperature decreases to the normal
operating temperature, the air conditioning
turns on.
If the coolant temperature gauge moves
fully into the red zone, or if the coolant
temperature warning or service engine
soon messages appear in your information
display, do the following:
271
Maintenance
1.
Stop your vehicle as soon as it is safe
to do so. Fully apply the parking brake,
shift into park (P) or neutral (N).
2. Leave the engine running until the
coolant temperature gauge needle
returns to the normal position. If the
temperature does not drop after
several minutes, follow the remaining
steps.
3. Switch the engine off and wait for it to
cool. Check the coolant level.
4. If the coolant level is at or below the
minimum mark, add prediluted coolant
immediately.
5. If the coolant level is normal, restart
the engine and continue.
AUTOMATIC TRANSMISSION
FLUID CHECK
Note:
Transmission fluid should be checked
by an authorized dealer. If required, fluid
should be added by an authorized dealer.
Have an authorized dealer check and
change the transmission fluid at the
correct service interval. See
(page 262). Your transmission does not
consume fluid. However, the fluid level
should be checked if the transmission is
not working properly, (i.e., if the
transmission slips or shifts slowly) or if you
notice some sign of fluid leakage.
Do not use supplemental transmission
fluid additives, treatments or cleaning
agents. The use of these materials may
affect transmission operation and result
in damage to internal transmission
components.
BRAKE FLUID CHECK
WARNING:
Do not use any fluid
other than the recommended brake fluid
as this will reduce brake efficiency. Use
of incorrect fluid could result in the loss
of vehicle control, serious personal injury
or death.
WARNING:
Only use brake fluid
from a sealed container. Contamination
with dirt, water, petroleum products or
other materials may result in brake
system damage or failure. Failure to
adhere to this warning could result in the
loss of vehicle control, serious personal
injury or death.
WARNING:
Do not allow the fluid
to touch your skin or eyes. If this
happens, rinse the affected areas
immediately with plenty of water and
contact your physician.
WARNING:
The brake system
could be affected if the brake fluid level
is below the
MIN
mark or above the
MAX
mark on the brake fluid reservoir.
272
Maintenance
E170684
1.
Park your vehicle on a level surface.
2. Look at the brake fluid reservoir to see
where the brake fluid level is relative
to the
MIN
and the
MAX
marks on the
reservoir.
Note:
If the brake fluid level is between the
MIN
and the
MAX
marks on the reservoir, it
is acceptable.
Note:
If the brake fluid level is below the
MIN
mark or above the
MAX
mark, have
your vehicle checked as soon as possible.
Note:
To avoid fluid contamination, the
reservoir cap must remain in place and fully
tight, unless you are adding fluid.
Only use fluid that meets our
specifications. See
Brake Fluid Service Interval
Brake fluid absorbs water over time which
degrades the effectiveness of the brake
fluid. Change the brake fluid at the
specified intervals to prevent degraded
braking performance.
For detailed interval information, see
Scheduled Maintenance in your Owner's
Manual or your local maintenance guide.
POWER STEERING FLUID
CHECK
Your vehicle is equipped with an electric
power steering (EPS) system. There is no
fluid reservoir to check or fill.
FUEL FILTER
Your vehicle is equipped with a lifetime
fuel filter that is integrated with the fuel
tank. Regular maintenance or replacement
is not needed.
CHARGING THE 12V BATTERY
Battery Management System
(If
Equipped)
The battery management system monitors
battery conditions and takes actions to
extend battery life. If excessive battery
drain is detected, the system may
temporarily disable certain electrical
features to protect the battery. Those
electrical accessories affected include the
rear defrost, heated/cooled seats, climate
control fan, heated steering wheel, audio
and navigation system. A message may be
shown in the information displays to alert
the driver that battery protection actions
are active. These messages are only for
notification that an action is taking place,
and not intended to indicate an electrical
problem or that the battery requires
replacement.
273
Maintenance
Electrical accessory installation
Note:
Charging and replacing the battery
requires the driver power window to be
re-initialized. See
To ensure proper operation of the Battery
Management System, any electrical
devices that are added to your vehicle
should not have their ground connection
made directly at the negative battery post.
A connection at the negative battery
terminal can cause inaccurate
measurements of the battery condition
and potential incorrect system operation.
When a battery replacement is required,
you must use a recommended
replacement battery that matches the
electrical requirements of the vehicle.
After battery replacement, or in some
cases after charging the battery with the
external charger, the Battery Management
System requires eight hours of vehicle
sleep time (key off with doors closed) to
relearn the new battery state of charge.
Prior to relearning the state of charge, the
Battery Management System may disable
electrical features (to protect the battery)
earlier than normal.
CHANGING THE 12V BATTERY
WARNING:
Batteries normally
produce explosive gases which can
cause personal injury. Therefore, do not
allow flames, sparks or lighted
substances to come near the battery.
When working near the battery, always
shield your face and protect your eyes.
Always provide correct ventilation.
WARNING:
When lifting a
plastic-cased battery, excessive pressure
on the end walls could cause acid to flow
through the vent caps, resulting in
personal injury and damage to the
vehicle or battery. Lift the battery with a
battery carrier or with your hands on
opposite corners.
WARNING:
Keep batteries out of
reach of children. Batteries contain
sulfuric acid. Avoid contact with skin,
eyes or clothing. Shield your eyes when
working near the battery to protect
against possible splashing of acid
solution. In case of acid contact with skin
or eyes, flush immediately with water for
a minimum of 15 minutes and get prompt
medical attention. If acid is swallowed,
call a physician immediately.
WARNING:
Battery posts,
terminals and related accessories
contain lead and lead compounds. Wash
hands after handling.
WARNING:
This vehicle may have
more than one battery. Removing the
battery cables from only one battery
does not disconnect your vehicle
electrical system. Make sure you
disconnect the battery cables from all
batteries when disconnecting power.
Failure to do so may cause serious
personal injury or property damage.
WARNING:
For vehicles with
Auto-Start-Stop the battery requirement
is different. You must replace the battery
with one of exactly the same
specification.
The battery is located in the engine
compartment. See
274
Maintenance
Your vehicle has a maintenance-free
battery. It does not require additional
water during service.
If your vehicle battery has a cover, make
sure you correctly install it after cleaning
or replacing the battery.
For longer, trouble-free operation, keep the
top of the battery clean and dry and the
battery cables tightly fastened to the
battery terminals. If any corrosion is
present on the battery or terminals, remove
the cables from the terminals and clean
with a wire brush. You can neutralize the
acid with a solution of baking soda and
water.
We recommend that you disconnect the
negative battery cable terminal from the
battery if you plan to store your vehicle for
an extended period.
To maintain correct operation of the
battery management system, if you add
any electrical devices to your vehicle, do
not connect the ground connection directly
to the negative battery terminal. A
connection at the negative battery terminal
can cause inaccurate measurements of
the battery condition and potential
incorrect system operation.
Note:
Electrical accessories or components
added to your vehicle by you or an
authorized dealer, may adversely affect
battery performance, durability and the
performance of other electrical systems on
your vehicle.
If a replacement battery is required, we
recommend you use a Ford replacement
battery that matches the electrical
requirements of your vehicle.
If you disconnect or replace the battery
and your vehicle has an automatic
transmission, transmission must relearn
its adaptive strategy. Because of this, the
transmission may shift firmly when first
driven. This is normal operation while the
transmission fully updates its operation to
optimum shift feel.
Remove and Reinstall the Battery
To disconnect or remove the battery, do
the following:
1.
Apply the parking brake and switch the
ignition off.
2. Switch all electrical equipment off, for
example lights and radio.
3. Wait a minimum of two minutes before
disconnecting the battery.
Note:
The engine management system has
a power hold function and remains powered
for a period after you switch the ignition off.
This is to allow diagnostic and adaptive
tables to be stored. Disconnecting the
battery without waiting can cause damage
not covered by the vehicle Warranty.
4. Disconnect the negative (-) battery
cable terminal first.
5. Disconnect the positive (+) battery
cable terminal last.
6. Remove the battery securing clamp.
7.
Remove the battery.
8. Install in the reverse order.
Note:
Before reconnecting the battery,
make sure the ignition remains switched off.
Note:
If you only disconnect the negative
battery cable terminal, make sure it is
isolated or placed away from the battery
terminal to avoid un-intended connection
or arcing.
Note:
Make sure the battery cable terminals
are fully tightened.
275
Maintenance
Note:
If you disconnect or replace the
battery, you must reset the clock and the
pre-set radio stations once the battery is
reconnected.
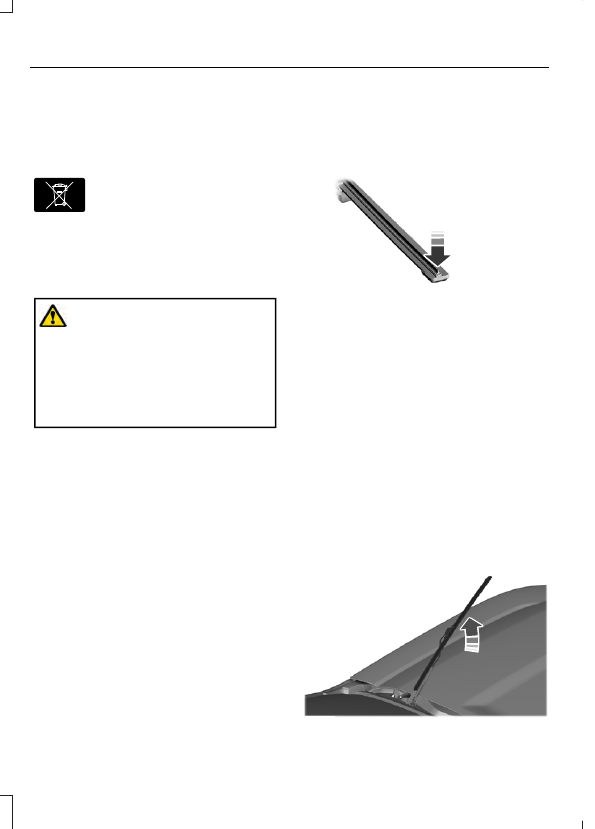
Battery Disposal
E107998
Make sure that you dispose of
old batteries in an
environmentally friendly way.
Seek advice from your local authority
about recycling old batteries.
WASHER FLUID CHECK
WARNING:
If you operate your
vehicle in temperatures below 40°F
(5°C), use washer fluid with antifreeze
protection. Failure to use washer fluid
with antifreeze protection in cold
weather could result in impaired
windshield vision and increase the risk
of injury or accident.
Add fluid to fill the reservoir if the level is
low. Only use a washer fluid that meets
Ford specifications. See
State or local regulations on volatile
organic compounds may restrict the use
of methanol, a common windshield washer
antifreeze additive. Washer fluids
containing non-methanol antifreeze
agents should be used only if they provide
cold weather protection without damaging
the vehicle’s paint finish, wiper blades or
washer system.
CHECKING THE WIPER
BLADES
E222238
Run the tip of your fingers over the edge of
the blade to check for roughness.
Clean the wiper blades with isopropyl
alcohol or windscreen washer concentrate.
CHANGING THE WIPER
BLADES
Changing the Windshield Wiper
Blades
Note:
The windshield wiper blades are
different in length.
Note:
If you install wiper blades of the
wrong length, the wiper blades can clash
damaging the wiper system.
E279824
276
Maintenance
1.
Pull the wiper blade and arm away
from the glass.
E279825
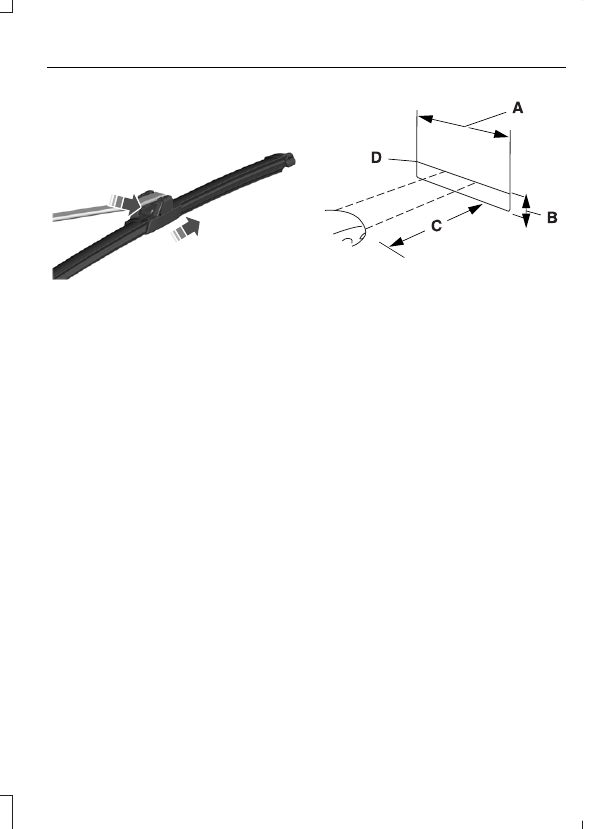
2. Squeeze the blade's lock pin and tab
on the bottom of the arm to release
the wiper blade.
3. Slide the blade out to remove it from
the arm hook.
4. Install in the reverse order.
Note:
Make sure that the wiper blade locks
into place.
ADJUSTING THE HEADLAMPS
Vertical Aim Adjustment
If your vehicle has been involved in a crash,
have the aim of the headlamp beam
checked by an authorized dealer.
E142592
8 ft (2.4 m)
A
Ground to the center of the
headlamp high beam bulb
B
25 ft (7.6 m)
C
Horizontal reference line
D
Vertical Aim Adjustment Procedure
1.
Park your vehicle on level ground
approximately 25 ft (7.6 m) from a wall
or screen.
2. Measure the distance from the ground
to the center of the headlamp high
beam bulb and mark an 8 ft (2.4 m)
long horizontal reference line on the
wall or screen at this height.
Note:
There may be an identifying mark on
the lens to help you locate the center line
of the headlamp high beam bulb. Refer to
the graphic below step 4.
Note:
To see a clearer light pattern for
adjusting, you may want to block the light
from one headlamp while adjusting the
other.
3. Switch on the low beam headlamps
and open the hood.
277
Maintenance
E142465
4. On the wall or screen you will observe
a flat zone of high intensity light
located at the top of the beam pattern.
If the top edge of the flat zone of high
intensity light is not on the horizontal
reference line, adjust the aim of the
headlamp beam.
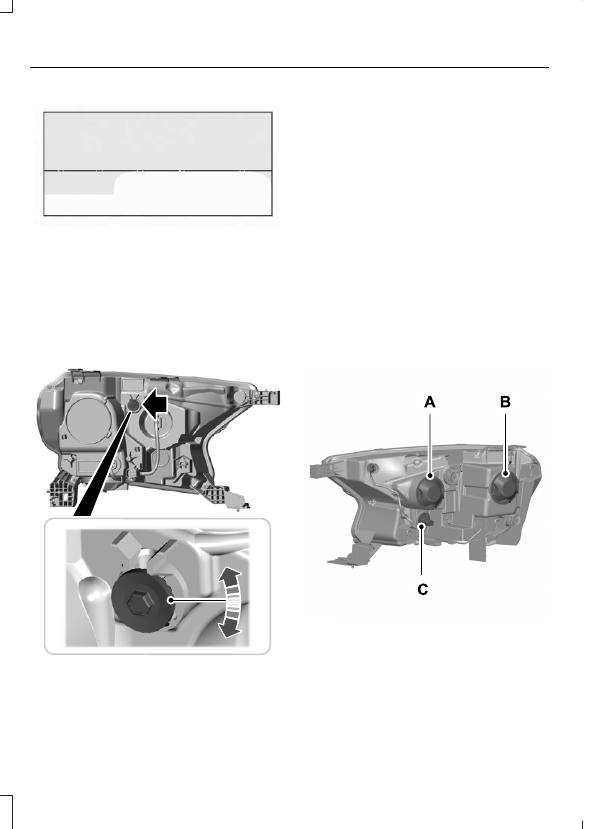
E284602
5. Use a suitable tool, for example a
screwdriver or socket wrench, to turn
the adjuster clockwise or
counterclockwise to adjust the vertical
aim of the headlamp. The horizontal
edge of the brighter light should touch
the horizontal reference line.
6. Close the hood and switch off the
lamps.
REMOVING A HEADLAMP
Contact an authorized dealer.
CHANGING A BULB
Replacing the Headlamp Bulbs
Note:
Do not touch the bulb glass.
E284568
Headlamp assembly:
A. High beam bulb.
B. Low beam bulb.
C. Front park and direction indicator bulb.
278
Maintenance
Нет комментариевНе стесняйтесь поделиться с нами вашим ценным мнением.
Текст