Ford Ranger (2022 year). Manual in english — page 14
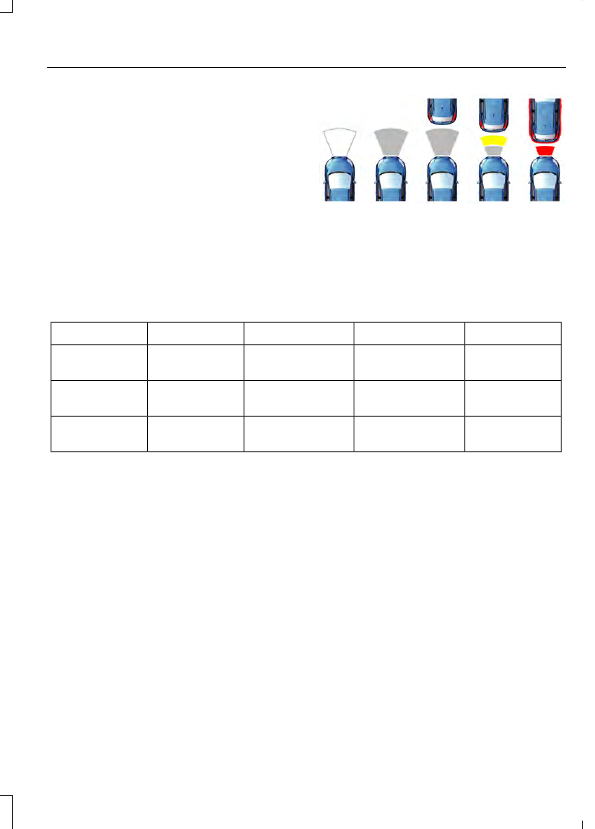
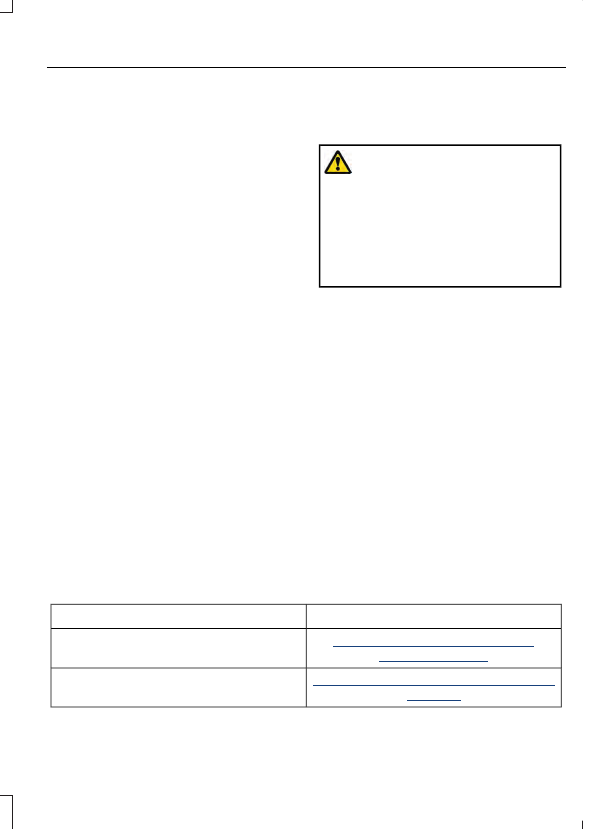
Distance Indication and Alert
This function provides a graphical
indication of the time gap to other
preceding vehicles traveling in the same
direction. The distance indication and alert
screen in the information display shows a
graphic similar to the one that follows.
E190004
If the time gap to a preceding vehicle is
small, a red visual indication displays to
the driver.
Note:
Distance indication and alert
deactivates and the graphics do not display
when adaptive cruise control is active.
Time Gap
Distance Gap
Graphics
Sensitivity
Speed
>0.9sec
>82 ft (25 m)
Grey
Normal
62 mph
(100 km/h)
0.6sec - 0.9sec
56–82 ft
(17–25 m)
Yellow
Normal
62 mph
(100 km/h)
<0.6sec
<56 ft (17 m)
Red
Normal
62 mph
(100 km/h)
Adjusting Pre-Collision Assist Settings
You can adjust alert and distance alert
sensitivity to one of three possible settings
by using the information display control.
See
You can switch the distance alert and
indication function off using the
information display controls. See
If required, you can switch active braking
off using the information display controls.
See
Note:
We recommend that you turn the
Pre-Collision Assist system off if you install
a snow plow or similar object in such a way
that it may block the radar sensor. Your
vehicle remembers the last selected setting
when you switch it off and then back on.
215
Driving Aids
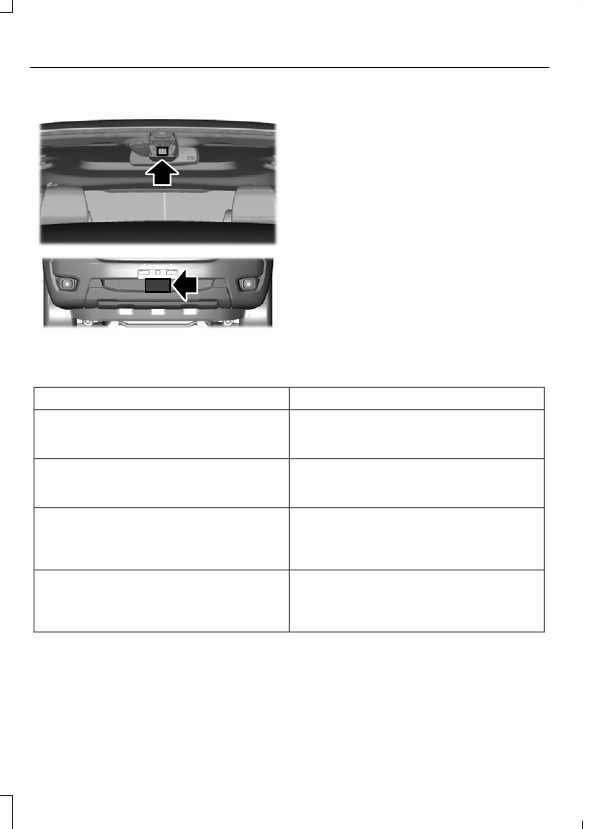
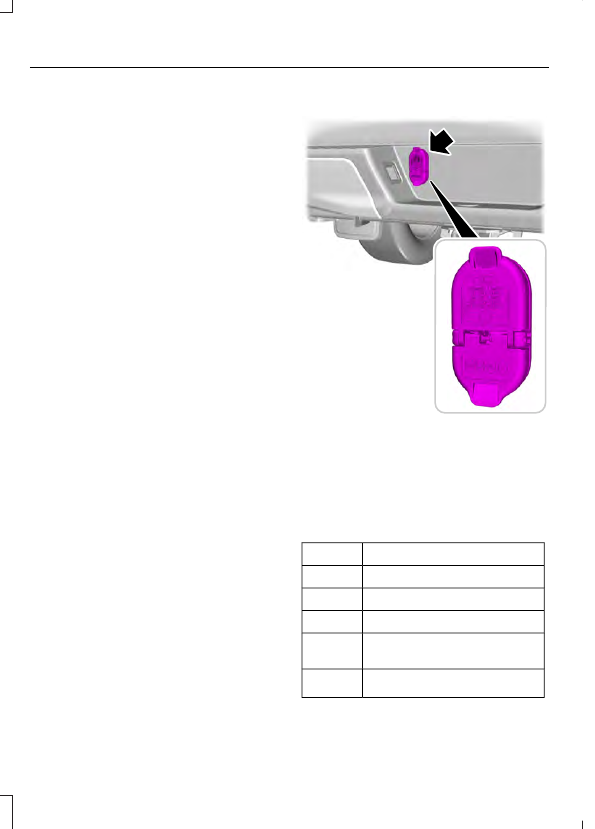
Blocked Sensors
E271779
If a message regarding a blocked sensor
or camera appears in the information
display, the radar signals or camera images
are obstructed. The radar sensor is located
behind a fascia cover near the driver side
of the lower grille. With an obstructed
radar, the Pre-Collision Assist system does
not function and cannot detect a vehicle
ahead. With the front camera obstructed,
the Pre-Collision Assist system does not
respond to pedestrians or stationary
vehicles and the system performance on
moving vehicles reduces. The following
table lists possible causes and actions for
when this message displays.
Action
Cause
Clean the grille surface in front of the radar
or remove the object causing the obstruc-
tion.
The surface of the radar in the grille is dirty
or obstructed in some way.
Wait a short time. It may take several
minutes for the radar to detect that there
is no obstruction.
The surface of the radar in the grille is clean
but the message remains in the display.
The Pre-Collision Assist system is tempor-
arily disabled. Pre-Collision Assist should
automatically reactivate a short time after
the weather conditions improve.
Heavy rain, spray, snow, or fog is interfering
with the radar signals.
The Pre-Collision Assist system is tempor-
arily disabled. Pre-Collision Assist should
automatically reactivate a short time after
the weather conditions improve.
Swirling water, or snow or ice on the surface
of the road may interfere with the radar
signals.
216
Driving Aids
Action
Cause
Contact an authorized dealer to have the
radar checked for proper coverage and
operation.
Radar is out of alignment due to a front end
impact.
Clean the outside of the windshield in front
of the camera.
The windshield in front of the camera is
dirty or obstructed in some way.
Wait a short time. It may take several
minutes for the camera to detect that there
is no obstruction.
The windshield in front of the camera is
clean but the message remains in the
display.
Note:
Proper system operation requires a
clear view of the road by the camera. Have
any windshield damage in the area of the
camera's field of view repaired.
Note:
If something hits the front end of your
vehicle or damage occurs, the radar sensing
zone may change. This could cause missed
or false vehicle detections. Contact an
authorized dealer to have the radar checked
for proper coverage and operation.
Note:
If your vehicle detects excessive heat
at the camera or a potential misalignment
condition, a message may display in the
information display indicating temporary
sensor unavailability. When operational
conditions are correct, the message
deactivates. For example, when the ambient
temperature around the sensor decreases
or the sensor automatically recalibrates
successfully.
217
Driving Aids
LOAD LIMIT
Vehicle Loading - with and
without a Trailer
This section guides you in the
proper loading of your vehicle,
trailer, or both. Keep your loaded
vehicle weight within its design
rating capability, with or without
a trailer. Properly loading your
vehicle provides maximum return
of vehicle design performance.
Before you load your vehicle,
become familiar with the
following terms for determining
your vehicle’s weight rating, with
or without a trailer, from the
vehicle’s Tire and Loading
Information label or Safety
Compliance Certification label.
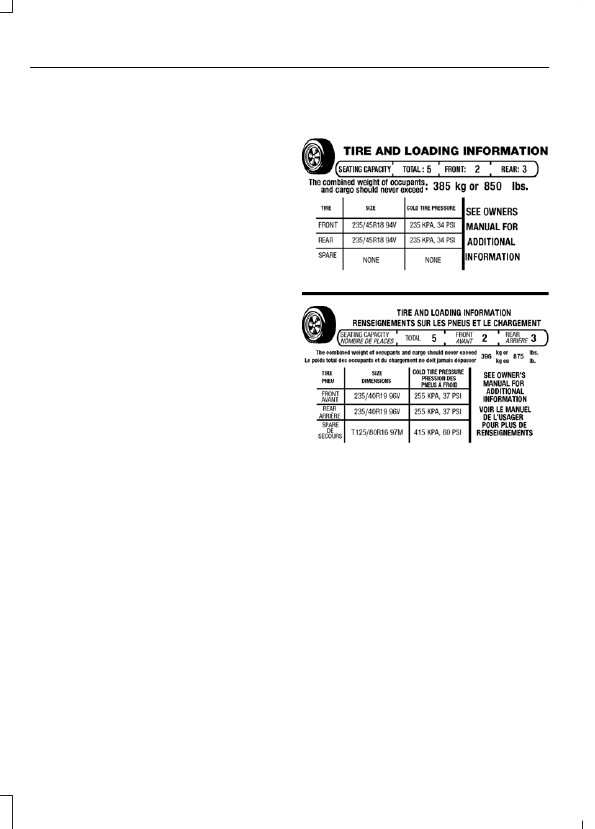
Tire and Loading Label Information
Example:
E198719
Payload
Payload is the combined weight
of cargo and passengers that your
vehicle is carrying. The maximum
payload for your vehicle appears
on the Tire and Loading label. The
label is either on the B-pillar or the
edge of the driver door. Vehicles
exported outside the US and
Canada may not have a tire and
loading label. Look for “The
combined weight of occupants
and cargo should never exceed
XXX kg OR XXX lb” for maximum
payload. The payload listed on the
Tire and Loading Information label
218
Load Carrying
is the maximum payload for your
vehicle as built by the assembly
plant. If you install any additional
equipment on your vehicle, you
must determine the new payload.
Subtract the weight of the
equipment from the payload listed
on the Tire and Loading label.
When towing, trailer tongue
weight or king pin weight is also
part of payload.
WARNING:
The
appropriate loading capacity of
your vehicle can be limited either
by volume capacity (how much
space is available) or by payload
capacity (how much weight the
vehicle should carry). Once you
have reached the maximum
payload of your vehicle, do not
add more cargo, even if there is
space available. Overloading or
improperly loading your vehicle
can contribute to loss of vehicle
control and vehicle rollover.
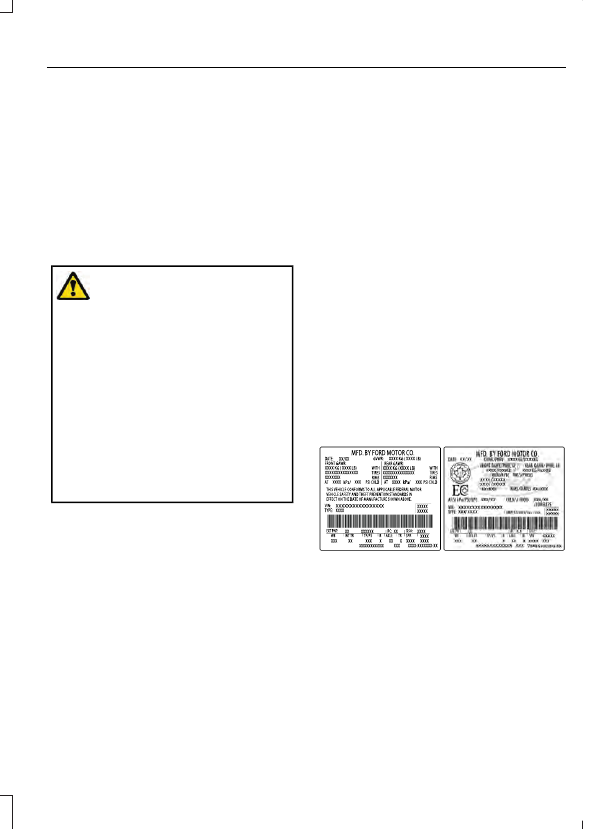
GAWR (Gross Axle Weight
Rating)
GAWR is the maximum allowable
weight that a single axle (front or
rear) can carry. These numbers
are on the Safety Compliance
Certification label. The label is
located on the door hinge pillar,
door-latch post, or the door edge
that meets the door-latch post,
next to the driver seating position.
The total load on each axle must
never exceed its Gross Axle
Weight Rating.
GVWR (Gross Vehicle Weight
Rating)
GVWR is the maximum allowable
weight of the fully loaded vehicle.
This includes all options,
equipment, passengers and cargo.
It appears on the Safety
Compliance Certification label.
The label is located on the door
hinge pillar, door-latch post, or the
door edge that meets the
door-latch post, next to the driver
seating position.
The gross vehicle weight must
never exceed the Gross Vehicle
Weight Rating.
Safety Compliance Certification Label
Example:
E198828
219
Load Carrying
WARNING:
Exceeding the
Safety Compliance Certification
label vehicle weight limits can
adversely affect the
performance and handling of
your vehicle, cause vehicle
damage and can result in the
loss of control of your vehicle,
serious personal injury or death.
Maximum Loaded Trailer
Weight
Maximum loaded trailer weight is
the highest possible weight of a
fully loaded trailer the vehicle can
tow. Consult an authorized dealer
(or the RV and Trailer Towing
Guide available at an authorized
dealer) for more detailed
information.
GCWR (Gross Combined
Weight Rating)
GCWR is the maximum allowable
weight of the vehicle and the
loaded trailer, including all cargo
and passengers, that the vehicle
can handle without risking
damage. (Important: The towing
vehicle’s braking system is rated
for operation at Gross Vehicle
Weight Rating, not at Gross
Combined Weight Rating.)
Separate functional brakes should
be used for safe control of towed
vehicles and for trailers where the
Gross Combined Weight of the
towing vehicle plus the trailer
exceed the Gross Vehicle Weight
Rating of the towing vehicle.
The gross combined weight must
never exceed the Gross Combined
Weight Rating.
Note:
For trailer towing
information refer to the RV and
Trailer Towing Guide available at
an authorized dealer.
WARNING:
Do not exceed
the GVWR or the GAWR
specified on the certification
label.
WARNING:
Do not use
replacement tires with lower
load carrying capacities than the
original tires because they may
lower your vehicle's GVWR and
GAWR limitations. Replacement
tires with a higher limit than the
original tires do not increase the
GVWR and GAWR limitations.
WARNING:
Exceeding any
vehicle weight rating can
adversely affect the
performance and handling of
your vehicle, cause vehicle
damage and can result in the
loss of control of your vehicle,
serious personal injury or death.
220
Load Carrying
Steps for determining the
correct load limit:
1. Locate the statement "The
combined weight of occupants
and cargo should never exceed
XXX kg or XXX lb." on your
vehicle’s placard.
2. Determine the combined
weight of the driver and
passengers that will be riding
in your vehicle.
3. Subtract the combined weight
of the driver and passengers
from XXX kg or XXX lb.
4. The resulting figure equals the
available amount of cargo and
luggage load capacity. For
example, if the “XXX” amount
equals 1,400 lb. and there will
be five 150 lb. passengers in
your vehicle, the amount of
available cargo and luggage
load capacity is 650 lb.
(1400-750 (5 x 150) = 650 lb.)
5. Determine the combined
weight of luggage and cargo
being loaded on the vehicle.
That weight may not safely
exceed the available cargo and
luggage load capacity
calculated in Step 4.
6. If your vehicle will be towing a
trailer, load from your trailer
will be transferred to your
vehicle. Consult this manual to
determine how this reduces the
available cargo and luggage
load capacity of your vehicle.
Helpful examples for calculating
the available amount of cargo
and luggage load capacity
Suppose your vehicle has a
1400-pound (635-kilogram) cargo
and luggage capacity. You decide
to go golfing. Is there enough load
capacity to carry you, four of your
friends and all the golf bags? You
and four friends average 220
pounds (99 kilograms) each and
the golf bags weigh approximately
30 pounds (13.5 kilograms) each.
The calculation would be: 1400 -
(5 x 220) - (5 x 30) = 1400 - 1100
- 150 = 150 pounds. Yes, you have
enough load capacity in your
vehicle to transport four friends
and your golf bags. In metric units,
the calculation would be: 635
kilograms - (5 x 99 kilograms) -
(5 x 13.5 kilograms) = 635 - 495 -
67.5 = 72.5 kilograms.
Suppose your vehicle has a
1400-pound (635-kilogram) cargo
and luggage capacity. You and
one of your friends decide to pick
up cement from the local home
improvement store to finish that
patio you have been planning for
the past two years. Measuring the
inside of the vehicle with the rear
seat folded down, you have room
for twelve 100-pound
(45-kilogram) bags of cement. Do
you have enough load capacity to
transport the cement to your
home? If you and your friend each
weigh 220 pounds (99 kilograms),
the calculation would be: 1400 -
(2 x 220) - (12 x 100) = 1400 - 440
221
Load Carrying
- 1200 = - 240 pounds. No, you do
not have enough cargo capacity
to carry that much weight. In
metric units, the calculation would
be: 635 kilograms - (2 x 99
kilograms) - (12 x 45 kilograms) =
635 - 198 - 540 = -103 kilograms.
You will need to reduce the load
weight by at least 240 pounds
(104 kilograms). If you remove
three 100-pound (45-kilogram)
cement bags, then the load
calculation would be:1400 - (2 x
220) - (9 x 100) = 1400 - 440 -
900 = 60 pounds. Now you have
the load capacity to transport the
cement and your friend home. In
metric units, the calculation would
be: 635 kilograms - (2 x 99
kilograms) - (9 x 45 kilograms) =
635 - 198 - 405 = 32 kilograms.
The above calculations also
assume that the loads are
positioned in your vehicle in a
manner that does not overload
the front or the rear gross axle
weight rating specified for your
vehicle on the Safety Compliance
Certification label.
Special Loading Instructions
for Owners of Pick-up Trucks
and Utility-type Vehicles
WARNING:
When loading
the roof racks, we recommend
you evenly distribute the load,
as well as maintain a low center
of gravity. Loaded vehicles, with
higher centers of gravity, may
handle differently than unloaded
vehicles. Take extra precautions,
such as slower speeds and
increased stopping distance,
when driving a heavily loaded
vehicle.
ROOF RACKS AND LOAD
CARRIERS
Note:
If you use a roof rack, the fuel
consumption of your vehicle is higher and
you may experience different driving
characteristics.
Note:
Read and follow the manufacturer's
instructions when you are fitting a roof rack.
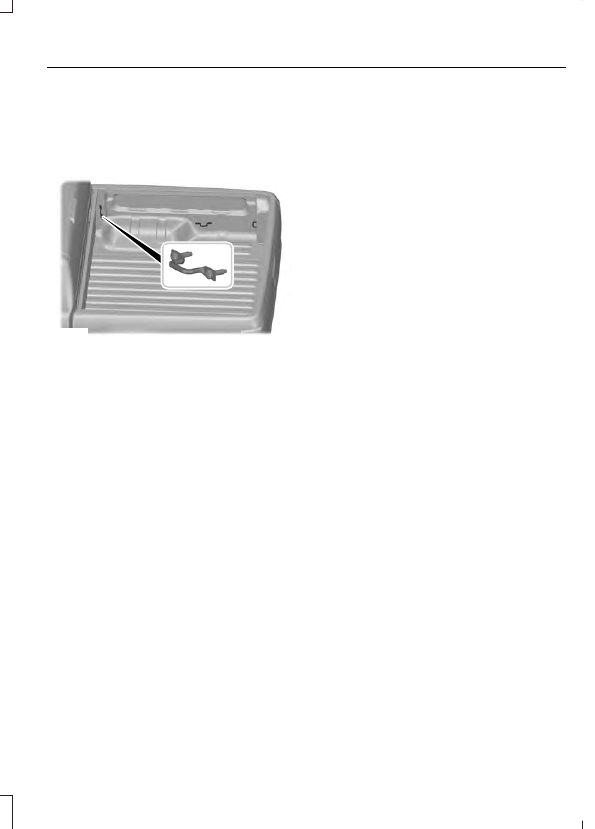
LOAD RETAINING FIXTURES
(IF
EQUIPPED)
Tie Down Points
WARNING:
Do not use the load
retaining fixtures for towing. Failure to
follow this instruction could result in
personal injury.
WARNING:
Do not exceed the
maximum load rating of the load
retaining fixtures. Failure to follow this
instruction could result in personal injury.
WARNING:
Check the load
retaining fixtures for damage before
using them. Failure to follow this
instruction could result in personal injury.
Note:
Use the load retaining fixtures to
retain the loads within the loadspace. Using
the load retaining fixtures for any other
purpose may lead to vehicle damage.
222
Load Carrying
Note:
Exceeding the maximum load rating
of the load retaining fixtures may lead to
vehicle damage.
Note:
The number of tie down points may
vary depending on your vehicle model.
E131643
Load Rating of the Tie Down Points: 661 lb
(300 kg).
USING A SLIDE-IN CAMPER
We do not recommend using your pickup
for carrying a slide-in camper.
223
Load Carrying
TOWING A TRAILER
WARNING:
Do not exceed
the GVWR or the GAWR
specified on the certification
label.
WARNING:
Towing trailers
beyond the maximum
recommended gross trailer
weight exceeds the limit of your
vehicle and could result in engine
damage, transmission damage,
structural damage, loss of
vehicle control, vehicle rollover
and personal injury.
WARNING:
Do not exceed
the lowest rating capacity for
your vehicle or trailer hitch.
Overloading your vehicle or
trailer hitch can impair your
vehicle stability and handling.
Failure to follow this instruction
could result in the loss of control
of your vehicle, personal injury or
death.
WARNING:
Do not cut,
drill, weld or modify the trailer
hitch. Modifying the trailer hitch
could reduce the hitch rating.
WARNING:
Make sure that
the vertical load on the tow ball
is between the minimum and
maximum recommended weight
at all times. Failure to follow this
instruction could result in the
loss of control of your vehicle,
personal injury or death.
WARNING:
Do not tow a
trailer fitted with electric trailer
brakes unless your vehicle is
fitted with a compatible
aftermarket electronic trailer
brake controller. Failure to follow
this instruction could result in
the loss of control of your
vehicle, personal injury or death.
For additional information and
assistance, we recommend that
you contact an authorized
dealer.
Note:
Your vehicle includes trailer
stability control if it has an
electronic stability program.
When towing a trailer:
•
Obey country specific
regulations for towing a trailer.
•
Place loads as low as possible
and central to the axle of your
trailer. For best stability of the
trailer in an unloaded vehicle,
place the load in the trailer
towards the nose within the
maximum nose load as this
gives the best stability. See
224
Towing
•
Reduce the stipulated
permitted gross combination
mass by 3% for every
additional 1,000 ft (300 m) in
high altitude regions above
1,000 ft (300 m).
•
Use a low gear when
descending a steep downhill
slope.
•
Do not use four-wheel drive
while towing for extended
periods of time on dry surfaces.
See
The stability of your vehicle to
trailer combination is dependent
on the quality of the trailer.
TRAILER SWAY CONTROL
(IF
EQUIPPED)
WARNING:
Turning off trailer sway
control increases the risk of loss of
vehicle control, serious injury or death.
Ford does not recommend disabling this
feature except in situations where speed
reduction may be detrimental (such as
hill climbing), the driver has significant
trailer towing experience, and can control
trailer sway and maintain safe operation.
Note:
This feature does not prevent trailer
sway, but reduces it once it begins.
Note:
This feature cannot stop all trailers
from swaying.
Note:
In some cases, if vehicle speed is too
high, the system may activate multiple
times, gradually reducing vehicle speed.
This feature applies your vehicle brakes at
individual wheels and, if necessary, reduces
engine power. If the trailer begins to sway,
the stability control light flashes and the
message
TRAILER SWAY REDUCE
SPEED
appears in the information display.
The first thing to do is slow your vehicle
down, then pull safely to the side of the
road and check for proper tongue load and
trailer load distribution. See
RECOMMENDED TOWING WEIGHTS
Website
Market
United States of America
https://www.fleet.ford.ca/towing-
Canada
225
Towing
ESSENTIAL TOWING CHECKS
Follow these guidelines for safe towing:
•
Do not tow a trailer until you drive your
vehicle at least 1,000 mi (1,600 km).
•
Consult your local motor vehicle laws
for towing a trailer.
•
See the instructions included with
towing accessories for the proper
installation and adjustment
specifications.
•
Service your vehicle more frequently if
you tow a trailer. See your scheduled
maintenance information. See
•
If you use a rental trailer, follow the
instructions the rental agency gives
you.
See
Load limits
in the Load Carrying
chapter for load specification terms found
on the tire label and Safety Compliance
label and instructions on calculating your
vehicle's load. See
Remember to account for the trailer
tongue weight as part of your vehicle load
when calculating the total vehicle weight.
Trailer Towing Connector
E193232
When attaching the trailer wiring connector
to your vehicle, only use a proper fitting
connector that works with the vehicle and
trailer functions. Some seven-position
connectors may have the SAE J2863 logo,
which confirms that it is the proper wiring
connector and works correctly with your
vehicle.
Function
Color
Left turn signal and stop lamp
Yellow
Ground (-)
White
Electric brakes
Blue
Right turn signal and stop
lamp
Green
Battery (+)
1
Orange
226
Towing
Function
Color
Running lights
Brown
Reverse lights
Grey
1
Your vehicle must recognize the trailer
before the trailer can receive power.
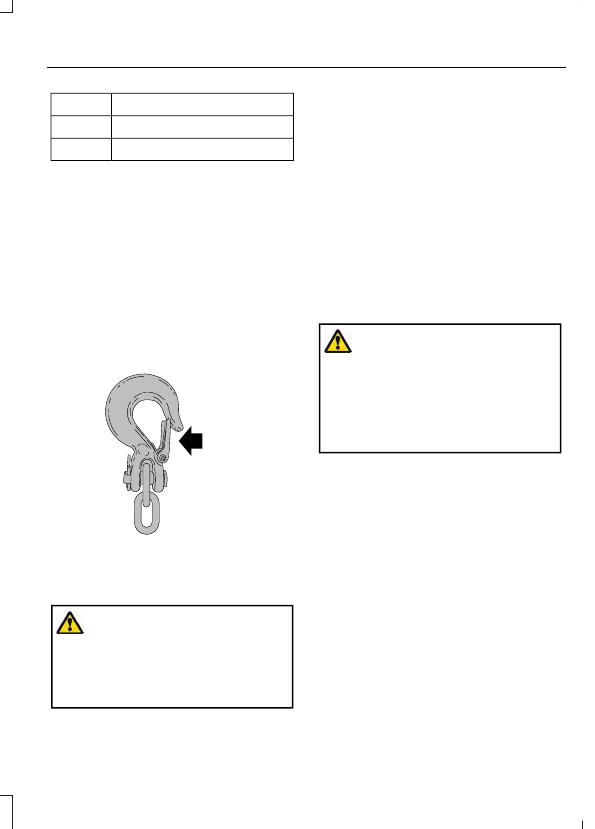
Safety Chains
Note:
Do not attach safety chains to the
bumper. Always connect the safety chains
to the frame or hook retainers of your trailer
hitch.
Install trailer safety chains to the trailer
hitch as recommended by the
manufacturer. Cross the chains under the
trailer tongue and allow enough slack for
turning tight corners. Do not allow the
chains to drag on the ground.
E265060
If the trailer safety chain hook has a latch,
make sure the latch is fully closed.
Trailer Brakes
WARNING:
Do not connect a
trailer's hydraulic brake system directly
to your vehicle's brake system. Your
vehicle may not have enough braking
power and your chances of having a
collision greatly increase.
Electric brakes and manual, automatic or
surge-type trailer brakes are safe if you
install them properly and adjust them to
the manufacturer's specifications. The
trailer brakes must meet local and federal
regulations.
The rating for the tow vehicle's braking
system operation is at the gross vehicle
weight rating, not the gross combined
weight rating.
Separate functioning brake systems
are required for safe control of towed
vehicles and trailers weighing more
than 1500 lb (680 kg) when loaded.
Trailer Lamps
WARNING:
Never connect any
trailer lamp wiring to the vehicle's tail
lamp wiring; this may damage the
electrical system resulting in fire. Contact
your authorized dealer as soon as
possible for assistance in proper trailer
tow wiring installation. Additional
electrical equipment may be required.
Trailer lamps are required on most towed
vehicles. Make sure all running lights, brake
lights, turn signals and hazard lights are
working.
Before Towing a Trailer
Practice turning, stopping and backing up
to get the feel of your vehicle-trailer
combination before starting on a trip.
When turning, make wider turns so the
trailer wheels clear curbs and other
obstacles.
When Towing a Trailer
•
Do not drive faster than 70 mph
(113 km/h) during the first 500 mi
(800 km).
•
Do not make full-throttle starts.
227
Towing
•
Check your hitch, electrical connections
and trailer wheel lug nuts thoroughly
after you have traveled 50 mi (80 km).
•
When stopped in congested or heavy
traffic during hot weather, place the
transmission in park (P) to aid engine
and transmission cooling and to help
A/C performance.
•
Turn off the speed control with heavy
loads or in hilly terrain. The speed
control may turn off automatically
when you are towing on long, steep
grades.
•
Shift to a lower gear when driving down
a long or steep hill. Do not apply the
brakes continuously, as they may
overheat and become less effective.
•
If your transmission is equipped with a
Grade Assist or Tow/Haul feature, use
this feature when towing. This provides
engine braking and helps eliminate
excessive transmission shifting for
optimum fuel economy and
transmission cooling.
•
If your vehicle is equipped with
AdvanceTrac with RSC, this system
may turn on during typical cornering
maneuvers with a heavily loaded trailer.
This is normal. Turning the corner at a
slower speed while towing may reduce
this tendency.
•
If you are towing a trailer frequently in
hot weather, hilly conditions, at the
gross combined weight rating, or any
combination of these factors, consider
refilling your rear axle with synthetic
gear lubricant if the axle is not already
filled with it. See
•
Allow more distance for stopping with
a trailer attached. Anticipate stops and
brake gradually.
•
Avoid parking on a grade. However, if
you must park on a grade:
1.
Turn the steering wheel to point your
vehicle tires away from traffic flow.
2. Set your vehicle parking brake.
3. Place the automatic transmission in
park (P).
4. Place wheel chocks in front and back
of the trailer wheels. Chocks are not
included with your vehicle.
Your vehicle may be equipped with a
temporary or conventional spare tire. A
temporary spare tire is different in diameter
or width, tread-type, or is from a different
manufacturer than the road tires on your
vehicle. Consult information on the tire
label or Safety Compliance label for
limitations when using.
Launching or Retrieving a Boat or
Personal Watercraft (PWC)
Note:
Disconnect the wiring to the trailer
before
backing the trailer into the water.
Note:
Reconnect the wiring to the trailer
after
removing the trailer from the water.
When backing down a ramp during boat
launching or retrieval:
•
Do not allow the static water level to
rise above the bottom edge of the rear
bumper.
•
Do not allow waves to break higher
than 6 in (15 cm) above the bottom
edge of the rear bumper.
Exceeding these limits may allow water to
enter vehicle components:
•
Causing internal damage to the
components.
•
Affecting driveability, emissions, and
reliability.
Replace the rear axle lubricant anytime
the rear axle has been submerged in water.
Water may have contaminated the rear
axle lubricant, which is not normally
checked or changed unless a leak is
suspected or other axle repair is required.
228
Towing
TOWING THE VEHICLE ON
FOUR WHEELS
WARNING:
If your vehicle has a
steering wheel lock make sure the
ignition is in the accessory or on position
when being towed.
Emergency Towing
If your vehicle becomes inoperable without
access to wheel dollies, a car-hauling
trailer or a flatbed transport vehicle, you
can flat-tow with all wheels on the ground,
regardless of the powertrain and
transmission configuration, under the
following conditions:
•
Your vehicle is facing forward for
towing in a forward direction.
•
Place the transmission in neutral (N).
If you cannot move the transmission
into neutral (N), you may need to
override the gear shifter. See
•
Maximum speed is 35 mph (55 km/h).
•
Maximum distance is 50 mi (80 km).
Recreational Towing
WARNING:
Do not disconnect the
battery when recreationally towing your
vehicle. This prevents the transfer case
from shifting properly and could cause
the vehicle to roll, even if the
transmission is in park (P).
WARNING:
Placing the transfer
case in its neutral position could cause
your vehicle to freely roll. Make sure you
press and hold the brake pedal and the
vehicle is in a secure, safe position when
you place the transfer case in its neutral
position.
Follow these guidelines if you have a need
for recreational towing. An example of
recreational towing would be towing your
vehicle behind a motorhome. These
guidelines are to make sure that you do
not damage the transmission.
You can only tow your vehicle with all
wheels on the ground by placing the
transfer case in its neutral position and
engaging the recreational tow feature.
Perform the following steps after
positioning your vehicle behind the tow
vehicle and properly securing them
together.
Note:
Put your climate control system in
recirculated air mode to prevent exhaust
fumes from entering your vehicle.
Note:
Failure to put the transfer case in its
neutral position can damage vehicle
components.
Note:
You can check the towing status at
any time by opening the driver door or
turning the ignition to the accessory or on
position.
Neutral Tow Enabled Leave
Transmission in Neutral
appears in the
instrument cluster display to confirm you
can recreationally tow your vehicle.
Switching
Neutral Tow
On
1.
Switch your vehicle to accessory mode
by pressing the push button ignition
switch without pressing the brake
pedal or by turning the key to the on
position.
2. Press and hold the brake pedal.
3. Rotate the four-wheel drive control to
2H
.
4. Shift the transmission to neutral (N).
5. Using the instrument cluster controls
on the steering wheel, select
Settings
.
6. Select
Vehicle
.
7.
Select
Neutral Tow
.
229
Towing
8. Press and hold the
OK
button until a
confirmation message appears in the
information display.
Note:
If completed successfully, the
information display shows
Neutral Tow
Enabled Leave Transmission in Neutral
.
This indicates that your vehicle is safe to
tow with all wheels on the ground.
Note:
If you do not see a confirmation
message in the instrument cluster display,
you must switch your vehicle off and
perform the procedure again from the
beginning.
Note:
You could hear noise as the transfer
case shifts into its neutral position. This is
normal.
9. Leave the transmission in neutral (N)
and switch your vehicle off by pressing
the push button ignition switch once
without pressing the brake pedal or
turning the key as far toward the off
position.
Note:
Vehicles with keys do not turn to the
off position when the transmission is in
neutral (N). You must leave the key in the
ignition when towing. Use the keyless entry
keypad or an extra set of keys to lock and
unlock your vehicle.
10.
Release the brake pedal.
Switching
Neutral Tow
Off
1.
With your vehicle still properly secured
to the tow vehicle, switch your vehicle
to accessory mode by pressing the
push button ignition switch without
pressing the brake pedal or by turning
the key to the on position.
2. Press and hold the brake pedal.
3. Shift the transmission out of neutral
(N) and into park (P).
Note:
If completed successfully, the
four-wheel drive control indicates
2H
and
the instrument cluster display shows
Neutral Tow Disabled
.
Note:
If the indicator light and message do
not display, you must perform the procedure
again from the beginning.
Note:
You could hear a noise as the transfer
case shifts out of its neutral position. This
is normal.
4. Apply the parking brake, then
disconnect your vehicle from the tow
vehicle.
5. Release the parking brake, start your
vehicle, and shift into drive (D) to make
sure the transfer case is out of its
neutral position.
6. If the transfer case does not
successfully shift out of its neutral
position, apply the parking brake. Have
your vehicle checked as soon as
possible.
230
Towing
Нет комментариевНе стесняйтесь поделиться с нами вашим ценным мнением.
Текст