Ford Bronco (2022 year). Manual in english — page 27

WHAT IS VOICE INTERACTION
Voice Interaction allows you to control
vehicle features using conversational
requests.
VOICE INTERACTION
EXAMPLES
Note:
You may need to enable your
vehicle's modem to use certain voice
commands. See
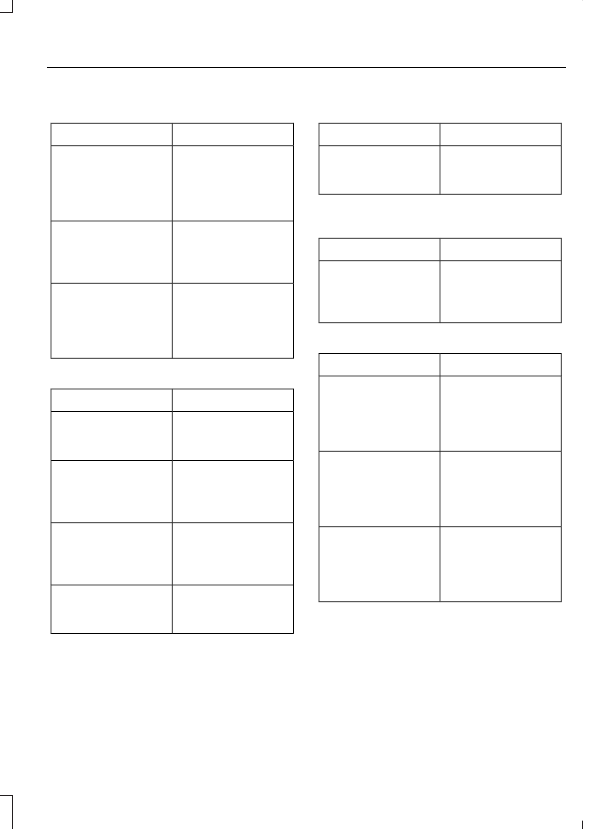
General Examples
Result
Command
The system resets
the current voice
interaction.
Start Over.
The system ends
the current voice
interaction.
Cancel.
The system goes to
the next page.
Next Page.
The system goes to
the previous page.
Previous Page.
The system
displays a list of
available
commands you can
use on the current
screen.
Help.
Entertainment Examples
Result
Command
The system plays
the selected music.
Play The Beatles.
The system shows
the selected music.
Show music by The
Beatles.
The system tunes
the radio to 101.9
FM.
Tune to FM 101.9.
The system tunes
the radio to Sirius
Channel 2.
Set the station to
Sirius Channel 2.
Climate Examples
Result
Command
The system sets
the temperature to
the minimum.
Set the temper-
ature to low.
The system sets
the temperature to
72°F (22°C).
Set the temper-
ature to 72°F
(22°C).
Phone Examples
Result
Command
The system calls
Henry using your
connected device.
Call Henry.
The system dials
the selected phone
number.
Dial (phone
number).
The system begins
a dictated text
message.
Send a text
message to Henry.
The system reads
you the most recent
message from
Henry.
Read my message
from Henry.
436
Voice Interaction
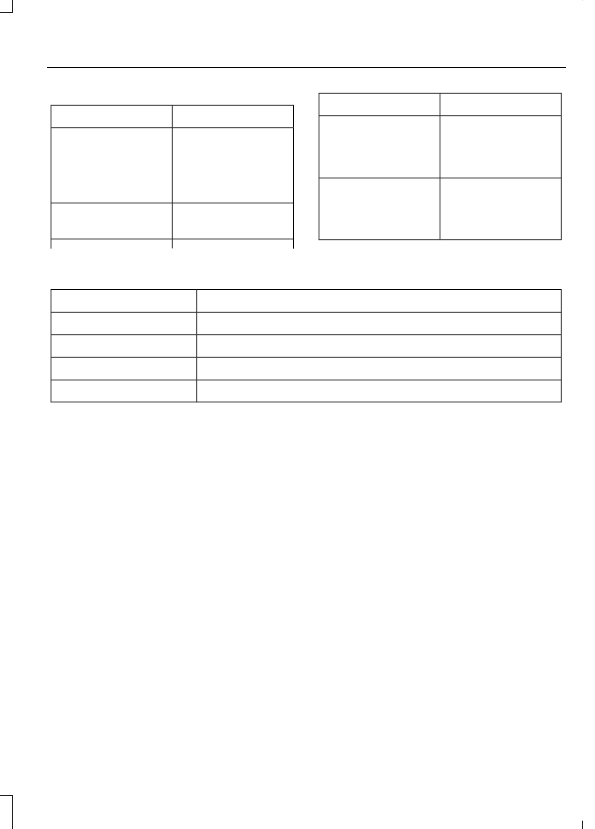
Apps Examples
Result
Command
The system
prompts you to say
the name of an app
to start it on the
system.
Mobile Apps.
The system will list
all of the currently
available Mobile
Apps.
List Mobile Apps.
The system will
search and connect
to compatible app
running on your
mobile device.
Find Mobile Apps
Navigation Examples
Result
Command
The system begins
guided navigation
to the address.
Drive to 125 Main
Street, New York.
The system
searches for the
requested point of
interest.
Where is ___
The system shows
directions to the
selected intersec-
tion.
Show me directions
to Oakwood
Boulevard and
Pelham Road.
The system ends
guided navigation
to the destination.
Cancel route.
Ford Assistant Examples
Note:
When you are not driving, additional
commands are available by using popular
chat applications. Use FordPass to setup a
conversation with your Ford assistant.
Remote Vehicle Control Examples
Result
Command
The vehicle tells
you how much gas
it has left.
How much gas is in
my tank?
Maintenance and Roadside Assistance
Examples
Result
Command
Your vehicle calls
the roadside assist-
ance phone
number.
Call roadside
assistance.
Vehicle Information Examples
Result
Command
Information about
the feature appears
on the center
display or FordPass
app.
How does cruise
control work?
Information about
the warning light
appears on the
center display or
FordPass app.
What does the
warning light
mean?
Information about
open recalls
appears on the
center display or
FordPass app.
Am I affected by
any recalls?
437
Voice Interaction
PHONE PRECAUTIONS
WARNING:
Driving while distracted
can result in loss of vehicle control, crash
and injury. We strongly recommend that
you use extreme caution when using any
device that may take your focus off the
road. Your primary responsibility is the
safe operation of your vehicle. We
recommend against the use of any
hand-held device while driving and
encourage the use of voice-operated
systems when possible. Make sure you
are aware of all applicable local laws
that may affect the use of electronic
devices while driving.
CONNECTING YOUR PHONE
Go to the settings menu on your device and
switch
Bluetooth®
on.
Press the phone option on the
feature bar.
1.
Press
Add Phone
.
Note:
A prompt alerts you to search for your
vehicle on your cell phone.
2. Select your vehicle on your cell phone.
Note:
A number appears on your cell phone
and on the touchscreen.
3. Confirm the number on your cell phone
matches the number on the
touchscreen.
Note:
The touchscreen indicates that you
have successfully paired your cell phone.
4. Download the phonebook from your
cell phone when you are prompted.
Note:
If you pair more than one cell phone,
use the phone settings on the center display
to specify the primary phone. You can
change this setting at any time.
PHONE MENU
This menu becomes available after pairing
a phone.
Recent Call List
Display and select an entry from a list of
previous calls.
Contacts
Display a smart search form to look up your
contacts. Use the List button to
alphabetically sort your contacts.
Favorites
Display the list of favorite contacts that
are set up on your phone.
Messaging
Displays the list of text messages to read,
listen to, or respond to.
Displays the list of emails to read, listen to,
or respond to.
Phone List
Display the list of paired or connected
devices that you can select.
Note:
Up to 12 devices can be stored.
Do Not Disturb
Reject incoming calls and switch ring tones
and alerts off.
Phone Keypad
Directly dial a number.
438
Phone
Voice Control
Say a command to use the Google or Siri
voice assistant available on your
connected phone to access supported
features.
Note:
Some features under the phone menu
may not be available if the feature is not
supported through the phone.
439
Phone

MAKING AND RECEIVING A
PHONE CALL
Making Calls
To call a number in your contacts,
select:
Action and Description
Menu Item
You can then select the
name of the contact you
want to call. Any numbers
stored for that contact
display along with any
stored contact photos. You
can then select the
number that you want to
call. The system begins the
call.
Contacts
To call a number from your recent calls,
select:
Action and Description
Menu Item
You can then select an
entry that you want to call.
The system begins the call.
Recent Call
List
To call a number from your favorites,
select:
Action and Description
Menu Item
You can then select an
entry that you want to call.
The system begins the call.
Favorites
To call a number that is not stored in
your phone, select:
Action and Description
Menu Item
Select the digits of the
number you wish to call.
Phone
Keypad
The system begins the call.
Call
Pressing the backspace button deletes the
last digit you typed.
Receiving Calls
During an incoming call, an audible tone
sounds. Caller information appears in the
display if it is available.
To accept the call, select:
Menu Item
Accept
Note:
You can also accept the call by
pressing the phone button on the steering
wheel.
To reject the call, select:
Menu Item
Reject
Ignore the call by doing nothing. The
system logs it as a missed call.
During a Phone Call
During a phone call, the contacts name
and number display on the screen along
with the call duration.
The phone status items are also visible:
•
Signal Strength.
•
Battery.
You can select any of the following during
an active phone call:
440
Phone
Item
Immediately end a
phone call. You can
also press the
button on the
steering wheel.
End Call
Press this to access
the phone keypad.
Keypad
Item
Mute
You can switch the
microphone off so
the caller does not
hear you.
Transfer the call to
the cell phone or
back to the touch-
screen.
Privacy
SENDING AND RECEIVING A TEXT MESSAGE
Description
Menu Item
Hear the text message.
Hear It
View the text message.
View
Call the sender.
Call
Reply to the text message with a standard text message.
Reply
441
Phone
SWITCHING TEXT MESSAGE
NOTIFICATION ON AND OFF
The settings on your device must be
enabled to receive text message
notifications on the center display. Check
your device settings to enable these
features.
442
Phone
CONNECTING A BLUETOOTH®
DEVICE
1.
Make sure
Bluetooth®
is enabled on
your device.
2. Press
Settings
on the touchscreen.
3. Press
Connectivity
.
4. Press
Bluetooth
.
5. Press
Add a Bluetooth Device
.
Note:
A prompt alerts you to search for your
vehicle on your device.
6. Select your vehicle on your device.
Note:
A number appears on your device and
on the touchscreen.
7.
Confirm that the number on your
device matches the number on the
touchscreen.
Note:
The touchscreen indicates that you
have successfully paired your device.
The
Bluetooth®
word mark and logos are
registered trademarks owned by
Bluetooth
SIG, Inc.
and any use of such marks by
Ford Motor Company is under license.
Other trademarks and trade names are
those of their respective owners.
PLAYING MEDIA USING
BLUETOOTH®
WARNING:
Driving while distracted
can result in loss of vehicle control, crash
and injury. We strongly recommend that
you use extreme caution when using any
device that may take your focus off the
road. Your primary responsibility is the
safe operation of your vehicle. We
recommend against the use of any
hand-held device while driving and
encourage the use of voice-operated
systems when possible. Make sure you
are aware of all applicable local laws
that may affect the use of electronic
devices while driving.
Connect your device.
E100027
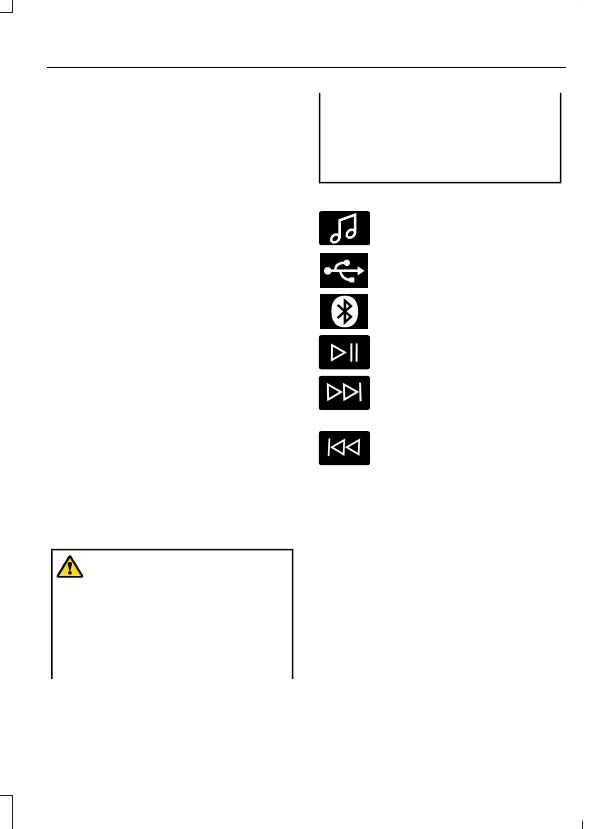
Press the audio button on the
feature bar.
Press
Sources
.
Press the
Bluetooth®
option.
Press to play a track. Press again
to pause the track.
Press to skip to the next track.
Press and hold to fast forward
through the track.
Press once to return to the
beginning of a track. Repeatedly
press to return to previous
tracks.
Press and hold to fast rewind through the
track.
443
Bluetooth®
APP PRECAUTIONS
WARNING:
Driving while distracted
can result in loss of vehicle control, crash
and injury. We strongly recommend that
you use extreme caution when using any
device that may take your focus off the
road. Your primary responsibility is the
safe operation of your vehicle. We
recommend against the use of any
hand-held device while driving and
encourage the use of voice-operated
systems when possible. Make sure you
are aware of all applicable local laws
that may affect the use of electronic
devices while driving.
APP REQUIREMENTS
When you start an app through the system
for the first time, you could be asked to
grant certain permissions. You can review
and change the permissions that you have
granted at any time when your vehicle is
not moving. We recommend that you
check your data plan before using your
apps through the system. Using them
could result in additional charges. We also
recommend that you check the app
provider's terms and conditions and
privacy policy before using their app. Make
sure that you have an active account for
apps that you want to use through the
system. Some apps will work with no
setup. Others require you to configure
some personal settings before you can use
them.
ACCESSING APPS
Select the apps option on the
feature bar.
ENABLING APPS ON AN IOS
DEVICE
Select the apps option on the
feature bar.
1.
Select Mobile Apps Help.
2. Follow the instructions to pair and
connect your device via
Bluetooth®
or
with a USB cable.
3. Start the apps on your device that you
want to use.
4. Select the app that you want to use on
the touchscreen.
Note:
Some apps may run through Apple
CarPlay if it is enabled.
Note:
Closing an app on your device will
close it on the touchscreen.
Note:
For troubleshooting assistance select
Compatible Apps List or My App Isn't Listed
under Mobile Apps Help.
ENABLING APPS ON AN
ANDROID DEVICE
Select the apps option on the
feature bar.
1.
Select Mobile Apps Help.
2. Follow the instructions to pair and
connect your device via
Bluetooth®
or
with a USB cable.
3. Start the apps on your device that you
want to use.
4. Select
Find Mobile Apps
.
5. Select the app that you want to use on
the touchscreen.
Note:
To enable apps when pairing with a
USB cable, switch on Android App via USB.
444
Apps
Note:
Some devices may lose the ability to
play music over USB when Mobile Apps are
enabled.
Note:
Some apps may run through Android
Auto if it is enabled.
Note:
Closing an app on your device will
close it on the touchscreen.
Note:
For troubleshooting assistance select
Compatible Apps List or My App Isn't Listed
under Mobile Apps Help.
SWITCHING APPLE CARPLAY
ON AND OFF
Enabling Apple CarPlay with USB
1.
Connect your device to a USB port.
2. Follow the instructions on your device
and the touchscreen.
Note:
Selecting "Enable Wireless CarPlay"
on your device prepares the device for
wireless CarPlay when you re-enter the
vehicle.
Enabling Apple CarPlay with
Wireless
1.
Pair your device to
Bluetooth®
.
2. Follow the instructions on your device
and the touchscreen.
Disabling Apple CarPlay
E280315
Select the settings option on the
feature bar.
1.
Press Phone List.
2. Select your device from the list.
3. Press Disable.
Re-Enabling Apple CarPlay
E280315
Select the settings option on the
feature bar.
1.
Press Phone List.
2. Select your device from the list.
3. Press Connect to Apple CarPlay.
SWITCHING ANDROID AUTO
ON AND OFF
Enabling Android Auto with USB
(If Equipped)
1.
Connect your device to a USB port.
2. Follow the instructions on the
touchscreen.
Note:
Certain features of the system are
not available when you are using Android
Auto.
Enabling Android Auto with
Wireless
1.
Pair your device to
Bluetooth®
.
2. Follow the instructions on your device
and the touchscreen.
Note:
Certain Android Devices do not
support Android Auto Wireless. Please
check your Android OS version for
compatibility.
Disabling Android Auto
E280315
Select the settings option on the
feature bar.
1.
Press Phone List.
2. Select your device from the list.
3. Press Disable.
Re-Enabling Android Auto
E280315
Select the settings option on the
feature bar.
1.
Press Phone List.
2. Select your device from the list.
445
Apps
3. Press Connect to Android Auto.
446
Apps
ACCESSING NAVIGATION
WARNING:
Driving while distracted
can result in loss of vehicle control, crash
and injury. We strongly recommend that
you use extreme caution when using any
device that may take your focus off the
road. Your primary responsibility is the
safe operation of your vehicle. We
recommend against the use of any
hand-held device while driving and
encourage the use of voice-operated
systems when possible. Make sure you
are aware of all applicable local laws
that may affect the use of electronic
devices while driving.
Press the button to access
Navigation.
Note:
For optimal reception performance,
keep the antenna clear of snow and ice
build-up and keep luggage and other
material as far away from the antenna as
possible. Placing luggage over the antenna
may reduce performance.
NAVIGATION MAP UPDATES
To update your Map data over Wi-Fi, your
vehicle must be connected to a Wi-Fi
access point. For USB updates and other
details, contact dealers at
1-866-462-8837 in the United States and
Canada, or 01-800-557-5539 in Mexico.
Note:
If you find map data errors, you may
report them by going to
www.here.com/mapcreator.
ADJUSTING THE MAP
ZOOMING THE MAP IN AND OUT
You can use pinch gestures to zoom in and
out. Place two fingers on the screen and
move them apart to zoom in. Place two
fingers on the screen and bring them
together to zoom out.
CHANGING THE FORMAT OF THE
MAP
E328845
Press the Menu button.
1.
Press the Map Orientation tile.
2. Select a map orientation.
LIVE TRAFFIC
WHAT IS LIVE TRAFFIC
You can observe real-time road congestion
when live traffic is on.
SWITCHING LIVE TRAFFIC ON
AND OFF
E328845
Press the Menu button.
1.
Press the Traffic on Map tile.
2. Press Traffic on or Traffic Off.
SETTING A DESTINATION
SETTING A DESTINATION USING
THE TEXT ENTRY SCREEN
1.
Press the search bar at the top of the
screen.
447
Navigation
2. Enter your destination using the
keyboard.
3. Press Search.
4. Select a destination from the list.
5. Press Start to begin navigation.
SETTING A DESTINATION USING
THE MAP SCREEN
Press and hold on the map to place a pin
at that location. Information about the
location of the pin appears on the screen.
E328844
Press the button to begin
navigation to the pin.
SETTING A DESTINATION USING
A PREDICTIVE DESTINATION
Press the predicted destination card on
the screen to navigate to it. These appear
when the navigation system has learned
your driving habits.
SETTING A DESTINATION USING
A RECENT DESTINATION
E358714
Press the button.
Press a destination from the list.
Note:
You can also use the search button
to view recent destinations.
SETTING A DESTINATION USING
A SAVED DESTINATION
Press the star icon next when viewing
location details to save the location.
E353215
Press the button.
Press a destination from the list.
Note:
You can also use the search button
to view saved destinations.
SETTING A DESTINATION USING
A POINT OF INTEREST
Press a point of interest icon on the map.
Information about the location of the point
of interest appears on the screen.
E328844
Press the button to begin
navigation to the point of
interest.
Note:
You can also use the search button
to view points of interest.
WAYPOINTS
ADDING A WAYPOINT
E328843
Press the Add Waypoint button
when in an active navigation
session.
1.
Enter your waypoint on the keyboard.
2. Press Search.
3. Select a waypoint from the list.
4. Press Add to Trip.
EDITING WAYPOINTS
1.
Press the waypoint you would like to
edit.
2. Select an option to reorder or delete
the waypoint.
ROUTE GUIDANCE
ADJUSTING THE GUIDANCE
PROMPT VOLUME
Turn the volume control when a guidance
prompt plays to adjust the volume.
448
Navigation

REPEATING AN INSTRUCTION
Press the turn indicator to hear the last
voice instruction.
ROUTE GUIDANCE SETTINGS
Avoid 4x4 Roads
Before Starting a Navigation Session
Before starting a navigation session you
can enable and disable 4x4 roads using
the controls on the point of interest detail
page. When enabled the system will
include 4x4 roads when determining the
best route. When disabled the system will
avoid 4x4 roads.
During a Navigation Session
If you do not wish to have your route take
you on 4x4 roads you can remove the turn
onto the 4x4 road using the turn list.
1.
Tap the chevron below the turn panel.
2. Swipe to the left on the 4x4 road on
the turn list that appears.
3. Press the delete button to remove that
road from your route.
The system will then re-route you to your
destination.
CANCELING ROUTE GUIDANCE
E280804
Press the button to cancel route
guidance to the selected
location.
449
Navigation

UPDATING THE VEHICLE
SYSTEMS WIRELESSLY
E327789
Over the air system updates
allow you to update your vehicle
system software wirelessly. To
make sure you receive all updates, set a
recurring schedule and connect to Wi-Fi.
Updates may take longer if not connected
to Wi-Fi, or may not download at all. See
Over the Air System Update
Requirements
Before updating, reference this list to make
sure your vehicle is ready be updated. If
these requirements are not met during a
scheduled update, the update will be
canceled and you can reschedule.
•
Your vehicle is not running.
•
Your vehicle is stopped.
•
Your vehicle is parked.
•
The hazard indicators are switched off.
•
The alarm is not sounding.
•
The doors are closed.
•
The parking lights are switched off.
•
You are not pressing the brake pedal.
•
An emergency call is not in progress.
•
Your vehicle is not in limp mode.
Enabling Over the Air Updates
1.
Press
Settings
on the touchscreen.
2. Press
Software Update
.
3. Switch
Automatic Updates
on or off.
Note:
Over the air updates are enabled by
default.
Note:
If you do not want to receive over the
air updates you can turn them off. You will
not be notified of new updates.
Scheduling an Update
Scheduling an update allows you to set a
convenient time for the update to
complete. We recommend updating
overnight when your vehicle is not in use.
Ensure Vehicle Connectivity and Automatic
Updates are enabled. Once you complete
these steps, your schedule will be saved
for future updates. As long as an update is
not in process you can adjust your
schedule.
Note:
Some updates may be applied
outside of your set schedule. Information
about the unscheduled update appears on
the touchscreen after it is applied.
Using the Settings Menu
1.
Press
Settings
on the touchscreen.
2. Press
Software Update
.
3. Press
Schedule Updates
.
4. Use the controls to set the time and
day of the update.
5. Save the schedule.
Note:
You can set the updates to occur at
any time.
Using the Status Bar Icon
E327785
When an update is available, tap
the notification icon and follow
the prompts on the screen.
Applying an Over the Air Update
You can see the progress of the update on
the touchscreen. An update cannot be
canceled once it has been started.
450
Vehicle System Updates

During an update you will not be able to
drive your vehicle, start the vehicle, use
remote controls to lock and unlock the
vehicle. The alarm, central locks, and door
tones are disabled. The electronic door
lock will not function during an update. You
can open the doors using the mechanical
latch if child locks are not on. Pull the
handle until it stops to use the mechanical
latch Some updates may not allow you to
use your vehicle during the update process.
Note:
Some updates can complete in the
background, but more complex updates can
take up to 45 minutes.
Note:
Double locking is switched off and
central locking is switched on during and
after an update.
Note:
If your vehicle is plugged in, charging
will stop during an update and resume when
the update is complete.
Viewing Update Details
If an update is successful, the touchscreen
will provide additional details about the
update. You can also access this
information under the System Update tile.
If an update is not successful, follow the
prompt that appears on the touchscreen.
PERFORMING A MASTER
RESET
E280315
Press the settings option on the
feature bar.
1.
Press the
Reset
tile.
2. Press
Master Reset
.
3. Follow the prompts on the screen to
complete the reset.
451
Vehicle System Updates
Нет комментариевНе стесняйтесь поделиться с нами вашим ценным мнением.
Текст