Ford Focus (2017 year). Manual — part 18
GENERAL INFORMATION
Condensation in Lamp Assemblies
Exterior lamps have vents to
accommodate normal changes in air
pressure.
Condensation can be a natural by-product
of this design. When moist air enters the
lamp assembly through the vents, there is
a possibility that condensation can occur
when the temperature is cold. When
normal condensation occurs, a fine mist
can form on the interior of the lens. The
fine mist eventually clears and exits
through the vents during normal operation.
Clearing time may take as long as 48 hours
under dry weather conditions.
Examples of acceptable condensation are:
•
The presence of a fine mist (no streaks,
drip marks or large droplets).
•
A fine mist covers less than 50% of the
lens.
Examples of unacceptable condensation
are:
•
A water puddle inside the lamp.
•
Streaks, drip marks or large droplets
present on the interior of the lens.
If you see any unacceptable condensation,
have your vehicle checked by an authorized
dealer.
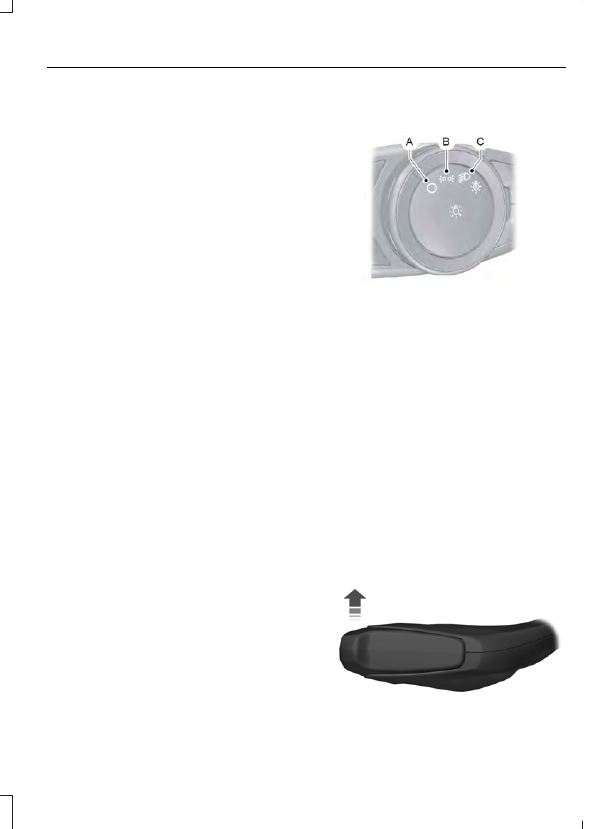
LIGHTING CONTROL
E142449
Off.
A
Parking lamps, instrument panel
lamps, license plate lamps and
tail lamps.
B
Headlamps.
C
Parking Lamps
Note: Prolonged use of the parking lamps
will cause the battery to run out of charge.
Note: Parking lamps may turn off
automatically. This prevents the vehicle
battery from running out of charge.
Switch the ignition off.
Select position B on the lighting control to
switch the parking lamps on.
High Beams
E163718
Push the lever away from you to switch
the high beam on.
Push the lever forward again or pull the
lever toward you to switch the high beams
off.
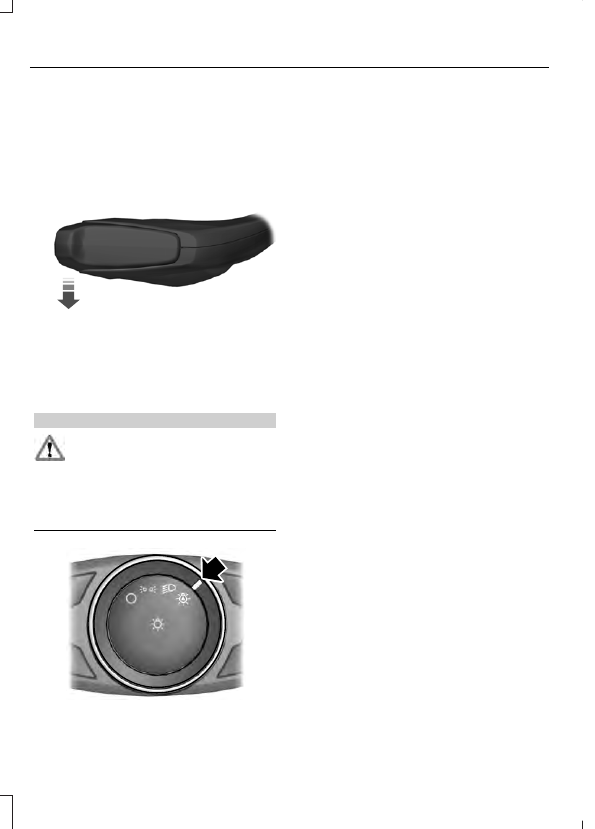
Headlamp Flasher
E163719
Slightly pull the lever toward you and
release it to flash the headlamps.
AUTOLAMPS
(If Equipped)
WARNING
The autolamps switch position may
not activate the headlamps in all low
visibility conditions, such as daytime
fog. Always ensure that your headlamps
are switched to auto or on, as appropriate,
during all low visibility conditions. Failure
to do so may result in a collision.
E142451
When the lighting control is in the
autolamps position, the headlamps
automatically turn on in low light situations
or when the wipers activate.
If equipped, the following also activate
when the lighting control is in the
autolamps position and you switch them
on in the information display:
•
Configurable daytime running lamps.
•
Automatic high beam control.
•
Adaptive headlamp control.
The headlamps remain on for a period of
time after you switch the ignition off. Use
the information display controls to adjust
the period of time that the headlamps
remain on. See Information Displays
(page 91).
Note: With the headlamps in the
autolamps position, you cannot switch the
high beam headlamps on until the
autolamps system turns the low beam
headlamps on.
Windshield Wiper Activated
Headlamps
The windshield wiper activated headlamps
turn on within 10 seconds when you switch
the windshield wipers on and the lighting
control is in the autolamps position. They
turn off approximately 60 seconds after
you switch the windshield wipers off.
The headlamps will not turn on by wiper
activation:
•
During a mist wipe.
•
When the wipers are on to clear washer
fluid during a wash condition.
•
If the wipers are in intermittent mode.
Note: If you switch autolamps and
autowipers on, the headlamps will
automatically turn on when the windshield
wipers continuously operate.
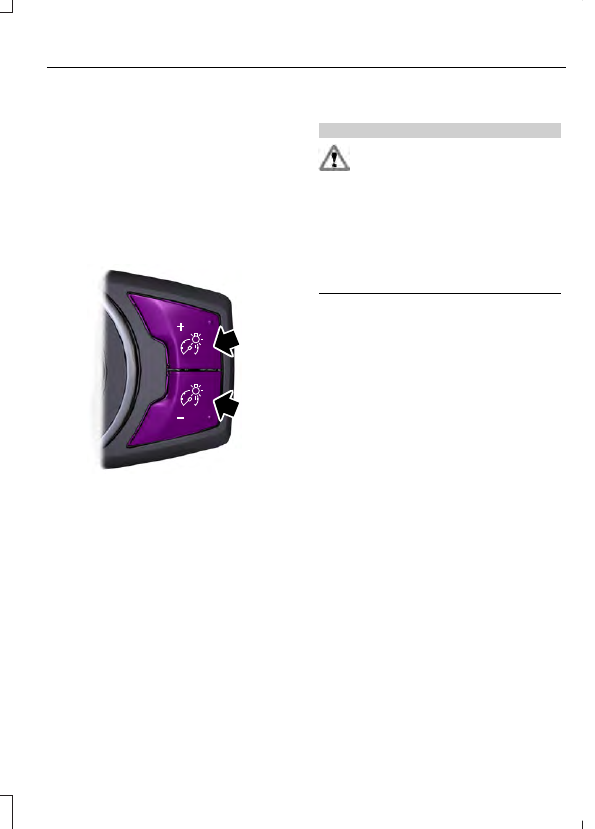
INSTRUMENT LIGHTING
DIMMER
Note: You disable the manual dimmer
when you adjust the setting to Auto
Dimming in the information display. See
Information Displays (page 91).
Note: If you disconnect the battery or it
becomes discharged, the illuminated
components will switch to the maximum
setting.
E161902
Press repeatedly or press and hold until
you reach the desired level.
HEADLAMP EXIT DELAY
After you switch the ignition off, you can
switch the headlamps on by pulling the
direction indicator lever toward you. You
will hear a short tone. The headlamps will
switch off automatically after three
minutes with any door open or 30 seconds
after the last door has been closed. You
can cancel this feature by pulling the
direction indicator toward you again or
switching the ignition on.
DAYTIME RUNNING LAMPS
WARNING
The daytime running lamps system
does not activate the rear lamps and
may not provide adequate lighting
during low visibility driving conditions. Also,
the autolamps switch position may not
activate the headlamps in all low visibility
conditions, such as daytime fog. Make sure
the headlamps are switched to auto or on,
as appropriate, during all low visibility
conditions. Failure to do so may result in a
crash.
Type 1 - Conventional (Non-
Configurable)
The daytime running lamps turn on when:
1.
The ignition is switched to the on
position.
2. The transmission is not in park (P) for
vehicles with automatic transmissions
or the parking brake is released for
vehicles with manual transmissions.
3. The lighting control is in the off, parking
lamp or autolamps positions.
4. The headlamps are off.
Type 2 - Configurable
Switch the daytime running lamps on or
off using the information display controls.
See Information Displays (page 91).
The daytime running lamps turn on when:
1.
They are switched on in the information
display. See Information Displays
(page 91).
2. The ignition is switched to the on
position.
3. The transmission is not in park (P) for
vehicles with automatic transmissions
or the parking brake is released for
vehicles with manual transmissions.
4. The lighting control is in the autolamps
position.
5. The headlamps are off.
The other lighting control switch positions
do not activate the daytime running lamps,
and you can use them to temporarily
override autolamp control.
When switched off in the information
display, the daytime running lamps are off
in all lighting control switch positions.
AUTOMATIC HIGH BEAM
CONTROL
The system automatically turns on the high
beams if it is dark enough and no other
traffic is present. When it detects the
headlights of an approaching vehicle, the
rear lamps of the preceding vehicle or
street lighting, the system turns off the high
beams before they distract other drivers.
The low beams remain on.
Note: If it appears that automatic high
beam is not functioning properly, check the
windshield in front of the camera for a
blockage. A clear view of the road is required
for proper system operation. Make sure that
authorized personnel repair any windshield
damage in the area of the camera's field of
view.
Note: If the system detects a blockage such
as bird droppings, bug splatter, snow or ice,
and you do not observe changes, the system
may go into low beam mode until you clear
the blockage. A message may also appear
in the information display noting the front
camera is blocked.
Note: Typical road dust, dirt and water
spots do not affect the performance of the
automatic high beam control. However, in
cold or inclement weather conditions, you
may notice a decrease in the availability of
the automatic high beam control, especially
at start up. If you want to change the beam
state independently of the system, you may
switch the high beams on or off using the
lighting control switch. Automatic high
beam control resumes when conditions are
correct.
Note: Modification of your vehicle ride
height such as using much larger tires, may
degrade feature performance.
A camera sensor, centrally mounted
behind the windshield of your vehicle,
continuously monitors conditions to decide
when to switch the high beams off and on.
Once the system is active, the high beams
switch on if:
•
The ambient light level is low enough.
•
There is no traffic in front of the vehicle.
•
The vehicle speed is greater than
approximately 32 mph (52 km/h).
The high beams turn off if:
•
The system detects the headlamps of
an approaching vehicle or the rear
lamps of a preceding vehicle.
•
Vehicle speed falls below
approximately 27 mph (44 km/h).
•
The ambient light level is high enough
that high beams are not required.
•
The system detects severe rain, snow
or fog.
•
The camera is blocked.
Activating the System
Switch the system on using the information
display. See Information Displays (page
91). Turn the switch to the autolamps
position. See Autolamps (page 76).
Нет комментариевНе стесняйтесь поделиться с нами вашим ценным мнением.
Текст