Volvo XC90 Recharge Plug-in Hybrid (2021 year). Manual in english — page 11
SEATS AND STEERING WHEEL
* Option/accessory.
193
Restarting the massage function
The massage function turns off automatically
after 20 minutes. The function is reactivated
manually.
–
Tap
Restart
, which is displayed in the
center display, to restart the selected mas-
sage program.
> The massage program will restart. If no
selection is made, the message will be
stored in Top view.
Related information
•
•
•
•
Storing positions for seats, mirrors and
head-up display
•
Using stored positions for seats, mirrors
and head-up display
•
Adjusting front seat massage settings
•
•
Adjusting front seat side bolster settings
•
Adjusting front seat lumbar support
•
Adjusting the passenger seat from the
driver's seat
Adjusting front seat massage
settings
*
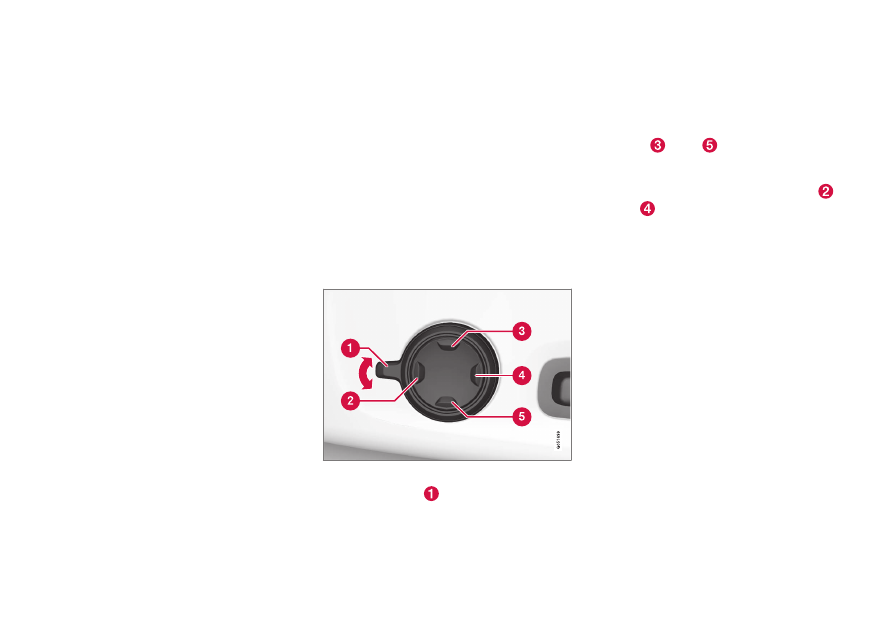
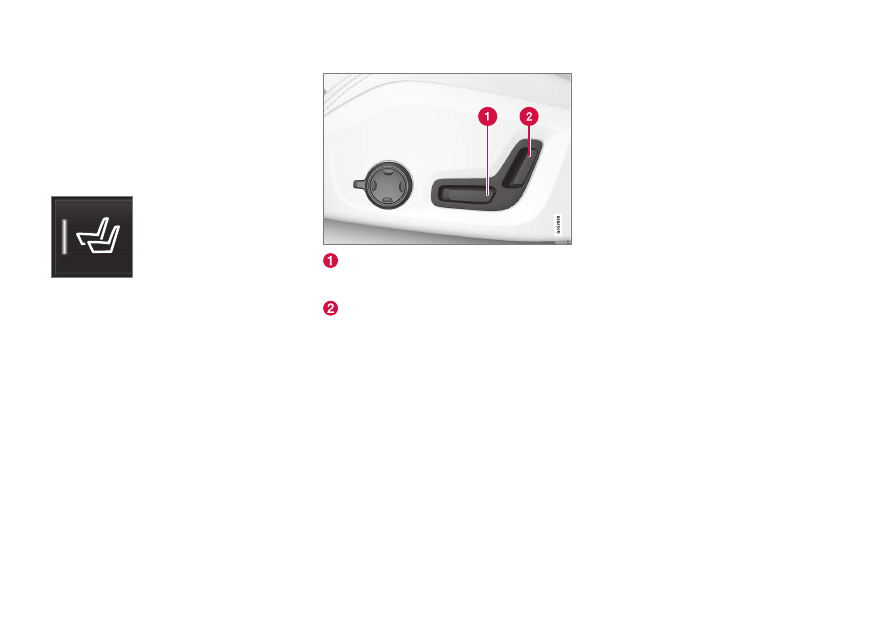
The settings for the multifunctional seats can
be adjusted using either the mutifunction
control on the seat or the center display. The
adjustment settings are shown in the center
display.
Adjusting front seat massage settings
The front seat backrests have a massage func-
tion. Air-filled cushions provide the massaging
action and a number of settings are available.
The massage function can only be activated
when the engine is running.
1. Activate the multifunction control by turn-
ing the control
upward/downward. The
seat settings view will appear in the center
display.
2. Select
Massage
in the seat settings view.
3. Select massage settings by tapping the
center display or by moving the cursor up/
down using the multifunction control's
upper
/lower
buttons. Change a set-
ting in the selected function by tapping
the arrows on the center display or by
using the multifunction control's front
/
rear
buttons.
Related information
•
•
•
•
Storing positions for seats, mirrors and
head-up display
•
Using stored positions for seats, mirrors
and head-up display
•
•
•
Adjusting front seat side bolster settings
•
Adjusting front seat lumbar support
•
-------------------------------------------------------------------------------------------------------------------------------------------------------------
SEATS AND STEERING WHEEL
* Option/accessory.
194
Adjusting
*
front seat cushion
length
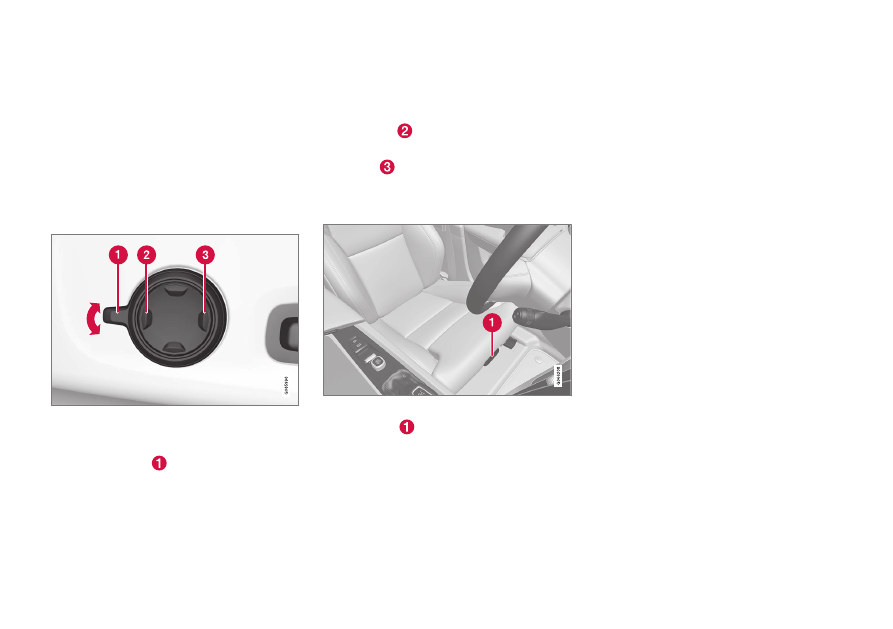
Depending on the selected equipment level,
the length of the seat cushion can either be
adjusted using the multifunction control
*
on
the side of the seat cushion, or manually
adjusted using the control on the front of the
seat cushion.
Adjusting seat cushion length using
the multifunction control
The multifunction control, located on the side of the
seat cushion.
1. Activate the multifunction control by turn-
ing the control
upward/downward. The
seat settings view will appear in the center
display.
2. Select
Cushion extension
in the seat set-
tings view.
•
Push in the front part of the four-way
button
to extend the seat cushion.
•
Press the rear part of the four-way but-
ton
to shorten the seat cushion.
Manually adjusting seat cushion
length
Control for adjusting seat cushion.
1. Grasp the
handle on the front of the
seat and pull upward.
2. Adjust the length of the seat cushion.
3. Release the handle and make sure the
seat cushion locks into position.
Related information
•
•
•
•
Storing positions for seats, mirrors and
head-up display
•
Using stored positions for seats, mirrors
and head-up display
•
Adjusting front seat massage settings
•
•
Adjusting front seat side bolster settings
•
Adjusting front seat lumbar support
•
-------------------------------------------------------------------------------------------------------------------------------------------------------------
SEATS AND STEERING WHEEL
}}
* Option/accessory.
195
Adjusting front seat side bolster
settings
*
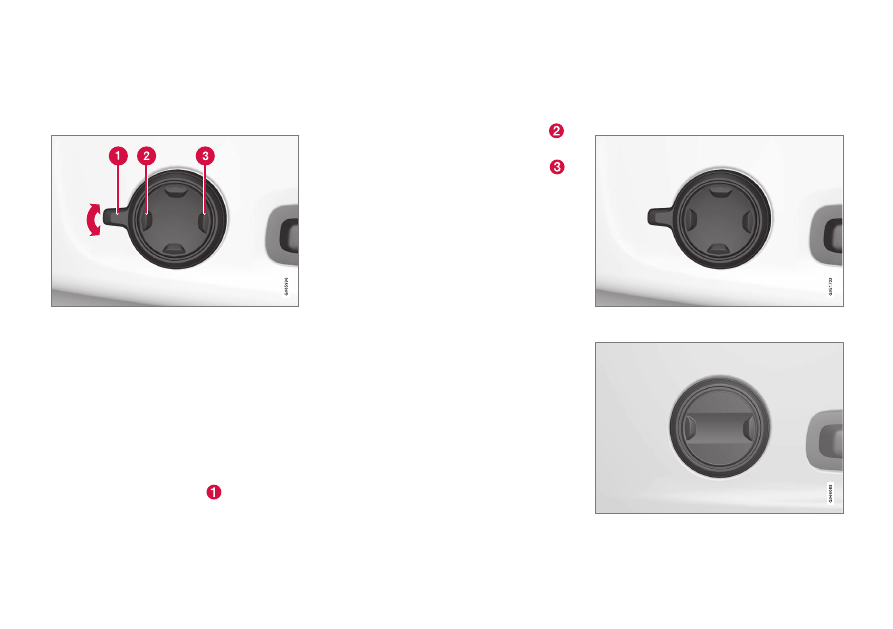
Enhance comfort in the front seat by adjust-
ing the sides of the backrest.
The multifunction control is located on the side of the
seat cushion.
The side bolsters in the front seat backrests
can be inflated/deflated to adjust the amount
of support provided. The settings for the multi-
functional seats can be adjusted using either
the mutifunction control on the seat or the
center display. The adjustment settings are
shown in the center display.
To adjust the side bolsters:
1. Activate the multifunction control by turn-
ing it upward/downward
. The seat set-
tings view will appear in the center dis-
play.
2. Select
Side bolsters
in the seat settings
view.
•
Press the front part of the four-way but-
ton to increase side bolster support
.
•
Press the rear part of the four-way but-
ton to decrease side bolster support
.
Related information
•
•
•
•
Storing positions for seats, mirrors and
head-up display
•
Using stored positions for seats, mirrors
and head-up display
•
Adjusting front seat massage settings
•
•
•
Adjusting front seat lumbar support
•
Adjusting the passenger seat from the
driver's seat
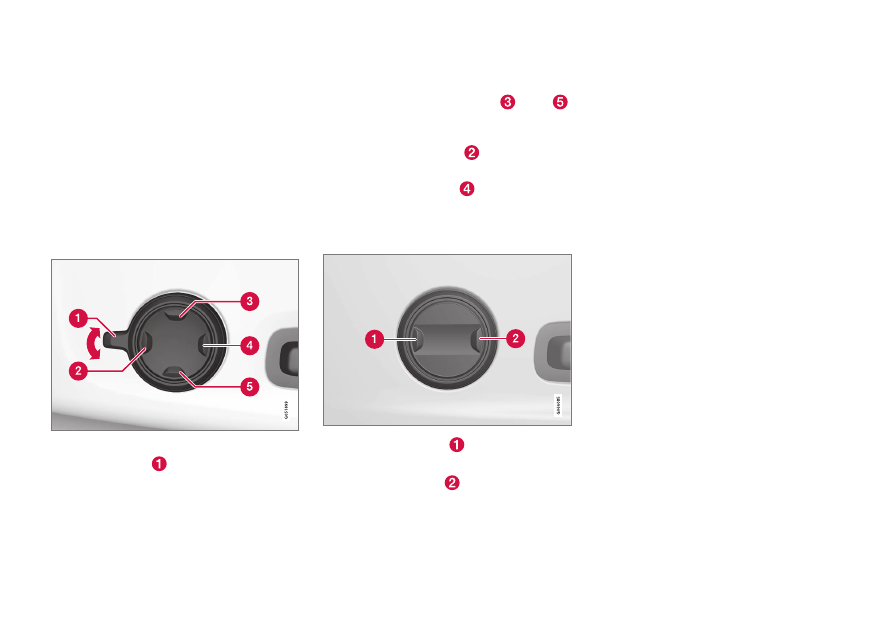
Adjusting front seat lumbar
support
*
Use the control on the side of the seat cush-
ion to adjust the lumbar support.
Multifunction control, in vehicles with four-way lum-
bar support
*
.
Control in vehicles with two-way lumbar support
*
.
-------------------------------------------------------------------------------------------------------------------------------------------------------------
||
SEATS AND STEERING WHEEL
* Option/accessory.
196
Lumbar support is adjusted using the multi-
function control in vehicles with four-way lum-
bar support
*
, or the round button in vehicles
with two-way lumbar support
*
. The control is
located on the side of the seat cushion.
Depending on the selected equipment level,
the lumbar support can be adjusted forward/
rearward and up/down (four-way lumbar sup-
port) or forward/backward (two-way lumbar
support).
Adjusting lumbar support in vehicles
with four-way lumbar support
1. Activate the multifunction control by turn-
ing the control
upward/downward. The
seat settings view will appear in the center
display.
2. Select
Lumbar
in the seat settings view.
•
Press the round button up
/down
to move the lumbar support upward/
downward.
•
Press the front part
of the button to
increase lumbar support.
•
Press the rear part
of the button to
decrease lumbar support.
Adjusting lumbar support in vehicles
with two-way lumbar support
1. Press the front part
of the round button
to increase lumbar support.
2. Press the rear part
of the round button
to decrease lumbar support.
Related information
•
•
•
•
Storing positions for seats, mirrors and
head-up display
•
Using stored positions for seats, mirrors
and head-up display
•
Adjusting front seat massage settings
•
•
•
Adjusting front seat side bolster settings
•
-------------------------------------------------------------------------------------------------------------------------------------------------------------
SEATS AND STEERING WHEEL
* Option/accessory.
197
Adjusting the passenger seat from
the driver's seat
*
The front passenger seat can be adjusted
from the driver's seat.
Activating the function
The function is activated via the function view
in the center display:
Tap the
Adjust Passenger
Seat
button to activate.
Adjust passenger seat
The driver must adjust the passenger seat
within 10 seconds of activating the function. If
no adjustment is made within this time, the
function will be deactivated.
The driver adjusts the passenger seat using
the controls on the driver's seat:
Move the passenger seat forward/rear-
ward by moving the control forward/rear-
ward.
Change the backrest tilt of the passenger
seat by moving the control forward/back-
ward.
Related information
•
•
•
•
Storing positions for seats, mirrors and
head-up display
•
Using stored positions for seats, mirrors
and head-up display
•
Adjusting front seat massage settings
•
•
•
Adjusting front seat side bolster settings
•
-------------------------------------------------------------------------------------------------------------------------------------------------------------
SEATS AND STEERING WHEEL
198
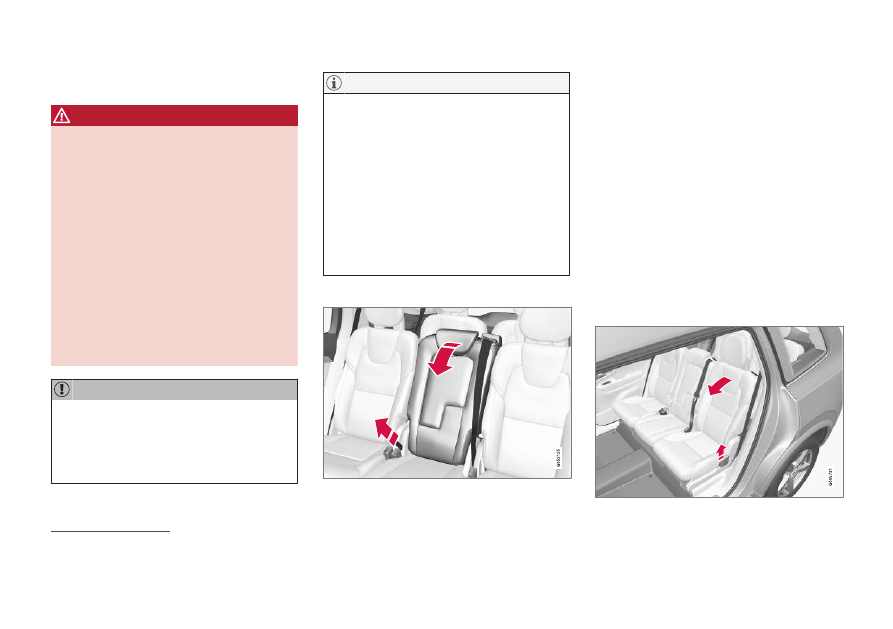
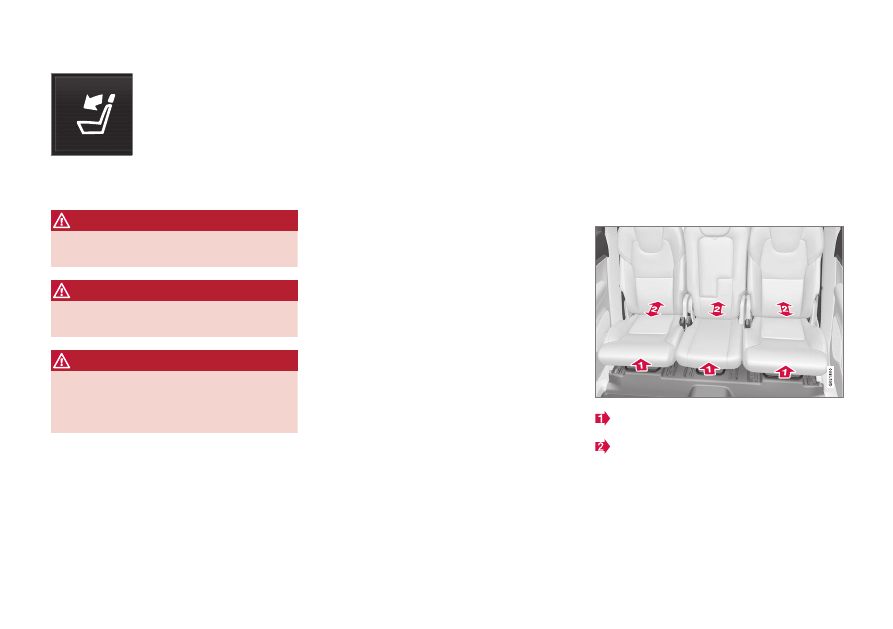
Folding the second row backrests
The backrests can be folded down separately.
WARNING
•
Adjust the seat and ensure it locks into
position before driving. Use caution
when adjusting the seat. Uncontrolled
or careless adjustments could lead to
injury.
•
Long objects must always be securely
tied down to help prevent injury or
damage in the event of sudden brak-
ing.
•
Always turn off the engine and apply
the parking brake when loading or
unloading the vehicle.
•
Put the gear selector in
P
to help pre-
vent the gear selector from being inad-
vertently moved.
When the backrest is folded down, make
sure there are no objects in the rear seat,
and the seat belts are not buckled. Other-
wise there is a risk of damage to the
upholstery.
The front seats may need to be pushed for-
ward and/or the backrest adjusted so that
the rear seat backrests can be fully low-
ered.
The rear seats may also need to be moved
rearward.
The seats in the second row must be in the
upright position before they can be folded
down completely. They should not be
folded down when they are tilted forward
to access the third row of seats.
Center seat
5
To fold down the backrest:
1. Push down the head restraint manually.
2. Pull the strap on the right side of the cen-
ter seat.
3. Fold the backrest down until it locks into
position. The seat cushion will move
downward/forward when the backrest is
folded down and create a flat surface.
To return the backrest to the upright position:
1. Pull the strap.
2. Fold up the backrest and release the strap.
Push the backrest until it locks into posi-
tion.
3. Adjust the head restraint if necessary.
Outboard seats
6
5
In vehicles with four or six seats, there is no center seat.
6
This illustration shows a vehicle with seven seats.
-------------------------------------------------------------------------------------------------------------------------------------------------------------
SEATS AND STEERING WHEEL
* Option/accessory.
199
To fold down the backrest:
When folding down a second row seat
backrest, always start from the seat's nor-
mal upright position.
Do not use the handle for folding down the
seat when the seat is in the position for
accessing the third row.
1. Pull up and hold the handle on the side of
the seat while the backrest is being folded
down.
2. Make sure that backrest and head
restraint do not come in contact with the
seat in front while the backrest is being
folded down. Fold the backrest down until
it locks into position.
> The seat cushion will move downward/
forward when the backrest is folded
down and create a flat surface. The
head restraint folds down automatically
when the backrest is lowered.
WARNING
Make sure the backrest is securely locked
into position after it is folded down.
To return the backrest to the upright position:
1. Pull up and hold the handle on the side of
the seat while the backrest is being folded
up.
2. Make sure that backrest and head
restraint do not come in contact with the
seat in front while the backrest is being
folded up. Fold up the backrest and
release the handle.
3. Press the backrest until it locks into posi-
tion.
4. Push up the head restraint manually.
WARNING
Make sure that the rear seat backrest and
head restraint are locked securely in place
after the seat is folded up.
The head restraints at the outer seats must
always be raised when there is a passenger
in one of these spots of the rear seat.
WARNING
The head restraints on the outboard sec-
ond-row seats must always be folded up
when there are passengers in the third row
of seats
*
.
Related information
•
Adjusting the second row head restraints
(p. 200)
•
Moving the second row seats forward/
rearward
•
Adjusting the second row backrest tilt
(p. 203)
•
Getting into and out of the third row of
seats
•
-------------------------------------------------------------------------------------------------------------------------------------------------------------
SEATS AND STEERING WHEEL
* Option/accessory.
200
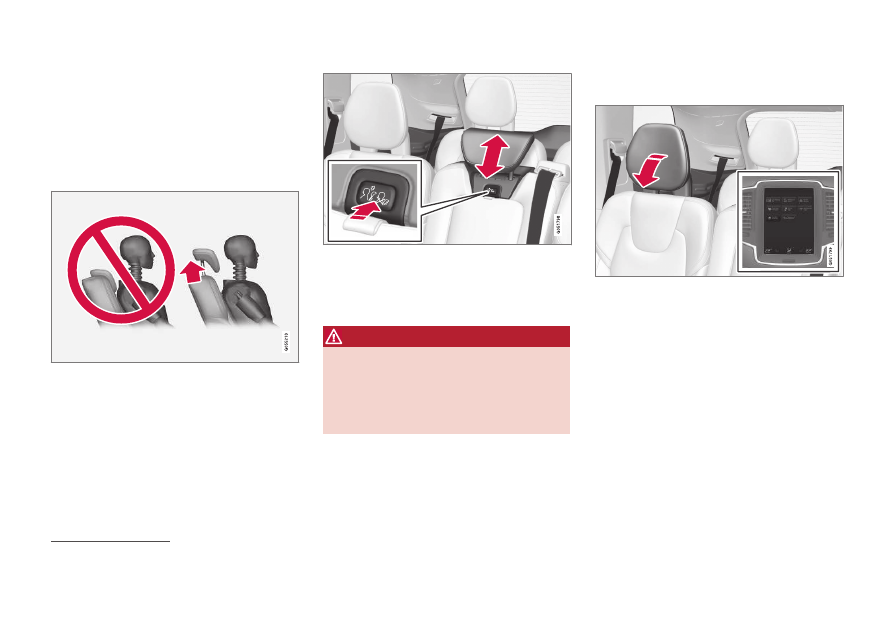
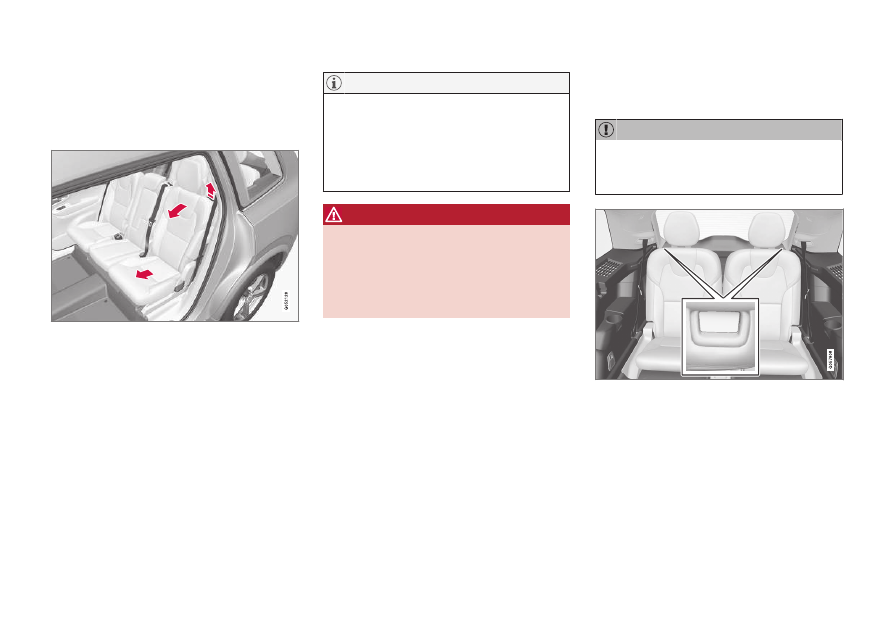
Adjusting the second row head
restraints
Adjust the center seat's head restraint to suit
the height of the passenger.
7
Fold down the
outer seats' head restraints
*
to improve rear
visibility.
Adjusting the center head restraint
The center head restraint should be adjusted
to suit the passenger's height. The entire back
of the head should be covered if possible.
Manually move the restraint up or down as
needed.
To lower the restraint, press and hold the but-
ton (located between the backrest and the
head restraint, see illustration) while carefully
lowering the head restraint.
WARNING
The center seat head restraint must be in
its lowest position when the seat is not
occupied. When the center seat is occu-
pied, the head restraint must be correctly
adjusted to the passenger's height, cover-
ing the entire back of the head if possible.
Electrically folding down the rear
seat's outboard head restraints
*
The outer head restraints can be folded via the
center display's function view. The head
restraint can be folded down when the vehicle
is in ignition mode
0
.
7
In vehicles with four or six seats, there is no center seat.
-------------------------------------------------------------------------------------------------------------------------------------------------------------
SEATS AND STEERING WHEEL
}}
* Option/accessory.
201
Tap the
Headrest Fold
but-
ton to activate/deactivate
folding.
Manually push the head restraint until it clicks
into position.
WARNING
Do not lower the head restraint if there are
passengers in any of the rear seats.
WARNING
The head restraint must be locked in the
upright position after it has been folded up.
WARNING
The head restraints on the outboard sec-
ond-row seats must always be folded up
when there are passengers in the third row
of seats
*
.
Related information
•
Folding the second row backrests (p. 198)
•
Moving the second row seats forward/
rearward
•
Adjusting the second row backrest tilt
(p. 203)
•
Getting into and out of the third row of
seats
•
Folding the third row backrests
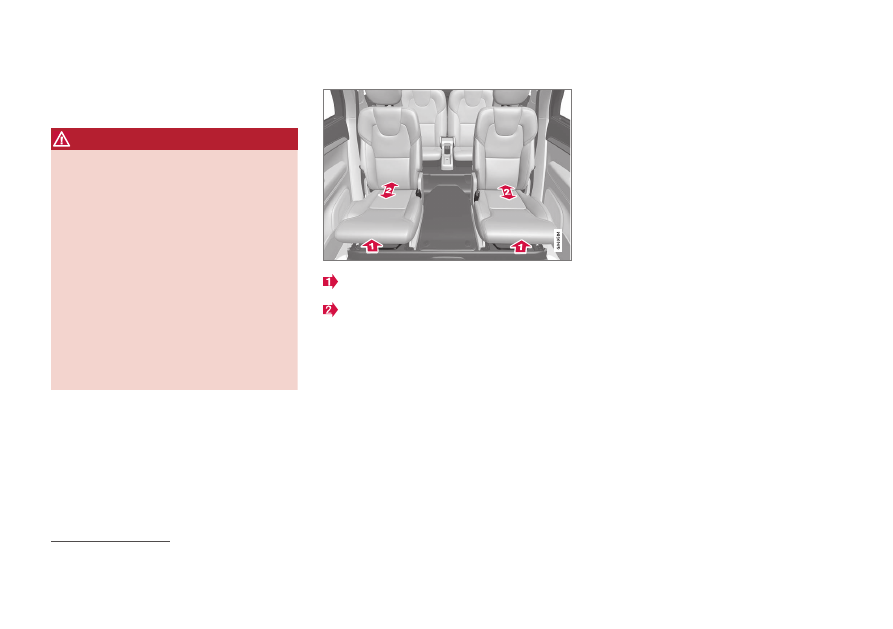
Moving the second row seats
forward/rearward
*
In vehicles with 6 or 7 seats
*
, the seats in the
second row can be moved forward or rear-
ward individually to help adapt legroom for
passengers in the second and third rows. The
second row seats cannot be moved forward
or backward in 4-seat models.
8
Adjusting seats in a 7-seat vehicle
Lift the handle under the seat.
Move the seat forward or backward to the
desired position.
3. Release the handle and press the seat
until it locks into position.
-------------------------------------------------------------------------------------------------------------------------------------------------------------
||
SEATS AND STEERING WHEEL
* Option/accessory.
202
Check to make sure the seat is securely
locked into place after its position has been
changed.
WARNING
•
Adjust the seat and ensure it locks into
position before driving. Use caution
when adjusting the seat. Uncontrolled
or careless adjustments could lead to
injury.
•
Long objects must always be securely
tied down to help prevent injury or
damage in the event of sudden brak-
ing.
•
Always turn off the engine and apply
the parking brake when loading or
unloading the vehicle.
•
Put the gear selector in
P
to help pre-
vent the gear selector from being inad-
vertently moved.
Adjusting seats in a 6-seat vehicle
Lift the handle under the seat.
Move the seat forward or backward to the
desired position.
3. Release the handle and press the seat
until it locks into position.
Check to make sure the seat is securely
locked into place after its position has been
changed.
Related information
•
Folding the second row backrests (p. 198)
•
Adjusting the second row head restraints
(p. 200)
•
Adjusting the second row backrest tilt
(p. 203)
•
Getting into and out of the third row of
seats
•
Folding the third row backrests
8
Four-seat vehicles are only available on some markets.
-------------------------------------------------------------------------------------------------------------------------------------------------------------
SEATS AND STEERING WHEEL
* Option/accessory.
203
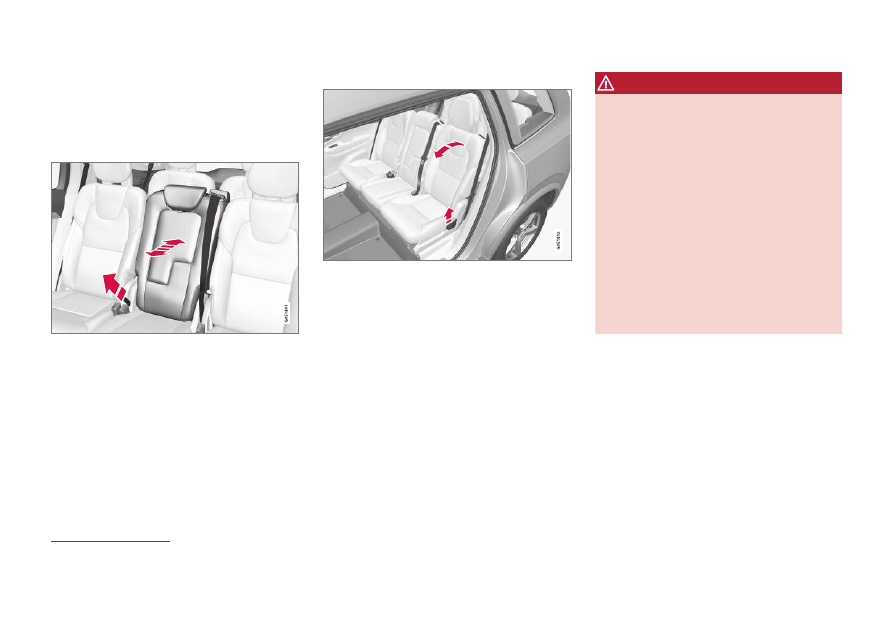
Adjusting the second row backrest
tilt
Backrest tilt can be adjusted separately for
each seat in the second row.
Center seat
9
1. Pull the strap on the right side of the cen-
ter seat.
2. Adjust backrest tilt forward/backward by
decreasing/increasing pressure on the
backrest.
3. Release the strap to lock the backrest in
its new position and press on the backrest
until the lock engages.
Check to make sure the seat is securely
locked into place after its position has been
changed.
Outboard seats
1. Pull the handle on the side of the seat
upward.
2. Adjust backrest tilt forward/backward by
decreasing/increasing pressure on the
backrest.
3. Release the handle to lock the backrest in
its new position and press on the backrest
until the lock engages.
Check to make sure the seat is securely
locked into place after its position has been
changed.
WARNING
•
Adjust the seat and ensure it locks into
position before driving. Use caution
when adjusting the seat. Uncontrolled
or careless adjustments could lead to
injury.
•
Long objects must always be securely
tied down to help prevent injury or
damage in the event of sudden brak-
ing.
•
Always turn off the engine and apply
the parking brake when loading or
unloading the vehicle.
•
Put the gear selector in
P
to help pre-
vent the gear selector from being inad-
vertently moved.
Related information
•
Folding the second row backrests (p. 198)
•
Adjusting the second row head restraints
(p. 200)
•
Moving the second row seats forward/
rearward
•
Getting into and out of the third row of
seats
•
Folding the third row backrests
9
In vehicles with four or six seats, there is no center seat.
-------------------------------------------------------------------------------------------------------------------------------------------------------------
SEATS AND STEERING WHEEL
* Option/accessory.
204
Getting into and out of the third
row of seats
*
The second row of seats can be adjusted to
make it easier to get in and out of the third
row of seats
*
.
The illustration is generic.
To fold down the backrest:
1. Pull the handle on the upper side of the
right or left outboard second row seat
upward/forward.
2. Fold the backrest down and move the
entire seat forward.
To return the seat to the upright position:
–
Push the seat rearward to its end position.
The backrest should then easily return to
the correct position.
If a backrest in the second row of seats
does not lock back into the upright posi-
tion after being folded down (e.g. for get-
ting in or out of the third row of seats), it
may need to be pushed forward again and
then pushed back with more force.
WARNING
Make sure that the rear seat backrest and
head restraint are locked securely in place
after the seat is folded up.
The head restraints at the outer seats must
always be raised when there is a passenger
in one of these spots of the rear seat.
Related information
•
Folding the second row backrests (p. 198)
•
Adjusting the second row head restraints
(p. 200)
•
Moving the second row seats forward/
rearward
•
Adjusting the second row backrest tilt
(p. 203)
•
Folding the third row backrests
Folding the third row backrests
*
The third row has two individual seats. These
can be folded down separately.
To fold down the third-row seat backrests,
it may be necessary to change the posi-
tion/tilt the seats in the second row.
1. Pull the handle on the upper side of the
backrest upward/forward.
-------------------------------------------------------------------------------------------------------------------------------------------------------------
SEATS AND STEERING WHEEL
}}
* Option/accessory.
205
2. Make sure that backrest and head
restraint do not come in contact with the
seat in front while the backrest is being
folded down. Fold the backrest down.
> The seat cushion will move downward/
forward when the backrest is folded
down and create a flat surface. The
head restraint folds down automatically
when the backrest is lowered.
To return the seat to the upright position, fold
the backrest up manually until it locks into
position. Fold up the head restraint manually.
WARNING
Make sure that the rear seat backrest and
head restraint are locked securely in place
after the seat is folded up.
The head restraints at the outer seats must
always be raised when there is a passenger
in one of these spots of the rear seat.
Related information
•
Folding the second row backrests (p. 198)
•
Adjusting the second row head restraints
(p. 200)
•
Moving the second row seats forward/
rearward
•
Adjusting the second row backrest tilt
(p. 203)
•
Getting into and out of the third row of
seats
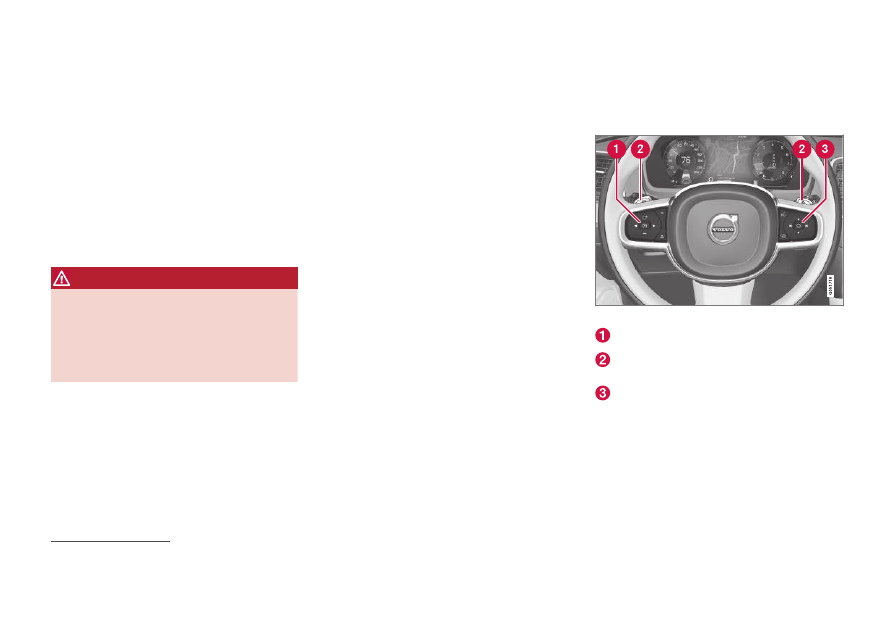
Steering wheel controls and horn
The steering wheel has a horn and controls
for e.g. driver support systems and voice con-
trol.
Steering wheel keypads and paddles
*
.
Driver support system controls.
10
Paddle
*
for manually shifting gears (auto-
matic transmission).
Controls for voice commands, adjusting
the head-up display, accessing menus and
messages, and handling phone calls.
10
Cruise Control, Adaptive Cruise Control
*
, Distance Alert
*
and Pilot Assist.
-------------------------------------------------------------------------------------------------------------------------------------------------------------
||
SEATS AND STEERING WHEEL
* Option/accessory.
206
Horn
The horn is located in the center of the steering
wheel.
Related information
•
Adjusting the steering wheel (p. 206)
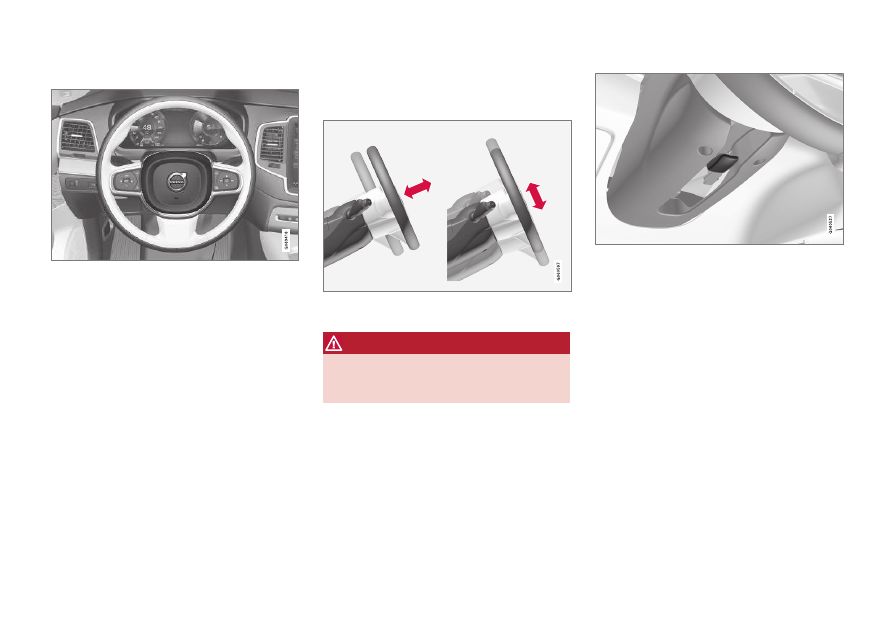
Adjusting the steering wheel
The steering wheel can be adjusted to various
positions.
The steering wheel's reach and height can be
adjusted.
WARNING
Adjust the steering wheel and ensure it
locks into position before driving. Never
adjust the steering wheel while driving.
Steering wheel adjuster lever.
1. Move the lever forward to release the
steering wheel.
2. Adjust the steering wheel to the desired
position.
3. Pull the lever back to lock the steering
wheel into place. If the lever is difficult to
move, press or lift the steering wheel
lightly while pulling the lever.
Related information
•
Steering wheel controls and horn (p. 205)
•
•
-------------------------------------------------------------------------------------------------------------------------------------------------------------
CLIMATE CONTROL
* Option/accessory.
208
Climate
The vehicle is equipped with electronic cli-
mate control. The climate system cools, heats
and dehumidifies the air in the passenger
compartment.
All of the climate system functions are con-
trolled from the center display and the buttons
on the center console.
Certain rear seat functions can also be con-
trolled from the climate controls
*
on the rear
of the tunnel console.
The climate system can be used to cool
down the media system in the center dis-
play if needed. In these cases, the message
Climate system
Cooling the
infotainment system
will be shown in the
instrument panel.
Related information
•
•
Climate control sensors (p. 209)
•
Perceived temperature (p. 209)
•
Climate control system voice commands
(p. 210)
•
•
•
•
•
Climate system controls (p. 219)
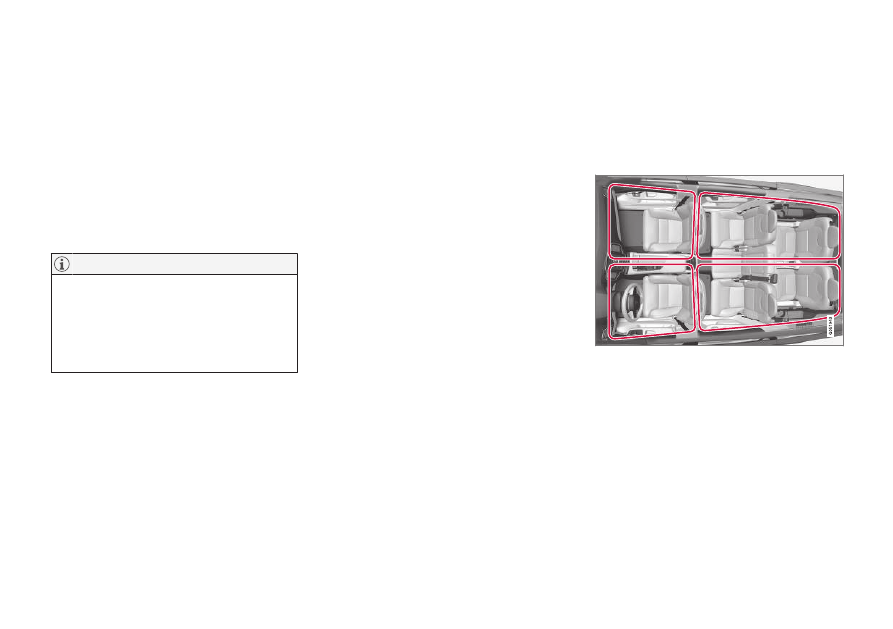
Climate zones
The vehicle is divided into climate zones to
make it possible to set different temperatures
for different parts of the passenger compart-
ment.
4-zone climate system
Climate zones with 4-zone climate system.
In 4-zone climate systems, the passenger
compartment temperature can be set sepa-
rately for the left and right sides of the vehicle,
and for the front and rear seats.
Related information
•
-------------------------------------------------------------------------------------------------------------------------------------------------------------
CLIMATE CONTROL
* Option/accessory.
209
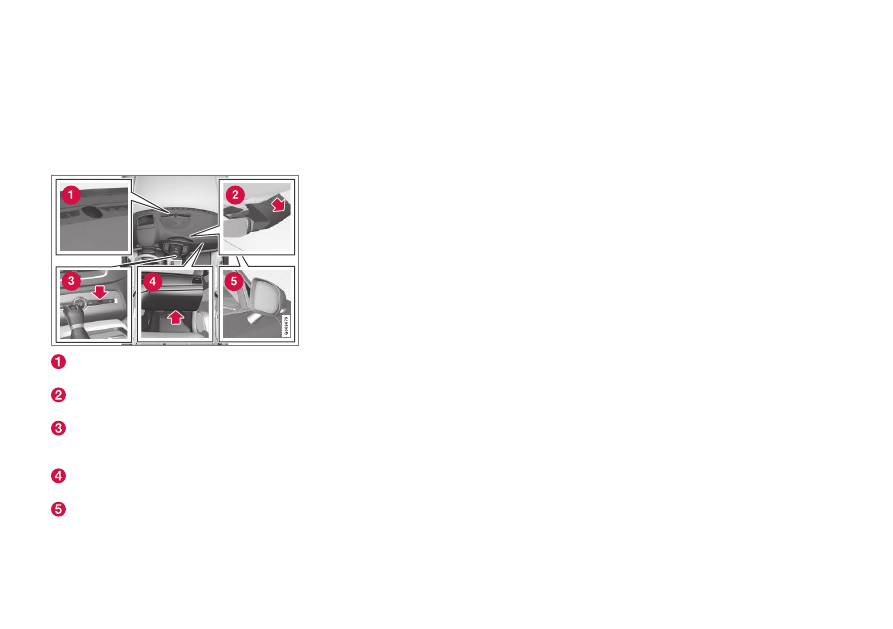
Climate control sensors
The climate system has a number of sensors
to help regulate the climate settings in the
vehicle. Do not cover or block the sensors
with clothing or other objects.
Location of the sensors
Sunlight sensors - on the upper side of the
dashboard.
Humidity sensor - in the rearview mirror
console.
Passenger compartment temperature sen-
sor - near the buttons in the center con-
sole.
Airborne particulate matter sensor
*
– on
the underside of the glove compartment.
Ambient temperature sensor - in the right-
side door mirror.
On vehicles equipped with the Interior Air
Quality System
*
, there is also an air quality
sensor in the climate system's air intake.
Related information
•
•
Perceived temperature
The climate control system regulates the cli-
mate in the passenger compartment based
on perceived temperature, not actual tem-
perature.
The selected passenger compartment tem-
perature is based on the physical perception of
the current ambient temperature, airflow
speed, humidity, sunlight in the passenger
compartment, etc.
The system has a sunlight sensor that detects
which side of the vehicle the sunlight is shin-
ing on and adjusts the temperature accord-
ingly. This means that the temperature of the
air coming out of the vents may be different
for the left and right sides, even if the tem-
perature setting is the same for both sides.
Related information
•
-------------------------------------------------------------------------------------------------------------------------------------------------------------
Нет комментариевНе стесняйтесь поделиться с нами вашим ценным мнением.
Текст