Volvo XC90 Recharge Plug-in Hybrid (2021 year). Manual in english — page 28
STARTING AND DRIVING
473
11. Start your vehicle's engine. If the engine
does not start, allow an additional 10
minutes of charging time and then try to
start the engine again.
When the engine is started under normal
conditions, the vehicle's electrical drive
motor is prioritized – the gasoline engine
remains off. This means that after the start
knob has been turned clockwise, the elec-
tric motor has "started" and the vehicle is
ready to be driven. Start of the electric
motor is indicated by the indicator lights on
the instrument panel going out and its pre-
selected theme illuminating.
Do not touch the connections between the
cable and the vehicle during the start
attempt. Risk of sparking.
12. Remove the jumper cables in the reverse
order
‒
first the black cables and then the
red cables.
Make sure that none of the clamps of the
black jumper cables come into contact
with either vehicle's positive (+) jump start
terminals or either of the red jumper
cable's connected clamps.
WARNING
PROPOSITION 65 WARNING!
Battery
posts, terminals, and related accessories
contain lead and lead compounds, chemi-
cals known to the state of California to
cause cancer and reproductive harm. Wash
hands after handling.
WARNING
•
Batteries generate hydrogen gas,
which is flammable and explosive.
•
Do not connect the jumper cable to
any part of the fuel system or to any
moving parts. Avoid touching hot
manifolds.
•
Battery fluid contains sulfuric acid. Do
not allow battery fluid to contact eyes,
skin, fabrics or painted surfaces.
•
If contact occurs, flush the affected
area immediately with water. Obtain
medical help immediately if eyes are
affected.
•
Never expose the battery to open flame
or electric spark. Do not smoke near
the battery. Failure to follow the
instructions for jump starting can lead
to injury.
The vehicle cannot be started if the hybrid
battery is discharged.
Related information
•
•
•
Adjusting the steering wheel (p. 206)
•
-------------------------------------------------------------------------------------------------------------------------------------------------------------
STARTING AND DRIVING
* Option/accessory.
474
Retractable hitch
*
The retractable hitch is designed to be used
to tow a trailer or mount a bicycle holder. The
hitch can be easily retracted or extended as
needed. When retracted, the hitch is com-
pletely concealed.
WARNING
Follow the instructions for folding in/out
the towbar carefully.
WARNING
Do not press the operating button for the
towbar if a trailer or accessory is attached
to the towbar.
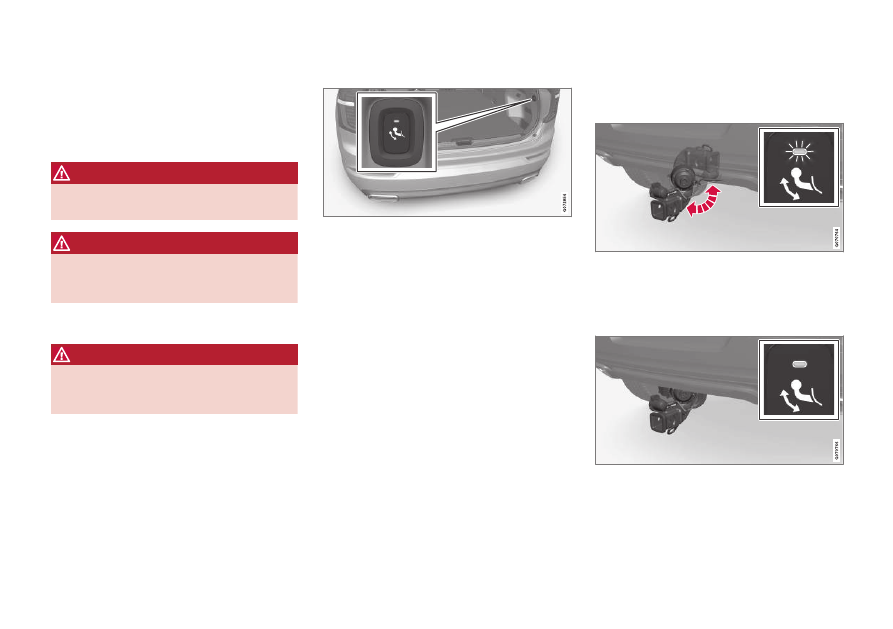
Folding out the hitch
WARNING
Do not stand near the center of the bumper
behind the vehicle when folding out the
towbar.
1.
Open the tailgate. There is a button for
operating the hitch on the right-hand side
at the rear of the cargo compartment.
Steady orange illumination from the indi-
cator light in the button shows that the
folding function is active.
2. Press the button and release – pressing
too long on the button may prevent the
hitch from folding out.
> The hitch will fold out and down to an
unlocked position – the indicator lamp
will flash orange. The hitch is ready to
be moved to the locked position.
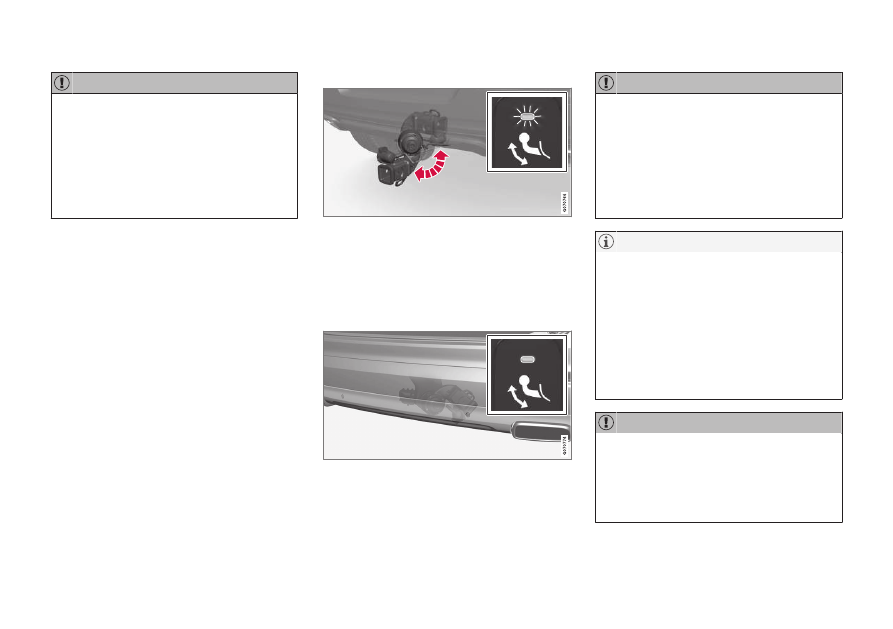
3.
Move the hitch to its end position, where it
will lock in place – the indicator lamp will
glow steadily orange.
> The hitch is now ready for use.
-------------------------------------------------------------------------------------------------------------------------------------------------------------
STARTING AND DRIVING
}}
475
When the towbar is activated by pressing
the button and put in unlocked position:
Wait at least 2 seconds before moving the
towbar to locked position. If the towbar
does not remain in locked position, wait a
few more seconds and try again.
Do not kick the towbar.
Retracting the hitch
1. Open the tailgate. Press the button on the
rear, right-hand side of the cargo compart-
ment and release. Pressing too long on
the button may prevent the hitch from
folding in.
> The hitch will automatically fold down
to the unlocked position and the indica-
tor light in the button will flash orange.
2.
Secure the hitch into position by pushing it
back to its retracted position under the
bumper, where it will lock into place.
> The indicator light in the button will
now glow steadily if the hitch is cor-
rectly locked in the retracted position.
When the towbar is activated by pressing
the button and put in unlocked position:
Wait at least 2 seconds before moving the
towbar to locked position. If the towbar
does not remain in locked position, wait a
few more seconds and try again.
Do not kick the towbar.
Power save mode will be activated after a
short time and the indicator light will go
out. The system can be reactivated by clos-
ing and then reopening the tailgate. This
applies to both folding in and folding out
the towbar.
If the vehicle's electrical system has
detected an attached trailer, the indicator
light will no longer glow steadily.
Make sure that there is no adapter in the
electrical socket or removable ball section
mounted when the towbar is folded in.
Remove the bicycle holder from the towbar
when it is not being used.
-------------------------------------------------------------------------------------------------------------------------------------------------------------
||
STARTING AND DRIVING
* Option/accessory.
476
Hitch-mounted bicycle holder
The weight limits for trailers and towbar-
mounted accessories differ. A separate
limit applies for each. This towbar is only
designed for towbar-mounted bicycle hold-
ers. All other accessories are not suitable.
Before mounting the bicycle on the bicycle
holder, keep in mind that:
•
The maximum weight for the bicycle
holder including bicycles is 130 lbs/60 kg.
For example: holder 40 lbs + bicycle 30
lbs + bicycle 30 lbs = 100 lbs total > OK
•
Do not mount more than two bicycles
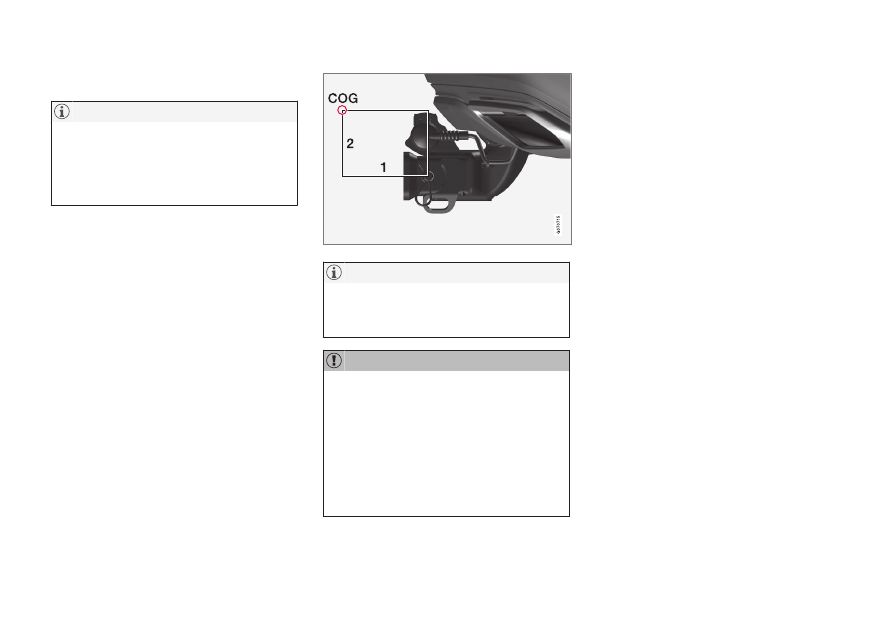
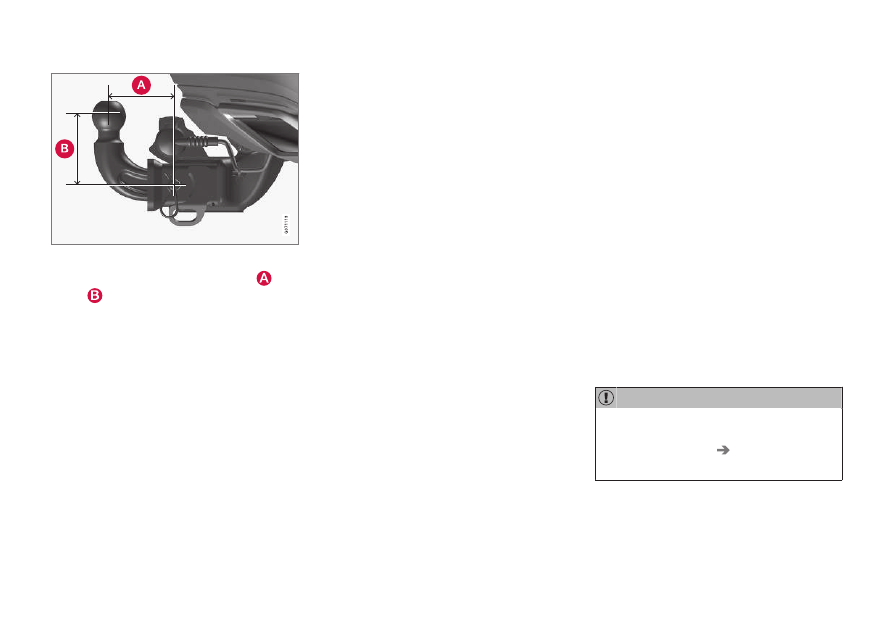
The center of gravity should not exceed the
dimensions:
1. 613 mm (24 1/7 ")
2. 642 mm (25 2/7 ")
Volvo recommends only using Volvo origi-
nal accessories. Follow the instructions
supplied with the product.
•
Never use towbar adapters or towbar
extenders.
•
Only use ball mount for towing. Do not
mount accessories directly on the ball
mount. Use accessories designed to
be mounted in the towbar's square
bracket. Do not use accessories
designed to be secured around the ball
mount.
Loading the bicycle holder
The greater the distance between the load and
the bicycle holder, the greater the load on the
hitch and on the vehicle.
Keep the following points in mind:
•
Mount the heaviest bicycle closest to the
vehicle.
•
If possible, mount the bicycles symmetri-
cally, as close as possible to the center of
the vehicle.
•
Remove loose objects from the bicycle,
such as baskets, batteries or child seats.
This will help reduce the load on the hitch
and the bicycle holder.
•
Do not place a cover over the bicycle as
this could lead to increased load on the
hitch.
Related information
•
•
-------------------------------------------------------------------------------------------------------------------------------------------------------------
STARTING AND DRIVING
}}
* Option/accessory.
477
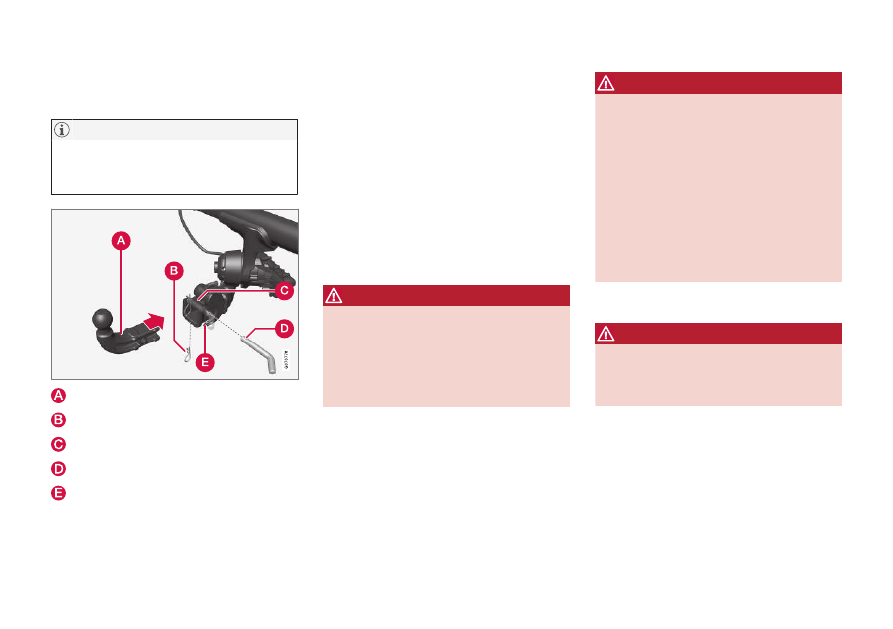
Detachable towbar
*
Volvo recommends the use of Volvo towbars
that are specially designed for the vehicle.
The optional detachable trailer hitch may
not be available in all markets or on all
models. Consult your Volvo retailer.
Ball holder
Cotter pin
Towbar assembly
Locking bolt
Safety wire attachment bracket
Installing the ball holder
1. If necessary, remove the cotter pin from
the locking bolt and slide the locking bolt
out of the towbar assembly.
2. Slide the ball holder into the towbar
assembly.
3. Align the hole in the ball holder with the
one in the towbar assembly.
4. Slide the locking bolt through the towbar
assembly/ball holder.
5. Insert the cotter pin in the hole at the end
of the locking bolt.
WARNING
•
Be sure the towbar is securely locked
in position before attaching anything to
it.
•
Always attach the trailer's safety wire
securely to the towbar's safety wire
attachment bracket.
Removing the ball holder
1. Remove the cotter pin from the locking
bolt and slide the locking bolt out of the
ball holder/towbar assembly.
2. Pull the ball holder out of the towbar
assembly.
WARNING
Damage may occur on the towbar if it is
not used correctly or if incorrect or faulty
accessories are used, such as:
•
Overloading of accessory.
•
Use of incorrect or faulty accessory.
•
Accessory used for an incorrect pur-
pose.
•
Use of weight-distributing towing sys-
tem.
•
Incorrectly positioned ball mount; see
geometric limits for the towbar.
Stowing the ball holder
WARNING
When not in use, the detachable ball holder
should always be properly stowed in the
designated location under the floor of the
cargo compartment.
Driving with a trailer
When towing a trailer, the original ball holder
or equivalent should be used.
-------------------------------------------------------------------------------------------------------------------------------------------------------------
||
STARTING AND DRIVING
* Option/accessory.
478
The ball mount must fall within the geometric
limits for the towbar, for both distance
and
height
. Geometric limits are described on a
type plate located on the towbar.
Related information
•
•
Driving with a trailer (p. 478)
•
Towing capacity and tongue weight
(p. 680)
Driving with a trailer
There are a number of things to consider
when towing a trailer, such as the towbar, the
trailer and how the load is distributed in the
trailer.
Load-carrying capacity is determined by the
vehicle's curb weight. The total weight of all
passengers and any installed accessories, e.g.
towbar, reduces the vehicle's load-carrying
capacity by the corresponding amount.
•
Towbars used on the vehicle must be
approved for the applicable use.
•
Distribute the load on the trailer so that
the weight on the towbar complies with
the specified maximum towball weight.
The tongue weight is calculated as part of
the vehicle's payload.
•
Increase the tire pressure to the recom-
mended pressure for a full load.
•
The engine is subjected to more load than
usual when towing a trailer.
•
Towing a trailer affects the vehicle's han-
dling, durability and driving economy.
•
Do not drive with a heavy trailer when the
vehicle is very new. Wait until the mileage
has reached at least 1000 km (620 miles).
•
On long and steep downgrades, the vehi-
cle's brakes are subjected to much more
load than usual. When manually shifting,
downshift and adapt speed accordingly.
•
Follow applicable regulations regarding
permitted speed and weight.
•
Drive slowly when towing a trailer up a
long and steep incline.
•
The maximum trailer weights given only
apply to altitudes up to 1000 meters
(3280 feet) above sea level. At higher alti-
tudes, engine power (and thus the vehi-
cle's climbing ability) is decreased due to
the reduced air density, and the maximum
trailer weight must therefore be reduced.
The weight of the vehicle and trailer must
be decreased by 10% for each additional
1000 m (3280 feet) or part thereof.
•
Avoid driving with a trailer on inclines of
more than 12%.
•
Avoid overloading and other incorrect use.
•
The trailer's brakes must be balanced with
the vehicle's brakes to help ensure safe
stops (follow applicable local regulations).
When towing a trailer using a vehicle with
pneumatic suspension
*
, use the
Suspension Control
Dynamic
setting
in the Individual drive mode.
-------------------------------------------------------------------------------------------------------------------------------------------------------------
STARTING AND DRIVING
}}
* Option/accessory.
479
•
Bumper-attached trailer hitches must
not be used on Volvos, nor should
safety chains be attached to the
bumper.
•
Trailer hitches attaching to the vehicle
rear axle must not be used.
•
Never connect a trailer's hydraulic
brake system directly to the vehicle
brake system, nor a trailer's lighting
system directly to the vehicle lighting
system. Consult your nearest author-
ized Volvo retailer for correct installa-
tion.
•
When towing a trailer, the trailer's
safety chains or wire must be correctly
fastened to the attachment points pro-
vided in the trailer hitch on the vehicle.
The safety chain or wire must never be
fastened to or wound around the tow-
ing ball.
The optional detachable trailer hitch may
not be available in all markets or on all
models. Consult your Volvo retailer.
Extreme weather conditions, towing a
trailer, high altitude and lower fuel grade
than recommended are factors that can
significantly increase the vehicle's fuel con-
sumption.
Trailer weights
WARNING
Please adhere to the recommendations
provided for trailer weight. If the recom-
mendations are not followed, the vehicle
and trailer may be difficult to control during
evasive maneuvers and braking.
The specified maximum trailer weights are
those permitted by Volvo. National vehicle
regulations may set additional restrictions
on trailer weight and speed. The trailer
hitches may be certified for higher towing
weights than the vehicle is permitted to
tow.
Self-leveling suspension
*
The vehicle's self-leveling system attempts to
keep the vehicle at a constant level, regardless
of load (up to the maximum permitted weight).
When the vehicle is stationary, the rear end of
the vehicle will be slightly lowered, which is
normal.
Driving in hilly terrain or hot weather
In certain conditions, there is a risk of over-
heating when driving with a trailer. If overheat-
ing of the engine and drive system is detected,
a warning symbol will illuminate in the instru-
ment panel and a message will appear.
The automatic transmission adapts the gear
for the current load and engine speed.
Steep inclines
Do not lock the automatic transmission into a
higher gear than what the engine can handle
‒
it is not always preferable to drive in high
gears at low rpm.
Parking on a hill
1. Depress the brake pedal.
2. Apply the parking brake.
3. Put the gear selector in
P
.
4. Release the brake pedal.
Put chocks behind the wheels when the vehi-
cle is parked on a hill with a trailer attached.
Starting on a hill
1. Depress the brake pedal.
2. Put the gear selector in
D
.
3. Release the parking brake.
4. Release the brake pedal and start driving.
-------------------------------------------------------------------------------------------------------------------------------------------------------------
||
STARTING AND DRIVING
* Option/accessory.
480
Related information
•
•
Checking trailer lights (p. 481)
•
Towing capacity and tongue weight
(p. 680)
•
Overheating of engine and transmission
(p. 470)
•
Trailer Stability Assist
*
Trailer Stability Assist (TSA
16
) is part of the
ESC
17
stability system and is a function
designed to help stabilize a vehicle that is
towing a trailer when the vehicle and trailer
have begun to sway. The function is added
when installing a towbar. Contact a Volvo
retailer for more information.
Reasons for swaying
A vehicle towing a trailer may begin to sway
for various reasons. Normally this only occurs
at high speeds. However, if the trailer is over-
loaded or unevenly distributed, e.g. too far
back, there is a risk of swaying even at low
speeds.
Swaying may be caused by factors such as:
•
The vehicle and trailer are hit by a sudden,
strong crosswind.
•
The vehicle and trailer are traveling on an
uneven road or over a bump.
•
Sudden movements of the steering wheel.
Once swaying has begun, it can be difficult or
impossible to stop it. This makes the vehicle
and trailer difficult to control and there is a risk
of swerving into oncoming traffic or driving off
the road.
Trailer Stability Assist function
Trailer Stability Assist continuously monitors
the vehicle's movements, particularly lateral
movements. If swaying is detected, the brakes
are applied individually on the front wheels,
which has a stabilizing effect on the vehicle
and trailer. This is often enough to enable the
driver to regain control of the vehicle.
If the Trailer Stability Assist function's first
attempt is not adequate to stop the swaying
motion, the brakes are applied on all wheels
and engine power is temporarily reduced. As
the swaying motion begins to decrease and
the vehicle and trailer have once again
become stable, TSA stops regulating the
brakes/engine power and the driver regains
control of the vehicle.
Trailer Stability Assist is deactivated if the
driver activates
ESC Sport Mode
in the
center display's menu system.
Trailer Stability Assist may not intervene if the
driver tries to compensate for the swaying
motion by moving the steering wheel rapidly,
because the system will then not be able to
determine if it is the trailer or the driver caus-
ing the swaying.
16
Trailer Stability Assist
17
Electronic Stability Control
-------------------------------------------------------------------------------------------------------------------------------------------------------------
STARTING AND DRIVING
}}
481
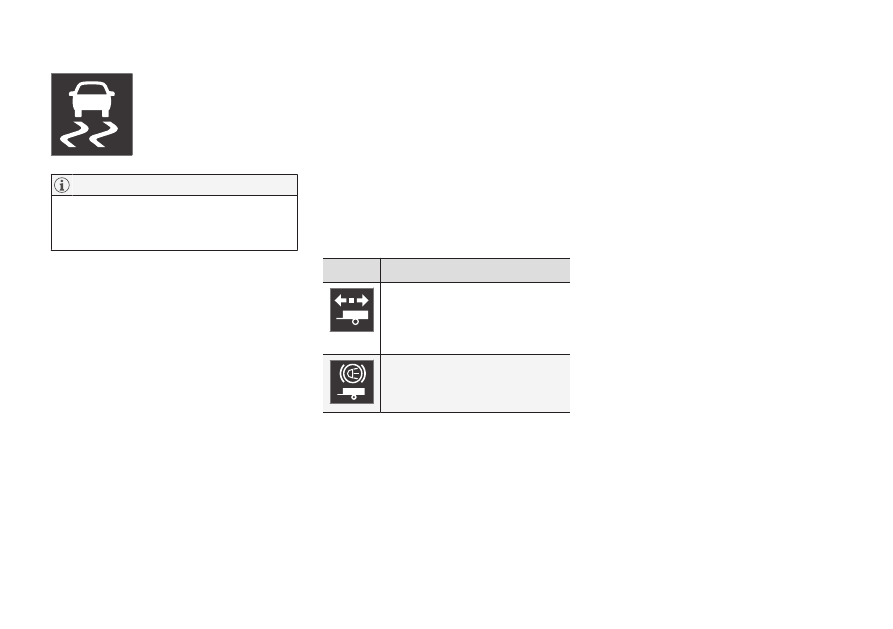
When Trailer Stability Assist
is activated, the ESC symbol
is displayed in the instrument
panel.
A vehicle software update is required when
a towbar is retrofitted. Contact a Volvo
retailer.
Related information
•
Driving with a trailer (p. 478)
•
Electronic Stability Control (p. 281)
Checking trailer lights
When connecting a trailer, make sure that all
of the lights on the trailer are functioning
before starting to drive.
Trailer turn signals and brake lights
If one or more of the turn signals or brake
lights on the trailer is not working, a symbol
and message will be displayed in the instru-
ment panel. The other lights on the trailer
must be checked manually by the driver before
the vehicle is driven.
Symbol Message
•
Trailer turn indicator
Right
turn indicator malfunction
•
Trailer turn indicator
Left
turn indicator malfunction
•
Trailer brake light
Malfunc-
tion
If any of the trailer's turn signal lights is not
working, the turn signal symbol in the instru-
ment panel will also flash more quickly than
normal.
Trailer rear fog light
When a trailer is connected, the vehicle's rear
fog light may not illuminate and rear fog light
functionality is instead transferred to the
trailer. If this is the case, check to see if the
trailer is equipped with a rear fog light before
activating the vehicle's fog lights when driving
with a trailer to help ensure safe operation.
-------------------------------------------------------------------------------------------------------------------------------------------------------------
||
STARTING AND DRIVING
* Option/accessory.
482
Checking trailer lights
*
Automatic check
When the trailer has been connected to the
vehicle's electrical system, its lights can be
checked by automatically activating them.
This function helps the driver check that the
trailer's lights are functioning correctly before
starting to drive.
In order to perform this check, the vehicle
must be switched off.
1. When a trailer is connected to the towbar,
the message
Automatic Trailer Lamp
Check
will appear in the instrument panel.
2. Acknowledge the message by pressing
the
O
button on the right-side steering
wheel keypad.
> The light check will begin.
3. Get out of the vehicle to perform the
check.
> All of the lights on the trailer will begin
flashing, and then illuminate separately
one at a time.
4. Visually check that all of the trailer's lights
are functioning correctly.
5. After a short time, all of the trailer's lights
will start flashing again.
> The light check is completed.
Disabling the automatic check
The automatic light check can be disabled in
the center display.
1. Tap
Settings
in the Top view.
2. Tap
My Car
Lights and Lighting
.
3. Deselect
Automatic Trailer Lamp
Check
.
Manual check
If the automatic check has been disabled, the
check can be started manually.
1. Tap
Settings
in the Top view.
2. Tap
My Car
Lights and Lighting
.
3. Select
Manual Trailer Lamp Check
.
> The light check will begin. Get out of
the vehicle to perform the check.
Related information
•
Driving with a trailer (p. 478)
Towing using a towline
This section refers to one vehicle being towed
behind another using a towline.
Never attempt to tow the vehicle behind
another vehicle as this could damage the elec-
tric motor. The vehicle must instead be lifted
onto a tow truck and transported with all four
wheels on the bed or lifting platform of the
truck (no wheels may touch the road).
Towing another vehicle
Towing another vehicle requires a lot of power
- use the
Constant AWD
drive mode. This
helps charge the hybrid battery and improve
the vehicle's driving and roadholding characte-
ristics.
Before towing another vehicle, check applica-
ble speed limit regulations.
Jump starting
Never attempt to tow the vehicle to start the
engine, as this could damage the electric
motor. Use an auxiliary battery if the start bat-
tery's charge level is so low that the engine
cannot be started.
Attempts to tow-start the vehicle could
cause damage to the electrical drive motor
and three-way catalytic converter.
-------------------------------------------------------------------------------------------------------------------------------------------------------------
STARTING AND DRIVING
}}
483
Related information
•
Attaching and removing the towing eyelet
(p. 483)
•
Hazard warning flashers (p. 164)
•
•
Jump starting using another battery
(p. 472)
•
Selecting ignition mode (p. 428)
•
Attaching and removing the
towing eyelet
Use the towing eyelet to tow another vehicle.
Screw the towing eyelet securely into place
in the threaded outlet behind the cover on the
right-hand side of the rear bumper.
If the vehicle is equipped with a towbar,
there is no rear attachment for the towing
eye.
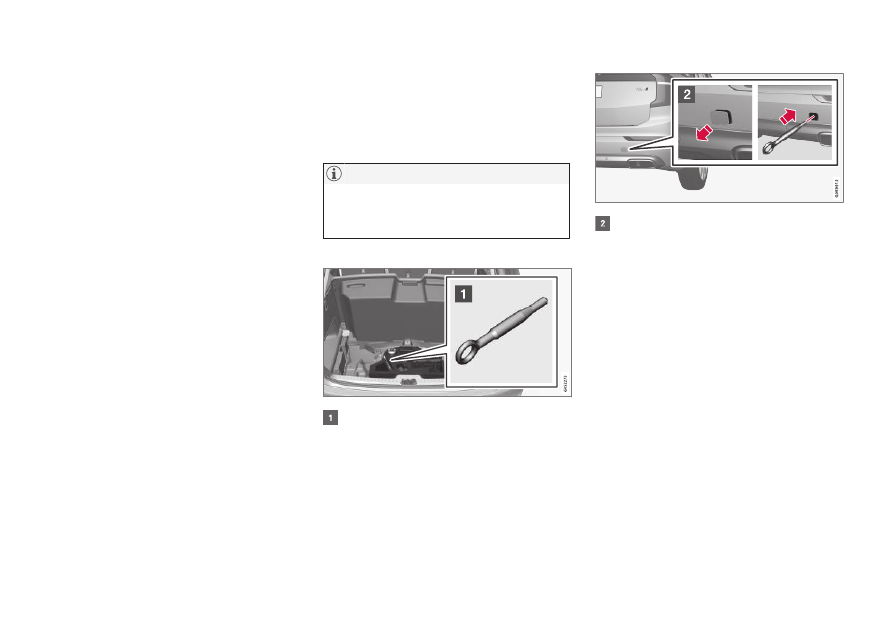
Attaching the towing eyelet
Take out the towing eyelet, which is
stored in a foam block under the floor in
the cargo compartment.
Remove the cover by pressing on the
mark with a finger while folding out the
opposite side/corner.
> The cover turns along its center line and
can then be removed.
-------------------------------------------------------------------------------------------------------------------------------------------------------------
||
STARTING AND DRIVING
* Option/accessory.
484
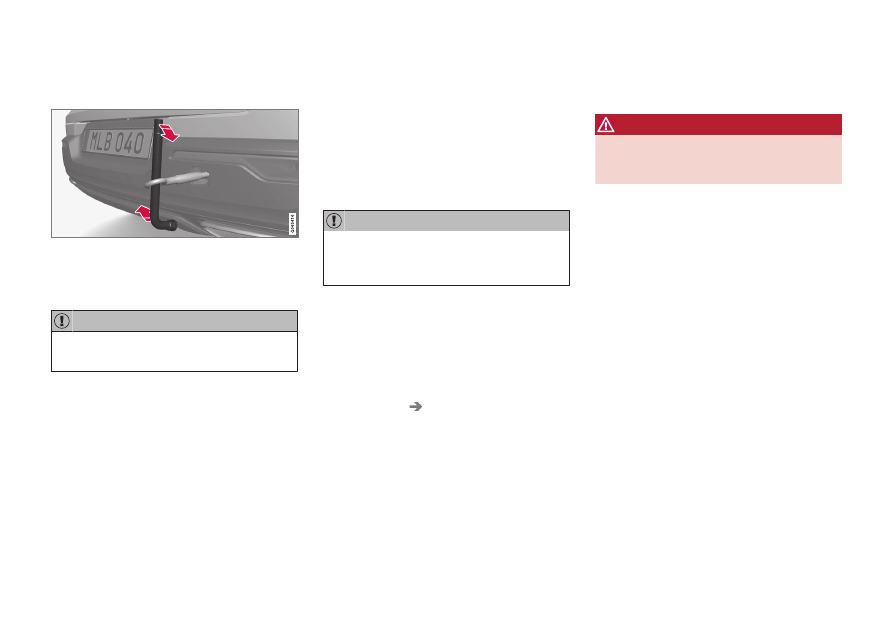
3. Screw the towing eyelet in as far as possi-
ble.
Fasten the eyelet securing by, for example,
inserting a lug wrench
*
through it and
using this as a lever.
It is important that the towing eye is
screwed in securely as far as possible.
Removing the towing eyelet
–
Unscrew the towing eyelet after use and
return it to the foam block.
Replace the cover on the bumper.
Related information
•
Towing using a towline (p. 482)
•
•
Recovery
This section refers to transporting the vehicle
with a tow truck or similar vehicle.
Call a professional towing service for assis-
tance.
In certain conditions, the towing eyelet can be
used to pull the vehicle onto a flatbed tow
truck.
Note that the vehicle must always be
towed raised with all wheels on the tow
truck.
For vehicles equipped with leveling con-
trol
*
: If the vehicle is equipped with pneumatic
suspension, this feature must be turned off
before the vehicle is lifted onto a tow truck.
Turning off the function in the center display.
1. Tap
Settings
in the Top view.
2. Tap
My Car
Parking Brake and
Suspension
.
3. Select
Disable Leveling Control
.
The vehicle's location and ground clearance
determine if it can be lifted onto a tow truck. If
the incline of the tow truck is too steep or if
the ground clearance under the vehicle is
insufficient, attempting to pull it up may result
in damage. In this case, the vehicle should
only be lifted with the tow truck's lifting equip-
ment.
WARNING
No person or object should be behind the
tow truck when the vehicle is lifted onto
the bed of the truck.
Related information
•
-------------------------------------------------------------------------------------------------------------------------------------------------------------
STARTING AND DRIVING
}}
* Option/accessory.
485
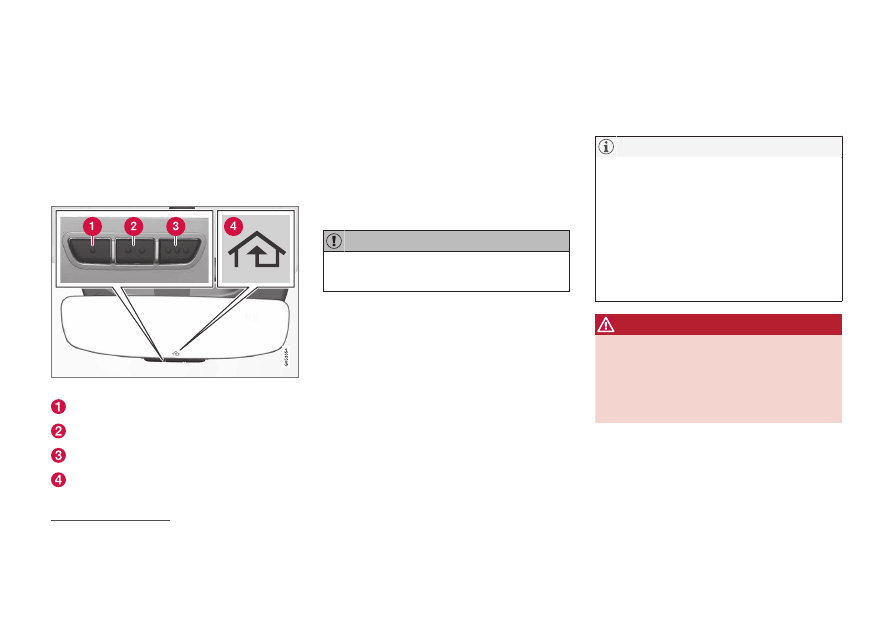
HomeLink
®
*
18
HomeLink
®
19
is a programmable remote con-
trol, integrated in the vehicle electrical sys-
tem, that can control up to three different
devices (e.g. garage door opener, alarm sys-
tem, outdoor and indoor lighting) and thereby
replace the remote controls for these.
General
The illustration is generic – the design may vary.
Button 1
Button 2
Button 3
Indicator light
HomeLink
®
is delivered integrated in the rear-
view mirror. The HomeLink
®
panel consists of
three programmable buttons and an indicator
light in the mirror.
For more information about HomeLink
®
,
please visit: homelink.com or call
1–800–355–3515.
Save the original remote controls for future
programming (e.g. for use in another vehicle).
The button programming should be cleared
if the vehicle is sold.
Related information
•
•
•
Programming HomeLink
®
*
20
Follow these instructions to program
HomeLink
®
, reset all programming, or pro-
gram individual buttons.
In some vehicles, the ignition must be on
or in the "accessory position" before
HomeLink
®
can be programmed or used. It
can be a good idea to put new batteries in
the remote control being replaced by
HomeLink
®
for faster programming and
better radio signal transmission. The
HomeLink
®
buttons should be reset before
programming.
WARNING
While HomeLink
®
is being programmed,
the garage door or gate being programmed
may be activated. Make sure that no one is
near the door or gate during programming.
When programming a garage door opener,
it is advised to park outside of the garage.
18
Certain markets only.
19
HomeLink and the HomeLink house symbol are registered trademarks of Gentex Corporation.
20
Certain markets only.
-------------------------------------------------------------------------------------------------------------------------------------------------------------
||
STARTING AND DRIVING
486
1. Point the remote control at the
HomeLink
®
button to be programmed and
hold it about 2-8 cm (1-3 inches) from the
button. Do not obstruct the HomeLink
®
indicator light.
Note:
Some remote controls are more
effective at programming HomeLink
®
from
a distance of about 15-20 cm (6-12
inches). Keep this in mind if you experi-
ence any programming difficulties.
2. Press and hold both the remote control
button and the HomeLink
®
button to be
programmed.
3. Do not release the buttons until the indica-
tor light has stopped flashing slowly
(about once a second) and either flashes
quickly (about 10 times a second) or
glows steadily.
>
If the indicator light glows steadily:
Indication that programming is com-
plete. Press the programmed button
twice to activate.
If the indicator light flashes quickly:
The device being programmed with
HomeLink
®
may have a security func-
tion that requires an extra step. Try
pressing the programmed button twice
to see whether the programming
works. Otherwise, continue with the
following steps.
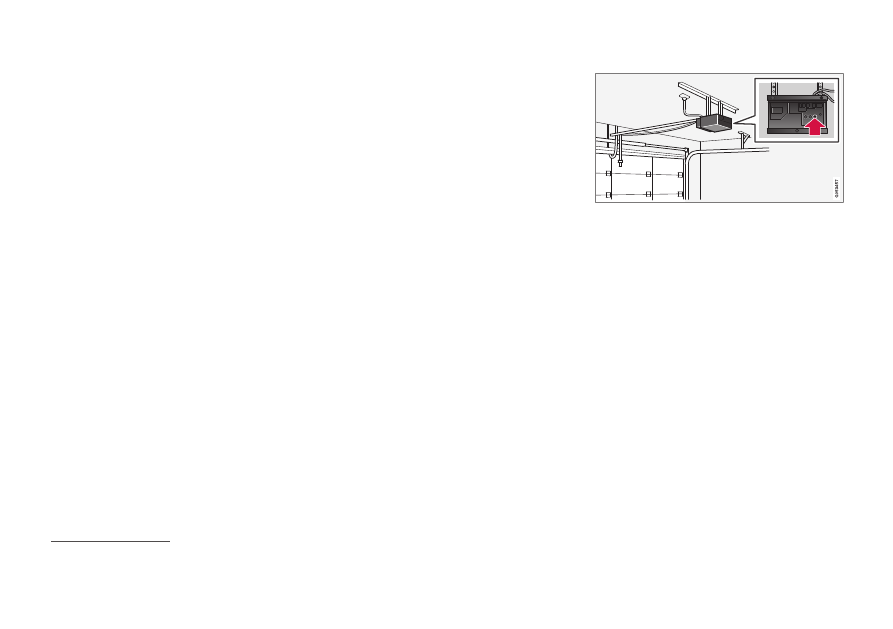
4. Locate the "training" button
21
on the
receiver for the e.g. garage door opener. It
is usually located near the antenna bracket
on the receiver.
5. Press and release the "training" button
once. Programming must be completed
within 30 seconds after pressing the but-
ton.
6. Press and release the HomeLink
®
button
to be programmed. Repeat the press/
hold/release sequence a second time. For
some receivers, the sequence may need to
be repeated a third time.
> Programming is now completed and
the garage door, gate, etc. should now
be activated when the programmed
button is pressed.
If you experience any difficulties programming,
please contact HomeLink
®
or call 1–800–355–3515.
21
The name and color of the button varies depending on the manufacturer.
-------------------------------------------------------------------------------------------------------------------------------------------------------------
STARTING AND DRIVING
* Option/accessory.
487
Programming individual buttons
To program an individual HomeLink
®
button:
1. Press and hold the desired button for
about 20 seconds.
2. When the indicator light on HomeLink
®
starts flashing slowly, it is possible to pro-
gram as usual.
Note:
If the button you are reprogram-
ming does not program with a new
device, it will return to the previously
saved programming.
Resetting the HomeLink
®
buttons
It is only possible to reset all HomeLink
®
but-
tons at once. It is not possible to reset individ-
ual buttons. Individual buttons can only be
reprogrammed.
–
Press and hold the outer buttons (1 and 3)
on HomeLink
®
for about 10 seconds.
> When the indicator light goes from a
steady glow to flashing, the buttons
have been reset and are ready for
reprogramming.
Related information
•
•
•
Using HomeLink
®
*
22
Once HomeLink
®
is programmed, it can be
used instead of the separate remote controls.
Press and hold the programming button. The
garage door, gate, alarm system, etc. will be
activated (this may take several seconds). If
the button is held down for more than 20 sec-
onds, reprogramming will begin. The indicator
light will glow steadily or flash when the but-
ton has been pressed. The original remote
controls may be used concurrently with
HomeLink
®
if desired.
When the ignition is switched off,
HomeLink
®
will be active for at least
7 minutes.
HomeLink
®
cannot be used if the vehicle is
locked and the alarm is armed
*
from the
outside.
WARNING
•
If you use HomeLink
®
to open a garage
door or gate, be sure no one is near the
gate or door while it is in motion.
•
Do not use HomeLink
®
with any
garage door opener that lacks safety
stop and reverse features as required
by U.S. federal safety standards (this
includes any garage door opener model
manufactured before April 1, 1982). A
garage door that cannot detect an
object - signaling the door to stop and
reverse - does not meet current U.S.
federal safety standards. For more
information, contact HomeLink at:
homelink.com.
Related information
•
•
•
22
Certain markets only.
-------------------------------------------------------------------------------------------------------------------------------------------------------------
STARTING AND DRIVING
* Option/accessory.
488
Type approval for HomeLink
®
*
23
FCC (USA) and IC (Canada)
This device complies with FCC rules part 15
and Industry Canada RSS-210. Operation is
subject to the following two conditions: (1)
This device may not cause harmful interfer-
ence, and (2) This device must accept any
interference that may be received including
interference that may cause undesired opera-
tion.
WARNING
The transmitter has been tested and com-
plies with FCC and IC rules. Changes or
modifications not expressly approved by
the party responsible for compliance could
void the user's authority to operate the
device.
24
Type approval for EU
Gentex Corporation hereby declares that
HomeLink
®
Model UAHL5 complies with the
Radio equipment directive 2014/53/EU.
Wavelengths within which the radio equip-
ment operates:
•
433.05MHz-434.79MHz <10mW E.R.P.
•
868.00MHz-868.60MHz <25mW E.R.P.
•
868.70MHz-868.20MHz <25mW E.R.P.
•
869.40MHz-869.65MHz <25mW E.R.P.
•
869.70MHz-870.00MHz <25mW E.R.P.
Certificate holder address: Gentex Corpora-
tion, 600 North Centennial Street, Zeeland MI
49464, USA
For further details, search for support informa-
tion on type approval at volvocars.com
Related information
•
Compass
*
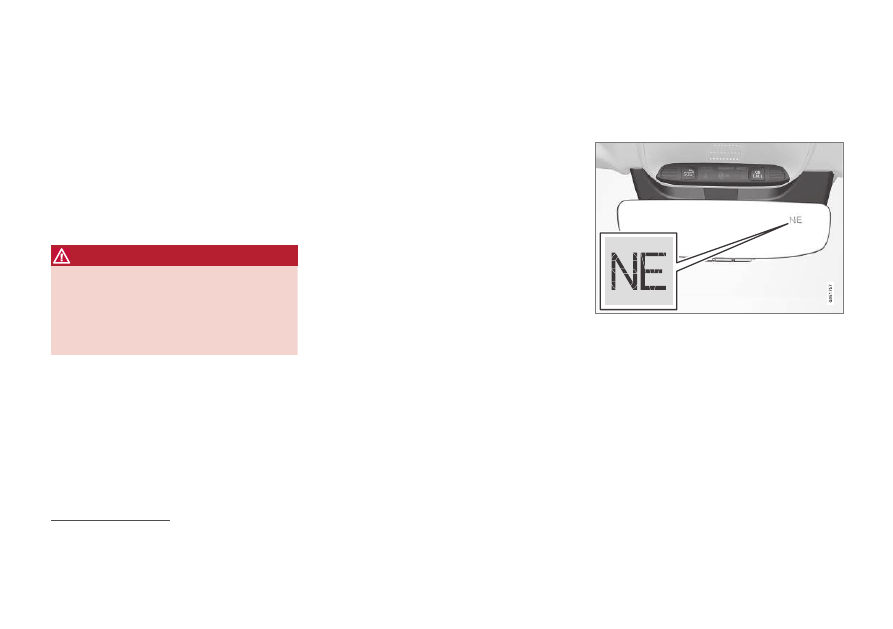
An integrated compass
25
in the upper right
corner of the rearview mirror shows the
direction the vehicle is traveling.
Rearview mirror with compass.
Eight different compass directions are shown
with the abbreviations:
N
(north),
NE
(north-
east),
E
(east),
SE
(southeast),
S
(south),
SW
(southwest),
W
(west) and
NW
(northwest).
Related information
•
Activating and deactivating the compass
•
23
Certain markets only.
24
The term "IC:" before the certification/registration number only signifies that Industry Canada technical specifications were met.
25
Rearview mirror with compass is available as an option only on certain markets and models.
-------------------------------------------------------------------------------------------------------------------------------------------------------------
Нет комментариевНе стесняйтесь поделиться с нами вашим ценным мнением.
Текст