Volvo V90 Twin Engine (2018 year). Instruction — part 28

AUDIO AND MEDIA
479
Digital radio
Digital radio (Digital Audio Broadcasting, DAB)
is a digital broadcasting system for radio. The
radio supports DAB, DAB+ and DMB (Digital
Multimedia Broadcasting).
The radio can be operated
using voice recognition, the
steering wheel keypad or the
centre display.
The digital radio app is
launched from app view in the
centre display.
Digital radio plays back in the same way as FM
and AM, see section "Changing and searching
for radio stations". Besides the options to select
playback from
Stations
,
Favourites
and
Genres
, there is also the option to select play-
back from subchannels and
Ensembles
. An
ensemble is a set of radio channels (a channel
group) broadcasting on the same frequency.
In the cases where the radio channel transmits
its logotype, it is downloaded and shown beside
the station name (download time varies).
DAB subchannel
Secondary components are usually named sub-
channels. These are temporary and can contain
e.g. translations of the main programme into
other languages. Subchannels are indicated with
an arrow symbol in the channel list.
Related information
•
Changing and searching radio stations
(p. 476)
•
Linking between different radio bands FM
and DAB (p. 479)
•
Voice recognition control of radio and media
(p. 124)
•
•
•
Resetting settings in the settings menu
(p. 176)
Linking between different radio
bands FM and DAB
The function enables the digital radio to switch
from a channel with poor or no reception to the
same channel in another channel group (ensem-
ble) with better reception, within DAB and/or
between DAB and FM.
DAB to DAB and DAB to FM linking
1. Press
Settings
in top view.
2. Press
Media
DAB
.
3. Tick/untick
DAB To DAB Handover
and/or
DAB To FM Handover
in order to activate/
deactivate the respective functions.
Related information
•
•
•

AUDIO AND MEDIA
480
Settings for radio
Settings for the different radio bands.
The broadcast of traffic messages etc. can be
temporarily interrupted by tapping on
in the
right-hand steering wheel keypad or by tapping
on
Cancel
in the centre display.
Drag down the top view and select
Settings
Media
and the desired radio band. Activating/
deactivating functions.
FM
•
Show Broadcast Information
— shows
information on programme content, artists,
etc.
•
Freeze Program Name
— select to stop
the programme service name from scrolling
continuously. Instead it freezes after 20 sec-
onds.
•
News
- interrupts the current media play-
back and broadcasts news. Playback of pre-
vious media source is resumed when the
news broadcast is finished.
•
Traffic Announcements
- interrupts the
current media playback and broadcasts infor-
mation about traffic disruptions. Playback of
previous media source is resumed when the
message is finished.
•
Local Interruptions
— interrupts the cur-
rent media playback and broadcasts informa-
tion about traffic disruptions in the neigh-
bourhood. Playback of previous media source
is resumed when the message is finished.
The
Local Interruptions
function is a geo-
graphically restricted version of the
Traffic
Announcements
function. The
Traffic
Announcements
function must be acti-
vated at the same time.
•
Alarm
- interrupts the current media play-
back and sends alerts about major accidents
and disasters. Playback of previous media
source is resumed when the message is fin-
ished.
DAB
•
Sort Services
- selection for how channels
will be sorted. Either alphabetically or by
service number.
•
DAB To DAB Handover
- starts the func-
tion for linking within DAB. If reception of a
radio channel is lost, another channel is
found automatically in another channel group
(ensemble).
•
DAB To FM Handover
- starts the function
for linking between DAB and FM. If reception
of a radio channel is lost, an alternative FM
frequency is searched for automatically.
•
Select Announcements
— select the
types of messages to be received while DAB
is playing. Selected messages will interrupt
the current media playback to play back the
message. Playback of previous media source
is resumed when the message is finished.
Alarm
- interrupts the current media play-
back and sends alerts about major accidents
and disasters. Playback of previous media
source is resumed when the message is fin-
ished.
Traffic Flash
— receives information about
traffic disruptions.
News Flash
— receives news.
Transport Flash
— receives information
about public transport, e.g. ferry and train
timetables.
Warning/Services
— receives information
about incidents of lower significance than
the Alarm function, e.g. power failures.
•
Show Broadcast Information
— select to
show radio text or selected types of radio
text, e.g. artist.
•
Show Program Related Images
— select
whether or not to show images for pro-
grammes on the screen.
Related information
•
•
Symbols in the centre display's status bar
(p. 45)
•
AUDIO AND MEDIA
}}
* Option/accessory.
481
Media player
The media player can play back audio from the
CD player
*, from external audio sources via the
USB port or via Bluetooth. It can also play video
via the USB port.
When the car is connected to the internet, it is
also possible to listen to web radio, audio books
and music services via apps.
The radio is operated in the media player and is
described in a separate section.
The media player is operated
from the centre display, but
several functions can be oper-
ated using the steering wheel's
right-hand keypad or voice con-
trol.
Related information
•
•
Voice recognition control of radio and media
(p. 124)
•
•
•
•
•
•
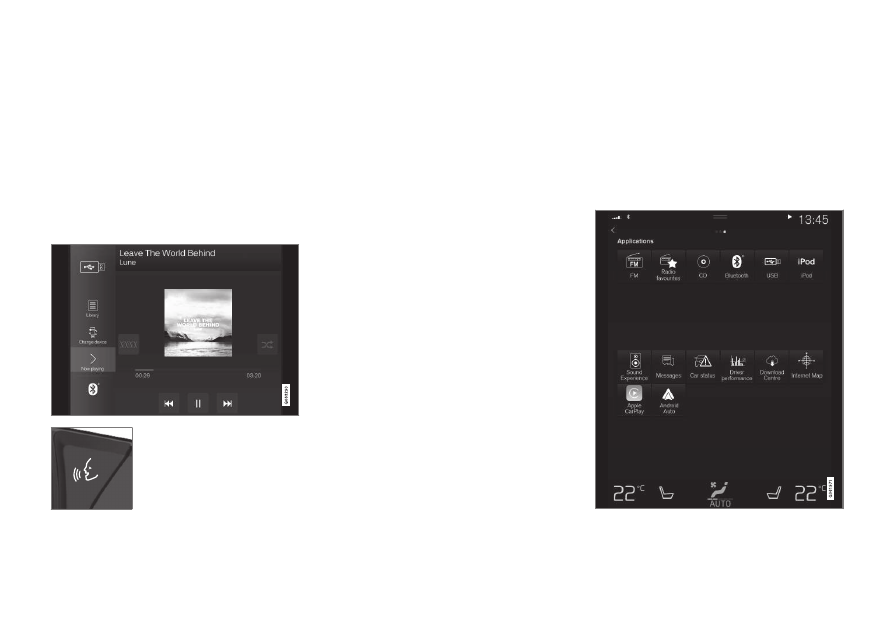
Media playback
The media player is controlled from the centre
display. Several functions can also be operated
using the steering wheel's right-hand keypad or
voice control.
The media player also operates the radio, which
is described in a separate section.
Starting the media source
Application view. (Generic image, basic apps vary by
market and model.)
||
AUDIO AND MEDIA
* Option/accessory.
482
CD
*
1. Insert a CD.
2. Open the app
CD
from the app view.
3. Select what to play back.
> Playback begins.
USB memory
1. Insert the USB memory.
2. Open the app
USB
from the app view.
3. Select what to play back.
> Playback begins.
Mp3 player and iPod
®
To start playback from iPod, use the iPod app
(not USB).
When an iPod is used as audio source, the
car's audio and media system has a menu
structure that is similar to the iPod player's
own menu structure.
1. Connect media source.
2. Start playback from the connected media
source.
3. Open the app (
iPod
,
USB
) from the app
view.
> Playback begins.
Bluetooth connected device
1. Activate Bluetooth in the media source.
2. Connect media source.
3. Start playback from the connected media
source.
4. Open the app
Bluetooth
from the app view.
> Playback begins.
Internet media
1. Connecting the car.
2. Open the app from the app view.
> Playback begins.
video
1. Connect media source.
2. Open the app
USB
from the app view.
3. Tap on the title of the desired item to play
back.
> Playback begins.
Apple CarPlay
Apple CarPlay is described in a separate section.
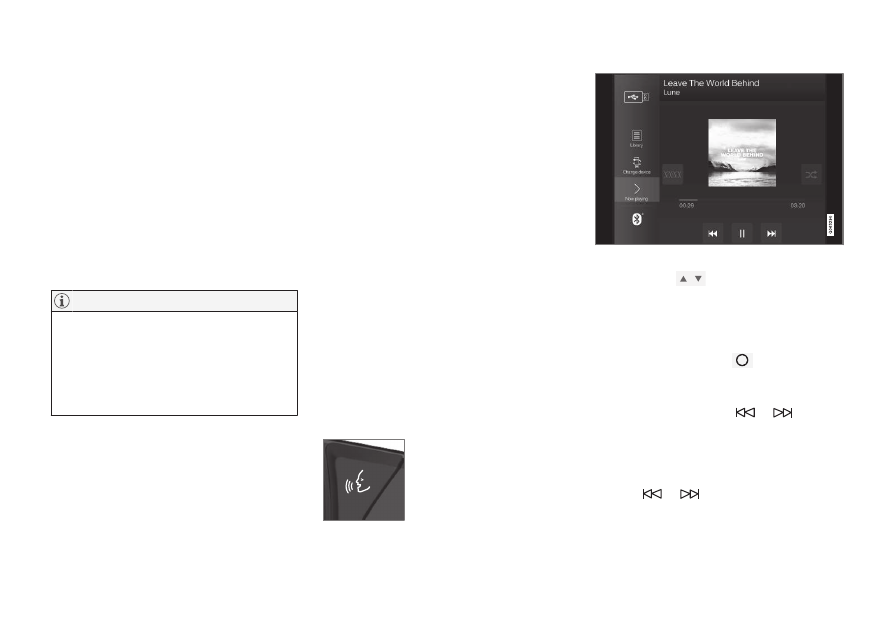
Controlling and changing media
The media player can be oper-
ated by voice recognition, from
the steering wheel keypad or
the centre display.
Volume - turn the control knob under the centre
display or press
on the steering wheel's
right-hand keypad in order to increase or
decrease the volume.
Play/pause - tap on the image belonging to the
song being played back, the physical button
under the centre display or
on the steering
wheel's right-hand keypad.
Change track/song - tap on the desired track in
the centre display, press on
or
under
the centre display or on the steering wheel's
right-hand keypad.
Fast forward/move in time - tap on the time axis
in the centre display and drag sideways, or press
and hold
or
under the centre display or
on the steering wheel's right-hand keypad.
AUDIO AND MEDIA
* Option/accessory.
483
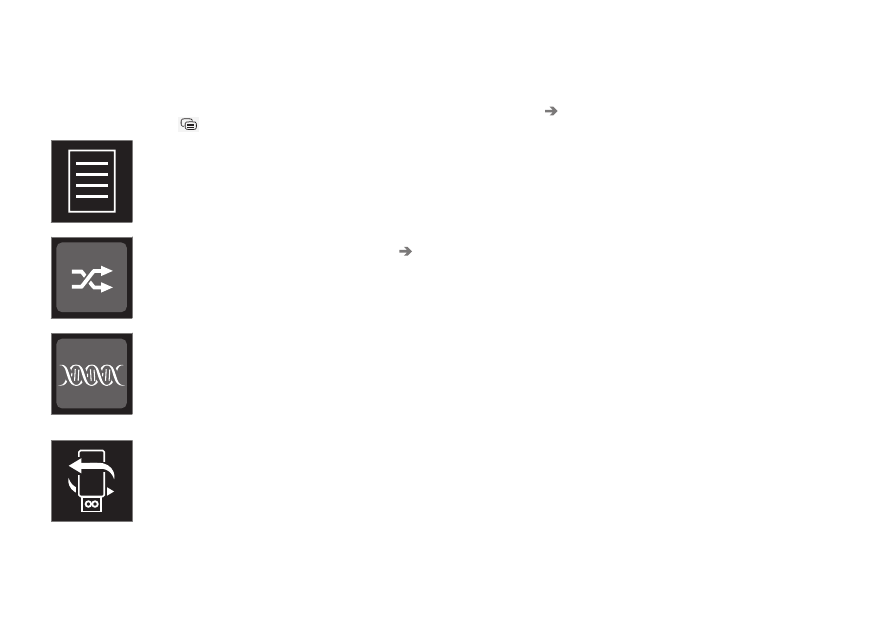
Changing media - select from previous sources
in the app, in the app view, press on the desired
app or select with the steering wheel's right-hand
keypad via the app menu
.
Library
- tap on the button to
play back from the library.
Shuffle
- tap on the button to
shuffle the playback order.
Similar
- tap on the button in
order to use Gracenote to
search for similar music on the
USB device and to create a
playlist from it. The playlist can
contain a maximum of 50
songs.
Change device
- tap on the
button in order to switch
between USB devices when
several are connected.
Settings for video
With the video player in full screen mode, or by
opening the top view and pressing
Settings
Video
, the following can be adjusted:
Audio
Language
,
Off
and
Subtitle Language
.
Playing back DivX
®
This DivX Certified
®
device must be registered in
order to play back purchased DivX Video-on-
Demand (VOD) films.
1. Press
Settings
in top view.
2. Tap
Video
DivX
® VOD
and retrieve the
registration code.
3. Go to vod.divx.com for more information and
to complete the registration.
Related information
•
Using the application menu in the driver dis-
play (p. 112)
•
Voice recognition control of radio and media
(p. 124)
•
•
•
•
Connecting a device via Bluetooth
•
Connecting a device via USB port (p. 486)
•
•
•
•
•
Audio settings for media (p. 487)
•
•
•
•
AUDIO AND MEDIA
484
Gracenote
®
Gracenote identifies artist, album, song titles
and associated images, which are shown during
playback.
Gracenote MusicID
®
is a standard for music rec-
ognition.
1. Press
Settings
in top view.
2. Press
Media
Gracenote
®
.
3. Select settings for Gracenote data:
•
Gracenote
® Online Search
- searches in
Gracenote's online database for playing
media.
•
Gracenote
® Multiple Results
- selects
how to display Gracenote data if there are
more than one search results.
1 - the file's original data are used.
2 - Gracenote data are used.
3 - Gracenote or original data can be
selected.
•
None
- no results are shown.
Updating Gracenote
The content of the Gracenote database is upda-
ted continuously. Download the latest update for
optimal functionality. For information and down-
load, see support.volvocars.com.
Related information
•
•
License agreement for audio and media
(p. 509)
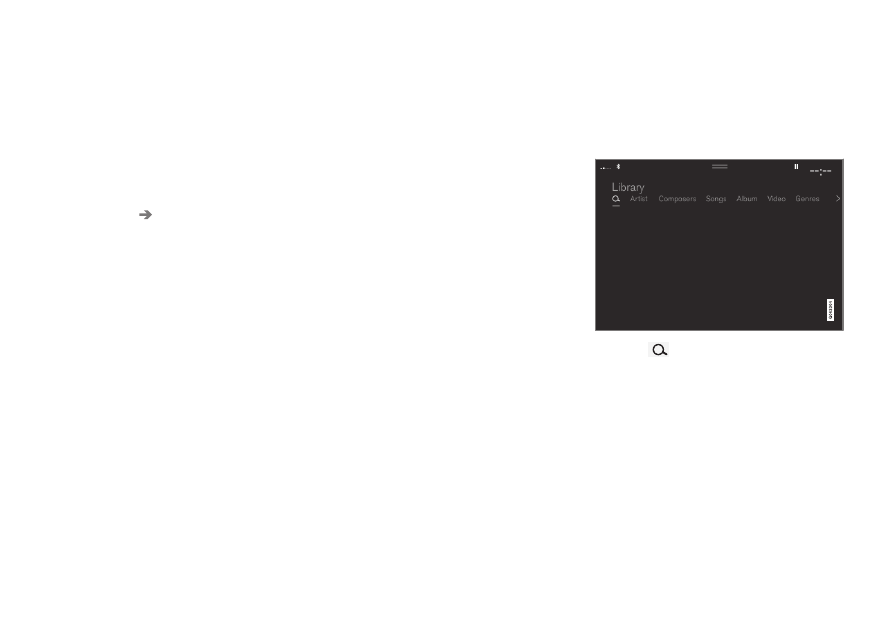
Searching media
It is possible to search by artist, composer, song
titles, album, video, audio book, playlist and, with
an online connected car, podcasts (digital media
via Internet).
1. Press
.
> Search view with keyboard is opened.
2. Enter the search terms.
3. Press
Search
.
> Connected devices are searched and the
search results are listed by category.
Swipe sideways across the screen to show each
category separately.
Related information
•
•

AUDIO AND MEDIA
* Option/accessory.
485
•
Using the keyboard in the centre display
(p. 49)
•
CD player
*
The media player can play back CD discs with
audio files. See technical specifications for sup-
ported formats.
Disc insert and eject slot.
Disc eject button.
Related information
•
•
Voice recognition control of radio and media
(p. 124)
•
•
Technical specifications for media (p. 493)
Media via Bluetooth
®
The car's media player is equipped with
Bluetooth
®
and can wirelessly play audio files
from external devices with Bluetooth
®
, such as
mobile phones and PDAs.
Related information
•
Connecting a device via Bluetooth
•
•
Voice recognition control of radio and media
(p. 124)
•
•
•
AUDIO AND MEDIA
* Option/accessory.
486
Connecting a device via Bluetooth
®
Connect a Bluetooth
®
device with the car in
order to stream media and use as Internet con-
nection if it is available.
Many phones on the market now have wireless
Bluetooth
®
technology, but not all of them are
fully compatible with the car. For compatibility,
see support.volvocars.com.
The procedure for connecting a media device is
the same as for connecting a phone.
Related information
•
•
•
•
Media via USB port
An external audio source, e.g. an iPod
® or MP3
player, can be connected to the audio system.
Devices with rechargeable batteries are
recharged when connected via USB and the igni-
tion is in position I, II or the engine is running.
The content of the external source can be loaded
more quickly if it only consists of compatible for-
mats. Video files can also be played back via the
USB port.
Some MP3 players have their own file systems
that are not supported by the audio system.
Related information
•
Connecting a device via USB port (p. 486)
•
•
Voice recognition control of radio and media
(p. 124)
•
•
•
•
•
Technical specifications for media (p. 493)
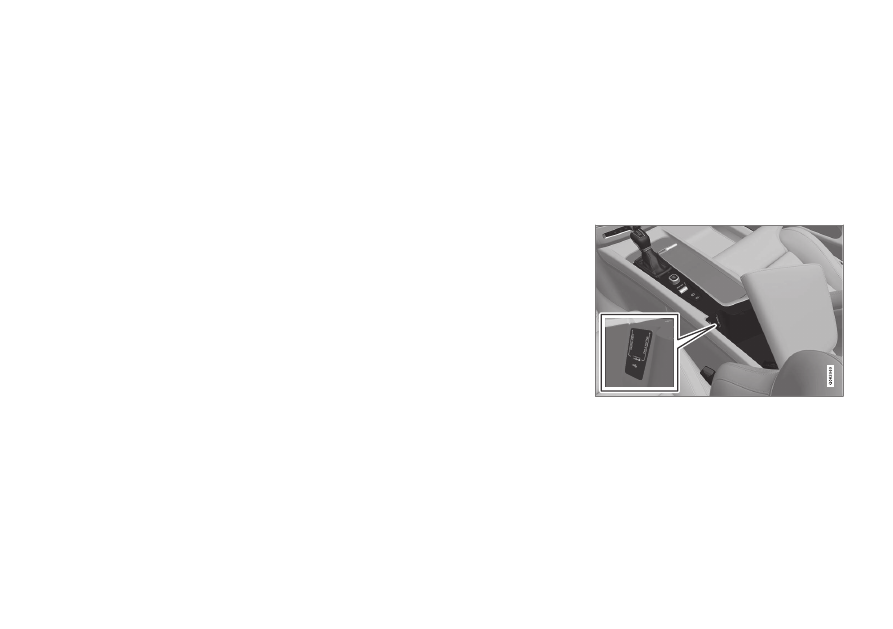
Connecting a device via USB port
An external audio source, e.g. an iPod
®
or MP3
player, can be connected to the audio system via
one of the ports in the tunnel console. Allow the
cable to lie forwards so that it is not trapped
when the lid is closed.
The phone must be connected to the USB port
with white frame (when there are two USB ports)
when using Apple CarPlay
* and Android Auto*.
USB ports in the tunnel console.
Related information
•
•
•
•
AUDIO AND MEDIA
* Option/accessory.
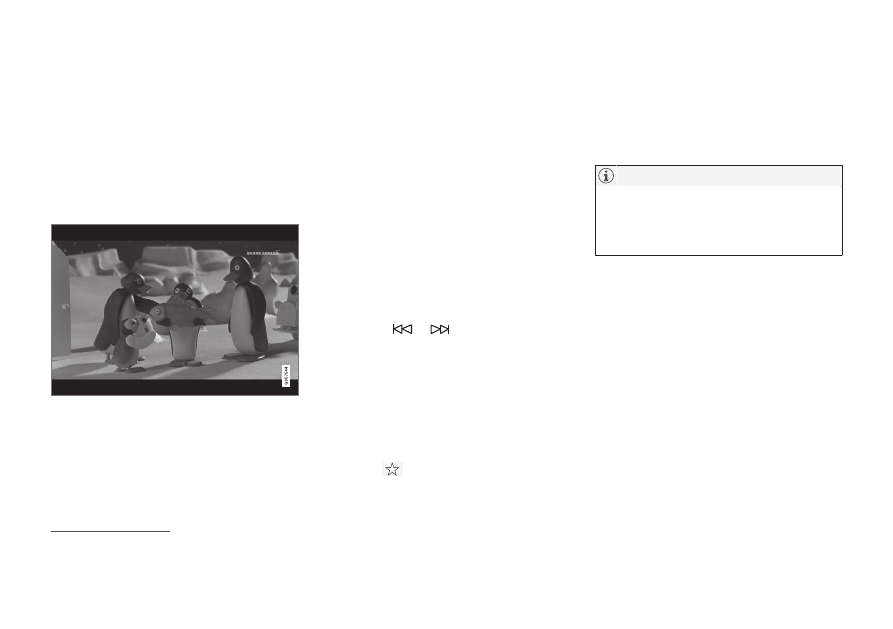
487
video
Videos on USB-connected devices can be
played back using the media player.
No picture is shown when the car starts to move,
but only the audio is played back. The picture is
shown again when the car is stationary.
See section "Technical specifications for media"
for supported video formats.
Related information
•
•
•
Technical specifications for media (p. 493)
Audio settings for media
Changing the audio settings for music and other
playback.
1. Press
Settings
in top view.
2. Tap on
Sound
and select settings:
•
Tone
— personal settings for bass, treble,
equaliser, etc.
•
Balance
- balance between right/left
loudspeakers and balance between front/
rear loudspeakers.
•
System Volumes
– adjusts volume in
the various systems of the car. For exam-
ple,
Voice Control
,
Park Assist
and
Phone Ringtone
.
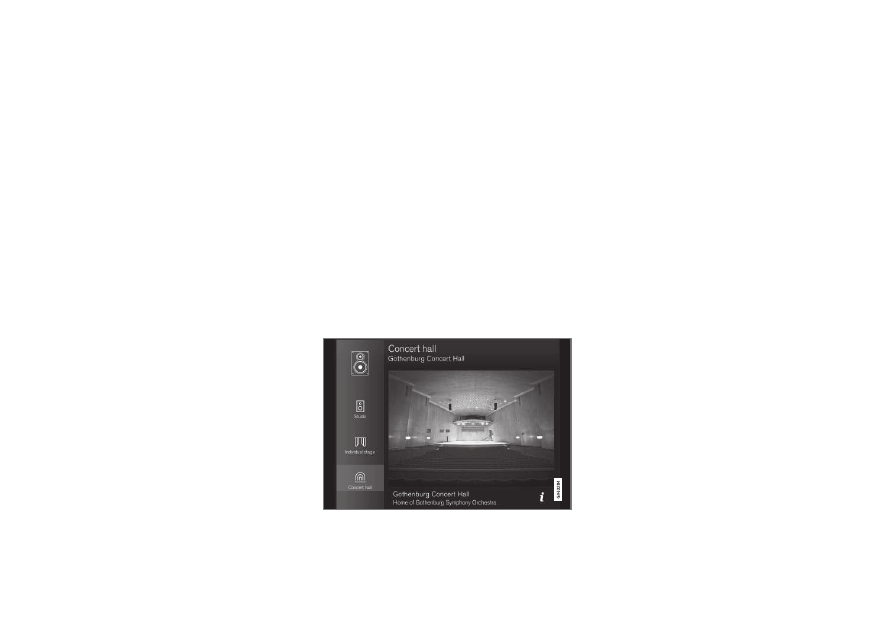
Sound experience
*
Recreating the acoustics from Gothenburg Concert Hall.
With the
Sound Experience
app, there are
more audio playback options, e.g. playback with
concert hall feel. The settings replace any
choices made for audio settings.
Related information
•
•
AUDIO AND MEDIA
* Option/accessory.
488
TV
*
2
No images are shown once the car reaches a
certain speed but the sound will be heard the
whole time. The picture returns once more when
the car is almost or completely stationary.
The TV is controlled from the centre display. Sev-
eral functions can also be controlled from the
right keypad on the steering wheel or with voice
recognition.
Related information
•
Using the TV
*
3
Start the TV
1. Open the app
TV
from the app view.
2. Select a channel.
Change or search for TV channels
The TV automatically searches for the channels
with best reception.
Change the list of visible channels
1. Press
Library
2. Select playback from
TV-channels
or
Favourites
.
3. Select the desired channel.
Change channel from selected list
–
Press on
or
under the centre dis-
play or on the steering wheel keypad.
> The highlight moves up or down one
place in the selected playlist
You can also change stations from the centre
display.
Favourites
A TV channel can be saved as a favourite:
–
Tap on
in order to add/remove a chan-
nel to/from the favourites list.
TV guide
A programme guide is available with information
about TV programmes for up to 48 hours.
–
Tap on
Guide
to show information about TV
programmes.
If the car is moved within the country, e.g.
from city to city, it is not certain that
Favourites
are available since the frequency
may have changed.
Change the format of the TV picture
Tapping on
Picture format
enables you to
choose which format the TV picture should be
shown in.
1.
Auto
- The TV picture is shown in the image
format being transmitted.
2.
Auto fill
- The TV picture is maximised with-
out cropping.
Settings for TV
The option to make certain settings is available,
both in the top view or when TV-viewing takes
place in full screen mode.
2
Applies to certain markets.
3
Applies to certain markets.
AUDIO AND MEDIA
* Option/accessory.
489
With the video player in full screen mode, or by
opening the top view and pressing
Settings
Media
TV
, the following can be adjusted:
•
Subtitle Language
•
Audio Language
The system only supports TV broadcasts in
the countries that broadcast in MPEG-2 or
MPEG-4 format and follow the DVB-T/T2
standard. The system does not support ana-
logue broadcasts.
Related information
•
•
Voice recognition control of radio and media
(p. 124)
•
•
Navigating in the centre display's views
(p. 40)
•
License agreement for audio and media
(p. 509)
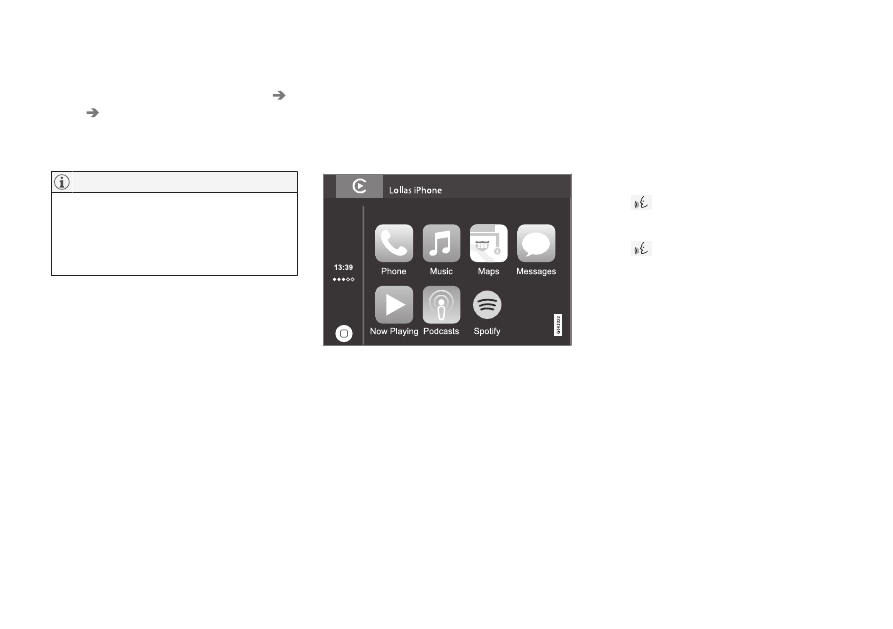
Apple CarPlay
*
Apple CarPlay gives you the option to listen to
music, make phone calls, get directions, send/
receive messages and use Siri, all while you stay
focused on your driving. Apple CarPlay works
with selected Apple devices.
If the car is not already equipped with
Apple CarPlay then it is possible to install it after-
wards. Contact a Volvo dealer to install
Apple CarPlay.
Information about which apps are supported and
which phones are compatible is available on
Apple's website: www.apple.com/ios/carplay/.
Using apps that are not compatible with
Apple CarPlay may sometimes mean that the
connection between an iPhone and the car is
broken. Please note that Volvo is not responsible
for the content in Apple CarPlay.
When using map navigation via Apple CarPlay
there is no guidance in the driver display or head-
up display, but only in the centre display.
The Apple CarPlay apps can be controlled via the
centre display, mobile phone or with the steering
wheel's right-hand keypad (applies to certain
functions). The apps can also be voice-controlled
using Siri. A long press on the steering wheel
button
starts voice control using Siri and a
short press activates the car's own voice control.
If Siri breaks off too early, hold the steering wheel
button
depressed.
By using Apple CarPlay you acknowledge
the following: Apple CarPlay is a service
provided by Apple Inc. under its terms and
conditions. Volvo Cars is thus not
responsible for Apple CarPlay or its
features/applications. When using Apple
CarPlay, certain information from your car
(including its position) is transferred to your
iPhone. In relation to Volvo Cars, you are
fully responsible for your and any others
person’s use of Apple CarPlay.
Related information
•
•
•
AUDIO AND MEDIA
* Option/accessory.
490
Using Apple CarPlay
*
To use Apple CarPlay, Siri voice control must be
activated in your phone. The phone must also
have an Internet connection via Wi-Fi or the
mobile network.
Connect an iPhone and start
Apple CarPlay
Apple CarPlay can only be used if Bluetooth
is deactivated. A phone or media player con-
nected to the car via Bluetooth will therefore
not be available when Apple CarPlay is active.
An alternative Internet source must be used
to connect to the Internet for the car's apps.
Use Wi-Fi or the car's built-in modem
*.
1. Connect an iPhone to the USB port. In the
cases where there are two USB ports, the
one with the white frame around the port
must be used.
2. Read the information in the pop-up message
and then tap on
OK
.
3. Tap on
Apple CarPlay
in the app view.
4. Read the terms and conditions and then tap
on
Accept
to connect.
> The subview with Apple CarPlay is opened
and compatible apps are shown.
5. Tap on the desired app.
> The app starts.
Starting Apple CarPlay
Apple CarPlay is started according to the follow-
ing after an iPhone has been connected.
1. Connect an iPhone to the USB port. In the
cases where there are two USB ports, the
one with the white frame around the port
must be used.
> If the setting for automatic start is
selected - the subview with
Apple CarPlay is opened and compatible
apps are shown.
2. If the subview with Apple CarPlay is not
opened, tap on
Apple CarPlay
in the app
view.
> The subview with Apple CarPlay is opened
and compatible apps are shown.
3. Tap on the desired app.
> The app starts.
Apple CarPlay runs in the background if another
app is started in the same subview. To show
Apple CarPlay in the subview again - tap on the
Apple CarPlay icon in the app view.
Switch the connection between
Apple CarPlay and iPod
Apple CarPlay to iPod
1. Press
Settings
in top view.
2. Continue to
Communication
Apple
CarPlay
.
3. Untick the box for the Apple device that shall
no longer start Apple CarPlay automatically
when the USB cable is connected.
4. Disconnect and connect the Apple device to
the USB port.
5. Open the app
iPod
from the app view.
iPod to Apple CarPlay
1. Tap on
Apple CarPlay
in the app view.
2. Read the information in the pop-up message
and then tap on
OK
.
3. Disconnect and connect the Apple device to
the USB port.
> The subview with Apple CarPlay is opened
and compatible apps are shown.
Related information
•
•
•
Connecting a device via USB port (p. 486)
•
•
AUDIO AND MEDIA
}}
* Option/accessory.
491
Settings for Apple CarPlay
*
Settings for Apple device connected with Apple
CarPlay.
Automatic start
1. Press
Settings
in top view.
2. Continue to
Communication
Apple
CarPlay
and select setting:
•
Tick the box - Apple CarPlay starts auto-
matically when the USB cable is con-
nected.
•
Untick the box - Apple CarPlay does not
start automatically when the USB cable is
connected.
A maximum of 20 Apple devices can be stored in
the list. When the list is full and a new device is
connected the oldest one is deleted.
A factory reset is required in order to delete the
list; see the section "Resetting settings in the
settings menu".
System volumes
1. Press
Settings
in top view.
2. Tap on
Sound
System Volumes
and
make the settings for the following:
•
Voice Control
•
Navi Voice Guidance
•
Phone Ringtone
Related information
•
•
Resetting settings in the settings menu
(p. 176)
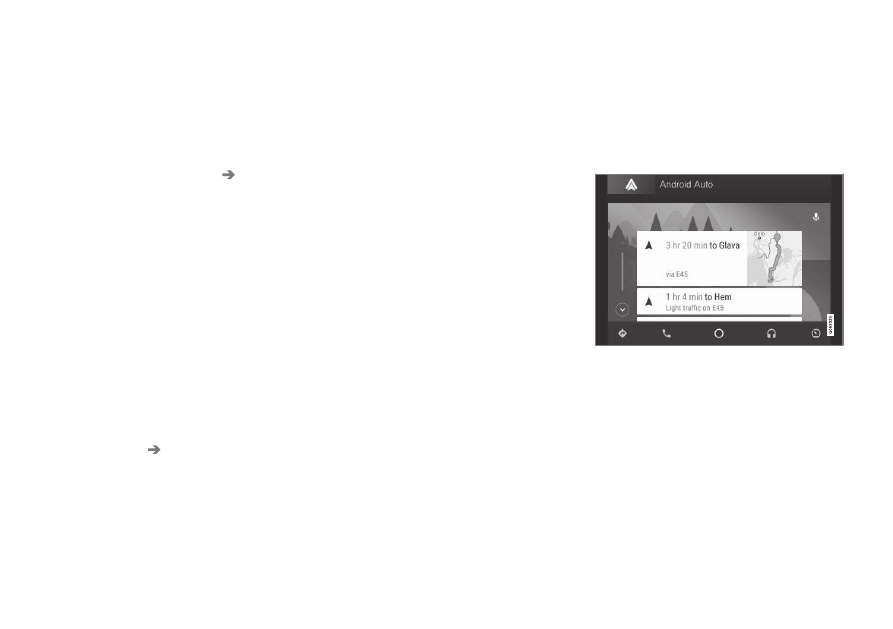
Android Auto
*
Android Auto gives you the option to listen to
music, make phone calls, get directions and use
car-adapted apps from an Android device.
Android Auto works with selected Android devi-
ces.
Information about which apps are supported and
which phones are compatible is available on the
website: www.android.com/auto/. For third-party
apps, see Google Play. Please note that Volvo is
not responsible for the content in Android Auto.
Android Auto is started from the app view. After
Android Auto has been started once, the applica-
tion will be started automatically the next time the
device is connected. Automatic start can be
deactivated under settings.
||
AUDIO AND MEDIA
* Option/accessory.
492
When a phone is connected to Android Auto
it is possible to stream via Bluetooth to
another media player. Bluetooth is active
while Android Auto is being used.
When using map navigation via Android Auto
there is no guidance in the driver display or head-
up display, but only in the centre display.
Android Auto can be controlled via the centre
display using the steering wheel's right-hand key-
pad or voice control. A long press on the steering
wheel button
starts voice recognition control
and a short press deactivates.
By using Android Auto, you acknowledge
the following: Android Auto is a service
provided by Google Inc. under its terms and
conditions. Volvo Cars is not responsible for
Android Auto or its features or applications.
When you use Android Auto, your car
transfers certain information (including its
location) to your connected Android phone.
You are fully responsible for your and any
other person’s use of Android Auto.
Starting Android Auto
The first time an Android is connected
1. Connect the Android to the USB port. In the
cases where there are two USB ports, the
one with the white frame around the port
must be used.
2. Read the information in the pop-up message
and then tap on
OK
.
3. Tap on
Android Auto
in the app view.
4. Read the terms and conditions and then tap
on
Accept
to connect.
> The subview with Android Auto is opened
and compatible apps are shown.
5. Tap on the desired app.
> The app starts.
Previously connected Android
1. Connect the phone to the USB port.
> If the setting for automatic start is
selected - the subview with Android Auto
is opened and compatible apps are
shown.
2. If the setting for automatic start is not
selected - open the
Android Auto
app from
the app view.
> The subview with Android Auto is opened
and compatible apps are shown.
3. Tap on the desired app.
> The app starts.
Android Auto runs in the background if another
app is started in the same subview. To show
Android Auto in the subview again - tap on the
Android Auto icon in the app view.
Related information
•
•
•
Connecting a device via USB port (p. 486)
•
•
•
AUDIO AND MEDIA
}}
* Option/accessory.
493
Settings for Android Auto
*
Settings for a phone that has been connected
the first time with Android Auto.
Automatic start
1. Press
Settings
in top view.
2. Press
Communication
Android Auto
and select setting:
•
Tick the box - Android Auto starts auto-
matically when the USB cable is con-
nected.
•
Untick the box - Android Auto does not
start automatically when the USB cable is
connected.
A maximum of 20 Android devices can be stored
in the list. When the list is full and a new device is
connected the oldest one is deleted.
A factory reset is required in order to delete the
list; see the section "Resetting settings in the
settings menu".
System volumes
1. Press
Settings
in top view.
2. Tap on
Sound
System Volumes
and
make the settings for the following:
•
Voice Control
•
Navi Voice Guidance
•
Phone Ringtone
Related information
•
•
Resetting settings in the settings menu
(p. 176)
•
Overview of the centre display (p. 33)
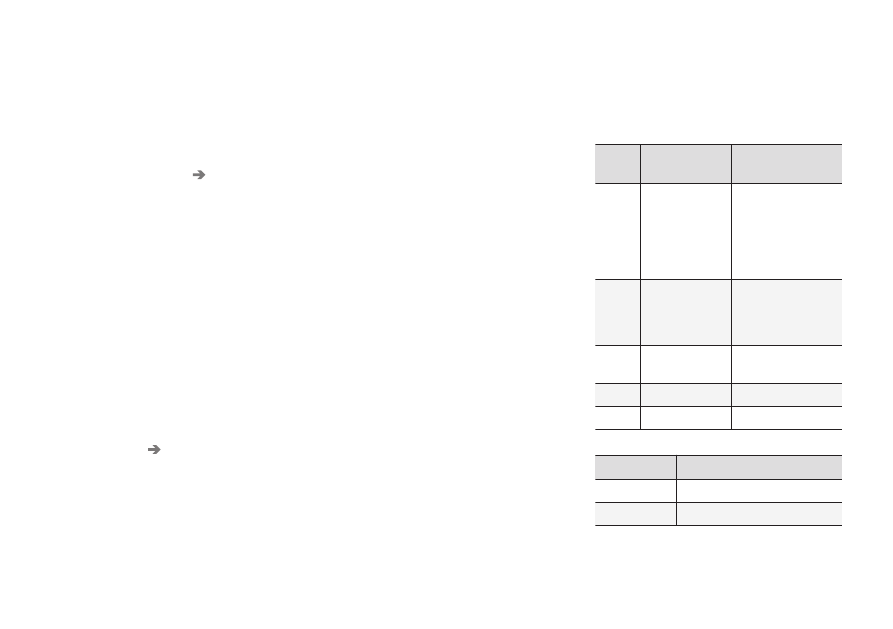
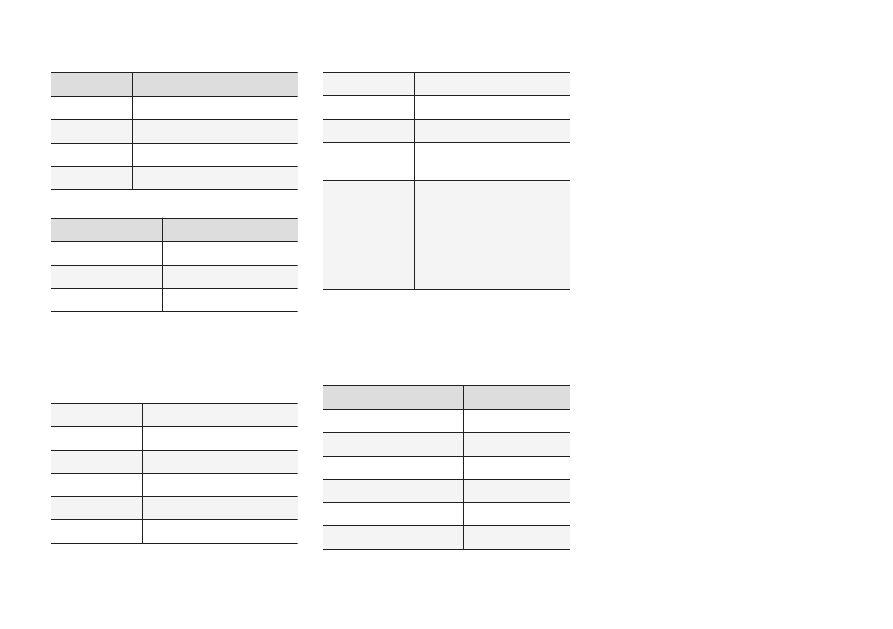
Technical specifications for media
Compatible file formats, audio specifications
and USB.
Audio files
For-
mat
File extension
Codec
MP3
.mp3
MPEG1 Layer III,
MPEG2 Layer III,
MP3 Pro (mp3
compatible),
MP3 HD (mp3
compatible)
AAC
.m4a, .m4b, .aac AAC LC (MPEG-4
part III Audio),
HE-AAC (aacPlus
v1/v2)
WMA
.wma
WMA8/9,
WMA9/10 Pro
WAV
.wav
LPCM
FLAC
.flac
FLAC
Video files
Format
File extension
MP4
.mp4, m4v
MPEG-PS
.mpg, .mp2, .mpeg, .m1v
||
AUDIO AND MEDIA
494
Format
File extension
AVI
.avi
AVI (DivX)
.avi, divx
ASF
.asf, .wmv
MKV
.mkv
Subtitles
Format
File extension
SubViewer
.sub
SubRip
.srt
SSA
.ssa
DivX
®
DivX certified devices have been tested for high-
quality DivX (.divx, .avi) video playback. When you
see the DivX logo, you have the freedom to play
DivX films.
Profile
DivX Home Theater
Video codec
DivX, MPEG-4
Resolution
720x576
Bit rate
4.8Mbps
Frame rate
30 fps
File extension
.divx, .avi
Max file size
4 GB
Audio codec
MP3, AC3
Subtitles
XSUB
Special func-
tions
Multiple subtitles, multiple
audio, resume play
Reference
Meets all requirements of
the DivX Home Theater pro-
file. Visit divx.com for more
information and software
tools to convert your files
into DivX Home Theater
video.
Storage on USB device
In order for the system to read the USB device
correctly, the following specifications must be fol-
lowed. No folder structure will be shown in the
centre display during playback.
Max number
Files
15000
Folders
1000
Folder levels
8
Playlists
100
Items in a playlist
1000
Subfolders
No limit
Technical specification for USB
connector
•
Type A socket
•
Version 2.0
•
Voltage supply 5 V
•
Current supply max. 2.1 A
Related information
•
•
Нет комментариевНе стесняйтесь поделиться с нами вашим ценным мнением.
Текст