Volvo V90 Twin Engine (2018 year). Instruction — part 14
LOCKS AND ALARM
* Option/accessory.
247
Deadlocks
*
Deadlock means that all opening handles are
disengaged mechanically, which prevents door
opening from the inside when the car is locked
from the outside.
Deadlocks are activated with the remote control
key and in keyless locking (Passive Entry)
*.
Deadlocks are activated with a delay of about
10 seconds after the doors have locked.
If a door is opened within the delay time then
the sequence is interrupted and the alarm is
deactivated.
The car can only be unlocked with the remote
control key, keyless unlocking or the Volvo On
Call
* app when deadlocks are activated.
The front left door can also be unlocked with the
detachable key blade. If the car is unlocked with
the detachable key blade, the alarm
* will be trig-
gered. See the section "Alarm" for switching off
the alarm.
WARNING
Do not allow anyone to remain in the car with-
out first deactivating the deadlocks in order to
avoid the risk of anyone being locked in.
Temporarily deactivating the deadlock
function
If someone is going to stay in the car but the
doors must be locked from the outside, then the
deadlock function can be temporarily deactivated
with the
Reduced guard
function. The proce-
dure is the same as with the temporary disen-
gagement of the alarm's movement and tilt
detectors
*.
Press the
Reduced guard
button in the centre display's
function view in order to deacti-
vate the deadlock function tem-
porarily.
After this,
Reduced Guard
is shown in the cen-
tre display and deadlocks are temporarily deacti-
vated in the subsequent locking of the car. Note
that the alarm's movement and tilt detectors
* are
switched off at the same time.
In conventional locking, the electrical sockets are
deactivated immediately, but when deadlocks are
temporarily deactivated, they will be active for a
maximum of 10 minutes after locking.
If the car is unlocked and then locked again, the
deadlock function must be deactivated again.
The system is reset the next time the engine is
started.
•
Remember that the alarm is activated
when the car is locked.
•
If any of the doors are opened from the
inside then the alarm is triggered.
Related information
•
•
Locking/unlocking from the outside (p. 241)
•
Locking/unlocking from the inside (p. 245)
•
Locking/unlocking with the detachable key
blade (p. 252)
•
LOCKS AND ALARM
* Option/accessory.
248
Locking/unlocking the tailgate
The tailgate can be locked/unlocked and
opened in different ways depending on the
equipment level of the car.
Unlocking the tailgate with the remote
control key
The alarm for the tailgate can be disarmed and the tail-
gate unlocked by using the remote control key's
button.
1. Press the remote control key's
button.
> The lock and alarm indicator on the instru-
ment panel extinguishes in order to show
that the alarm is not armed for the whole
of the car.
The alarm's level and movement sensors
and the sensors for opening the tailgate
are disconnected.
The tailgate is unlocked, but remains
closed while the doors remain locked and
their alarm functions armed.
To open the tailgate, grip the rubber pres-
sure plate beneath the tailgate handle
and open the tailgate.
If the tailgate is not opened within
2 minutes then it is relocked and the
alarm is re-armed.
2. With the power operated tailgate option
* -
Long press (approx. 1.5 seconds) on the
remote control key's
button
> The tailgate is unlocked and opened,
while the doors remain locked and their
alarm functions armed.
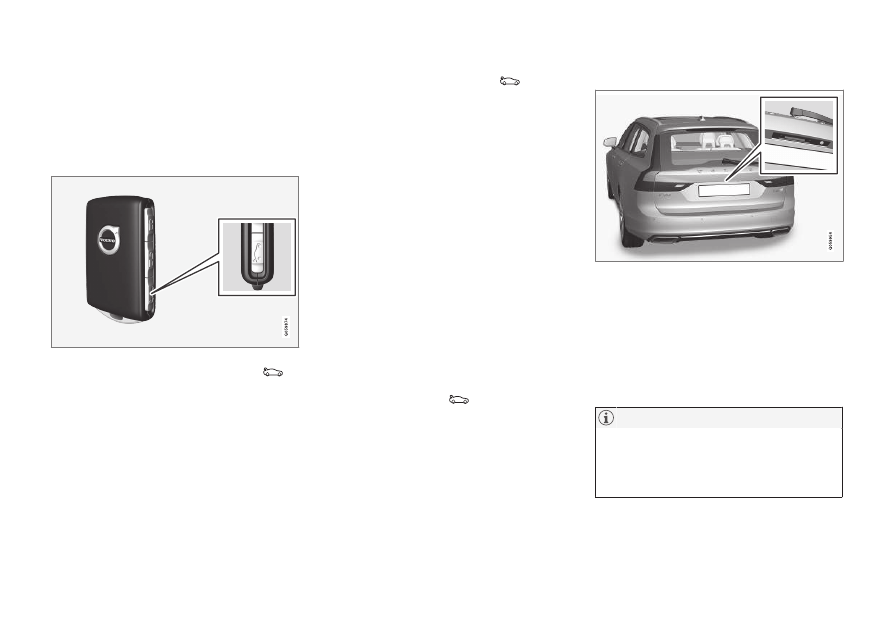
Keyless unlocking of the tailgate
*
Rubber plate with pressure-sensitive surface.
The tailgate is held closed by an electrical lock.
You simply need to have the remote control key
in the vicinity e.g. in a pocket or a bag.
1. To open the tailgate - lightly press on the
rubberised pressure plate beneath the tail-
gate handle.
> The lock is released.
If the remote key is not detected sufficiently
close to the tailgate, locking/unlocking will
not work. See the section "Remote key
range" for more information.
LOCKS AND ALARM
* Option/accessory.
249
2. Lift by the outside handle in order to fully
open the tailgate.
•
Minimal force is required to release the
rear hatch lock - just gently press the rub-
berised panel.
•
Do not place the lift force on the rubber
panel when opening the rear hatch - lift
the handle. Using too much force may
damage the electrical contacts on the rub-
ber panel.
WARNING
Do not drive with an open tailgate! Toxic
exhaust fumes could be drawn into the car
through the cargo area.
Unlocking the tailgate from the inside
of the car
1.
Brief press on the
button on the instru-
ment panel.
> The tailgate can be unlocked and opened
from the outside by grasping the rubber-
ised pressure plate.
2. With the power operated tailgate option* -
Long press on the
button on the instru-
ment panel.
> The tailgate opens.
Locking with the remote control key
–
Press the remote control key's
button.
> The lock and alarm indicator on the instru-
ment panel starts to flash - the car is
locked and the alarm
* is armed.
Related information
•
•
Remote control key range (p. 238)
•
•
LOCKS AND ALARM
* Option/accessory.
250
Using private locking
The tailgate can be locked with the private lock-
ing function when the car is taken in for service,
left at a hotel or similar.
The car needs to be in ignition mode I as a
minimum for the private locking function to be
activated.
Function button for private
locking. Depending on the cur-
rent status of the lock,
Private
locking unlocked
or
Private
locking locked
is shown.
Enter the security code before using for
the first time
A security code needs to be selected during the
first time the function is used. It can then be used
to deactivate private locking if the selected PIN
code has been lost or forgotten. The security
code acts as a PUK code for all subsequent PIN
codes set for the private locking function.
Save the security code in a safe place.
To create a security code:
1. Press the button for private locking in the
function view.
> A pop-up window is shown.
2. Enter the desired security code.
> The security code is saved. The private
locking function is now ready to be acti-
vated.
If the system has been reset then the above pro-
cedure needs to be repeated.
Activate private locking
1. Press the button for private locking in the
function view.
> A pop-up window is shown.
2. Enter the code to be used in order to unlock
the tailgate after locking and tap on
Confirm
.
> The tailgate is locked. Confirmation of
locking takes place by means of a green
indicator being shown by the button in the
function view.
Deactivate private locking
1. Press the button for private locking in the
function view.
> A pop-up window is shown.
2. Enter the code that was used for locking and
tap on
Confirm
.
> The tailgate is unlocked. Confirmation of
unlocking takes place by means of the
green indicator by the button in the func-
tion view extinguishing.
If the PIN code has been lost/forgotten, or if
the wrong PIN code has been entered more
than three times, the security code can be
used to deactivate the private locking.
If private locking is activated and the car is
unlocked via Volvo On Call
* or the Volvo On
Call
* app, private locking will be deactivated
automatically.
Related information
•
•
LOCKS AND ALARM
* Option/accessory.
251
Detachable key blade
The remote control key contains a detachable
key blade of metal with which a number of func-
tions can be activated and some operations car-
ried out.
The key blade's unique code is provided by
authorised Volvo workshops, which are recom-
mended when ordering new key blades.
The key blade's application areas
Using the remote control key's detachable key
blade:
•
the left-hand
11
front door can be opened
manually if central locking cannot be acti-
vated with the remote control key.
•
all doors are emergency locked - see the
section "Locking/unlocking with detachable
key blade".
•
the rear doors' mechanical child safety locks
can be activated/deactivated - see the sec-
tion "Child safety locks".
The button-less key
12
(Key Tag) does not have a
detachable key blade. If necessary, use the
detachable key blade from the normal remote
control key.
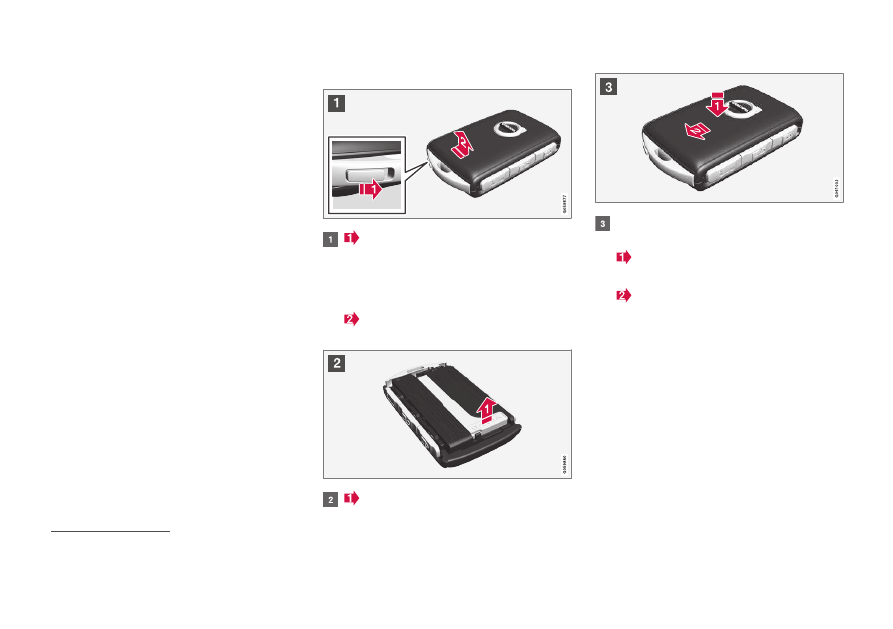
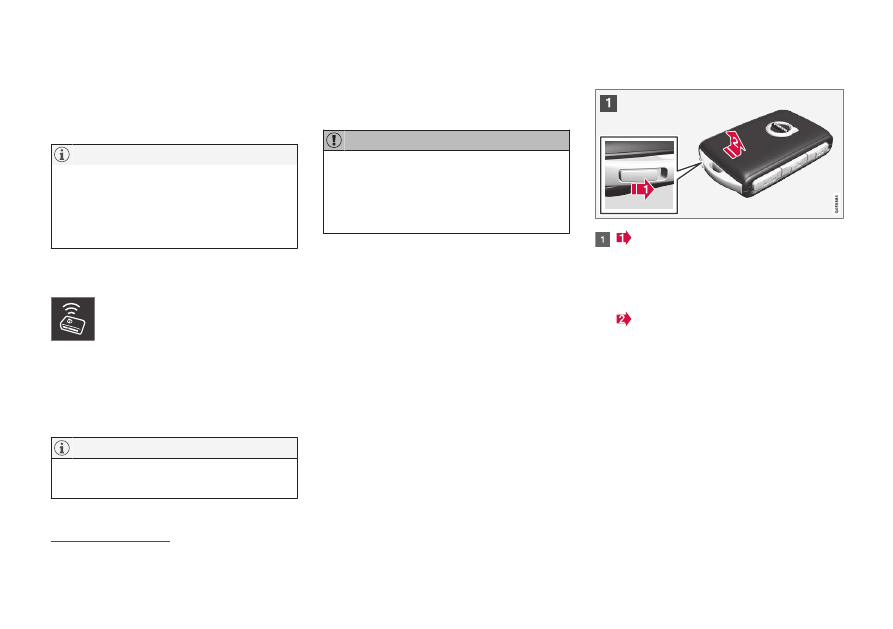
Detaching the key blade
Hold the remote control key with the
front visible and the Volvo logo facing the
right way - slide the button at bottom edge
by the key ring to the right. Guide the front
side's shell a few millimetres upwards.
The shell will then come free and can be
lifted off the key.
Detach the key blade by angling it up.
Return the key blade to its intended position
in the remote control key after use.
Refit the shell by pressing it downward
until a clicking sound is heard.
Then slide the shell back sedan.
> A further click will indicate that the shell is
securely attached.
Related information
•
Locking/unlocking with the detachable key
blade (p. 252)
•
•
11
This applies whether the car is left-hand drive or right-hand drive.
12
Supplied with cars equipped with the keyless locking/unlocking option (Passive Entry
*).
LOCKS AND ALARM
* Option/accessory.
252
Locking/unlocking with the
detachable key blade
Amongst other things, the detachable key blade
can be used to unlock the car from the outside -
e.g. if the remote control key's battery has
become discharged.
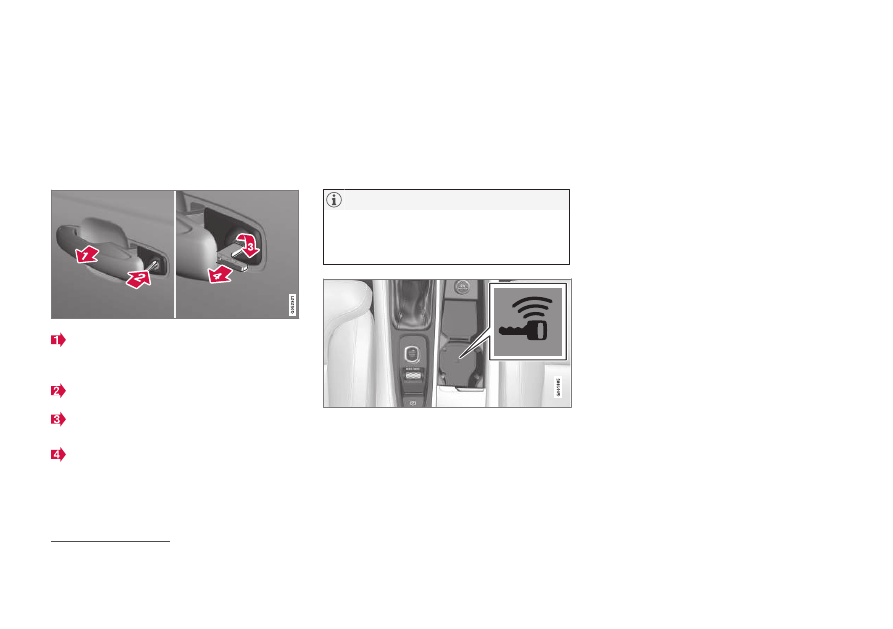
Unlocking
Pull out the front door handle on the left-
hand side
13
to its end position so that the
lock cylinder become visible.
Insert the key in the lock cylinder.
Turn clockwise 45 degrees so that the key
blade is pointing straight back.
Turn the key back 45 degrees to its starting
position. Remove the key from the lock cylin-
der and release the handle so that the rear
section of the handle is resting against the
car again.
5. Pull out the handle.
> The door opens.
Locking will be performed in the same way, but
with an anticlockwise turn 45 degrees instead of
clockwise in step (3).
Switching off the alarm
*
When the door is unlocked using the key
blade and is then opened, the alarm is trig-
gered.
The backup reader's location in the cup holder.
Deactivate the alarm as follows:
1. Place the remote control key in the backup
reader in the bottom of the cup holder in the
tunnel console.
2. Then turn the start knob clockwise and
release it.
> The control automatically returns to its
starting position - the alarm signal stops
and the alarm switches off.
Locking
It is also possible to lock the car with the remote
control key's detachable key blade e.g. in the
event of a loss of power or if the key's battery
has become discharged.
The left-hand front door can be locked with its
lock cylinder and the detachable key blade.
Other doors have no lock cylinders and instead
have a lock switch on the end of each door which
must be depressed using the key blade - they are
then mechanically locked/blocked to prevent
them being opened from outside.
The doors can still be opened from the inside.
13
This applies whether the car is right-hand drive or left-hand drive.
LOCKS AND ALARM
}}
* Option/accessory.
253
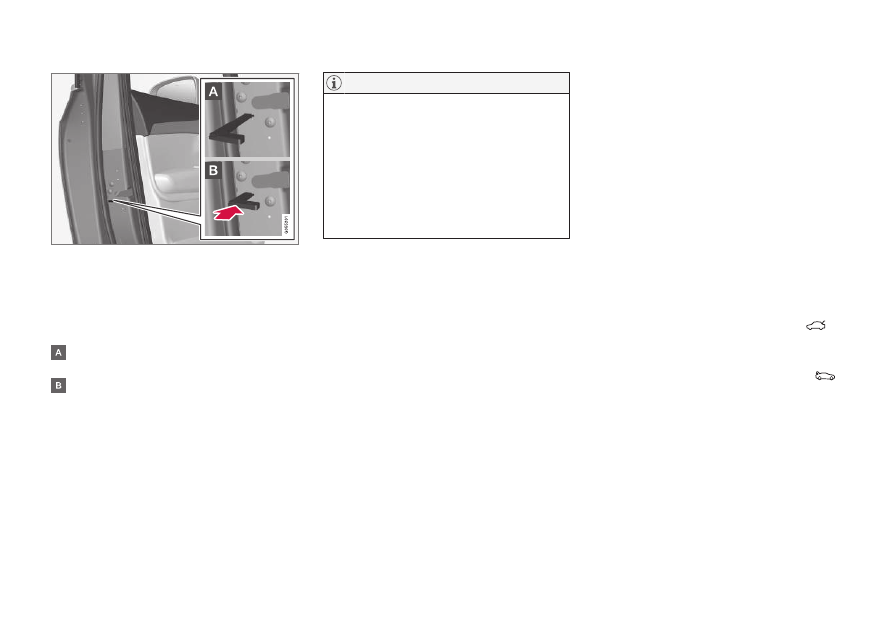
Manual locking of the door. Not to be mixed up with the
child safety locks.
–
Remove the detachable key blade from the
remote control key. Insert the key blade in
the hole for lock reset and press the key in
until the key bottoms, approx. 12 mm.
The door can be opened from both the out-
side and the inside.
The door is blocked against opening from
the outside. To return to position A, the inner
door handle must be opened.
The doors can also be unlocked with the unlock
button on the remote control key or with the cen-
tral locking button on the driver's door.
•
A door's lock reset only locks that partic-
ular door - not all doors simultaneously.
•
A manually locked rear door with acti-
vated manual or electric child safety locks
cannot be opened from either the outside
or the inside. A rear door that is locked in
this way can only be unlocked with the
remote control key or central locking but-
ton.
Related information
•
Power operated tailgate
*
The car's tailgate can be opened/closed electri-
cally.
Opening/closing via a foot movement is also
available as an extended option - see the section
"Opening/closing the power operated tailgate
with foot movement" for more information.
Opening
The tailgate can be opened with its handle, with
foot movement
*, a button on the instrument
panel or the remote control key.
Choose one of the following options to open the
tailgate:
•
Light press on the tailgate handle.
•
Long press on the instrument panel's
button. Keep it depressed until the tailgate
starts to open.
•
Long press on the remote control key's
button. Keep it depressed until the tailgate
starts to open.
•
Foot movement
* under the rear bumper.
||
LOCKS AND ALARM
* Option/accessory.
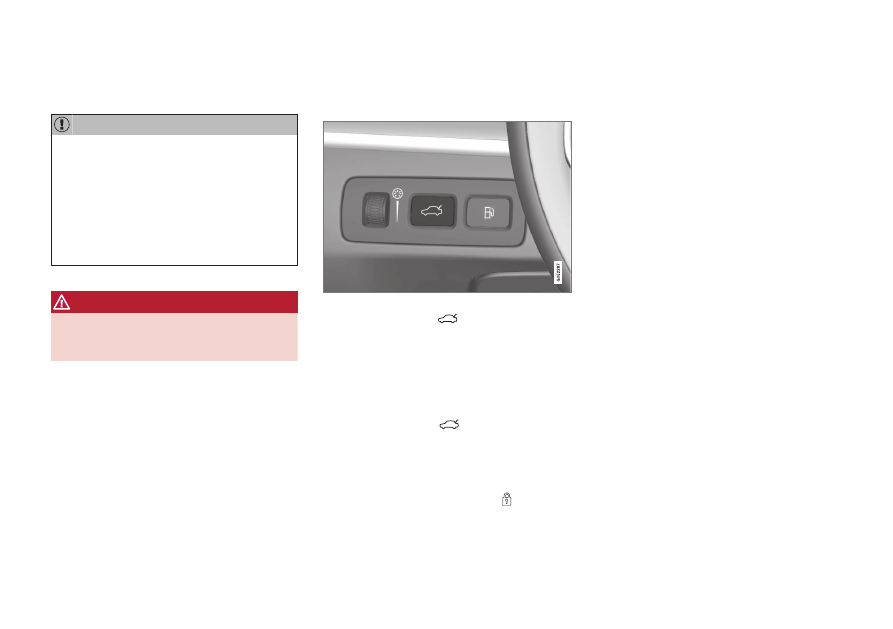
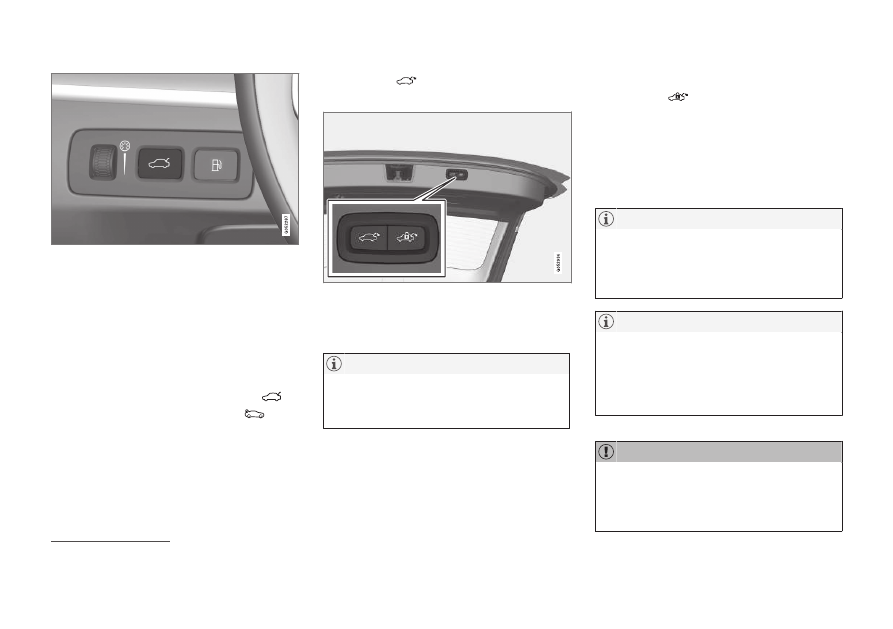
254
Opening/closing button on the instrument panel.
Closing
The tailgate can be closed via the instrument
panel's button, with foot movement
*, with the
remote control key or the buttons
14
along the
bottom edge of the tailgate.
Choose one of the following options to close the
tailgate:
–
Long press on the instrument panel's
button or the remote control key's
but-
ton.
> The tailgate closes automatically and
acoustic signals sound - the tailgate
remains unlocked.
–
Press the
button
14
on the underside of
the tailgate to close.
Button for closing and locking on the underside of the
tailgate.
> The tailgate closes automatically - the tail-
gate remains unlocked.
The button is active 24 hours after the hatch
has been left open. Thereafter, it must be
closed manually.
Closing and locking
–
Press the
button
14
on the underside of
the tailgate to close it and simultaneously
lock the tailgate and doors (all doors must be
closed for locking).
> The tailgate closes automatically - the tail-
gate and doors are locked, and the alarm
*
is armed.
If the remote key is not detected sufficiently
close to the tailgate, locking/unlocking will
not work. See the section "Remote key
range" for more information.
When using key-free
* blocking/closing, three
signals will sound if the key is not detected
sufficiently close to the tailgate. See the sec-
tions "Remote key range" and "Locks and
remote keys" for more information.
During manual tailgate operation, open or
close it slowly. Do not use force to open/
close it if there is resistance. It may be dam-
aged and stop working correctly.
14
A car with keyless locking/entry (Passive Entry
*) has one button for closing and one button for closing and locking.
LOCKS AND ALARM
}}
* Option/accessory.
255
Cancel opening/closing
–
Cancel opening/closing in one of the follow-
ing ways:
•
Press the button on the instrument panel.
•
Press the remote control key's button.
•
Press the close button
14
along the bottom
edge of the tailgate.
•
Press the rubberised pressure plate
beneath the outside handle.
•
Using the foot movement
* (see section
"Opening/closing power operated tailgate
with foot movement" for more informa-
tion).
> Tailgate movement will be interrupted and
the tailgate will stop and can then be
manoeuvred manually.
Programmable max. opening
The maximum opening position of the tailgate
can be adjusted, e.g. to suit a low ceiling height in
a garage.
To adjust max. opening:
1. Open the tailgate - stop it in the open posi-
tion.
2. Press the
button on the underside of
the tailgate for at least 3 seconds.
> Two short acoustic signals sound to indi-
cate that the set position has been saved.
To reset max. opening:
–
Manually move the tailgate to its highest
possible position - press the
button on
the tailgate for at least 3 seconds.
> Two acoustic signals sound to indicate
that the set position has been cleared.
The tailgate will then assume its max.
position when opened.
•
If the system has been operating continu-
ously for a long time, it is switched off to
avoid overload. It can be used again after
about 2 minutes.
Pinch protection
If something with sufficient resistance prevents
the tailgate from opening/closing then the pinch
protection is activated.
•
During opening - movement is interrupted,
the tailgate stops and a long acoustic signal
sounds.
•
During closing - movement is interrupted, the
tailgate stops, a long acoustic signal sounds
and the tailgate returns to the programmed
max. position.
WARNING
Observe the risk of trapping when opening/
closing. Before starting opening/closing,
check that there is nobody near to the tailgate
as trapping may have serious consequences.
Always operate the tailgate with caution.
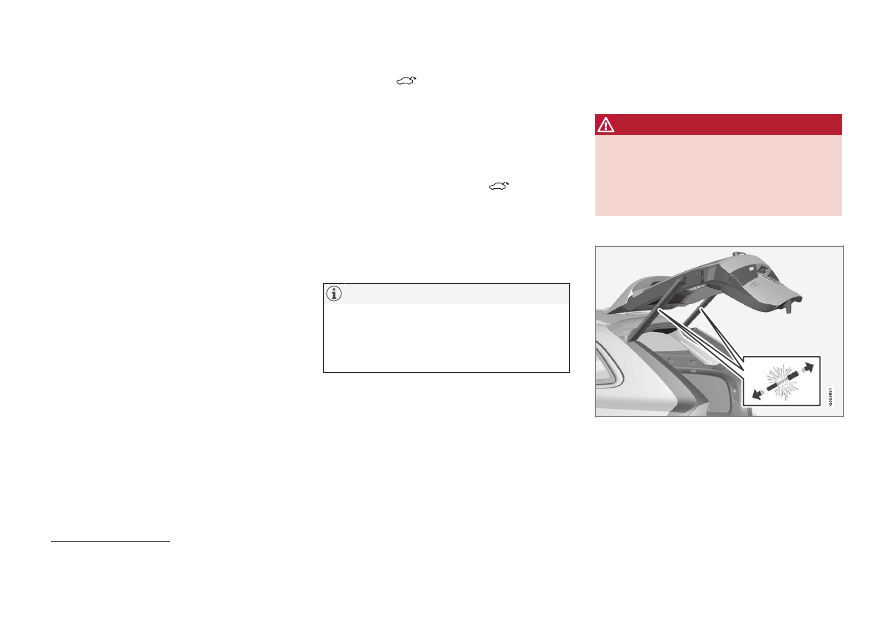
Pre-tensioned springs
The pre-tensioned springs for the power operated tail-
gate.
14
A car with keyless locking/entry (Passive Entry
*) has one button for closing and one button for closing and locking.
||
LOCKS AND ALARM
* Option/accessory.
256
WARNING
Do not open the pre-tensioned springs for the
power operated tailgate. They are pre-ten-
sioned with high pressure and can cause
injury if opened.
Related information
•
Locking/unlocking the tailgate (p. 248)
•
Opening/closing the tailgate with foot move-
ment
•
Remote control key range (p. 238)
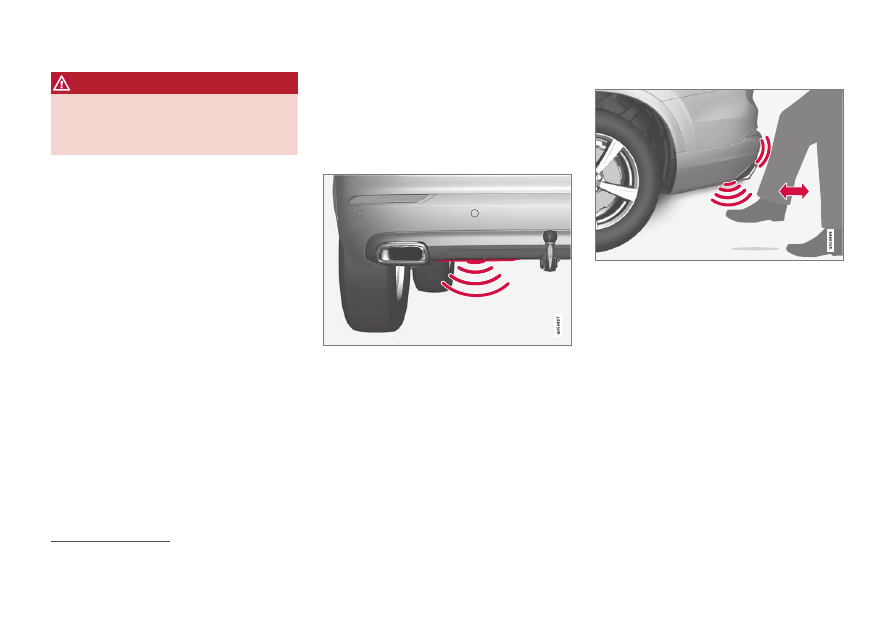
Opening/closing the tailgate with
foot movement
*
To facilitate the operation of the tailgate when
your hands are occupied, it can be opened/
closed by means of a forward kicking motion
under the rear bumper.
The sensor is positioned to the left of centre in the
bumper.
One of the car's remote control keys must be
within range
15
behind the car in order for open-
ing/closing to be possible. This also applies to an
already unlocked car in order to avoid accidental
opening e.g. in a car wash.
Operation
Kicking motion within the detector's valid activation area.
15
See the section "Remote control key range" for more information.
LOCKS AND ALARM
* Option/accessory.
257
Opening/closing
The foot-operated tailgate function is availa-
ble in two versions:
•
Opening and closing with foot movement
•
Only unlocking with foot movement (lift
up the tailgate manually to open it)
Note that the function for opening and clos-
ing with foot movement requires the "Power
operated tailgate"
* option.
–
Make one slow, forward kicking motion
under the left part of the rear bumper. Then
take a step back. The bumper must not be
touched.
> A short acoustic signal sounds when
opening/closing is activated - the tailgate
is opened/closed.
If the tailgate is on open position then it is
always closed on activation via foot move-
ment.
The tailgate can also be closed via the instrument
panel's button, the remote control key or the but-
ton(s)
16
under the tailgate. For more information,
see the section "Power operated tailgate".
If several kicking motions take place without an
approved remote control key being located
behind the car, opening will not be possible until
after a certain delay.
Do not leave your foot positioned under the car
during the kicking motion. This could cause acti-
vation to fail.
Cancel opening/closing
–
Make one slow forward kicking motion when
opening/closing is in progress in order to
stop the movement of the tailgate.
The remote control key does not have to be in
the vicinity of the car to cancel opening/closing.
There is a risk of reduced function, or no
function, if the rear bumper is loaded with
large amounts of ice, snow, dirt or similar. For
this reason, make sure you keep it clean.
Pay attention to the possibility that the sys-
tem may be activated in a car wash or similar
if the remote key is within range.
Related information
•
Locking/unlocking the tailgate (p. 248)
•
•
Remote control key range (p. 238)
16
Only applies to a car equipped with keyless locking/entry (Passive Entry)
*.
LOCKS AND ALARM
* Option/accessory.
258
Replacing the battery in the remote
control key
The battery in the remote control key needs to
be replaced when it has become discharged.
All batteries have a limited service life and
must eventually be replaced (does not apply
to Key Tag). The service life of the battery var-
ies depending on how often the vehicle/key
is used.
The battery for the remote control key should be
replaced if:
the information symbol illuminates and
the message
Car key battery low
See Owner's manual
is shown in the
driver display
and/or
•
the locks repeatedly do not react to signals
from the remote control key within 20 metres
(65 feet) of the car.
Always try moving closer to the car and mak-
ing another unlock attempt.
The battery in the button-less key
17
(Key Tag)
cannot be replaced - a new key can be ordered
from an authorised Volvo workshop.
A discharged Key Tag must be handed over
to an authorised Volvo workshop. The key
must be deleted from the car since it is still
possible to use it to start the car via back-up
start.
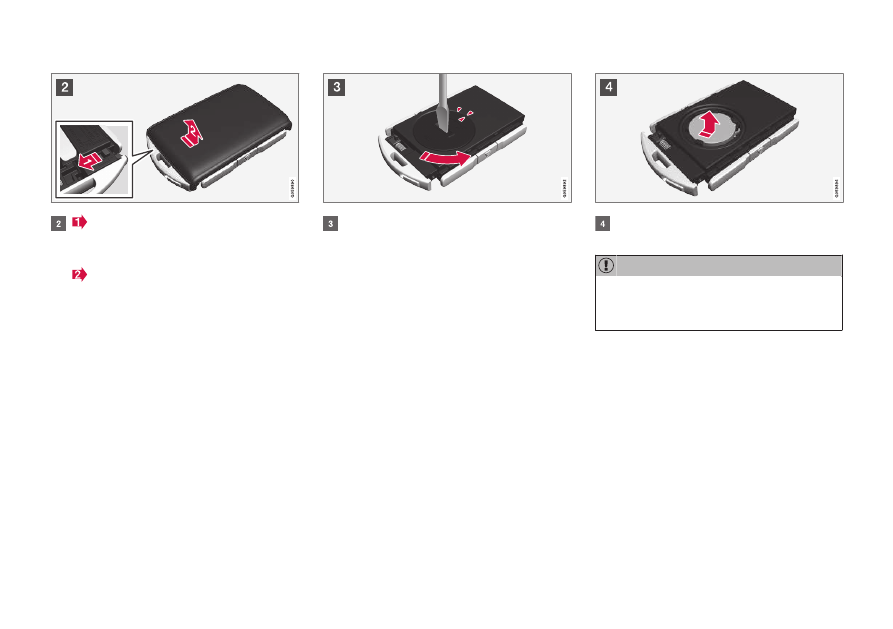
Opening and changing
Hold the remote control key with the
front visible and the Volvo logo facing the
right way - slide the button at bottom edge
by the key ring to the right. Slide the front
side's shell a few millimetres upwards.
The shell will then come free and can be
lifted off the key.
17
This key is supplied with a car equipped with the keyless locking/entry option (Passive Entry
*).
LOCKS AND ALARM
}}
259
Turn the key, move the button to the side
and slide the back shell a few millimetres
upwards.
The shell will then come free and can be
lifted off the key.
Use a screwdriver or similar to turn the bat-
tery cover anticlockwise until the markings
meet at the OPEN text.
Carefully lift away the battery cover by press-
ing e.g. a fingernail into the recess.
Then prize the battery cover upwards.
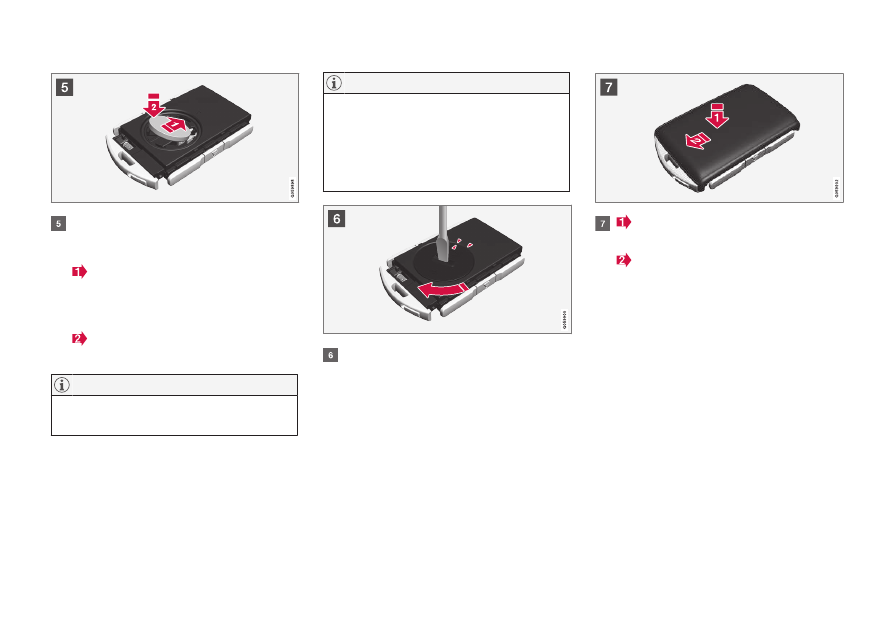
The battery (+) side is facing upwards. Then
carefully prize loose the battery as illustrated.
Avoid touching new batteries and their con-
tact surfaces with your fingers as this may
impair their function.
||
LOCKS AND ALARM
260
Install a new battery with the (+) side up.
Avoid touching the remote control key's bat-
tery contacts with your fingers.
Place the battery in the holder with the
edge down. Then slide the battery forwards
so that it fastens under the two plastic
catches.
Press the battery down so that it fastens
under the upper black plastic catch.
Use batteries with the designation CR2032,
3 V.
Volvo recommends that the batteries to be
used in the remote control key fulfil UN
Manual of Test and Criteria, Part III, sub-
section 38.3. Batteries fitted in the factory or
replaced by an authorised Volvo workshop
fulfil the above criteria.
Refit the battery cover and turn it clockwise
until the marking aligns with the CLOSE text.
Reposition the rear side's shell and press
it down until a clicking sound can be heard.
Then slide the shell back sedan.
> A further click will indicate that the shell is
properly positioned and securely attached.
LOCKS AND ALARM
* Option/accessory.
261
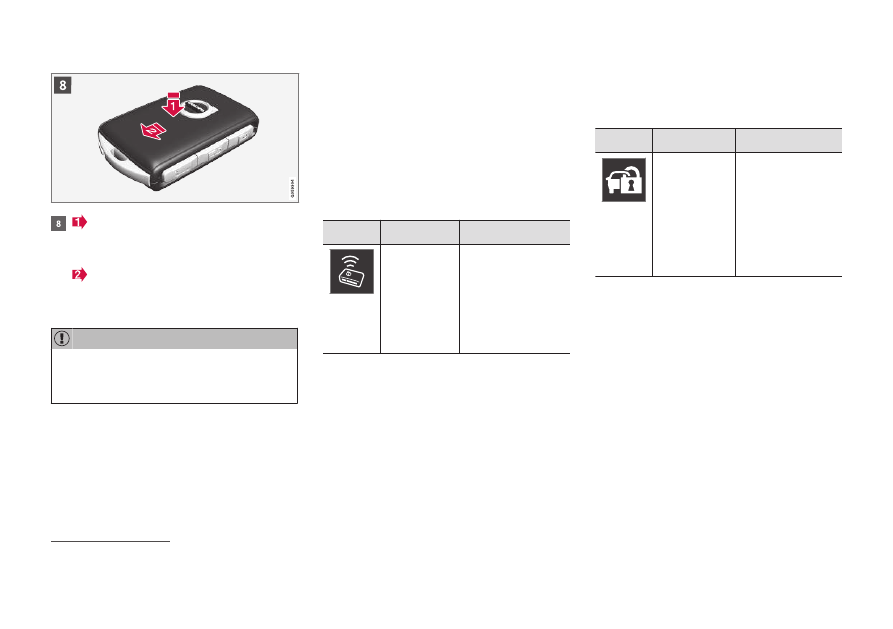
Turn the remote control key over and refit
the front side's shell by pressing it down until
a clicking sound can be heard.
Then slide the shell back sedan.
> A further click will indicate that the shell is
securely attached.
Make sure that exhausted batteries are dis-
posed of in a manner which is kind to the
environment.
Related information
•
Immobiliser
The electronic immobiliser is a theft protection
system that prevents an unauthorised person
from starting the car.
The car can only be started with the correct
remote control key.
The following error message in the driver display
is related to the electronic immobiliser:
Symbol
Message
Specification
Car key not
found
See
Owner's
manual
Error reading the
remote control key
during starting -
place the key in the
cup holder near the
key symbol and try
again.
Remote-controlled immobiliser with
tracking system
18
The car is fitted with a system which makes it
possible to track and locate the car and to
remotely activate the immobiliser, which prevents
starting the engine. Contact your nearest Volvo
dealer for more information and assistance with
activating the system.
The following error message in the driver display
is related to the remote-controlled immobiliser
with tracking system:
Symbol
Message
Specification
Remotely
immobilised
Car not pos-
sible to start
The remote-con-
trolled immobiliser
with tracking sys-
tem is activated.
The car cannot be
started. Contact
Volvo On Call
Service Centre.
Related information
•
•
Remote control key range (p. 238)
18
Only certain markets and in combination with Volvo On Call
*.
LOCKS AND ALARM
* Option/accessory.
262
Child safety locks
The child safety locks prevent children from
being able to open a rear door from the inside.
There is an electric
* and a manual lock.
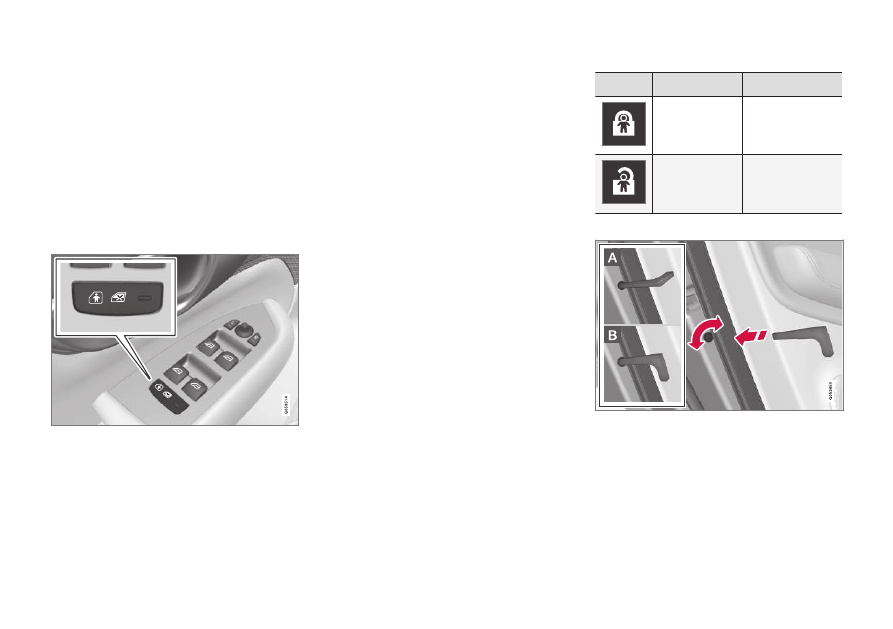
Electric activation/deactivation
*
The electric child safety locks can be activated/
deactivated in all ignition positions higher than 0.
Activation/deactivation can be performed up to
2 minutes after switching off the engine, provided
that no door is opened. See the section "Ignition
position" for more information.
Button for electric activation/deactivation.
1. Start the engine or choose an ignition posi-
tion higher than 0.
2. Press the button in the driver's door control
panel.
> The driver display shows the message
Rear child lock
Activated
and the but-
ton's lamp illuminates - the locks are
active.
When the electric child safety lock is active then
the rear:
•
windows can only be opened with the driver's
door control panel
•
doors cannot be opened from inside.
To deactivate the locks:
–
Press the button in the driver's door control
panel.
> The driver display shows the message
Rear child lock
Deactivated
and the
button's lamp goes out - the locks are
deactivated.
The current setting is stored when the engine is
switched off - if the child safety locks are acti-
vated at engine shutdown, the function will
remain activated the next time the engine is
started.
Symbol
Message
Specification
Rear child
lock
Acti-
vated
Child safety
locks are acti-
vated.
Rear child
lock
Deacti-
vated
Child safety
locks are deacti-
vated.
Manual activation/deactivation
Manual child safety locks. Not to be mixed up with man-
ual door locks.
–
Use the remote control key's detachable key
blade to turn the knob. For more information,
see the section "Detachable key blade".
Нет комментариевНе стесняйтесь поделиться с нами вашим ценным мнением.
Текст