Volvo XC70 (2016 year). Instruction — part 19
09 Wheels and tires
09
304
WARNING
The temperature grade for this tire is
established for a tire that is properly infla-
ted and not overloaded. Excessive speed,
under-inflation, or excessive loading, either
separately or in combination, can cause
heat buildup and tire failure.
Snow chains
Snow chains can be used on your Volvo with
the following restrictions:
•
Snow chains should be installed on front
wheels only. Use only Volvo approved
snow chains.
•
If accessory, aftermarket or "custom"
tires and wheels are installed and are of a
size different than the original tires and
wheels, chains in some cases CANNOT
be used. Sufficient clearances between
chains and brakes, suspension and body
components must be maintained.
•
Some strap-on type chains will interfere
with brake components and therefore
CANNOT be used.
•
All Wheel Drive models: Snow chains
should only be installed on the front
wheels.
•
Certain size tires may not allow the
assembly of snow chains/traction devi-
ces.
Consult your Volvo retailer for additional
snow chain information.
•
Check local regulations regarding the
use of snow chains before installing.
•
Use single-sided snow chains only.
•
Always follow the chain manufactur-
er's installation instructions carefully.
Install chains as tightly as possible and
retighten periodically.
•
Never exceed the chain manufactur-
er's specified maximum speed limit.
(Under no circumstances should you
exceed 31 mph (50 km/h).
•
Avoid bumps, holes or sharp turns
when driving with snow chains.
•
The handling of the vehicle can be
adversely affected when driving with
chains. Avoid fast or sharp turns as
well as locked wheel braking.
09 Wheels and tires
09
}}
305
Snow tires/studded tires
4
Owners who live in or regularly commute
through areas with sustained periods of snow
or icy driving conditions are strongly advised
to fit suitable winter tires to help retain the
highest degree of traction.
Tires for winter use:
•
It is important to install winter tires on all
four wheels to help retain traction during
cornering, braking, and accelerating. Fail-
ure to do so could reduce traction to an
unsafe level or adversely affect handling.
•
Do not mix tires of different design as this
could also negatively affect overall tire
road grip.
•
Winter tires wear more quickly on dry
roads in warm weather. They should be
removed when the winter driving season
has ended.
•
Studded tires should be run-in 300 –
600 miles (500 – 1000 km) during which
the vehicle should be driven as smoothly
as possible to give the studs the opportu-
nity to seat properly in the tires. The tires
should have the same rotational direction
throughout their entire lifetime.
Please consult state or provincial regula-
tions restricting the use of studded winter
tires before installing such tires.
Tire pressure monitoring -
introduction
Volvo provides two different systems to moni-
tor tire pressure: Tire Pressure Monitoring
System (TPMS) or Tire Monitor.
Determining which tire monitoring
system is in your vehicle
To see which system is installed in your vehi-
cle, press the MY CAR button on the center
console. Go to
Settings
Car settings
.
•
If your vehicle has a menu called
Tire
monitoring
, see Tire Monitor - introduc-
•
If your vehicle has a menu called
Tire
pressure
, see Tire Pressure Monitoring
System (TPMS) – general information
Introduction
Each tire, including the spare (if provided),
should be checked monthly when cold and
inflated to the inflation pressure recom-
mended by the vehicle manufacturer on the
vehicle placard or tire inflation pressure label.
(If your vehicle has tires of a different size
than the size indicated on the vehicle placard
or tire inflation pressure label, you should
determine the proper tire inflation pressure for
those tires.)
As an added safety feature, your vehicle has
been equipped with a tire pressure monitor-
ing system that illuminates a low tire pressure
telltale (
) when one or more of your tires
is significantly under-inflated. Accordingly,
when the low tire pressure telltale illuminates,
you should stop and check your tires as soon
as possible, and inflate them to the proper
pressure.
Driving on a significantly under-inflated tire
causes the tire to overheat and can lead to
tire failure. Under-inflation also reduces fuel
efficiency and tire tread life, and may affect
the vehicle's handling and stopping ability.
Please note that a tire pressure monitoring
system is not a substitute for proper tire
maintenance, and it is the driver's responsi-
bility to maintain correct tire pressure, even if
under-inflation has not reached the level to
trigger illumination of the system's low tire
pressure telltale.
Your vehicle has also been equipped with a
TPMS malfunction indicator to indicate when
the system is not operating properly. The
monitoring system's malfunction indicator is
combined with the low tire pressure telltale.
When the system detects a malfunction, the
telltale will flash for approximately one minute
and then remain continuously illuminated.
This sequence will continue upon subsequent
vehicle start-ups as long as the malfunction
4
Where permitted
09 Wheels and tires
09
306
exists. When the malfunction indicator is illu-
minated, the system may not be able to
detect or signal low tire pressure as intended.
System malfunctions may occur for a variety
of reasons, including the installation of
replacement or alternate tires or wheels on
the vehicle that prevent the tire pressure
monitoring system from functioning properly.
Always check the system's malfunction tell-
tale after replacing one or more tires or
wheels on your vehicle to ensure that the
replacement or alternate tires and wheels
allow the system to continue to function
properly.
The system indicates low tire pressure but
does not replace normal tire maintenance.
For information on correct tire pressure,
please refer to the tire inflation pressure
table (see Tire inflation – pressure table
(p. 300)), the tire inflation pressure placard
located on the driver's side B-pillar (the
structural member at the side of the vehi-
cle, at the rear of the driver's door open-
ing) or consult your Volvo retailer.
WARNING
Incorrect inflation pressure could lead to
tire failure, resulting in a loss of control of
the vehicle.
Tire Pressure Monitoring System
(TPMS) – general information
TPMS uses sensors mounted in the tire valves
to check inflation pressure levels. When the
vehicle is moving at a speed of approximately
20 mph (30 km/h) or faster, these sensors
transmit inflation pressure data to a receiver
located in the vehicle.
USA – FCC ID: KR5S180052050
This device complies with part 15 of the
FCC rules. Operation is subject to the fol-
lowing conditions: (1) This device may not
cause harmful interference, and (2) this
device must accept any interference
received, including interference that may
cause undesired operation.
When low inflation pressure is detected or if a
sensor is not functioning properly, TPMS will
light up the tire pressure warning light (
)
(also referred to as a telltale) in the instrument
panel and will display one of the following
messages:
Tire pressure low
,
Tire needs
air now
or
Tire press. syst Service
required
.
If a malfunction occurs in the system, the
tire pressure warning light will flash for
approximately 1 minute and then remain
illuminated.
Tire press. syst Service
required
will be displayed.
Related information
•
Tire Pressure Monitoring System (TPMS)
•
Tire Pressure Monitoring System (TPMS)
•
Tire Pressure Monitoring System (TPMS)
– activating/deactivating (p. 308)
•
09 Wheels and tires
09
307
Tire Pressure Monitoring System
(TPMS) – changing wheels
Please keep the following in mind when
changing or replacing the factory installed
TPMS wheels/tires on the vehicle:
•
Not all aftermarket wheels are equipped
with TPMS sensors in the valves.
•
If the vehicle is equipped with a tempo-
rary spare tire, this tire does not have a
TPMS sensor.
•
If wheels without TPMS sensors are
mounted on the vehicle, a text message
will displayed in the instrument panel
each time the vehicle is driven above
20 mph (30 km/h) for 10 minutes or more.
•
Once TPMS sensors are properly instal-
led, the warning message should not
reappear. If the message is still displayed,
drive the vehicle for several minutes at a
speed of 20 mph (30 km/h) or faster to
erase the message.
•
Volvo recommends that TPMS sensors
be fitted on all wheels used on the vehi-
cle, including winter tires. Volvo does not
recommend moving sensors back and
forth between sets of wheels.
When inflating tires with TPMS sensors,
press the pump's mouthpiece straight
onto the valve to help avoid bending or
otherwise damaging the valve.
•
After inflating the tires, always reinstall
the valve cap to help avoid damage to
the valve from dirt, gravel, etc.
•
Use plastic valve caps only. Metal
caps could corrode and become diffi-
cult to remove.
•
If you change to tires with a different
dimension than the factory-installed
ones, the TPMS system must be
reconfigured for these tires. This must
be done by a trained and qualified
Volvo service technician.
•
If a tire is changed, or if the TPMS sen-
sor is moved to another wheel, the
sensor's seal, nut, and valve core
should be replaced.
•
When installing TPMS sensors, the
vehicle must be parked for at least
15 minutes with the ignition off. If the
vehicle is driven within 15 minutes, a
TPMS error message will be displayed.
Related information
•
Tire Pressure Monitoring System (TPMS)
– general information (p. 306)
•
Tire Pressure Monitoring System (TPMS)
•
Tire Pressure Monitoring System (TPMS)
•

09 Wheels and tires
09
308
*
Option/accessory, for more information, see Introduction.
Tire Pressure Monitoring System
(TPMS) – recalibrating
In certain cases, it may be necessary to recali-
brate TPMS to conform to Volvo's recom-
mended tire inflation pressures (see the infla-
tion pressure table in Tire inflation – pressure
table (p. 300)), for example, if higher inflation
pressure is necessary when transporting
heavy loads, etc.
Recalibrating TPMS (Canadian models
only)*
This is done in the vehicle's menu system.
To recalibrate:
1. Switch off the engine.
2. Inflate the tires to the desired pressure
and put the ignition in mode I or II (see
Ignition modes (p. 79) for additional infor-
mation).
3. Press the MY CAR key in the center con-
sole control panel and select
Settings
Car settings
Tire pressure
.
4. Press OK/MENU, select
Calibrate tire
pressure
and press OK/MENU again.
5. Drive the vehicle at a speed above
20 mph (30 km/h) continuously for at
least 10 minutes.
> Calibration is done automatically once
initiated by the driver and the system
does not give any confirmation when
calibration is finished.
The new pressures are used until step 1-5
above are repeated.
Related information
•
Tire Pressure Monitoring System (TPMS)
– general information (p. 306)
•
Tire Pressure Monitoring System (TPMS)
•
Tire Pressure Monitoring System (TPMS)
– activating/deactivating (p. 308)
•
Tire Pressure Monitoring System (TPMS)
•
Tire Pressure Monitoring System
(TPMS) – activating/deactivating
Activating/deactivating TPMS
(Canadian models only)
1. Switch off the engine.
2. Put the ignition in mode I or II (see Igni-
tion modes (p. 79) for additional informa-
tion).
3. Press the MY CAR key in the center con-
sole control panel and select
Settings
Car settings
Tire pressure
4. Select
Tire monitoring
and press OK/
MENU to turn the system on or off.
Related information
•
09 Wheels and tires
09
309
Tire Pressure Monitoring System
(TPMS) – messages
Erasing warning messages
When a low tire pressure warning message
has been displayed and the tire pressure
warning light in the instrument panell (
)
has come on:
1. Use a tire pressure gauge to check the
inflation pressure of all four tires.
2. Re-inflate the tire(s) to the correct pres-
sure (consult the tire pressure placard
located on the driver's side B-pillar (the
structural member at the side of the vehi-
cle, at the rear of the driver's door open-
ing) or the inflation pressure table, see
Tire inflation – pressure table (p. 300).
3. In certain cases, it may be necessary to
drive the vehicle for several minutes at a
speed of 20 mph (30 km/h) or faster. This
will erase the warning text and the telltale
will go out.
•
Tire monitoring systems use a tem-
perature compensated pressure value.
This pressure value is dependent on
tire temperature and ambient tempera-
ture, which can differ from the recom-
mended cold tire pressure in the tire
inflation table and on the tire pressure
placard located on the driver's side B-
pillar (the structural member at the
side of the vehicle, at the rear of the
driver's door opening). This means
that it may sometimes be necessary to
inflate them slightly above the recom-
mended cold pressure value
(approx. 3-4 psi or 0.2-0.3 bar) in order
to reset a low tire pressure warning.
•
To help avoid incorrect tire inflation
pressure, if possible only inflate the
tires when they are cold. The tires are
considered to be cold when they have
the same temperature as the sur-
rounding (ambient) air. This tempera-
ture is normally reached after the vehi-
cle has been parked for at least
3 hours. After driving a distance of
approximately 1 mile (1.6 km), the tires
are considered to be hot.
•
After inflating the tires, always reinstall
the valve cap to help avoid damage to
the valve from dirt, gravel, etc.
•
Use plastic valve caps only. Metal
caps could corrode and become diffi-
cult to remove.
WARNING
•
Incorrect inflation pressure could lead
to tire failure, resulting in a loss of con-
trol of the vehicle.
•
Tire monitoring systems cannot indi-
cate sudden tire damage caused by
external factors (e.g., a blowout) in
advance.
Related information
•
Tire Pressure Monitoring System (TPMS)
– general information (p. 306)
•
Tire Pressure Monitoring System (TPMS)
•
Tire Pressure Monitoring System (TPMS)
– activating/deactivating (p. 308)
•
Tire Pressure Monitoring System (TPMS)
•
Tire pressure monitoring - introduction
•
09 Wheels and tires
09
310
Tire Monitor - introduction
Tire Monitor uses the rotational speed of the
tires in combination with signal analysis of the
ABS sensor signals to determine if they are
properly inflated.
When a tire is under-inflated, its diameter
(and consequently also its rotational speed)
changes. By comparing the individual tires
with each other it is possible to determine if
one or more tires are under inflated.
When low inflation pressure is detected or if
the system is not functioning properly, Tire
Monitor will light up the tire pressure warning
light (
) (also referred to as a telltale) in
the instrument panel and will display one of
the following messages in the text window,
for example:
Tire pressure low Check rear
right tire
5
or
Tire press. syst Service
required
.
If two or more tires have low pressure or if the
system cannot determine which tire has low
pressure, a general text (
Tire pressure low
Check tires
) will be displayed.
If a malfunction occurs in the system, the
tire pressure warning light will flash for
approximately 1 minute and then remain
illuminated.
Tire press. syst Service
required
will be displayed.
The system indicates low tire pressure but
does not replace normal tire maintenance.
For information on correct tire pressure,
please refer to the tire inflation pressure
table (see Tire inflation – pressure table
(p. 300)), the tire inflation pressure placard
located on the driver's side B-pillar (the
structural member at the side of the vehi-
cle, at the rear of the driver's door open-
ing) or consult your Volvo retailer.
Related information
•
Tire pressure monitoring - introduction
Calibrating Tire Monitor
In order for Tire Monitor to work correctly, tire
pressure reference values must be set. This
must be done each time wheels or tire pres-
sures are changed.
Calibration
1. Switch off the engine.
2. Inflate the tires to the desired pressure
(consult tire pressure placard located on
the driver's side B-pillar (the structural
member at the side of the vehicle) and
put the ignition in mode II, see Ignition
3. Press the MY CAR button on the center
console control panel and select
Settings
Car settings
Tire monitoring
.
4. Press OK/MENU, select
Calibrate tire
pressure
and press OK/MENU again.
5. Drive away.
> The calibration process will be comple-
ted while driving and will be interrupted
if the vehicle is parked and the engine
is switched off. Calibration continues
automatically when driving resumes.
The system will not give any confirma-
tion when calibration is finished
although it will state if calibration fails.
5
That last part of this message varies, depending on the tire(s) effected.
09 Wheels and tires
09
311
The new reference values will be used until
steps 1-5 stated above are repeated.
Always remember to calibrate Tire Monitor
when the wheels have been changed or
the tire pressure has been corrected
according to tire pressure placard or tire
pressure table. If correct reference values
have not been set, the system cannot
issue low tire pressure alerts correctly.
Tire Monitor status information
The current status of the system and the tires
is indicated by color-coded graphics.
This status can be displayed by pressing the
MY CAR button on the center console and
going to
Settings
Car settings
Tire
monitoring
.
The following color-coded graphics indicate:
•
All green: the system is operational and
all tire pressures are at or above the rec-
ommended levels.
•
One yellow wheel: the tire indicated is
under-inflated.
•
All wheels yellow: two or more tires are
under-inflated
•
All wheels gray: the system is currently
unavailable. It might be necessary to
drive at a speed of at least 20 mph
(30 km/h) for several minutes for the sys-
tem to become operational.
•
All wheels gray in combination with the
message
Tire press. syst Service
required
and the telltale in the instru-
ment panel (
) is illuminated: the
system is not functioning correctly. Have
it checked by a trained and qualified
Volvo service technician.
•
All wheels gray in combination with the
message
Tire press. syst currently
unavailable
and the telltale in the
instrument panel (
) is illuminated:
the system is temporarily unavailable. It
should become operational again shortly.
Related information
•
09 Wheels and tires
09
312
Tire Monitor – messages
When low tire pressure has been detected, a
message will be displayed and the tire pres-
sure warning telltale in the instrument panel
will illuminate.
Erasing warning messages
To erase a low tire pressure message and
turn off the telltale:
1. Use a tire pressure gauge to check the
inflation pressure of all four tires (see the
article "Tire inflation – checking pres-
sure").
2. Re-inflate the tires to the correct pressure
(consult the tire pressure placard located
on the driver's side B-pillar (the structural
member at the side of the vehicle, at the
rear of the driver's door opening) or the
inflation pressure table, see Tire inflation –
3. Recalibrate Tire Monitor, see Calibrating
To help avoid incorrect tire inflation pres-
sure, only inflate the tires when they are
cold. The tires are considered to be cold
when they have the same temperature as
the surrounding (ambient) air. This tem-
perature is normally reached after the vehi-
cle has been parked for at least 3 hours.
After driving a distance of approximately
1 mile (1.6 km), the tires are considered to
be hot.
•
After inflating the tires, always reinstall
the valve cap to help avoid damage to
the valve from dirt, gravel, etc.
•
Use plastic valve caps only. Metal
caps could corrode and become diffi-
cult to remove.
WARNING
•
Incorrect inflation pressure could lead
to tire failure, resulting in a loss of con-
trol of the vehicle.
•
Tire monitoring systems cannot indi-
cate sudden tire damage caused by
external factors (e.g., a blowout) in
advance.
Related information
•
Tire Monitor – messages (p. 312)
•
Tire inflation – checking pressure (p. 297)
•

09 Wheels and tires
09
}}
*
Option/accessory, for more information, see Introduction.
313
Self-supporting run flat tires (SST)
Self-supporting run flat tires are available as
optional equipment on certain models.
The vehicle must be equipped with one of the
tire pressure monitoring systems if tires of
this type are installed.
Tires of this type have specially reinforced
sidewalls that make it possible to continue
driving to a limited extent even though the tire
has lost some or all of its inflation pressure.
These tires are mounted on special rims (nor-
mal tires can also be mounted on these rims).
If an SST tire loses inflation pressure, the yel-
low TPMS symbol illuminates in the instru-
ment panel and a text message is also dis-
played. If this happens, reduce speed to not
more than 50 mph (80 km/h). The tire should
be replaced as soon as possible.
WARNING
•
SST tires should only be mounted by
service technicians who are familiar
with tires of this type.
•
SST tires may only be mounted on
vehicles equipped with a tire pressure
monitoring system.
•
Do not drive faster than 50 mph
(80 km/h) if the monitoring system indi-
cates that a tire has lost inflation pres-
sure.
•
Do not drive farther than 50 miles
(80 km) before replacing a damaged
SST tire.
•
Drive carefully and avoid e.g., hard
braking or fast turns.
•
SST tires must be replaced if they are
damaged. A tire of this type cannot be
repaired.
Related information
•
Tire pressure monitoring - introduction
Tire sealing system* – general
information
Certain models are equipped with a tire
sealing system* that enables you to tempo-
rarily seal a hole in the tread surface and re-
inflate a flat tire, or to adjust a tire’s inflation
pressure.
Introduction
The tire sealing system consists of an air
compressor, a container for the sealing com-
pound, wiring to connect the system to the
vehicle’s electrical system via one of the 12-
volt sockets, and a hose used to connect the
system to the tire’s inflation valve.
The tire sealing system's compressor has
been tested and approved by Volvo.
||
09 Wheels and tires
09
314
*
Option/accessory, for more information, see Introduction.
The 12-volt sockets are located in the front
tunnel console, on the rear side of the center
console in the rear seat and in the cargo
area*.
Accessing the tire sealing system
The tire sealing system is stowed under the
floor of the cargo area. To access it:
1. Lift the floor hatch in the cargo area.
2. Lift out the tire sealing system.
•
The tire sealing system is only
intended to seal holes on the tire’s
tread area, not the sidewall.
•
Tires with large holes or tears cannot
be repaired with the tire sealing sys-
tem.
•
After use, stow the tire sealing system
properly to help prevent rattling.
WARNING
•
After using the tire sealing system, the
vehicle should not be driven farther
than approximately 120 miles (200
km).
•
Have the tire inspected by a trained
and qualified Volvo service technician
as soon as possible to determine if it
can be permanently repaired or must
be replaced.
•
The vehicle should not be driven faster
than 50 mph (80 km/h) while using a
tire that has been temporarily repaired
with the tire sealing system.
•
After using the tire sealing system,
drive carefully and avoid abrupt steer-
ing maneuvers and sudden stops.
Tire sealing system–temporarily
repairing a flat tire
Temporarily repairing a flat tire is done in two
stages:
•
Stage 1: The hole is sealed by pumping
sealing compound into the tire. The car is
then driven a short distance to distribute
the sealing compound in the tire.
09 Wheels and tires
09
}}
*
Option/accessory, for more information, see Introduction.
315
Do not remove any foreign objects (nails,
etc.) from the tire before using the sealing
system.
•
Stage 2: The tire’s inflation pressure is
checked and adjusted if necessary.
WARNING
•
Never leave the tire sealing system
unattended when it is operating.
•
Keep the tire sealing system away
from children.
•
Be sure the vehicle is parked safely off
the road and away from moving traffic.
•
Apply the parking brake.
Related information
•
Tire sealing system* – overview (p. 315)
•
Tire sealing system* – inflating tires
•
Tire sealing system* – sealing compound
•
Tire sealing system* – sealing hole
•
Tire sealing system – checking inflation
•
Tunnel console – 12-volt sockets (p. 140)
•
12-volt socket in the cargo area* (p. 141)
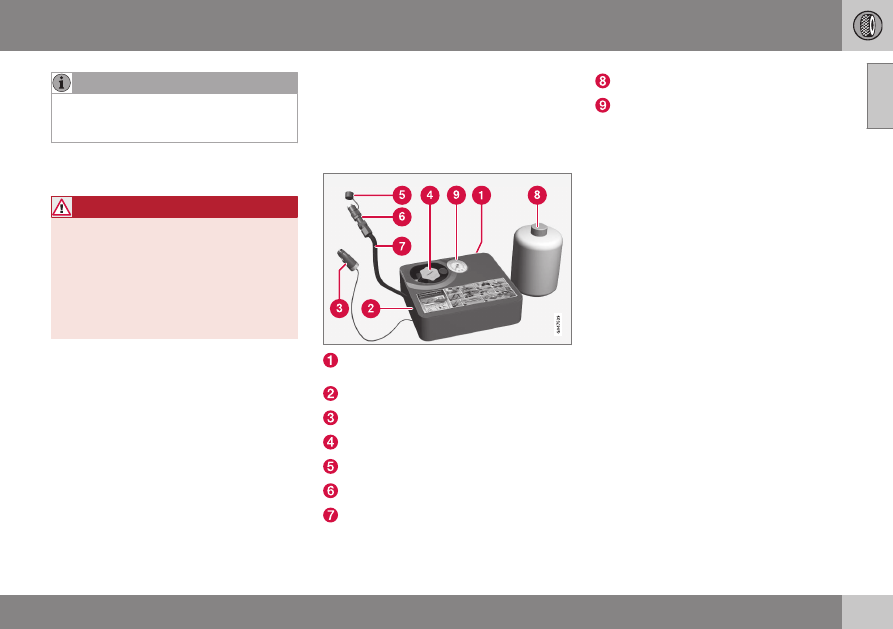
Tire sealing system* – overview
Certain models are equipped with a tire
sealing system* that enables you to tempo-
rarily seal a hole in the tread surface and re-
inflate a flat tire, or to adjust a tire’s inflation
pressure.
Speed limit sticker (on the rear side of the
compressor)
On/Off switch
Electrical wire
Bottle holder (orange cover)
Protective hose cover
Air release knob
Hose
Bottle with sealing compound
Air pressure gauge

||
09 Wheels and tires
09
316
*
Option/accessory, for more information, see Introduction.
WARNING
Please keep the following points in mind
when using the tire sealing system:
•
The sealing compound bottle (no. 8 in
the illustration) contains 1) rubber
latex, natural and 2) ethanediol. These
substances are harmful if swallowed.
•
The contents of this bottle may cause
allergic skin reactions or otherwise be
potentially harmful to the respiratory
tract, the skin, the central nervous sys-
tem, and the eyes.
Precautions:
•
Keep out of reach of children.
•
Do not ingest the contents.
•
Avoid prolonged or repeated contact
with the skin.
•
Wash thoroughly after handling.
First aid:
•
Skin: Wash affected areas of skin with
soap and water. Get medical attention
if symptoms occur.
•
Eyes: Flush with plenty of water for
least 15 minutes, occasionally lifting
the upper and lower eyelids. Get medi-
cal attention if symptoms occur.
•
Inhalation: Move the exposed person
to fresh air. If irritation persists, get
medical attention.
•
Ingestion: Do NOT induce vomiting
unless directed to do so by medical
personnel. Get medical attention.
•
Disposal: Dispose of this material and
its container to a hazardous or special
waste collection point.
Do not break the seal on the bottle. This
occurs automatically when the bottle is
screwed into the holder.
Related information
•
Tire sealing system* – general information
•
Tire sealing system* – inflating tires
•
Tire sealing system – checking inflation
•
Tire sealing system* – sealing hole
•
Tire sealing system* – sealing compound
Tire sealing system* – sealing hole
The tire sealing system can be used to tem-
porarily seal a hole in the tread surface of a
tire.
Stage 1: Sealing the hole
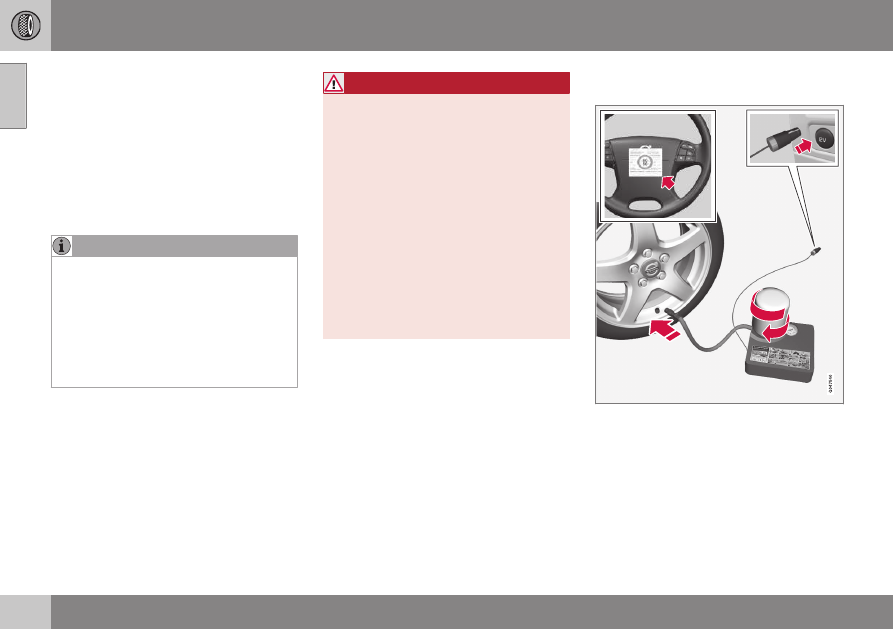
1. Peel off the speed limit sticker and affix it
to the steering wheel hub where it will be
clearly visible to the driver.
2. Ensure that the on/off switch is in posi-
tion 0 (the 0 side of the switch should be
pressed down).
WARNING
Contact with the sealing compound may
cause skin irritation. If contact occurs,
wash the affected area immediately with
soap and water.
3. Unscrew the orange cover over the bottle
holder and unscrew the cap on the bottle
of sealing compound.
Do not break the seal on the bottle. This
occurs automatically when the bottle is
screwed into the holder.
4. Screw the bottle into the bottle holder.
09 Wheels and tires
09
}}
317
WARNING
The bottle is equipped with a catch to
keep it securely in place and help prevent
sealing compound leakage. Once in place,
the bottle cannot be unscrewed. This must
be done by a trained and qualified Volvo
service technician.
5. Remove the valve cap from the tire’s
inflation valve and screw the tire sealing
system’s hose connector onto the valve
as tightly as possible by hand.
6. Connect the electrical wire to the nearest
12-volt socket in the vehicle.
Be sure that none of the other 12-volt
sockets is being used while the compres-
sor is in operation.
7. Start the vehicle’s engine.
WARNING
The vehicle´s engine should be running
when the tire sealing system is used to
avoid battery drain. Therefore, be sure the
vehicle is parked in a well ventilated place,
or outdoors, before using the system.
8. Start the tire sealing system’s compres-
sor by pressing the on/off switch to posi-
tion I.
WARNING
•
Never stand next to the tire being infla-
ted when the compressor is in opera-
tion.
•
If cracks, bubbles, etc. form on the tire,
switch off the compressor immediately.
•
If there is visible damage to the sidewall
or the rim, the tire cannot be repaired.
The vehicle should not be driven if this
occurs. Contact a towing service or
Volvo On Call Roadside Assistance if
applicable.
The air pressure gauge will temporarily
show an increase in pressure to approxi-
mately 88 psi (6 bar) while the sealing
compound is being pumped into the tire.
The pressure should return to a normal
level after approximately 30 seconds.
9. Within seven minutes, inflate the tire to
between 22—44 psi (1.8—3.0 bar).
Switch off the compressor briefly to get a
clear reading from the pressure gauge.
09 Wheels and tires
09
318
*
Option/accessory, for more information, see Introduction.
The compressor should not be used for
more than 10 minutes at a time to avoid
overheating.
WARNING
If the pressure remains below 22 psi
(1.8 bar) after approximately seven
minutes, turn off the compressor. In this
case, the hole is too large to be sealed and
the vehicle should not be driven.
10. Switch off the compressor and discon-
nect the electrical wire from the 12-volt
socket.
11. Unscrew the hose from the tire’s inflation
valve and reinstall the valve cap.
•
After inflating the tires, always reinstall
the valve cap to help avoid damage to
the valve from dirt, gravel, etc.
•
Use plastic valve caps only. Metal caps
could corrode and become difficult to
remove.
12. Immediately drive the vehicle for approxi-
mately 2 miles (3 km) at a maximum
speed of 50 mph (80 km/h) to distribute
the sealing compound in the tire.
If your vehicle is equipped with the Tire
Pressure Monitoring System (TPMS), the
use of the sealing compound may lead to
incorrect tire pressure readings or in rare
cases, damage to the tire pressure sensor.
Use the tire sealing system to check and
adjust the damaged tire's inflation pres-
sure.
•
Safely stow the tire sealing system in a
convenient place as it will soon be
used again to check the tire’s inflation
pressure.
•
The empty bottle of sealing compound
cannot be removed from the bottle
holder. Consult a trained and qualified
Volvo service technician to have the
bottle removed and properly disposed
of.
WARNING
If heavy vibrations, unsteady steering
behavior, or noises should occur while
driving, reduce speed and park the vehicle
in a safe place. Recheck the tire for
bumps, cracks, or other visible damage,
and recheck its inflation pressure. If the
pressure is below 19 psi (1.3 bar), do not
continue driving. Have the vehicle towed
to a trained and qualified Volvo service
technician.
Tire sealing system – checking
inflation pressure
The tire sealing system can also be used to
check the tires' inflation pressure.
Stage 2: Checking inflation pressure
1. Connect the tire sealing system as
described in stage 1, see Tire sealing
system* – sealing hole (p. 316).
2. Refer to the inflation pressure table in this
chapter for the correct inflation pressure.
If the tire needs to be inflated, start the
tire sealing system’s compressor. If nec-
essary, release air from the tire by turning
the air release knob counterclockwise.
The compressor should not be used for
more than 10 minutes at a time to avoid
overheating.
WARNING
If you interrupt your trip for more than 1
hour, check the inflation pressure in the
damaged tire again before continuing.
09 Wheels and tires
09
*
Option/accessory, for more information, see Introduction.
319
Tire sealing system* – inflating tires
The tire sealing system can be used to inflate
the tires.
To do so:
1. Park the car in a safe place.
2. The compressor should be switched off.
Ensure that the on/off switch is in position
0 (the 0 side of the switch should be
pressed down).
3. Take out the electrical wire and hose.
4. Remove the valve cap from the tire’s
inflation valve and screw the hose con-
nector onto the valve as tightly as possi-
ble by hand.
5. Connect the electrical wire to the nearest
12-volt socket in the vehicle.
6. Start the vehicle’s engine.
WARNING
•
The vehicle’s engine should be running
when the tire sealing system is used to
avoid battery drain. Therefore, be sure
the vehicle is parked in a well ventilated
place, or outdoors, before using the
system. The parking brake should be
securely applied and the gear selector
should be in the P (park) position.
•
Children should never be left unatten-
ded in the vehicle when the engine is
running.
7. Check the tire’s inflation pressure on the
gauge. Switch off the compressor briefly
to get a clear reading from the pressure
gauge.
8. Refer to the tire inflation table in this
chapter for the correct inflation pressure.
If the tire needs to be inflated, start the
tire sealing system’s compressor (press
the on/off switch to position I). If neces-
sary, release air from the tire by turning
the air release knob counterclockwise.
The compressor should not be used for
more than 10 minutes at a time to avoid
overheating.
9. Turn off the compressor (press the on/off
switch to position 0) when the correct
inflation pressure has been reached.
10. Unscrew the hose from the tire’s inflation
valve and reinstall the valve cap.
•
After inflating the tires, always reinstall
the valve cap to help avoid damage to
the valve from dirt, gravel, etc.
•
Use plastic valve caps only. Metal caps
could corrode and become difficult to
remove.
11. Disconnect the electrical wire from the
12-volt socket.
Нет комментариевНе стесняйтесь поделиться с нами вашим ценным мнением.
Текст