Toyota Sequoia (2005). Manual — part 13
MA002–35
MA–2
–
MAINTENANCE
INSIDE VEHICLE
49
INSIDE VEHICLE
GENERAL MAINTENANCE
These are maintenance and inspection items which are considered to be the owner’s responsibility.
They can be done by the owner or they can have them done at a service shop.
These items include those which should be checked on a daily basis, those which, in most cases, do not
require (special) tools and those which are considered to be reasonable for the owner to do.
Items and procedures for general maintenance are as follows.
1.
GENERAL NOTES
Maintenance items may vary from country to country. Check the owner’s manual supplement in which
the maintenance schedule is shown.
Every service item in the periodic maintenance schedule must be performed.
Periodic maintenance service must be performed according to whichever interval in the periodic main-
tenance schedule occurs first, the odometer reading (miles) or the time interval (months).
Maintenance service after the last period should be performed at the same interval as before unless
otherwise noted.
Failure to do even one item can cause the engine to run poorly and increase exhaust emissions.
2.
LIGHTS
(a)
Check that the headlights, stop lights, taillights, turn signal lights, and other lights are all working.
(b)
Check the headlight aim.
3.
WARNING LIGHTS AND BUZZERS
Check that all warning lights and buzzers function properly.
4.
HORN
Check that it is working.
5.
WINDSHIELD GLASS
Check for scratches, pits or abrasions.
6.
WINDSHIELD WIPER AND WASHER
(a)
Check operation of the wipers and washer.
(b)
Check that the wipers do not streak.
7.
WINDSHIELD DEFROSTER
Check that air comes out from the defroster outlet when operating the heater or air conditioner.
8.
REAR VIEW MIRROR
Check that it is mounted securely.
9.
SUN VISORS
Check that they move freely and are mounted securely.
10.
STEERING WHEEL
Check that it has the specified free play. Be alert for changes in steering condition, such as hard steering,
excessive free play or strange noises.
11.
SEATS
(a)
Check that the seat adjusters operate smoothly.
(b)
Check that all latches lock securely in any position.
(c)
Check that the head restraints move up and down smoothly and that the locks hold securely in any
latch position.
(d)
For fold–down seat backs, check that the latches lock securely.
12.
SEAT BELTS
(a)
Check that the seat belt system such as the buckles, retractors and anchors operate properly and
smoothly.
(b)
Check that the belt webbing is not cut, frayed, worn or damaged.
–
MAINTENANCE
INSIDE VEHICLE
MA–3
50
13.
ACCELERATOR PEDAL
Check the pedal for smooth operation and uneven pedal effort or catching.
14.
BRAKE PEDAL
(See page
(a)
Check the pedal for smooth operation.
(b)
Check that the pedal has the proper reserve distance and free play.
(c)
Check the brake booster function.
15.
BRAKES
At a safe place, check that the brakes do not pull to one side when applied.
16.
PARKING BRAKE
(See page
(a)
Check that the lever has the proper travel.
(b)
On a safe incline, check that the vehicle is held securely with only the parking brake applied.
17.
AUTOMATIC TRANSMISSION ”PARK” MECHANISM
On a safe incline, check that the vehicle is held securely with the selector lever in ”P” position and all brakes
released.
MA003–50
MA–4
–
MAINTENANCE
UNDER HOOD
51
UNDER HOOD
GENERAL MAINTENANCE
1.
GENERAL NOTES
Maintenance items may vary from country to country. Check the owner’s manual supplement in which
the maintenance schedule is shown.
Every service item in the periodic maintenance schedule must be performed.
Periodic maintenance service must be performed according to whichever interval in the periodic main-
tenance schedule occurs first, the odometer reading (miles) or the time interval (months).
Maintenance service after the last period should be performed at the same interval as before unless
otherwise noted.
Failure to do even one item can cause the engine to run poorly and increase exhaust emissions.
2.
WINDSHIELD WASHER FLUID
Check that there is sufficient fluid in the tank.
3.
ENGINE COOLANT LEVEL
Check that the coolant level is between the FULL and LOW lines on the see–through reservoir.
4.
RADIATOR AND HOSES
(a)
Check that the front of the radiator is clean and not blocked with leaves, dirt or bugs.
(2UZ–FE engine: See page
(b)
Check the hoses for cracks, kinks, rot or loose connections.
5.
BATTERY ELECTROLYTE LEVEL
Check that the electrolyte level of all battery cells is between the upper and lower level lines on the case.
6.
BRAKE AND CLUTCH FLUID LEVELS
Check that the brake and clutch fluid levels are near the upper level line on the see–through reservoirs.
7.
ENGINE DRIVE BELTS
Check all drive belts for fraying, cracks, wear or oiliness.
8.
ENGINE OIL LEVEL
Check the level on the dipstick with the engine turned off.
9.
POWER STEERING FLUID LEVEL
(a)
Check the level on the dipstick.
(b)
The level should be in the HOT or COLD range depending on the fluid temperature.
10.
AUTOMATIC TRANSMISSION FLUID LEVEL
(a)
Park the vehicle on a level surface.
(b)
With the engine idling and the parking brake applied, shift the selector into all positions from the P to
L, and then shift into the P position.
(c)
Pull out the dipstick and wipe off the fluid with a clean rag. Re–insert the dipstick and check that the
fluid level is in the HOT range.
(d)
Do this check with the fluid at normal driving temperature (70 – 80
°
C, 158 – 176
°
F).
HINT:
Wait until the engine cools down (approx. 30 min.) before checking the fluid level after extended driving at
high speeds, in hot weather, in heavy traffic or pulling a trailer.
11.
EXHAUST SYSTEM
(a)
Visually inspect for cracks, holes or loose supports.
(b)
If any change in the sound of the exhaust or smell of the exhaust fumes is noticed, find the cause and
correct.
MA004–18
P08488
Back
Front
–
MAINTENANCE
ENGINE
MA–5
52
ENGINE
INSPECTION
HINT:
Perform the following procedures when the engine is cold.
1.
REPLACE TIMING BELT
(See page
2.
INSPECT DRIVE BELT
(See page
3.
REPLACE SPARK PLUGS
(See page
4.
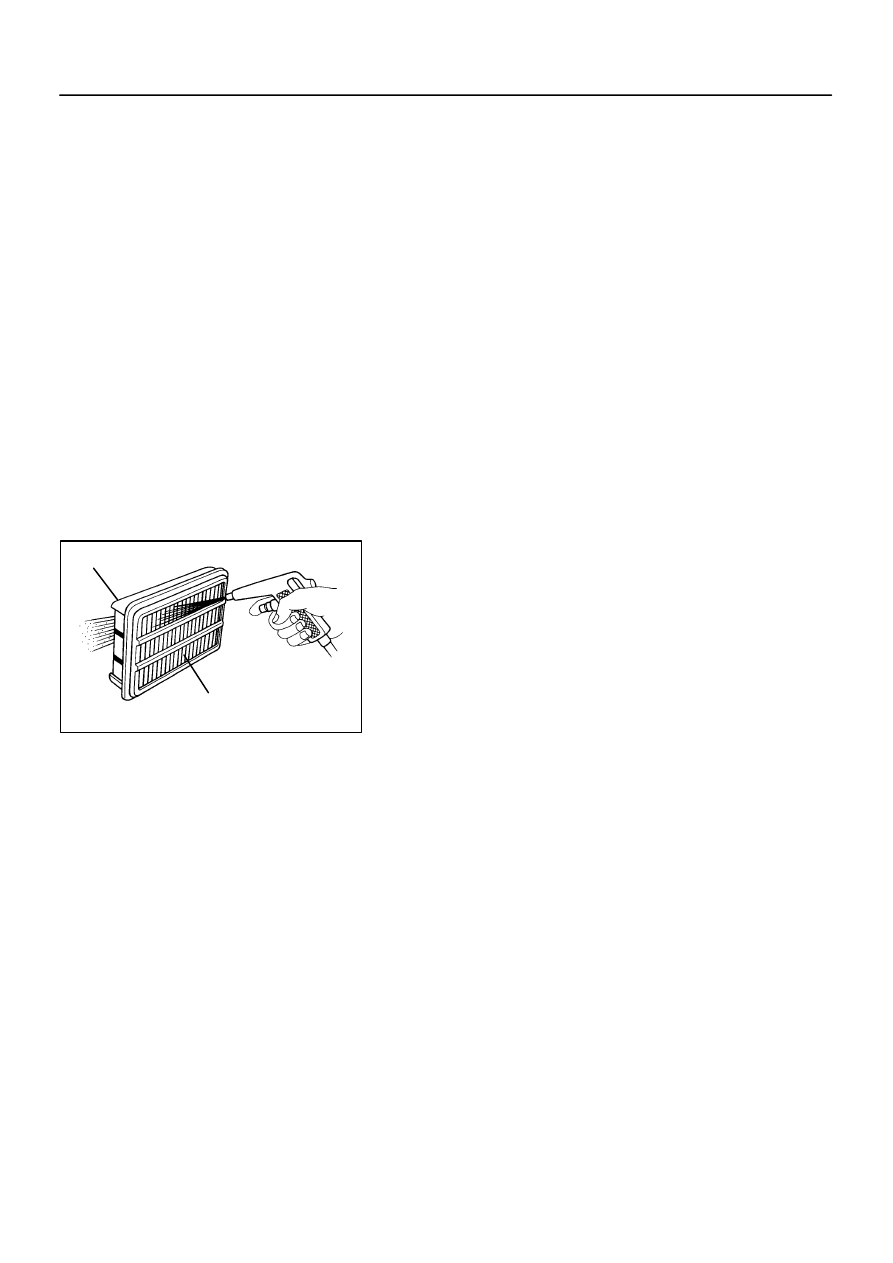
INSPECT AIR FILTER
(a)
Visually check that the air cleaner element is not exces-
sively dirty, damaged or oily.
HINT:
Oiliness may indicate a stuck PCV valve.
If necessary, replace the air cleaner element.
(b)
Clean the element with compressed air.
First blow from back side thoroughly, then blow off the
front side of the element.
5.
REPLACE AIR FILTER
Replace the used air cleaner element with a new one.
6.
REPLACE ENGINE OIL AND OIL FILTER
(See page
7.
REPLACE ENGINE COOLANT
(See page
8.
INSPECT CHARCOAL CANISTER
(See page
9.
REPLACE GASKET IN FUEL TANK CAP
(See page
10.
INSPECT FUEL LINES, CONNECTIONS, FUEL TANK
VAPOR VENT SYSTEM HOSES AND FUEL TANK
BAND
Visually inspect the fuel lines for cracks, leakage loose connec-
tions, deformation or tank band looseness.
11.
INSPECT EXHAUST PIPES AND MOUNTINGS
Visually inspect the pipes, hangers and connections for severe
corrosion, leaks or damage.
12.
INSPECT VALVE CLEARANCE
(See page
Нет комментариевНе стесняйтесь поделиться с нами вашим ценным мнением.
Текст