Toyota Sequoia (2005). Manual — part 831

RS0BC–08
RS–30
–
SUPPLEMENTAL RESTRAINT SYSTEM
STEERING WHEEL PAD AND SPIRAL CABLE
3313
REPLACEMENT
REPLACEMENT REQUIREMENTS
In the following cases, replace the steering wheel pad, steering wheel or spiral cable with a new one.
Case
Replacing part
The airbag has been deployed.
Steering wheel pad
The steering wheel pad has been found to be faulty in troubleshooting.
Steering wheel pad
The spiral cable has been found to be faulty in troubleshooting.
Spiral cable
The steering wheel pad has been found to be faulty while checking items.
(see page
Steering wheel pad
The steering wheel has been found to be faulty while checking items.
(see page
Steering wheel
The spiral cable has been found to be faulty while checking items.
(see page
Spiral cable
The steering wheel pad has been dropped.
Steering wheel pad
CAUTION:
For removal and installation of the steering wheel pad, see page
the correct procedure.
RS0BD–11
–
SUPPLEMENTAL RESTRAINT SYSTEM
STEERING WHEEL PAD AND SPIRAL CABLE
RS–31
3314
INSTALLATION
CAUTION:
If the steering wheel pad has been dropped, or there are cracks, dents or other defects in the
case or connector, replace the steering wheel pad with a new one.
When installing the steering wheel pad, take care it is not pinched between other parts.
Never use airbag parts from another vehicle. When replacing parts, replace them with new
ones.
1.
INSTALL SPIRAL CABLE (SEE PAGE
)
2.
INSTALL STEERING COLUMN COVER LOWER (SEE PAGE
)
3.
INSTALL STEERING WHEEL (SEE PAGE
)
4.
INSTALL STEERING WHEEL PAD (SEE PAGE
)
5.
CONNECT CABLE TO NEGATIVE BATTERY TERMINAL
6.
PERFORM INITIALIZATION (SEE PAGE
)
Some system need initialization when disconnecting the cable from the negative battery terminal.
7.
INSPECT SRS WARNING LIGHT (SEE PAGE
RS0BE–11
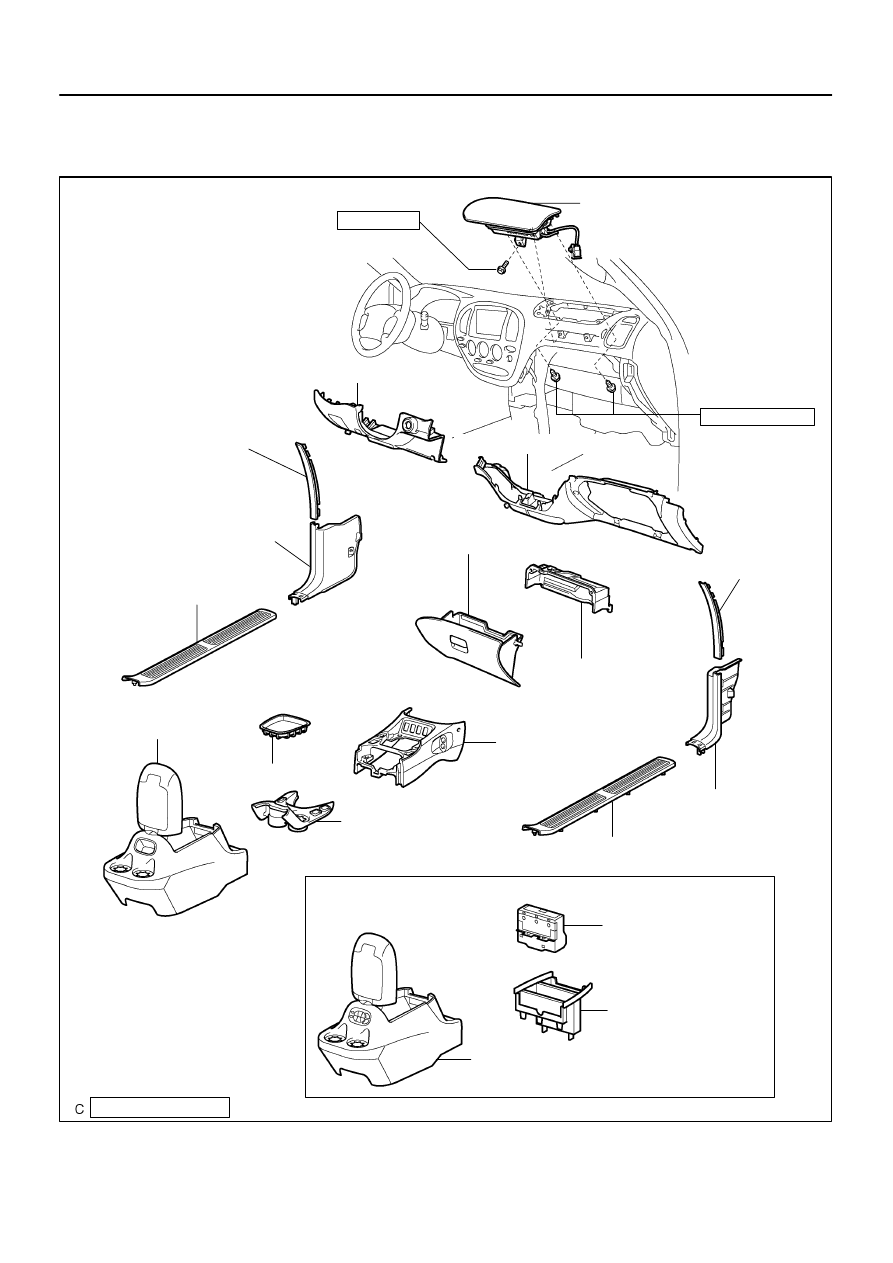
H23930
Front Passenger
Airbag Assembly
N·m (kgf·cm, ft·lbf) : Specified torque
20 (204, 15)
Lower Finish Panel
Cowl Side Trim Board
Lower No. 2
Finish Panel
Front Door
Scuff Plate
Glove Compartment Door
Front Door Scuff Plate
Cowl Side Trim Board
Front Console Box
Lower Instrument Cover
Upper Console Panel
Rear Console Box
Side Panel
Side Panel
5.0 (51, 44 in.·lbf)
Shifting Hole Cover
Rear Console Box
Disc Player Cover
Disc Player
w/ Rear seat audio or Rear seat entertainment:
RS–32
–
SUPPLEMENTAL RESTRAINT SYSTEM
FRONT PASSENGER AIRBAG ASSEMBLY
3315
FRONT PASSENGER AIRBAG ASSEMBLY
COMPONENTS
RS0T6–03
H23215
–
SUPPLEMENTAL RESTRAINT SYSTEM
FRONT PASSENGER AIRBAG ASSEMBLY
RS–33
3316
REMOVAL
NOTICE:
If the wiring connector of the SRS is disconnected
and the ignition switch is in the ON or ACC position,
DTCs will be recorded.
Never use airbag parts from another vehicle. When
replacing parts, replace them with new ones.
1.
PRECAUTION (SEE PAGE
2.
DISCONNECT CABLE FROM NEGATIVE BATTERY
TERMINAL
Wait for 90 seconds after disconnecting the cable to prevent the
airbag working.
3.
REMOVE FRONT DOOR SCUFF PLATES
(SEE PAGE
4.
REMOVE COWL SIDE TRIM BOARDS
(SEE PAGE
5.
REMOVE SIDE PANELS (SEE PAGE
6.
REMOVE LOWER FINISH PANEL
(SEE PAGE
7.
REMOVE GLOVE COMPARTMENT DOOR
(SEE PAGE
8.
REMOVE LOWER NO. 2 FINISH PANEL
(SEE PAGE
9.
REMOVE SHIFTING HOLE COVER
(SEE PAGE
10.
REMOVE UPPER CONSOLE PANEL
(SEE PAGE
11.
REMOVE REAR CONSOLE BOX
(SEE PAGE
12.
REMOVE FRONT CONSOLE BOX
(SEE PAGE
13.
REMOVE LOWER INSTRUMENT COVER
(SEE PAGE
14.
REMOVE FRONT PASSENGER AIRBAG ASSEMBLY
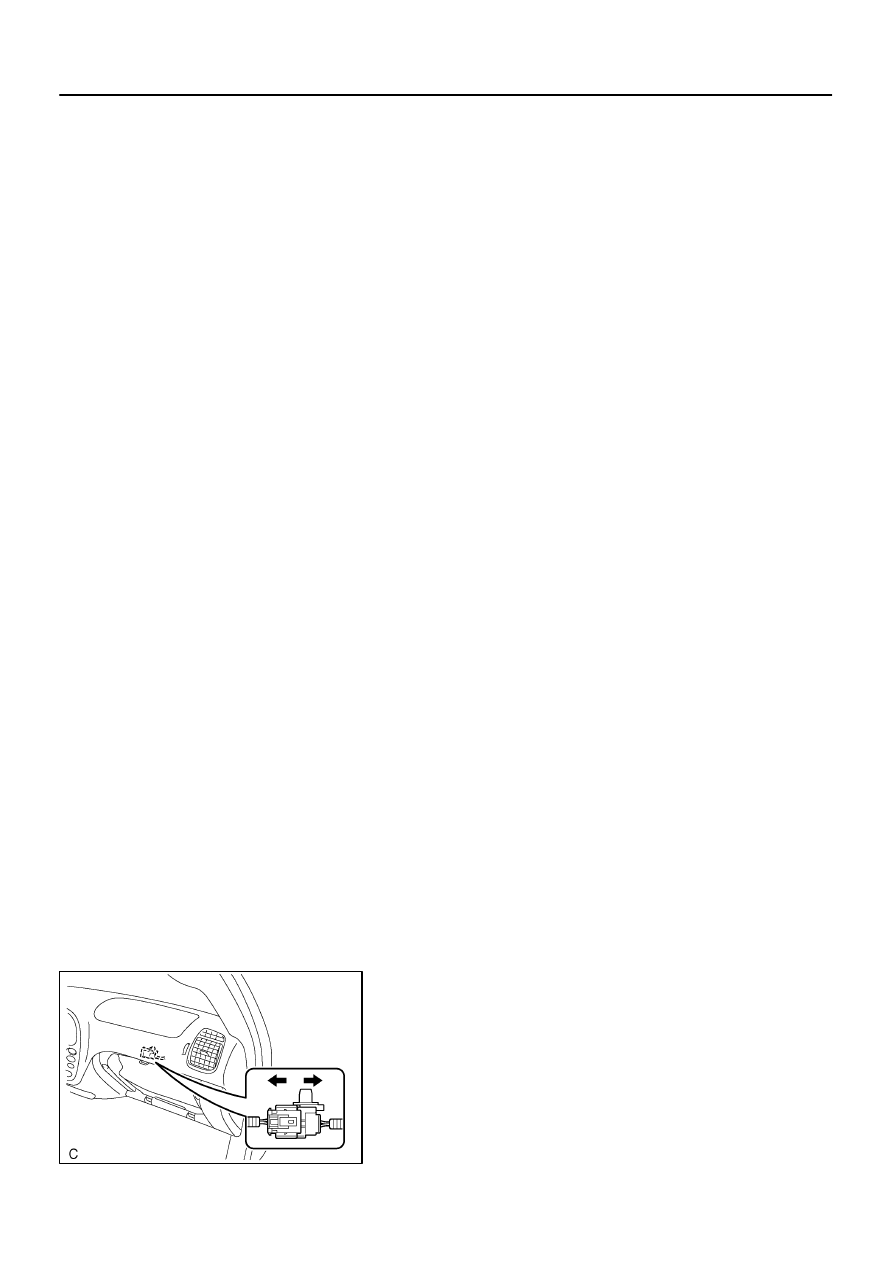
(a)
Using a clip remover, disengage the connector clamp.
(b)
Disconnect the airbag connector.
NOTICE:
When handling the airbag connector, take care not to dam-
age the airbag wire harness.
(c)
Remove the bolt holding the front passenger airbag as-
sembly and instrument panel.
(d)
Remove the 2 bolts holding the front passenger airbag
assembly and instrument panel reinforcement.
Нет комментариевНе стесняйтесь поделиться с нами вашим ценным мнением.
Текст