Toyota Prius (2022 year). Manual in english — page 33
534
6-3. Do-it-yourself maintenance
■
Situations in which the tire pressure warning system may not oper-
ate properly
●
In the following cases, the tire pressure warning system may not operate
properly.
• If non-genuine Toyota wheels are used.
• When a replacement tire is used, the system may not operate cor-
rectly due to the structure of the replacement tire.
• A tire has been replaced with a tire that is not of the specified size.
• Tire chains etc. are equipped.
• An auxiliary-supported run-flat tire is equipped.
• If a window tint that affects the radio wave signals is installed.
• If there is a lot of snow or ice on the vehicle, particularly around the
wheels or wheel housings.
• If the tire inflation pressure is extremely higher than the specified
level.
• If wheel without the tire pressure warning valve and transmitter is
used.
• If the ID code on the tire pressure warning valves and transmitters is
not registered in the tire pressure warning computer.
●
Performance may be affected in the following situations.
• Near a TV tower, electric power plant, gas station, radio station, large
display, airport or other facility that generates strong radio waves or
electrical noise
• When carrying a portable radio, cellular phone, cordless phone or
other wireless communication device
●
When the vehicle is parked, the time taken for the warning to start or go
off could be extended.
●
When tire inflation pressure declines rapidly for example when a tire has
burst, the warning may not function.
■
The initialization operation
●
Make sure to carry out initialization after adjusting the tire inflation pres-
sure.
Also, make sure the tires are cold before carrying out initialization or tire
inflation pressure adjustment.
●
If you have accidentally turned the power switch off during initialization,
it is not necessary to press the reset switch again as initialization will
restart automatically when the power switch has been turned to ON
mode for the next time.
●
If you accidentally press the reset switch when initialization is not neces-
sary, adjust the tire inflation pressure to the specified level when the
tires are cold, and conduct initialization again.
535
6-3. Do-it-yourself maintenance
6
Mainten
■
When initialization of the tire pressure warning system has failed
Initialization can be completed in a few minutes. However, in the following
cases, the settings have not been recorded and the system will not oper-
ate properly. If repeated attempts to record tire inflation pressure settings
are unsuccessful, have the vehicle inspected by your Toyota dealer.
●
When operating the initialization of the system, the tire pressure warning
light does not flash 3 times and the setting message does not appear on
the multi-information display.
●
After driving for a certain period of time since the initialization has been
completed, the warning light comes on after blinking for 1 minute.
WARNING
■
When inspecting or replacing tires
Observe the following precautions to prevent accidents.
Failure to do so may cause damage to parts of the drive train as well as
dangerous handling characteristics, which may lead to an accident
resulting in death or serious injury.
●
Do not mix tires of different makes, models or tread patterns.
Also, do not mix tires of remarkably different treadwear.
●
Do not use tire sizes other than those recommended by Toyota.
●
Do not mix differently constructed tires (radial, bias-belted or bias-ply
tires).
●
Do not mix summer, all season and snow tires.
●
Do not use tires that have been used on another vehicle.
Do not use tires if you do not know how they were used previously.
■
When initializing the tire pressure warning system
Do not initialize the tire pressure warning system without first adjusting
the tire inflation pressure to the specified level. Otherwise, the tire pres-
sure warning light may not come on even if the tire inflation pressure is
low, or it may come on when the tire inflation pressure is actually nor-
mal.
536
6-3. Do-it-yourself maintenance
NOTICE
■
Repairing or replacing tires, wheels, tire pressure warning valves,
transmitters and tire valve caps
●
When removing or fitting the wheels, tires or the tire pressure warning
valves and transmitters, contact your Toyota dealer as the tire pres-
sure warning valves and transmitters may be damaged if not handled
correctly.
●
Make sure to install the tire valve caps. If the tire valve caps are not
installed, water could enter the tire pressure warning valves and the
tire pressure warning valves could be bound.
●
When replacing tire valve caps, do not use tire valve caps other than
those specified. The cap may become stuck.
■
To avoid damage to the tire pressure warning valves and transmit-
ters
When a tire is repaired with liquid sealants, the tire pressure warning
valve and transmitter may not operate properly. If a liquid sealant is
used, contact your Toyota dealer or other qualified service shop as soon
as possible. After use of liquid sealant, make sure to replace the tire
pressure warning valve and transmitter when repairing or replacing the
tire. (
■
Driving on rough roads
Take particular care when driving on roads with loose surfaces or pot-
holes.
These conditions may cause losses in tire inflation pressure, reducing
the cushioning ability of the tires. In addition, driving on rough roads
may cause damage to the tires themselves, as well as the vehicle’s
wheels and body.
■
Low profile tires (vehicles with 215/45R17 tires)
Low profile tires may cause greater damage than usual to the wheel
when receiving impact from the road surface. Therefore pay attention to
the following:
●
Be sure to use proper tire inflation pressure. If tires are under-inflated,
they may be damaged more severely.
●
Avoid pot holes, uneven pavement, curbs and other road hazards.
Failure to do so can lead to severe tire and wheel damage.
■
If tire inflation pressure of each tire becomes low while driving
Do not continue driving, or your tires and/or wheels may be ruined.

537
6-3. Do-it-yourself maintenance
6
Mainten
Tire inflation pressure
The recommended cold tire infla-
tion pressure and tire size are dis-
played on the tire and loading
information label. (
Tire inflation pressure
538
6-3. Do-it-yourself maintenance
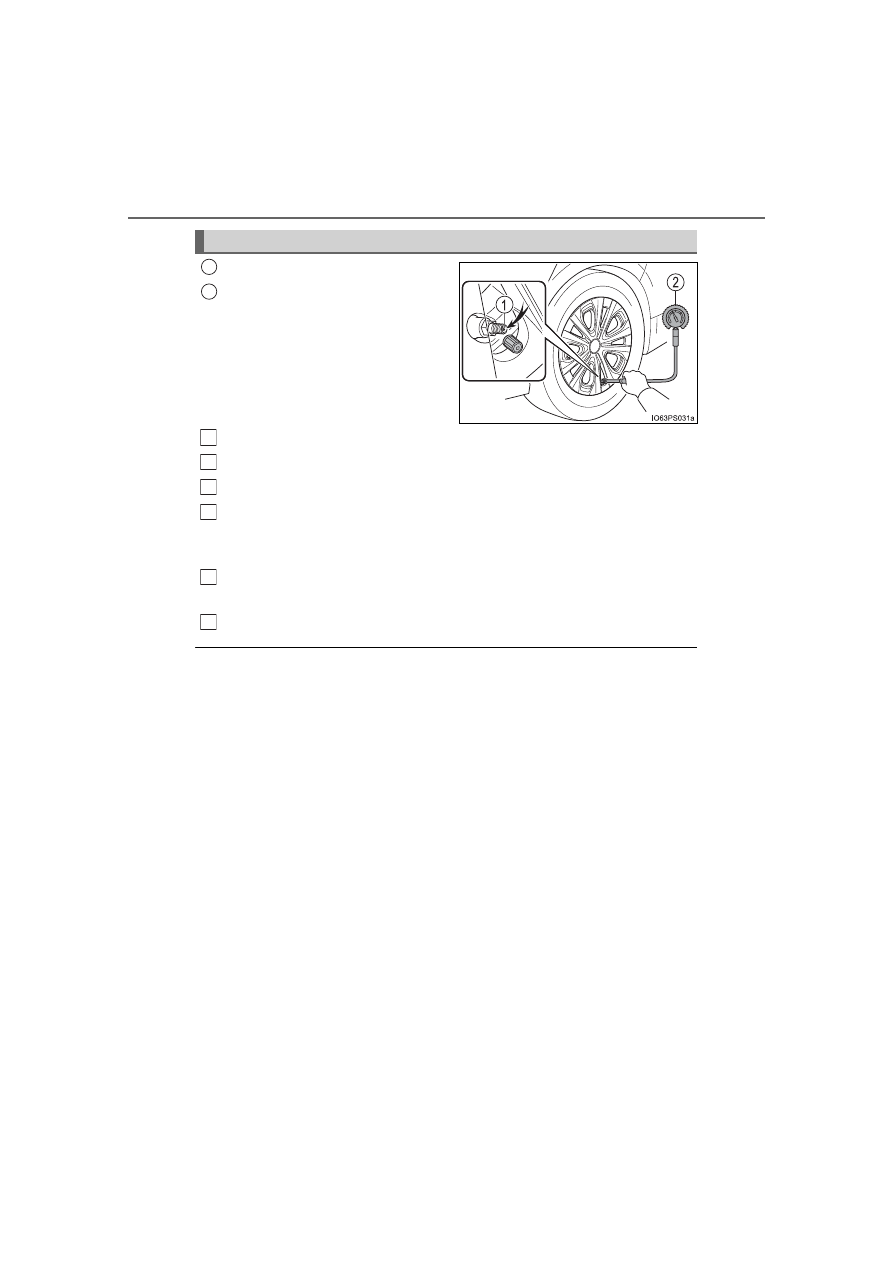
Tire valve
Tire pressure gauge
Remove the tire valve cap.
Press the tip of the tire pressure gauge onto the tire valve.
Read the pressure using the gauge gradations.
If the tire inflation pressure is not at the recommended level, adjust
the pressure.
If you add too much air, press the center of the valve to deflate.
After completing the tire inflation pressure measurement and
adjustment, apply soapy water to the valve and check for leakage.
Put the tire valve cap back on.
■
Tire inflation pressure check interval
You should check tire inflation pressure every two weeks, or at least once
a month.
Do not forget to check the spare.
■
Effects of incorrect tire inflation pressure
Driving with incorrect tire inflation pressure may result in the following:
●
Reduced fuel economy
●
Reduced driving comfort and poor handling
●
Reduced tire life due to wear
●
Reduced safety
●
Damage to the drive train
If a tire needs frequent inflating, have it checked by your Toyota dealer.
Inspection and adjustment procedure
1
2
1
2
3
4
5
6
539
6-3. Do-it-yourself maintenance
6
Mainten
■
Instructions for checking tire inflation pressure
When checking tire inflation pressure, observe the following:
●
Check only when the tires are cold.
If your vehicle has been parked for at least 3 hours or has not been
driven for more than 1 mile or 1.5 km, you will get an accurate cold tire
inflation pressure reading.
●
Always use a tire pressure gauge.
It is difficult to judge if a tire is properly inflated based only on its appear-
ance.
●
It is normal for the tire inflation pressure to be higher after driving as
heat is generated in the tire. Do not reduce tire inflation pressure after
driving.
●
Never exceed the vehicle capacity weight.
Passengers and luggage weight should be placed so that the vehicle is
balanced.
WARNING
■
Proper inflation is critical to save tire performance
Keep your tires properly inflated.
If the tires are not properly inflated, the following conditions may occur
which could lead to an accident resulting in death or serious injury:
●
Excessive wear
●
Uneven wear
●
Poor handling
●
Possibility of blowouts resulting from overheated tires
●
Air leaking from between tire and wheel
●
Wheel deformation and/or tire damage
●
Greater possibility of tire damage while driving (due to road hazards,
expansion joints, sharp edges in the road, etc.)
NOTICE
■
When inspecting and adjusting tire inflation pressure
Be sure to put the tire valve caps back on.
If a valve cap is not installed, dirt or moisture may get into the valve and
cause an air leak, resulting in decreased tire inflation pressure.
540
6-3. Do-it-yourself maintenance
Wheels
When replacing wheels, care should be taken to ensure that they are
equivalent to those removed in load capacity, diameter, rim width and
inset
*
.
Replacement wheels are available at your Toyota dealer.
*
: Conventionally referred to as “offset”.
Toyota does not recommend using the following:
●
Wheels of different sizes or types
●
Used wheels
●
Bent wheels that have been straightened
●
Use only Toyota wheel nuts and wrenches designed for use with
your aluminum wheels.
●
When rotating, repairing or changing your tires, check that the
wheel nuts are still tight after driving 1000 miles (1600 km).
●
Be careful not to damage the aluminum wheels when using tire
chains.
●
Use only Toyota genuine balance weights or equivalent and a plas-
tic or rubber hammer when balancing your wheels.
If a wheel is bent, cracked or heavily corroded, it should be
replaced. Otherwise, the tire may separate from the wheel or
cause a loss of handling control.
Wheel selection
Aluminum wheel precautions
541
6-3. Do-it-yourself maintenance
6
Mainten
■
When replacing wheels
The wheels of your vehicle are equipped with tire pressure warning
valves and transmitters that allow the tire pressure warning system to
provide advance warning in the event of a loss in tire inflation pressure.
Whenever wheels are replaced, tire pressure warning valves and trans-
mitters must be installed. (
WARNING
■
When replacing wheels
●
Do not use wheels that are a different size from those recommended in
the Owner’s Manual, as this may result in a loss of handling control.
●
Never use an inner tube in a leaking wheel which is designed for a
tubeless tire. Doing so may result in an accident, causing death or seri-
ous injury.
■
When installing the wheel nuts
●
Be sure to install the wheel nuts with the tapered ends facing inward.
(
Installing the nuts with the tapered ends facing outward can cause the
wheel to break and eventually cause the wheel to come off while driv-
ing, which could lead to an accident resulting in death or serious injury.
●
Never use oil or grease on the wheel bolts or wheel nuts.
Oil and grease may cause the wheel nuts to be excessively tightened,
leading to bolt or disc wheel damage. In addition, the oil or grease can
cause the wheel nuts to loosen and the wheel may fall off, causing an
accident and resulting in death or serious injury. Remove any oil or
grease from the wheel bolts or wheel nuts.
■
Use of defective wheels prohibited
Do not use cracked or deformed wheels.
Doing so could cause the tire to leak air during driving, possibly causing
an accident.
542
6-3. Do-it-yourself maintenance
NOTICE
■
Replacing tire pressure warning valves and transmitters
●
Because tire repair or replacement may affect the tire pressure warn-
ing valves and transmitters, make sure to have tires serviced by your
Toyota dealer or other qualified service shop. In addition, make sure to
purchase your tire pressure warning valves and transmitters at your
Toyota dealer.
●
Ensure that only genuine Toyota wheels are used on your vehicle.
Tire pressure warning valves and transmitters may not work properly
with non-genuine wheels.

543
6-3. Do-it-yourself maintenance
6
Mainten
Air conditioning filter
Turn the power switch off.
Open the glove box and slide
off the damper.
Push in each side of the glove
box to disconnect the claws,
and then slowly and fully open
the glove box while supporting
it.
With the glove box fully open,
slightly lift up the glove box and
pull toward the seat to detach
the bottom of the glove box.
Do not use excessive force if the
glove box does not detach when
lightly pulled. Instead, pull toward
the seat while slightly adjusting the
height of the glove box.
The air conditioning filter must be changed regularly to maintain
air conditioning efficiency.
Replacing the air conditioning filter
1
2
3
4

544
6-3. Do-it-yourself maintenance
Remove the filter cover.
Unlock the filter cover.
Move the filter cover in the
direction of the arrow, and
then pull it out of the claws.
Remove the filter case.
Remove the air conditioning fil-
ter from the filter case and
replace it with a new one.
The “
UP” marks shown on the fil-
ter should be pointing up.
When installing, reverse the steps listed.
5
1
2
6
7
8

545
6-3. Do-it-yourself maintenance
6
Mainten
■
Checking interval
Inspect and replace the air conditioning filter according to the maintenance
schedule. In dusty areas or areas with heavy traffic flow, early replacement
may be required. (For scheduled maintenance information, please refer to the
“Scheduled Maintenance Guide” or “Owner’s Manual Supplement”.)
■
If air flow from the vents decreases dramatically
The filter may be clogged. Check the filter and replace if necessary.
NOTICE
■
When using the air conditioning system
Make sure that a filter is always installed.
Using the air conditioning system without a filter may cause damage to the
system.
■
When removing the glove box
Always follow the specified procedure to remove the glove box (
P. 543). If
the glove box is removed without following the specified procedure, the
hinge of the glove box may become damaged.
■
To prevent damage to the filter cover
When moving the filter cover in the direc-
tion of arrow to release the fitting, pay
attention not to apply excessive force to
the claws. Otherwise, the claws may be
damaged.

546
6-3. Do-it-yourself maintenance
Cleaning the hybrid battery (traction bat-
tery) air intake vent and filter
Remove the dust from the air
intake vent with a vacuum
cleaner, etc.
Make sure to only use a vacuum to
suck out dust and clogs. Attempt-
ing to blow out dust and clogs
using an airgun, etc. may push it
into the air intake vent. (
If dust and clogs cannot be completely removed with the air intake
vent cover installed, remove the cover and clean the filter.
Turn the power switch off.
Using a Phillips screwdriver,
remove the clip.
To prevent the fuel economy from being affected, visually
inspect the hybrid battery (traction battery) air intake vent peri-
odically for dust and clogs. If it is dusty or clogged or if “Mainte-
nance Required for Traction Battery Cooling Parts See Owner’s
Manual” is shown on the multi-information display, clean the air
intake vent using the following procedures:
Cleaning the air intake vent
If dust and clogs cannot be completely removed
1
2

547
6-3. Do-it-yourself maintenance
6
Mainten
Remove the air intake vent
cover.
Pull the cover as shown in
the illustration to disengage
the 5 claws, starting from the
claw in the upper right cor-
ner.
Pull the cover toward the
front of the vehicle to remove
it.
Remove the air intake vent fil-
ter.
Disengage the 1 claw as
shown in the illustration.
Disengage the 2 claws to
remove the filter from the
cover.
Remove the dust and clogs
from the filter using a vacuum
cleaner, etc.
Make sure to also remove the dust
and clogs from the inside of the air
intake vent cover.
3
1
2
4
1
2
5

548
6-3. Do-it-yourself maintenance
Reinstall the filter to the cover.
Engage the filter to the 2
claws as shown in the illus-
tration.
Engage the 1 claw to install
the filter.
Make sure that the filter is not
crooked or deformed when install-
ing it.
Install the air intake vent cover.
Insert the tab of the cover as
shown in the illustration.
Push the cover to engage the
5 claws.
Install the clip.
6
1
2
7
1
2
8
549
6-3. Do-it-yourself maintenance
6
Mainten
■
Scheduled maintenance of the air intake vent is necessary when
In some situations such as when the vehicle is used frequently or in heavy
traffic or dusty areas, the air intake vent may need to be cleaned more regu-
larly. For details, refer to the “Scheduled Maintenance Guide” or “Owner’s
Manual Supplement”.
■
Cleaning the air intake vent
●
Dust in the air intake vent may interfere with the cooling of the hybrid battery
(traction battery). If charging/discharging of the hybrid battery (traction bat-
tery) becomes limited, the distance that the vehicle can be driven using the
electric motor (traction motor) may be reduced and the fuel economy may
be reduced. Inspect and clean the air intake vent periodically.
●
Improper handling of the air intake vent cover and filter may result in dam-
age to them. If you have any concerns about cleaning the filter, contact your
Toyota dealer.
■
If “Maintenance Required for Traction Battery Cooling Parts See Owner’s
Manual” is shown on the multi-information display
●
If this warning message is shown on the multi-information display, remove
the air intake vent cover and clean the filter. (
●
After cleaning the air intake vent, start the hybrid system and check that the
warning message is no longer shown.
It may take approximately 20 minutes after the hybrid system is started until
the warning message disappears. If the warning message does not disap-
pear, have the vehicle inspected by your Toyota dealer.
WARNING
■
When cleaning the air intake vent
●
Do not use water or other liquids to clean the air intake vent. If water is
applied to the hybrid battery (traction battery) or other components, a mal-
function or fire may occur.
●
Before cleaning the air intake vent, make sure to turn the power switch off
to stop the hybrid system.
■
When removing the air intake vent cover
Do not touch the service plug located near the air intake vent. (
Нет комментариевНе стесняйтесь поделиться с нами вашим ценным мнением.
Текст