Toyota 4Runner (2020 year). Manual — part 26

408
6-3. Do-it-yourself maintenance
4RUNNER (U)
With the engine at operating temperature and turned off, check the oil
level on the dipstick.
■
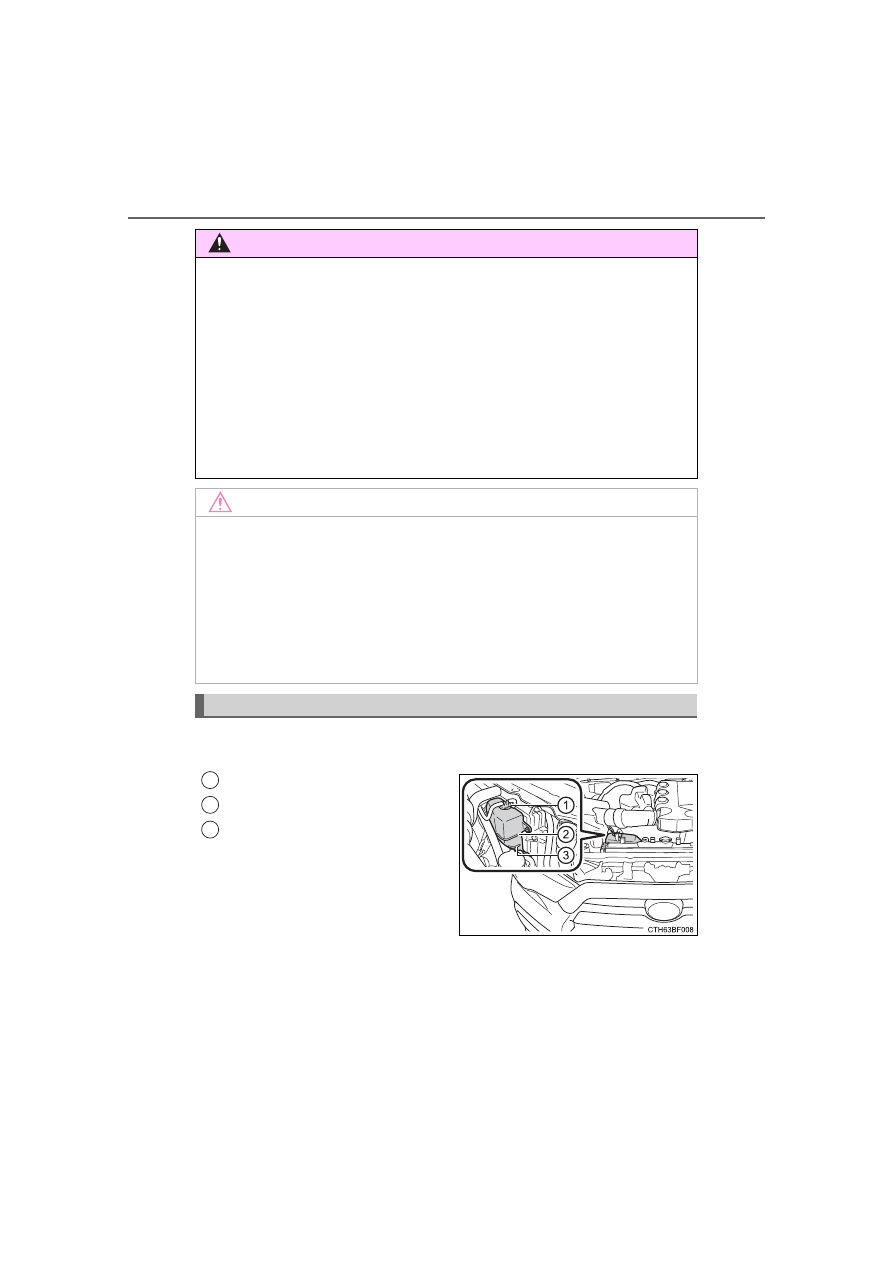
Checking the engine oil
Park the vehicle on level ground. After warming up the engine
and turning it off, wait more than 5 minutes for the oil to drain
back into the bottom of the engine.
Holding a rag under the end,
pull the dipstick out.
Wipe the dipstick clean.
Reinsert the dipstick fully.
Holding a rag under the end,
pull the dipstick out and
check the oil level.
Low
Normal
Excessive
The shape of the dipstick may
differ depending on the type of
vehicle or engine.
Wipe the dipstick and reinsert it fully.
Engine oil
1
2
3
4
5
1
2
3
6
-------------------------------------------------------------------------------------------------------------------------------------------------------------

409
6-3. Do-it-yourself maintenance
6
Mainten
ance an
d ca
re
4RUNNER (U)
■
Adding engine oil
If the oil level is below or near
the low level mark, add engine
oil of the same type as that
already in the engine.
Make sure to check the oil type and prepare the items needed
before adding oil.
Remove the oil filler cap by turning it counterclockwise.
Add engine oil slowly, checking the dipstick.
Install the oil filler cap by turning it clockwise.
■
Engine oil consumption
A certain amount of engine oil will be consumed while driving. In the following
situations, oil consumption may increase, and engine oil may need to be
refilled in between oil maintenance intervals.
●
When the engine is new, for example directly after purchasing the vehicle or
after replacing the engine
●
If low quality oil or oil of an inappropriate viscosity is used
●
When driving at high engine speeds or with a heavy load, when towing, or
when driving while accelerating or decelerating frequently
●
When leaving the engine idling for a long time, or when driving frequently
through heavy traffic
Engine oil selection
Oil quantity
(Low
Full)
1.8 qt. (1.7 L, 1.5 Imp. qt.)
Items
Clean funnel
1
2
3
-------------------------------------------------------------------------------------------------------------------------------------------------------------
410
6-3. Do-it-yourself maintenance
4RUNNER (U)
The coolant level is satisfactory if it is between the “F” and “L” lines on
the reservoir when the engine is cold.
Reservoir cap
“F” line
“L” line
If the level is on or below the “L”
line, add coolant up to the “F” line.
(
WARNING
■
Used engine oil
●
Used engine oil contains potentially harmful contaminants which may
cause skin disorders such as inflammation and skin cancer, so care
should be taken to avoid prolonged and repeated contact. To remove used
engine oil from your skin, wash thoroughly with soap and water.
●
Dispose of used oil and filters only in a safe and acceptable manner. Do
not dispose of used oil and filters in household trash, in sewers or onto the
ground.
Call your Toyota dealer, service station or auto parts store for information
concerning recycling or disposal.
●
Do not leave used engine oil within the reach of children.
NOTICE
■
To prevent serious engine damage
Check the oil level on a regular basis.
■
When replacing the engine oil
●
Be careful not to spill engine oil on the vehicle components.
●
Avoid overfilling, or the engine could be damaged.
●
Check the oil level on the dipstick every time you refill the vehicle.
●
Be sure the engine oil filler cap is properly tightened.
Engine coolant
1
2
3
-------------------------------------------------------------------------------------------------------------------------------------------------------------
411
6-3. Do-it-yourself maintenance
6
Mainten
ance an
d ca
re
4RUNNER (U)
■
Coolant selection
Only use “Toyota Super Long Life Coolant” or a similar high quality ethylene
glycol based non-silicate, non-amine, non-nitrite, and non-borate coolant with
long-life hybrid organic acid technology.
U.S.A.:
“Toyota Super Long Life Coolant” is a mixture of 50% coolant and 50% deion-
ized water. (Minimum temperature: -31
F [-35
C])
Canada:
“Toyota Super Long Life Coolant” is a mixture of 55% coolant and 45% deion-
ized water. (Minimum temperature: -44
F [-42
C])
For more details about engine coolant, contact your Toyota dealer.
■
If the coolant level drops within a short time of replenishing
Visually check the radiator, hoses, engine coolant reservoir caps, drain cock
and water pump.
If you cannot find a leak, have your Toyota dealer test the cap and check for
leaks in the cooling system.
WARNING
■
When the engine is hot
Do not remove the engine coolant reservoir cap or the radiator cap.
(
The cooling system may be under pressure and may spray hot coolant if the
cap is removed, causing serious injuries, such as burns.
NOTICE
■
When adding coolant
Coolant is neither plain water nor straight antifreeze. The correct mixture of
water and antifreeze must be used to provide proper lubrication, corrosion
protection and cooling. Be sure to read the antifreeze or coolant label.
■
If you spill coolant
Be sure to wash it off with water to prevent it from damaging parts or paint.
-------------------------------------------------------------------------------------------------------------------------------------------------------------

412
6-3. Do-it-yourself maintenance
4RUNNER (U)
Check the radiator and condenser and clear away any foreign objects.
If either of the above parts is extremely dirty or you are not sure of
their condition, have your vehicle inspected by your Toyota dealer.
■
Checking fluid level
The brake fluid level should be
between the “MAX” and “MIN”
lines on the tank.
“MAX” line
“MIN” line
■
Adding fluid
Make sure to check the fluid type and prepare the necessary item.
■
Refilling brake fluid
Turn the engine switch off.
Depress the brake pedal more than 40 times.
Remove the reservoir cap by hand. Add brake fluid up to the
“MAX” line.
If you do not follow the procedure above, the reservoir may over-
flow.
Radiator and condenser
WARNING
■
When the engine is hot
Do not touch the radiator or condenser as they may be hot and cause seri-
ous injuries, such as burns.
Brake fluid
1
2
Fluid type
FMVSS No.116 DOT 3 or SAE J1703 brake fluid
Items
Clean funnel
1
2
3
-------------------------------------------------------------------------------------------------------------------------------------------------------------
413
6-3. Do-it-yourself maintenance
6
Mainten
ance an
d ca
re
4RUNNER (U)
■
Brake fluid can absorb moisture from the air
Excess moisture in the brake fluid can cause a dangerous loss of braking effi-
ciency. Use only newly opened brake fluid.
WARNING
■
When filling the reservoir
Take care as brake fluid can harm your hands and eyes and damage
painted surfaces.
If fluid gets on your hands or in your eyes, flush the affected area with clean
water immediately.
If you still experience discomfort, see a doctor.
NOTICE
■
If the fluid level is low or high
It is normal for the brake fluid level to go down slightly as the brake pads
wear out or when the fluid level in the accumulator is high.
If the reservoir needs frequent refilling, there may be a serious problem.
-------------------------------------------------------------------------------------------------------------------------------------------------------------

414
6-3. Do-it-yourself maintenance
4RUNNER (U)
■
Fluid level
The fluid level should be within the appropriate range.
Full (when cold)
Add fluid (when cold)
Full (when hot)
Add fluid (when hot)
Hot: Vehicle has been driven around 50 mph (80 km/h) for 20 min-
utes, or slightly longer in frigid temperatures. (Fluid tempera-
ture, 140°F - 175°F [60°C - 80°C]).
Cold: Engine has not been run for about 5 hours. (Room tempera-
ture, 50°F - 85°F [10°C - 30°C]).
■
Checking the fluid level
Make sure to check the fluid type and prepare the necessary items.
Clean all dirt off the reservoir.
Remove the cap by turning it counterclockwise.
Wipe the dipstick clean.
Reinstall the cap and remove it again.
Check the fluid level.
Power steering fluid
1
2
3
4
Fluid type
Automatic transmission fluid DEXRON
®
II or III
Items
Rag or paper, clean funnel (only for adding fluid)
1
2
3
4
5
-------------------------------------------------------------------------------------------------------------------------------------------------------------

415
6-3. Do-it-yourself maintenance
6
Mainten
ance an
d ca
re
4RUNNER (U)
Check the battery as follows.
■
Battery exterior
Make sure that the battery terminals are not corroded and that
there are no loose connections, cracks, or loose clamps.
Terminals
Hold-down clamp
■
Before recharging
When recharging, the battery produces hydrogen gas which is flammable and
explosive. Therefore, observe the following before recharging:
●
If recharging with the battery installed on the vehicle, be sure to disconnect
the ground cable.
●
Make sure the power switch on the charger is off when connecting and dis-
connecting the charger cables to the battery.
WARNING
■
When checking the reservoir
Take care as the reservoir may be hot.
NOTICE
■
When adding fluid
Avoid overfilling, or the power steering may be damaged.
■
After replacing the reservoir cap
Check the steering box case, vane pump and hose connections for leaks or
damage.
Battery
1
2
-------------------------------------------------------------------------------------------------------------------------------------------------------------
416
6-3. Do-it-yourself maintenance
4RUNNER (U)
■
After recharging/reconnecting the battery (vehicles with a smart key sys-
tem)
The engine may not start. Follow the procedure below to initialize the system.
Shift the shift lever to P.
Open and close any of the doors.
Restart the engine.
●
Unlocking the doors using the smart key system may not be possible imme-
diately after reconnecting the battery. If this happens, use the wireless
remote control or the mechanical key to lock/unlock the doors.
●
Start the engine with the engine switch in ACCESSORY mode. The engine
may not start when the engine switch turned from off. However, the engine
will operate normally from the second attempt.
●
The engine switch mode is recorded by the vehicle. If the battery is recon-
nected, the vehicle will return the engine switch mode to the status it was in
before the battery was disconnected. Make sure to turn off the engine
before disconnect the battery. Take extra care when connecting the battery
if the engine switch mode prior to discharge is unknown.
If the system will not start even after multiple attempts, contact your Toyota
dealer.
WARNING
■
Chemicals in the battery
Batteries contain poisonous and corrosive sulfuric acid and may produce
hydrogen gas which is flammable and explosive. To reduce the risk of death
or serious injury, take the following precautions while working on or near the
battery:
●
Do not cause sparks by touching the battery terminals with tools.
●
Do not smoke or light a match near the battery.
●
Avoid contact with eyes, skin and clothes.
●
Never inhale or swallow electrolyte.
●
Wear protective safety glasses when working near the battery.
●
Keep children away from the battery.
1
2
3
-------------------------------------------------------------------------------------------------------------------------------------------------------------
417
6-3. Do-it-yourself maintenance
6
Mainten
ance an
d ca
re
4RUNNER (U)
WARNING
■
Where to safely charge the battery
Always charge the battery in an open area. Do not charge the battery in a
garage or closed room where there is insufficient ventilation.
■
How to recharge the battery
Only perform a slow charge (5 A or less). The battery may explode if
charged at a quicker rate.
■
Emergency measures regarding electrolyte
●
If electrolyte gets in your eyes
Flush your eyes with clean water for at least 15 minutes and get immedi-
ate medical attention. If possible, continue to apply water with a sponge or
cloth while traveling to the nearest medical facility.
●
If electrolyte gets on your skin
Wash the affected area thoroughly. If you feel pain or burning, get medical
attention immediately.
●
If electrolyte gets on your clothes
It can soak through clothing on to your skin. Immediately take off the cloth-
ing and follow the procedure above if necessary.
●
If you accidentally swallow electrolyte
Drink a large quantity of water or milk. Get emergency medical attention
immediately.
NOTICE
■
When recharging the battery
Never recharge the battery while the engine is running. Also, be sure all
accessories are turned off.
-------------------------------------------------------------------------------------------------------------------------------------------------------------

418
6-3. Do-it-yourself maintenance
4RUNNER (U)
Type A
If any washer does not work or the
warning message appears on the
multi-information
display,
the
washer tank may be empty. Add
washer fluid.
Type B
If the washer fluid level is at
“LOW”, add washer fluid.
■
Using the gauge (Type B only)
Washer fluid
The washer fluid level can be checked by
observing the position of the level on the
liquid-covered holes in the gauge.
If the level falls below the second hole
from the bottom (the “LOW” position), refill
the washer fluid.
Current
fluid
level
-------------------------------------------------------------------------------------------------------------------------------------------------------------
419
6-3. Do-it-yourself maintenance
6
Mainten
ance an
d ca
re
4RUNNER (U)
WARNING
■
When adding washer fluid
Do not add washer fluid when the engine is hot or running as washer fluid
contains alcohol and may catch fire if spilled on the engine etc.
NOTICE
■
Do not use any fluid other than washer fluid
Do not use soapy water or engine antifreeze instead of washer fluid.
Doing so may cause streaking on the vehicle's painted surfaces, as well as
damaging the pump leading to problems of the washer fluid not spraying.
■
Diluting washer fluid
Dilute washer fluid with water as necessary.
Refer to the freezing temperatures listed on the label of the washer fluid bot-
tle.
-------------------------------------------------------------------------------------------------------------------------------------------------------------

420
6-3. Do-it-yourself maintenance
4RUNNER (U)
Check if the treadwear indicators are showing on the tires. Also check
the tires for uneven wear, such as excessive wear on one side of the
tread.
Check the spare tire condition and pressure if not rotated.
New tread
Worn tread
Treadwear indicator
The location of treadwear indicators is shown by a “TWI” or “
” mark,
etc., molded into the sidewall of each tire.
Replace the tires if the treadwear indicators are showing on a tire.
Tires
Replace or rotate tires in accordance with maintenance sched-
ules and treadwear.
Checking tires
1
2
3
-------------------------------------------------------------------------------------------------------------------------------------------------------------

421
6-3. Do-it-yourself maintenance
6
Mainten
ance an
d ca
re
4RUNNER (U)
Vehicles without P245/60R20 tires
Rotate the tires in the order
shown.
To equalize tire wear and extend
tire life, Toyota recommends that
tire rotation is carried out at the
same interval as tire inspection.
Vehicles with P245/60R20 tires
Rotate the tires in the order
shown.
To equalize tire wear and extend
tire life, Toyota recommends that
tire rotation is carried out at the
same interval as tire inspection.
Tire rotation
Front
Front
-------------------------------------------------------------------------------------------------------------------------------------------------------------

422
6-3. Do-it-yourself maintenance
4RUNNER (U)
Your vehicle is equipped with a tire pressure warning system that uses
tire pressure warning valve and transmitters to detect low tire inflation
pressure before serious problems arise.
●
The tire pressure detected by
the tire pressure warning sys-
tem can be displayed on the
multi-information display.
*
:
If equipped
●
If the tire pressure drops below
a predetermined level, the
driver is warned by a screen
display and a warning light.
(
*
:
If equipped
Tire pressure warning system
*
*
-------------------------------------------------------------------------------------------------------------------------------------------------------------

423
6-3. Do-it-yourself maintenance
6
Mainten
ance an
d ca
re
4RUNNER (U)
◆
Installing tire pressure warning valve and transmitters
When replacing the tires or wheels, the tire pressure warning valve
and transmitters must be installed to the wheels which will be
installed to the vehicle.
When new tire pressure warning valve and transmitters are
installed, new ID codes must be registered in the tire pressure
warning computer and the tire pressure warning system must be
initialized. (
◆
Initializing the tire pressure warning system
■
The tire pressure warning system must be initialized in the fol-
lowing circumstances:
●
When the tire inflation pressure is changed such as when chang-
ing traveling speed or load weight.
●
When the tire inflation pressure is changed such as when the tire
size is changed.
●
When rotating the tires.
●
After performing the transmitter ID code registration procedure.
(
When the tire pressure warning system is initialized, the current tire
inflation pressure is set as the benchmark pressure.
■
How to initialize the tire pressure warning system
Park the vehicle in a safe place and turn the engine switch off.
The initialization procedure cannot be started while the vehicle is
moving.
Adjust the tire inflation pressure to the specified cold tire inflation
pressure level. (
Make sure to adjust the tire pressure to the specified cold tire infla-
tion pressure level. The tire pressure warning system will operate
based on this pressure level.
Start the engine. (
Select
on the multi-information display using the meter con-
trol switches on the steering wheel. (
Select “Vehicle Settings” and then press and hold
.
Select “TPWS” and then press
.
1
2
3
4
5
6
-------------------------------------------------------------------------------------------------------------------------------------------------------------
Нет комментариевНе стесняйтесь поделиться с нами вашим ценным мнением.
Текст