Toyota Corolla (2020 year). Owner's manual — part 23
358
5-13. Phone operation (Hands-free system for cellular phones)
or “Mark Read” to mark mail
unread or read on the message
screen.
This function is available when
“Update Message Read Status on
Phone” is set to on. (P.368)
*
: If equipped
1
Display the message screen.
(P.356)
2
Select the desired message
from the list.
3
Select “Reply”.
4
Select “Dictation”.
5
When the “Say Your Mes-
sage” screen is displayed,
speak message that you
want to send.
6
Select “Send” to send mes-
sage.
“Cancel”: Select to cancel sending
the message.
“Retry”: Select to retry speaking
message that you want to send.
While the message is being sent, a
sending message screen is dis-
played.
7
Check that a confirmation
screen is displayed when the
operation is complete.
If an error message is displayed,
follow the guidance on the screen
to try again.
15 messages have already
been stored.
1
Display the message screen.
(P.356)
2
Select the desired message
from the list.
3
Select “Reply”.
4
Select “Quick Message”.
5
Select the desired message.
: Select to edit the message.
(P.358)
6
Select “Send”.
“Cancel”: Select to cancel sending
the message.
While the message is being sent, a
sending message screen is dis-
played.
7
Check that a confirmation
screen is displayed when the
operation is complete.
If an error message is displayed,
follow the guidance on the screen
to try again.
Depending on the type of Blue-
tooth
®
phone, reply function is not
available.
■
Editing quick reply mes-
sages
This operation cannot be per-
formed while driving.
1
Select
corresponding to
the desired message to edit.
2
Select “OK” when editing is
completed.
To reset the edited quick reply mes-
sages, select “Default”.
Replying to a message
(dictation reply)
*
Replying to a message
(quick reply)
-------------------------------------------------------------------------------------------------------------------------------------------------------------
359
5-13. Phone operation (Hands-free system for cellular phones)
5
Entune au
dio
Calls can be made to an
e-mail/SMS/MMS message
sender’s phone number.
This operation can be per-
formed while driving.
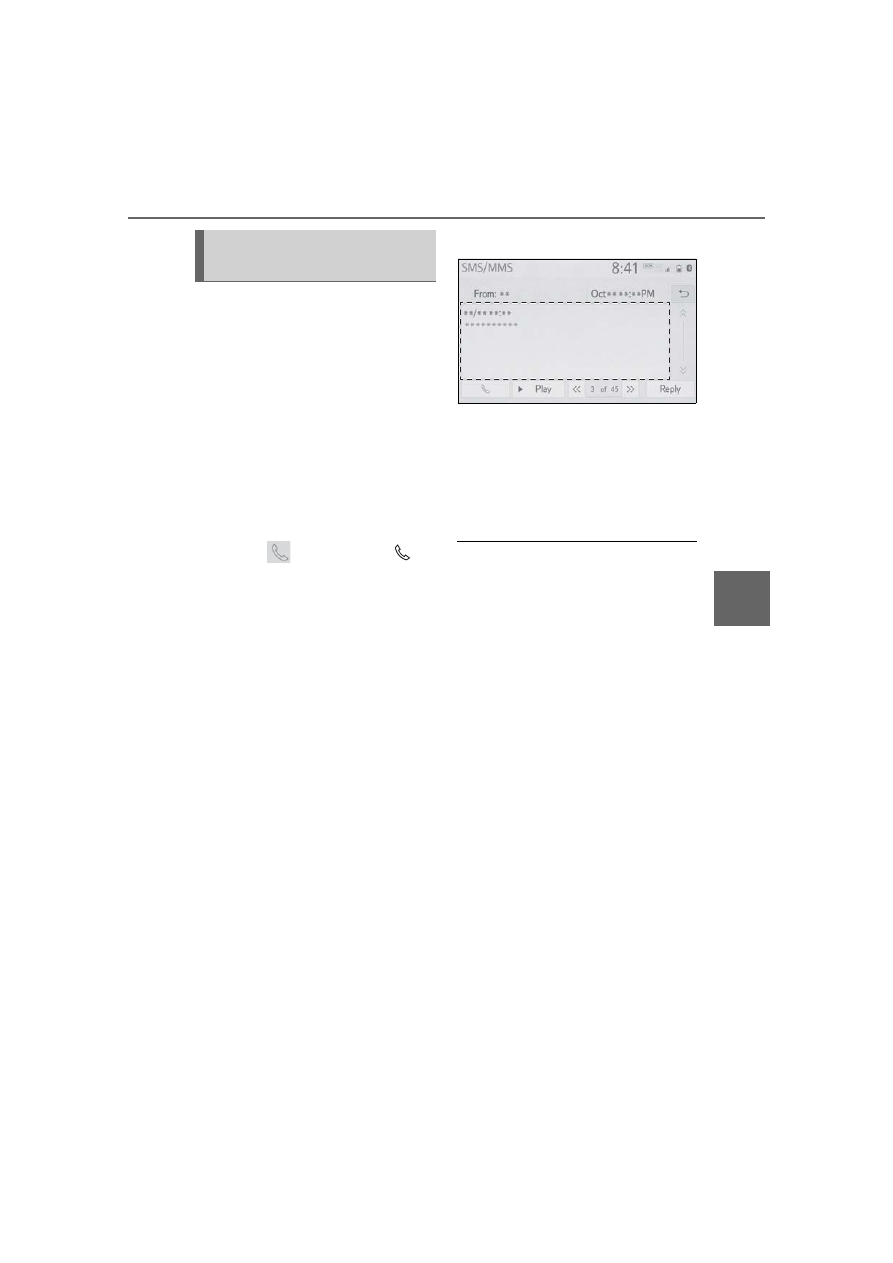
■
Calling from
e-mail/SMS/MMS message
display
1
Display the message screen.
(P.356)
2
Select the desired message.
3
Select
, or press the
switch on the steering wheel.
If there are 2 or more phone num-
bers, select the desired number.
4
Check that the dialing screen
is displayed.
■
Calling from a number
within a message
Calls can be made to a number
identified in a message’s text
area.
This operation cannot be per-
formed while driving.
1
Display the message screen.
(P.356)
2
Select the desired message.
3
Select the text area.
Identified phone numbers con-
tained in the message are dis-
played in blue text.
4
Select the desired number.
5
Check that the dialing screen
is displayed.
A series of numbers may be recog-
nized as a phone number. Addition-
ally, some phone numbers may not
be recognized, such as those for
other countries.
■
Calling from the incoming
message screen
For detail, refer to “Receiving a
message”. (P.356)
Calling the message
sender
-------------------------------------------------------------------------------------------------------------------------------------------------------------
360
5-14. Phone settings
5-14.Phone settings
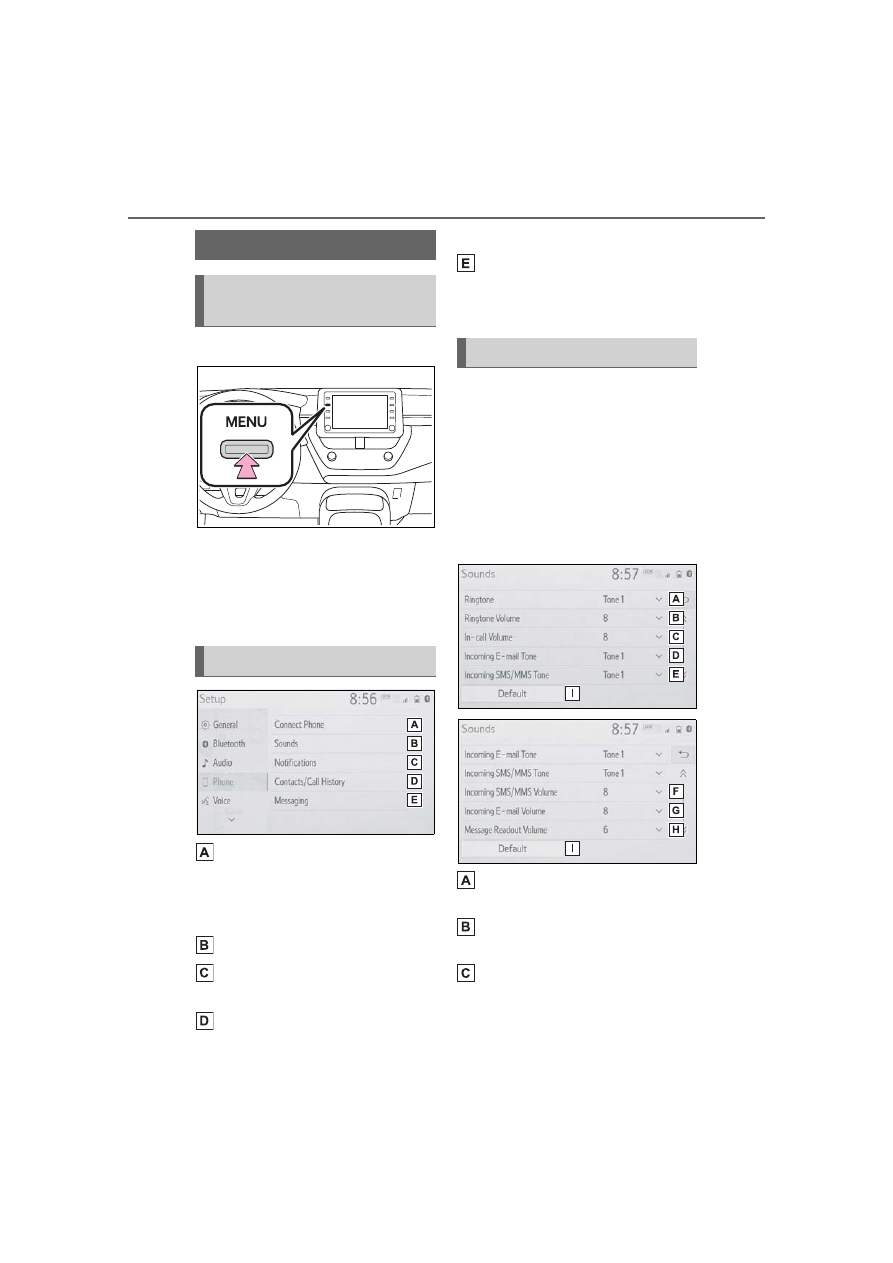
1
Press the “MENU” button.
2
Select “Setup”.
3
Select “Phone”.
4
Select the desired item to be
set.
Connecting a Bluetooth
®
device and editing the Blue-
tooth
®
device information
(P.280, 283)
Sound settings
*
(P.360)
Notification settings
*
(P.361)
Contact/call history settings
*
(P.362)
Message settings
*
(P.368)
*
: This operation cannot be per-
formed while driving.
The call and ringtone volume
can be adjusted. A ringtone can
be selected.
1
Display the phone settings
screen. (P.360)
2
Select “Sounds”.
3
Select the desired item to be
set.
Select to set the desired ring-
tone.
Select “-” or “+” to adjust the
ringtone volume.
Select “-” or “+” to adjust the
default volume of the other
party’s voice.
Setup
Displaying the phone set-
tings screen
Phone settings screen
Sounds settings screen
-------------------------------------------------------------------------------------------------------------------------------------------------------------

361
5-14. Phone settings
5
Entune au
dio
Select to set the desired
incoming e-mail tone.
Select to set the desired
incoming SMS/MMS tone.
Select “-” or “+” to adjust the
incoming SMS/MMS tone
volume.
Select “-” or “+” to adjust the
incoming e-mail tone volume.
Select “-” or “+” to adjust the
message readout volume.
Select to reset all setup
items.
Depending on the type of Blue-
tooth
®
phone, certain functions may
not be available.
1
Display the phone settings
screen. (P.360)
2
Select “Notifications”.
3
Select the desired item to be
set.
Select to change the incom-
ing call display.
“Full Screen”: When a call is
received, the incoming call screen
is displayed and can be operated
on the screen.
“Drop-down”: A message is dis-
played at the top of the screen.
Select to set the SMS/MMS
notification pop-up on/off.
Select to change the incom-
ing SMS/MMS display.
“Full Screen”: When an
SMS/MMS message is
received, the incoming
SMS/MMS display screen is
displayed and can be oper-
ated on the screen.
“Drop-down”: When an
SMS/MMS message is
received, a message is dis-
played at the top of the
Notifications settings
screen
-------------------------------------------------------------------------------------------------------------------------------------------------------------
362
5-14. Phone settings
screen.
Select to set the e-mail notifi-
cation pop-up on/off.
Select to change the incom-
ing e-mail display.
“Full Screen”: When an
e-mail is received, the incom-
ing e-mail display screen is
displayed and can be oper-
ated on the screen.
“Drop-down”: When an
e-mail is received, a mes-
sage is displayed at the top
of the screen.
Select to set display of the
contact/history transfer com-
pletion message on/off.
Select to reset all setup
items.
Depending on the type of Blue-
tooth
®
phone, these functions may
not be available.
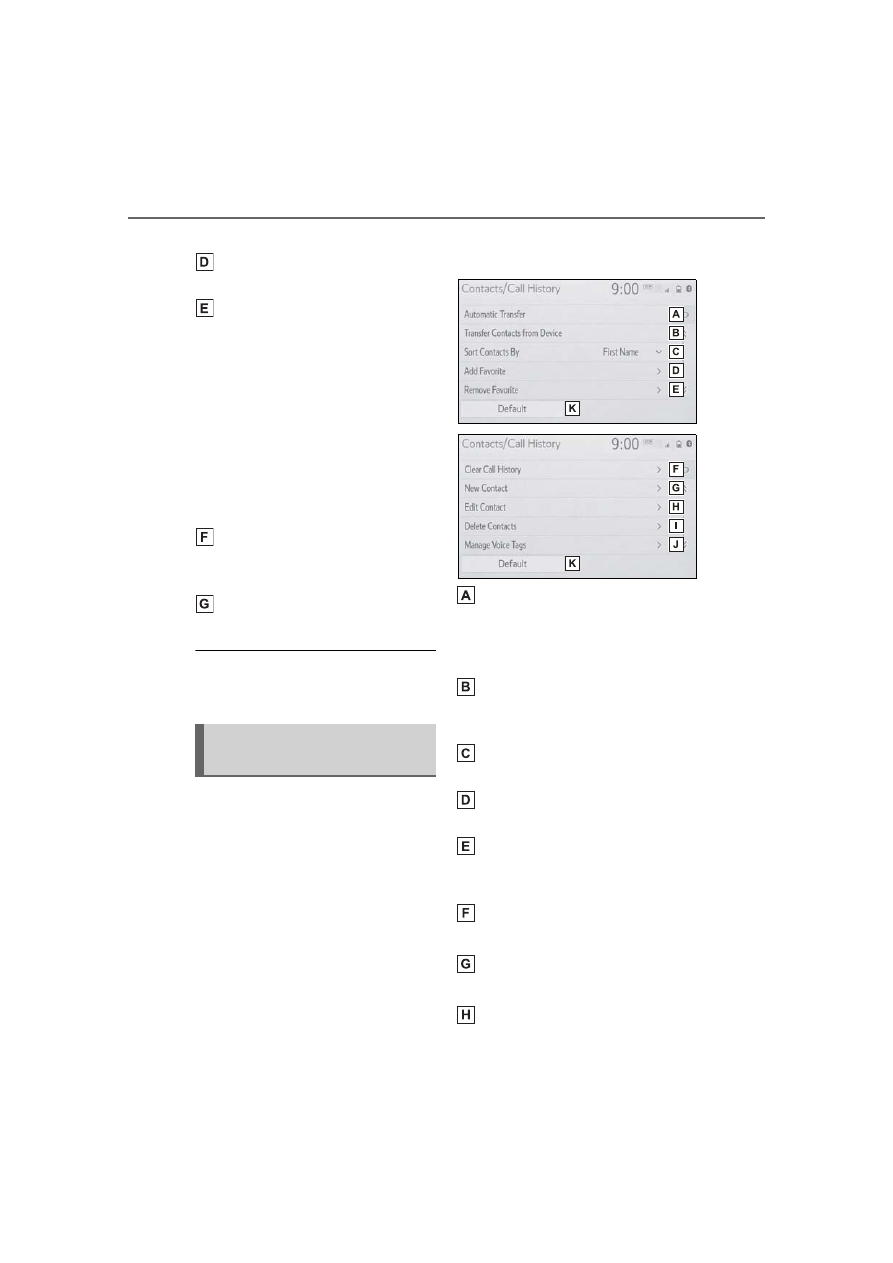
Contacts can be transferred
from a Bluetooth
®
phone to this
system. Contacts and favorites
can be added, edited and
deleted. Also, the call history
can be deleted.
1
Display the phone settings
screen. (P.360)
2
Select “Contacts/Call His-
tory”.
3
Select the desired item to be
set.
For PBAP compatible Blue-
tooth
®
phones: Select to
change the contact/history
transfer settings. (P.363)
Select to update contacts
from the connected device.
(P.363)
Select to sort contacts by the
first name or last name field.
Select to add contacts to the
favorites list. (P.366)
Select to delete contacts
from the favorites list.
(P.366)
Select to clear the call his-
tory.
*
Select to add new contacts to
the contact list.
*
(P.365)
Select to edit contacts in the
Contacts/Call history set-
tings screen
-------------------------------------------------------------------------------------------------------------------------------------------------------------
363
5-14. Phone settings
5
Entune au
dio
contact list.
*
(P.365)
Select to delete contacts
from the contact list.
*
(P.366)
Select to set the voice tags.
(P.367)
Select to reset all setup
items.
*
: For PBAP compatible Bluetooth
®
phones, this function is available
when “Automatic Transfer” is set
to off. (P.363)
●
Depending on the type of Blue-
tooth
®
phone, certain functions
may not be available.
●
Contact data is managed inde-
pendently for every registered
phone. When one phone is con-
nected, another phone’s regis-
tered data cannot be read.
The automatic contact/history
function is available for PBAP
compatible Bluetooth
®
phones
only.
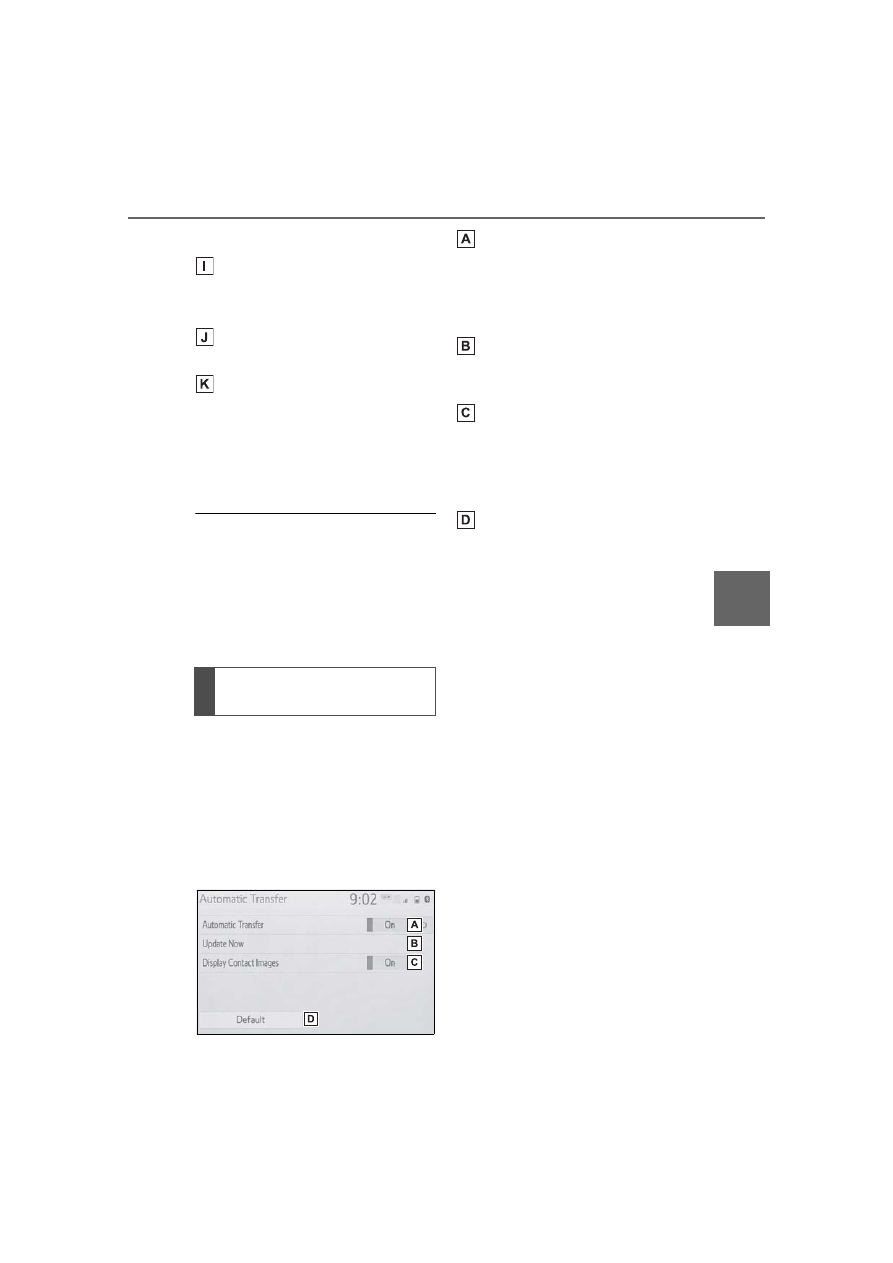
1
Select “Automatic Transfer”.
2
Select the desired item to be
set.
Select to set automatic con-
tact/history transfer on/off.
When set to on, the phone’s
contact data and history are
automatically transferred.
Select to update contacts
from the connected phone.
(P.363)
Select to set the transferred
contact image display on/off.
Only when the vehicle is not
moving, the contact image
can be displayed.
Select to reset all setup
items.
■
Updating contacts from
phone
1
Select “Update Now”.
Contacts are transferred automati-
cally.
2
Check that a confirmation
screen is displayed when the
operation is complete.
This operation may be unnec-
essary depending on the type
of Bluetooth
®
phone.
If another Bluetooth
®
device
is connected when transfer-
ring contact data, depending
on the phone, the connected
Bluetooth
®
device may need
to be disconnected.
Depending on the type of
Bluetooth
®
phone being con-
nected, it may be necessary
to perform additional steps on
the phone.
Setting automatic con-
tact/history transfer
-------------------------------------------------------------------------------------------------------------------------------------------------------------
364
5-14. Phone settings
■
Updating the contacts in a
different way (from the call
history screen)
*
1
Display the phone top
screen. (P.345)
2
Select “History” and select a
contact not yet registered in
the contact list.
3
Select “Update Contact”.
4
Select the desired contact.
5
Select a phone type for the
phone number.
*
: For PBAP compatible Bluetooth
®
phones, this function is available
when “Automatic Transfer” is set
to off. (P.362)
When the contact is not regis-
tered
1
Select “Transfer Contacts
from Device”.
2
Select “From Phone (Blue-
tooth)”.
3
Transfer the contact data to
the system using a Blue-
tooth
®
phone.
This operation may be unnec-
essary depending on the type
of Bluetooth
®
phone.
To cancel this function, select
“Cancel”.
4
Check that a confirmation
screen is displayed when the
operation is complete.
When the contact is regis-
tered
1
Select “Transfer Contacts
from Device”.
2
Select “From Phone (Blue-
tooth)”.
3
Select “Replace Contacts” or
“Add Contact”.
“Replace Contacts”: Select to trans-
fer the contact from the connected
cellular phone and replace the cur-
rent one.
“Add Contact”: Select to transfer
the desired contact data from the
connected cellular phone to add to
the current one.
4
Transfer the contact data to
the system using a Blue-
tooth
®
phone.
This operation may be unnec-
essary depending on the type
of Bluetooth
®
phone.
To cancel this function, select
“Cancel”.
5
Check that a confirmation
screen is displayed when the
operation is complete.
Backed-up contact data (vCard
formatted) can be transferred
from USB device or Bluetooth
®
phone to this system.
Transfer contacts from
device
From phone (OPP compati-
ble Bluetooth
®
phones only)
From USB device
-------------------------------------------------------------------------------------------------------------------------------------------------------------
365
5-14. Phone settings
5
Entune au
dio
1
Connect a USB device.
(P.304)
2
Select “Transfer Contacts
from Device”.
3
Select “From USB”.
4
Select “USB 1” or “USB 2”
when the multiple USB
devices are connected. If a
USB device is connected,
skip this procedure.
5
Select “Replace Contacts” or
“Add Contact”. If the contact
is already registered, skip
this procedure.
“Replace Contacts”: Select to trans-
fer the contact from the connected
USB device or Bluetooth
®
phone
and replace the current one.
“Add Contact”: Select to transfer
the desired contact data from the
connected USB device or Blue-
tooth
®
phone to add to the current
one.
6
Select a desired file from
vCard file list.
7
Check that a confirmation
screen is displayed when the
operation is complete.
●
Depending on the type of Blue-
tooth
®
phone used and number of
files, it may take time to display
vCard file lists and download con-
tacts.
●
Downloading may not complete
correctly in the following cases:
• If the engine switch is turned off
during downloading.
• If the USB device or Bluetooth
®
phone is removed before down-
loading is complete.
New contact data can be regis-
tered.
Up to 4 numbers per person can
be registered. For PBAP com-
patible Bluetooth
®
phones, this
function is available when “Auto-
matic Transfer” is set to off.
(P.362)
1
Select “New Contact”.
2
Enter the name and select
“OK”.
3
Enter the phone number and
select “OK”.
4
Select the phone type for the
phone number.
5
To add another number to
this contact, select “Yes”.
■
Registering a new contact
in a different way (from the
call history screen)
1
Display the phone top
screen. (P.345)
2
Select “History” and select a
contact not yet registered in
the contact list.
3
Select “Add to Contacts”.
4
Follow the steps in “Register-
ing a new contact to the con-
tacts list” from step
2
.
For PBAP compatible Blue-
Registering a new contact
to the contacts list
Editing the contact data
-------------------------------------------------------------------------------------------------------------------------------------------------------------
366
5-14. Phone settings
tooth
®
phones, this function is
available when “Automatic
Transfer” is set to off. (P.362)
1
Select “Edit Contact”.
2
Select the desired contact.
3
Select
next to the name
or desired number.
4
Enter the name or the phone
number and select “OK”.
For PBAP compatible Blue-
tooth
®
phones, this function is
available when “Automatic
Transfer” is set to off. (P.362)
1
Select “Delete Contacts”.
2
Select the desired contact
and select “Delete”.
3
Select “Yes” when the confir-
mation screen appears.
●
Multiple data can be selected and
deleted at the same time.
●
When a Bluetooth
®
phone is
deleted, the contact data will be
deleted at the same time.
Up to 15 contacts (maximum of
4 numbers per contact) can be
registered in the favorites list.
■
Registering the contacts in
the favorites list
1
Select “Add Favorite”.
2
Select the desired contact to
add to the favorites list.
Dimmed contacts are already
stored as a favorite.
3
Check that a confirmation
screen is displayed when the
operation is complete.
When 15 contacts have
already been registered to the
favorites list
1
When 15 contacts have
already been registered to
the favorites list, a registered
contact needs to be replaced.
Select “Yes” when the confir-
mation screen appears to
replace a contact.
2
Select the contact to be
replaced.
3
Check that a confirmation
screen is displayed when the
operation is complete.
■
Registering contacts in the
favorites list in a different
way (from the contact
details screen)
1
Display the phone top
screen. (P.345)
2
Select “Contacts” and select
the desired contact.
3
Select “Add Favorite”.
4
Check that a confirmation
screen is displayed when the
operation is complete.
■
Deleting the contacts in the
favorites list
1
Select “Remove Favorite”.
2
Select the desired contacts
and select “Remove”.
Deleting the contact data
Favorites list setting
-------------------------------------------------------------------------------------------------------------------------------------------------------------
367
5-14. Phone settings
5
Entune au
dio
3
Select “Yes” when the confir-
mation screen appears.
4
Check that a confirmation
screen is displayed when the
operation is complete.
■
Deleting contacts in the
favorites list in a different
way (from the contact
details screen)
1
Display the phone top
screen. (P.345)
2
Select “Favorites” or “Con-
tacts” and select the desired
contact to delete.
3
Select “Remove Favorite”.
4
Select “Yes” when the confir-
mation screen appears.
5
Check that a confirmation
screen is displayed when the
operation is complete.
Calls can be made by saying the
voice tag of a registered contact
in the contact list. (P.336)
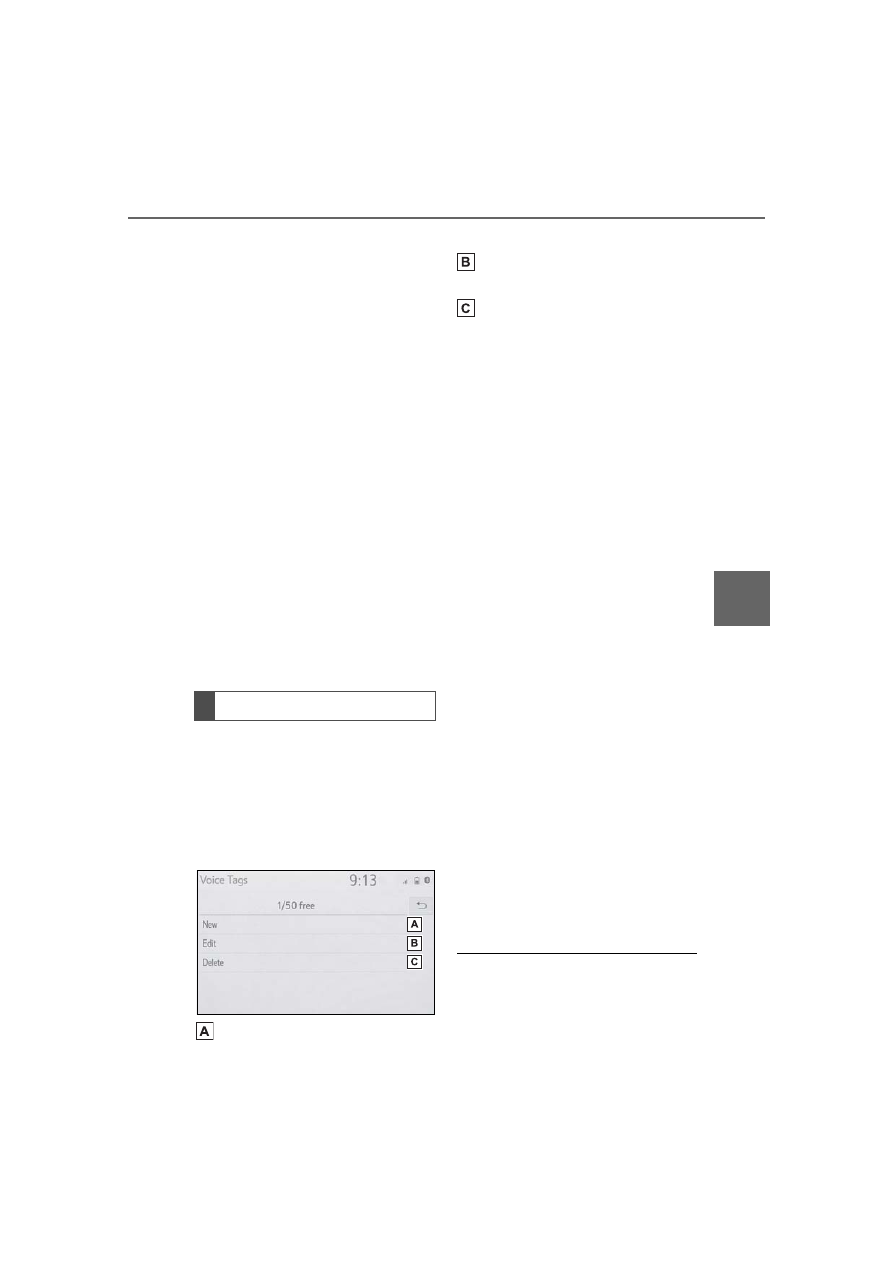
1
Select “Manage Voice Tags”.
2
Select the desired item to be
set.
Select to register a new voice
tag. (P.367)
Select to edit a voice tag.
(P.367)
Select to delete a voice tag.
(P.367)
■
Registering a voice tag
Up to 50 voice tags can be reg-
istered.
1
Select “New”.
2
Select the desired contact to
register a voice tag for.
3
Select “REC” and record a
voice tag.
When recording a voice tag, do so
in a quiet area.
“Play”: Select to play the voice tag.
4
Select “OK” when voice tag
registration is complete.
■
Editing a voice tag
1
Select “Edit”.
2
Select the desired contact to
edit.
3
Follow the steps in “Register-
ing a voice tag” from step
3
.
■
Deleting the voice tag
1
Select “Delete”.
2
Select the desired contact
and select “Delete”.
3
Select “Yes” when the confir-
mation screen appears.
●
Multiple data can be selected and
deleted at the same time.
●
Voice tags are deleted when the
set language of the system is
changed. (P.296)
Setting voice tags
-------------------------------------------------------------------------------------------------------------------------------------------------------------
368
5-14. Phone settings
1
Display the phone settings
screen. (P.360)
2
Select “Messaging”.
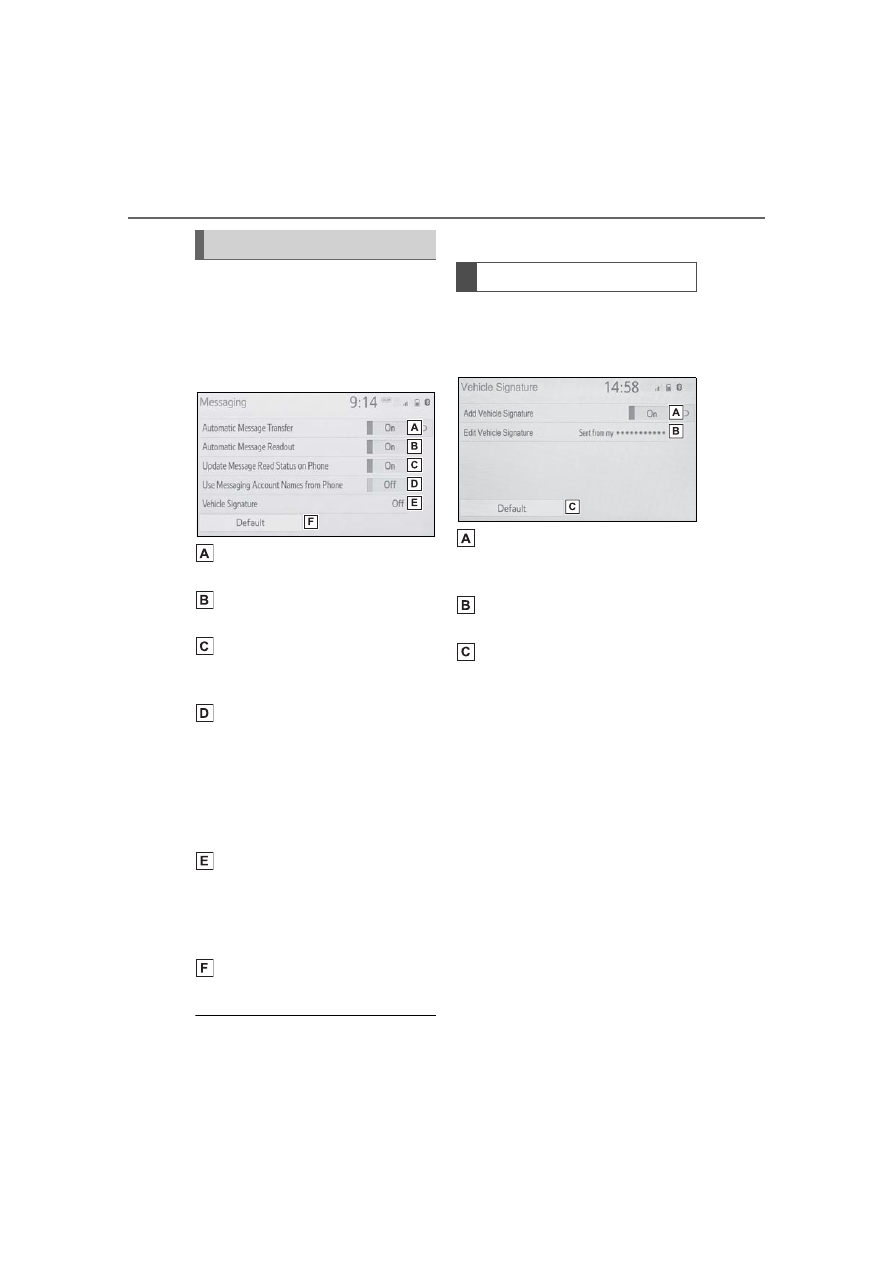
3
Select the desired item to be
set.
Select to set automatic mes-
sage transfer on/off.
Select to set automatic mes-
sage readout on/off.
Select to set updating mes-
sage read status on phone
on/off.
Select to set display of mes-
saging account names on the
message screen on/off.
When set to on, messaging
account names used on the
cellular phone will be dis-
played.
Select to set adding the vehi-
cle signature to outgoing
messages on/off.
The vehicle signature can be
edited. (P.368)
Select to reset all setup
items.
Depending on the phone, these
functions may not be available.
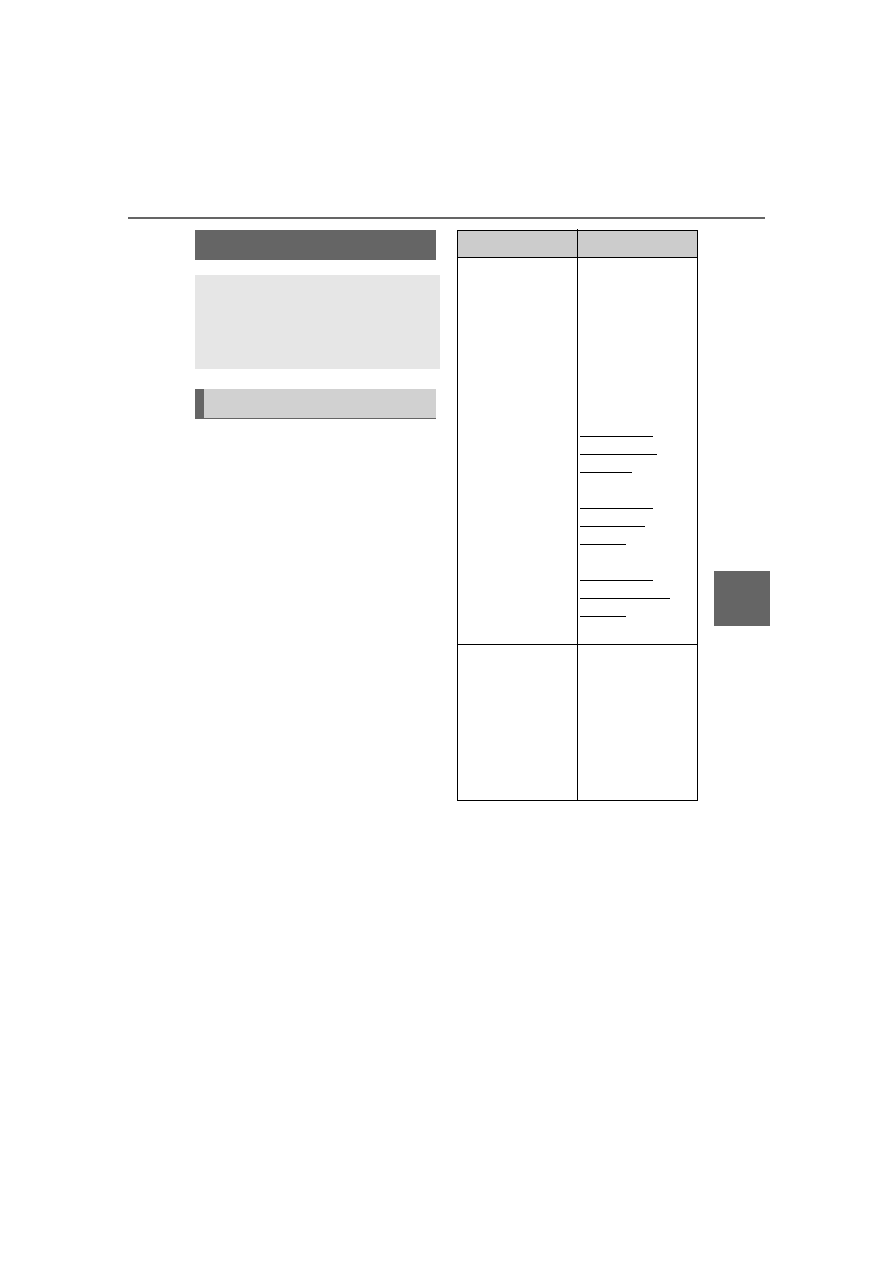
1
Select “Vehicle Signature”.
2
Select the desired item to be
set.
Select to set adding the vehi-
cle signature to outgoing
messages on/off.
Select to edit the vehicle sig-
nature. (P.368)
Select to reset all setup
items.
■
Editing vehicle signature
1
Select “Edit Vehicle Signa-
ture”.
2
Enter desired signature with
using keyboard.
3
Select “OK”.
4
Select “OK” on the confirma-
tion screen, or select “Edit
Again” when it needs to
amend.
Message settings screen
Vehicle signature settings
-------------------------------------------------------------------------------------------------------------------------------------------------------------
369
5-15. What to do if... (Bluetooth
®
)
5
Entune au
dio
5-15.What to do if... (Bluetooth®)
■
When using the hands-free
system with a Bluetooth
®
device
The hands-free system or Blue-
tooth
®
device does not work.
■
When registering/connect-
ing a cellular phone
A cellular phone cannot be reg-
istered.
Troubleshooting
If there is a problem with the
hands-free system or a
Bluetooth
®
device, first
check the table below.
Troubleshooting
Likely cause
Solution
The connected
device may not
be a compatible
Bluetooth
®
cellu-
lar phone.
For a list of spe-
cific devices
which operation
has been con-
firmed on this
system, check
with your Toyota
dealer or the fol-
lowing website:
http://www.
toyota.com/
Entune/ in the
United States,
http://www.
toyota.ca/
entune in
Canada, and
http://www.
toyotapr.com/
entune in Puerto
Rico
The Bluetooth
®
version of the
connected cellu-
lar phone may
be older than the
specified ver-
sion.
Use a cellular
phone with Blue-
tooth
®
version
2.0 or higher
(recommended:
Ver. 4.1 +EDR or
higher).
(P.279)
-------------------------------------------------------------------------------------------------------------------------------------------------------------
370
5-15. What to do if... (Bluetooth
®
)
A Bluetooth
®
connection can-
not be made.
■
When making/receiving a
call
A call cannot be made/received.
■
When using the phonebook
Phonebook data cannot be
transferred manually/automati-
cally.
Likely cause
Solution
An incorrect
passcode was
entered on the
cellular phone.
Enter the correct
passcode on the
cellular phone.
The registration
operation has
not been com-
pleted on the cel-
lular phone side.
Complete the
registration oper-
ation on the cel-
lular phone
(approve regis-
tration on the
phone).
Old registration
information
remains on
either this sys-
tem or the cellu-
lar phone.
Delete the exist-
ing registration
information from
both this system
and the cellular
phone, then reg-
ister the cellular
phone you wish
to connect to this
system.
(P.282)
Likely cause
Solution
Another Blue-
tooth
®
device is
already con-
nected.
Manually con-
nect the cellular
phone you wish
to use to this
system.
(P.280)
Bluetooth
®
func-
tion is not
enabled on the
cellular phone.
Enable the Blue-
tooth
®
function
on the cellular
phone.
Automatic Blue-
tooth
®
connec-
tion on this
system is set to
off.
Set automatic
Bluetooth
®
con-
nection on this
system to on
when the engine
switch is in ACC
or ON. (P.284)
Preferred device
settings function
on this system is
set to on.
Set preferred
device settings
function on this
system to off.
(P.285)
Set the desired
cellular phone to
the highest auto-
matic connec-
tion priority.
(P.285)
Likely cause
Solution
Your vehicle is in
a
area.
Move to where
no longer
appears on the
display.
Likely cause
Solution
-------------------------------------------------------------------------------------------------------------------------------------------------------------
371
5-15. What to do if... (Bluetooth
®
)
5
Entune au
dio
Phonebook data cannot be
edited.
■
When using the Bluetooth
®
message function
Messages cannot be viewed.
New message notifications are
not displayed.
■
In other situations
The Bluetooth
®
connection sta-
Likely cause
Solution
The profile ver-
sion of the con-
nected cellular
phone may not
be compatible
with transferring
phonebook data.
For a list of spe-
cific devices
which operation
has been con-
firmed on this
system, check
with your Toyota
dealer or the fol-
lowing website:
http://www.
toyota.com/
Entune/ in the
United States,
http://www.
toyota.ca/
entune in
Canada, and
http://www.
toyotapr.com/
entune in Puerto
Rico
Automatic con-
tact transfer
function on this
system is set to
off.
Set automatic
contact transfer
function on this
system to on.
(P.363)
Passcode has
not been entered
on the cellular
phone.
Enter the pass-
code on the cel-
lular phone if
requested
(default pass-
code: 1234).
Transfer opera-
tion on the cellu-
lar phone has
not completed.
Complete trans-
fer operation on
the cellular
phone (approve
transfer opera-
tion on the
phone).
Likely cause
Solution
Automatic con-
tact transfer
function on this
system is set to
on.
Set automatic
contact transfer
function on this
system to off.
(P.363)
Likely cause
Solution
Message trans-
fer is not enabled
on the cellular
phone.
Enable mes-
sage transfer on
the cellular
phone (approve
message trans-
fer on the
phone).
Automatic trans-
fer function on
this system is set
to off.
Set automatic
transfer function
on this system to
on. (P.363)
Likely cause
Solution
Notification of
SMS/MMS/E-ma
il reception on
this system is set
to off.
Set notification of
SMS/MMS/E-ma
il reception on
this system to
on. (P.361)
Automatic mes-
sage transfer
function is not
enabled on the
cellular phone.
Enable auto-
matic transfer
function on the
cellular phone.
-------------------------------------------------------------------------------------------------------------------------------------------------------------
372
5-15. What to do if... (Bluetooth
®
)
tus is displayed at the top of the
screen each time the engine
switch is in ACC or ON.
Even though all conceivable
measures have been taken, the
symptom status does not
change.
For details, refer to the owner’s
manual that came with the cellular
phone.
Likely cause
Solution
Connection con-
firmation display
on this system is
set to on.
To turn off the
display, set con-
nection confir-
mation display
on this system to
off. (P.285)
Likely cause
Solution
The cellular
phone is not
close enough to
this system.
Bring the cellu-
lar phone closer
to this system.
Radio interfer-
ence has
occurred.
Turn off Wi-Fi
®
devices or other
devices that may
emit radio
waves.
The cellular
phone is the
most likely cause
of the symptom.
Turn the cellular
phone off,
remove and rein-
stall the battery
pack, and then
restart the cellu-
lar phone.
Enable the cellu-
lar phone’s Blue-
tooth
®
connection.
Stop the cellular
phone’s security
software and
close all applica-
tions.
Before using an
application
installed on the
cellular phone,
carefully check
its source and
how its opera-
tion might affect
this system.
Likely cause
Solution
-------------------------------------------------------------------------------------------------------------------------------------------------------------
373
5-16. Toyota Entune overview
5
Entune au
dio
5-16.Toyota Entune overview
Entune Audio Plus/Entune
Premium Audio
Owners of this system should
refer to the “NAVIGATION AND
MULTIMEDIA SYSTEM
OWNER’S MANUAL”.
●
Availability of functions of the Toy-
ota Entune is dependent on net-
work reception level.
●
Each function is available in the
following areas:
• Toyota Entune App Suite Connect
is available in the contiguous
United States, Washington D.C.,
Alaska, Hawaii, Puerto Rico and
Canada.
• Toyota Entune App Suite Connect
is not available in the United
States Virgin Islands.
• Wi-Fi
®
Hotspot is available in the
contiguous United States, Wash-
ington D.C.,Alaska and Hawaii.
• Wi-Fi
®
Hotspot is not available in
Puerto Rico, Canada, and in the
United States Virgin Islands.
• Safety Connect features include:
Automatic Collision Notification,
Emergency Assistance, S.O.S,
Stolen Vehicle Location (available
in the contiguous United States,
Washington D.C., Hawaii, Alaska,
Puerto Rico and Canada) and
Enhanced Roadside Assistance
(available in the contiguous
United States, Washington D.C.,
Alaska, Puerto Rico and Canada).
• Safety Connect is not available in
the United States Virgin Islands.
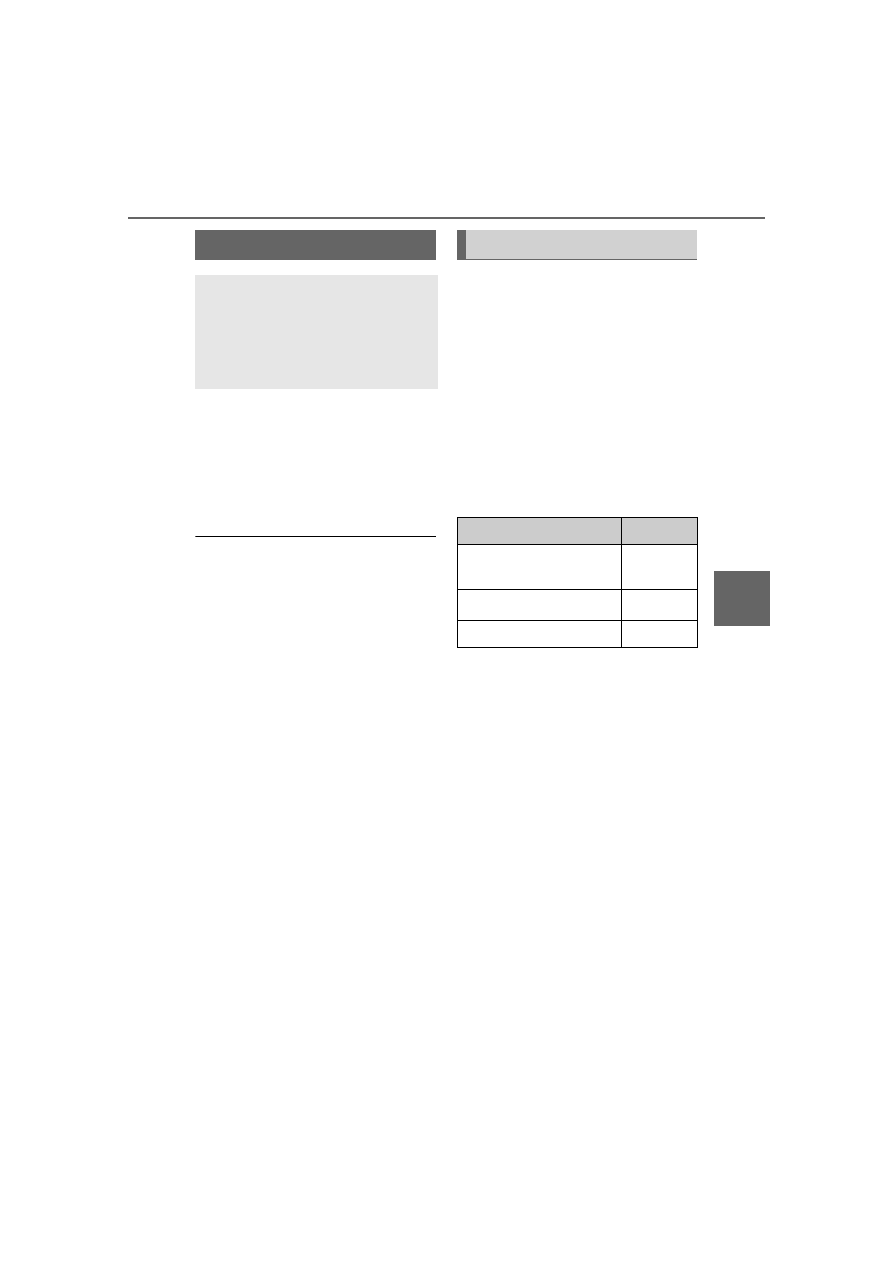
The functions included in Toy-
ota Entune are classified into
the following three types.
• Type A: Function achieved by
using a smart phone or an
embedded cellular device in the
vehicle (DCM: Data Communica-
tion Module) and the system
• Type B: Function achieved by
using DCM and the system
• Type C: Function achieved by
using DCM
Toyota Entune
Toyota Entune is a service
that includes Toyota Entune
App Suite Connect, Wi-Fi
®
Hotspot and Safety Con-
nect.
Functional overview
Function
Type
Toyota Entune App
Suite Connect
Type A
Wi-Fi
®
Hotspot
Type B
Safety Connect
Type C
-------------------------------------------------------------------------------------------------------------------------------------------------------------
Нет комментариевНе стесняйтесь поделиться с нами вашим ценным мнением.
Текст