Toyota Supra (2021 year). Manual in english — part 5
272
6-1. MOBILITY
Supra Owner’s Manual_U (from Mar. ’20
Prod.)
This chapter describes all stan-
dard, country-specific and
optional features offered with
the series. It also describes fea-
tures and functions that are not
necessarily available in your
vehicle, e.g., due to the selected
options or country versions. This
also applies to safety-related
functions and systems. When
using these functions and sys-
tems, the applicable laws and
regulations must be observed.
The tire characteristics and tire
inflation pressure influence the
following:
• The service life of the tires.
• Road safety.
• Driving comfort.
• Fuel consumption.
The tire inflation pressure table,
refer to page 274, contains all
tire inflation pressure specifica-
tions for the specified tire sizes
at the ambient temperature. The
tire inflation pressure values
apply to tire sizes approved by
the manufacturer of the vehicle
for the vehicle type.
To identify the correct tire infla-
tion pressure, please note the
following:
If the tire's speed code cannot
be found, then the tire inflation
pressure for the corresponding
tire size applies.
• Tire sizes of your vehicle.
• Maximum permitted driving
speed.
Wheels and tires
Vehicle features and
options
Tire inflation pressure
General information
Safety information
WARNING
A tire with too little or no tire infla-
tion pressure may heat up signifi-
cantly and sustain damage. This
will have a negative impact on
aspects of handling, such as
steering and braking response.
There is a risk of an accident.
Regularly check the tire inflation
pressure, and correct it as
needed, for instance twice a
month and before a long trip.
Tire inflation pressure
specifications
In the tire inflation pressure
table
-------------------------------------------------------------------------------------------------------------------------------------------------------------
273
6-1. MOBILITY
Supra Owner’s Manual_U (from Mar. ’20
Prod.)
6
MOBILITY
The current tire inflation pres-
sure values and the intended
tire inflation pressure values for
the mounted tires can be dis-
played on the Control Display.
To ensure that they are dis-
played correctly, the tire sizes
must be stored in the system
and must have been set, refer to
page 288, for the mounted tires.
The current tire inflation pres-
sure value is located on each
tire.
The reference tire inflation pres-
sure value is located in the
lower area of the Control Dis-
play.
Tires heat up while driving. The
tire inflation pressure increases
with the tire temperature.
Tires have a natural, consistent
loss of tire inflation pressure.
The displays of inflation devices
may under-read by up to 0.1
bar/2 psi.
The tire inflation pressure speci-
fications in the tire inflation pres-
sure table only relate to cold
tires or tires at the same tem-
perature as the ambient tem-
perature.
Only check the tire inflation
pressure levels when the tires
are cold, i.e.:
• Driving range of max. 1.25
miles/2 km has not been
exceeded.
• If the vehicle has not moved
again for at least 2 hours after
a trip.
Check the tire inflation pressure
of the emergency wheel in the
cargo area regularly, and correct
it as needed.
1
Determine, refer to page 272,
the intended tire inflation
pressure levels for the
mounted tires.
2
Check the tire inflation pres-
sure in all four tires, using a
pressure gauge, for example.
3
Correct the tire inflation pres-
sure if the actual tire inflation
pressure deviates from spec-
ified tire inflation pressure.
4
Check whether all valve caps
are screwed onto the tire
valves.
On the Control Display
Checking the tire inflation
pressure
General information
Checking using tire inflation
pressure specifications in
the tire inflation pressure
table
-------------------------------------------------------------------------------------------------------------------------------------------------------------
274
6-1. MOBILITY
Supra Owner’s Manual_U (from Mar. ’20
Prod.)
Via Toyota Supra Command:
1
"My vehicle"
2
"Vehicle status"
3
"Tire Pressure Monitor"
4
Check whether the current
tire inflation pressure levels
deviate from the intended tire
pressure value.
5
Correct the tire inflation pres-
sure if the actual tire inflation
pressure deviates from spec-
ified tire inflation pressure.
With tires that cannot be found
in the tire pressure values on
the Control Display, reset the
Tire Pressure Monitor TPM.
For speeds of up to 100
mph/160 km/h and for optimum
driving comfort, note the pres-
sure values in the tire inflation
pressure table, refer to page
274, and adjust as necessary.
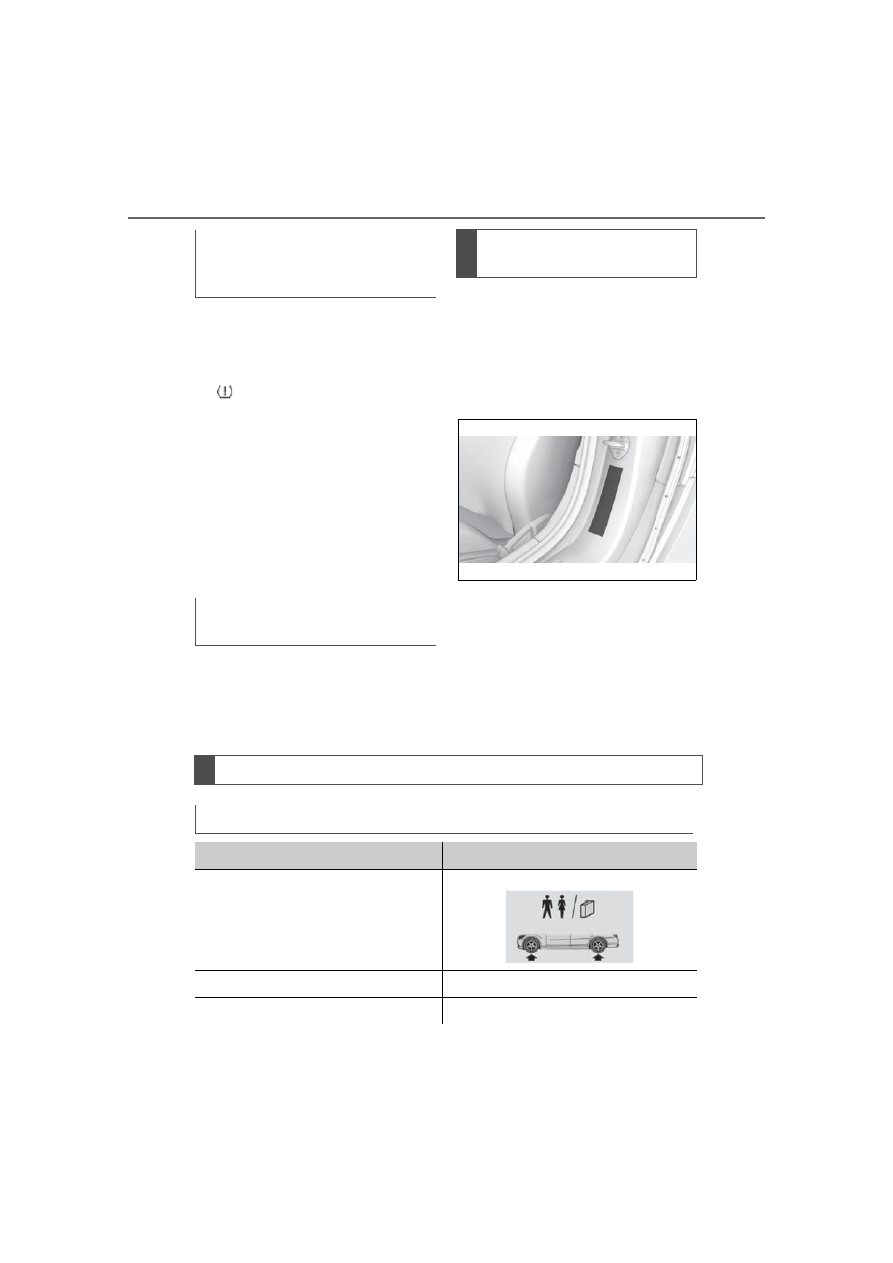
These pressure values can also
be found on the tire inflation
pressure label on the driver's
door pillar.
Do not exceed a speed of 100
mph/160 km/h.
Checking using the tire infla-
tion pressure specifications
on the Control Display
After correcting the tire infla-
tion pressure
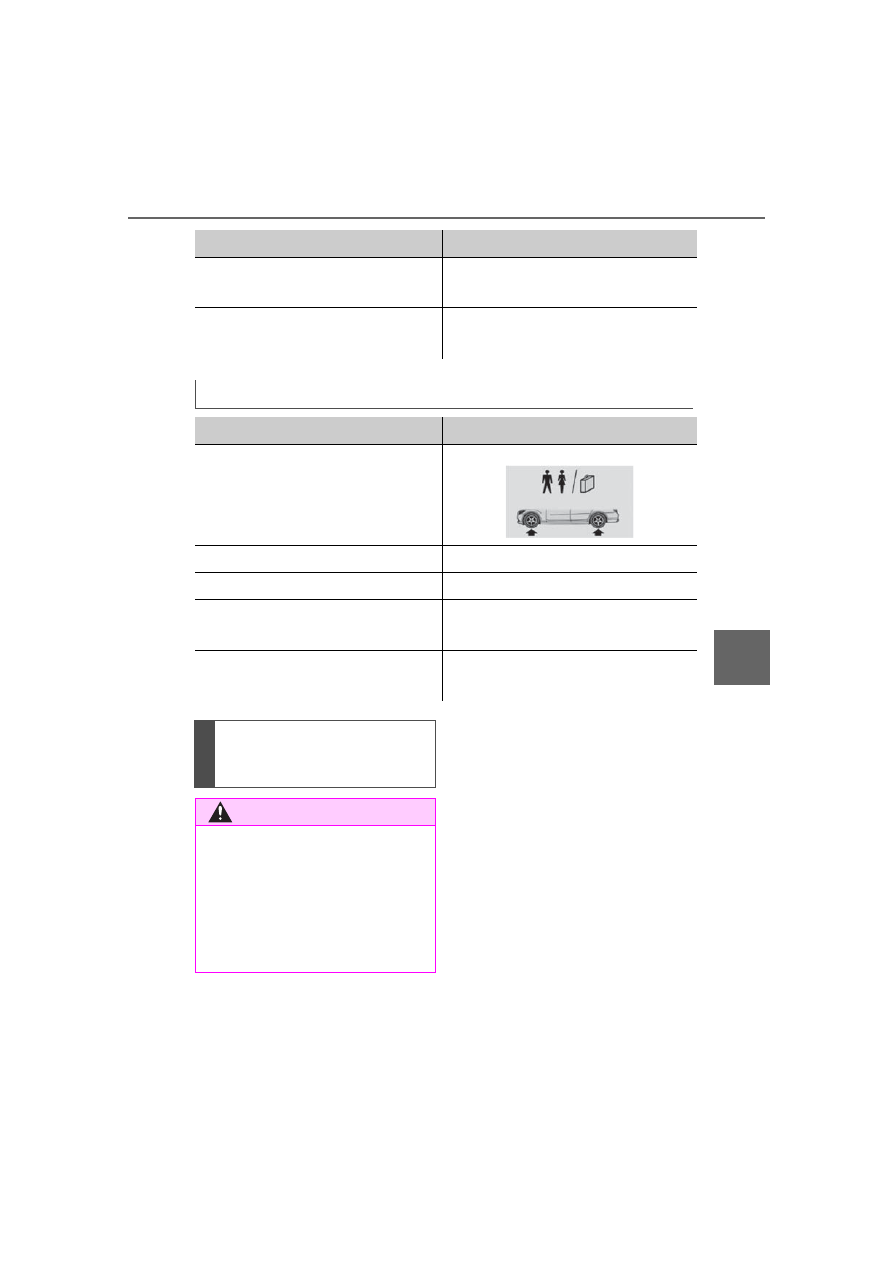
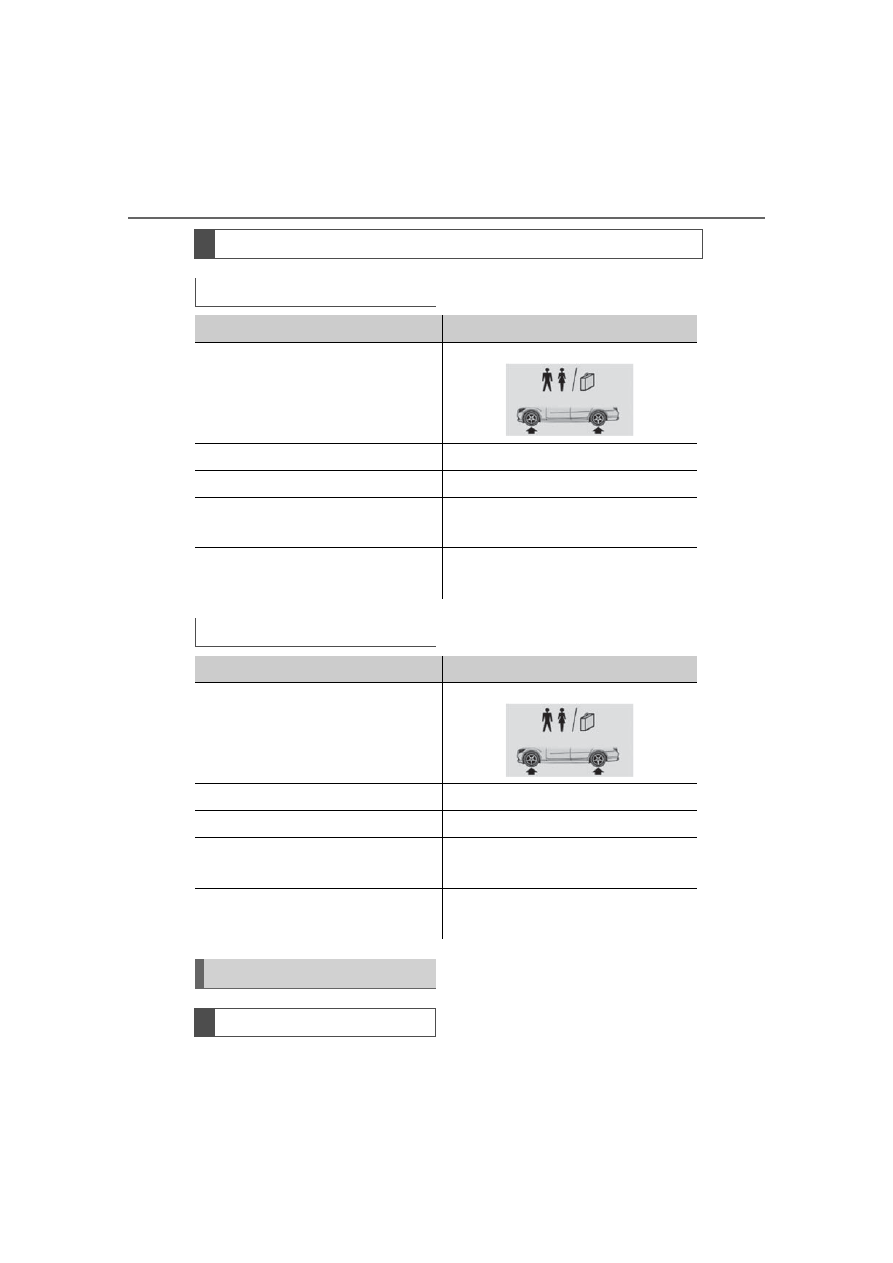
Tire inflation pressures up
to 100 mph/160 km/h
Tire inflation pressure values up to 100 mph/160 km/h
SZ-R models
Tire size
Pressure specifications in bar/PSI
Specifications in bar/PSI with cold
tires
225/50 R 17 98 H M+S XL Std/RSC
2.2 / 32
255/40 R 18 99 V M+S XL Std
2.2 / 32
-------------------------------------------------------------------------------------------------------------------------------------------------------------
275
6-1. MOBILITY
Supra Owner’s Manual_U (from Mar. ’20
Prod.)
6
MOBILITY
For speeds over 100 mph/160
km/h and for optimum driving
comfort, note the pressure val-
ues in the tire inflation pressure
table, refer to page 276, and
adjust as necessary.
Front: 255/40 ZR 18 95 Y Std
Rear: 275/40 ZR 18 99 Y Std
2.2 / 32
2.2 / 32
Front: 255/35 ZR 19 96 Y XL Std
Rear: 275/35 ZR 19 100 Y XL Std
2.2 / 32
2.2 / 32
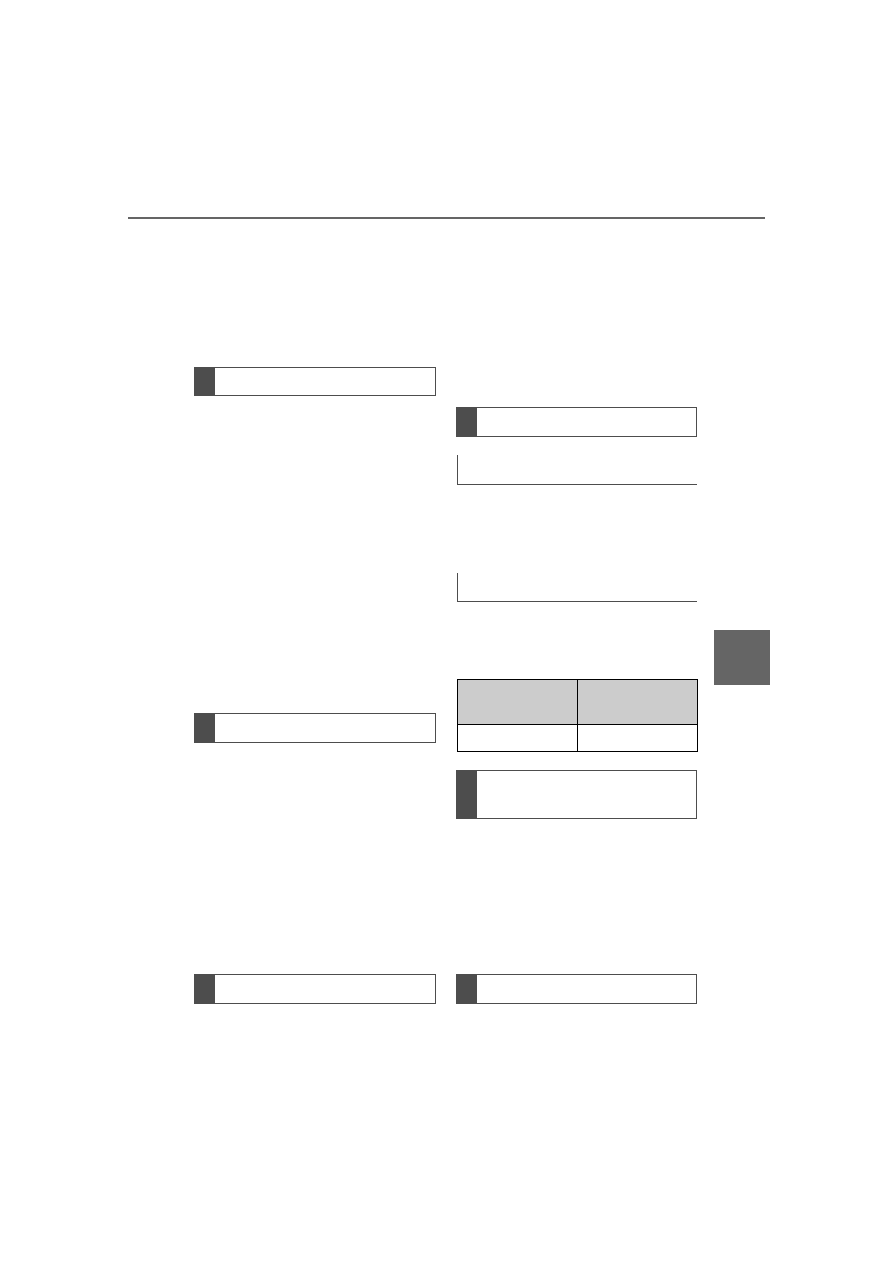
Tire size
Pressure specifications in bar/PSI
RZ models
Tire size
Pressure specifications in bar/PSI
Specifications in bar/PSI with cold
tires
225/50 R 17 98 H M+S XL Std/RSC
2.2 / 32
255/40 R 18 99 V M+S XL Std
2.6 / 38
Front: 255/40 ZR 18 95 Y Std
Rear: 275/40 ZR 18 99 Y Std
2.6 / 38
2.6 / 38
Front: 255/35 ZR 19 96 Y XL Std
Rear: 275/35 ZR 19 100 Y XL Std
2.6 / 38
2.6 / 38
Tire inflation pressures at
max. speeds above 100
mph/160 km/h
WARNING
In order to drive at maximum
speeds in excess of 100 mph/160
km/h, please observe, and, if nec-
essary, adjust tire pressures for
speeds exceeding 100 mph/160
km/h from the relevant table on
the following pages. Otherwise,
tire damage and accidents could
occur.
-------------------------------------------------------------------------------------------------------------------------------------------------------------
276
6-1. MOBILITY
Supra Owner’s Manual_U (from Mar. ’20
Prod.)
245/45 R 18 96 Y
245: nominal width in mm
45: aspect ratio in %
Tire inflation pressure values over 100 mph/160 km/h
SZ-R models
Tire size
Pressure specifications in bar/PSI
Specifications in bar/PSI with cold
tires
225/50 R 17 98 H M+S XL Std/RSC
2.2 / 32
255/40 R 18 99 V M+S XL Std
2.2 / 32
Front: 255/40 ZR 18 95 Y Std
Rear: 275/40 ZR 18 99 Y Std
2.2 / 32
2.2 / 32
Front: 255/35 ZR 19 96 Y XL Std
Rear: 275/35 ZR 19 100 Y XL Std
2.2 / 32
2.2 / 32
RZ models
Tire size
Pressure specifications in bar/PSI
Specifications in bar/PSI with cold
tires
225/50 R 17 98 H M+S XL Std/RSC
2.2 / 32
255/40 R 18 99 V M+S XL Std
2.6 / 38
Front: 255/40 ZR 18 95 Y Std
Rear: 275/40 ZR 18 99 Y Std
2.6 / 38
2.6 / 38
Front: 255/35 ZR 19 96 Y XL Std
Rear: 275/35 ZR 19 100 Y XL Std
2.6 / 38
2.6 / 38
Tire identification marks
Tire size
-------------------------------------------------------------------------------------------------------------------------------------------------------------
277
6-1. MOBILITY
Supra Owner’s Manual_U (from Mar. ’20
Prod.)
6
MOBILITY
R: radial tire code
18: rim diameter in inches
96: load rating, not for ZR tires
Y: speed rating, before the R on
ZR tires
Maximum tire load is the maxi-
mum permissible weight for
which the tire is approved.
Locate the maximum tire load
on the tire sidewall and the
Gross Axle Weight Rating –
GAWR – on the certification
label on the driver door B-pillar.
Divide the tire load by 1.1. It
must be greater than one-half of
the vehicle’s Gross Axle Weight
Rating – GAWR. Note, front vs.
rear GAWR and tire loads,
respectively.
Q = up to 100 mph/160 km/h
R = up to 106 mph/170 km/h
S = up to 112 mph/180 km/h
T = up to 118 mph/190 km/h
H = up to 131 mph/210 km/h
V = up to 150 mph/240 km/h
W = up to 167 mph/270 km/h
Y = up to 186 mph/300 km/h
DOT code: DOT xxxx xxx 3818
xxxx: manufacturer code for the
tire brand
xxx: tire size and tire design
3818: tire age
Tires with DOT codes meet the
guidelines of the U.S. Depart-
ment of Transportation.
Regardless of the tire tread,
replace tires at least every 6
years.
You can find the manufacture
date of the tire on the tire's side-
wall.
Quality grades can be found
where applicable on the tire
sidewall between tread shoulder
and maximum section width.
E.g.: Treadwear 200; Traction
AA; Temperature A
Treadwear
Maximum tire load
Speed letter
Tire Identification Number
Tire age
Recommendation
Manufacture date
Designation
Manufacture
date
DOT … 3818
38th week, 2018
Uniform Tire Quality Grad-
ing
DOT Quality Grades
-------------------------------------------------------------------------------------------------------------------------------------------------------------
278
6-1. MOBILITY
Supra Owner’s Manual_U (from Mar. ’20
Prod.)
Traction AA A B C
Temperature A B C
All passenger vehicle tires must
conform to Federal Safety
Requirements in addition to
these grades
The treadwear grade is a com-
parative rating based on the
wear rate of the tire when tested
under controlled conditions on a
specified government test
course. E.g., a tire graded 150
would wear one and one-half, 1
g, times as well on the govern-
ment course as a tire graded
100. The relative performance
of tires depends upon the actual
conditions of their use, however,
and may depart significantly
from the norm due to variations
in driving habits, service prac-
tices and differences in road
characteristics and climate.
The traction grades, from high-
est to lowest, are AA, A, B, and
C.
Those grades represent the
tire's ability to stop on wet pave-
ment as measured under con-
trolled conditions on specified
government test surfaces of
asphalt and concrete. A tire
marked C may have poor trac-
tion performance.
The traction grade assigned to
this tire is based on
straight-ahead braking traction
tests, and does not include
acceleration, cornering, hydro-
planing, or peak traction charac-
teristics.
The temperature grades are A,
the highest, B, and C, represent-
ing the tire's resistance to the
generation of heat and its ability
to dissipate heat when tested
under controlled conditions on a
specified indoor laboratory test
wheel. Sustained high tempera-
ture can cause the material of
the tire to degenerate and
reduce tire life, and excessive
temperature can lead to sudden
tire failure.
The grade C corresponds to a
level of performance which all
passenger vehicle tires must
meet under the Federal Motor
Vehicle Safety Standard No.
109. Grades Band A represent
higher levels of performance on
the laboratory test wheel than
the minimum required by law.
Treadwear
Traction
Temperature
-------------------------------------------------------------------------------------------------------------------------------------------------------------
279
6-1. MOBILITY
Supra Owner’s Manual_U (from Mar. ’20
Prod.)
6
MOBILITY
Winter and all-season tires with
better cold weather performance
than summer tires.
Do not drive with a tire tread of
less than 0.12 in/3 mm, other-
wise there is an increased risk
of hydroplaning.
Do not drive with a tire tread of
less than 0.16 in/4 mm, as such
tires are less suitable for winter
operation.
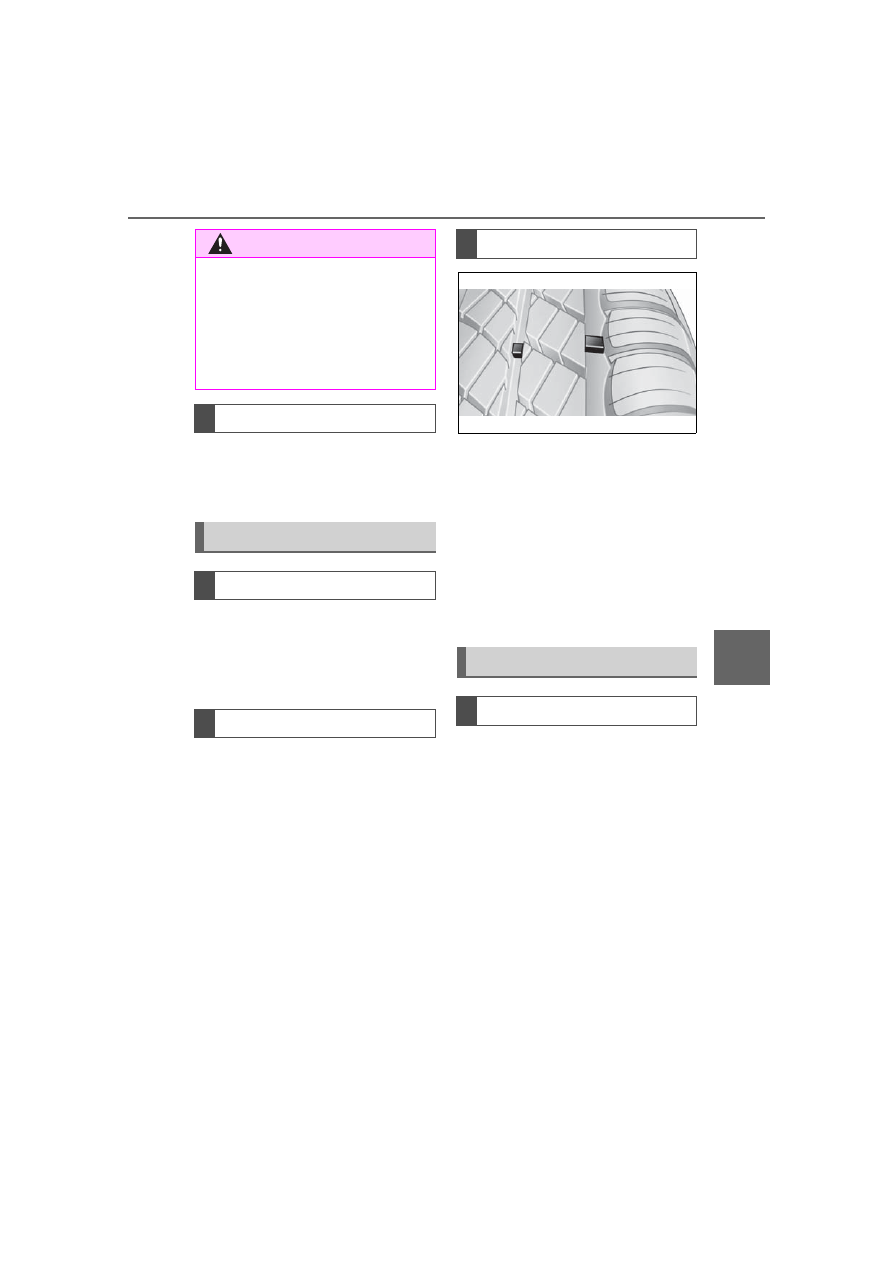
Wear indicators are distributed
around the tire's circumference
and have the legally required
minimum height of 0.063
inches/1.6 mm.
The positions of the wear indica-
tors are marked on the tire side-
wall with TWI, Tread Wear
Indicator.
Inspect your tires regularly for
damage, foreign objects lodged
in the tread, and tread wear.
Driving over rough or damaged
road surfaces, as well as debris,
curbs and other obstacles can
cause serious damage to
wheels, tires and suspension
parts. This is more likely to
occur with low-profile tires,
which provide less cushioning
between the wheel and the
road. Be careful to avoid road
hazards and reduce your speed,
especially if your vehicle is
WARNING
The temperature grade for this tire
is established for a tire that is
properly inflated and not over-
loaded. Excessive speed, under-
inflation, or excessive loading,
either separately or in combina-
tion, can cause heat buildup and
possible tire failure.
M+S
Tire tread
Summer tires
Winter tires
Minimum tread depth
Tire damage
General information
-------------------------------------------------------------------------------------------------------------------------------------------------------------
280
6-1. MOBILITY
Supra Owner’s Manual_U (from Mar. ’20
Prod.)
equipped with low-profile tires.
Indications of tire damage or
other vehicle malfunctions:
• Unusual vibrations.
• Unusual tire or running
noises.
• Unusual handling such as a
strong tendency to pull to the
left or right.
Damage can be caused by the
following situations, for instance:
• Driving over curbs.
• Road damage.
• Tire inflation pressure too low.
• Vehicle overloading.
• Incorrect tire storage.
Have mounting and wheel bal-
ancing carried out by your Toy-
ota dealer.
You can ask your Toyota dealer
about the correct wheel/tire
combination and wheel rim ver-
sions for the vehicle.
Safety information
WARNING
Damaged tires can lose tire infla-
tion pressure, which can lead to
loss of vehicle control. There is a
risk of an accident. If tire damage
is suspected while driving, imme-
diately reduce speed and stop.
Have wheels and tires checked.
For this purpose, drive carefully to
the nearest your Toyota dealer.
Have vehicle towed or trans-
ported as needed. Do not repair
damaged tires, but have them
replaced.
WARNING
Tires can become damaged by
driving over obstacles, e.g., curbs
or road damage, at high speed.
Larger wheels have a smaller tire
crosssection. The smaller the tire
cross-section, the higher the risk
of tire damage. There is a danger
of accidents and property dam-
age. If possible, avoid driving over
objects or road conditions that
may damage tires, or drive over
them slowly and carefully.
Changing wheels and
tires
Mounting and wheel bal-
ancing
Wheel and tire combina-
tion
General information
-------------------------------------------------------------------------------------------------------------------------------------------------------------
281
6-1. MOBILITY
Supra Owner’s Manual_U (from Mar. ’20
Prod.)
6
MOBILITY
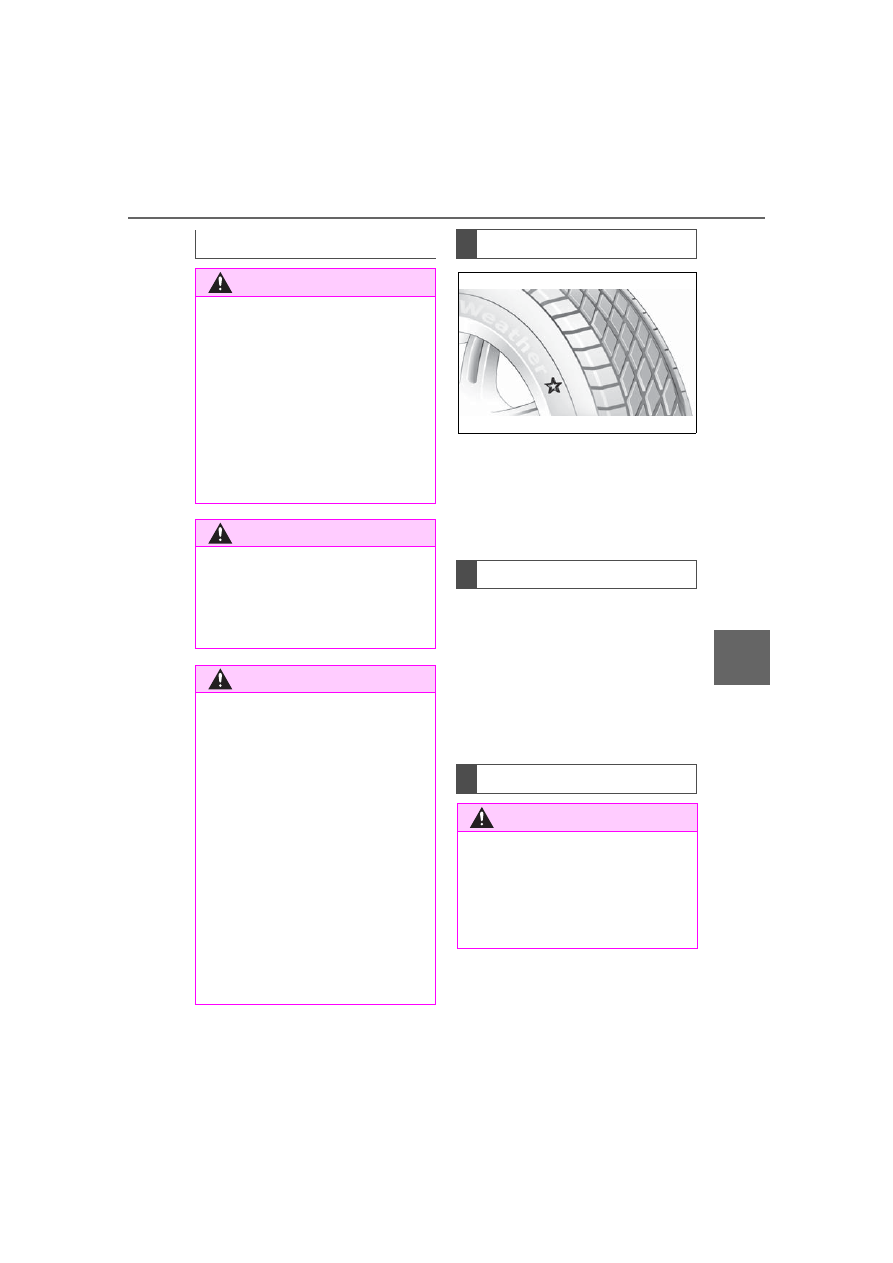
For each tire size, the manufac-
turer of the vehicle recommends
certain tire brands. The tire
brands can be identified by a
star on the tire sidewall.
Tire traction is not optimal due to
manufacturing circumstances
when tires are brand-new; they
achieve their full traction poten-
tial after a break-in time.
Drive conservatively for the first
200 miles/300 km.
The manufacturer of your vehi-
cle does not recommend the
use of retreaded tires.
Safety information
WARNING
Wheels and tires which are not
suitable for your vehicle can dam-
age parts of the vehicle, for
instance due to contact with the
body due to tolerances despite
the same official size rating.
There is a risk of an accident. The
manufacturer of your vehicle
strongly suggests that you use
wheels and tires that have been
recommended by the vehicle
manufacturer for your vehicle
type.
WARNING
Mounted steel wheels can cause
technical problems, for instance
unexpected loosening of the lug
bolts and damage to the brake
discs. There is a risk of accident.
Do not mount steel wheels.
WARNING
Incorrect wheel/tire combinations
will have a negative impact on the
vehicle's handling and on the
function of a variety of systems,
such as the Anti-lock Brake Sys-
tem or Vehicle Stability Control
System. There is a risk of an acci-
dent. To maintain good handling
and vehicle response, use only
tires with a single tread configura-
tion from a single manufacturer.
The manufacturer of the vehicle
recommends that you use wheels
and tires that have been recom-
mended by the vehicle manufac-
turer for your vehicle type.
Following tire damage, have the
original wheel/tire combination
remounted on the vehicle as soon
as possible.
Recommended tire brands
New tires
Retreaded tires
WARNING
Retreaded tires can have different
tire casing structures. With
advanced age the service life can
be limited. There is a risk of an
accident. The manufacturer of
your vehicle does not recommend
the use of retreaded tires.
-------------------------------------------------------------------------------------------------------------------------------------------------------------
282
6-1. MOBILITY
Supra Owner’s Manual_U (from Mar. ’20
Prod.)
Winter tires are recommended
for operating on winter roads.
Although so-called all-season
M+S tires provide better winter
traction than summer tires, they
usually do not provide the same
level of performance as winter
tires.
If the maximum speed of the
vehicle is higher than the per-
missible speed for the winter
tires, then attach a label show-
ing the permissible maximum
speed in the field of view. The
label is available from your Toy-
ota dealer.
With winter tires mounted,
observe and do not exceed the
permissible maximum speed.
Do not exceed the maximum tire
inflation pressure indicated on
the side wall of the tire.
Store wheels and tires in a cool,
dry and dark place.
Always protect tires against all
contact with oil, grease, and sol-
vents.
Do not leave tires in plastic
bags.
Remove dirt from wheels or
tires.
• Park the vehicle as far away
as possible from passing traf-
fic and on solid ground.
• Switch on the hazard warning
system.
• Secure the vehicle against
rolling away by setting the
parking brake.
• Turn the steering wheel until
the front wheels are in the
straight-ahead position and
engage the steering wheel
lock.
• Have all vehicle occupants
get out of the vehicle and
Winter tires
General information
Maximum speed of winter
tires
Rotating wheels between
axles
WARNING
Rotating tires between the axles
on vehicles with different tire sizes
or rim sizes on the front and rear
axles can cause damage to the
tires and the vehicle. There is a
risk of accident. Do not rotate the
tires between the axles on vehi-
cles with different tire sizes or rim
sizes on the front and rear axles.
Storing tires
Tire inflation pressure
Storage
Repairing a flat tire
Safety measures
-------------------------------------------------------------------------------------------------------------------------------------------------------------
283
6-1. MOBILITY
Supra Owner’s Manual_U (from Mar. ’20
Prod.)
6
MOBILITY
ensure that they remain out-
side the immediate area in a
safe place, such as behind a
guardrail.
• If necessary, set up a warning
triangle at an appropriate dis-
tance.
With the Mobility System, minor
tire damage can be sealed tem-
porarily to enable continued
travel. To accomplish this, seal-
ant is pumped into the tires,
which seals the damage from
the inside.
• Follow the instructions on
using the Mobility System
found on the compressor and
sealant container.
• Use of the Mobility System
may be ineffective if the tire
puncture measures approx.
1/8 inches/4 mm or more.
• Contact your Toyota dealer if
the tire cannot be made driv-
able.
• Do not remove foreign bodies
that have penetrated the tire.
Only remove foreign objects if
they are visibly protruding
from the tire.
• Pull the speed limit sticker off
the sealant container and
apply it to the steering wheel.
• The use of a sealant can
damage the TPM wheel elec-
tronics. In this case, have the
electronics checked and
replaced at the next opportu-
nity.
• The compressor can be used
to check the tire inflation pres-
sure.
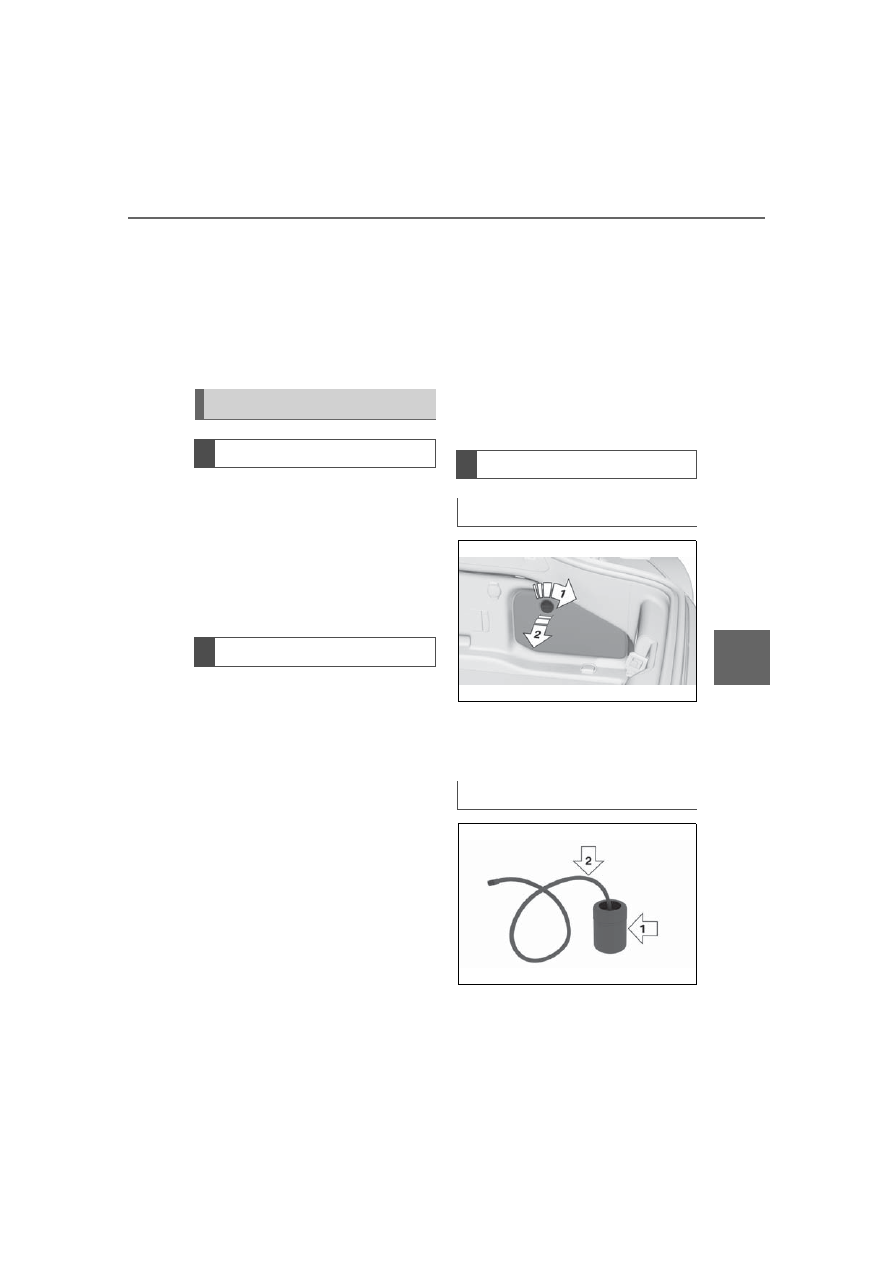
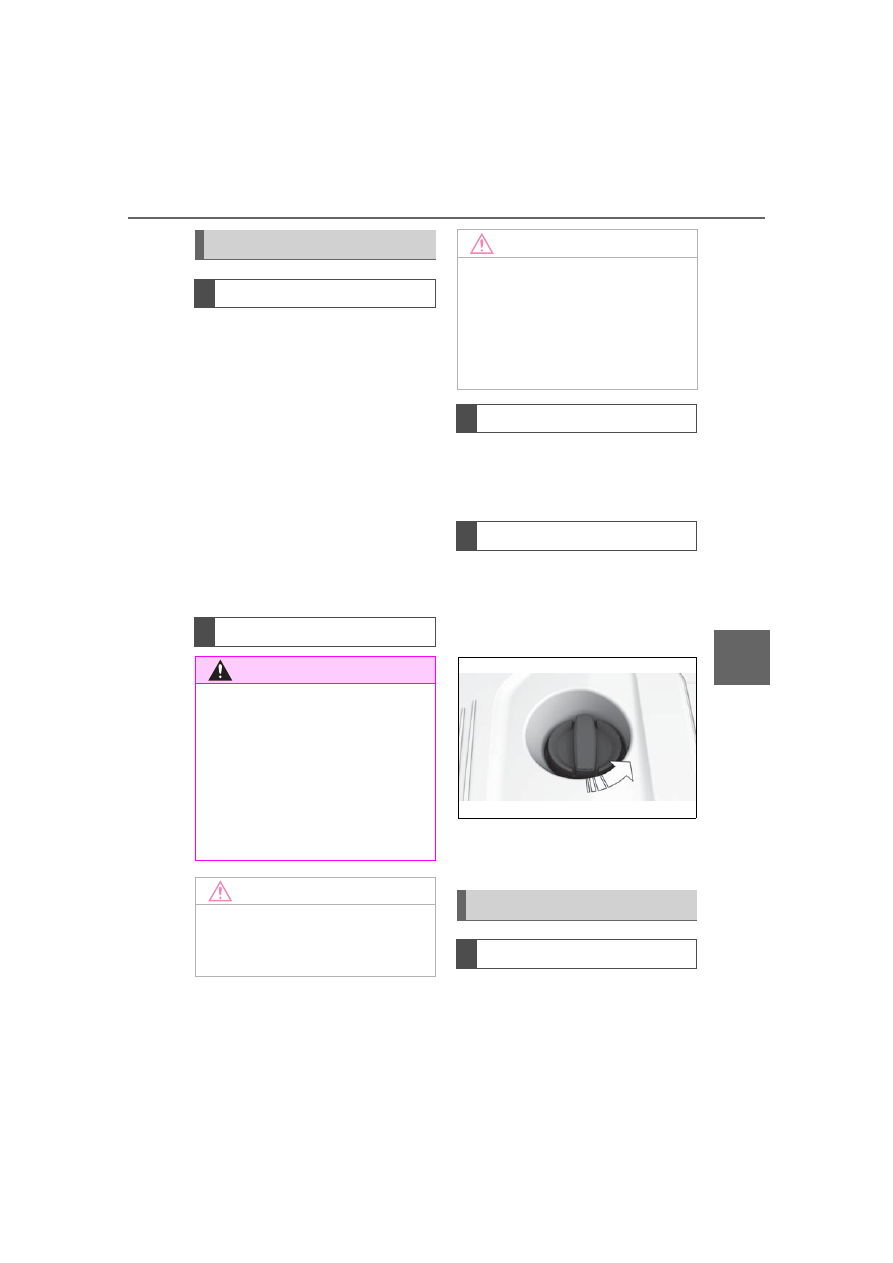
The Mobility System is located in
the right storage compartment of the
cargo area.
• Sealant container, arrow
1
.
• Filling hose, arrow
2
.
Mobility System
Concept
General information
Overview
Storage
Sealant container
-------------------------------------------------------------------------------------------------------------------------------------------------------------
284
6-1. MOBILITY
Supra Owner’s Manual_U (from Mar. ’20
Prod.)
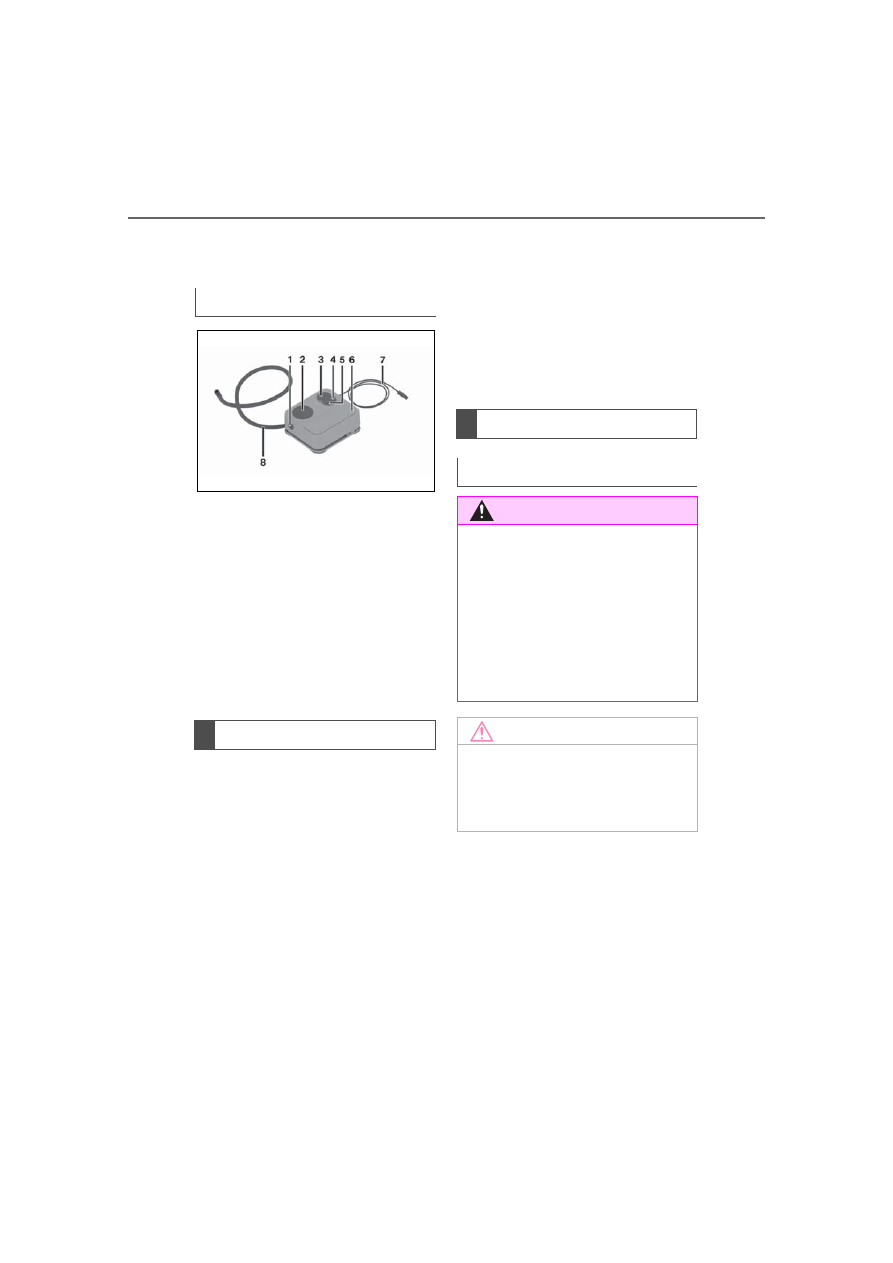
Observe use-by date on the
sealant container.
1
Sealant container unlocking
2
Sealant container holder
3
Tire pressure gauge
4
Reduce tire inflation pressure
button
5
On/off switch
6
Compressor
7
Connector/cable for socket
8
Connection hose
• Park the vehicle as far away
as possible from passing traf-
fic and on solid ground.
• Switch on the hazard warning
system.
• Secure the vehicle against
rolling away by setting the
parking brake.
• Turn the steering wheel until
the front wheels are in the
straight-ahead position and
engage the steering wheel
lock.
• Have all vehicle occupants
get out of the vehicle and
ensure that they remain out-
side the immediate area in a
safe place, such as behind a
guardrail.
• If necessary, set up a warning
triangle at an appropriate dis-
tance.
Compressor
Safety measures
Filling the tire with sealant
Safety information
WARNING
If the exhaust pipe is blocked or
ventilation is insufficient, harmful
exhaust gases can enter into the
vehicle. The exhaust gases con-
tain pollutants which are colorless
and odorless. In enclosed areas,
exhaust gases can also accumu-
late outside of the vehicle. There
is danger to life. Keep the exhaust
pipe free and ensure sufficient
ventilation.
NOTICE
The compressor can overheat
during extended operation. There
is a risk of damage to property. Do
not run the compressor for more
than 10 minutes.
-------------------------------------------------------------------------------------------------------------------------------------------------------------
285
6-1. MOBILITY
Supra Owner’s Manual_U (from Mar. ’20
Prod.)
6
MOBILITY
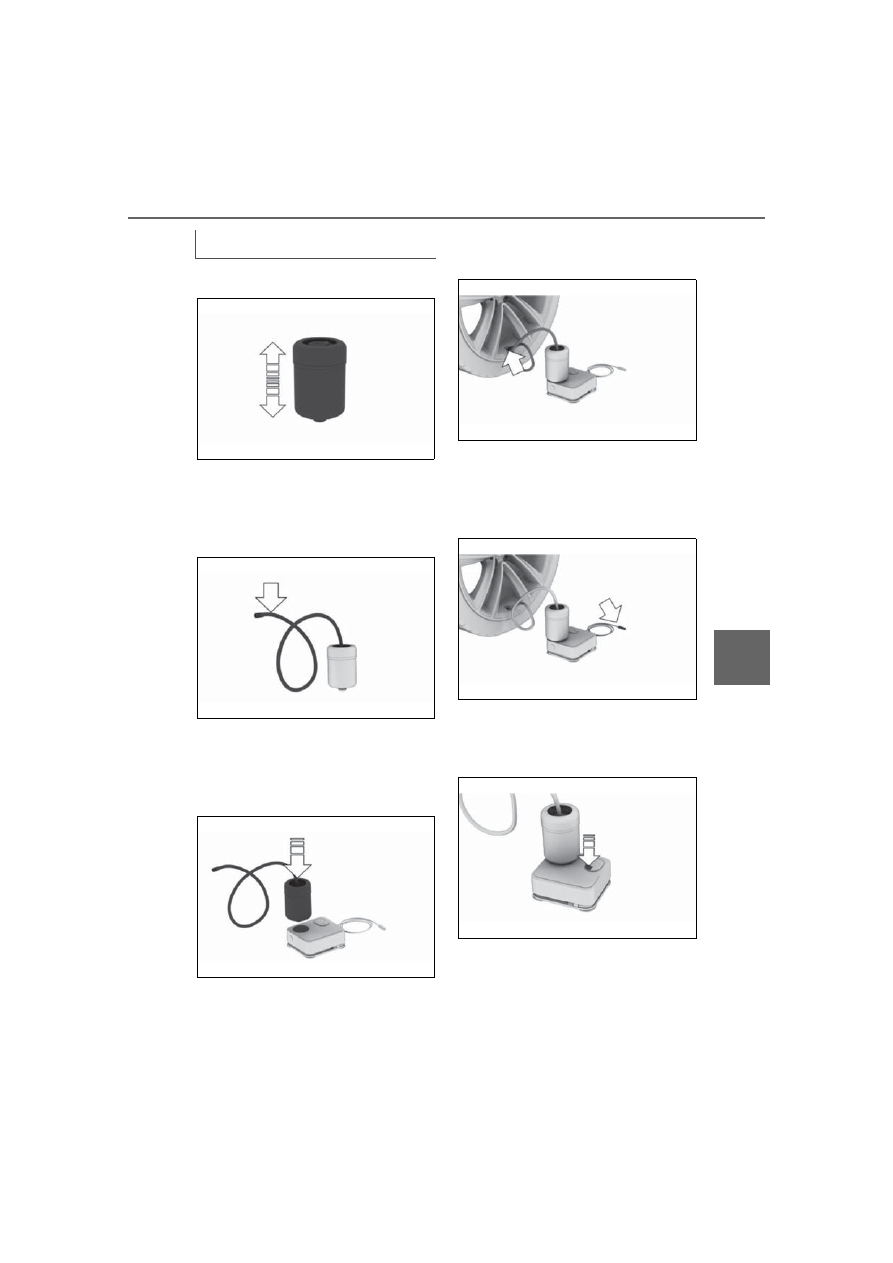
1
Shake the sealant container.
2
Pull filling hose completely
out of the cover of the sealant
container. Do not kink the
hose.
3
Slide the sealant container
into the holder on the com-
pressor housing, ensuring
that it engages audibly.
4
Screw the filling hose of the
sealant container onto the
tire valve of the nonworking
wheel.
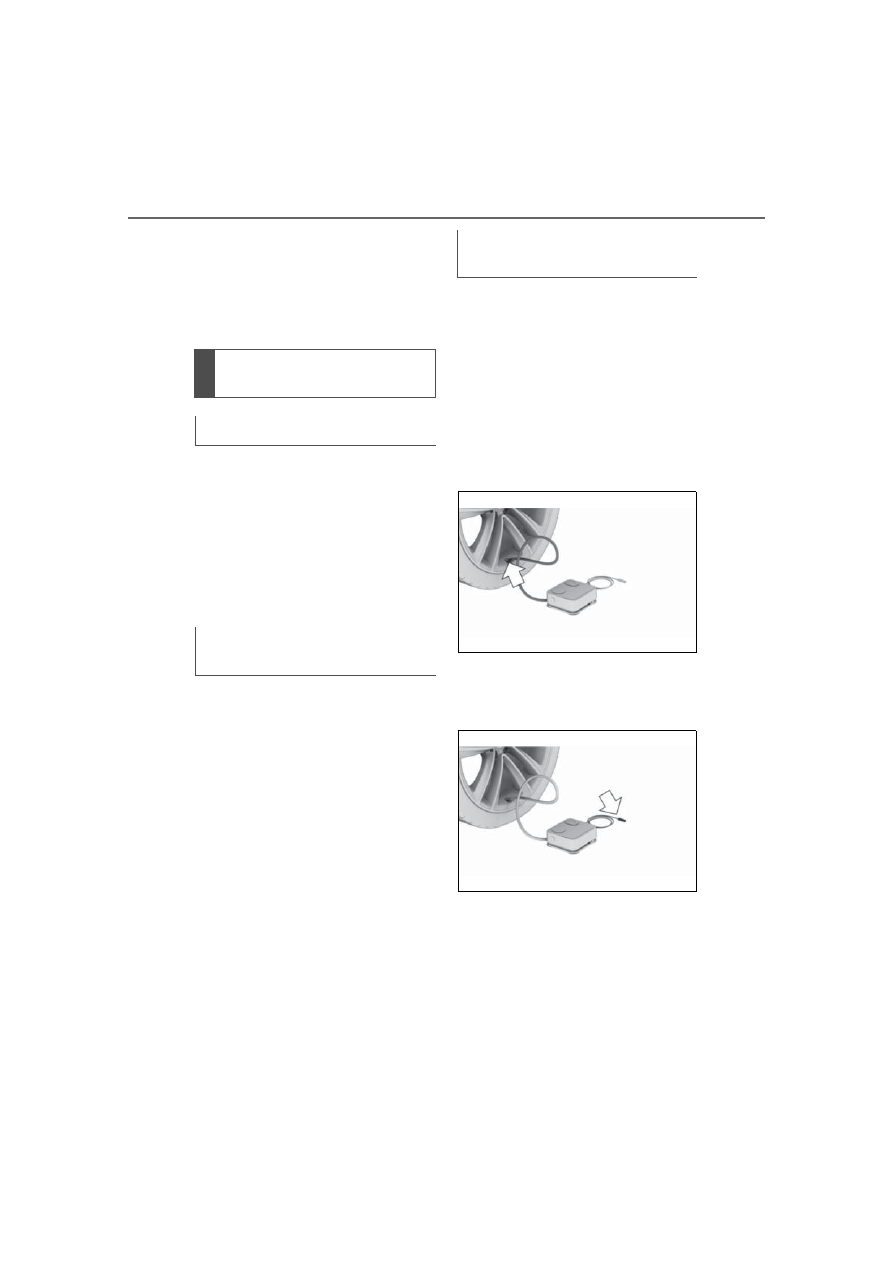
5
With the compressor
switched off, insert the plug
into the power socket inside
the vehicle.
6
With standby state switched
on or the engine running,
switch on the compressor.
Let the compressor run for max.
10 minutes to fill the tire with
sealant and achieve a tire infla-
tion pressure of approx. 2.0 bar.
Filling
-------------------------------------------------------------------------------------------------------------------------------------------------------------
286
6-1. MOBILITY
Supra Owner’s Manual_U (from Mar. ’20
Prod.)
While the tire is being filled with
sealant, the tire inflation pres-
sure may sporadically reach
approx. 5 bar. Do not switch off
the compressor at this point.
1
Switch off the compressor.
2
Read the tire inflation pres-
sure on the tire pressure
gauge.
To continue the trip, a tire infla-
tion pressure of at least 2 bar
must be reached.
1
Unscrew the filling hose of
the sealant container from
the tire valve.
2
Press the red unlocking
device.
3
Remove the sealant con-
tainer from the compressor.
4
Wrap and store the sealant
container in suitable material
to avoid dirtying the cargo
area.
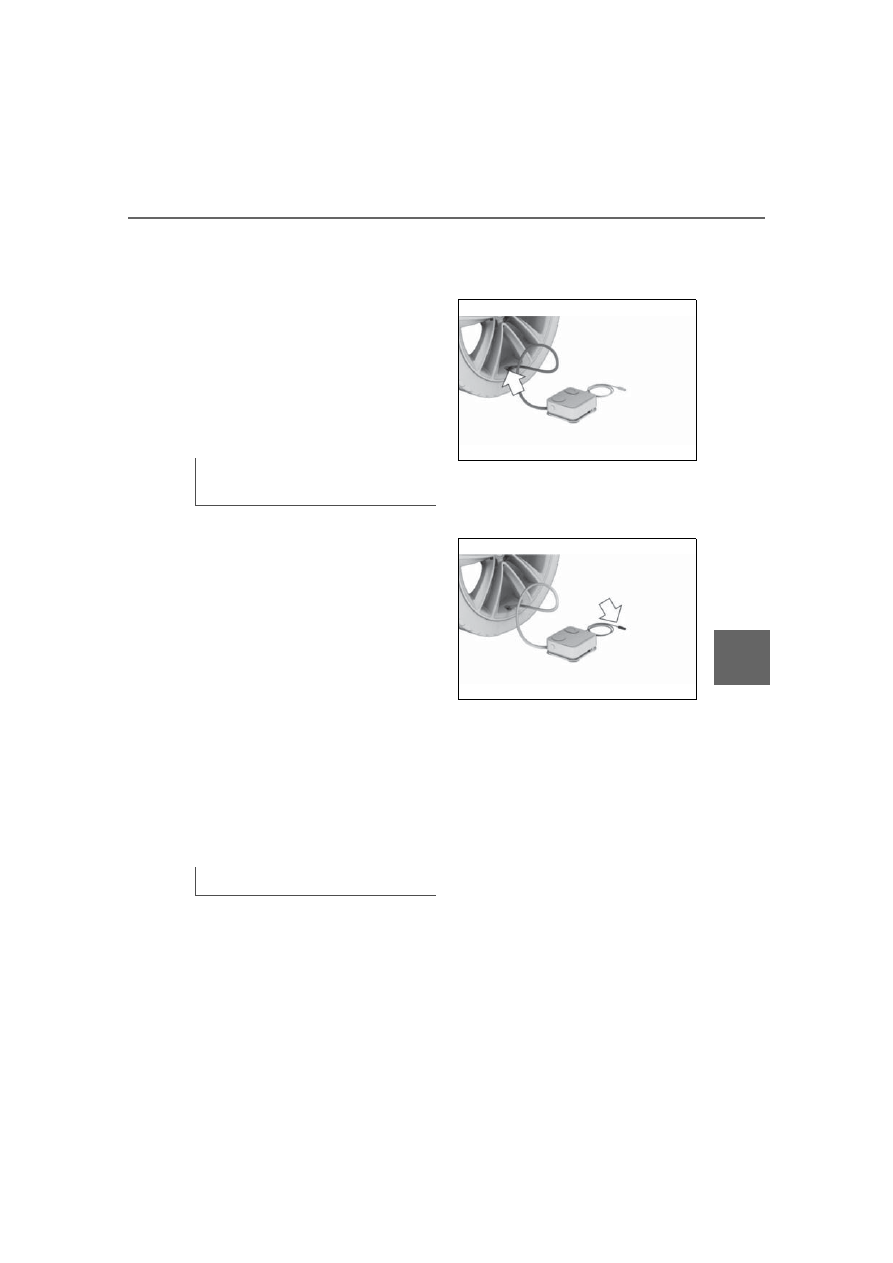
1
Pull the connector out of the
power socket inside the vehi-
cle.
2
Drive 33 ft/10 m forward and
back to distribute the sealant
in the tire.
3
Screw the connection hose of
the compressor directly onto
the tire valve stem.
4
Insert the connector into the
power socket inside the vehi-
cle.
5
With standby state switched
on or the engine running,
switch on the compressor.
If a tire inflation pressure of at least
2 bar cannot be reached, contact
your Toyota dealer.
If a tire inflation pressure of at least
Checking and adjusting
the tire inflation pressure
Checking
Removing and stowing the
sealant container
Minimum tire inflation pres-
sure is not reached
-------------------------------------------------------------------------------------------------------------------------------------------------------------
287
6-1. MOBILITY
Supra Owner’s Manual_U (from Mar. ’20
Prod.)
6
MOBILITY
2 bar is reached, see Minimum tire
inflation pressure is reached.
6
Unscrew the connection
hose of the compressor from
the tire valve.
7
Pull the connector out of the
power socket inside the vehi-
cle.
8
Stow the Mobility System in
the vehicle.
1
Unscrew the connection
hose of the compressor from
the tire valve.
2
Pull the connector out of the
power socket inside the vehi-
cle.
3
Stow the Mobility System in
the vehicle.
4
Immediately drive approx. 5
miles/10 km to ensure that
the sealant is evenly distrib-
uted in the tire.
Do not exceed a speed of 50
mph/80 km/h.
If possible, do not drive at speeds
less than 12 mph/20 km/h.
1
Stop at a suitable location.
2
Screw the connection hose of
the compressor directly onto
the tire valve stem.
3
Insert the connector into the
power socket inside the vehi-
cle.
4
Correct the tire inflation pres-
sure to at least 2.0 bar.
• Increase tire inflation pres-
sure: with standby state
switched on or the engine
running, switch on the com-
pressor.
• Reduce tire inflation pressure:
press the button on the com-
pressor.
5
Unscrew the connection
hose of the compressor from
the tire valve.
6
Pull the connector out of the
power socket inside the vehi-
cle.
Minimum tire inflation pres-
sure is reached
Adjustment
-------------------------------------------------------------------------------------------------------------------------------------------------------------
288
6-1. MOBILITY
Supra Owner’s Manual_U (from Mar. ’20
Prod.)
7
Stow the Mobility System in
the vehicle.
Do not exceed the maximum
permissible speed of 50 mph/80
km/h
Reset the Tire Pressure Monitor
TPM, refer to page 288.
Replace the nonworking tire and
the sealant container of the
Mobility System promptly.
Tire chains cannot be mounted.
Snow tires should be used
instead.
The system monitors tire infla-
tion pressure in the four
mounted tires. The system
warns you if there is a loss of
pressure in one or more tires.
Sensors in the tire valves mea-
sure the tire inflation pressure
and tire temperature.
The system detects the
mounted tires automatically. The
system displays the specified
nominal pressure values on the
Control Display and compares
these values to the actual tire
pressure values.
If tires are being used that are
not specified on the tire inflation
pressure details on the vehicle,
refer to page 272, such as tires
with special approval, the sys-
tem needs to be actively reset.
The system will then take over
the actual tire inflation pressures
as the target pressures.
When operating the system,
also note the additional informa-
tion found in the Tire inflation
pressure, refer to page 272.
Continuing the trip
Snow chains
NOTICE
■
Driving with tire chains
Do not fit tire chains. Tire chains
may damage the vehicle body
and suspension, and adversely
affect driving performance.
Selecting tire chains
Tire Pressure Monitor
TPM
Concept
General information
-------------------------------------------------------------------------------------------------------------------------------------------------------------
289
6-1. MOBILITY
Supra Owner’s Manual_U (from Mar. ’20
Prod.)
6
MOBILITY
The following conditions must
be met for the system; other-
wise, reliable flagging of a loss
of tire inflation pressure is not
assured:
• After each tire or wheel
change, the system detects
and updates the mounted
tires and displays them after a
short trip on the Control Dis-
play.
Enter the information about the
mounted tires in the tire settings
when the system does not automat-
ically detect the tires.
• TPM does not activate until
after driving for a few minutes:
• After a tire or wheel replacement.
• Reset, for tires without special
approval.
• After changing the tire setting.
• For tires with special
approval:
• After a tire or wheel replacement,
a reset was performed with the
correct tire inflation pressure.
• After the tire inflation pressure
was adjusted to a new value, a
reset was performed.
• Wheels with TPM wheel elec-
tronics.
The information about the
mounted tires can be entered in
the tire settings if the system
does not automatically detect
the tires.
The tire sizes of the mounted
tires can be gathered from the
tire inflation pressure details on
the vehicle, refer to page 272, or
directly on the tires.
The tire details do not need to
be re-entered when the tire infla-
tion pressure is corrected.
For summer and winter tires, the
tire details entered last are
stored. After a tire or wheel
replacement, the settings of the
tire sets used last can be
selected.
Via Toyota Supra Command:
1
"My vehicle"
2
"Vehicle status"
Safety information
WARNING
The display of the target pres-
sures is not a substitute for the
tire inflation pressure details on
the vehicle. Incorrect entries in
the tire settings can lead to incor-
rect target tire inflation pressure
values. In this case, it cannot be
guaranteed that the notification of
a loss of tire inflation pressure will
be reliable. There is a risk of injury
and risk of damage to property.
Ensure that the tire sizes of the
mounted tires are displayed cor-
rectly and match the details on the
tires and on the vehicle.
Functional requirements
Tire settings
General information
Opening the menu
-------------------------------------------------------------------------------------------------------------------------------------------------------------
290
6-1. MOBILITY
Supra Owner’s Manual_U (from Mar. ’20
Prod.)
3
"Tire Pressure Monitor"
Via Toyota Supra Command:
1
"Tire settings"
2
Selecting tires:
• "Summer tires"
• "Winter tires/all-season tires"
3
"Current:"
4
Select the tire type that is
mounted on the rear axle:
• Tire size, e.g., 245/45 R18 96
Y.
• For tires with special
approval: "Other tire"
5
Select the maximum road
speed that will be used with
the tires.
6
"Confirm settings"
The measurement of the current
tire inflation pressure is started.
The measurement progress is
displayed.
The system status can be dis-
played on the Control Display,
e.g., whether or not the system
is active.
Via Toyota Supra Command:
1
"My vehicle"
2
"Vehicle status"
3
"Tire Pressure Monitor"
The current status is displayed.
The current tire inflation pres-
sure is displayed for each tire.
The current tire inflation pres-
sures may change during driv-
ing operation or depending on
the external temperature.
Depending on the model, the
current tire temperatures are
displayed.
The current tire temperatures
may change while driving or due
to the external temperature.
Tire and system status are indi-
cated by the color of the wheels
and a SMS text message on the
Control Display.
Any existing messages are not
deleted if the displayed target
pressure is not reached after the
tire inflation pressure is cor-
rected.
• The system is active and
bases warnings on the dis-
played target pressures.
Changing settings
Status display
Current status
Current tire inflation pres-
sure
Current tire temperature
Tire conditions
General information
All wheels green
-------------------------------------------------------------------------------------------------------------------------------------------------------------
291
6-1. MOBILITY
Supra Owner’s Manual_U (from Mar. ’20
Prod.)
6
MOBILITY
• For tires with special
approval: the system is active
and bases warnings on the
tire inflation pressures stored
during the last reset.
A flat tire or major drop in the
tire inflation pressure has
occurred in the indicated tires.
It may not be possible to identify
tire inflation pressure losses.
Possible causes:
• Malfunction.
• During tire inflation pressure
measurement, after confirma-
tion of the tire settings.
• For tires with special
approval: the system is being
reset.
Via Toyota Supra Command:
1
"My vehicle"
2
"Vehicle status"
3
"Tire Pressure Monitor"
4
"Tire settings"
5
Selecting tires:
• "Summer tires"
• "Winter tires/all-season tires"
6
"Current:"
When not selecting "Other
tire":
7
"Load state"
8
"Confirm settings"
9
Drive the vehicle.
When selecting "Other tire":
7
"Tire settings"
8
Switch on drive-ready state
and do not drive off.
9
Reset tire inflation pressure:
"Perform reset".
10
Drive away.
After driving faster than 19
mph/30 km/h for a short period,
the set tire inflation pressures
are accepted as the target tire
inflation pressures. The reset is
completed automatically while
driving.
After a successfully completed
reset, the wheels on the Control
Display are shown in green.
You may interrupt this trip at any
time. When you continue the
reset resumes automatically.
A low tire inflation pressure may
cause the VSC Vehicle Stability
Control System to be switched
on.
One to four yellow wheels
Gray wheels
Reset the tire inflation
pressure
Messages: for tires with-
out special approval
General information
-------------------------------------------------------------------------------------------------------------------------------------------------------------
292
6-1. MOBILITY
Supra Owner’s Manual_U (from Mar. ’20
Prod.)
■
Message
A symbol with a vehicle mes-
sage appears on the Control
Display.
■
Measure
Check the tire pressure and cor-
rect as needed.
■
Message
In addition, a symbol with a
vehicle message appears on the
Control Display.
■
Measure
1
Reduce the vehicle speed.
Do not exceed a speed of 80
mph/130 km/h.
2
At the next opportunity, for
instance at a gas station,
check the tire inflation pres-
sure in all four tires and cor-
rect if necessary.
■
Message
In addition, a symbol with the
affected tire appears in a vehicle
message on the Control Display.
■
Measure
Reduce your speed and stop
cautiously. Avoid sudden brak-
ing and steering maneuvers.
Safety information
WARNING
A damaged regular tire with low or
missing tire inflation pressure
impacts handling, such as steer-
ing and braking response. Do not
continue driving if the vehicle is
equipped with normal tires.
If a tire inflation pressure
check is required
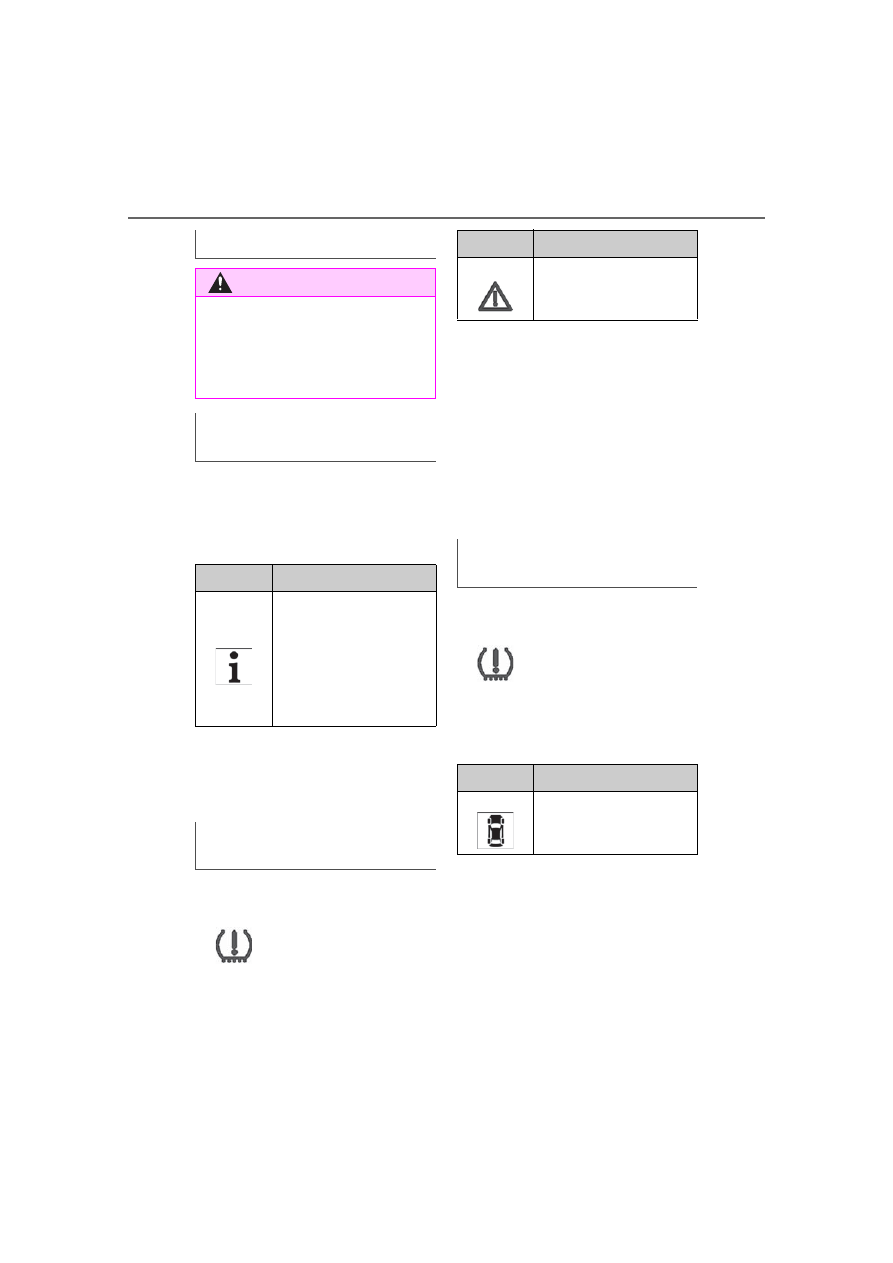
Symbol
Possible cause
Inflation was not carried
out according to specifi-
cations, e.g., when the
tire has not been suffi-
ciently inflated or in the
case of a natural steady
tire pressure loss.
If the tire inflation pressure
is too low
A yellow warning light is
illuminated in the instru-
ment cluster.
Symbol
Possible cause
There is a tire inflation
pressure loss.
If there is a significant loss
of tire inflation pressure
A yellow warning light is
illuminated in the instru-
ment cluster.
Symbol
Possible cause
There is a flat tire or a
major loss in tire infla-
tion pressure.
-------------------------------------------------------------------------------------------------------------------------------------------------------------
293
6-1. MOBILITY
Supra Owner’s Manual_U (from Mar. ’20
Prod.)
6
MOBILITY
A low tire inflation pressure may
cause the VSC Vehicle Stability
Control System to be switched
on.
■
Message
A symbol with a vehicle mes-
sage appears on the Control
Display.
■
Measure
1
Check the tire pressure and
correct as needed.
2
Perform a system reset.
■
Message
In addition, a symbol with a
vehicle message appears on the
Control Display.
Messages: for tires with
special approval
General information
Safety information
WARNING
A damaged regular tire with low or
missing tire inflation pressure
impacts handling, such as steer-
ing and braking response. Do not
continue driving if the vehicle is
equipped with normal tires.
If a tire inflation pressure
check is required
Symbol
Possible cause
Inflation was not carried
out according to specifi-
cations, e.g., the tire
has not been suffi-
ciently inflated.
The system has
detected a wheel
change, but no reset
was done.
The tire inflation pres-
sure has fallen below
the level of the last
reset.
No reset was per-
formed for the system.
The system issues a
warning based on the
tire inflation pressures
stored during the last
reset.
If the tire inflation pressure
is too low
A yellow warning light is
illuminated in the instru-
ment cluster.
-------------------------------------------------------------------------------------------------------------------------------------------------------------
294
6-1. MOBILITY
Supra Owner’s Manual_U (from Mar. ’20
Prod.)
■
Measure
1
Reduce the vehicle speed.
Do not exceed a speed of 80
mph/130 km/h.
2
At the next opportunity, for
instance at a gas station,
check the tire inflation pres-
sure in all four tires and cor-
rect if necessary.
3
Reset the system.
■
Message
In addition, a symbol with the
affected tire appears in a vehicle
message on the Control Display.
■
Measure
Reduce your speed and stop
cautiously. Avoid sudden brak-
ing and steering maneuvers.
1
Identify the damaged tire.
Check the tire inflation pressure in
all four tires, for instance using the
tire pressure gauge of a flat tire kit.
For tires with special approval: if
the tire inflation pressure in all four
tires is correct, the TPM may not
have been reset. In this case, per-
form the reset.
If tire damage cannot be found,
contact your Toyota dealer.
2
Repair the flat tire, e.g., with
a flat tire kit or by changing
the wheel.
Use of sealant, for instance from
the flat tire kit, may damage the
TPM wheel electronics. Have
the electronics replaced at the
next opportunity.
Symbol
Possible cause
There is a tire inflation
pressure loss.
No reset was per-
formed for the system.
The system issues a
warning based on the
tire inflation pressures
stored during the last
reset.
If there is a significant loss
of tire inflation pressure
A yellow warning light is
illuminated in the instru-
ment cluster.
Symbol
Possible cause
There is a flat tire or a
major loss in tire infla-
tion pressure.
No reset was per-
formed for the system.
The system issues a
warning based on the
tire inflation pressures
stored during the last
reset.
Actions in the event of a
flat tire
-------------------------------------------------------------------------------------------------------------------------------------------------------------
295
6-1. MOBILITY
Supra Owner’s Manual_U (from Mar. ’20
Prod.)
6
MOBILITY
The tire inflation pressure
depends on the tire's tempera-
ture.
Driving or exposure to the sun
will increase the tire's tempera-
ture, thus increasing the tire
inflation pressure.
The tire inflation pressure is
reduced when the tire tempera-
ture falls again.
These circumstances may
cause a warning when tempera-
tures fall very sharply.
Following a temperature-related
warning, the target pressures
are displayed on the Control
Display again after a short dis-
tance.
The system cannot indicate sud-
den serious tire damage caused
by external circumstances.
Tires with special approval: the
system will not function correctly
if a reset was not performed, for
example a flat tire may be indi-
cated although the tire inflation
pressures are correct.
• A wheel without TPM wheel
electronics, such as an emer-
gency wheel, is mounted:
have the wheels checked, if
needed.
• Malfunction: have the system
checked.
• Interference caused by sys-
tems or devices with the
same radio frequency: after
leaving the area of the inter-
ference, the system automati-
cally becomes active again.
• For tires with special
approval: the system was
unable to complete the reset.
Perform a system reset again.
• Each tire, including the spare
(if provided) should be
checked monthly when cold
and inflated to the inflation
System limits
Temperature
Sudden tire pressure loss
Failure to perform a reset
Malfunction
Message
The yellow warning
light flashes and is then
illuminated continu-
ously. A vehicle mes-
sage is displayed. It
may not be possible to
identify tire pressure
losses.
Measure
Declaration according to
NHTSA/FMVSS 138 Tire
Pressure Monitoring System
-------------------------------------------------------------------------------------------------------------------------------------------------------------
296
6-1. MOBILITY
Supra Owner’s Manual_U (from Mar. ’20
Prod.)
pressure recommended by
the vehicle manufacturer on
the vehicle placard or tire
inflation pressure label. (If
your vehicle has tires of a dif-
ferent size than the size indi-
cated on the vehicle placard
or tire inflation pressure label,
you should determine the
proper tire inflation pressure
for those tires.) As an added
safety feature, your vehicle
has been equipped with a tire
pressure monitoring system
(TPMS) that illuminates a low
tire pressure telltale when one
or more of your tires is signifi-
cantly under-inflated. Accord-
ingly, when the low tire
pressure telltale illuminates,
you should stop and check
your tires as soon as possi-
ble, and inflate them to the
proper pressure. Driving on a
significantly under-inflated tire
causes the tire to overheat
and can lead to tire failure.
Under-inflation also reduces
fuel efficiency and tire tread
life, and may affect the vehi-
cle's handling and stopping
ability. Please note that the
TPMS is not a substitute for
proper tire maintenance, and
it is the driver's responsibility
to maintain correct tire pres-
sure, even if under-inflation
has not reached the level to
trigger illumination of the
TPMS low tire pressure tell-
tale. Your vehicle has also
been equipped with a TPMS
malfunction indicator to indi-
cate when the system is not
operating properly. The TPMS
malfunction indicator is com-
bined with the low tire pres-
sure telltale. When the system
detects a malfunction, the tell-
tale will flash for approxi-
mately one minute and then
remain continuously illumi-
nated. This sequence will
continue upon subsequent
vehicle start-ups as long as
the malfunction exists. When
the malfunction indicator is
illuminated, the system may
not be able to detect or signal
low tire pressure as intended.
TPMS malfunctions may
occur for a variety of reasons,
including the installation of
replacement or alternate tires
or wheels on the vehicle that
prevent the TPMS from func-
tioning properly. Always
check the TPMS malfunction
telltale after replacing one or
more tires or wheels on your
vehicle to ensure that the
replacement or alternate tires
and wheels allow the TPMS
to continue to function prop-
erly.
-------------------------------------------------------------------------------------------------------------------------------------------------------------
297
6-1. MOBILITY
Supra Owner’s Manual_U (from Mar. ’20
Prod.)
6
MOBILITY
If a tire is punctured and loses
pressure, it is not necessary to
replace the tire immediately if a
tire repair kit (Mobility System) is
used.
If needed, the tools for changing
wheels are available as acces-
sories from your Toyota dealer.
The wheel lug bolts have a spe-
cial coding. The lug bolts can
only be released with the
adapter which matches the cod-
ing.
The adapter of the lug bolt lock
is in the onboard vehicle tool kit
or in a storage compartment
close to the onboard vehicle tool
kit.
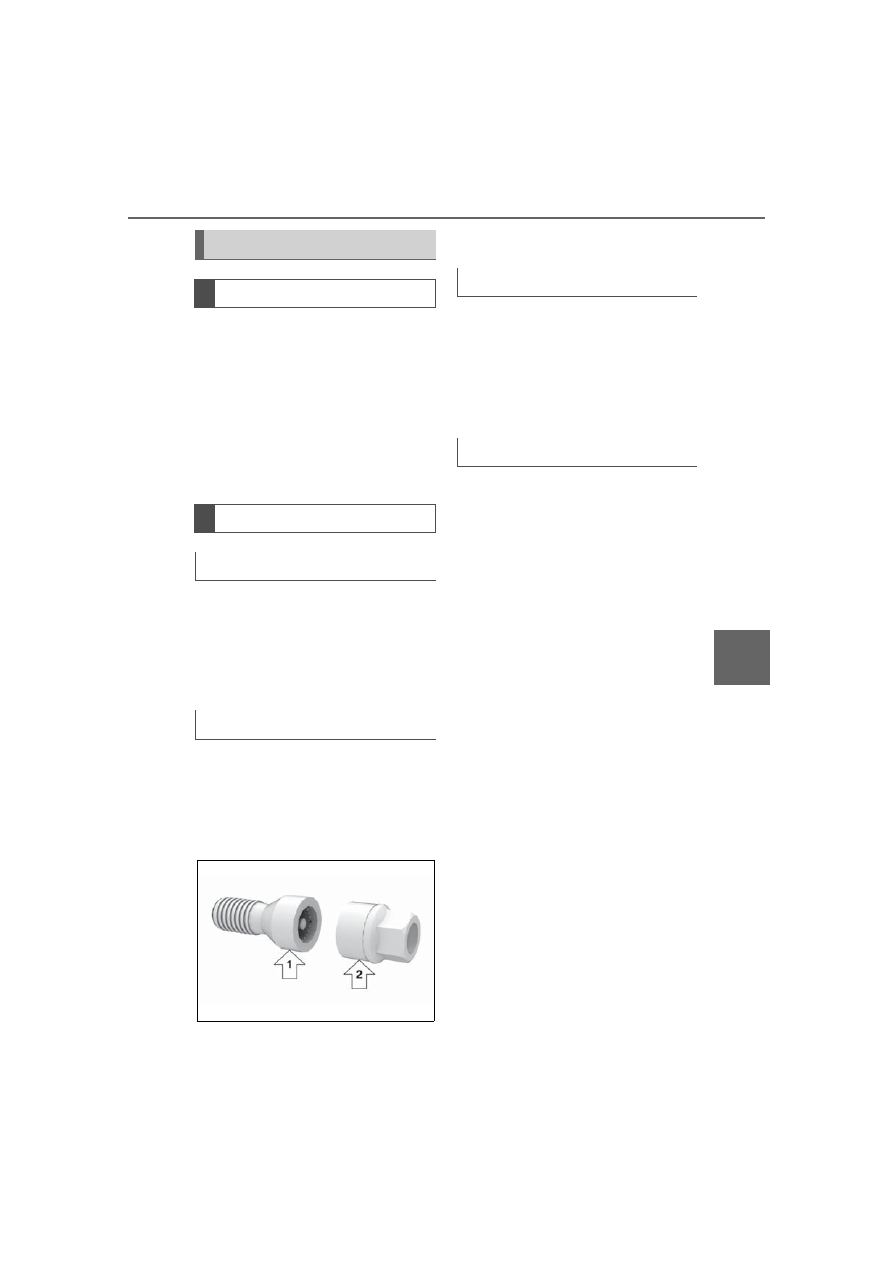
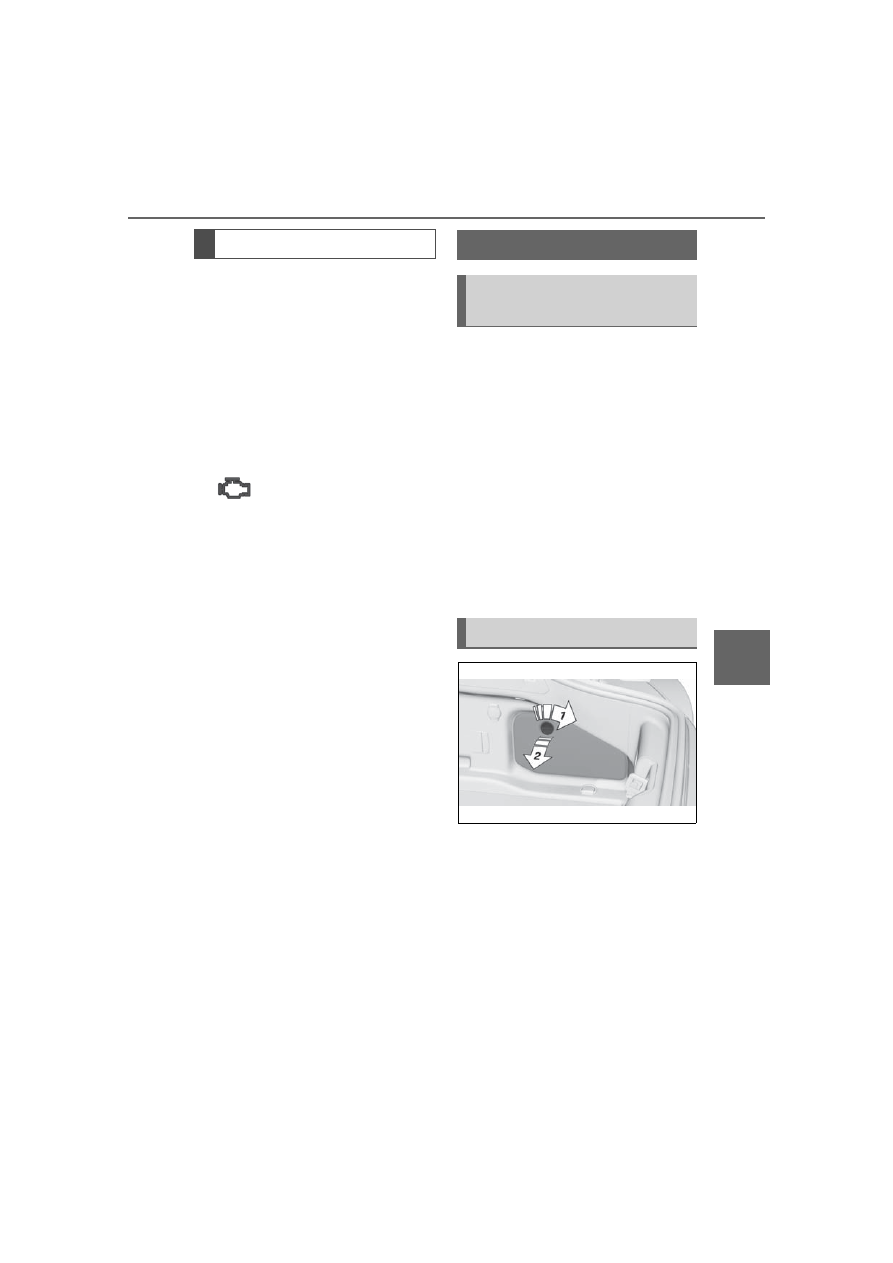
• Lug bolt, arrow
1
.
• Adapter, arrow
2
.
1
Attach the adapter to the lug
bolt.
2
Unscrew the lug bolt.
3
Remove the adapter after
unscrewing the lug bolt.
1
Attach the adapter to the lug
bolt. If necessary, turn the
adapter until it fits on the lug
bolt.
2
Screw on the wheel stud.
The tightening torque is 140
Nm.
3
Remove the adapter and
stow it after screwing on the
lug bolt.
Changing wheels/tires
General information
Lug bolt lock
Concept
Overview
Unscrewing
Screwing on
-------------------------------------------------------------------------------------------------------------------------------------------------------------
298
6-1. MOBILITY
Supra Owner’s Manual_U (from Mar. ’20
Prod.)
This chapter describes all stan-
dard, country-specific and
optional features offered with
the series. It also describes fea-
tures and functions that are not
necessarily available in your
vehicle, e.g., due to the selected
options or country versions. This
also applies to safety-related
functions and systems. When
using these functions and sys-
tems, the applicable laws and
regulations must be observed.
Engine compartment
Vehicle features and
options
-------------------------------------------------------------------------------------------------------------------------------------------------------------
299
6-1. MOBILITY
Supra Owner’s Manual_U (from Mar. ’20
Prod.)
6
MOBILITY
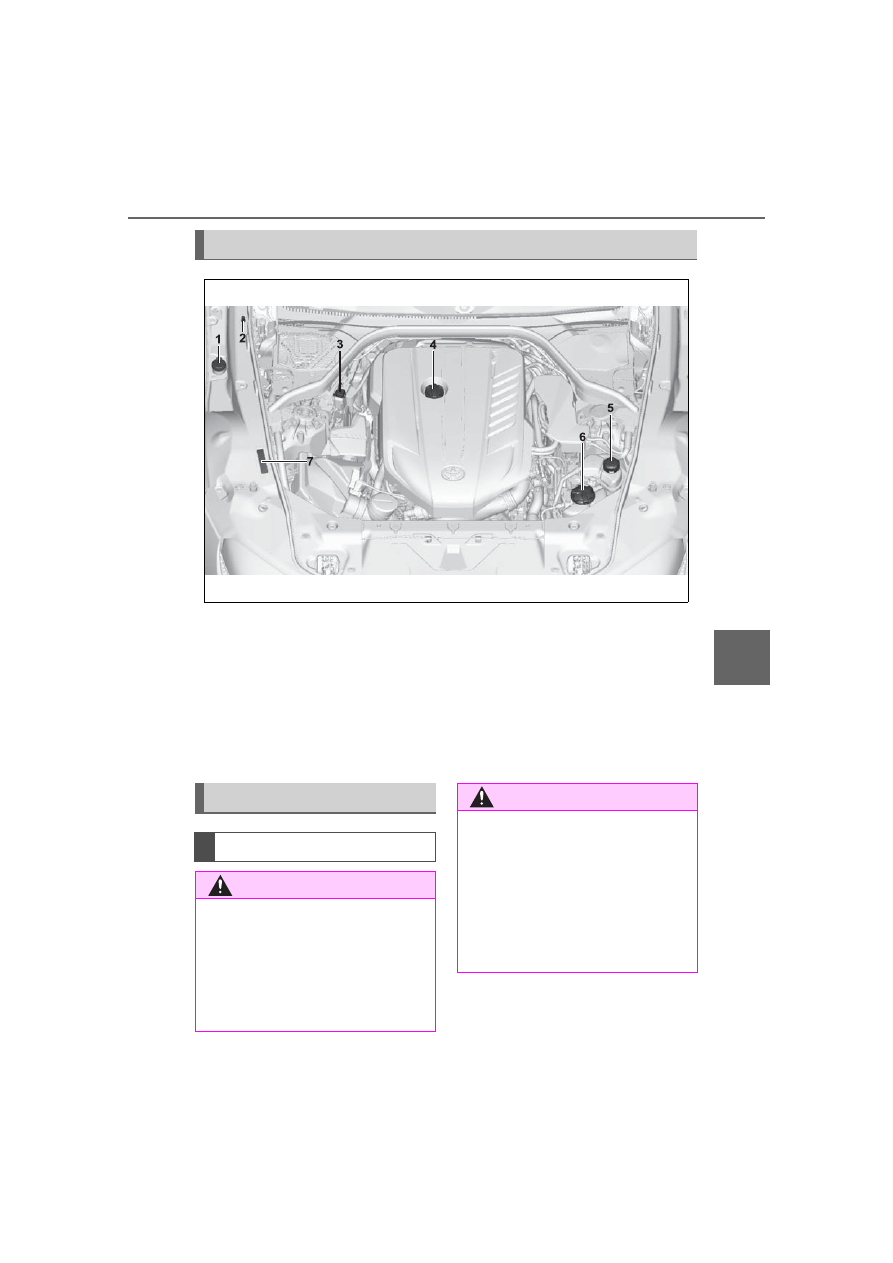
1
Filler neck for washer fluid
2
Jump-starting, negative battery terminal
3
Jump-starting, positive battery terminal
4
Oil filler neck
5
Coolant reservoir, auxiliary cooling
6
Coolant reservoir, engine
7
Vehicle identification number
Overview
Hood
Safety information
WARNING
Improperly executed work in the
engine compartment can damage
vehicle components and impair
vehicle functions. There is a risk
of an accident and damage to
property. Have work in the engine
compartment performed by your
Toyota dealer.
WARNING
The engine compartment accom-
modates moving components.
Certain components in the engine
compartment can also move with
the vehicle switched off, for
instance the radiator fan. There is
a risk of injury. Do not reach into
the area of moving parts. Keep
articles of clothing and hair away
from moving parts.
-------------------------------------------------------------------------------------------------------------------------------------------------------------
300
6-1. MOBILITY
Supra Owner’s Manual_U (from Mar. ’20
Prod.)
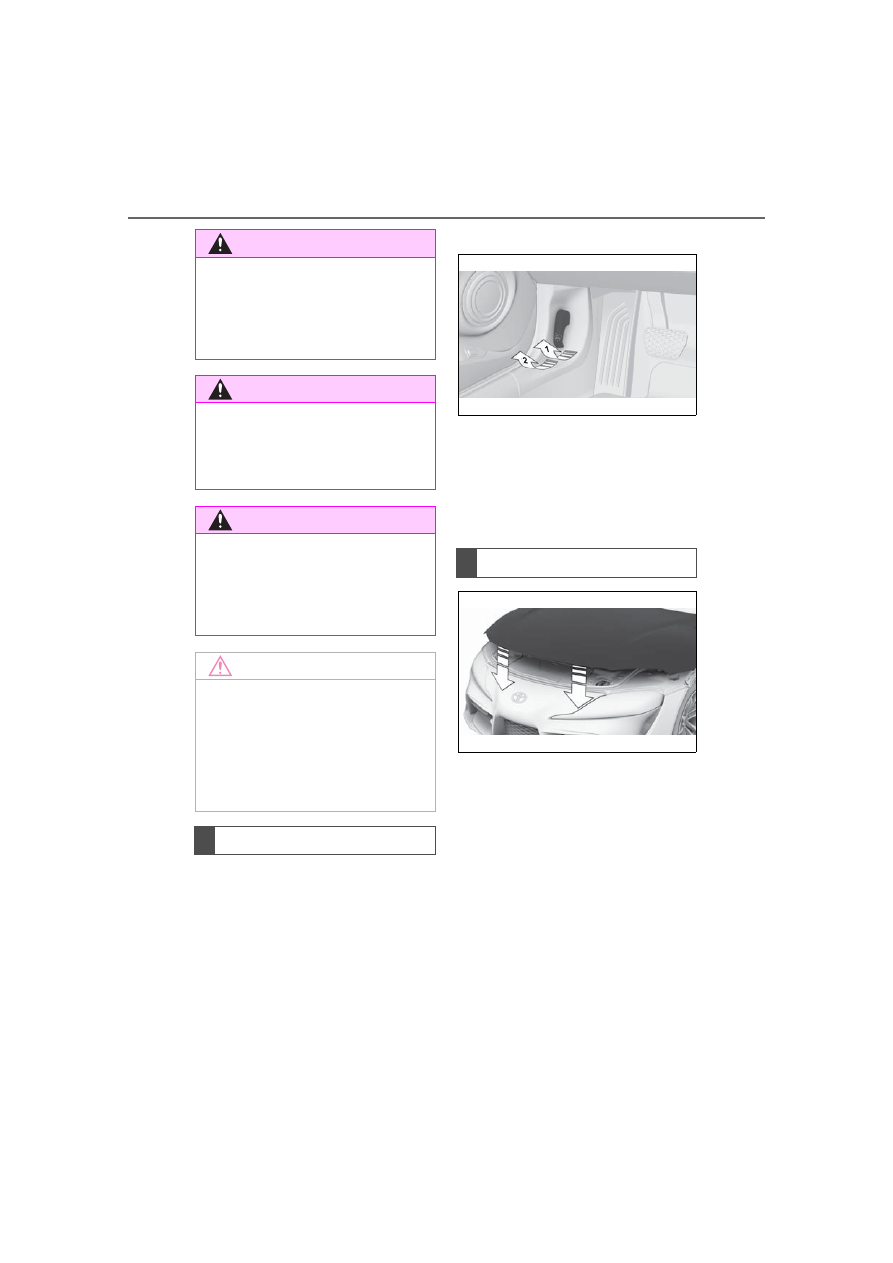
1
Pull lever, arrow
1
.
Hood is unlocked.
2
After the lever is released,
pull the lever again, arrow
2
.
Hood can be opened.
3
Be careful of protruding parts
on the hood.
Energetically close the hood
from approx. 20 in/50 cm.
The hood must engage on both
sides.
WARNING
There are protruding parts, for
instance locking hook, on the
inside of the hood. There is a risk
of injury. If the hood is open, pay
attention to protruding parts and
keep clear of these areas.
WARNING
An incorrectly locked hood can
open while driving and restrict vis-
ibility. There is a risk of an acci-
dent. Stop immediately and
correctly close the hood.
WARNING
Body parts can be jammed when
opening and closing the hood.
There is a risk of injury. Make sure
that the area of movement of the
hood is clear during opening and
closing.
NOTICE
Folded-away wipers can be
jammed when the hood is
opened. There is a risk of damage
to property. Make sure that the
wipers with the wiper blades
mounted are folded down onto the
windshield before opening the
hood.
Opening
Closing
-------------------------------------------------------------------------------------------------------------------------------------------------------------
301
6-1. MOBILITY
Supra Owner’s Manual_U (from Mar. ’20
Prod.)
6
MOBILITY
This chapter describes all stan-
dard, country-specific and
optional features offered with
the series. It also describes fea-
tures that are not necessarily
available in your vehicle, for
instance, due to the selected
options or country versions. This
also applies to safety-related
functions and systems. When
using these functions and sys-
tems, the applicable laws and
regulations must be observed.
The engine oil consumption is
dependent on your driving style
and driving conditions.
Therefore, regularly check the
engine oil level after refueling by
taking a detailed measurement.
The engine oil consumption can
increase in the following situa-
tions, for example:
• Sporty driving style.
• Break-in of the engine.
• Idling of the engine.
• With use of engine oil types
that are classified as not suit-
able.
Different vehicle messages
appear on the Control Display
depending on the engine oil
level.
The electronic oil measurement
has two measuring principles:
• Monitoring.
• Detailed measurement.
When making frequent
short-distance trips or using a
dynamic driving style, for
instance when taking curves
aggressively, regularly perform
a detailed measurement.
The engine oil level is monitored
Engine oil
Vehicle features and
options
General information
Safety information
NOTICE
An engine oil level that is too low
causes engine damage. There is
a risk of damage to property.
Immediately add engine oil.
NOTICE
Too much engine oil can damage
the engine or the catalytic con-
verter. There is a risk of damage
to property. Do not add too much
engine oil. When too much engine
oil is added, have the engine oil
level corrected by your Toyota
dealer.
Electronic oil measure-
ment
General information
Monitoring
Concept
-------------------------------------------------------------------------------------------------------------------------------------------------------------
302
6-1. MOBILITY
Supra Owner’s Manual_U (from Mar. ’20
Prod.)
electronically while driving and
can be shown on the Control
Display.
If the engine oil level is outside
its permissible operating range,
a vehicle message is displayed.
A red indicator light indi-
cates that the engine oil pres-
sure is too low.
A current measured value is
available after approx. 30 min-
utes of normal driving.
Via Toyota Supra Command:
1
"My Vehicle"
2
"Vehicle status"
3
"Engine oil level"
The engine oil level is displayed.
When making frequent
short-distance trips or using a
dynamic driving style, it may not
be possible to calculate a mea-
sured value. In this case, the
measured value for the last, suf-
ficiently long trip is displayed.
The engine oil level is checked
when the vehicle is stationary
and displayed via a scale.
If the engine oil level is outside
its permissible operating range,
a vehicle message is displayed.
During the measurement, the
idle speed is increased some-
what.
• Vehicle is parked in a horizon-
tal position.
• Selector lever in selector lever
position N or P and accelera-
tor pedal not depressed.
• Engine is running and is at
operating temperature.
Via Toyota Supra Command:
1
"My Vehicle"
2
"Vehicle status"
3
"Engine oil level"
4
"Measure engine oil level"
5
"Start measurement"
The engine oil level is checked
and displayed via a scale.
Functional requirements
Displaying the engine oil
level
System limits
Detailed measurement
Concept
General information
Functional requirements
Performing a detailed mea-
surement
-------------------------------------------------------------------------------------------------------------------------------------------------------------
303
6-1. MOBILITY
Supra Owner’s Manual_U (from Mar. ’20
Prod.)
6
MOBILITY
Only add engine oil when the
message is displayed in the
instrument cluster. The quantity
to be added is indicated in the
message shown on the Control
Display.
Only add suitable types of
engine oil, refer to page 303.
Safely park the vehicle and
switch off drive-ready state
before adding engine oil.
Take care not to add too much
engine oil.
The oil filler neck is located in
the engine compartment, refer
to page 299.
1
Open the hood, refer to page
300.
2
Open the lid counterclock-
wise.
3
Add engine oil.
4
Close the cap.
The engine oil quality is critical
for the life of the engine.
Only add the types of engine oil
Adding engine oil
General information
Safety information
WARNING
Operating materials, for instance
oils, greases, coolants, fuels, can
contain harmful ingredients.
There is a risk of injuries or dan-
ger to life. Follow the instructions
on the containers. Avoid the con-
tact of articles of clothing, skin or
eyes with operating materials. Do
not refill operating materials into
different bottles. Store operating
materials out of reach of children.
NOTICE
An engine oil level that is too low
causes engine damage. There is
a risk of damage to property.
Immediately add engine oil.
NOTICE
Too much engine oil can damage
the engine or the catalytic con-
verter. There is a risk of damage
to property. Do not add too much
engine oil. When too much engine
oil is added, have the engine oil
level corrected by your Toyota
dealer.
Overview
Adding engine oil
Engine oil types to add
General information
-------------------------------------------------------------------------------------------------------------------------------------------------------------
304
6-1. MOBILITY
Supra Owner’s Manual_U (from Mar. ’20
Prod.)
which are listed.
Add engine oils that meet the
following oil rating standards:
If an engine oil suitable for con-
tinuous use is not available, up
to 1 US quart/liter of an engine
oil with the following oil rating
can be added:
■
ACEA grade
■
API grade
More information about suitable
oil ratings and viscosity grades
of engine oils can be requested
from your Toyota dealer.
The vehicle manufacturer rec-
ommends that you have your
Toyota dealer change the
engine oil.
Safety information
NOTICE
Oil additives can damage the
engine. There is a risk of damage
to property. Do not use oil addi-
tives.
NOTICE
Incorrect engine oil can cause
malfunctions in the engine or
damage it. There is a risk of dam-
age to property. When selecting
an engine oil, make sure that the
engine oil has the correct oil rat-
ing.
Suitable engine oil types
Gasoline engine
Toyota Genuine Motor Oil SN
0W-20 C5 for GR Toyota Supra
Alternative engine oil
types
API SL.
API SM.
API SN.
SAE 0W-20.
SAE 0W-30.
Engine oil change
NOTICE
Engine oil that is not changed in
timely fashion can cause
increased engine wear and thus
engine damage. There is a risk of
damage to property. Do not
exceed the service data indicated
in the vehicle.
-------------------------------------------------------------------------------------------------------------------------------------------------------------
305
6-1. MOBILITY
Supra Owner’s Manual_U (from Mar. ’20
Prod.)
6
MOBILITY
This chapter describes all stan-
dard, country-specific and
optional features offered with
the series. It also describes fea-
tures that are not necessarily
available in your vehicle, for
instance, due to the selected
options or country versions. This
also applies to safety-related
functions and systems. When
using these functions and sys-
tems, the applicable laws and
regulations must be observed.
Coolant consists of water and
additives.
Not all commercially available
additives are suitable for the
vehicle. Do not mix additives of
different colors. Observe the
water - additive mixing ratio of
50:50. Information about suit-
able additives is available from
your Toyota dealer.
Vehicles with gasoline engine
feature two cooling circuits.
Always check the coolant levels
of both coolant reservoirs and
refill as needed.
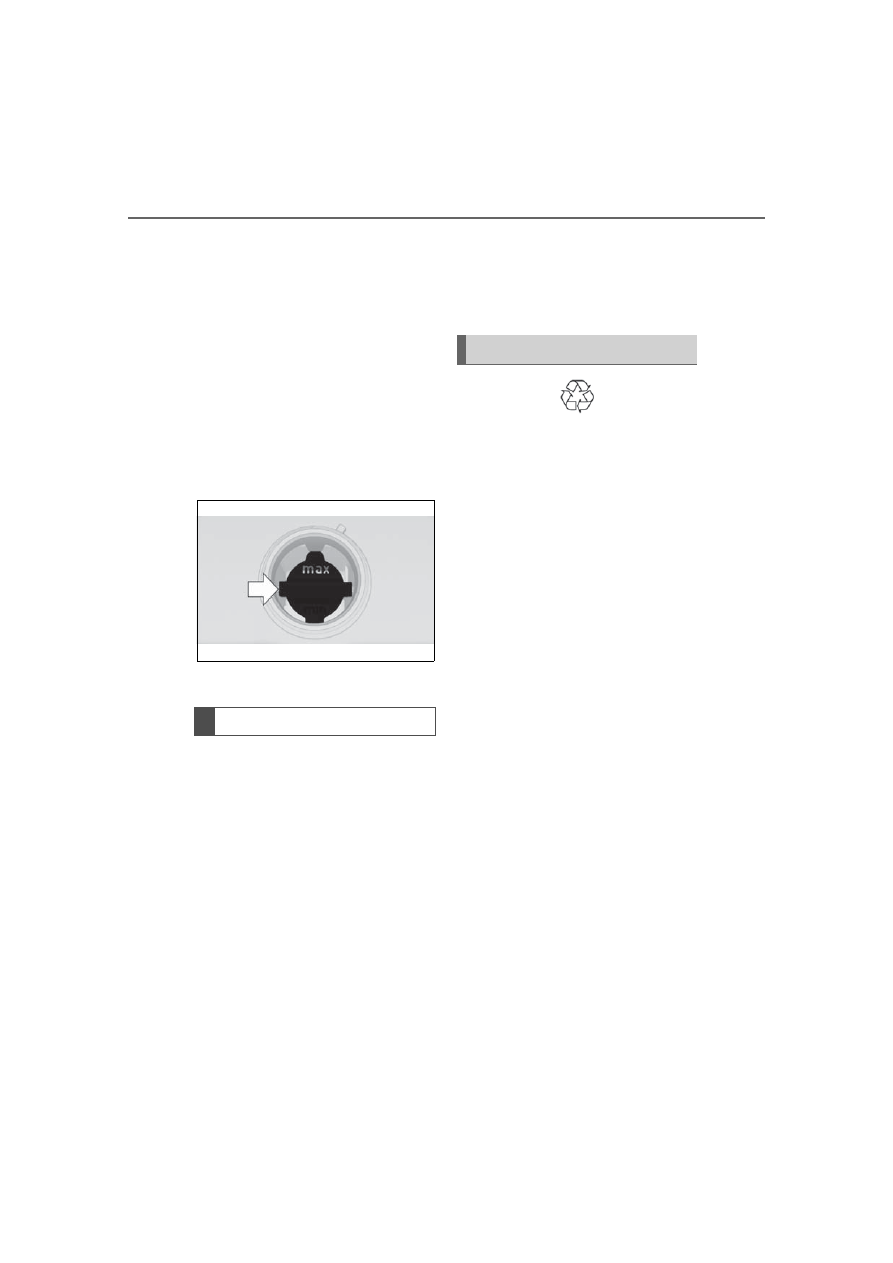
The coolant level is indicated
using the Max mark in the filler
neck of the coolant reservoir.
Depending on the engine instal-
lation, the coolant reservoir is
located on the right side or the
left side of the engine compart-
ment, refer to page 299.
1
Let the engine cool.
Coolant
Vehicle features andop-
tions
General information
Safety information
WARNING
With the engine hot and the cool-
ing system open, coolant can
escape and lead to scalding.
There is a risk of injury. Only open
the cooling system with the
engine cooled down.
WARNING
Additives are harmful and incor-
rect additives can damage the
engine. There is a risk of injury
and risk of damage to property.
Do not allow additives to come
into contact with skin, eyes or arti-
cles of clothing. Use suitable addi-
tives only.
Coolant level
General information
Checking the coolant level
-------------------------------------------------------------------------------------------------------------------------------------------------------------
306
6-1. MOBILITY
Supra Owner’s Manual_U (from Mar. ’20
Prod.)
2
Open the hood, refer to page
300.
3
Turn the lid of the coolant
reservoir slightly counter-
clockwise to allow any
excess pressure to dissi-
pate, then open it.
4
Open the coolant reservoir
lid.
5
The coolant level is correct
when it is just below the max-
imum mark in the filler neck.
6
Close the cap.
1
Let the engine cool.
2
Open the hood, refer to page
300.
3
Turn the lid of the coolant
reservoir slightly counter-
clockwise to allow any
excess pressure to dissi-
pate, then open it.
4
Open the coolant reservoir
lid.
5
If the coolant is low, slowly
add coolant up to the speci-
fied level; do not overfill.
6
Close the cap.
7
Have the cause of the cool-
ant loss eliminated as soon
as possible.
Comply with the relevant envi-
ronmental protection regulations
when disposing of coolant and
coolant additives.
Adding
Disposal
-------------------------------------------------------------------------------------------------------------------------------------------------------------
307
6-1. MOBILITY
Supra Owner’s Manual_U (from Mar. ’20
Prod.)
6
MOBILITY
This chapter describes all stan-
dard, country-specific and
optional features offered with
the series. It also describes fea-
tures and functions that are not
necessarily available in your
vehicle, e.g., due to the selected
options or country versions. This
also applies to safety-related
functions and systems. When
using these functions and sys-
tems, the applicable laws and
regulations must be observed.
The maintenance system pro-
vides service notifications and
thereby provides support in
maintaining road safety and the
operational reliability of the vehi-
cle.
In some cases, scopes and
intervals of the maintenance
system may vary according to
the country version. Replace-
ment work, spare parts, fuels
and lubricants, and wear materi-
als are calculated separately.
Further information is available
from a Toyota dealer.
Sensors and special algorithms
take into account the driving
conditions of the vehicle. CBS
uses these to calculate the need
for maintenance.
The system makes it possible to
adapt the amount of mainte-
nance corresponding to your
user profile.
Information on service notifica-
tions, refer to page 145, can be
displayed on the Control Dis-
play.
Storage periods during which
the vehicle battery was discon-
nected are not taken into
account.
If this occurs, have a Toyota
dealer update the time-depen-
dent maintenance procedures,
such as checking brake fluid
and, if necessary, changing the
engine oil and the microfil-
ter/activated-charcoal filter.
Maintenance
Vehicle features and
options
Maintenance system
Condition Based Service
CBS
Concept
General information
Storage periods
-------------------------------------------------------------------------------------------------------------------------------------------------------------
308
6-1. MOBILITY
Supra Owner’s Manual_U (from Mar. ’20
Prod.)
Please consult “Owner's War-
ranty Information Booklet” or
“Owner's Manual Supplement”
for additional information on ser-
vice and maintenance work.
The manufacturer of your vehi-
cle recommends that mainte-
nance and repair be performed
by a Toyota dealer. Records of
regular maintenance and repair
work should be retained.
Scheduled maintenance should
be performed at specified inter-
vals according to the mainte-
nance schedule.
For details about maintenance
items and schedules, refer to
the "Scheduled Maintenance
Guide" or "Owner's Manual Sup-
plement".
Devices connected to the OBD
socket trigger the alarm system
when the vehicle is locked.
Remove any devices con-
nected at the OBD socket
before locking the vehicle.
There is an OBD socket on the
driver's side for checking the pri-
mary components in the vehi-
cle's emissions.
"Owner's Warranty Infor-
mation Booklet" or
"Owner's Manual Supple-
ment"
Scheduled maintenance
Socket for OBD Onboard
Diagnosis
General information
Safety information
NOTICE
The socket for Onboard Diagno-
sis is an intricate component
intended to be used in conjunction
with specialized equipment to
check the vehicle’s primary emis-
sions system. Improper use of the
socket for Onboard Diagnosis, or
contact with the socket for
Onboard Diagnosis for other than
its intended purpose, can cause
vehicle malfunctions and creates
risks of personal and property
damage. Given the foregoing, the
manufacture of your vehicle
strongly recommends that access
to the socket for Onboard Diagno-
sis be limited to your Toyota
dealer or other persons that have
the specialized training and
equipment for purposes of prop-
erly utilizing the socket for
Onboard Diagnosis.
Position
-------------------------------------------------------------------------------------------------------------------------------------------------------------
309
6-1. MOBILITY
Supra Owner’s Manual_U (from Mar. ’20
Prod.)
6
MOBILITY
This chapter describes all stan-
dard, country-specific and
optional features offered with
the series. It also describes fea-
tures and functions that are not
necessarily available in your
vehicle, e.g., due to the selected
options or country versions. This
also applies to safety-related
functions and systems. When
using these functions and sys-
tems, the applicable laws and
regulations must be observed.
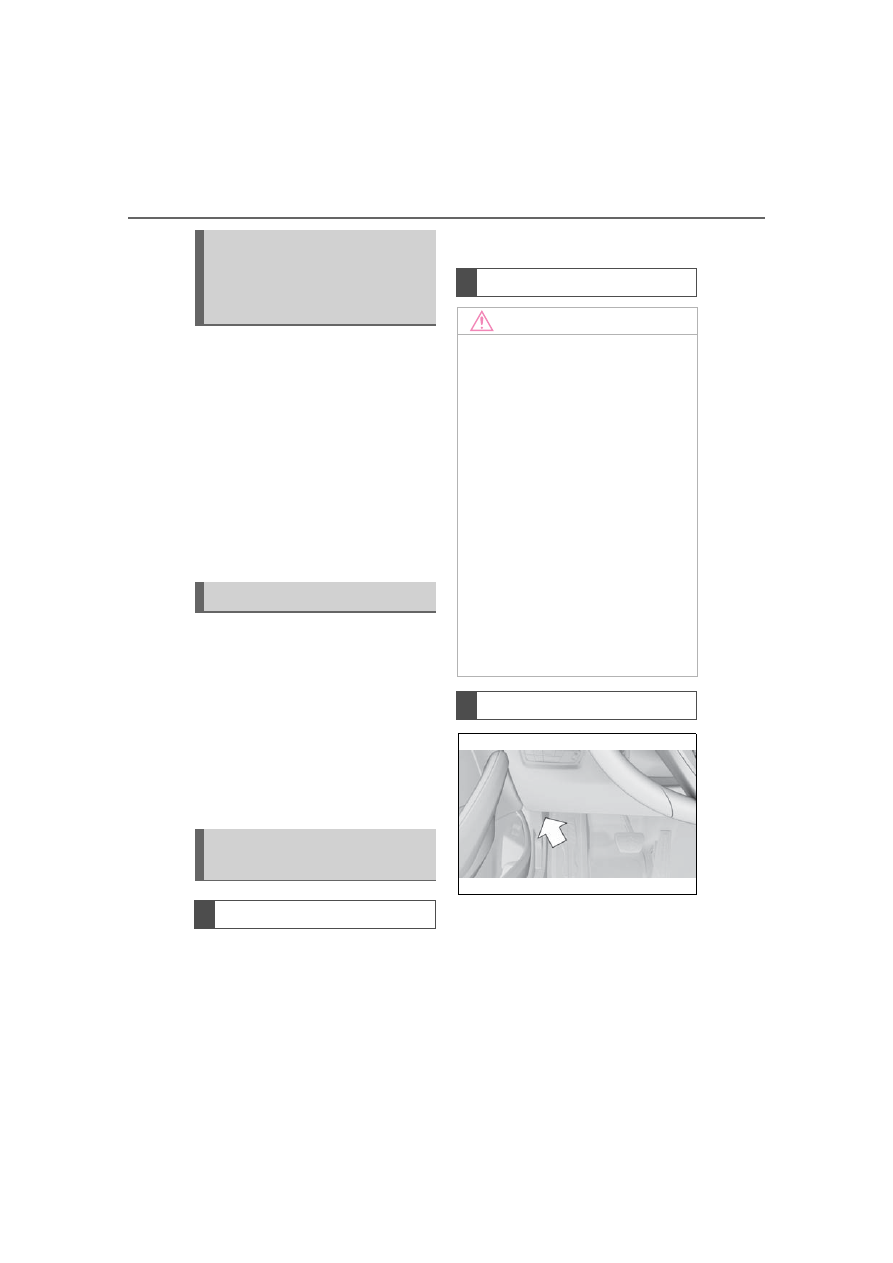
The onboard vehicle tool kit is
located under a cover on the
right side of the cargo area.
Unlock the cover of the right
side panel, arrow
1
, and fold
open, arrow
2
.
Emissions
• The warning light
lights up:
Emissions are deterio-
rating. Have the vehi-
cle checked as soon
as possible.
• The warning light
flashes under certain
circumstances:
This indicates that
there is excessive mis-
firing in the engine.
Reduce the vehicle
speed and have the
system checked imme-
diately; otherwise, seri-
ous engine misfiring
within a brief period
can seriously damage
emission control com-
ponents, in particular
the catalytic converter.
Replacing components
Vehicle features and
options
Onboard vehicle tool kit
-------------------------------------------------------------------------------------------------------------------------------------------------------------
310
6-1. MOBILITY
Supra Owner’s Manual_U (from Mar. ’20
Prod.)
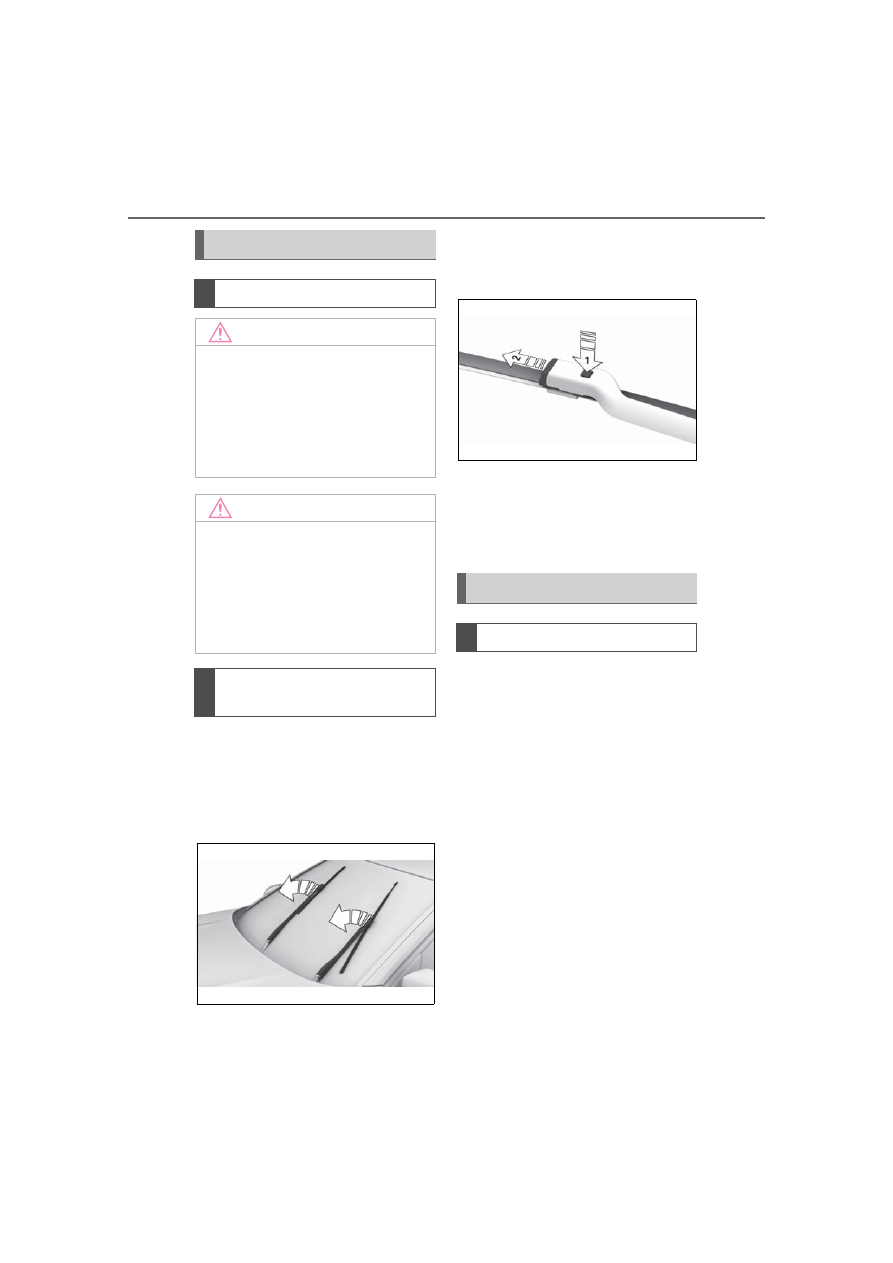
1
To change the wiper blades,
fold up the wiper arms, refer
to page 127.
2
Lift the wiper all the way off of
the windshield.
3
Press the button, arrow
1
,
and pull out the wiper blade,
arrow
2
.
4
Insert the new wiper blade
and press it on until it you
hear it snap into the holder.
5
Fold down the wipers.
Lights and bulbs make an
essential contribution to vehicle
safety.
All headlights and lights are
made using LED technology.
Some items of equipment use
light-emitting diodes installed
behind a cover as a light source.
These light-emitting diodes are
related to conventional lasers
and are officially designated as
Class 1 light-emitting diodes.
The manufacturer of the vehicle
recommends that you let your
Toyota dealer perform the work
in case of a malfunction.
Follow the safety information,
Wiper blades
Safety information
NOTICE
The window may sustain damage
if the wiper falls onto it without the
wiper blade installed. There is a
risk of damage to property. Hold
the wiper firmly when changing
the wiper blade. Do not fold or
switch on the wiper without a
wiper blade installed.
NOTICE
Folded-away wipers can be
jammed when the hood is
opened. There is a risk of damage
to property. Make sure that the
wipers with the wiper blades
mounted are folded down onto the
windshield before opening the
hood.
Replacing the front wiper
blades
Lights and bulbs
General information
-------------------------------------------------------------------------------------------------------------------------------------------------------------
311
6-1. MOBILITY
Supra Owner’s Manual_U (from Mar. ’20
Prod.)
6
MOBILITY
refer to page 311.
Condensation can form on the
inside of the headlight glass in
cool or humid weather. When
driving with the lights switched
on, the condensation evapo-
rates after a short time. The
headlight glass does not need to
be changed.
If despite driving with the head-
lights switched on, increasing
humidity forms, for instance
water droplets in the light, have
the headlights checked.
The battery is maintenance-free.
More information regarding the
battery can be requested from
your Toyota dealer.
The manufacturer of your vehi-
cle recommends that you have
your Toyota dealer register the
vehicle battery to the vehicle
after the battery has been
replaced. Once the battery has
been registered again, all com-
fort features will be available
without restriction and any vehi-
cle messages displayed which
relate to comfort features will
disappear.
The installed battery is designed
specifically for this vehicle. If an
inappropriate battery is used,
operation of the Auto Start Stop
function may be restricted in
order to protect the battery.
Also, the battery may deterio-
rate faster than normal and the
engine may not be able to be
restarted. Contact your Toyota
dealer for details.
Headlight glass
Safety information
WARNING
Focused laser light can irritate or
permanently damage the retina of
the eye. There is a risk of injury.
The manufacturer of your vehicle
recommends that the work on the
lighting system including bulb
replacement be performed by
your Toyota dealer.
WARNING
Intensive brightness can irritate or
damage the retina of the eye.
There is a risk of injury. Do not
look directly into the headlights or
other light sources. Do not
remove the LED covers.
Vehicle battery
General information
When replacing the bat-
tery
-------------------------------------------------------------------------------------------------------------------------------------------------------------
312
6-1. MOBILITY
Supra Owner’s Manual_U (from Mar. ’20
Prod.)
Make sure that the battery is
always sufficiently charged to
guarantee that the battery
remains usable for its full ser-
vice life.
Charge the battery in the follow-
ing situations:
When the inspection glass on
the top of the battery is black.
When the take-off perfor-
mance is insufficient.
The following circumstances
can have a negative effect on
the performance of the battery:
Frequent short-distance
drives.
The vehicle is not used for
more than a month.
Charge the battery only when
the engine is off and via the
starting aid terminals, refer to
page 323, in the engine com-
partment.
After a power loss, some equip-
ment needs to be newly initial-
ized or individual settings
updated, for example:
Memory function: store the
positions again.
Time: update.
Date: update.
Safety information
WARNING
Vehicle batteries that are not com-
patible can damage vehicle sys-
tems and impair vehicle functions.
There is a risk of personal and
property damage. Only vehicle
batteries that are compatible with
your vehicle type should be
installed in your vehicle. Informa-
tion on compatible vehicle batter-
ies is available at your Toyota
dealer.
Charging the battery
General information
A discharged battery is
indicated by a red indi-
cator light.
Safety information
NOTICE
Battery chargers for the vehicle
battery can work with high volt-
ages and currents, which means
that the 12 volt on-board network
can be overloaded or damaged.
There is a risk of damage to prop-
erty. Only connect battery char-
gers for the vehicle battery to the
starting aid terminals in the
engine compartment.
Charging the battery
Power failure
Disposing of old batteries
Have old batteries dis-
posed of by your Toyota
dealer or take them to a
collection point.
-------------------------------------------------------------------------------------------------------------------------------------------------------------
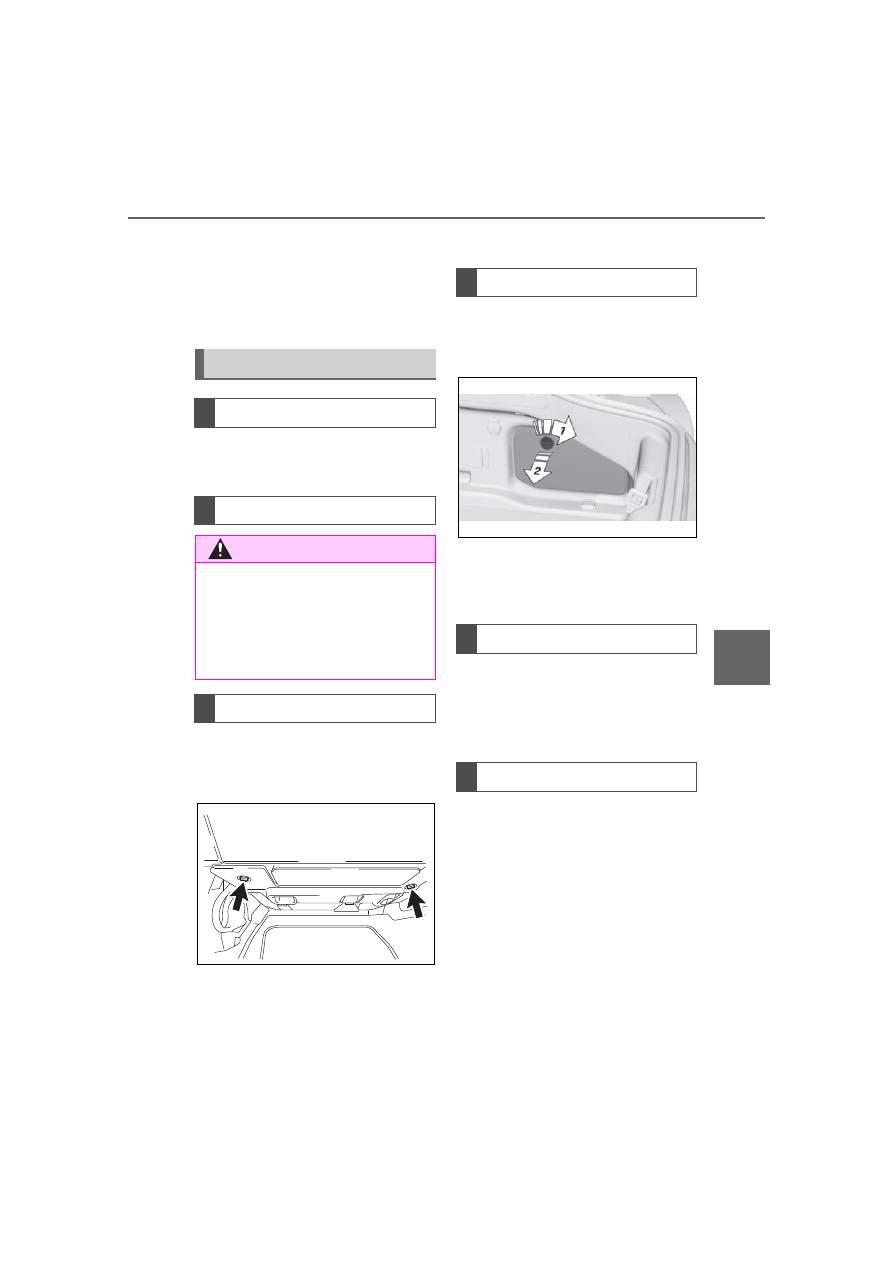
313
6-1. MOBILITY
Supra Owner’s Manual_U (from Mar. ’20
Prod.)
6
MOBILITY
Maintain the battery in an
upright position for transport and
storage. Secure the battery so
that it does not tip over during
transport.
The fuses are located at differ-
ent places in the vehicle.
The fuses are located in the
car's interior in the front passen-
ger floor area behind a cover.
Loosen fasteners, arrows, and
open cover.
The fuse box is located on the
front right.
The fuses are located in the
cargo area on the right side
behind a cover.
Unlock the cover of the right
side panel, arrow
1
, and fold
open, arrow
2
.
Additional fuse boxes are
located in the vehicle. In the
case of a malfunction, contact
your Toyota dealer.
The vehicle manufacturer rec-
ommends that you have your
Toyota dealer replace the fuses.
Fuses
General information
Safety information
WARNING
Incorrect and repaired fuses can
overload electrical lines and com-
ponents. There is a risk of fire.
Never attempt to repair a blown
fuse. Do not replace a nonworking
fuse with a substitute of another
color or amperage rating.
In the car's interior
In the cargo area
Additional fuse boxes
Replacing fuses
-------------------------------------------------------------------------------------------------------------------------------------------------------------
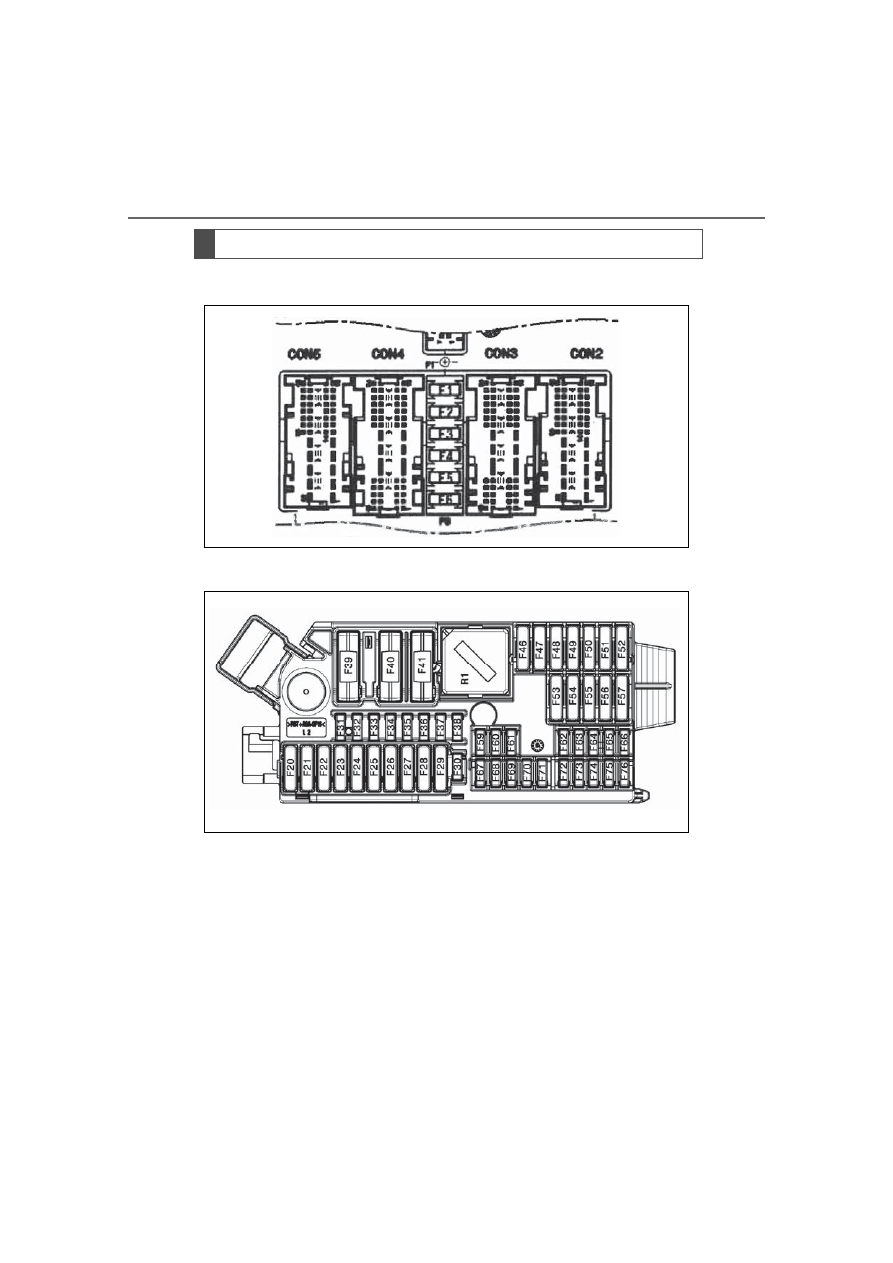
314
6-1. MOBILITY
Supra Owner’s Manual_U (from Mar. ’20
Prod.)
BDC
Front
Fuse informations
-------------------------------------------------------------------------------------------------------------------------------------------------------------
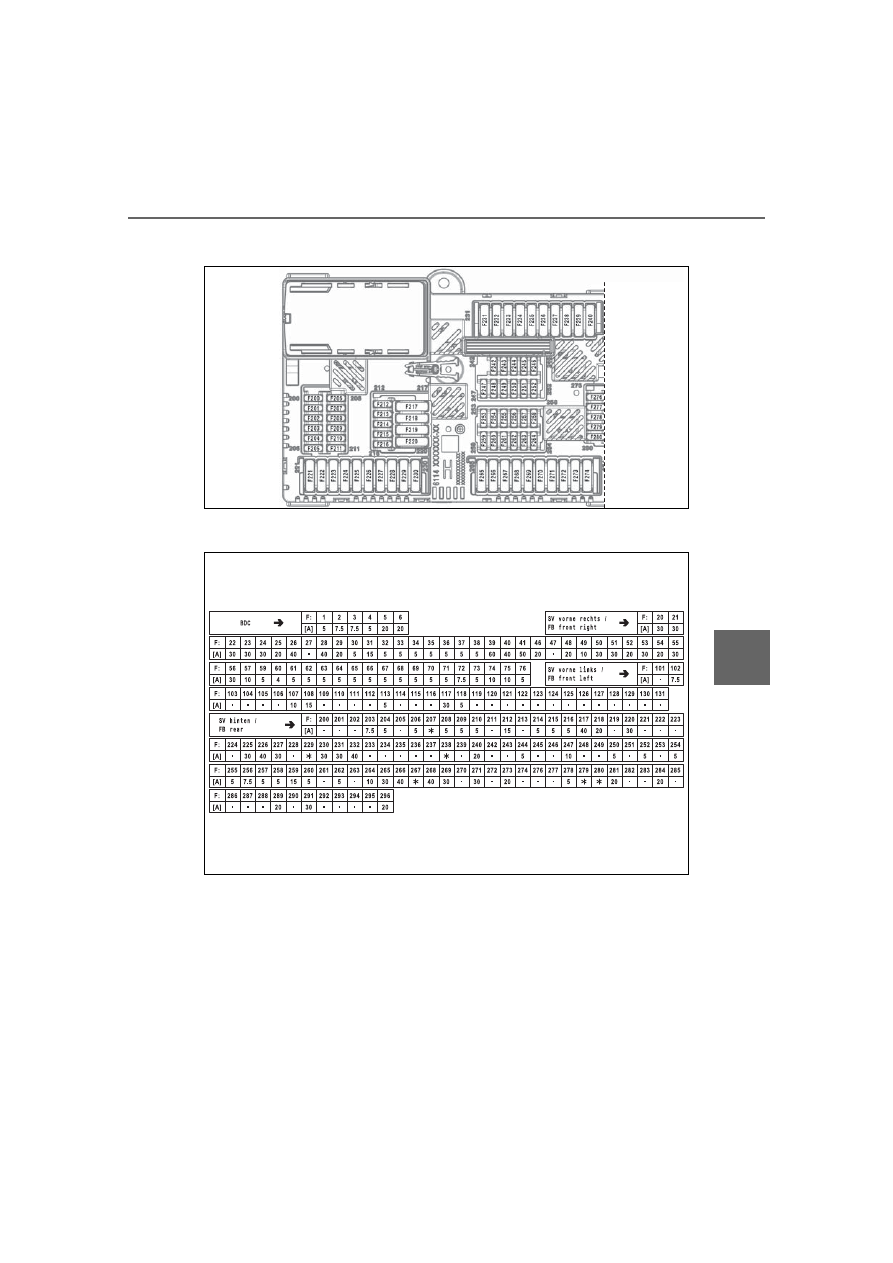
315
6-1. MOBILITY
Supra Owner’s Manual_U (from Mar. ’20
Prod.)
6
MOBILITY
Rear
Fuse values
F: Fuse
[A]: Ampere (Fuse - Value)
*: Spare Slot
-------------------------------------------------------------------------------------------------------------------------------------------------------------
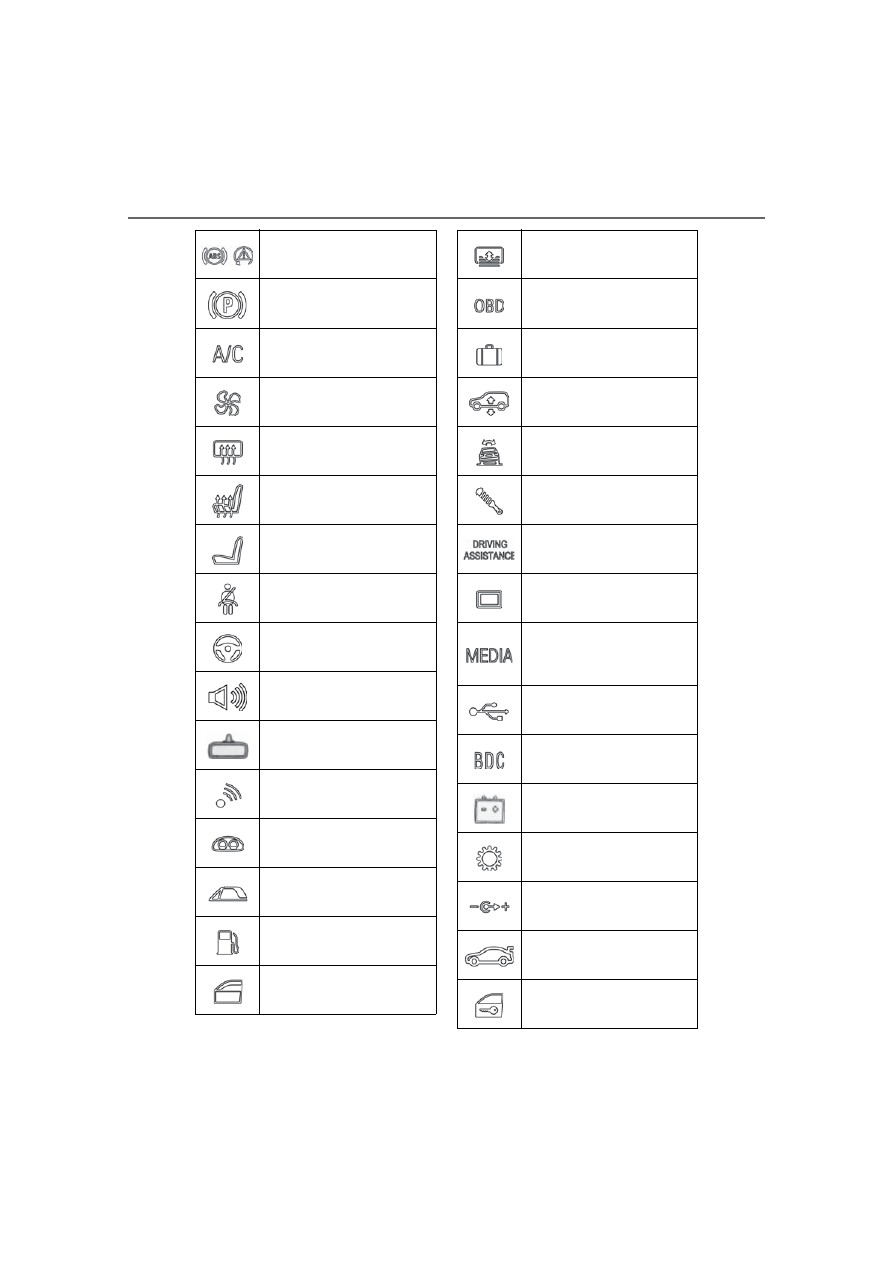
316
6-1. MOBILITY
Supra Owner’s Manual_U (from Mar. ’20
Prod.)
F28
F28, F32
F3, F40, F204
F40
F231
F48, F50, F52, F265,
F269
F55, F56, F64, F65, F67,
F68
F75
F1, F57, F210
F215, F217
F59
F36, F244
F34, F73
F36, F63
F206, F244, F271
F20, F21
F3
F2
F254
F2
F2, F29
F2
F1, F59, F60, F76, F204,
F208, F209, F255
F212
F1, F32, F59, F212,
F214, F215, F216, F217,
F218, F220
F214
F39
F252
F32, F70, F209
F46, F273
F3, F254
F4, F5, F6, F244
-------------------------------------------------------------------------------------------------------------------------------------------------------------
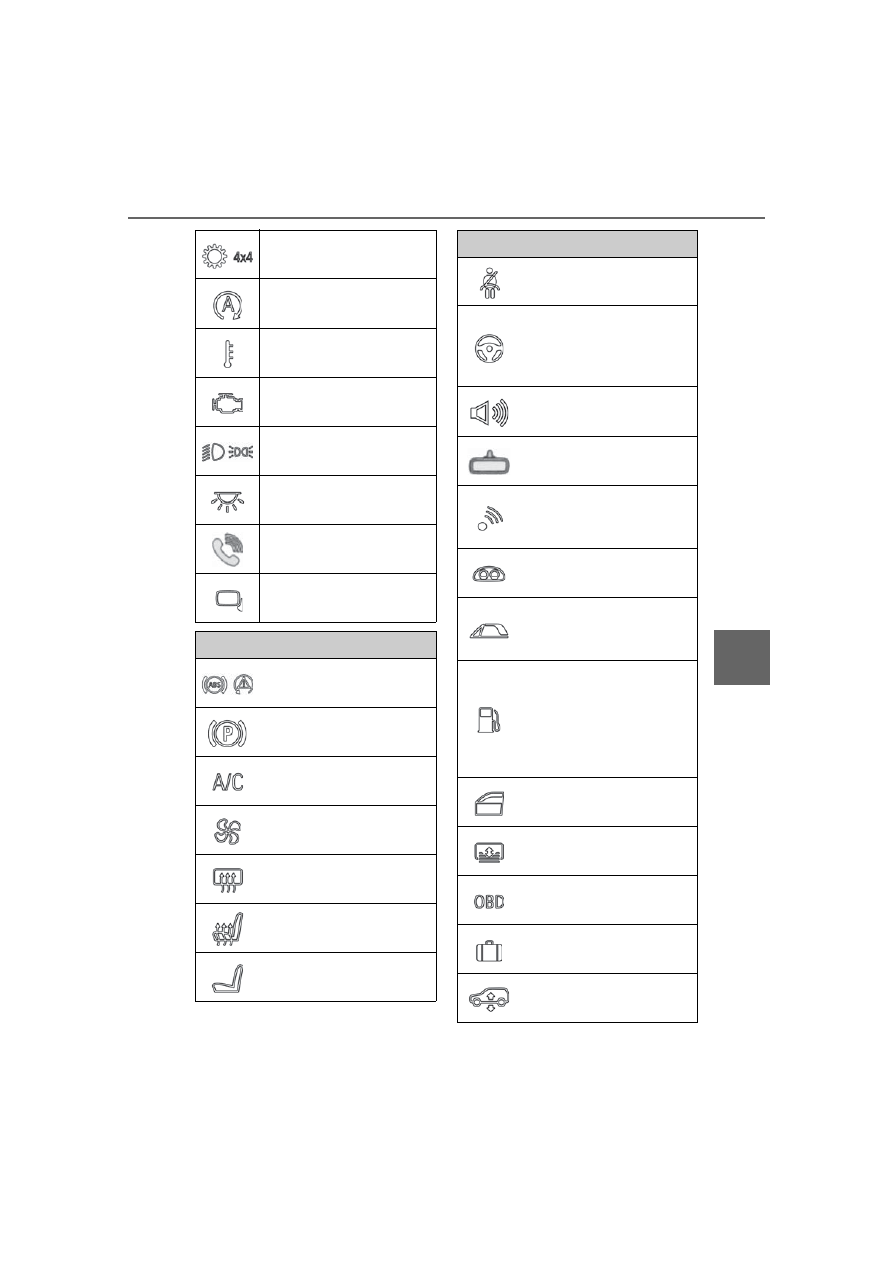
317
6-1. MOBILITY
Supra Owner’s Manual_U (from Mar. ’20
Prod.)
6
MOBILITY
F51
F4
F69, F70
F203, F206, F209, F271
F1, F3, F39
F36, F61, F62, F67, F68,
F71
F4
F67, F68
Symbol Meaning
VSC Vehicle Stability
Control System
Parking brake
Air conditioning
Blower motor, Interior
ventilation
Rear window heating
Seat heating
Seat setting
Crash-security module
Switching center column,
Light switch element,
steering Operating panel
Audio
HiFi amplifier, Video mod-
ule TV
Rear-view mirror
Overhead function cen-
ter, Exterior door handle
electronics
Instrument cluster
Additional battery: Dual
Accumulator System
(DSS)
Fuel pump control elec-
tronics, Natural Vacuum
Leak Detection, Gas gen-
erator for battery safety
terminal, Remote control
receiver
Electric window opener
Heating and air-condi-
tioning system
Vehicle's diagnostic port
(interface)
Interior lights in the boot
Vertical Dynamic platform
Symbol Meaning
-------------------------------------------------------------------------------------------------------------------------------------------------------------
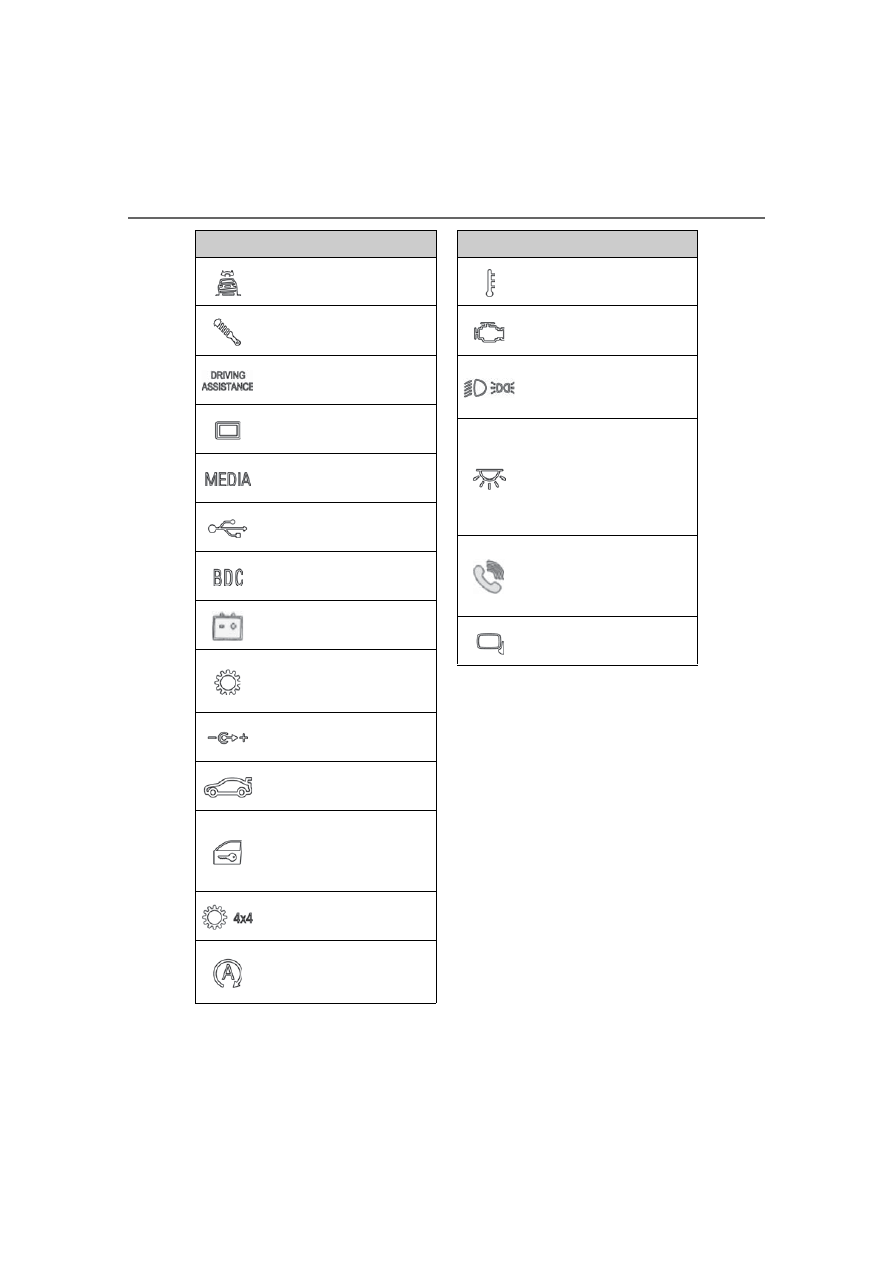
318
6-1. MOBILITY
Supra Owner’s Manual_U (from Mar. ’20
Prod.)
Vertical Dynamic platform
Vertical Dynamic platform
Mono Camera (Kafas)
Head Unit
Active Sound Design
USB Hub
Body Domain Controller
Controller (Toyota Supra
Command)
Electric fan (air cooler),
Controlled differential
lock
12 V socket, Cigarette
lighter
Interior lights in the boot
Door lock, Exterior door
handle electronics,
Telematic Communica-
tion Box
Electronic gear box con-
trol
Telematic Communica-
tion Box, Exterior door
handle electronics
Symbol Meaning
Electric fan, Rear Power
distributor
Engine control
Switching center column,
Light switch element,
Body Domain Controller
Control panels centre
console, Interior light in
the glove box, Interior
light, Interior light in the
sunvisor, Exterior mirror,
Selector lever
Telematic Communica-
tion Box, Exterior door
handle electronics pas-
senger side
Switcher block driver's
door, Exterior mirror
Symbol Meaning
-------------------------------------------------------------------------------------------------------------------------------------------------------------
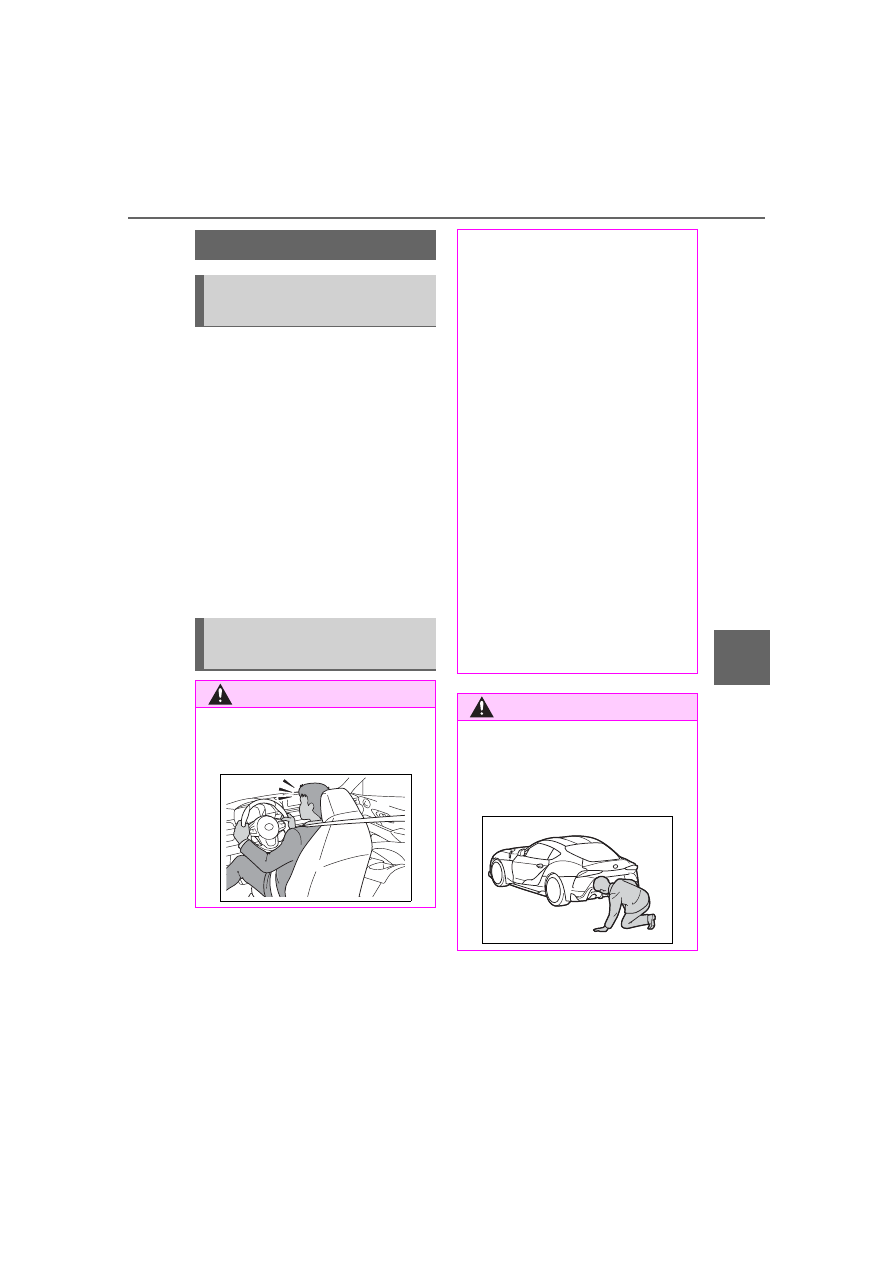
319
6-1. MOBILITY
Supra Owner’s Manual_U (from Mar. ’20
Prod.)
6
MOBILITY
This chapter describes all stan-
dard, country-specific and
optional features offered with
the series. It also describes fea-
tures and functions that are not
necessarily available in your
vehicle, e.g., due to the selected
options or country versions. This
also applies to safety-related
functions and systems. When
using these functions and sys-
tems, the applicable laws and
regulations must be observed.
Breakdown assistance
Vehicle features and
options
If a malfunction occurs
while driving
WARNING
If a malfunction occurs while driv-
ing, immediately stop the vehicle
in a safe place.
If a warning light illuminates or
flashes, or a warning message is
displayed, immediately stop the
vehicle in a safe place. Do not
open the hood to inspect the
engine, as doing so may lead to
serious injury, such as steam
burns. If a warning message is
displayed, perform the necessary
procedures according to the dis-
played message or explanation in
the owner’s manual.
These warning messages indicate
that a malfunction has occurred in
a system or function of the vehi-
cle. If you continue to drive the
vehicle, the engine may stop sud-
denly, possibly leading to an acci-
dent. Also, even if no warning
lights are illuminated or messages
are displayed, if any abnormal
sounds, smells or vibrations are
detected, or of the engine stops
suddenly, refrain from opening the
hood to inspect the engine and
consult an authorized Toyota
retailer or Toyota authorized
repairer, or any reliable repairer.
WARNING
If you hear a loud noise or feel
something impact the underside
of the vehicle while driving, imme-
diately stop the vehicle in a safe
place.
-------------------------------------------------------------------------------------------------------------------------------------------------------------
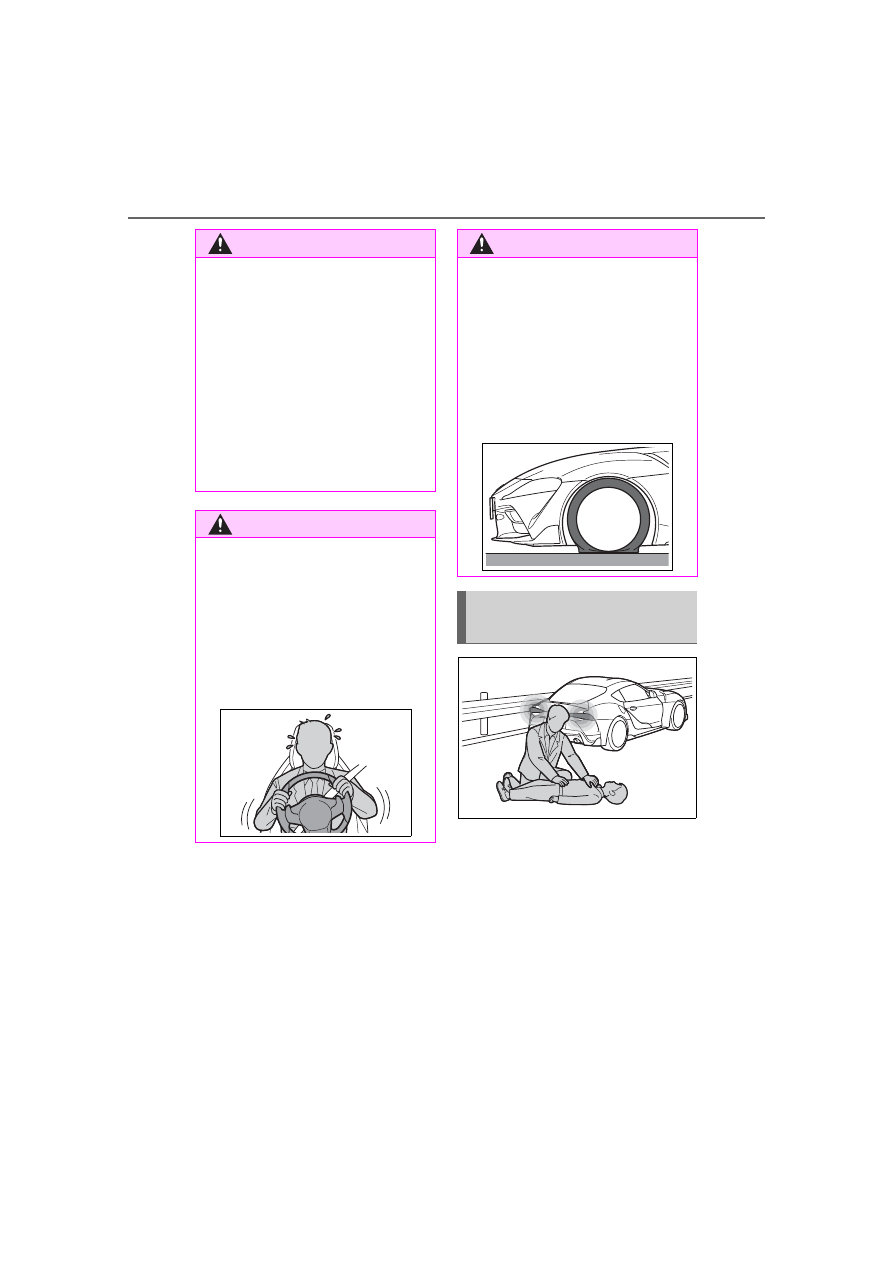
320
6-1. MOBILITY
Supra Owner’s Manual_U (from Mar. ’20
Prod.)
If you have been involved in a
collision, perform the following:
1
Immediately leave the vehi-
cle and move to a safe place
in order to avoid secondary
collisions. Make sure to turn
the engine switch off to help
prevent the vehicle from
catching fire. If the airbags
have deployed (inflated), the
WARNING
After stopping the vehicle in a
safe place, check the underside of
the vehicle for any leaking brake
fluid, oil or fuel. If any fluid is leak-
ing, stop driving immediately and
have the vehicle inspected by an
authorized Toyota retailer or Toy-
ota authorized repairer, or any
reliable repairer.
Brake and fuel lines run under the
floor of the vehicle. If any of these
lines are damaged, the brakes
may fail or leaking fuel may ignite
and cause a fire.
WARNING
During normal driving, do not turn
off the engine. Turning the engine
off while driving will not cause loss
of steering or braking control, but
the power assist to these systems
will be lost. This will make it more
difficult to steer and brake, so you
should pull over and stop the
vehicle as soon as it is safe to do
so.
WARNING
While driving, if a tire has been
punctured or has ruptured, firmly
grip the steering wheel, gradually
reduce the vehicle speed and
stop the vehicle in a safe place.
Avoid sudden braking and steer-
ing operations as doing so may
cause you to lose control of the
vehicle. Gradually reduce the
vehicle speed and stop the vehi-
cle in a safe place.
If you have been involved
in a collision
-------------------------------------------------------------------------------------------------------------------------------------------------------------
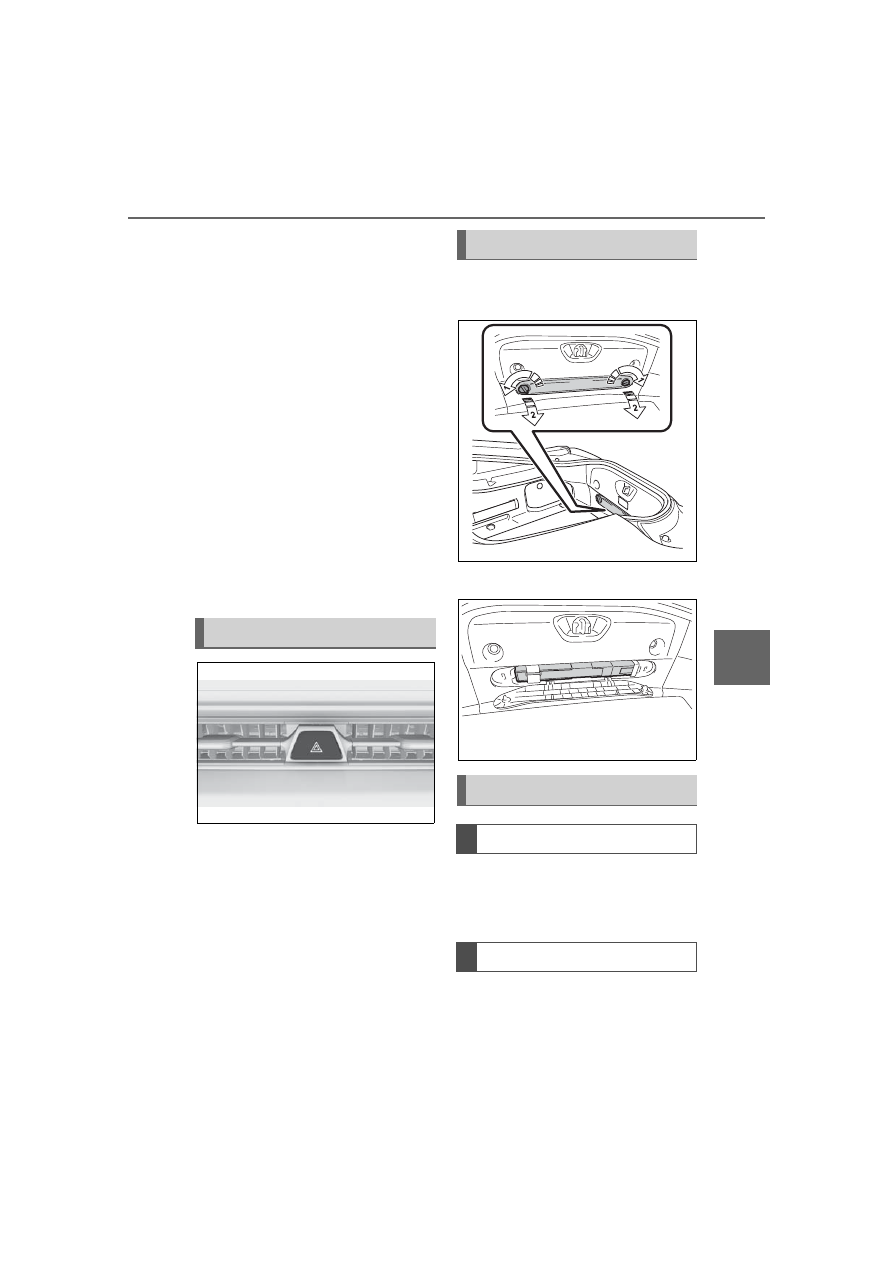
321
6-1. MOBILITY
Supra Owner’s Manual_U (from Mar. ’20
Prod.)
6
MOBILITY
airbag related parts will be
extremely hot. Avoid touching
the parts with your hands or
any part of your body.
2
If someone has been injured,
contact emergency services
and request assistance. If
someone has no obvious
external injuries, but they
may have a head injury, keep
their airway open while mov-
ing them as little as possible.
If there is danger of the vehi-
cle being involved in a sec-
ondary collision, move the
injured person to a safe place
while keeping them as hori-
zontal as possible.
The button is located in the cen-
ter console.
The red light in the button
flashes when the hazard warn-
ing flashers are activated.
1
Unlock the cover, arrow
1
,
and fold open, arrow
2
.
2
Remove the warning triangle.
Contact the roadside assis-
tance if assistance is needed in
the event of a breakdown.
In the event of a breakdown,
data on the vehicle's condition is
transmitted to the roadside
Hazard warning flashers
Warning triangle
Roadside assistance
Concept
General information
-------------------------------------------------------------------------------------------------------------------------------------------------------------
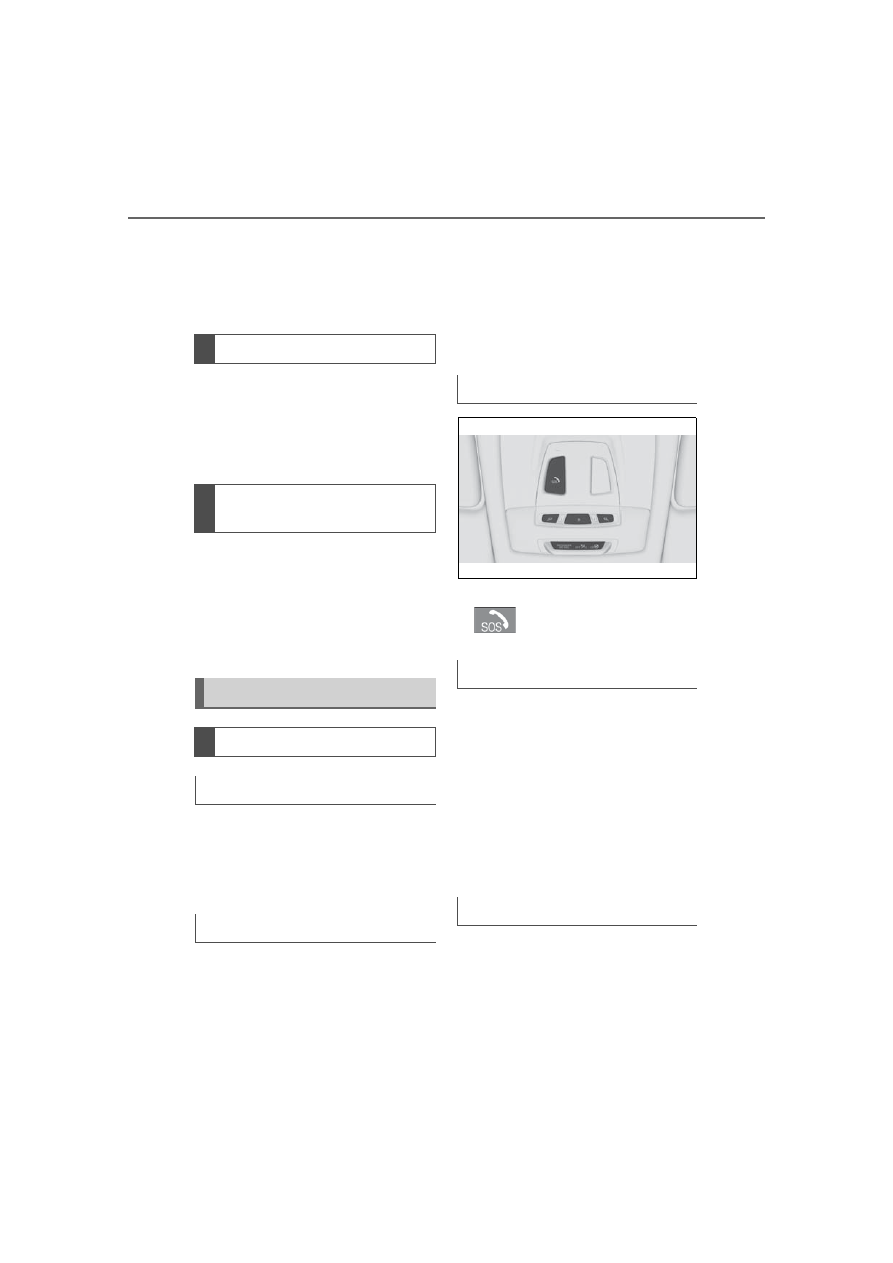
322
6-1. MOBILITY
Supra Owner’s Manual_U (from Mar. ’20
Prod.)
assistance.
Roadside assistance can also
be contacted via a vehicle mes-
sage, refer to page 138.
Active Toyota Supra Connect
contract.
Cellular network reception.
Standby state is switched on.
Via Toyota Supra Command:
1
"Toyota Supra Connect"
2
"Toyota Supra Assistance"
3
"Roadside assistance"
A voice connection is established.
In case of an emergency, an
emergency call can be triggered
automatically by the system or
manually.
Only press the SOS button in an
emergency.
The automatic emergency call
establishes a connection with
the Toyota Emergency Call Cen-
ter.
For technical reasons, the emer-
gency call cannot be guaran-
teed under unfavorable
conditions.
Active Toyota Supra Connect
contract.
Standby state is switched on.
The automatic emergency call
is functional.
The SIM card integrated in
the vehicle has been acti-
vated.
Under certain conditions, for
instance if the airbags trigger, an
emergency call is automatically
initiated immediately after an
accident of corresponding
Functional requirements
Starting roadside assis-
tance
Emergency call
Automatic emergency call
Concept
General information
Overview
SOS button.
Functional requirements
Automatic triggering
-------------------------------------------------------------------------------------------------------------------------------------------------------------
323
6-1. MOBILITY
Supra Owner’s Manual_U (from Mar. ’20
Prod.)
6
MOBILITY
severity. Automatic emergency
call is not affected by pressing
the SOS button.
1
Tap the cover.
2
Press and hold the SOS but-
ton until the LED in the area
of the button illuminates
green.
The LED is illuminated green
when an emergency call has
been initiated.
If a cancel prompt appears on the
Control Display, the emergency call
can be aborted.
If the situation allows, wait in your
vehicle until the voice connection
has been established.
The LED flashes green when
a connection to the Toyota
Emergency Call Center has
been established.
The Toyota Emergency Call Center
then makes contact with the occu-
pants of the vehicle and initiates
further steps to help.
Even if you are unable to respond,
the Toyota Emergency Call Center
can take further steps to help you
under certain circumstances.
For this, data is transmitted to the
Toyota Emergency Call Center
which serves to determine the nec-
essary rescue measures. E.g., the
current position of the vehicle, if it
can be established.
Even if the Toyota Emergency Call
Center is no longer heard through
the loudspeakers, the Toyota Emer-
gency Call Center may still be able
to hear the occupants of the vehi-
cle.
The Toyota Emergency Call
Center ends the Emergency
call.
If the battery is discharged, the
engine can be started using the
battery of another vehicle and
two jumper cables. Only use
jumper cables with fully insu-
lated clamp handles.
Manual triggering
Jump-starting
General information
Safety information
WARNING
Contact with live components can
lead to an electric shock. There is
a risk of injuries or danger to life.
Do not touch any components
that are under voltage.
WARNING
If the jumper cables are con-
nected in the incorrect order,
sparking may occur. There is a
risk of injury. Pay attention to the
correct order during connection.
-------------------------------------------------------------------------------------------------------------------------------------------------------------
324
6-1. MOBILITY
Supra Owner’s Manual_U (from Mar. ’20
Prod.)
1
Check whether the battery of
the other vehicle has a volt-
age of 12 volts. The voltage
information can be found on
the battery.
2
Switch off the engine of the
assisting vehicle.
3
Switch off any electronic sys-
tems/power consumers in
both vehicles.
Before you begin, switch off all
unnecessary electronic sys-
tems/power consumers, such as
the radio, on the assisting and
receiving vehicle.
1
Open the cover of the starting
aid terminal.
2
Attach one terminal clamp of
the positive jumper cable to
the positive terminal of the
battery, or to the correspond-
ing starting aid terminal of the
vehicle providing assistance.
3
Attach the terminal clamp on
the other end of the cable to
the positive terminal of the
battery, or to the correspond-
ing starting aid terminal of the
vehicle to be started.
4
Attach one terminal clamp of
the negative jumper cable to
the negative terminal of the
battery, or to the correspond-
ing engine or body ground of
assisting vehicle.
5
Attach the second terminal
clamp to the negative termi-
nal of the battery, or to the
corresponding engine or
body ground of the vehicle to
be started.
Never use spray fluids to start
the engine.
1
Start the engine of the assist-
ing vehicle and let it run for
several minutes at an
increased idle speed.
2
Start the engine of the vehicle
that is to be started in the
usual way.
If the first starting attempt is not
successful, wait a few minutes
before making another attempt in
order to allow the discharged bat-
tery to recharge.
3
Let both engines run for sev-
eral minutes.
4
Disconnect the jumper
cables in the reverse order.
Check the battery and recharge,
if needed.
NOTICE
In the case of body contact
between the two vehicles, a short
circuit can occur during
jump-starting. There is a risk of
damage to property. Make sure
that no body contact occurs.
Preparation
Connecting the cables
Starting the engine
-------------------------------------------------------------------------------------------------------------------------------------------------------------
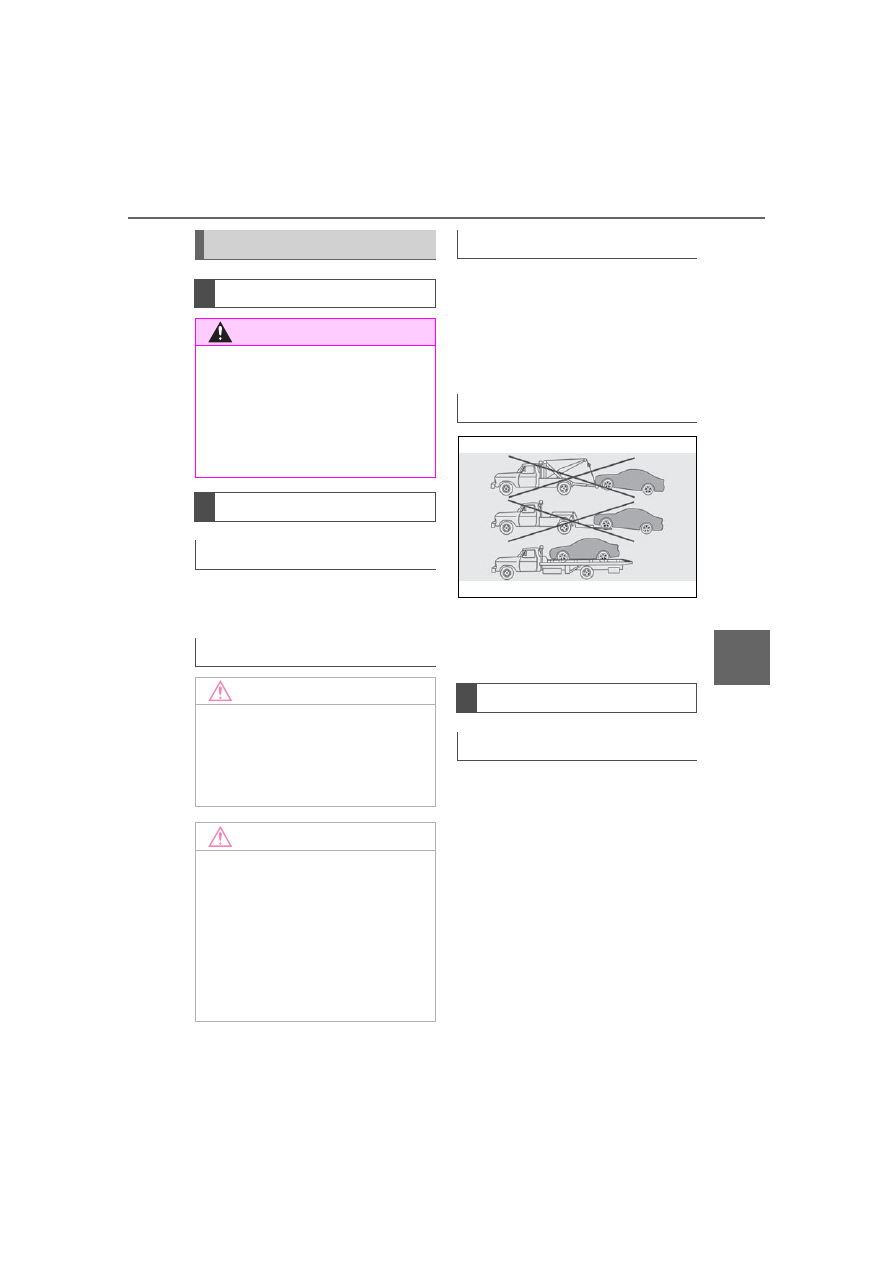
325
6-1. MOBILITY
Supra Owner’s Manual_U (from Mar. ’20
Prod.)
6
MOBILITY
The vehicle is not permitted to
be towed.
To remove a broken-down vehi-
cle from the danger area, it can
be pushed for a short distance.
For rolling or pushing the vehi-
cle, refer to page 131.
The vehicle should only be
transported on a loading plat-
form.
Switch on the hazard warning
system, depending on local reg-
ulations.
If the electrical system has
failed, clearly identify the vehicle
being towed by placing a sign or
a warning triangle in the rear
window.
Tow-starting and towing
Safety information
WARNING
Due to system limits, individual
functions can malfunction during
tow-starting/towing with the Toy-
ota Supra Safety systems acti-
vated. There is a risk of an
accident. Switch all Toyota Supra
Safety systems off prior to
tow-starting/towing.
Transporting the vehicle
General information
Safety information
NOTICE
The vehicle can be damaged
when towing the vehicle with a
single lifted axle. There is a risk of
damage to property. The vehicle
should only be transported on a
loading platform.
NOTICE
The vehicle can become dam-
aged when lifting and securing it.
There is a risk of damage to prop-
erty.
●
Lift the vehicle using suitable
means.
●
Do not lift or secure the vehicle
by its tow fitting, body parts, or
suspension parts.
Pushing the vehicle
Tow truck
Towing other vehicles
General information
-------------------------------------------------------------------------------------------------------------------------------------------------------------
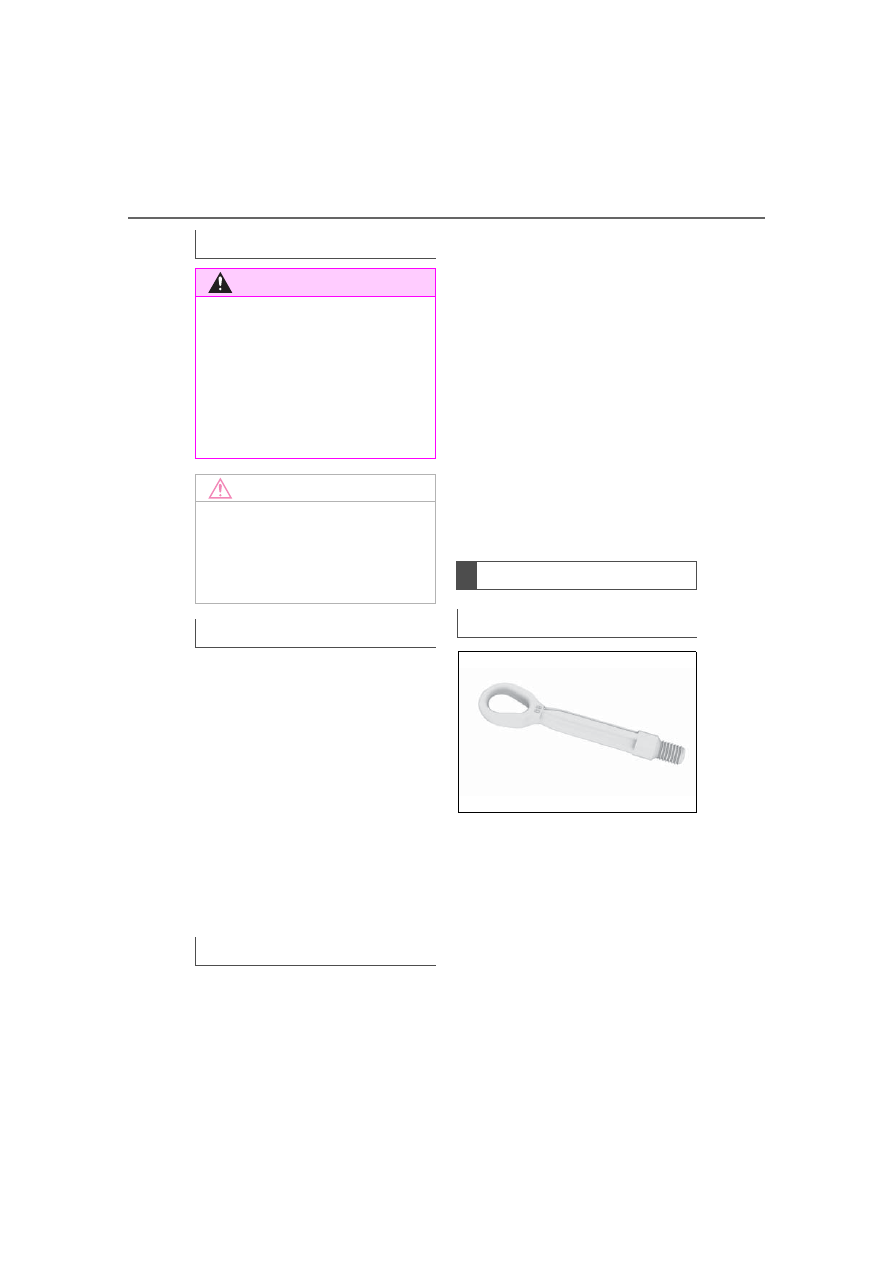
326
6-1. MOBILITY
Supra Owner’s Manual_U (from Mar. ’20
Prod.)
The tow fittings used should be
on the same side on both vehi-
cles.
Should it prove impossible to
avoid mounting the tow bar at
an offset angle, please follow
the following:
Maneuvering capability is lim-
ited going around corners.
The tow bar will generate lat-
eral forces if it is secured with
an offset.
Observe the following notes
when using the tow rope:
Use nylon ropes or straps,
which will enable the vehicle
to be towed without jerking.
Make sure the tow rope is not
twisted when fastening.
Check the fastening of the
tow fitting and tow rope in reg-
ular intervals.
Do not exceed a towing
speed of 30 mph/50 km/h.
Do not exceed a towing dis-
tance of 3 miles/5 km.
When starting to tow the vehi-
cle, make sure that the tow
rope is taut.
The screw-in tow fitting should
always be carried in the vehicle.
The tow fitting can be screwed
in at the front or rear of the vehi-
cle.
The tow fitting is found in the
onboard vehicle tool kit, refer to
page 309.
Use only the tow fitting pro-
vided with the vehicle and
Safety information
WARNING
If the approved gross vehicle
weight of the towing vehicle is
lighter than the vehicle to be
towed, the tow fitting can tear off
or it will not be possible to control
the vehicle's response. There is a
risk of an accident. Make sure
that the gross vehicle weight of
the towing vehicle is heavier than
the vehicle to be towed.
NOTICE
If the tow bar or tow rope is
attached incorrectly, damage to
other vehicle parts can occur.
There is a risk of damage to prop-
erty. Correctly attach the tow bar
or tow rope to the tow fitting.
Tow bar
Tow rope
Tow fitting
General information
-------------------------------------------------------------------------------------------------------------------------------------------------------------
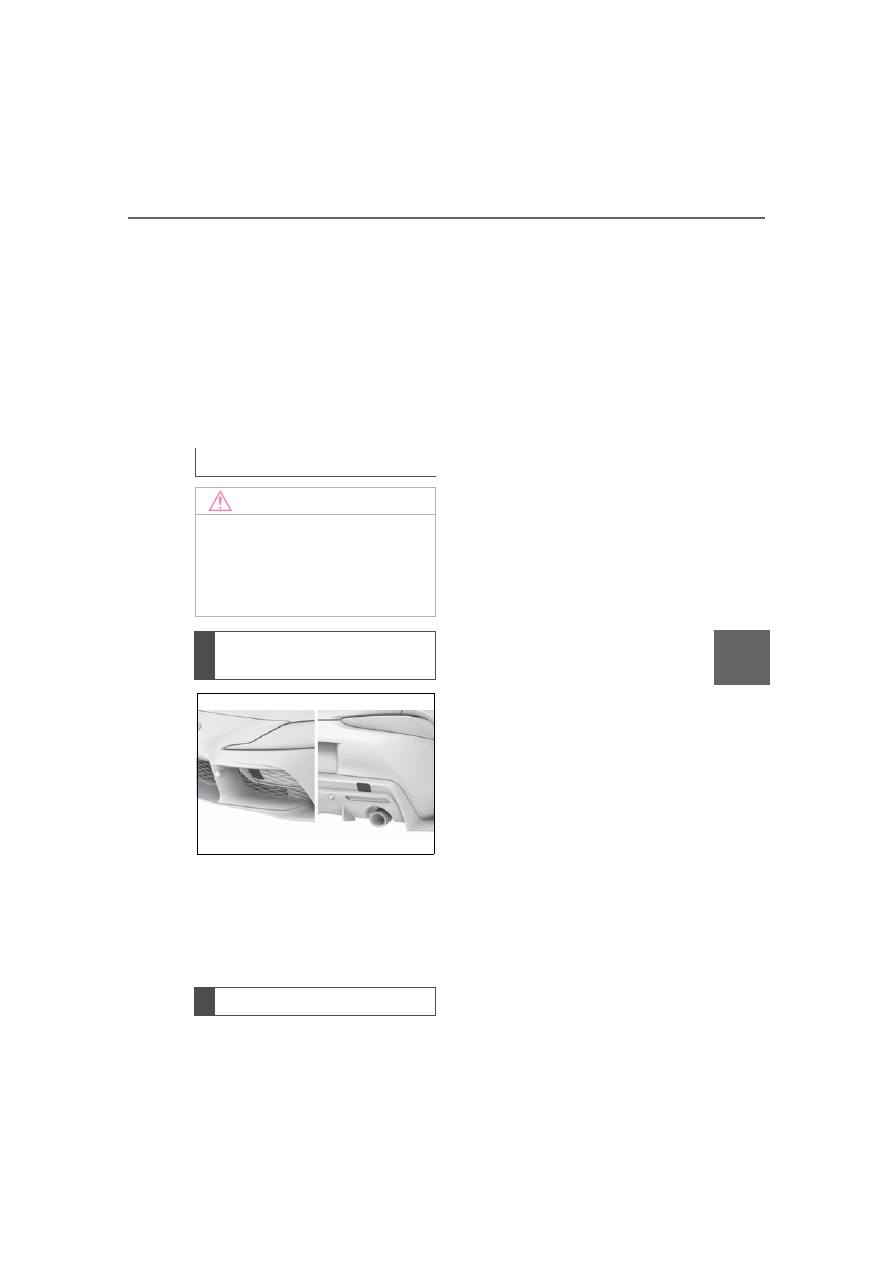
327
6-1. MOBILITY
Supra Owner’s Manual_U (from Mar. ’20
Prod.)
6
MOBILITY
screw it all the way in.
Use the tow fitting for towing
on paved roads only.
Avoid lateral loading of the
tow fitting, for instance do not
lift the vehicle by the tow fit-
ting.
Check the fastening of the
tow fitting in regular intervals.
Press on the mark on the edge
of the cover to push it out.
For covers which have an open-
ing instead of a marking, pull the
cover out by the opening.
Do not tow-start the vehicle.
Start the engine by jump-start-
ing, refer to page 323, if possi-
ble.
Have the reasons for the start-
ing difficulties corrected by your
Toyota dealer.
Safety information
NOTICE
If the tow fitting is not used as
intended, there may be damage
to the vehicle or to the tow fitting.
There is a risk of damage to prop-
erty. Follow the notes on using the
tow fitting.
Screw thread for tow fit-
ting
Tow-starting
-------------------------------------------------------------------------------------------------------------------------------------------------------------
328
6-1. MOBILITY
Supra Owner’s Manual_U (from Mar. ’20
Prod.)
This chapter describes all stan-
dard, country-specific and
optional features offered with
the series. It also describes fea-
tures and functions that are not
necessarily available in your
vehicle, e.g., due to the selected
options or country versions. This
also applies to safety-related
functions and systems. When
using these functions and sys-
tems, the applicable laws and
regulations must be observed.
Regularly remove foreign
objects such as leaves in the
area below the windshield when
the hood is raised.
Wash your vehicle frequently,
particularly in winter. Intense
soiling and road salt can dam-
age the vehicle.
Maximum temperature: 140
°F/60 °C.
Minimum distance from sen-
sors, cameras, seals: 12 in/30
cm.
Care
Vehicle features and
options
Washing the vehicle
General information
Steam blaster and
high-pressure washer
Safety information
NOTICE
When cleaning with high-pressure
washers, components can be
damaged due to the pressure or
temperatures being too high.
There is a risk of damage to prop-
erty. Maintain sufficient distance
and do not spray too long continu-
ously. Follow the operating
instructions for the high-pressure
washer.
Distances and temperature
Automatic vehicle washes
Safety information
NOTICE
Water can penetrate in the wind-
shield area due to high-pressure
washers. There is a risk of dam-
age to property. Avoid high-pres-
sure washers.
-------------------------------------------------------------------------------------------------------------------------------------------------------------
329
6-1. MOBILITY
Supra Owner’s Manual_U (from Mar. ’20
Prod.)
6
MOBILITY
■
Safety information
■
General information
In a vehicle wash, the vehicle
must be able to roll freely.
To roll or push the vehicle, refer
to page 131.
Some vehicle washes do not
permit persons in the vehicle.
The vehicle cannot be locked
from the outside when in selec-
tor lever position N. A signal
sounds when an attempt is
made to lock the vehicle.
Make sure that the remote con-
trol is in the vehicle.
Switch on drive-ready state,
refer to page 41.
Do not rub wet headlights dry
and do not use abrasive or
acidic cleaning agents.
Soak areas that have been dirt-
ied, for instance from insects,
with shampoo and wash off with
water.
Thaw ice with de-icing spray; do
not use an ice scraper.
After washing the vehicle, apply
the brakes briefly to dry them;
otherwise, braking action can be
reduced. The heat generated
during braking dries brake discs
and brake pads and protects
them against corrosion.
Completely remove all residues
NOTICE
Improper use of automatic vehicle
washes can cause damage to the
vehicle. There is a risk of damage
to property. Follow the following
instructions:
●
Give preference to cloth vehicle
washes or those that use soft
brushes in order to avoid paint
damage.
●
Avoid vehicle washes with
guide rails higher than 4 in/10
cm to avoid damage to the
chassis.
●
Observe the tire width of the
guide rail to avoid damage to
tires and rims.
●
Fold in exterior mirrors to avoid
damage to the exterior mirrors.
●
Deactivate the wiper and, if nec-
essary, rain sensor to avoid
damage to the wiper system.
●
Do not treat the convertible top
with wax. Ensure that a cycle
without wax or a special cycle
for convertibles is available to
avoid damage to the convertible
top.
Driving into a vehicle wash
NOTICE
Selector lever position P is auto-
matically engaged when standby
state is switched off. There is a
risk of damage to property. Do not
switch standby state off in vehicle
washes.
Driving out of a vehicle wash
Headlights
After washing the vehicle
-------------------------------------------------------------------------------------------------------------------------------------------------------------
330
6-1. MOBILITY
Supra Owner’s Manual_U (from Mar. ’20
Prod.)
on the windows, to minimize
loss of visibility due to smearing
and to reduce wiper noises and
wiper blade wear.
Regular care contributes to driv-
ing safety and value retention.
Environmental influences in
areas with elevated air pollution
or natural contaminants, such as
tree resin or pollen can affect
the vehicle's paintwork. Tailor
the frequency and extent of your
vehicle care to these influences.
Aggressive substances such as
spilled fuel, oil, grease or bird
droppings, must be removed
immediately to prevent the finish
from being altered or discolored.
Perform the following to protect
the vehicle.
Working from top to bottom,
liberally apply water to the
vehicle body, wheel wells and
underside of the vehicle to
remove any dirt and dust.
Wash the vehicle body using
a sponge or soft cloth, such
as a chamois.
For hard-to-remove marks,
use a neutral detergent and
rinse thoroughly with water.
Wipe away any water.
Never use wax or abrasive
compounds.
Vehicle care
Vehicle care products
Safety information
WARNING
Cleansers can contain sub-
stances that are dangerous and
harmful to your health. There is a
risk of injury. When cleaning the
interior, open the doors or win-
dows. Only use products intended
for cleaning vehicles. Follow the
instructions on the container.
Vehicle paint
General information
Matte finish
Safety information
WARNING
Improperly performed work on the
vehicle paint can lead to a failure
or malfunction of the radar sen-
sors and thereby result in a safety
risk. There is a risk of accidents or
risk of damage to property. Have
paintwork or paintwork repairs on
bumpers of vehicles with radar
sensors performed by your Toyota
dealer only.
NOTICE
■
To prevent paint deteriora-
tion and corrosion on the
body and components (alumi-
num wheels etc.)
Observe the following precau-
tions:
-------------------------------------------------------------------------------------------------------------------------------------------------------------

331
6-1. MOBILITY
Supra Owner’s Manual_U (from Mar. ’20
Prod.)
6
MOBILITY
Remove dust from the leather
regularly, using a cloth or vac-
uum cleaner.
Otherwise, particles of dust and
road grime chafe in pores and
folds, and lead to increased
wear and premature degrada-
tion of the leather surface.
To guard against discoloration,
such as from clothing, clean
leather and provide leather care
roughly every two months.
Clean light-colored leather more
frequently because soiling on
such surfaces is substantially
more visible.
Use leather care products; oth-
erwise, dirt and grease will grad-
ually break down the protective
layer of the leather surface.
Vacuum the upholstery regularly
with a vacuum cleaner.
If upholstery is very dirty, for
instance with beverage stains,
use a soft sponge or microfiber
cloth with a suitable interior
cleaner.
Clean the upholstery down to
the seams using large sweeping
motions. Avoid rubbing the
material vigorously.
NOTICE
●
Wash the vehicle immediately in
the following cases:
• After driving near the sea coast
• After driving on salted roads
• If coal tar or tree sap is present
on the paint surface
• If dead insects, insect droppings
or bird droppings are present on
the paint surface
• After driving in an area contami-
nated with soot, oily smoke,
mine dust, iron powder or chem-
ical substances
• If the vehicle becomes heavily
soiled with dust or mud
• If liquids such as benzene and
gasoline are spilled on the paint
surface
●
If the paint is chipped or
scratched, have it repaired
immediately.
●
To prevent the wheels from cor-
roding, remove any dirt and
store in a place with low humid-
ity when storing the wheels.
For the matte finish, pay attention
to the following as well:
●
If anything is spilled on a
painted surface, wipe it off as
soon as possible. If spilled
washer fluid or alkaline fluids
are left as is, the paint in the
affected area may deteriorate,
causing blemishing.
●
Do not wax or apply coating to
the vehicle. Doing so may
cause a change in the body sur-
face's texture or irregularities in
the paint.
Leather care
Upholstery material care
General information
-------------------------------------------------------------------------------------------------------------------------------------------------------------
332
6-1. MOBILITY
Supra Owner’s Manual_U (from Mar. ’20
Prod.)
When cleaning the vehicle, use
only neutral wheel cleaners hav-
ing a pH value from 5 to 9. Do
not use abrasive cleaning
agents or steam jets above 140
°F/60 °C. Follow the manufac-
turer's instructions.
Aggressive, acidic or alkaline
cleaning agents can destroy the
protective layer of adjacent
components, such as the brake
disc.
After cleaning, apply the brakes
briefly to dry them. The heat
generated during braking dries
brake discs and brake pads and
protects them against corrosion.
Carefully clean components
such as the radiator grille or
door handles with plenty of
water, possibly with shampoo
added, particularly when they
have been exposed to road salt.
Environmental influences can
cause surface soiling of rubber
parts and a loss of gloss. Use
only water and suitable cleaning
agents for cleaning.
Treat especially worn rubber
parts with rubber care agents at
regular intervals. When cleaning
rubber seals, do not use any sili-
con-containing vehicle care
products in order to avoid dam-
age or noises.
Clean with a microfiber cloth.
Dampen cloth lightly with water.
Do not soak the roofliner.
Safety information
NOTICE
Open hook-and-loop fasteners on
articles of clothing can damage
the seat covers. There is a risk of
damage to property. Ensure that
any hook-and-loop fasteners are
closed.
Caring for special compo-
nents
Light-alloy wheels
Chrome surfaces
Rubber components
Plastic components
NOTICE
Cleansers that contain alcohol or
solvents, such as lacquer thin-
ners, heavy-duty grease remov-
ers, fuel, or such, can damage
plastic parts. There is a risk of
damage to property. Clean with a
microfiber cloth. Dampen cloth
lightly with water.
-------------------------------------------------------------------------------------------------------------------------------------------------------------
333
6-1. MOBILITY
Supra Owner’s Manual_U (from Mar. ’20
Prod.)
6
MOBILITY
Dirty belt straps impede the reel-
ing action and thus have a neg-
ative impact on safety.
Use only a mild soapy solution
for cleaning the installed belt
straps.
Safety belts should only be
allowed to retract if they are dry.
The floor mats can be removed
from the car's interior for clean-
ing.
If the floor carpets are very dirty,
clean with a microfiber cloth and
water or a textile cleaner. To
prevent matting of the carpet,
rub back and forth in the direc-
tion of travel only.
To clean sensors and camera
lenses, use a cloth moistened
with a small amount of glass
detergent.
Clean with a clean, antistatic
microfiber cloth.
Clean the protective glass of the
Head-up Display, refer to page
154, using a microfiber cloth and
commercially available
dish-washing soap.
Safety belts
WARNING
Chemical cleansers can destroy
the safety belt webbing. Missing
protective effect of the safety
belts. There is a risk of injuries or
danger to life. Use only a mild
soapy solution for cleaning the
safety belts.
Carpets and floor mats
WARNING
Objects in the driver's floor area
can limit the pedal distance or
block a depressed pedal. There is
a risk of an accident. Stow objects
in the vehicle such that they are
secured and cannot enter into the
driver's floor area. Use floor mats
that are suitable for the vehicle
and can be safely attached to the
floor. Do not use loose floor mats
and do not layer several floor
mats. Make sure that there is suf-
ficient clearance for the pedals.
Ensure that the floor mats are
securely fastened again after they
were removed, for instance for
cleaning.
Sensors and camera lenses
Displays, screens, and pro-
tective glass of the Head-up
Display
NOTICE
Chemical cleansers, moisture or
fluids of any kind can damage the
surface of displays and screens.
There is a risk of damage to prop-
erty. Clean with a clean, antistatic
microfiber cloth.
NOTICE
The surface of displays can be
damaged with improper cleaning.
There is a risk of damage to prop-
erty. Avoid pressure that is too
high and do not use any scratch-
ing materials.
-------------------------------------------------------------------------------------------------------------------------------------------------------------
334
6-1. MOBILITY
Supra Owner’s Manual_U (from Mar. ’20
Prod.)
When the vehicle is shut down
for longer than three months,
special measures must be
taken. Further information is
available from your Toyota
dealer.
Long-term vehicle storage
-------------------------------------------------------------------------------------------------------------------------------------------------------------
335
Supra Owner’s Manual_U (from Mar. ’20
Prod.)
7
7
REFERENCE
REFERENCE
.
7-1. REFERENCE
Technical data . . . .
Certification . . . . .
-------------------------------------------------------------------------------------------------------------------------------------------------------------
Нет комментариевНе стесняйтесь поделиться с нами вашим ценным мнением.
Текст