Toyota Matrix (2014 year). Instruction — part 23
358
4-3. Do-it-yourself maintenance
MATRIX_U
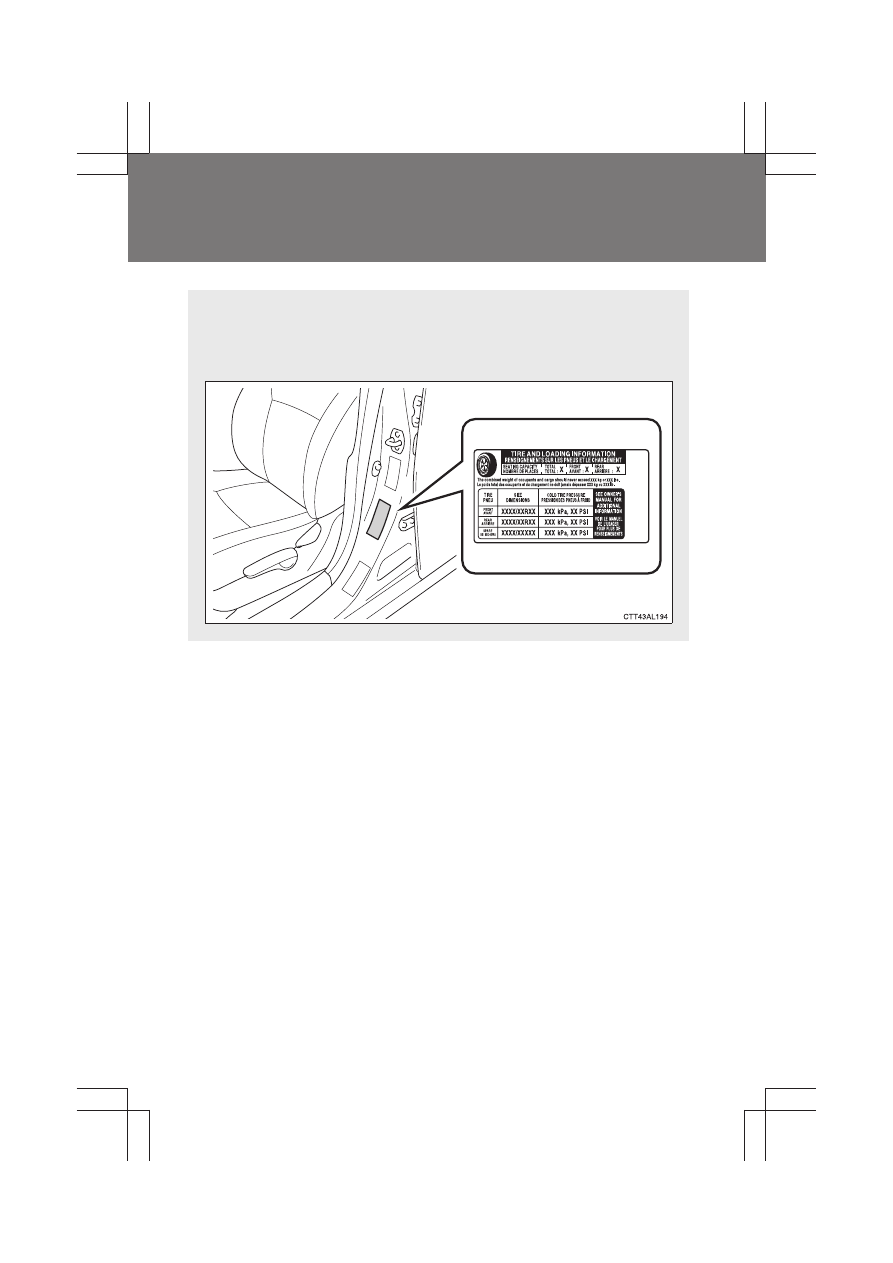
Tire inflation pressure
■
Tire inflation pressure
The recommended cold tire inflation pressure and tire size is dis-
played on the tire and loading information label. (
→P. 451)
359
4-3. Do-it-yourself maintenance
4
M
ain
ten
anc
e a
nd
ca
re
MATRIX_U
■
Tire inflation pressure check interval
You should check tire inflation pressure every two weeks, or at least
once a month.
Do not forget to check the spare.
■
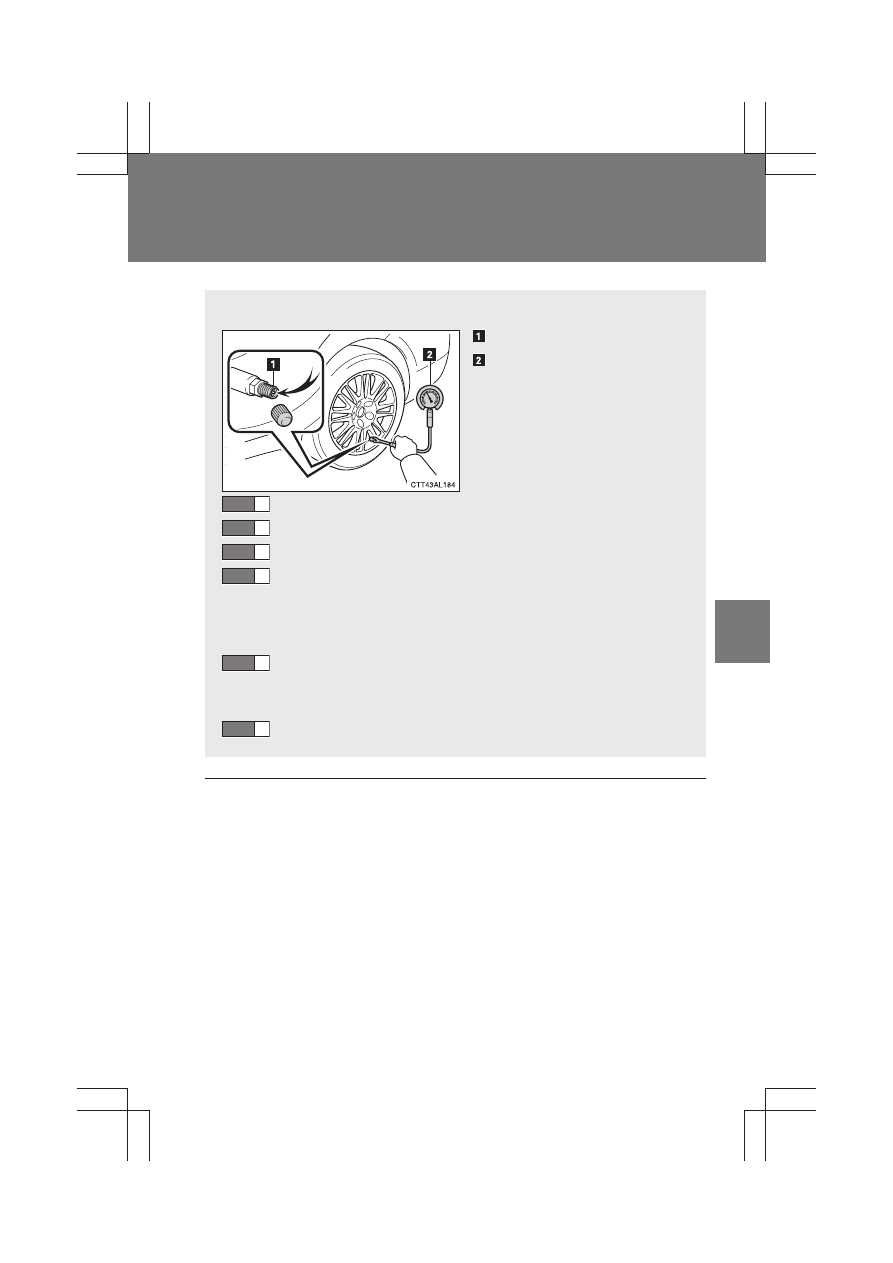
Inspection and adjustment procedure
Tire valve
Tire pressure gauge
Remove the tire valve cap.
Press the tip of the tire pressure gauge onto the tire valve.
Read the pressure using the graduations of the gauge.
If the tire inflation pressure is not at the recommended level
adjust the pressure.
If you add too much air, press the center of the valve to
lower.
After completing the tire inflation pressure measurement
and adjustment, apply soapy water to the valve and check
for leakage.
Reinstall the tire valve cap.
STEP
1
STEP
2
STEP
3
STEP
4
STEP
5
STEP
6
360
4-3. Do-it-yourself maintenance
MATRIX_U
■
Effects of incorrect tire inflation pressure
Driving with incorrect tire inflation pressure may result in the following:
●
Reduced fuel efficiency
●
Reduced driving comfort and tire life
●
Reduced safety
●
Damage to the drive train
If a tire needs frequent refilling, have it checked by your Toyota dealer.
■
Instructions for checking tire inflation pressure
When checking tire inflation pressure, observe the following:
●
Check only when the tires are cold.
If your vehicle has been parked for at least 3 hours and has not been
driven for more than 1 mile or 1.5 km, you will get an accurate cold
tire inflation pressure reading.
●
Always use a tire pressure gauge.
The appearance of the tire can be misleading. In addition, tire infla-
tion pressures that are even just a few pounds off can degrade ride
and handling.
●
Do not bleed or reduce tire inflation pressure after driving. It is normal
for the tire inflation pressure to be higher after driving.
●
Never exceed the vehicle capacity weight.
Passengers and luggage weight should be placed so that the vehicle
is balanced.
361
4-3. Do-it-yourself maintenance
4
M
ain
ten
anc
e a
nd
ca
re
MATRIX_U
CAUTION
■
Proper inflation is critical to save tire performance
Keep your tires properly inflated. Otherwise, the following conditions
may occur and result in an accident causing death or serious injury.
●
Excessive wear
●
Uneven wear
●
Poor handling
●
Possibility of blowouts resulting from overheated tires
●
Poor sealing of the tire bead
●
Wheel deformation and/or tire separation
●
A greater possibility of tire damage from road hazards
NOTICE
■
When inspecting and adjusting tire inflation pressure
Be sure to reinstall the tire valve caps.
Without the valve caps, dirt or moisture could get into the valve and
cause air leakage, which could result in an accident. If the caps have
been lost, replace them as soon as possible.
362
4-3. Do-it-yourself maintenance
MATRIX_U
Wheels
If a wheel is bent, cracked or heavily corroded, it should be
replaced.
Otherwise, the tire may separate from the wheel or cause loss of
handling control.
■
Wheel selection
When replacing wheels, care should be taken to ensure that
they are equivalent to those removed in load capacity, diameter,
rim width, and inset*.
Replacement wheels are available at your Toyota dealer.
*: Conventionally referred to as “offset”.
Toyota does not recommend using:
● Wheels of different sizes or types
● Used wheels
● Bent wheels that have been straightened
■
Aluminum wheel precautions
● Use only Toyota wheel nuts and wrenches designed for use
with your aluminum wheels.
● When rotating, repairing or changing your tires, check that the
wheel nuts are still tight after driving 1000 miles (1600 km).
● Be careful not to damage the aluminum wheels when using
tire chains.
● Use only Toyota genuine balance weights or equivalent and
use a plastic or rubber hammer when balancing your wheels.
363
4-3. Do-it-yourself maintenance
4
M
ain
ten
anc
e a
nd
ca
re
MATRIX_U
■
When replacing wheels
The wheels of your Toyota, except for the compact spare tire, are
equipped with tire pressure warning valves and transmitters that allow
the tire pressure warning system to provide advanced warning in the
event of a loss in tire inflation pressure. Whenever wheels are replaced,
the tire pressure warning valves and transmitters must be installed.
(
→P. 350)
CAUTION
■
When replacing wheels
●
Do not use wheels that are a different size from those recommended in
the Owner’s Manual, as this may result in loss of handling control.
●
Never use an inner tube in a leaking wheel which is designed for a
tubeless tire. Doing so may result in an accident, causing serious
injury or death.
■
When installing the wheel nuts
●
Never use oil or grease on the wheel bolts or wheel nuts.
Oil and grease may cause the wheel nuts to be excessively tightened,
leading to bolt or disc wheel damage. In addition, the oil or grease can
cause the wheel nuts to loosen and the wheel may fall off, causing an
accident and resulting in death or serious injury. Remove any oil or
grease from the wheel bolts or wheel nuts.
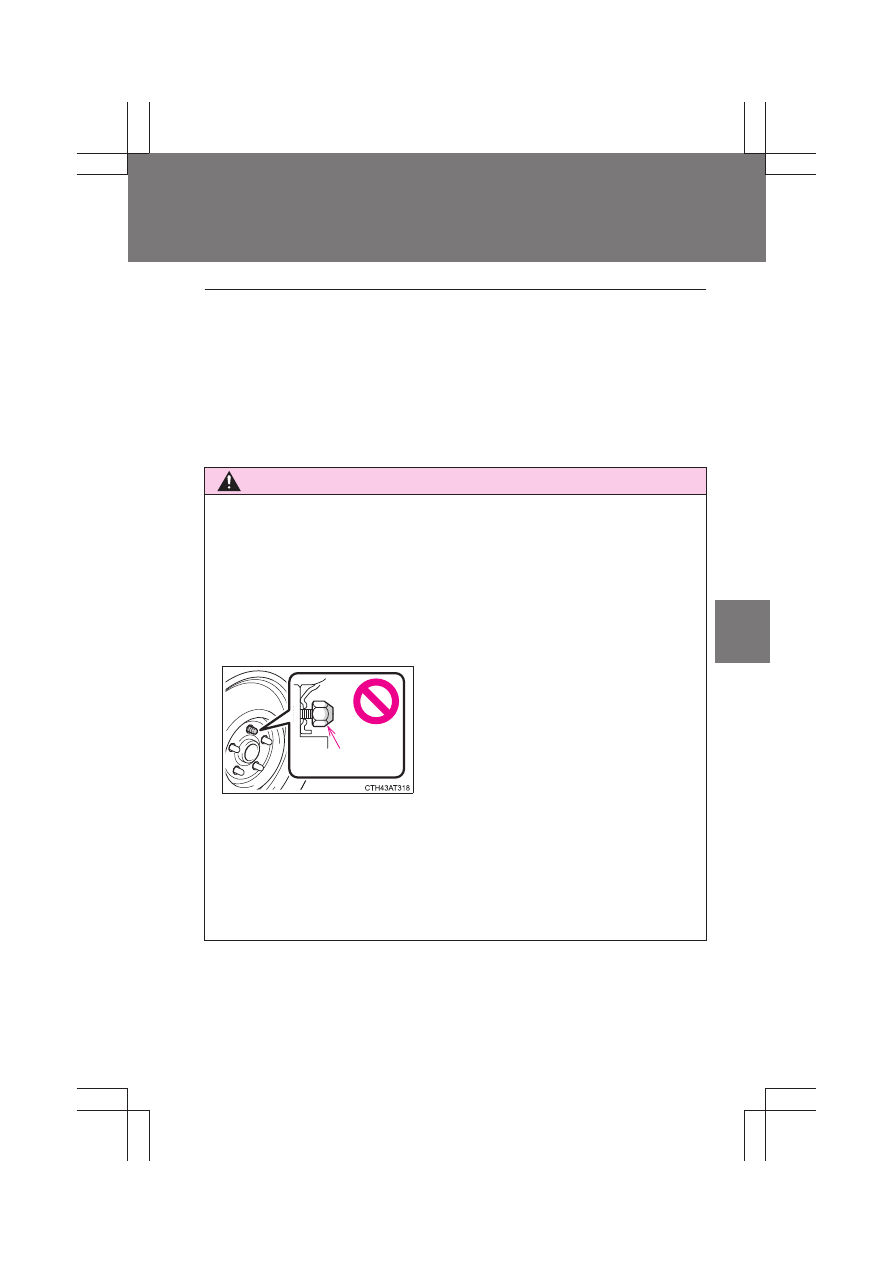
●
Be sure to install the wheel nuts with
the tapered end facing inward. Install-
ing the nuts with the tapered end fac-
ing outward can cause wheel to
break and eventually cause a wheel
to come off while driving, which could
lead to an accident resulting in death
or serious injury.
Tapered
portion
364
4-3. Do-it-yourself maintenance
MATRIX_U
NOTICE
■
Replacing tire pressure warning valves and transmitters
●
Because tire repair or replacement may affect the tire pressure warn-
ing valves and transmitters, make sure to have tires serviced by your
Toyota dealer or other qualified service shop. In addition, make sure to
purchase your tire pressure warning valves and transmitters at your
Toyota dealer.
●
Ensure that only genuine Toyota wheels are used on your vehicle.
Tire pressure warning valves and transmitters may not work properly
with non-genuine wheels.
365
4-3. Do-it-yourself maintenance
4
M
ain
ten
anc
e a
nd
ca
re
MATRIX_U
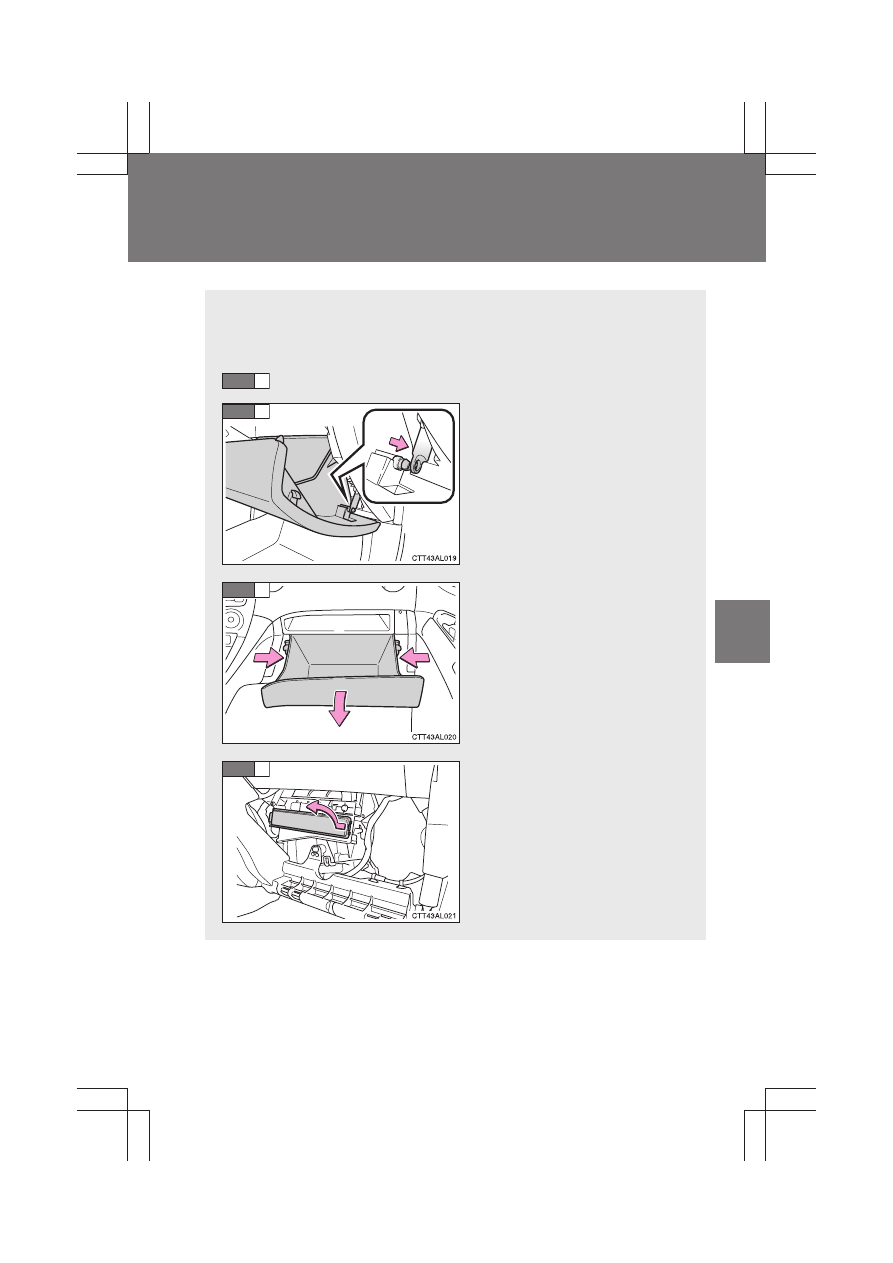
Air conditioning filter
The air conditioning filter must be changed regularly to maintain air
conditioning efficiency.
■
Removal method
Turn the engine switch OFF.
Open the glove box. Slide off
the damper.
Push in each side of the glove
box to disconnect the claws.
Remove the filter cover.
STEP
1
STEP
2
STEP
3
STEP
4
366
4-3. Do-it-yourself maintenance
MATRIX_U
■
Checking interval
Replace the air conditioning filter according to the maintenance schedule. In
dusty areas or areas with heavy traffic flow, early replacement may be
required. (For scheduled maintenance information, please refer to the
“Scheduled Maintenance Guide” or “Owner’s Manual Supplement”.)
■
If air flow from the vents decreases dramatically
The filter may be clogged. Check the filter and replace if necessary.
NOTICE
■
When using the air conditioning system
Make sure that a filter is always installed.
Using the air conditioning system without a filter may cause damage to the
system.
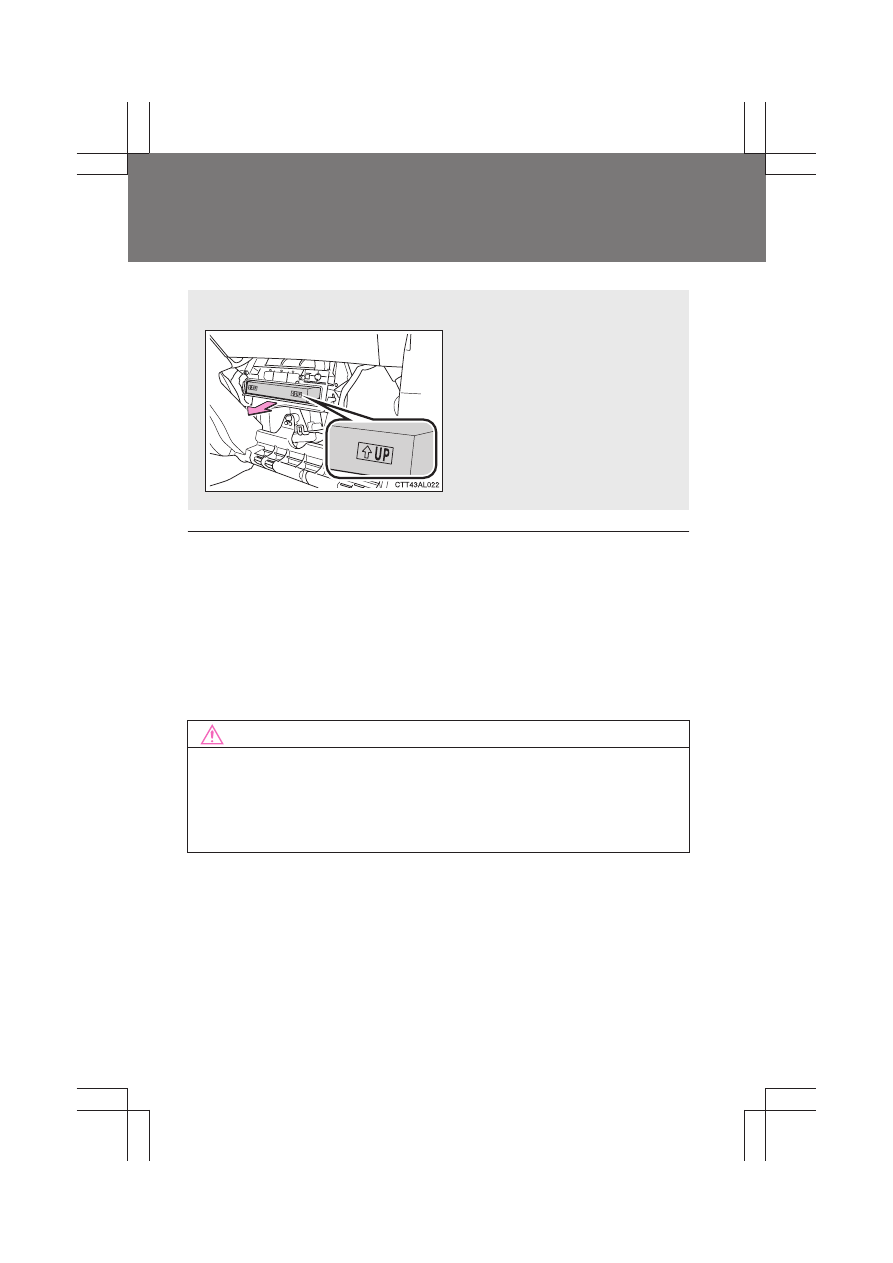
■
Replacement method
Remove the air conditioning
filter and replace it with a new
one.
The “↑UP” marks shown on
the filter should be pointing up.
367
4-3. Do-it-yourself maintenance
4
M
ain
ten
anc
e a
nd
ca
re
MATRIX_U
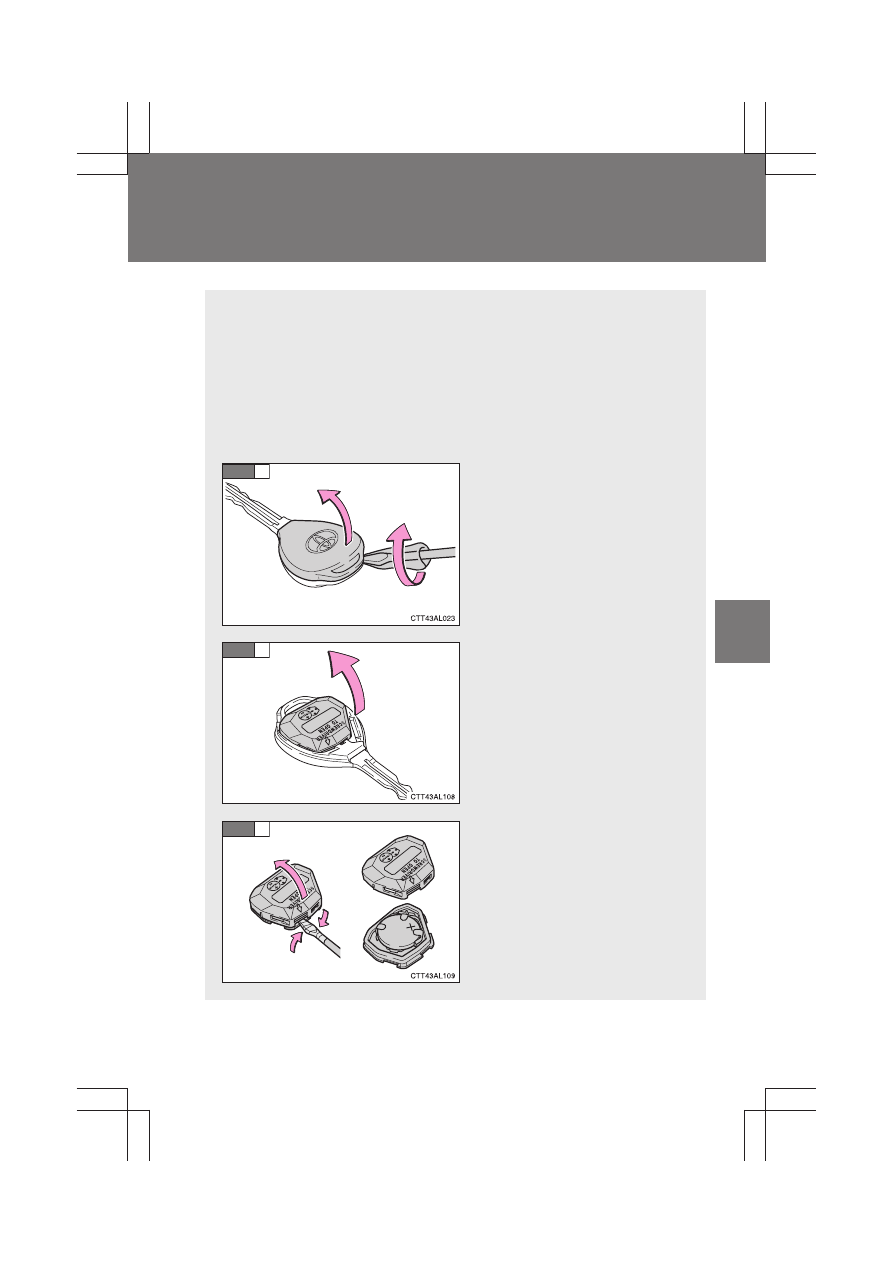
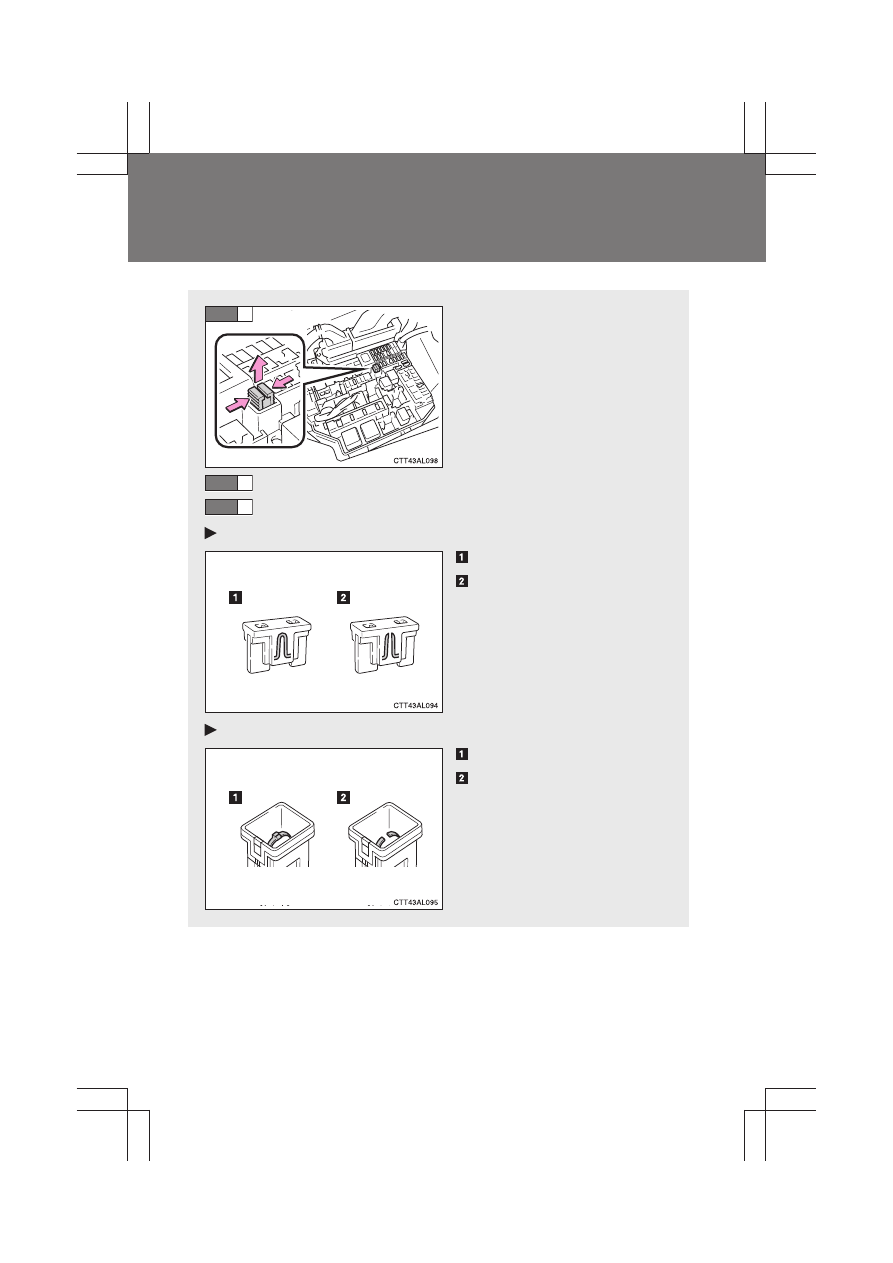
Key battery (vehicles with wireless remote control)
Replace the battery with a new one if it is discharged.
■
You will need the following items:
● Flathead screwdriver (To prevent damage to the key, cover
the tip of the screwdriver with a rag.)
● Lithium battery CR2025
■
Replacing the battery
Remove the cover.
Remove the module.
Open the case cover using a
flathead screwdriver pro-
tected with tape etc. and
remove the depleted battery.
Insert a new battery with the
“+” terminal facing up.
STEP
1
STEP
2
STEP
3
368
4-3. Do-it-yourself maintenance
MATRIX_U
■
If the key battery is discharged
The following symptoms may occur.
●
The wireless remote control will not function properly.
●
The operational range is reduced.
■
Use CR2025 lithium battery
●
Batteries can be purchased at your Toyota dealer, jewelers, or camera
stores.
●
Replace only with the same or equivalent type recommended by your
Toyota dealer.
●
Dispose of used batteries according to the local laws.
CAUTION
■
Removed battery and other parts
These parts are small and if swallowed by a child, they can cause choking.
Keep away from children. Failure to do so could result in death or serious
injury.
NOTICE
■
For normal operation after replacing the battery
Observe the following precautions to prevent accidents.
●
Always work with dry hands.
Moisture may cause the battery to rust.
●
Do not touch or move any other components inside the remote control.
●
Do not bend either of the battery terminals.
369
4-3. Do-it-yourself maintenance
4
M
ain
ten
anc
e a
nd
ca
re
MATRIX_U
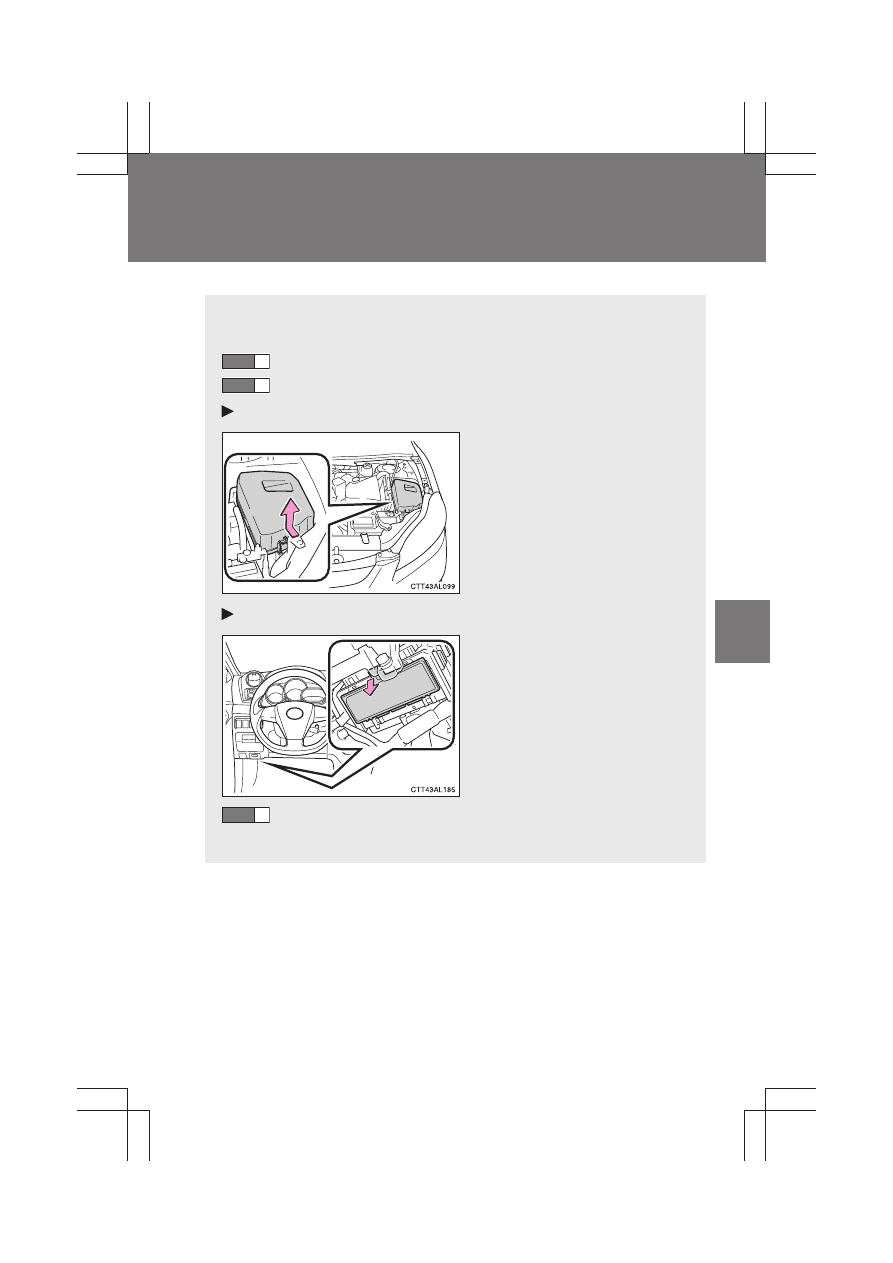
Checking and replacing fuses
If any of the electrical components do not operate, a fuse may have
blown. If this happens, check and replace the fuses as necessary.
Turn the engine switch OFF.
Open the fuse box cover.
Engine compartment
Push the tab in and lift the lid
off.
Under the driver’s side instrument panel
Remove the lid.
After a system failure, see “Fuse layout and amperage rat-
ings” (→P. 372) for details about which fuse to check.
STEP
1
STEP
2
STEP
3
370
4-3. Do-it-yourself maintenance
MATRIX_U
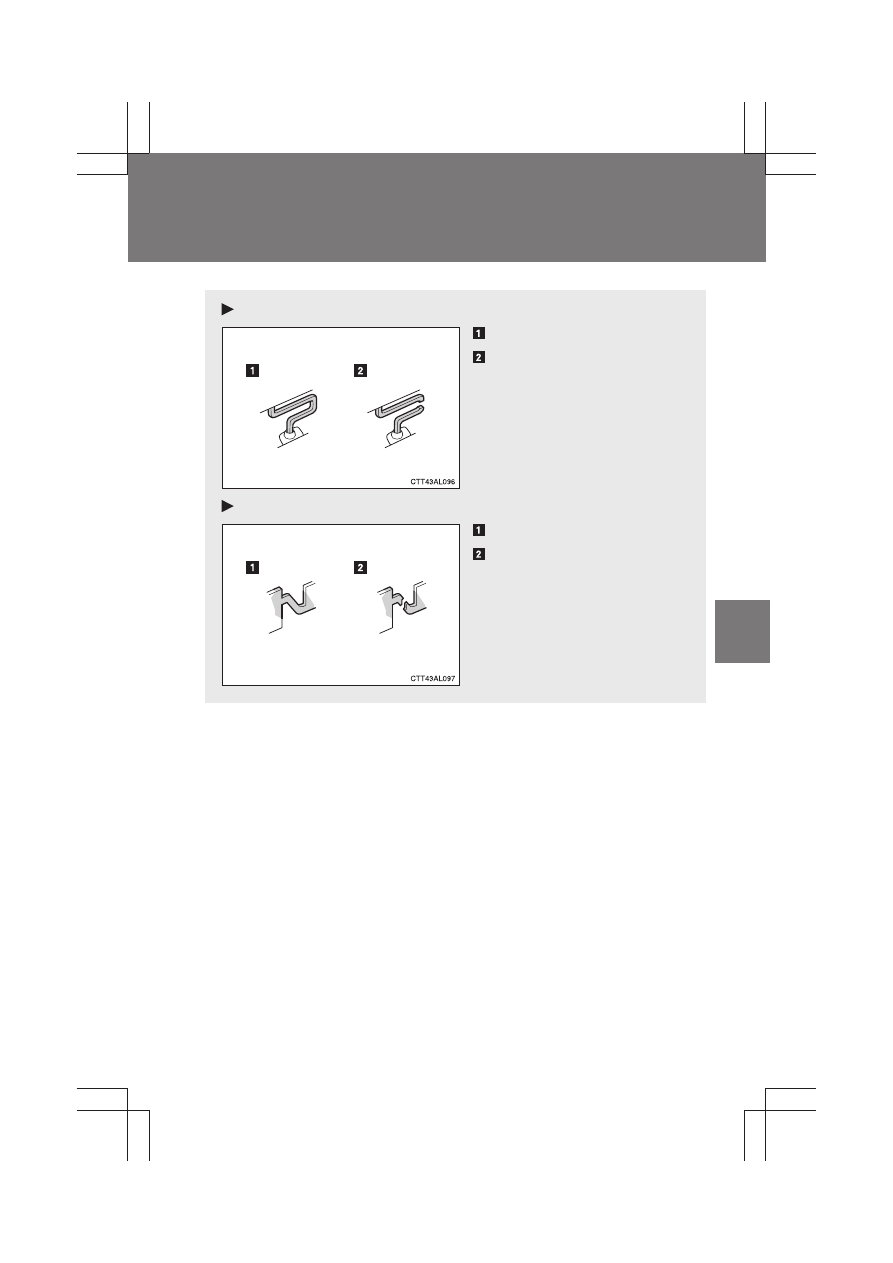
Take out the pullout tool.
Only type A fuse can be
removed using the pullout tool.
For type A and B fuses: Remove the fuse.
Check if the fuse has blown.
Type A
Normal fuse
Blown fuse
Replace it with one of an
appropriate amperage rating.
The amperage rating can be
found on the fuse box lid.
Type B
Normal fuse
Blown fuse
Replace it with one of an
appropriate amperage rating.
The amperage rating can be
found on the fuse box lid.
STEP
4
STEP
5
STEP
6
371
4-3. Do-it-yourself maintenance
4
M
ain
ten
anc
e a
nd
ca
re
MATRIX_U
Type C
Normal fuse
Blown fuse
Contact your Toyota dealer.
Type D
Normal fuse
Blown fuse
Contact your Toyota dealer.
372
4-3. Do-it-yourself maintenance
MATRIX_U
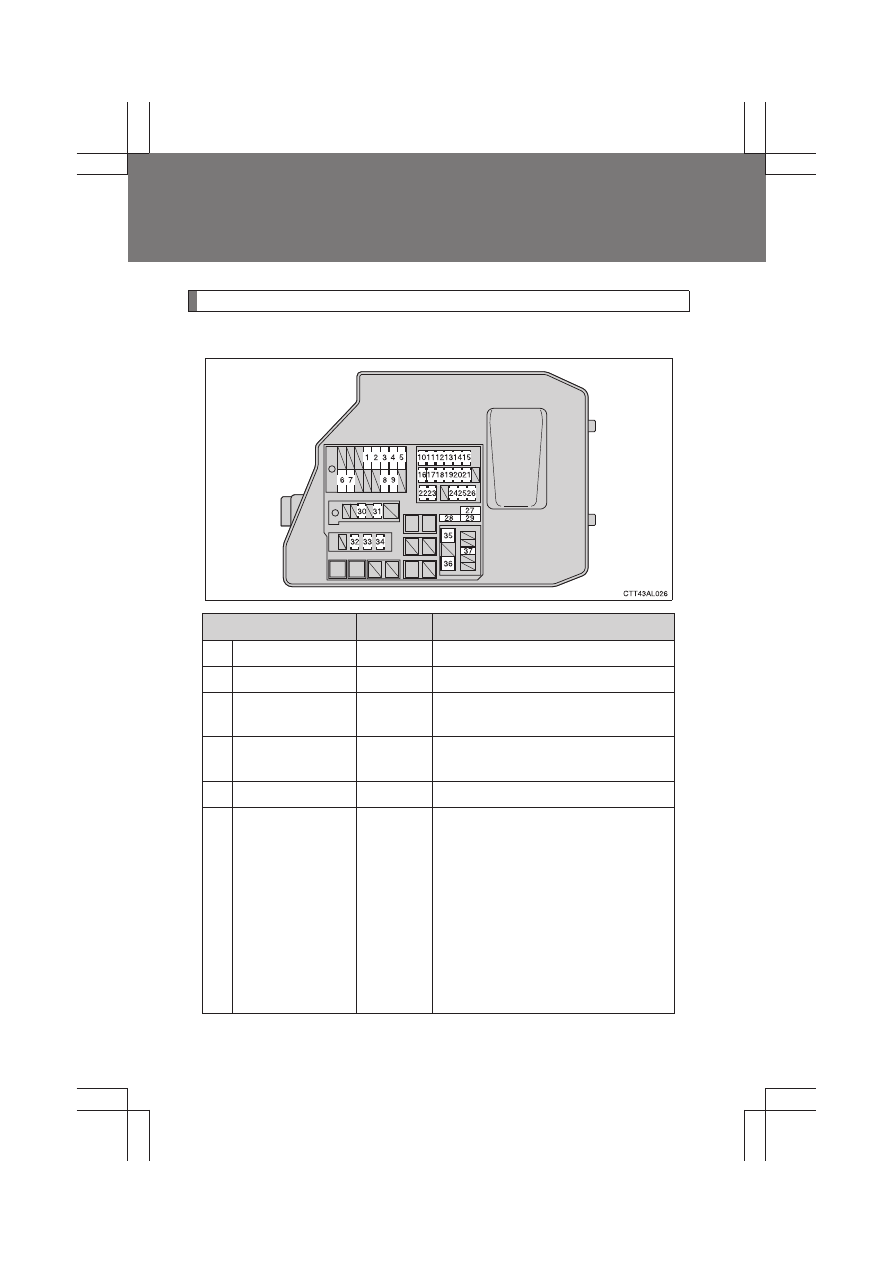
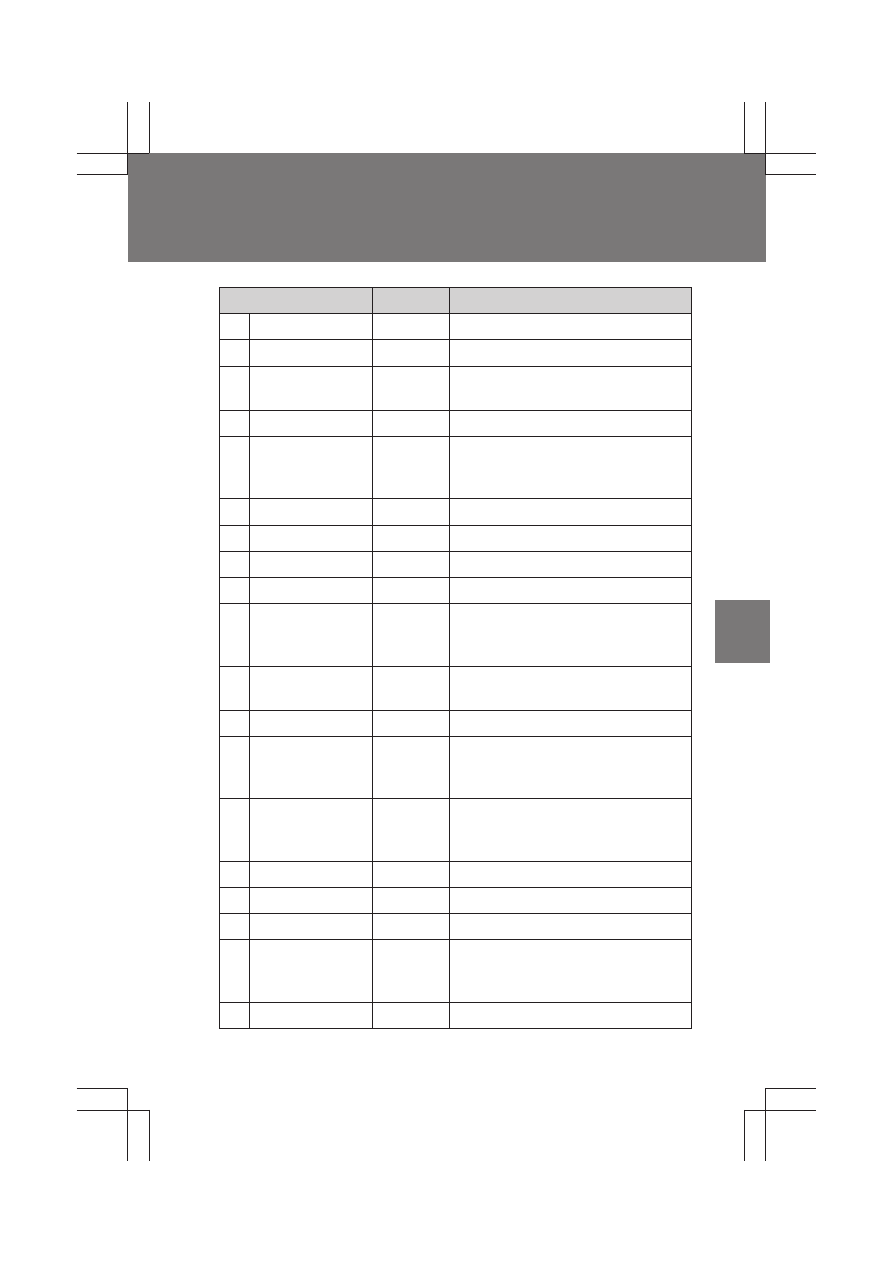
Fuse layout and amperage ratings
■
Engine compartment
Fuse
Ampere
Circuit
1
CDS FAN
30 A
Electric cooling fan(s)
2
RDI FAN
40 A
Electric cooling fan(s)
3
ABS NO. 3
30 A
Anti-lock brake system, vehicle sta-
bility control system
4
ABS NO. 1
50 A
Anti-lock brake system, vehicle sta-
bility control system
5
HTR
50 A
Air conditioning system
6
ALT
120 A
Charging system, RDI FAN, CDS
FAN, ABS NO. 1, ABS NO. 3, PWR
OUTLET/INVERTER, HTR, HTR
SUB NO. 1, HTR SUB NO. 3, ACC,
CIG, ECU-IG NO. 2, HTR-IG,
WIPER, RR WIPER, WASHER,
ECU-IG NO. 1, AM1, 4WD, DOOR,
STOP, FR DOOR, POWER, RR
DOOR, RL DOOR, OBD, ACC-B,
FR FOG, SUNROOF, DEF, MIR
HTR, TAIL, PANEL
373
4-3. Do-it-yourself maintenance
4
M
ain
ten
anc
e a
nd
ca
re
MATRIX_U
7
EPS
60 A
Electric power steering
8
P/I
50 A
EFI MAIN, HORN, IG2
9
H-LP MAIN
50 A
H-LP LH LO, H-LP RH LO, H-LP
LH HI, H-LP RH HI
10
EFI NO. 2
10 A
Emission control system
11
EFI NO. 1
10 A
Multiport fuel injection system/
sequential multiport fuel injection
system
12
H-LP RH HI
10 A
Right-hand headlight (high beam)
13
H-LP LH HI
10 A
Left-hand headlight (high beam)
14
H-LP RH LO
10 A
Right-hand headlight (low beam)
15
H-LP LH LO
10 A
Left-hand headlight (low beam)
16
ETCS
10 A
Multiport fuel injection system/
sequential multiport fuel injection
system
17
TURN-HAZ
10 A
Turn signal lights, emergency
flashers
18
ALT-S
7.5 A
Charging system
19
AM2 NO. 2
7.5 A
Starting system, multiport fuel
injection system/sequential multi-
port fuel injection system
20
AM2
30 A
Starting system, multiport fuel
injection system/sequential multi-
port fuel injection system
21
STRG LOCK
20 A
No circuit
22
IG2 NO. 2
7.5 A
Starting system
23
ECU-B2
10 A
PTC heater
24
ECU-B
10 A
Main body ECU, gauge and
meters, daytime running light sys-
tem
25
RAD NO. 1
15 A
Audio system
Fuse
Ampere
Circuit
Нет комментариевНе стесняйтесь поделиться с нами вашим ценным мнением.
Текст