Toyota Tundra. Manual — part 2926

Fig. 19: Identifying Transfer Assembly Replacement Components (10 Of 10)
Courtesy of TOYOTA MOTOR SALES, U.S.A., INC.
REMOVAL
1. DRAIN TRANSFER OIL (see REPLACEMENT )
2. REMOVE AUTOMATIC TRANSMISSION WITH TRANSFER ASSEMBLY (for A750F)
a. Remove the automatic transmission with transfer assembly (see REMOVAL ).
3. REMOVE AUTOMATIC TRANSMISSION WITH TRANSFER ASSEMBLY (for AB60F)
2009 Toyota Tundra
2009 TRANSMISSION JF1A Transfer - Tundra

a. Remove the automatic transmission with transfer assembly (see REMOVAL ).
4. REMOVE TRANSFER ASSEMBLY
a. Remove the 8 transfer adaptor rear mounting bolts.
b. Pull the transfer straight up and remove it from the transmission.
Fig. 20: Removing Transfer Assembly
Courtesy of TOYOTA MOTOR SALES, U.S.A., INC.
DISASSEMBLY
1. REMOVE TRANSFER OIL PUMP PLATE
a. Remove the 4 bolts and oil pump plate, oil pump drive rotor and oil pump driven rotor.
Fig. 21: Identifying Transfer Oil Pump Plate Bolts
Courtesy of TOYOTA MOTOR SALES, U.S.A., INC.
2. REMOVE TRANSFER CASE STRAIGHT PIN
a. Remove the 2 straight pins.
NOTE:
Take care not to damage the rear adaptor oil seal with the transfer
input gear spline.
NOTE:
Do not drop the oil pump drive rotor and oil pump driven rotor.
NOTE:
Do not drop the straight pins.
2009 Toyota Tundra
2009 TRANSMISSION JF1A Transfer - Tundra
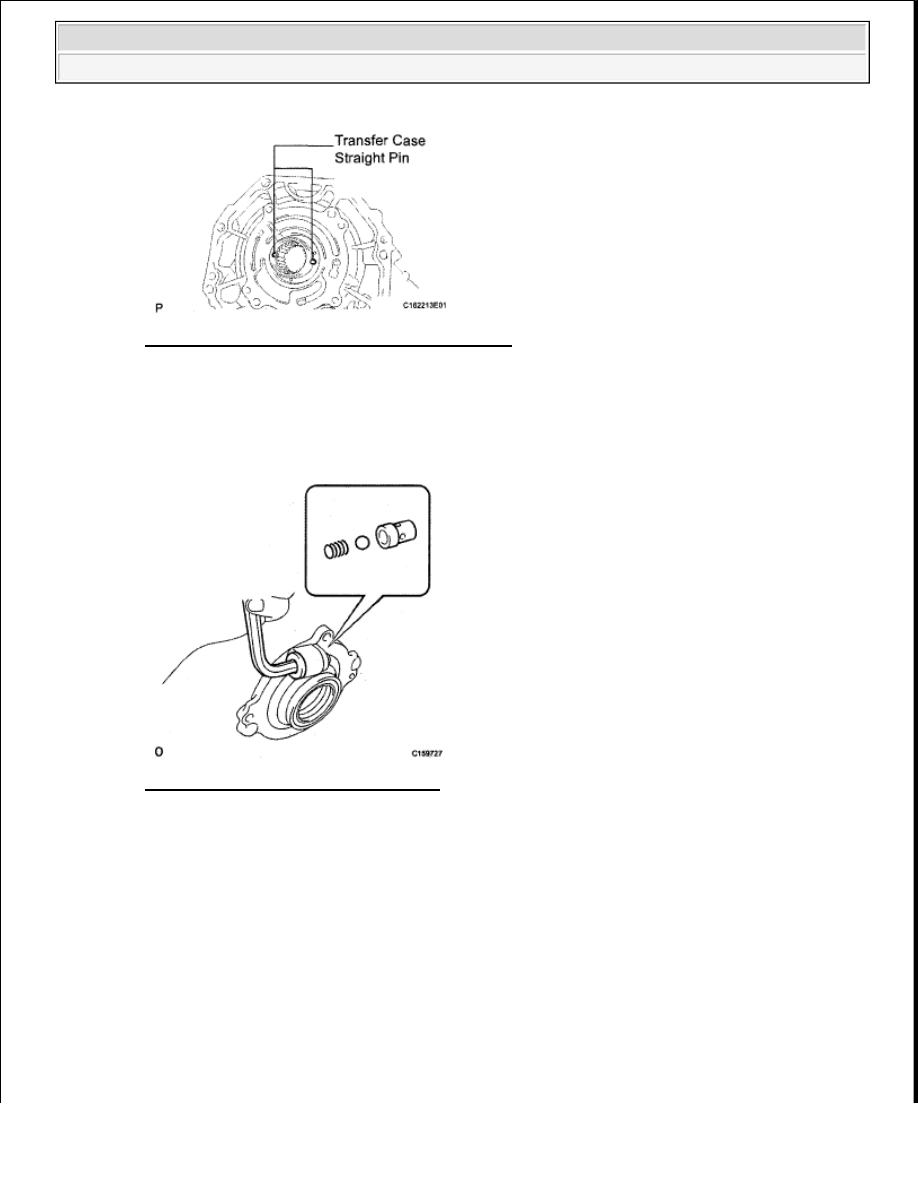
Fig. 22: Identifying Transfer Case Straight Pins
Courtesy of TOYOTA MOTOR SALES, U.S.A., INC.
3. REMOVE TRANSFER CASE PLUG
a. Using a 10 mm hexagon wrench, remove the case plug, compression spring, ball and relief valve
seat.
Fig. 23: Removing Transfer Case Plug
Courtesy of TOYOTA MOTOR SALES, U.S.A., INC.
4. REMOVE TRANSFER OIL PUMP PLATE OIL SEAL
a. Using a screwdriver and hammer, tap out the oil seal from the oil pump plate.
5. REMOVE FRONT OUTPUT SHAFT COMPANION FLANGE SUB-ASSEMBLY
a. Using a chisel and hammer, loosen the staked part of the lock nut.
NOTE:
Be careful not to damage the oil seal and oil pump plate contact
surfaces.
2009 Toyota Tundra
2009 TRANSMISSION JF1A Transfer - Tundra

Fig. 24: Loosening Staked Part Of Lock Nut
Courtesy of TOYOTA MOTOR SALES, U.S.A., INC.
b. Using SST to hold the companion flange, remove the lock nut.
SST 09330-00021
Fig. 25: Removing Lock Nut Using SST
Courtesy of TOYOTA MOTOR SALES, U.S.A., INC.
c. Using SST, remove the companion flange.
SST 09950-40011 (09951-04020, 09952-04010, 09953-04030, 09954-04010, 09955-04051, 09957-
04010, 09958-04011)
Fig. 26: Removing Companion Flange Using SST
Courtesy of TOYOTA MOTOR SALES, U.S.A., INC.
2009 Toyota Tundra
2009 TRANSMISSION JF1A Transfer - Tundra
Нет комментариевНе стесняйтесь поделиться с нами вашим ценным мнением.
Текст