Toyota Tundra. Manual — part 1044
Torque: 100 N*m (1019 kgf*cm, 885 ft.*lbf)
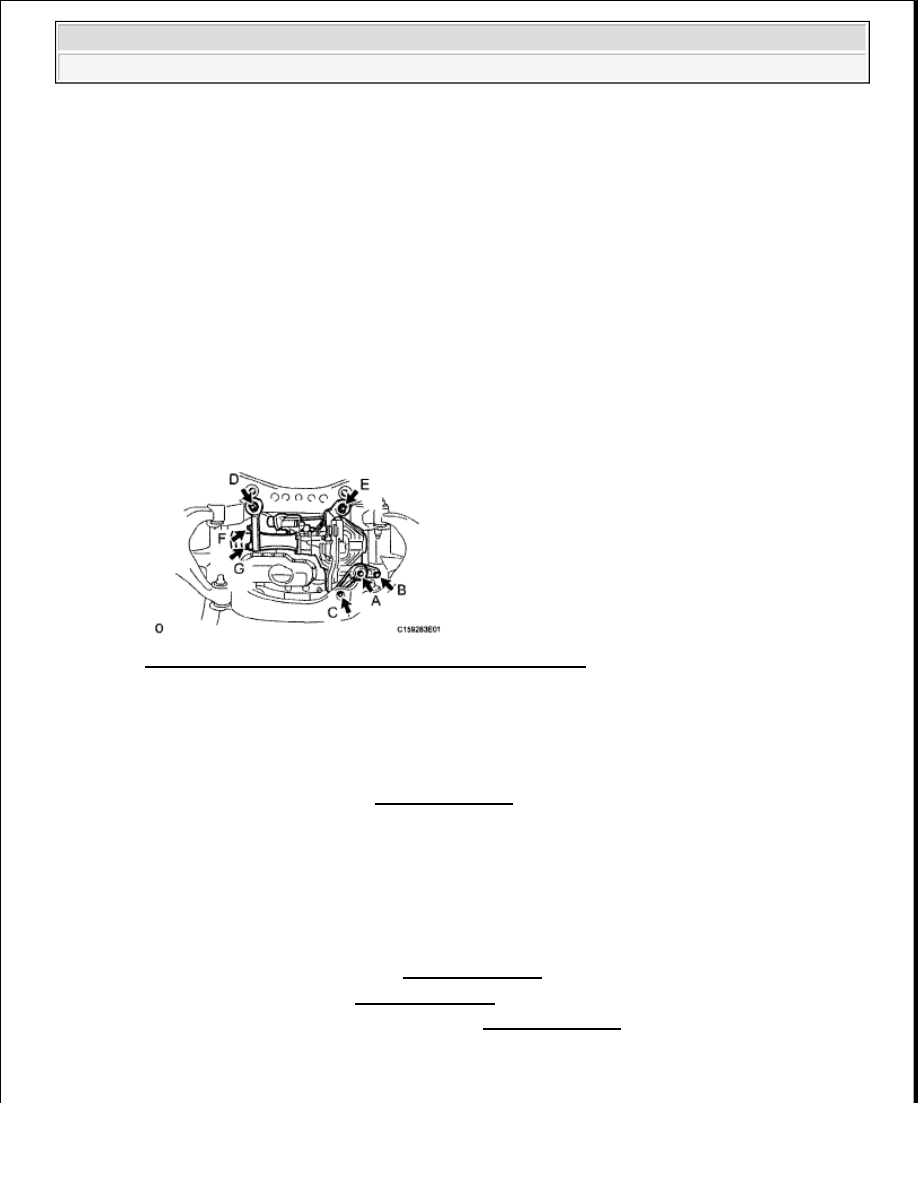
b. Using a jack, slowly raise the front differential carrier assembly to its installation position.
c. Temporarily install the A, B, C, D and E bolts.
d. Tighten the A bolt.
Torque: 120 N*m (1224 kgf*cm, 89 ft.*lbf)
e. Tighten the B and C bolts.
Torque: 120 N*m (1224 kgf*cm, 89 ft.*lbf)
f. Tighten the D and E bolts.
Torque: 120 N*m (1224 kgf*cm, 89 ft.*lbf)
Fig. 255: Identifying Front Differential Carrier Assembly
Courtesy of TOYOTA MOTOR SALES, U.S.A., INC.
g. Connect the automatic disconnecting differential actuator hose.
h. Connect the automatic disconnecting differential actuator connector.
2. INSTALL FRONT DRIVE SHAFT ASSEMBLY LH
a. Install the front drive shaft (see INSTALLATION ).
3. INSTALL FRONT DRIVE SHAFT ASSEMBLY RH
HINT:
Use the same procedure as the LH side.
4. INSTALL FRONT PROPELLER SHAFT ASSEMBLY
a. Install the front propeller shaft (see INSTALLATION ).
5. ADD DIFFERENTIAL OIL (see REPLACEMENT )
6. INSTALL NO. 1 ENGINE UNDER COVER (See INSTALLATION )
7. INSTALL FRONT WHEEL
a. Install the front wheels.
2009 Toyota Tundra
2009 DRIVELINE/AXLES Differential - Tundra
Torque:
for aluminum wheel
131 N*m (1336 kgf*cm, 97 ft.*lbf)
for steel wheel
209 N*m (2131 kgf*cm, 154 ft.*lbf)
8. INSPECT AUTOMATIC DISCONNECTING DIFFERENTIAL ACTUATOR
a. Inspect the automatic disconnecting differential actuator (see ON-VEHICLE INSPECTION ).
AUTOMATIC DISCONNECTING DIFFERENTIAL ACTUATOR (FOR 4WD)
COMPONENTS
2009 Toyota Tundra
2009 DRIVELINE/AXLES Differential - Tundra

Fig. 256: Identifying Automatic Disconnecting Differential Actuator Components With Torque
Specifications (For 4WD)
Courtesy of TOYOTA MOTOR SALES, U.S.A., INC.
REMOVAL
1. REMOVE NO. 1 ENGINE UNDER COVER (See REMOVAL )
2. REMOVE AUTOMATIC DISCONNECTING DIFFERENTIAL ACTUATOR
a. Disconnect the actuator hose.
b. Disconnect the actuator connector.
c. Remove the 4 bolts and actuator.
2009 Toyota Tundra
2009 DRIVELINE/AXLES Differential - Tundra

Fig. 257: Identifying Differential Actuator Bolts
Courtesy of TOYOTA MOTOR SALES, U.S.A., INC.
INSTALLATION
1. INSTALL AUTOMATIC DISCONNECTING DIFFERENTIAL ACTUATOR
a. Remove any old FIPG material and be careful not to drop oil on the contact surfaces of the
differential tube and actuator.
b. Clean the contact surfaces with any residual FIPG material using gasoline or alcohol.
c. Apply seal packing to the differential tube as shown in the illustration.
Seal packing: Toyota Genuine Seal Packing 1281, Three Bond 1281 or equivalent
Fig. 258: Identifying Seal Packing
Courtesy of TOYOTA MOTOR SALES, U.S.A., INC.
HINT:
Install the actuator within 10 minutes of applying seal packing.
d. Clean the threads of the 4 bolts and retainer bolt holes with toluene or trichloroethylene.
e. Install the actuator onto the differential tube.
f. Apply adhesive to 2 to 3 threads of each bolt end.
Adhesive: Toyota Genuine Adhesive 1324, Three Bond 1324 or equivalent
2009 Toyota Tundra
2009 DRIVELINE/AXLES Differential - Tundra
Нет комментариевНе стесняйтесь поделиться с нами вашим ценным мнением.
Текст