Toyota Tundra. Manual — part 2285

Fig. 48: Locating No. 1 Oil Pan Bolts
Courtesy of TOYOTA MOTOR SALES, U.S.A., INC.
d. Uniformly tighten the bolts and nuts in several passes.
Torque:
for bolt A, D, E
7.5 N*m (76 kgf*cm, 66 in.*lbf)
for bolt B, C, nut
28 N*m (286 kgf*cm, 21 ft.*lbf)
4. INSTALL NO. 2 OIL PAN SUB-ASSEMBLY
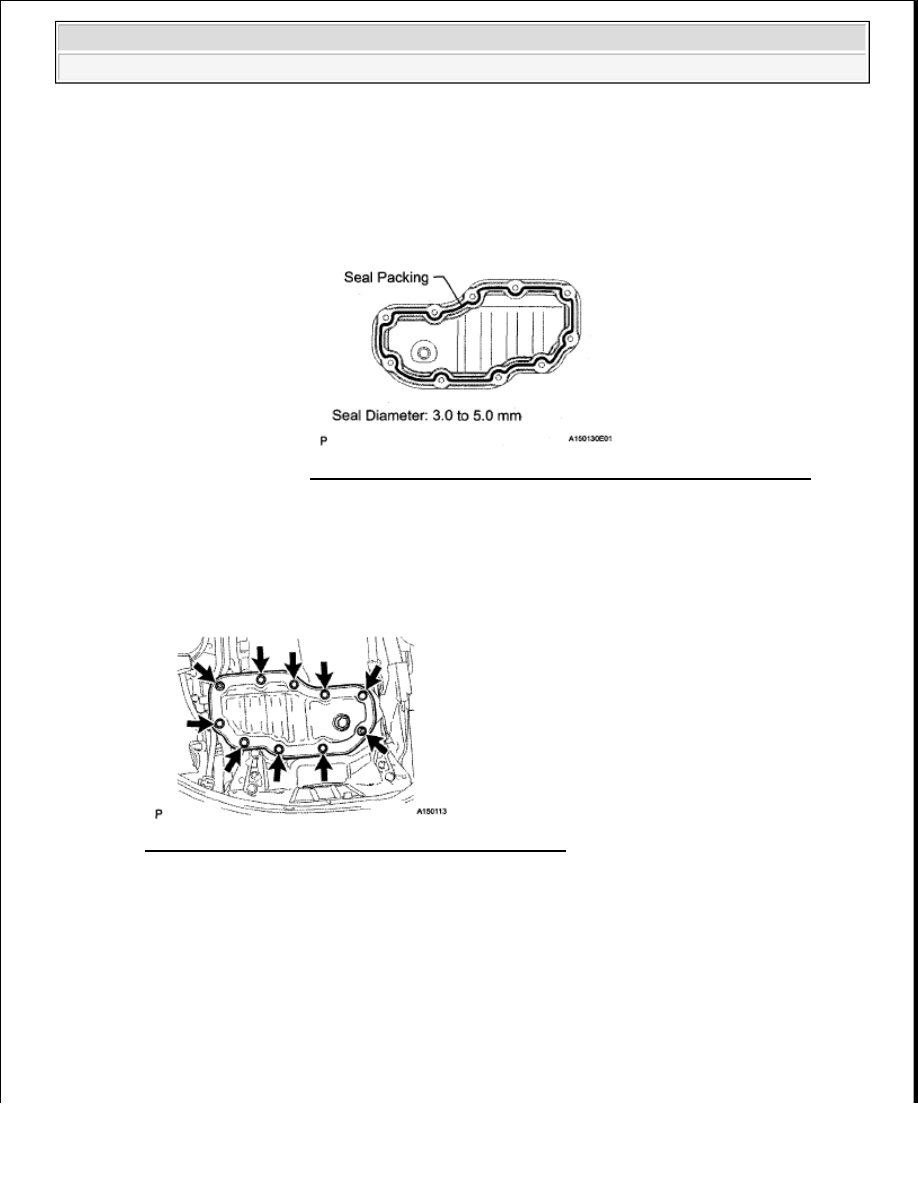
a. Apply seal packing to the No. 2 oil pan as shown in the illustration.
Seal packing:
Toyota Genuine Seal Packing Black, Three Bond 1207B or equivalent
Standard seal diameter:
3.0 to 5.0 mm (0.118 to 0.197 in.)
Bolt B
12 mm
25 mm (0.984 in.)
Bolt C
12 mm
60 mm (2.36 in.)
Bolt D
10 mm
35 mm (1.38 in.)
Bolt E
10 mm
22 mm (0.866 in.)
NOTE:
Make sure the rear ends of the No. 1 oil pan and cylinder block are
aligned. If not, the oil pan may become damaged.
NOTE:
Install the oil pan within 3 minutes and tighten the bolts within
2009 Toyota Tundra
2009 ENGINE Lubrication (2UZ-FE) - Tundra
b. Install the No. 2 oil pan with the 8 bolts and 2 nuts. Uniformly tighten the bolts and nuts in several
passes.
Torque: 7.5 N*m (76 kgf*cm, 66 in.*lbf)
Fig. 50: Identifying No. 2 Oil Pan With Bolts And Nuts
Courtesy of TOYOTA MOTOR SALES, U.S.A., INC.
5. INSTALL CRANKSHAFT POSITION SENSOR (See INSTALLATION )
6. INSTALL OIL FILTER BRACKET SUB-ASSEMBLY
a. Install a new gasket to the oil filter bracket.
b. Install the oil filter bracket with the 2 bolts and nut.
Torque: 18 N*m (185 kgf*cm, 13 ft.*lbf)
15 minutes after applying seal packing.
Be careful not to drop any oil on the contact surfaces of the No.
toil pan and No. 2 oil pan.
Do not expose the seal to engine oil for at least an hour after
installing it.
Fig. 49: Identifying Seal Packing Applying To No. 2 Oil Pan
Courtesy of TOYOTA MOTOR SALES, U.S.A., INC.
2009 Toyota Tundra
2009 ENGINE Lubrication (2UZ-FE) - Tundra

Fig. 51: Identifying Bolts, Nut And Oil Filter Bracket
Courtesy of TOYOTA MOTOR SALES, U.S.A., INC.
c. Connect the oil cooler hoses to the oil cooler.
d. Connect the oil pressure sender gauge connector.
7. INSTALL OIL FILTER ASSEMBLY (see REPLACEMENT )
8. INSTALL ENGINE OIL LEVEL DIPSTICK GUIDE
a. Apply a light coat of engine oil to a new O-ring.
b. Install a new O-ring to the guide.
c. Install the dipstick guide with the bolt.
Torque: 8.0 N*m (82 kgf*cm, 71 in.*lbf)
d. Install the dipstick.
Fig. 52: Identifying Dipstick Guide With Bolt
Courtesy of TOYOTA MOTOR SALES, U.S.A., INC.
9. INSTALL CRANKSHAFT TIMING PULLEY (See INSTALLATION )
10. INSTALL TIMING BELT
a. Install the timing belt (see INSTALLATION ).
11. INSTALL ENGINE ASSEMBLY
a. Install the engine to the vehicle (see INSTALLATION ).
12. CONNECT CABLE TO NEGATIVE BATTERY TERMINAL
2009 Toyota Tundra
2009 ENGINE Lubrication (2UZ-FE) - Tundra
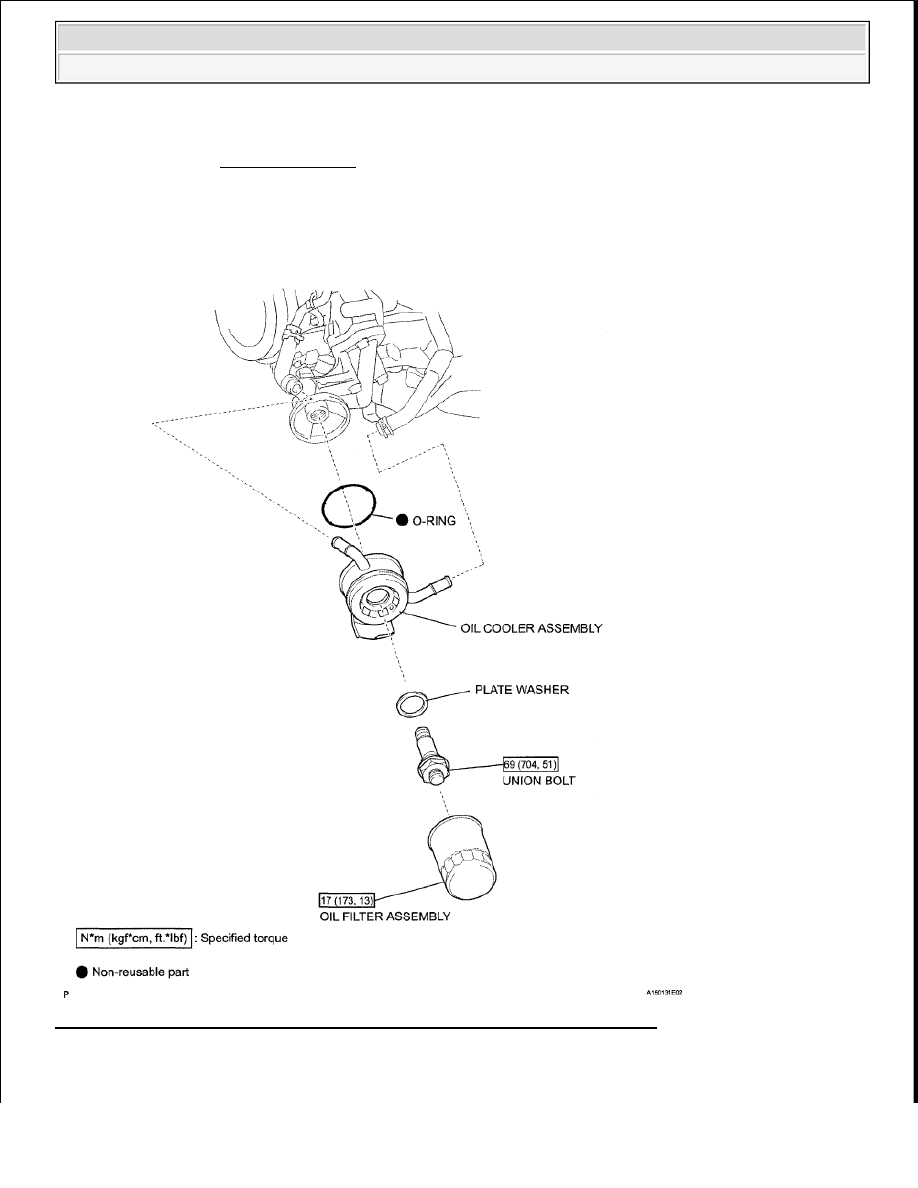
ENGINE OIL COOLER
COMPONENTS
Fig. 53: Identifying Engine Oil Cooler Components And Torque Specifications
Courtesy of TOYOTA MOTOR SALES, U.S.A., INC.
REMOVAL
NOTE:
Some systems need to be initialized after the cable is reconnected (see
INITIALIZATION ).
2009 Toyota Tundra
2009 ENGINE Lubrication (2UZ-FE) - Tundra
Нет комментариевНе стесняйтесь поделиться с нами вашим ценным мнением.
Текст