Toyota Tundra. Manual — part 1814
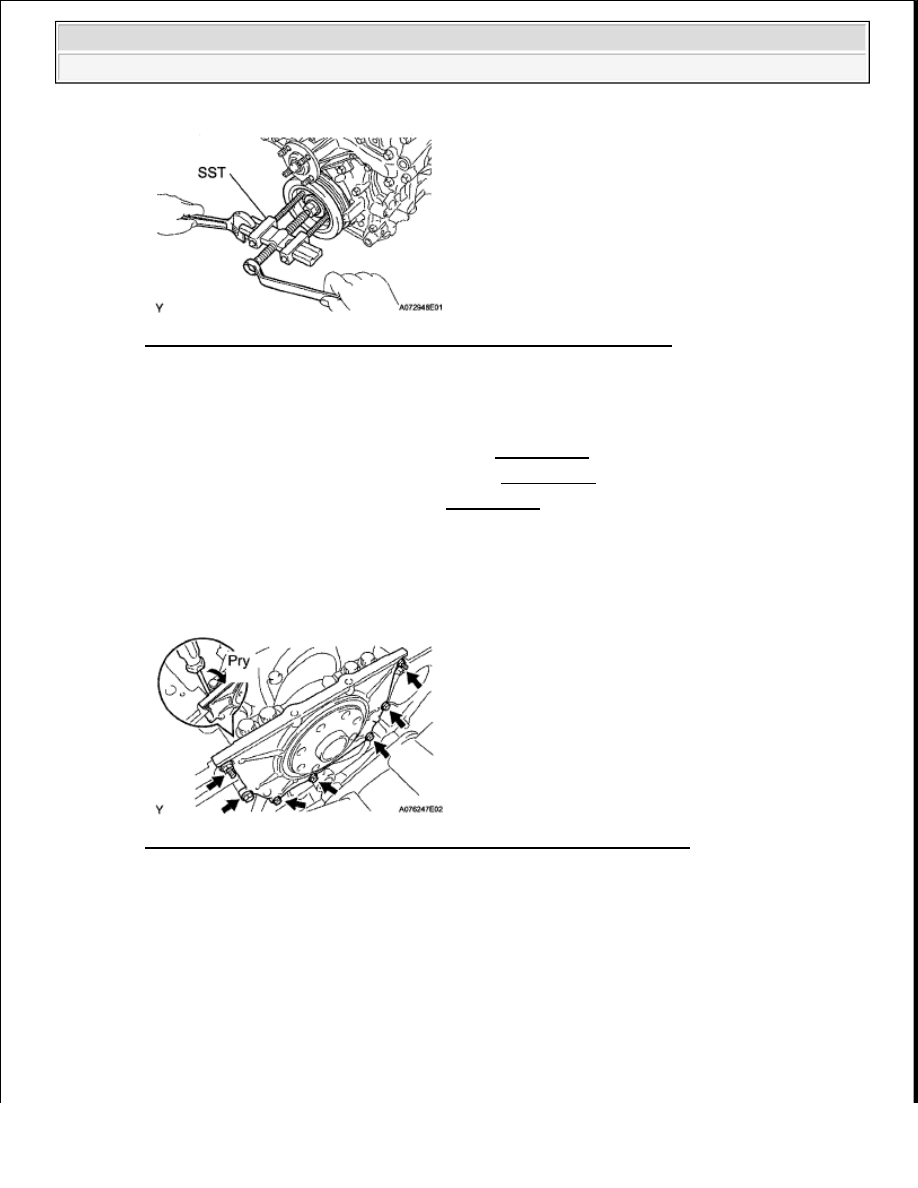
Fig. 252: Using Pulley Set Bolt & SST To Remove Crankshaft Pulley
Courtesy of TOYOTA MOTOR SALES, U.S.A., INC.
25
REMOVE OIL PAN DRAIN PLUG
a
Remove the drain plug and gasket
26
REMOVE NO. 2 OIL PAN SUB-ASSEMBLY (See REMOVAL )
27
REMOVE OIL STRAINER SUB-ASSEMBLY (See REMOVAL )
28
REMOVE OIL PAN SUB-ASSEMBLY (See REMOVAL )
29
REMOVE ENGINE REAR OIL SEAL RETAINER
a
Remove the 5 bolts and 2 nuts
b
Using a screwdriver, remove the oil seal retainer by prying between the oil seal retainer and
crankshaft bearing cap
Fig. 253: Using Screwdriver To Remove Engine Rear Oil Seal Retainer
Courtesy of TOYOTA MOTOR SALES, U.S.A., INC.
30
REMOVE REAR CRANKSHAFT OIL SEAL
a
Using a screwdriver and hammer, tap out the oil seal
NOTE:
Be careful not to damage the rear oil seal retainer.
2009 Toyota Tundra
2009 ENGINE Engine Mechanical (1GR-FE) - Tundra

Fig. 254: Tapping Out Oil Seal Using Screwdriver & Hammer
Courtesy of TOYOTA MOTOR SALES, U.S.A., INC.
31
REMOVE TIMING CHAIN COVER SUB-ASSEMBLY
a
Remove the 24 bolts labeled A and B, and 2 nuts
Fig. 255: Locating Timing Chain Cover Sub-Assembly Bolts And Nuts
Courtesy of TOYOTA MOTOR SALES, U.S.A., INC.
b
Remove the timing chain cover by prying between the timing chain cover and cylinder head or
cylinder block with a screwdriver
c
Remove the O-ring from the cylinder head LH side
NOTE:
Be careful not to damage the contact surfaces of the timing chain
cover, cylinder block and cylinder head.
2009 Toyota Tundra
2009 ENGINE Engine Mechanical (1GR-FE) - Tundra

Fig. 256: Identifying Timing Chain Cover By Prying Between Timing Chain Cover And
Cylinder Head
Courtesy of TOYOTA MOTOR SALES, U.S.A., INC.
32
REMOVE WATER PUMP ASSEMBLY
a
Remove the 8 bolts, water pump and gasket
Fig. 257: Locating Water Pump Assembly Bolts
Courtesy of TOYOTA MOTOR SALES, U.S.A., INC.
33
REMOVE FRONT CRANKSHAFT OIL SEAL (See REMOVAL )
34
REMOVE NO. 1 CHAIN TENSIONER ASSEMBLY
NOTE:
Never rotate the crankshaft with the chain tensioner removed.
When rotating the camshaft with the timing chain removed, rotate the
crankshaft counterclockwise 40° from the TDC first.
2009 Toyota Tundra
2009 ENGINE Engine Mechanical (1GR-FE) - Tundra

a
While turning the stopper plate of the tensioner clockwise, push in the plunger of the chain
tensioner as shown below
b
While turning the stopper plate of the tensioner counterclockwise, insert a bar of 3 5 mm (0 138 in )
into the holes on the stopper plate and tensioner to fix the stopper plate
c
Remove the 2 bolts and chain tensioner
Fig. 258: Pushing Plunger Of Chain Tensioner
Courtesy of TOYOTA MOTOR SALES, U.S.A., INC.
35
REMOVE CHAIN TENSIONER SLIPPER
a
Remove the chain tensioner slipper
36
REMOVE NO. 1 IDLE GEAR SHAFT
a
Using a 10 mm hexagon wrench, remove the No 2 idle gear shaft, No 1 idle gear and No 1 idle
gear shaft
Fig. 259: Using Hexagon Wrench To Remove Idle Gear Shafts
Courtesy of TOYOTA MOTOR SALES, U.S.A., INC.
37
REMOVE NO. 2 CHAIN VIBRATION DAMPER
a
Remove the 2 No 2 chain vibration dampers
2009 Toyota Tundra
2009 ENGINE Engine Mechanical (1GR-FE) - Tundra
Нет комментариевНе стесняйтесь поделиться с нами вашим ценным мнением.
Текст