Toyota Tundra. Manual — part 2465

Courtesy of TOYOTA MOTOR SALES, U.S.A., INC.
INSTALLATION
1. INSTALL PRESSURE SWITCH
a. Sufficiently apply compressor oil to a new O-ring and the fitting surface of the pressure switch.
Compressor oil:
ND-OIL 8 or equivalent
b. Install the O-ring on the pressure switch.
c. Install the switch.
Torque: 10.8 N*m (110 kgf*cm, 8 ft.*lbf)
d. Connect the connector.
Fig. 364: Locating Pressure Switch Connector
Courtesy of TOYOTA MOTOR SALES, U.S.A., INC.
2. CHARGE REFRIGERANT (See REPLACEMENT )
3. WARM UP ENGINE (See REPLACEMENT )
4. CHECK FOR LEAKAGE OF REFRIGERANT (See REPLACEMENT )
MAGNETIC CLUTCH RELAY
ON-VEHICLE INSPECTION
1. INSPECT MAGNETIC CLUTCH RELAY (MG CLT)
a. Remove the magnetic clutch relay from the engine room relay block.
b. Measure the resistance according to the value(s) in the table below.
2009 Toyota Tundra
2009 HVAC Air Conditioning - Tundra

Fig. 365: Inspecting Magnetic Clutch Relay (MG CLT)
Courtesy of TOYOTA MOTOR SALES, U.S.A., INC.
Standard Resistance
TESTER CONNECTION SPECIFIED CONDITION CHART
If the result is not as specified, replace the relay.
c. Install the magnetic clutch relay.
INTEGRATION CONTROL AND PANEL (FOR COLUMN SHIFT TYPE)
COMPONENTS
Tester Connection
Condition
Specified Condition
3 - 5
When battery voltage is not applied between terminals 10 kohms or higher
When battery voltage is applied to terminals 1 and 2
Below 1 ohms
2009 Toyota Tundra
2009 HVAC Air Conditioning - Tundra
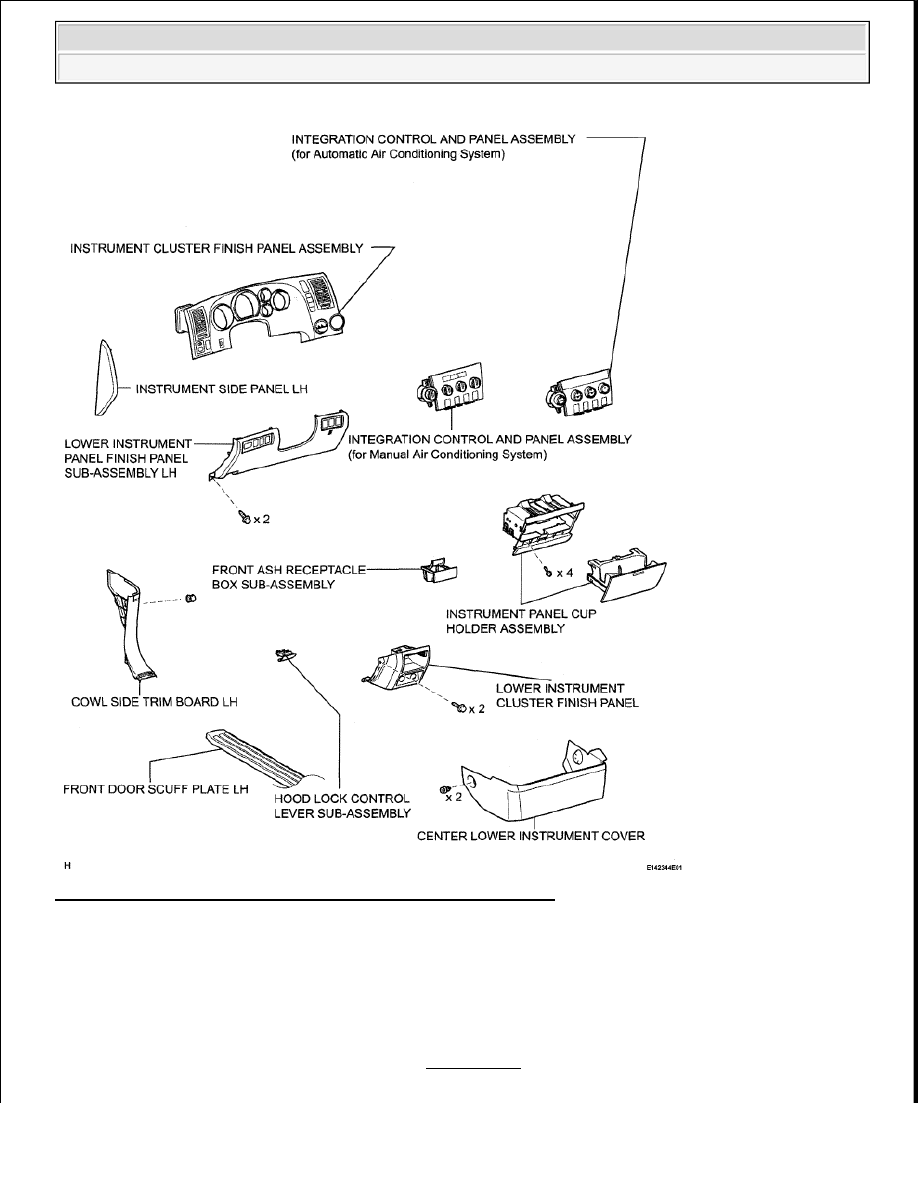
Fig. 366: Identifying Integration Control And Panel Components
Courtesy of TOYOTA MOTOR SALES, U.S.A., INC.
REMOVAL
1. REMOVE FRONT DOOR SCUFF PLATE LH
a. for Regular Cab:
Remove the front door scuff plate (see REMOVAL ).
2009 Toyota Tundra
2009 HVAC Air Conditioning - Tundra

b. for Double Cab:
Remove the front door scuff plate (see REMOVAL ).
c. for CrewMax:
Remove the front door scuff plate (see REMOVAL ).
2. REMOVE COWL SIDE TRIM BOARD LH
a. for Regular Cab:
Remove the cowl side trim board (see REMOVAL ).
b. for Double Cab:
Remove the cowl side trim board (see REMOVAL ).
c. for CrewMax:
Remove the cowl side trim board (see REMOVAL ).
3. REMOVE CENTER LOWER INSTRUMENT COVER (See REMOVAL )
4. REMOVE INSTRUMENT SIDE PANEL LH (See REMOVAL )
5. REMOVE LOWER INSTRUMENT PANEL FINISH PANEL SUB-ASSEMBLY LH (See
REMOVAL )
6. REMOVE INSTRUMENT CLUSTER FINISH PANEL ASSEMBLY (See REMOVAL )
7. REMOVE FRONT ASH RECEPTACLE BOX SUB-ASSEMBLY
8. REMOVE LOWER INSTRUMENT CLUSTER FINISH PANEL (See REMOVAL )
9. REMOVE INSTRUMENT PANEL CUP HOLDER ASSEMBLY (See REMOVAL )
10. REMOVE INTEGRATION CONTROL AND PANEL ASSEMBLY
a. Detach the 4 clips.
b. Disconnect the connector and remove the panel.
2009 Toyota Tundra
2009 HVAC Air Conditioning - Tundra
Нет комментариевНе стесняйтесь поделиться с нами вашим ценным мнением.
Текст