Toyota Tundra. Manual — part 2266

Fig. 50: Identifying Air Cleaner Hose And Clamps
Courtesy of TOYOTA MOTOR SALES, U.S.A., INC.
b. Connect the vacuum hose and ventilation hose.
11. INSTALL COWL TOP OUTER PANEL SUB-ASSEMBLY
a. Install the outer panel with the 7 bolts.
Fig. 51: Identifying Outer Panel With Bolts
Courtesy of TOYOTA MOTOR SALES, U.S.A., INC.
Torque: 7.5 N*m (76 kgf*cm, 66 in.*lbf)
b. Connect the 2 washer hoses.
12. INSTALL FRONT WIPER MOTOR AND LINK ASSEMBLY
a. Install the front wiper motor and link (see INSTALLATION ).
13. ADD ENGINE COOLANT (see REPLACEMENT ).
14. INSPECT FOR COOLANT LEAK (see ON-VEHICLE INSPECTION )
15. INSTALL V-BANK COVER SUB-ASSEMBLY (see INSTALLATION )
16. INSTALL NO. 1 ENGINE UNDER COVER (See REPLACEMENT )
VACUUM SWITCHING VALVE (FOR ACIS)
ON-VEHICLE INSPECTION
2009 Toyota Tundra
2009 ENGINE Intake (3UR-FE) - Tundra

1. REMOVE V-BANK COVER SUB-ASSEMBLY (see REMOVAL )
2. INSPECT VACUUM SWITCHING VALVE ASSEMBLY (for ACIS)
a. Disconnect the vacuum switching valve connector.
b. Measure the resistance according to the value(s) in the table below.
Standard resistance
VACUUM SWITCHING VALVE ASSEMBLY (for ACIS) STANDARD RESISTANCE
SPECIFICATION
Fig. 52: Inspecting Vacuum Switching Valve Assembly
Courtesy of TOYOTA MOTOR SALES, U.S.A., INC.
If the result is not as specified, replace the vacuum switching valve assembly.
c. Check the vacuum switching valve operation.
1. When applying a vacuum to port E, check that air is sucked into the filter. If the result is not
as specified, replace the vacuum switching valve assembly.
Tester Condition Condition Specified Condition
1 - 2
20°C (68°F)
37 to 44 ohms
1 - Body ground
Always
1 Mohms or higher
2 - Body ground
2009 Toyota Tundra
2009 ENGINE Intake (3UR-FE) - Tundra

Fig. 53: Checking Vacuum Switching Valve Operation
Courtesy of TOYOTA MOTOR SALES, U.S.A., INC.
2. Apply voltage across the terminals.
Fig. 54: Applying Voltage Across Terminals
Courtesy of TOYOTA MOTOR SALES, U.S.A., INC.
3. When applying a vacuum to port F, check that air is sucked into port E.
If the result is not as specified, replace the vacuum switching valve assembly.
d. Connect the vacuum switching valve connector.
3. INSTALL V-BANK COVER SUB-ASSEMBLY (see INSTALLATION )
AIR CLEANER
COMPONENTS
2009 Toyota Tundra
2009 ENGINE Intake (3UR-FE) - Tundra
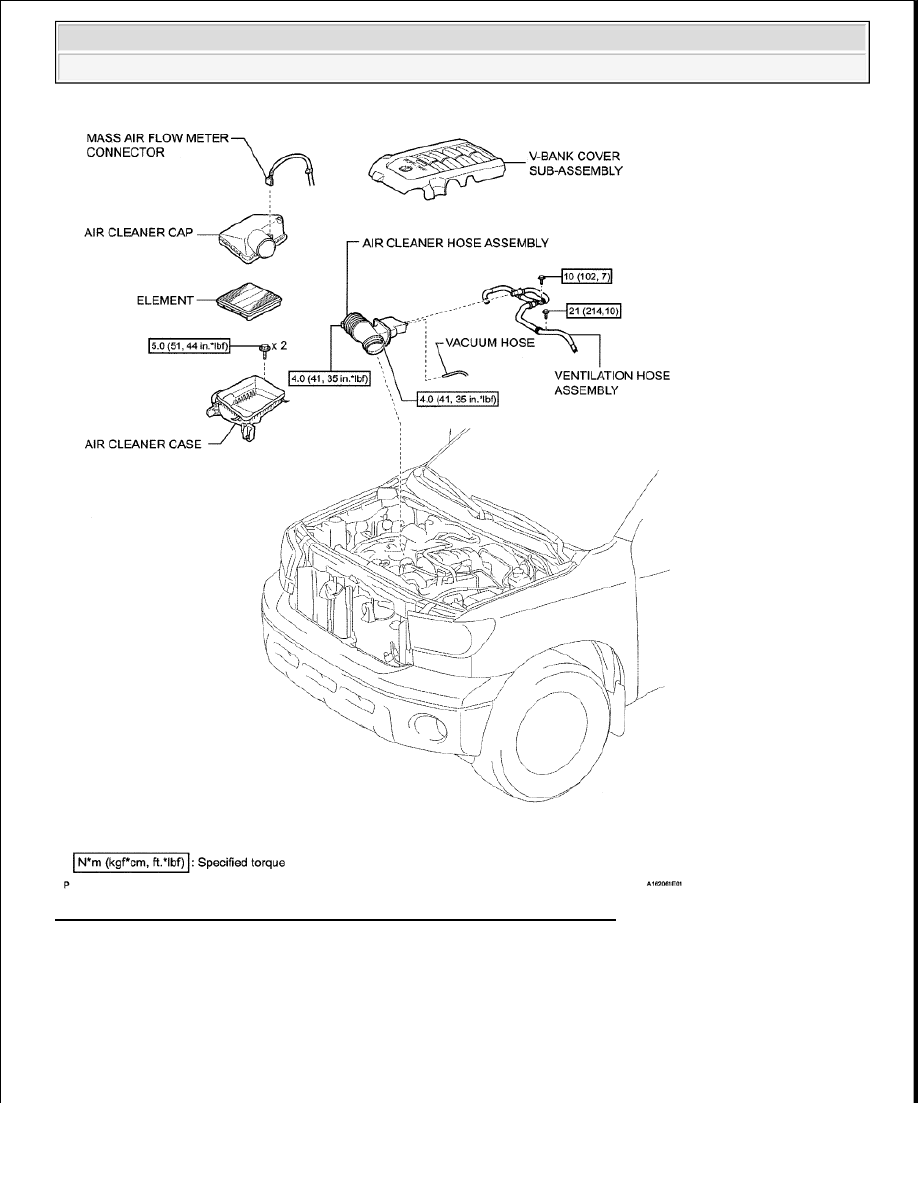
Fig. 55: Identifying Air Cleaner Components With Torque Specifications
Courtesy of TOYOTA MOTOR SALES, U.S.A., INC.
REMOVAL
1. REMOVE V-BANK COVER SUB-ASSEMBLY
a. Raise the front of the V-bank cover to detach the 2 pins. Then remove the 2 V-bank cover hooks
from the bracket, and remove the V-bank cover.
2009 Toyota Tundra
2009 ENGINE Intake (3UR-FE) - Tundra
Нет комментариевНе стесняйтесь поделиться с нами вашим ценным мнением.
Текст