Toyota Sienna (2019 year). Instruction — part 28

SIENNA_OM_OM08025U_(U)
433
6-3. Do-it-yourself maintenance
6
Mainten
WARNING
?
When replacing wheels
?
Do not use wheels that are a different size from those recommended in
the Owner’s Manual, as this may result in a loss of handling control.
?
Never use an inner tube in a leaking wheel which is designed for a
tubeless tire. Doing so may result in an accident, causing death or seri-
ous injury.
?
When installing the wheel nuts
?
Never use oil or grease on the wheel bolts or wheel nuts.
Oil and grease may cause the wheel nuts to be excessively tightened,
leading to bolt or disc wheel damage. In addition, the oil or grease can
cause the wheel nuts to loosen and the wheel may fall off, causing an
accident and resulting in death or serious injury. Remove any oil or
grease from the wheel bolts or wheel nuts.
?
Use of defective wheels prohibited
Do not use cracked or deformed wheels.
Doing so could cause the tire to leak air during driving, possibly causing
an accident.
NOTICE
?
Replacing tire pressure warning valves and transmitters
?
Because tire repair or replacement may affect the tire pressure warn-
ing valves and transmitters, make sure to have tires serviced by your
Toyota dealer or other qualified service shop. In addition, make sure to
purchase your tire pressure warning valves and transmitters at your
Toyota dealer.
?
Ensure that only genuine Toyota wheels are used on your vehicle.
Tire pressure warning valves and transmitters may not work properly
with non-genuine wheels.
?
Be sure to install the wheel nuts with
the tapered ends facing inward.
Installing the nuts with the tapered
ends facing outward can cause the
wheel to break and eventually cause
the wheel to come off while driving,
which could lead to an accident
resulting in death or serious injury.
Tapered
portion
434
SIENNA_OM_OM08025U_(U)
6-3. Do-it-yourself maintenance
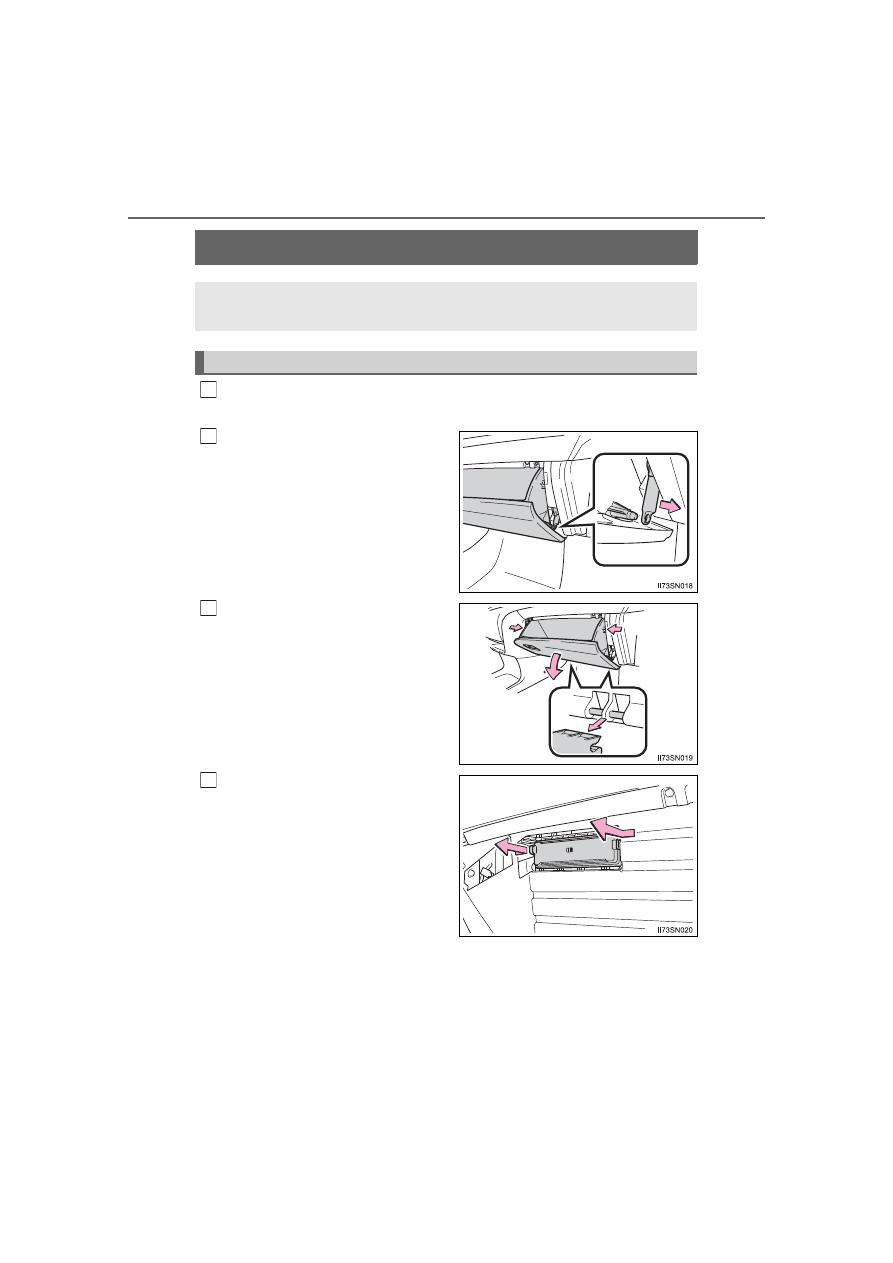
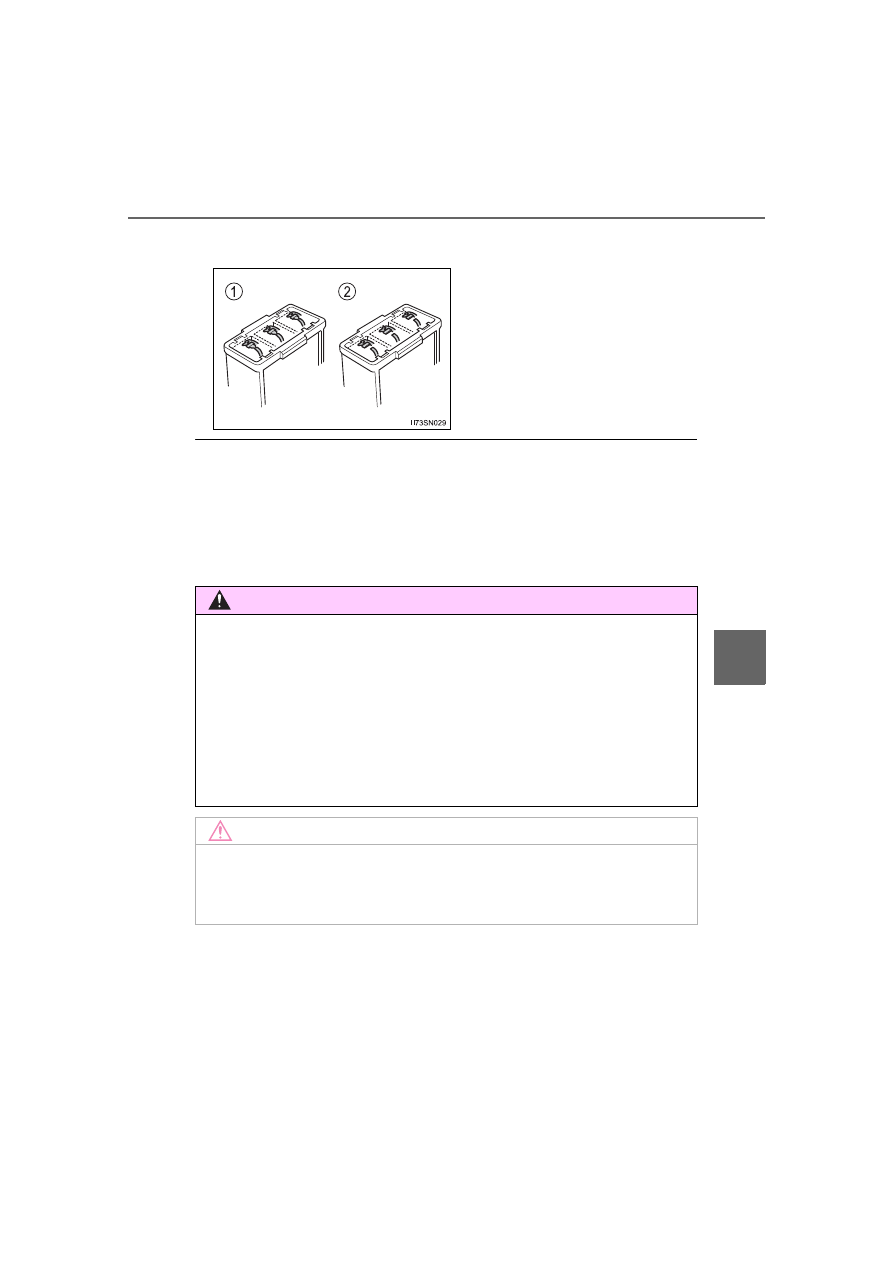
Air conditioning filter
Turn the engine switch to the “LOCK” position (vehicles without a
smart key system) or off (vehicles with a smart key system).
Open the glove box. Slide off
the damper.
Push in each side of the glove
box to disconnect the claws.
Remove the filter cover.
The air conditioning filter must be changed regularly to maintain
air conditioning efficiency.
Removal method
1
2
3
4
SIENNA_OM_OM08025U_(U)
435
6-3. Do-it-yourself maintenance
6
Mainten
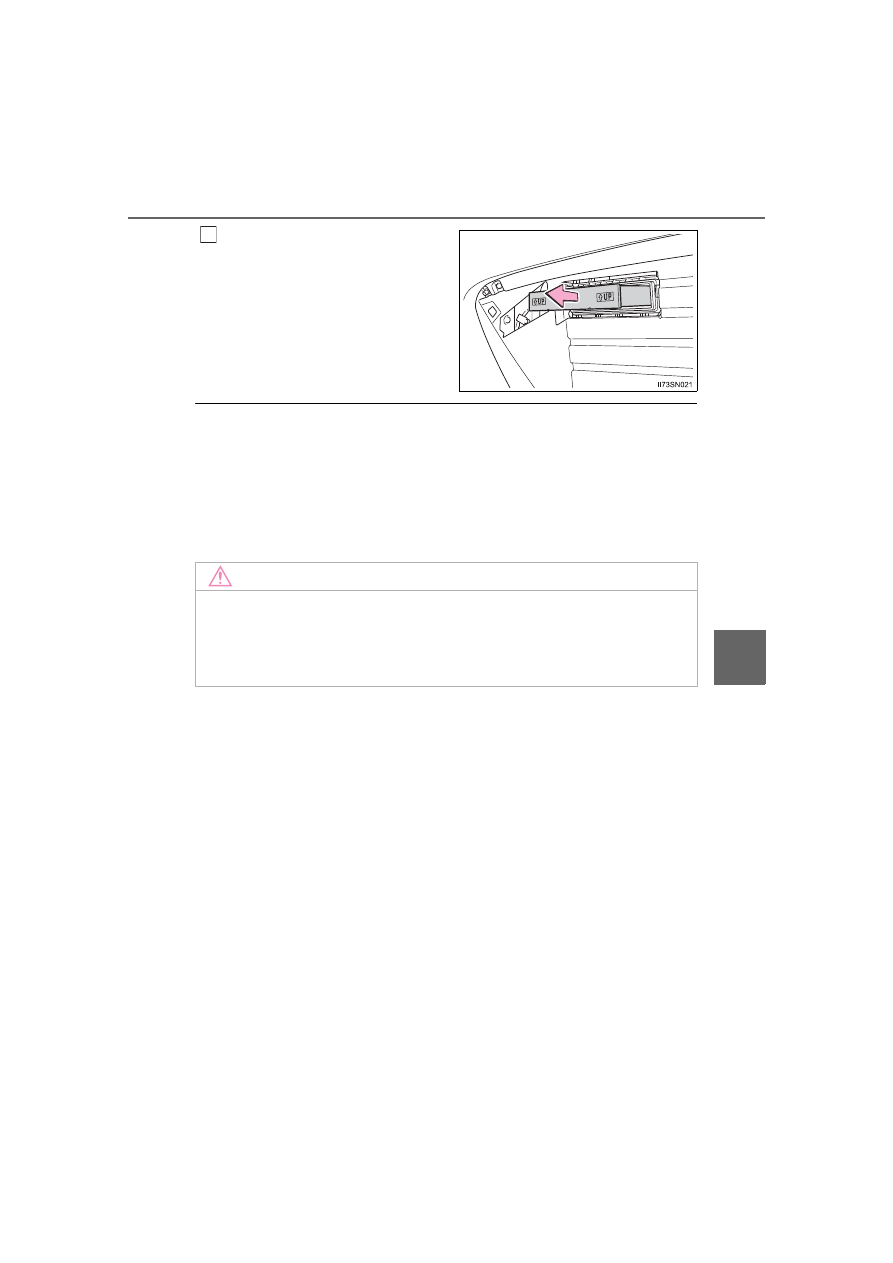
Remove the filter and replace it
with a new one.
The
“UP” marks shown on the fil-
ter should be pointing up.
?
Checking interval
Replace the air conditioning filter according to the maintenance schedule. In
dusty areas or areas with heavy traffic flow, more frequent cleaning or early
replacement may be required. (For scheduled maintenance information,
please refer to the “Scheduled Maintenance Guide” or “Owner’s Manual
Supplement”.)
?
If air flow from the vents decreases dramatically
The filter may be clogged. Check the filter and replace it if necessary.
5
NOTICE
?
When using the air conditioning system
Make sure that a filter is always installed.
Using the air conditioning system without a filter may cause damage to the
system.
436
SIENNA_OM_OM08025U_(U)
6-3. Do-it-yourself maintenance
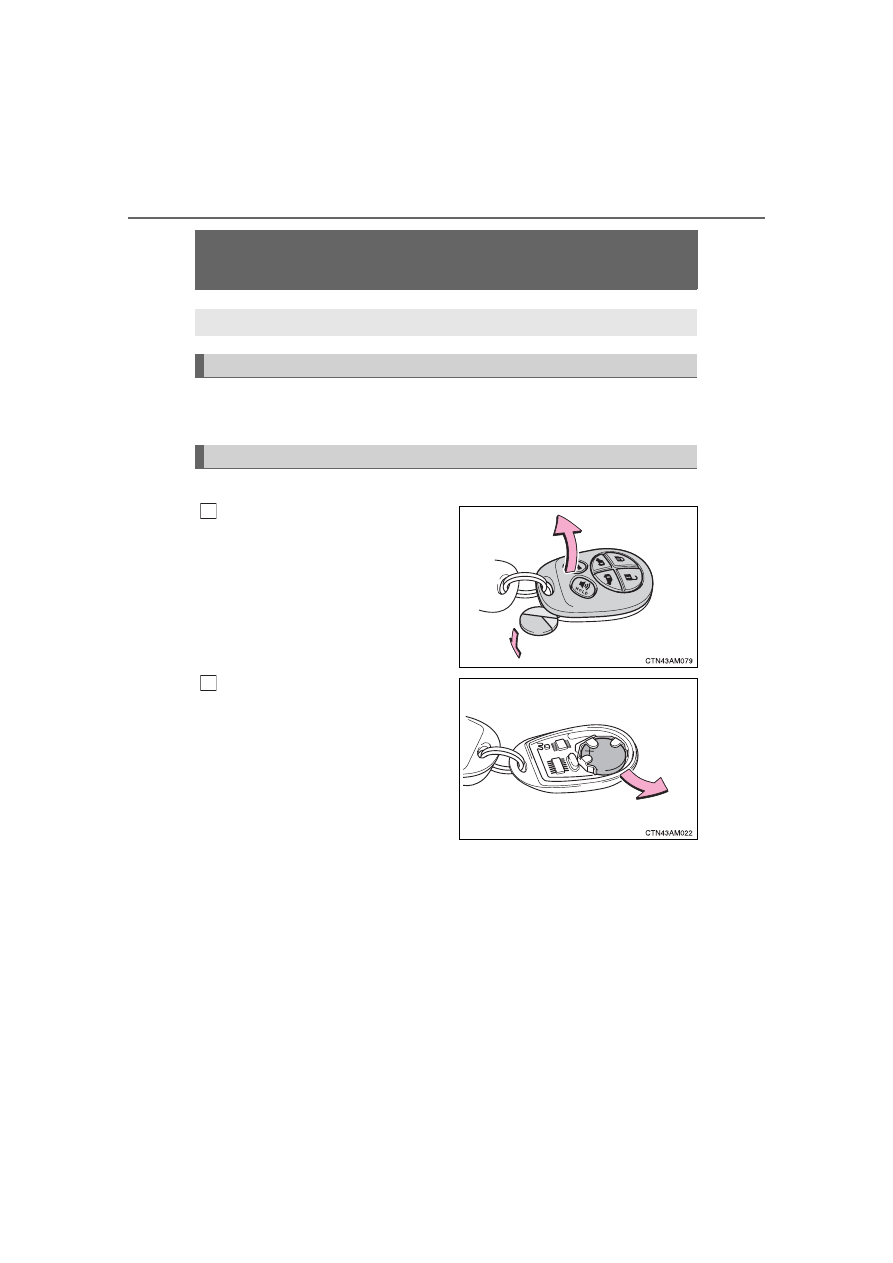
Wireless remote control/electronic key
battery
?
Flathead screwdriver
?
Lithium battery CR2032
Vehicles without a smart key system
Remove the cover using a coin
protected with tape etc.
Remove the depleted battery.
Insert a new battery with the “+”
terminal facing up.
Replace the battery with a new one if it is depleted.
You will need the following items:
Replacing the battery
1
2
SIENNA_OM_OM08025U_(U)
437
6-3. Do-it-yourself maintenance
6
Mainten
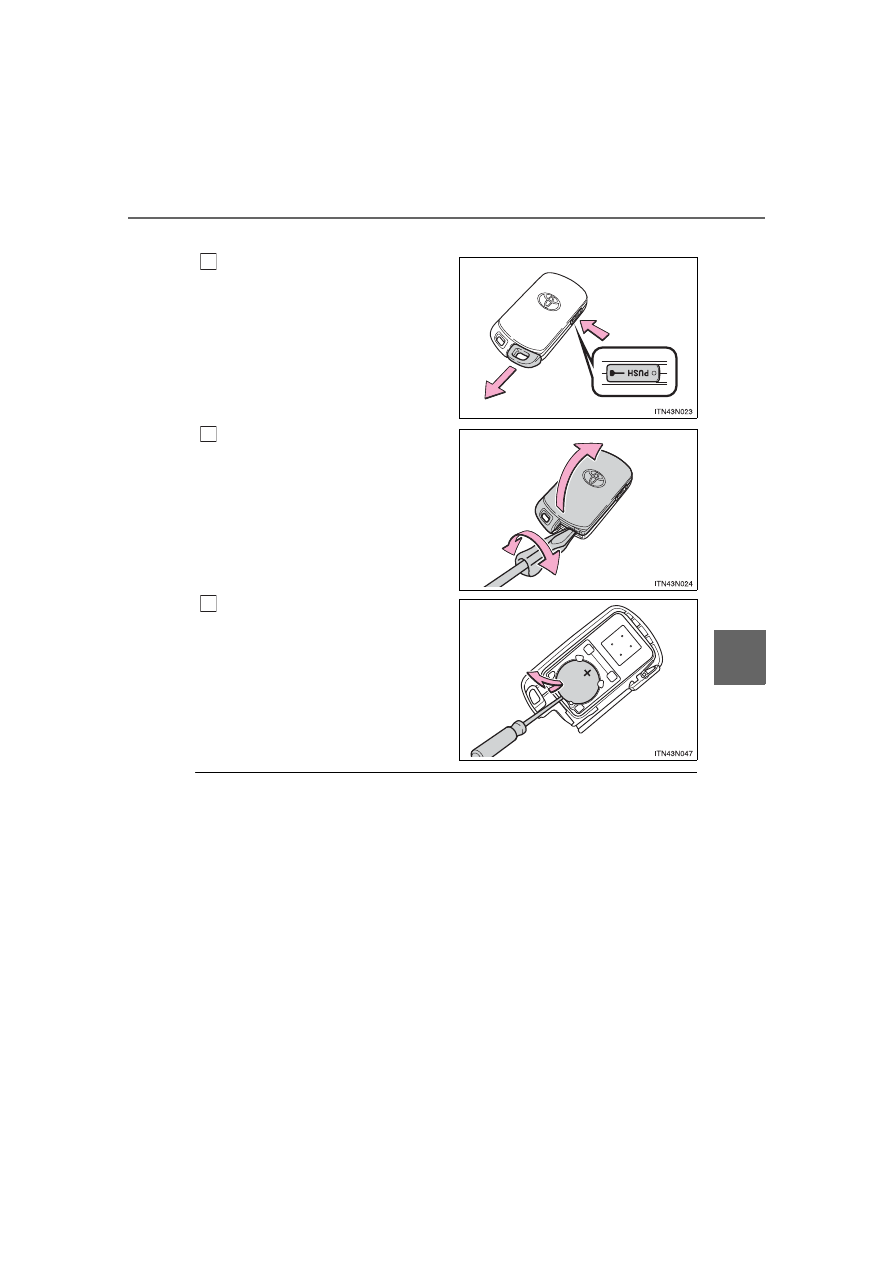
Vehicles with a smart key system
Take out the mechanical key.
Remove the cover.
To prevent damage to the key,
cover the tip of the screwdriver with
a rag.
Remove the depleted battery.
Insert a new battery with the “+”
terminal facing up.
?
Use a CR2032 lithium battery
?
Batteries can be purchased at your Toyota dealer, local electrical appliance
shops or camera stores.
?
Replace only with the same or equivalent type recommended by the manu-
facturer.
?
Dispose of used batteries according to local laws.
?
If the key battery is depleted
The following symptoms may occur.
?
The smart key system (if equipped) and wireless remote control will not
function properly.
?
The operational range will be reduced.
1
2
3
438
SIENNA_OM_OM08025U_(U)
6-3. Do-it-yourself maintenance
WARNING
?
Removed battery and other parts
These parts are small and if swallowed by a child, they can cause choking.
Keep away from children. Failure to do so could result in death or serious
injury.
NOTICE
?
For normal operation after replacing the battery
Observe the following precautions to prevent accidents.
?
Always work with dry hands.
Moisture may cause the battery to rust.
?
Do not touch or move any other components inside the remote control.
?
Do not bend either of the battery terminals.

439
SIENNA_OM_OM08025U_(U)
6-3. Do-it-yourself maintenance
6
Mainten
Checking and replacing fuses
Turn the engine switch to the “LOCK” position (vehicles without a
smart key system) or off (vehicles with a smart key system).
Open the fuse box cover.
If any of the electrical components do not operate, a fuse may
have blown. If this happens, check and replace the fuses as nec-
essary.
1
2
Engine compartment type A
Engine compartment type B
Push the tab in and lift the lid off.
Push the tab in and lift the lid off.
Driver’s side instrument panel
Remove the lid.

440
SIENNA_OM_OM08025U_(U)
6-3. Do-it-yourself maintenance
Remove the fuse.
Only type A fuses can be removed
using the pullout tool.
Check if the fuse has blown.
Normal fuse
Blown fuse
Type A and B
Replace the blown fuse with a new fuse of an appropriate amper-
age rating. The amperage rating can be found on the fuse box lid.
Type C, D and E
Contact your Toyota dealer.
3
4
1
2
Type A
Type B
Type C
Type D
SIENNA_OM_OM08025U_(U)
441
6-3. Do-it-yourself maintenance
6
Mainten
?
After a fuse is replaced
?
If the lights do not turn on even after the fuse has been replaced, a bulb may
need replacement. (
?
If the replaced fuse blows again, have the vehicle inspected by your Toyota
dealer.
?
If there is an overload in the circuit
The fuses are designed to blow, protecting the wiring harness from damage.
Type E
WARNING
?
To prevent system breakdowns and vehicle fire
Observe the following precautions.
Failing to do so may cause damage to the vehicle, and possibly a fire or
injury.
?
Never use a fuse of a higher amperage rating than that indicated, or use
any other object in place of a fuse.
?
Always use a genuine Toyota fuse or equivalent.
Never replace a fuse with a wire, even as a temporary fix.
?
Do not modify the fuses or fuse boxes.
NOTICE
?
Before replacing fuses
Have the cause of electrical overload determined and repaired by your Toy-
ota dealer as soon as possible.

442
SIENNA_OM_OM08025U_(U)
6-3. Do-it-yourself maintenance
Light bulbs
Check the wattage of the light bulb to be replaced. (
P. 525)
You may replace the following bulbs by yourself. The difficulty
level of replacement varies depending on the bulb. If necessary
bulb replacement seems difficult to perform, contact your Toy-
ota dealer.
For more information about replacing other light bulbs, contact
your Toyota dealer.
Preparing for light bulb replacement
Turning off the power back door main switch
SIENNA_OM_OM08025U_(U)
443
6-3. Do-it-yourself maintenance
6
Mainten
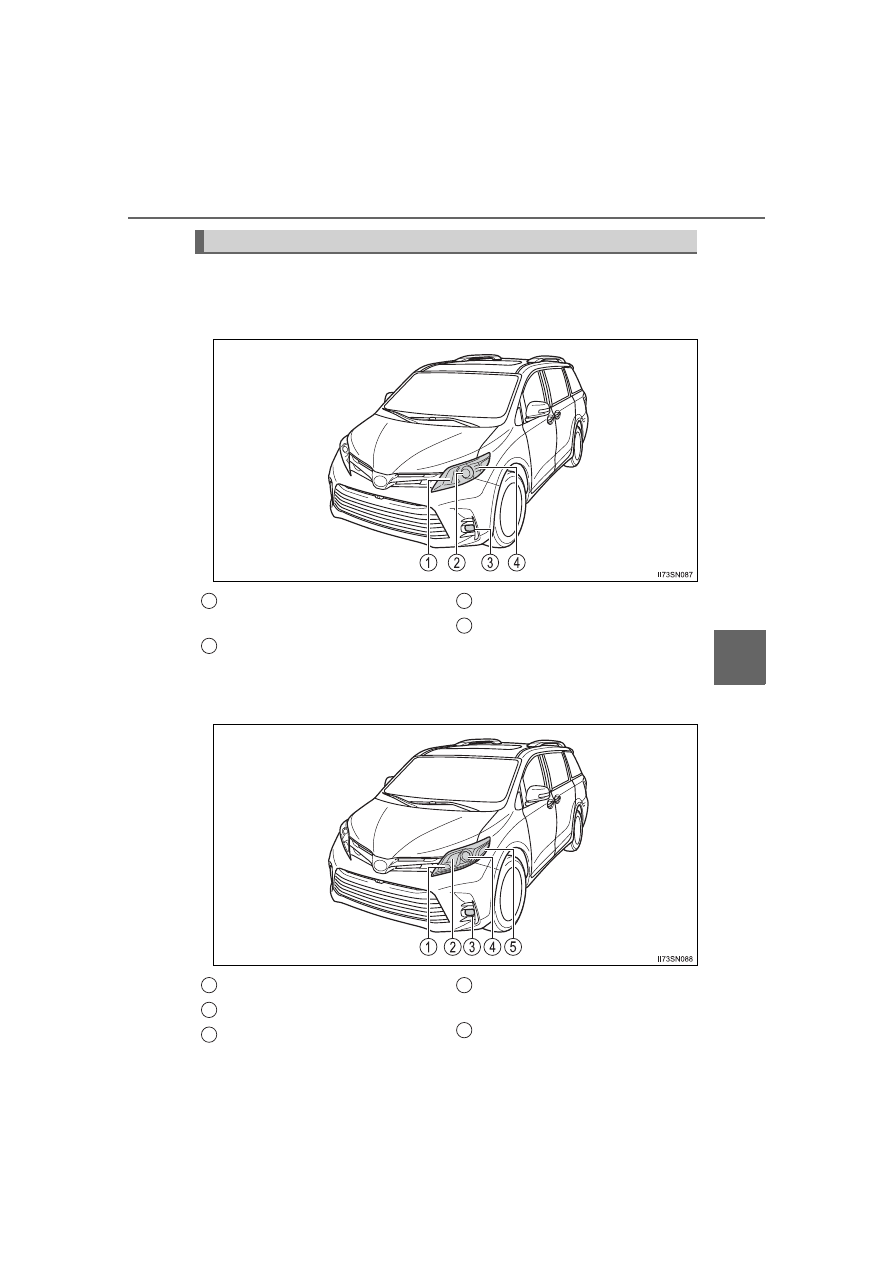
?
Front
Vehicles without daytime running lights or with bulb type daytime
running lights
Vehicles with LED type daytime running lights
Bulb locations
Headlight high beam and day-
time running lights (if equipped)
Headlight low beam
(halogen bulb)
Fog light (if equipped)
Front turn signal/parking and
front side marker lights
1
2
3
4
Front turn signal light
Headlight high beam
Fog light
Headlight low beam
(halogen bulb)
Front side marker light
1
2
3
4
5

444
SIENNA_OM_OM08025U_(U)
6-3. Do-it-yourself maintenance
?
Rear
Vehicles with bulb type stop/tail lights
Vehicles with LED type stop/tail lights
Rear turn signal light
Back-up light
License plate lights
Tail light
Stop/tail lights
1
2
3
4
5
Tail light
License plate lights
Back-up light
Rear turn signal light
1
2
3
4
SIENNA_OM_OM08025U_(U)
445
6-3. Do-it-yourself maintenance
6
Mainten
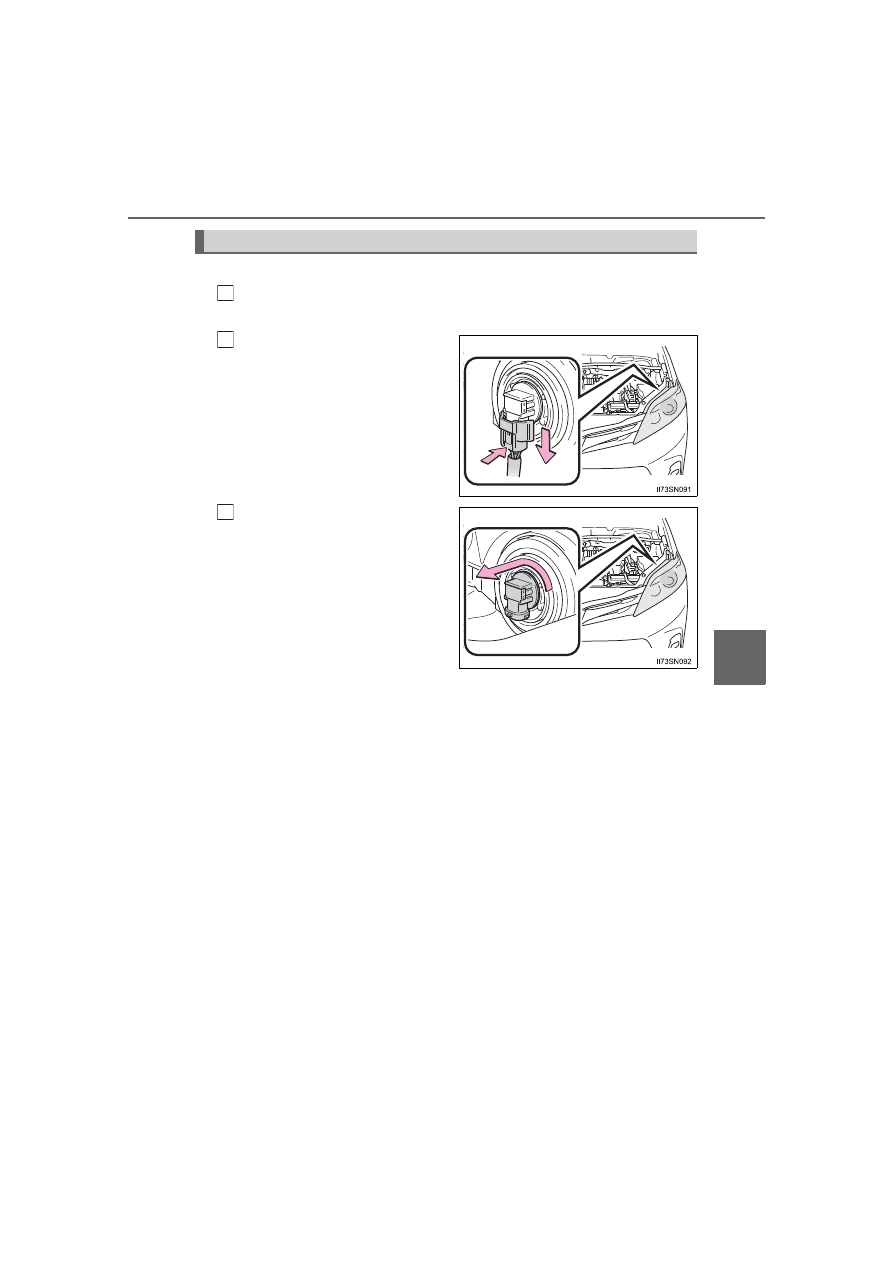
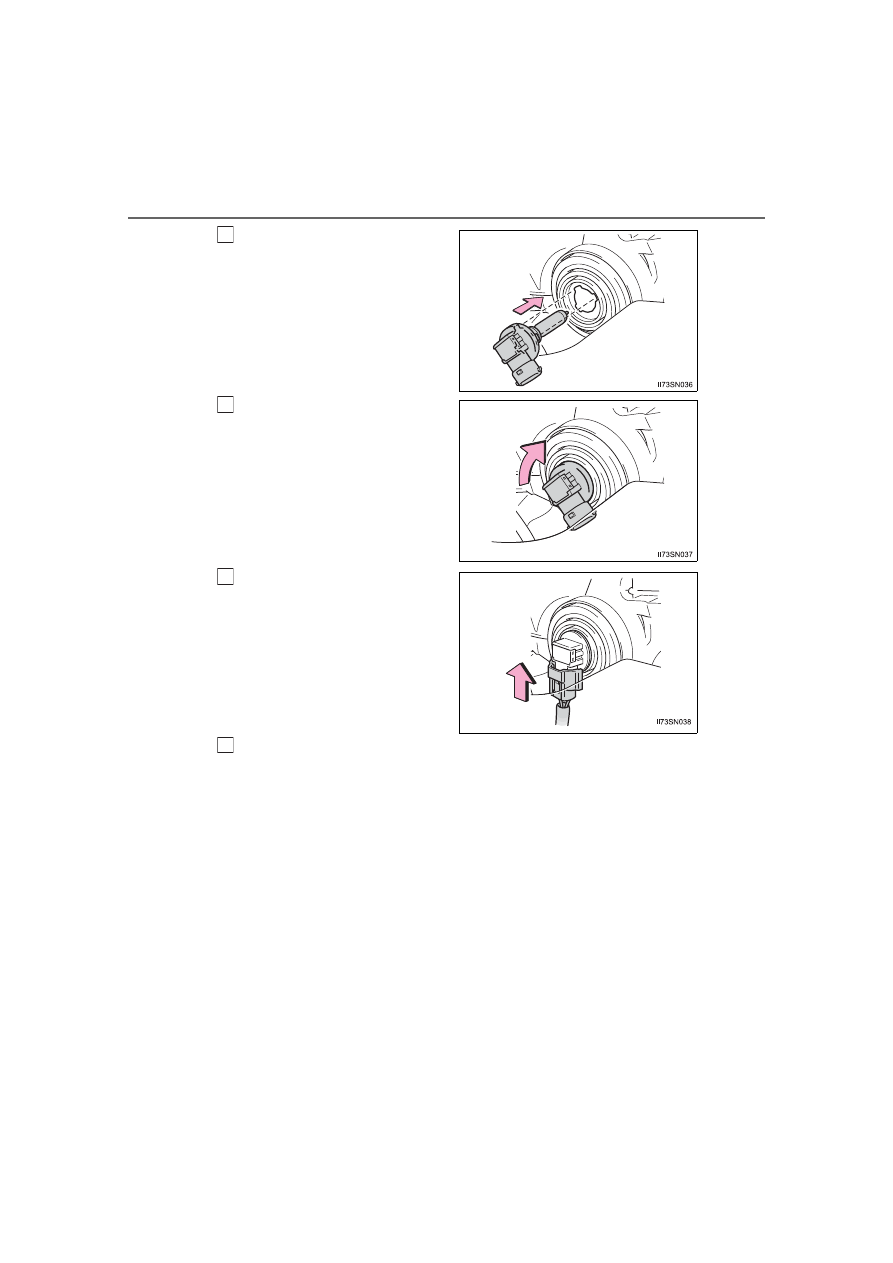
?
Headlight low beams (halogen bulb)
For left side only:
Open the fuse box cover. (
Unplug the connector while
pushing the lock release.
Turn the bulb base counter-
clockwise.
Replacing light bulbs
1
2
3
446
SIENNA_OM_OM08025U_(U)
6-3. Do-it-yourself maintenance
Install a new light bulb.
Align the 3 tabs on the light bulb
with the mounting, and insert.
Turn and secure the bulb
base.
Install the connector.
Shake the bulb base gently to
check that it is not loose, turn
the headlights on once and visu-
ally confirm that no light is leak-
ing through the mounting.
For left side only: Install the fuse box cover.
4
5
6
7
SIENNA_OM_OM08025U_(U)
447
6-3. Do-it-yourself maintenance
6
Mainten
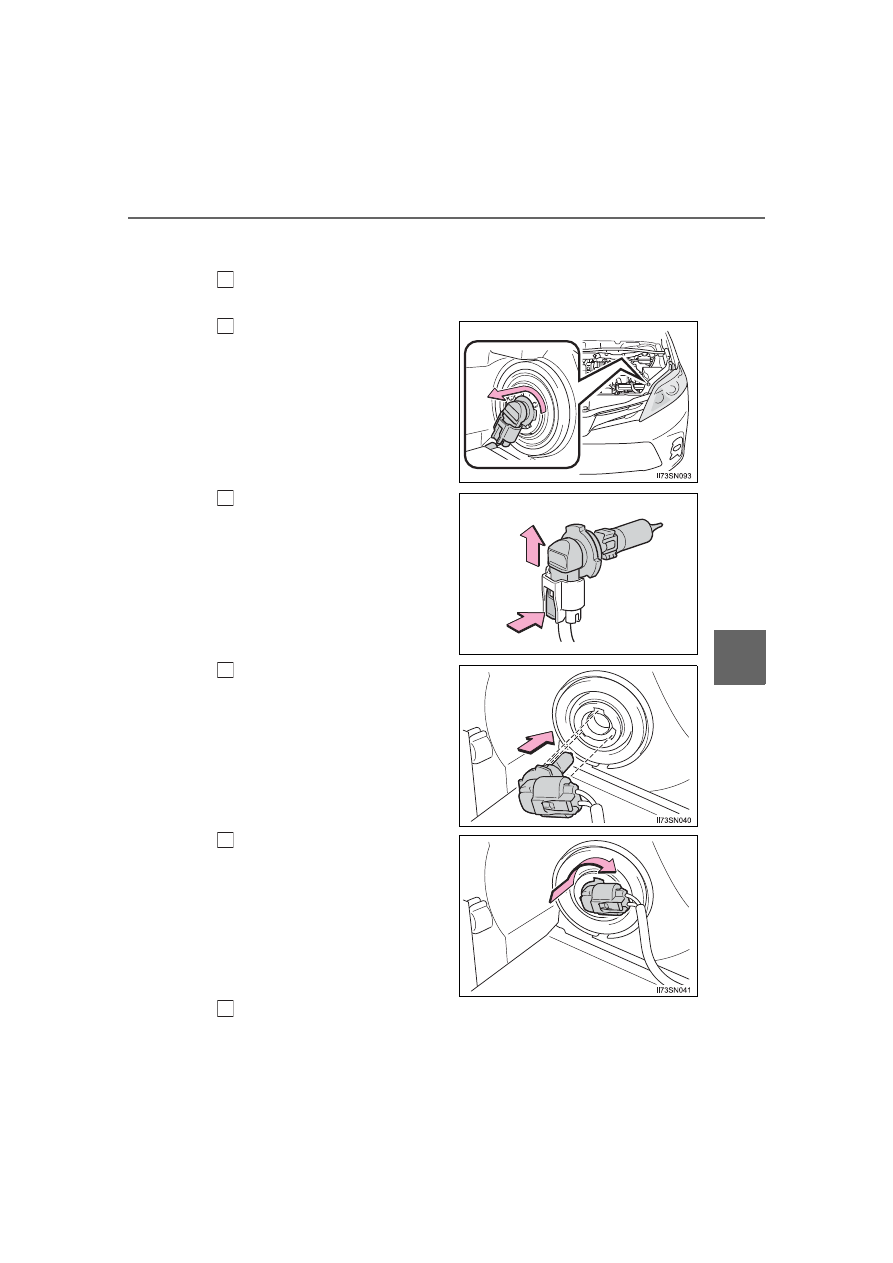
?
Headlight high beams and bulb type daytime running lights (if
equipped)
For left side only:
Open the fuse box cover. (
Turn the bulb base counter-
clockwise.
Unplug the connector while
pushing the lock release.
Install a new light bulb.
Align the 3 tabs on the light bulb
with the mounting, and insert.
Turn and secure the bulb
base.
Shake the bulb base gently to
check that it is not loose, turn
the headlights on once and visu-
ally confirm that no light is leak-
ing through the mounting.
For left side only: Install the fuse box cover.
1
2
ITO43P165
3
4
5
6
448
SIENNA_OM_OM08025U_(U)
6-3. Do-it-yourself maintenance
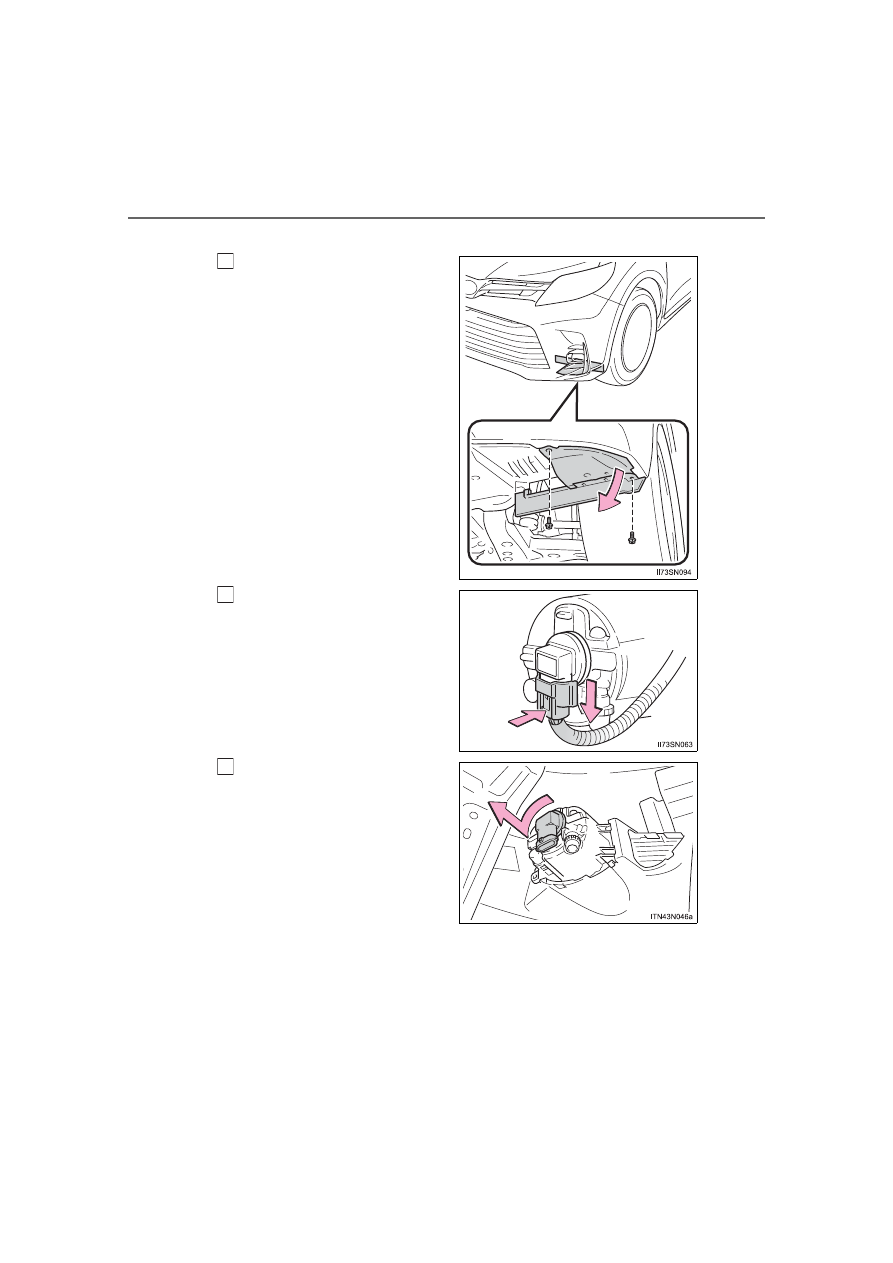
?
Fog lights (if equipped)
Remove the engine under
cover bolt and pull down the
engine under cover.
Unplug the connector while
pushing the lock release.
Turn the bulb base counter-
clockwise.
1
2
3
Нет комментариевНе стесняйтесь поделиться с нами вашим ценным мнением.
Текст