Toyota Highlander (2022 year). Manual in english — page 30
481
7-2. Steps to take in an emergency
7
Whe
n tr
ouble
ar
ises
near where the wire cable is
hanging from.)
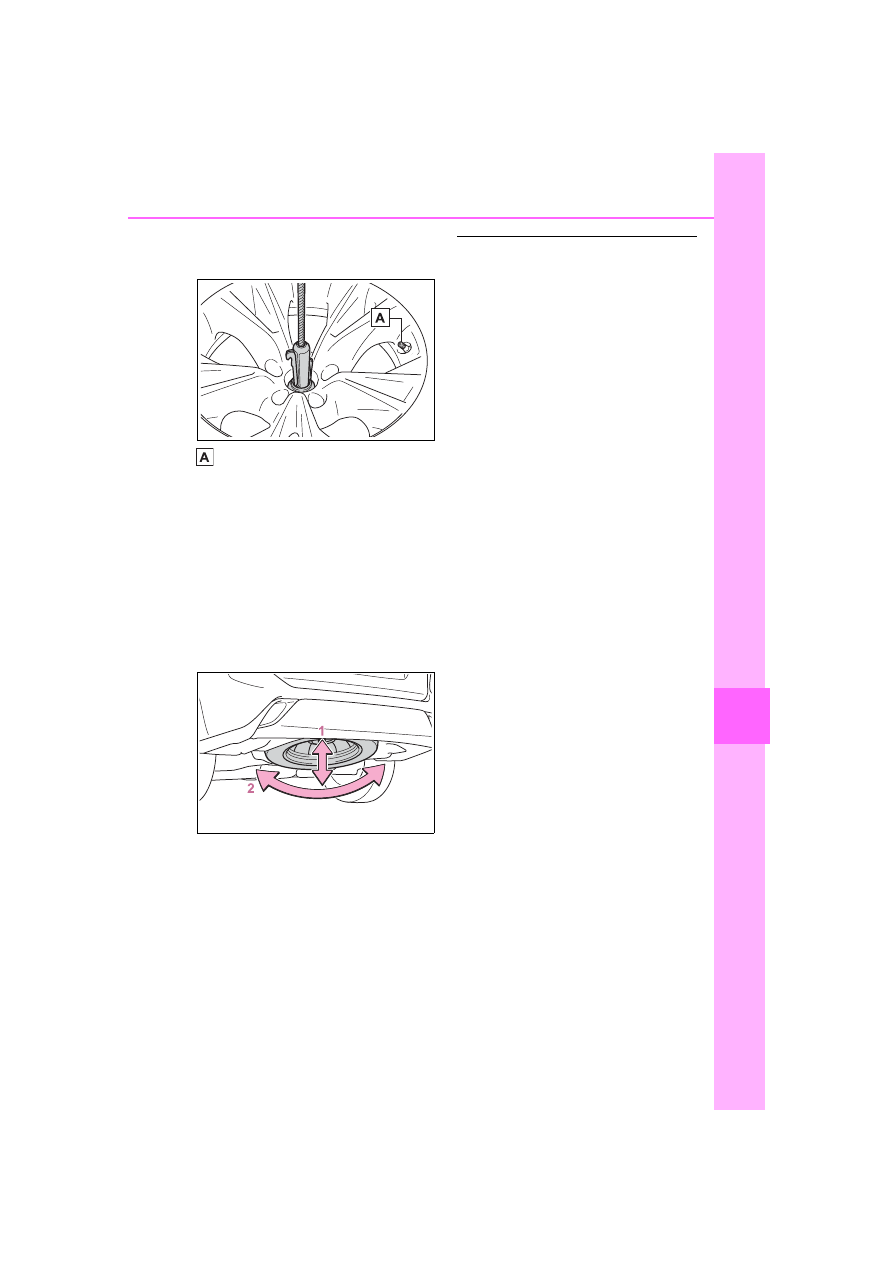
Valve stem
6
Using the jack handle and
adapter socket, tighten the
tire clamp bolt by turning it
clockwise until the tire is in
the correct position and two
clicks are heard as the jack
handle skips.
7
Confirm it is not loose after
tightening:
1
Push and pull the tire
2
Try rotating
Visually check to ensure tire is not
hung on surrounding parts.
If looseness or misassembly exists,
repeat steps
2
to
7
.
8
Repeat step
7
, any time the
tire is lowered or disturbed.
9
Stow the jack and all tools.
■
The compact spare tire (vehi-
cles with a compact spare tire)
●
The compact spare tire is identi-
fied by the label “TEMPORARY
USE ONLY” on the tire sidewall.
Use the compact spare tire tempo-
rarily, and only in an emergency.
●
Make sure to check the tire infla-
tion pressure of the compact
spare tire. (
■
When using the compact spare
tire (vehicles with a compact
spare tire)
As the compact spare tire is not
equipped with a tire pressure warn-
ing valve and transmitter, low infla-
tion pressure of the spare tire will
not be indicated by the tire pressure
warning system. Also, if you replace
the compact spare tire after the tire
pressure warning light comes on,
the light remains on.
■
When the compact spare tire is
equipped (vehicles with a com-
pact spare tire)
When driving with the compact
spare tire installed, the vehicle
height will be different than when
driving with standard tires.
■
If you have a flat front tire on a
road covered with snow or ice
(vehicles with a compact spare
tire)
Install the compact spare tire on one
of the rear wheels of the vehicle.
Perform the following steps and fit
tire chains to the front tires:
1
Replace a rear tire with the com-
pact spare tire.
2
Replace the flat front tire with the
tire removed from the rear of the
vehicle.
3
Fit tire chains to the front tires.
482
7-2. Steps to take in an emergency
WARNING
■
When using the compact
spare tire (vehicles with a
compact spare tire)
●
Remember that the compact
spare tire provided is specifi-
cally designed for use with your
vehicle. Do not use your com-
pact spare tire on another vehi-
cle.
●
Do not use more than one com-
pact spare tire simultaneously.
●
Replace the compact spare tire
with a standard tire as soon as
possible.
●
Avoid sudden acceleration,
abrupt steering, sudden brak-
ing and shifting operations that
cause sudden engine braking.
■
When the compact spare tire
is attached (vehicles with a
compact spare tire)
The vehicle speed may not be
correctly detected, and the follow-
ing systems may not operate cor-
rectly:
• ABS & Brake assist
• VSC
• TRAC
• EPS
• Dynamic radar cruise control
with full-speed range
• PCS (Pre-Collision System)
• LTA (Lane Tracing Assist)
• RSA (Road Sign Assist) (if
equipped)
• Automatic High Beam
• AFS (Adaptive Front-lighting
System) (if equipped)
• Tire pressure warning system
• Intuitive parking assist (if
equipped)
• PKSB (Parking Support Brake)
(if equipped)
• Toyota parking assist monitor (if
equipped)
• Panoramic view monitor (if
equipped)
• BSM (Blind Spot Monitor) (if
equipped)
• Navigation system (if equipped)
Also, not only can the following
system not be utilized fully, but it
may even negatively affect the
drive-train components:
• AWD system (AWD models)
■
Speed limit when using the
compact spare tire (vehicles
with a compact spare tire)
Do not drive at speeds in excess
of 50 mph (80 km/h) when a com-
pact spare tire is installed on the
vehicle.
The compact spare tire is not
designed for driving at high
speeds. Failure to observe this
precaution may lead to an acci-
dent causing death or serious
injury.
■
After using the tools and jack
Before driving, make sure all the
tools and jack are securely in
place in their storage location to
reduce the possibility of personal
injury during a collision or sudden
braking.
483
7-2. Steps to take in an emergency
7
W
he
n
tro
ub
le
ar
is
es
NOTICE
■
Be careful when driving over
bumps with the compact
spare tire installed on the
vehicle (vehicles with a com-
pact spare tire)
The vehicle becomes lower when
driving with the compact spare tire
compared to when driving with
standard tires. Be careful when
driving over uneven road sur-
faces.
■
Driving with tire chains and
the compact spare tire (vehi-
cles with a compact spare
tire)
Do not fit tire chains to the com-
pact spare tire. Tire chains may
damage the vehicle body and
adversely affect driving perfor-
mance.
■
When replacing the tires
When removing or fitting the
wheels, tires or the tire pressure
warning valve and transmitter,
contact your Toyota dealer as the
tire pressure warning valve and
transmitter may be damaged if not
handled correctly.
■
When stowing the flat tire
●
Ensure that there is no object
caught between the tire and the
vehicle underbody.
●
Securely tighten the spare tire
clamp bolt to hold the spare
wheel carrier by the hook.
●
Stow the flat tire in the spare tire
location. Failure to do so may
cause damage to the spare tire
carrier. Proper storage reduces
the possibility of injury in a colli-
sion or during sudden braking.
●
Have the flat tire repaired and
the spare tire replaced with it as
soon as possible.
■
Proper storage of the spare
tire
●
If the hoist assembly is slanted
when stowing a tire, the hoist
assembly may become stuck in
the wheel opening and the tire
may not be raised properly,
causing damage to the wheel or
the wire cable.
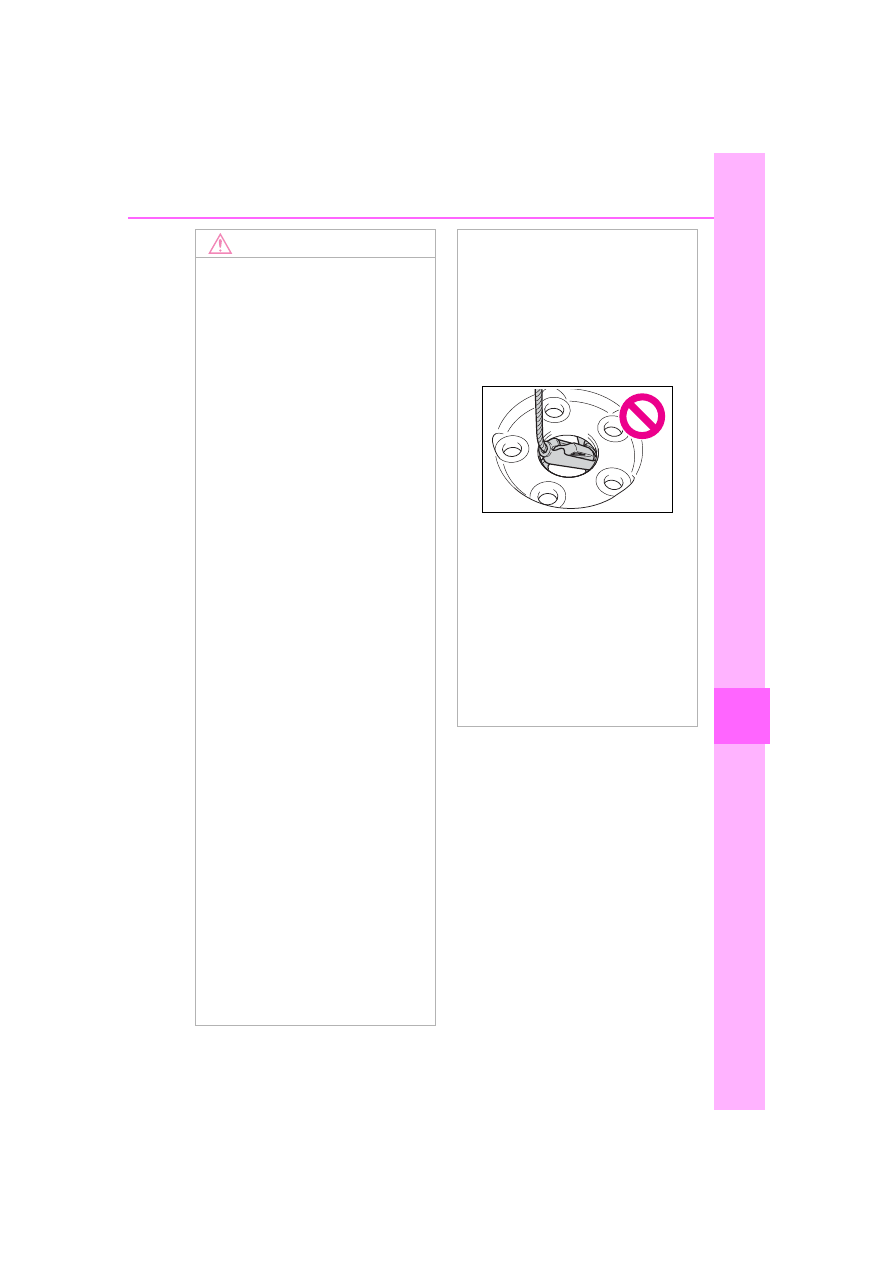
●
Do not attempt to turn the spare
tire clamp bolt without a tire on
the hoist assembly, as doing so
may cause the wire cable to slip
off of the shaft inside the unit
and the wire cable may not be
able to be raised or lowered. If
the spare tire clamp bolt has
been turned without a tire on the
hoist assembly and the wire
cable cannot be raised or low-
ered, contact your Toyota
dealer.

484
7-2. Steps to take in an emergency
One of the following may be the
cause of the problem:
There may not be sufficient
fuel in the vehicle’s tank.
Refuel the vehicle.
The engine may be flooded.
Try to restart the engine again
following correct starting pro-
cedures. (
There may be a malfunction
in the engine immobilizer sys-
tem. (
One of the following may be the
cause of the problem:
The battery may be dis-
charged. (
The battery terminal connec-
tions may be loose or cor-
roded. (
The engine starting system may
be malfunctioning due to an
electrical problem such as elec-
tronic key battery depletion or a
blown fuse. However, an interim
measure is available to start the
engine. (
One of the following may be the
cause of the problem:
One or both of the battery ter-
minals may be disconnected.
(
The battery may be dis-
charged. (
Contact your Toyota dealer if the
problem cannot be repaired, or if
repair procedures are unknown.
When the engine does not start,
the following steps can be used
as an interim measure to start
the engine if the engine switch is
If the engine will not
start
If the engine will not start
even though correct starting
procedures are being fol-
lowed (
P.202), consider
each of the following points:
The engine will not start
even though the starter
motor operates normally.
The starter motor turns
over slowly, the interior
lights and headlights are
dim, or the horn does not
sound or sounds at a low
volume.
The starter motor does
not turn over
The starter motor does
not turn over, the interior
lights and headlights do
not turn on, or the horn
does not sound.
Starting the engine in an
emergency
485
7-2. Steps to take in an emergency
7
W
he
n
tro
ub
le
ar
is
es
functioning normally.
Do not use this starting proce-
dure except in cases of emer-
gency.
1
Pull the parking brake switch
to check that the parking
brake is set. (
Parking brake indicator will come
on.
2
Shift the shift lever to P.
3
Turn the engine switch to
ACC.
4
Press and hold the engine
switch for about 15 seconds
while depressing the brake
pedal firmly.
Even if the engine can be
started using the above steps,
the system may be malfunction-
ing. Have the vehicle inspected
by your Toyota dealer.
If you lose your keys
New genuine mechanical
keys can be made by your
Toyota dealer using another
mechanical key and the key
number stamped on your
key number plate.
Keep the plate in a safe
place such as your wallet,
not in the vehicle.
NOTICE
■
When an electronic key is lost
If the electronic key remains lost,
the risk of vehicle theft increases
significantly. Visit your Toyota
dealer immediately with all
remaining electronic keys that
were provided with your vehicle.
486
7-2. Steps to take in an emergency
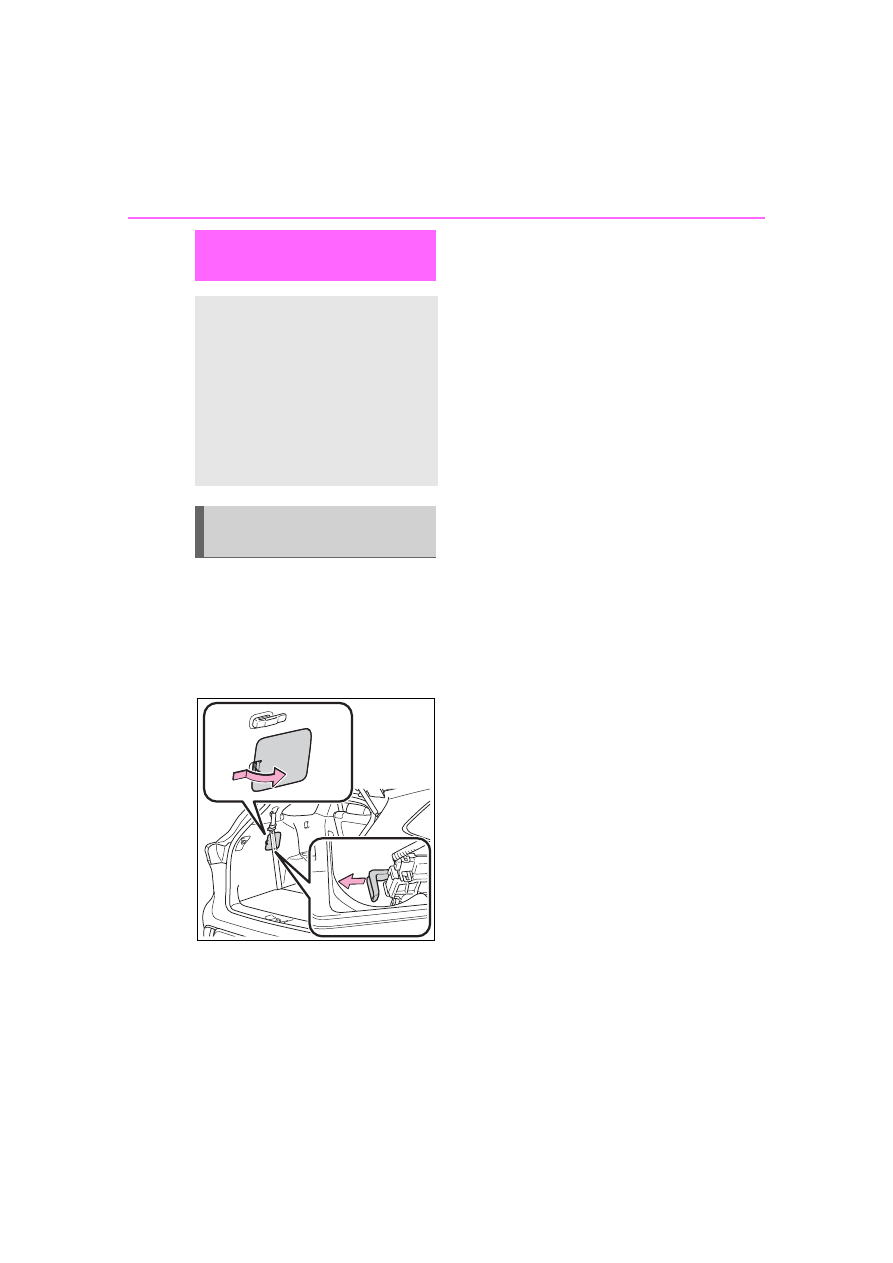
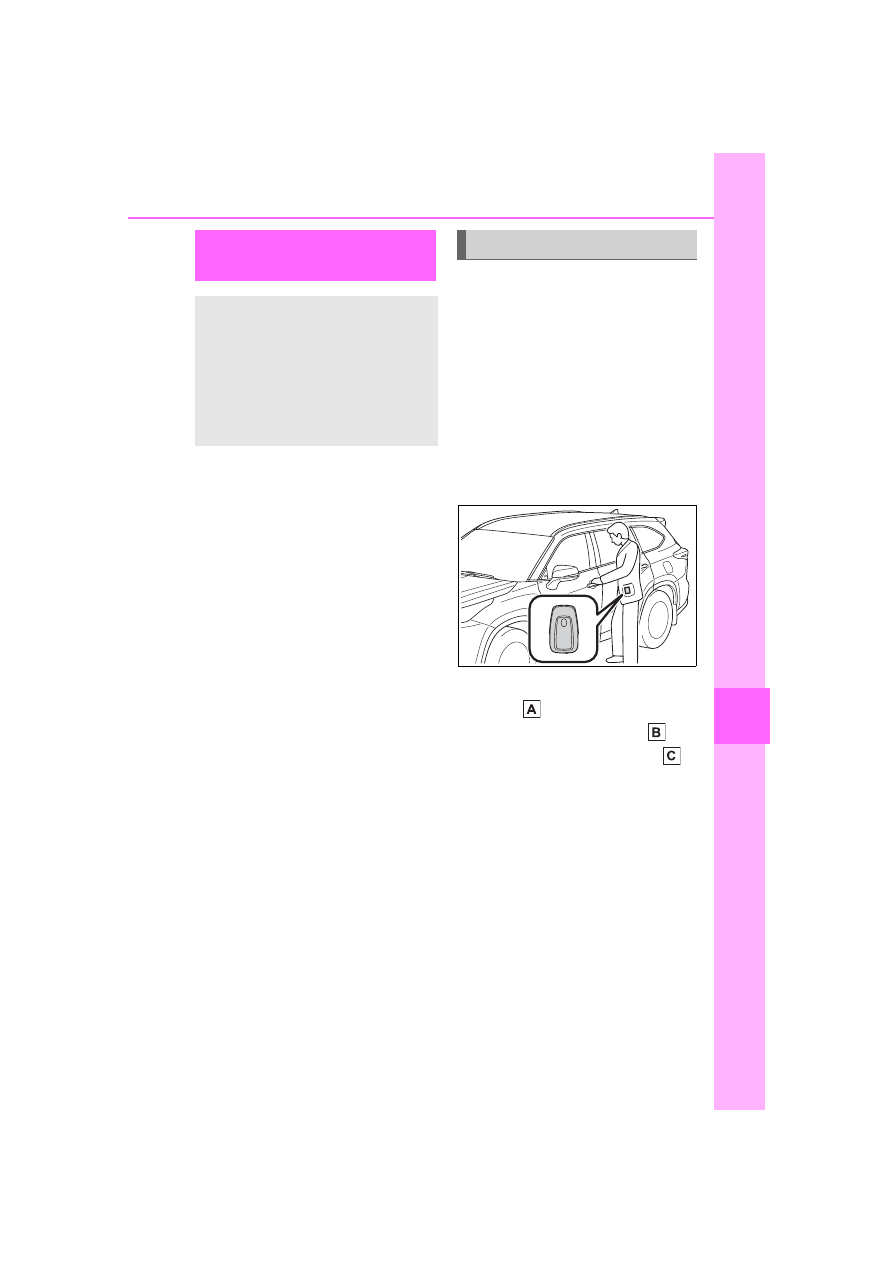
If the fuel filler door opener
switch cannot be operated,
remove the cover inside the
luggage compartment and
pull the lever to open the fuel
filler door.
Using the lever to open the
fuel filler door may not allow
for an adequate reduction in
fuel tank pressure before refu-
eling. To prevent fuel from
spilling out, turn the cap
slowly when removing it.
During refueling, fuel may spill
out from the filler opening due
to air being discharged from
inside the fuel tank. There-
fore, fill the fuel tank carefully
and slowly.
If the fuel filler door
cannot be opened
If the fuel filler door opener
switch cannot be operated,
contact your Toyota dealer
to service the vehicle. In
case where refueling is
urgently necessary, the fol-
lowing procedure can be
used to open the fuel filler
door.
Opening the fuel filler
door
487
7-2. Steps to take in an emergency
7
Whe
n tr
ouble
ar
ises
■
When the electronic key does
not work properly
●
Make sure that the smart key sys-
tem has not been deactivated in
the customization setting. If it is
off, turn the function on. (Custom-
izable features:
●
Check if battery-saving mode is
set. If it is set, cancel the function.
(
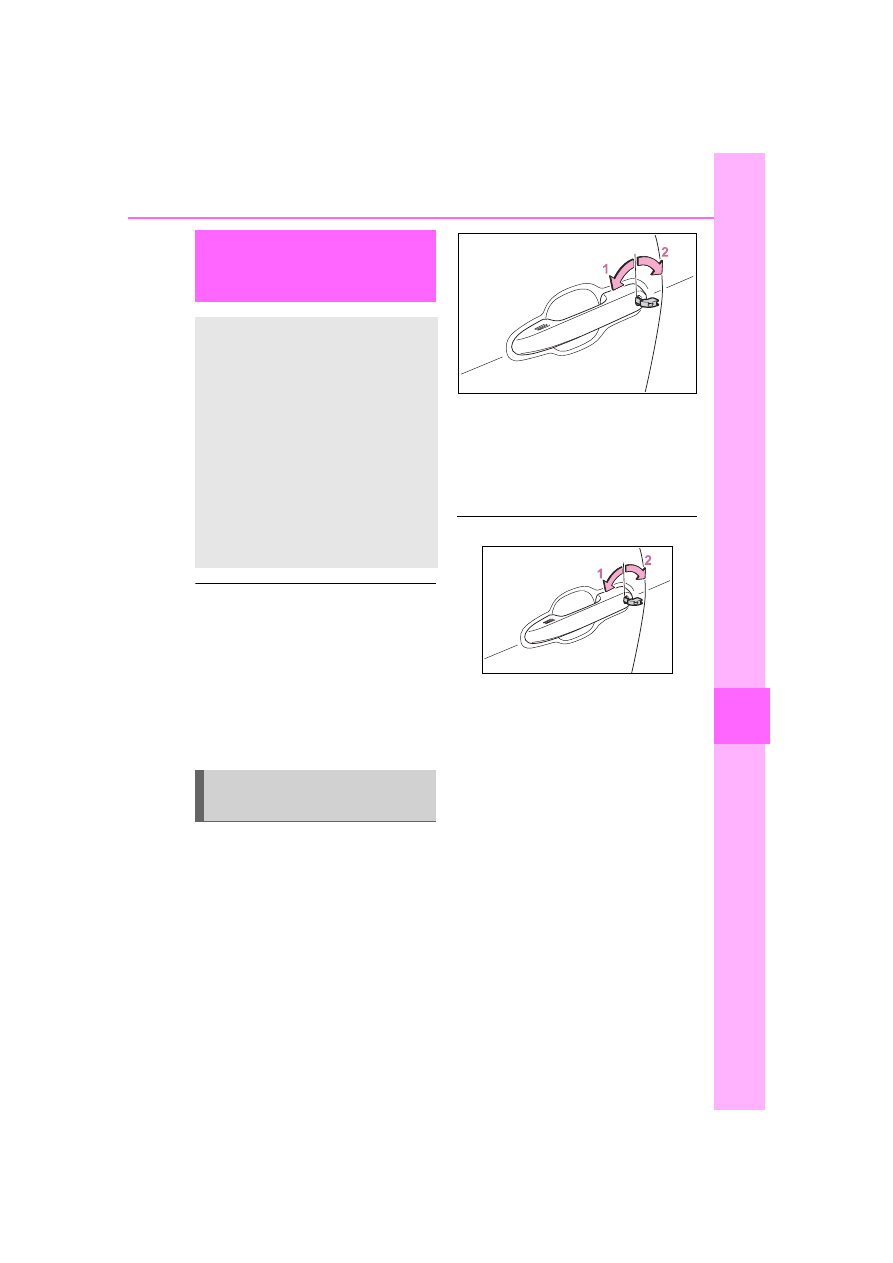
■
Unlocking the door
Use the mechanical key
(
P.116) in order to perform the
following operations:
1
Locks all the doors
2
Unlocks all the doors
Turning the key unlocks the driver’s
door. Turning the key again unlocks
the other doors.
■
Key linked functions
1
Closes the windows and the
moon roof
*
(turn and hold)
2
Opens the windows and the
moon roof
*
(turn and hold)
These settings must be customized
at your Toyota dealer.
*
: If equipped
If the electronic key
does not operate prop-
erly
If communication between
the electronic key and vehi-
cle is interrupted (
or the electronic key cannot
be used because the battery
is depleted, the smart key
system and wireless remote
control cannot be used. In
such cases, the doors can
be opened and the engine
can be started by following
the procedure below.
Locking and unlocking
the doors
488
7-2. Steps to take in an emergency
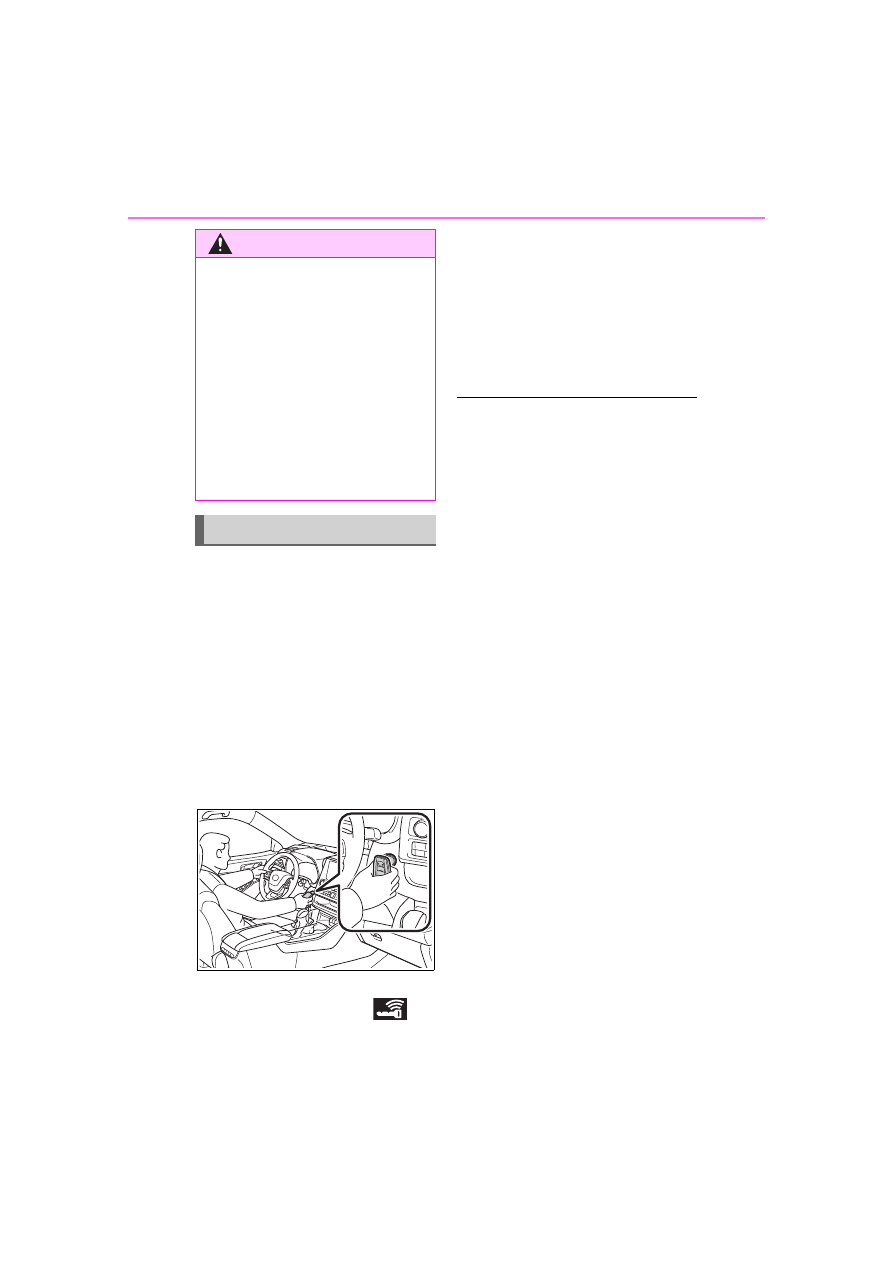
1
Ensure that the shift lever is
in P and depress the brake
pedal.
2
Touch the Toyota emblem
side of the electronic key to
the engine switch.
When the electronic key is
detected, a buzzer sounds and the
engine switch will turn to ON.
When the smart key system is
deactivated in customization set-
ting, the engine switch will turn to
ACC.
3
Firmly depress the brake
pedal and check that
is
shown on the multi-informa-
tion display.
4
Press the engine switch
shortly and firmly.
In the event that the engine still
cannot be started, contact your
Toyota dealer.
■
Stopping the engine
Shift the shift lever to P, set the park-
ing brake, and press the engine
switch as you normally do when
stopping the engine.
■
Replacing the key battery
As the above procedure is a tempo-
rary measure, it is recommended
that the electronic key battery be
replaced immediately when the bat-
tery is depleted. (
■
Changing engine switch modes
Release the brake pedal and press
the engine switch in step
3
above.
The engine does not start and
modes will be changed each time
the switch is pressed. (
WARNING
■
When using the mechanical
key and operating the power
windows or moon roof (if
equipped)
Operate the power window or
moon roof after checking to make
sure that there is no possibility of
any passenger having any of their
body parts caught in the window
or moon roof. Also, do not allow
children to operate the mechani-
cal key. It is possible for children
and other passengers to get
caught in the power window or
moon roof.
Starting the engine
489
7-2. Steps to take in an emergency
7
Whe
n tr
ouble
ar
ises
If you have a set of jumper (or
booster) cables and a second
vehicle with a 12-volt battery,
you can jump start your vehicle
by following the steps below.
1
Confirm that the electronic
key is being carried.
Vehicles with an alarm: When con-
necting the jumper (or booster)
cables, depending on the situation,
the alarm may activate and doors
locked. (
P.74)
2
Open the hood. (
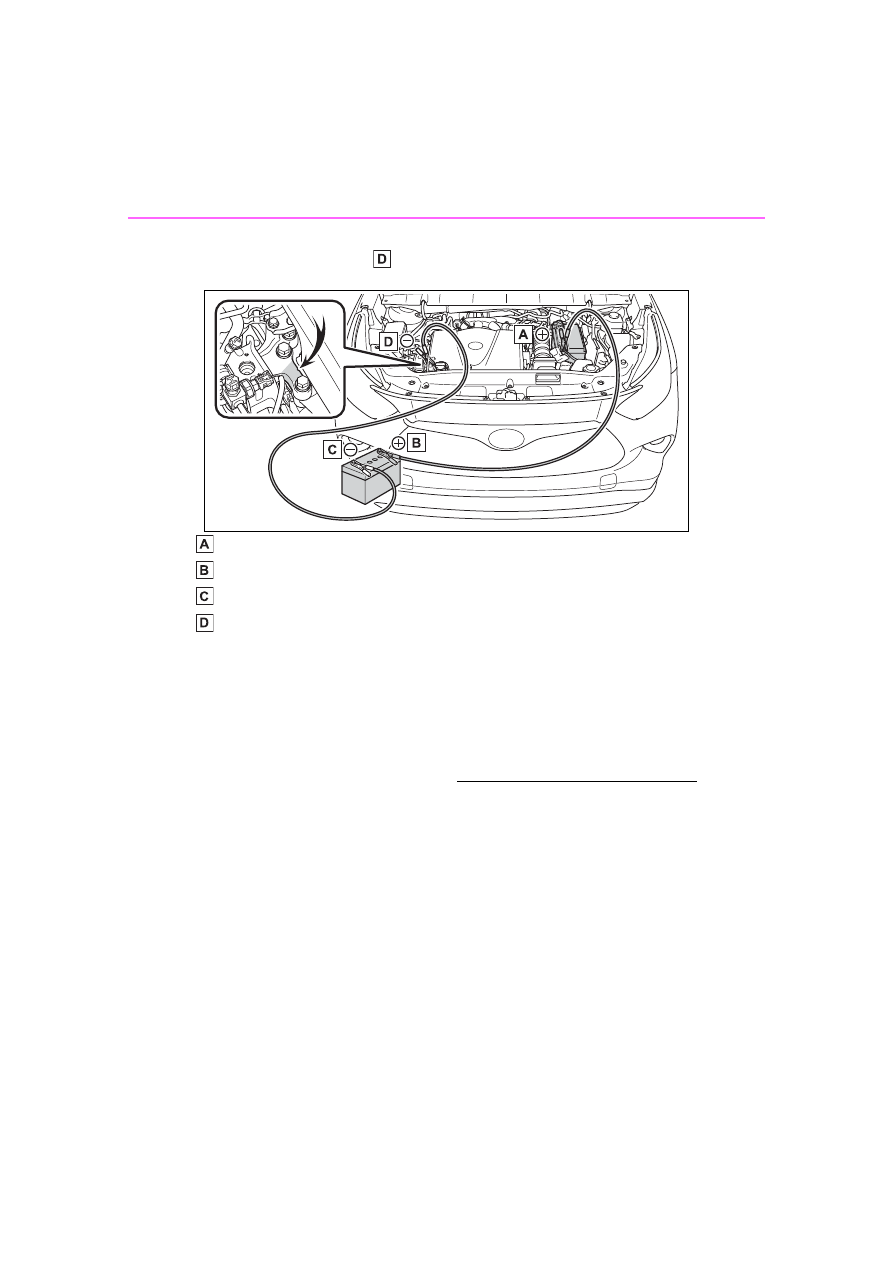
3
Connect a positive jumper cable clamp to on your vehicle and
connect the clamp on the other end of the positive cable to on
the second vehicle. Then, connect a negative cable clamp to
If the vehicle battery
is discharged
The following procedures
may be used to start the
engine if the vehicle’s bat-
tery is discharged.
You can also call your Toy-
ota dealer or a qualified
repair shop.
Restarting the engine
490
7-2. Steps to take in an emergency
on the second vehicle and connect the clamp at the other end of
the negative cable to .
Positive (+) battery terminal (your vehicle)
Positive (+) battery terminal (second vehicle)
Negative (-) battery terminal (second vehicle)
Solid, stationary, unpainted metallic point away from the battery
and any moving parts as shown in the illustration
4
Start the engine of the sec-
ond vehicle. Increase the
engine speed slightly and
maintain at that level for
approximately 5 minutes to
recharge the battery of your
vehicle.
5
Open and close any of the
doors of your vehicle with the
engine switch OFF.
6
Maintain the engine speed of
the second vehicle and start
the engine of your vehicle by
turning the engine switch to
ON.
7
Once the vehicle’s engine
has started, remove the
jumper cables in the exact
reverse order from which
they were connected.
Once the engine starts, have the
vehicle inspected at your Toyota
dealer as soon as possible.
■
Starting the engine when the
battery is discharged
The engine cannot be started by
push-starting.
■
To prevent battery discharge
●
Turn off the headlights and the
audio system while the engine is
stopped. (Vehicles with Stop &
Start system: Except when the
engine is stopped by the Stop &
Start system.)
●
Turn off any unnecessary electri-
cal components when the vehicle
is running at a low speed for an
extended period, such as in heavy
491
7-2. Steps to take in an emergency
7
Whe
n tr
ouble
ar
ises
traffic.
■
When the battery is removed or
discharged
●
Information stored in the ECU is
cleared. When the battery is
depleted, have the vehicle
inspected at your Toyota dealer.
●
Some systems may require initial-
ization. (
■
When removing the battery ter-
minals
When the battery terminals are
removed, the information stored in
the ECU is cleared. Before remov-
ing the battery terminals, contact
your Toyota dealer.
■
Charging the battery
The electricity stored in the battery
will discharge gradually even when
the vehicle is not in use, due to nat-
ural discharge and the draining
effects of certain electrical appli-
ances. If the vehicle is left for a long
time, the battery may discharge,
and the engine may be unable to
start. (The battery recharges auto-
matically during driving.)
■
After jump starting the vehicle
(Vehicles with Stop & Start sys-
tem)
Be sure to disable the Stop & Start
system so that the battery can be
charged. (
■
When recharging or replacing
the battery
●
In some cases, it may not be pos-
sible to unlock the doors using the
smart key system when the bat-
tery is discharged. Use the wire-
less remote control or the
mechanical key to lock or unlock
the doors.
●
The engine may not start on the
first attempt after the battery has
recharged but will start normally
after the second attempt. This is
not a malfunction.
●
The engine switch mode is memo-
rized by the vehicle. When the
battery is reconnected, the system
will return to the mode it was in
before the battery was dis-
charged. Before disconnecting the
battery, turn the engine switch off.
If you are unsure what mode the
engine switch was in before the
battery discharged, be especially
careful when reconnecting the
battery.
●
Vehicles with power back door:
The power back door must be ini-
tialized. (
●
Vehicles with Stop & Start system:
The Stop & Start system may not
automatically stop the engine for
up to an hour.
■
When replacing the battery
●
Use a Central Degassing type bat-
tery (European Regulations).
●
Vehicles with Stop & Start system:
Use a genuine battery specifically
designed for use with the Stop &
Start system or a battery with
equivalent specifications to a gen-
uine battery. If an unsupported
battery is used, Stop & Start sys-
tem functions may be restricted to
protect the battery.
Also, battery performance may
decrease and the engine may not
be able to restart. Contact your
Toyota dealer for details.
●
Vehicles without Stop & Start sys-
tem: Use a battery that the case
size is same as the previous one
(LN3), 20 hour rate capacity
(20HR) is equivalent (70Ah) or
greater, and performance rating
(CCA) is equivalent (603A) or
greater.
Vehicles with Stop & Start system:
Use a battery that the case size is
same as the previous one (LN3), 20
hour rate capacity (20HR) is equiva-
lent (65Ah) or greater, and perfor-
mance rating (CCA) is equivalent
(603A) or greater.
• If the sizes differ, the battery can-
not be properly secured.
492
7-2. Steps to take in an emergency
• If the 20 hour rate capacity is low,
even if the time period where the
vehicle is not used is a short time,
the battery may discharge and the
engine may not be able to start.
For details, consult your Toyota
dealer.
WARNING
■
When removing the battery
terminals
Always remove the negative (-)
terminal first. If the positive (+) ter-
minal contacts any metal in the
surrounding area when the posi-
tive (+) terminal is removed, a
spark may occur, leading to a fire
in addition to electrical shocks
and death or serious injury.
■
When disconnecting the bat-
tery
Do not disconnect the negative (-)
terminal on the body side. The
disconnected negative (-) terminal
may touch the positive (+) termi-
nal, which may cause a short and
result in death or serious injury.
■
Avoiding battery fires or
explosions
Observe the following precautions
to prevent accidentally igniting the
flammable gas that may be emit-
ted from the battery:
●
Make sure each jumper cable is
connected to the correct termi-
nal and that it is not unintention-
ally in contact with any other
than the intended terminal.
●
Do not allow the other end of
the jumper cable connected to
the “+” terminal to come into
contact with any other parts or
metal surfaces in the area, such
as brackets or unpainted metal.
●
Do not allow the + and - clamps
of the jumper cables to come
into contact with each other.
●
Do not smoke, use matches,
cigarette lighters or allow open
flame near the battery.
■
Battery precautions
The battery contains poisonous
and corrosive acidic electrolyte,
while related parts contain lead
and lead compounds. Observe
the following precautions when
handling the battery:
●
When working with the battery,
always wear safety glasses and
take care not to allow any bat-
tery fluids (acid) to come into
contact with skin, clothing or the
vehicle body.
●
Do not lean over the battery.
●
In the event that battery fluid
comes into contact with the skin
or eyes, immediately wash the
affected area with water and
seek medical attention. Place a
wet sponge or cloth over the
affected area until medical
attention can be received.
●
Always wash your hands after
handling the battery support,
terminals, and other bat-
tery-related parts.
●
Do not allow children near the
battery.
■
When replacing the battery
●
When the vent plug and indica-
tor are close to the hold down
clamp, the battery fluid (sulfuric
acid) may leak.
●
For information regarding bat-
tery replacement, contact your
Toyota dealer.
493
7-2. Steps to take in an emergency
7
W
he
n
tro
ub
le
ar
is
es
1
Stop the vehicle in a safe
place and turn off the air con-
ditioning system, and then
stop the engine.
2
If you see steam:
Carefully lift the hood after
the steam subsides.
If you do not see steam:
Carefully lift the hood.
3
After the engine has cooled
down sufficiently, inspect the
NOTICE
■
When handling jumper cables
When connecting the jumper
cables, ensure that they do not
become entangled in the cooling
fan or engine drive belt.
If your vehicle over-
heats
The following may indicate
that your vehicle is over-
heating.
The needle of the engine
coolant temperature gauge
(
P.81) enters the red zone
or a loss of engine power is
experienced. (For example,
the vehicle speed does not
increase.)
“Engine Coolant Temp High
Stop in a Safe Place See
Owner’s Manual” is shown
on the multi-information dis-
play.
Steam comes out from
under the hood.
Correction procedures
494
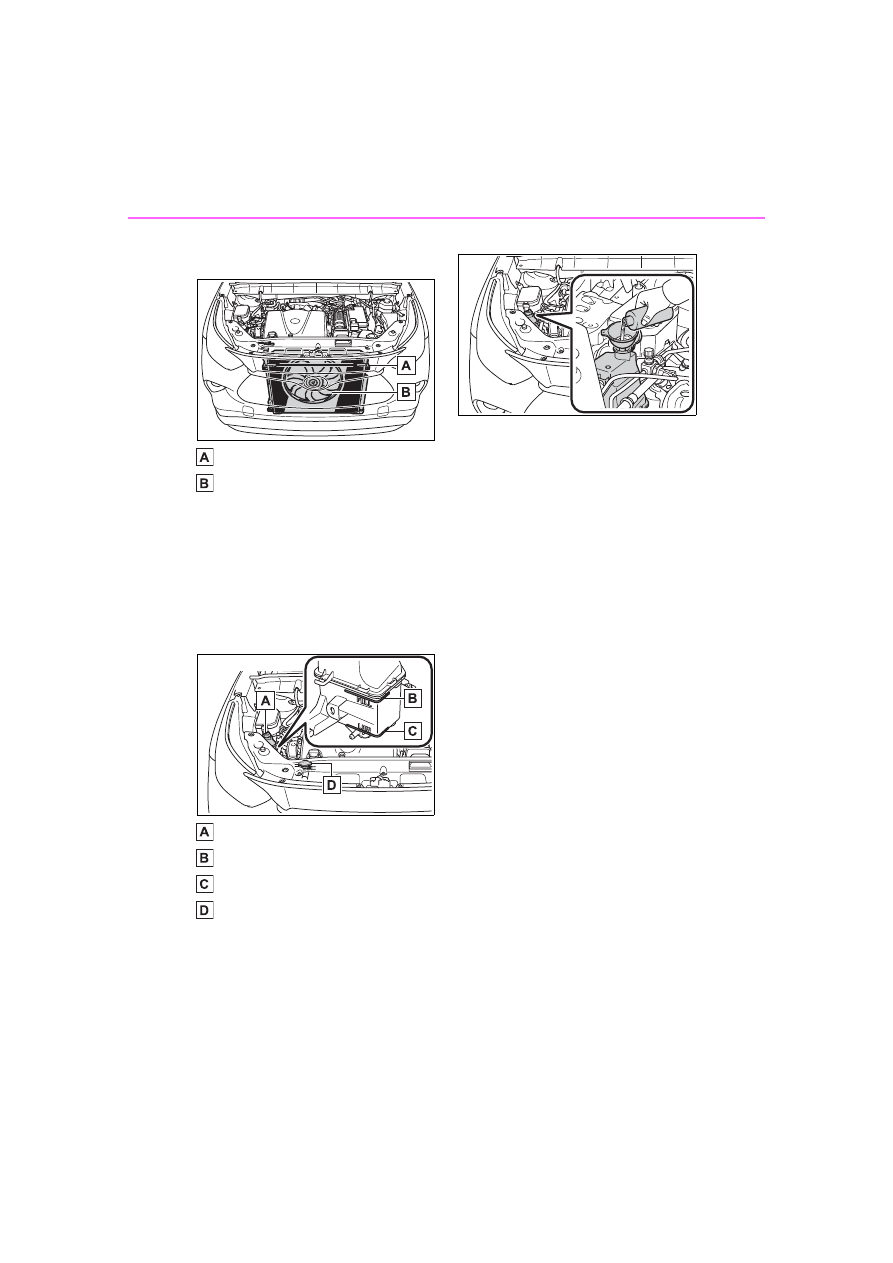
7-2. Steps to take in an emergency
hoses and radiator core (radi-
ator) for any leaks.
Radiator
Cooling fan
If a large amount of coolant leaks,
immediately contact your Toyota
dealer.
4
The coolant level is satisfac-
tory if it is between the
“FULL” and “LOW” lines on
the reservoir.
Reservoir
“FULL” line
“LOW” line
Radiator cap
5
Add coolant if necessary.
Water can be used in an emer-
gency if coolant is unavailable.
6
Start the engine and turn the
air conditioning system on to
check that the radiator cool-
ing fan operates and to check
for coolant leaks from the
radiator or hoses.
The fan operates when the air con-
ditioning system is turned on imme-
diately after a cold start. Confirm
that the fan is operating by check-
ing the fan sound and air flow. If it is
difficult to check these, turn the air
conditioning system on and off
repeatedly. (The fan may not oper-
ate in freezing temperatures.)
7
If the fan is not operating:
Stop the engine immediately
and contact your Toyota
dealer.
If the fan is operating:
Have the vehicle inspected at
the nearest Toyota dealer.
8
Check if “Engine Coolant
Temp High Stop in a Safe
Place See Owner's Manual”
is shown on the multi-infor-
mation display.
If the message does not disappear:
Stop the engine and contact your
Toyota dealer.
If the message is not displayed:
Have the vehicle inspected at the
nearest Toyota dealer.
495
7-2. Steps to take in an emergency
7
W
he
n
tro
ub
le
ar
is
es
1
Stop the engine. Shift the
shift lever to P and set the
parking brake.
2
Remove the mud, snow or
sand from around the front
wheels.
3
Place wood, stones or some
other material under the front
wheels to help provide trac-
tion.
4
Restart the engine.
5
Shift the shift lever to D or R
and release the parking
brake. Then, while exercising
caution, depress the acceler-
ator pedal.
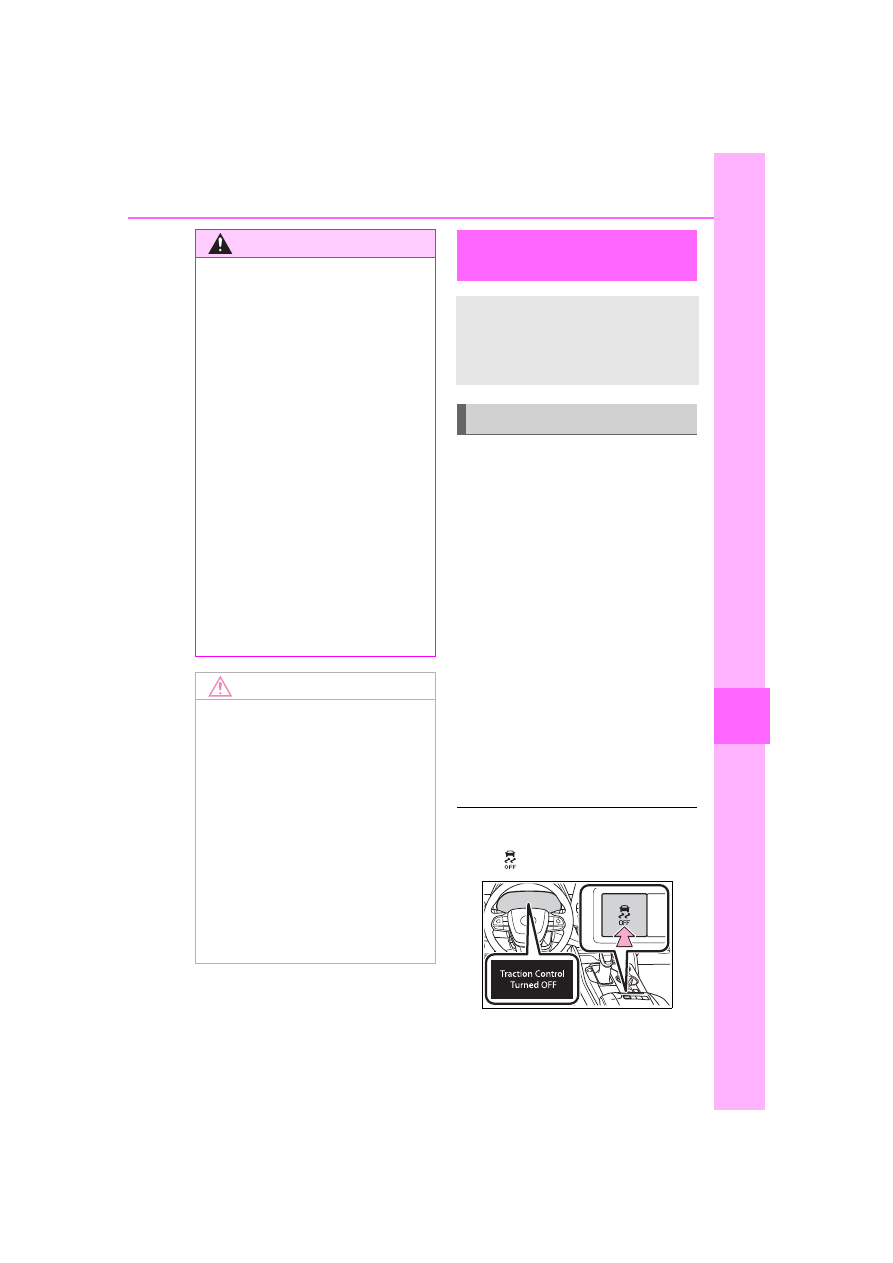
■
When it is difficult to free the
vehicle
Press
to turn off TRAC.
WARNING
■
When inspecting under the
hood of your vehicle
Observe the following precau-
tions.
Failure to do so may result in seri-
ous injury such as burns.
●
If steam is seen coming from
under the hood, do not open the
hood until the steam has sub-
sided. The engine compart-
ment may be very hot.
●
Keep hands and clothing (espe-
cially a tie, a scarf or a muffler)
away from the fan and belts.
Failure to do so may cause the
hands or clothing to be caught,
resulting in serious injury.
●
Do not loosen the radiator cap
and the coolant reservoir cap
while the engine and radiator
are hot.
High temperature steam or
coolant could spray out.
NOTICE
■
When adding engine coolant
Add coolant slowly after the
engine has cooled down suffi-
ciently. Adding cool coolant to a
hot engine too quickly can cause
damage to the engine.
■
To prevent damage to the
cooling system
Observe the following precau-
tions:
●
Avoid contaminating the coolant
with foreign matter (such as
sand or dust, etc.).
●
Do not use any coolant additive.
If the vehicle becomes
stuck
Carry out the following pro-
cedures if the tires spin or
the vehicle becomes stuck
in mud, dirt or snow:
Recovering procedure
496
7-2. Steps to take in an emergency
WARNING
■
When attempting to free a
stuck vehicle
If you choose to push the vehicle
back and forth to free it, make
sure the surrounding area is clear
to avoid striking other vehicles,
objects or people. The vehicle
may also lunge forward or lunge
back suddenly as it becomes free.
Use extreme caution.
■
When shifting the shift lever
Be careful not to shift the shift
lever with the accelerator pedal
depressed.
This may lead to unexpected
rapid acceleration of the vehicle
that may cause an accident
resulting in death or serious injury.
NOTICE
■
To avoid damage to the trans-
mission and other compo-
nents
●
Avoid spinning the front wheels
and depressing the accelerator
pedal more than necessary.
●
If the vehicle remains stuck
even after these procedures are
performed, the vehicle may
require towing to be freed.
Нет комментариевНе стесняйтесь поделиться с нами вашим ценным мнением.
Текст