Toyota Highlander (2022 year). Manual in english — page 1
13
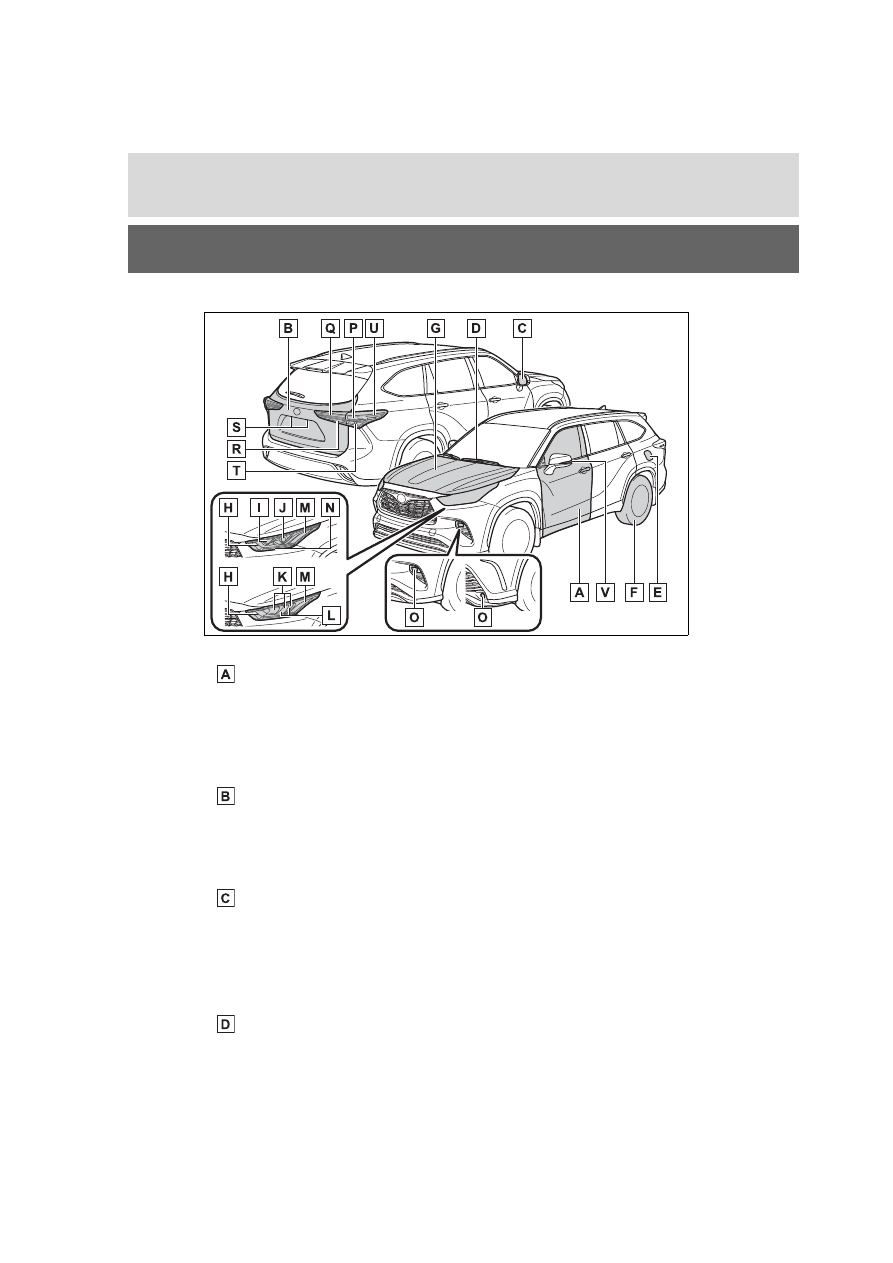
Pictorial index
Pictorial index
■
Exterior
The shape of the lights may differ depending on the grade, etc.
Side doors . . . . . . . . . . . . . . . . . . .. P.117
Locking/unlocking . . . . . . . . . . . . . . . . P.117
Opening/closing the side windows. . . . . . . . . ... P.167
Locking/unlocking by using the mechanical key . . . . .. P.488
Warning lights/warning messages . . . . . . . ... P.456, 467
Back door . . . . . . . . . . . . . . . . . . ... P.121
Opening from inside the cabin
*
. . . . . . . . . . . P.124
Opening from outside. . . . . . . . . . . . . . ... P.125
Warning lights/warning messages . . . . . . . ... P.456, 467
Outside rear view mirrors . . . . . . . . . . . . . P.165
Adjusting the mirror angle . . . . . . . . . . . . . P.165
Folding the mirrors . . . . . . . . . . . . . . . ... P.166
Driving position memory
*
. . . . . . . . . . . . . . P.147
Defogging the mirrors . . . . . . . . . . . . .. P.335, 341
Windshield wipers. . . . . . . . . . . . . . . .. P.222
14
Pictorial index
Precautions for winter season. . . . . . . . . . . .. P.324
To prevent freezing (windshield wiper de-icer). . . . P.336, 341
Precautions for car wash
*
. . . . . . . . . . . . . P.395
Fuel filler door . . . . . . . . . . . . . . . . . P.227
Refueling method. . . . . . . . . . . . . . . . . P.227
Fuel type/fuel tank capacity . . . . . . . . . . . . . P.501
Tires. . . . . . . . . . . . . . . . . . . . . . P.417
Tire size/inflation pressure . . . . . . . . . . ... P.417, 505
Winter tires/tire chains . . . . . . . . . . . . . . . P.324
Checking/rotation/tire pressure warning system . . . . .. P.417
Coping with flat tires. . . . . . . . . . . . . . . . P.471
Hood. . . . . . . . . . . . . . . . . . . . . P.408
Opening . . . . . . . . . . . . . . . . . . . ... P.408
Engine oil . . . . . . . . . . . . . . . . . . . . P.502
Coping with overheating . . . . . . . . . . . . . .. P.494
Warning messages . . . . . . . . . . . . . . . .. P.467
Front turn signal lights/parking lights
*
. . . . ... P.209P.216
Parking lights
*
. . . . . . . . . . . . . . . . . P.216
Headlights/daytime running lights
*
. . . . . . . . .. P.216
Headlights. . . . . . . . . . . . . . . . . . ... P.216
Daytime running lights . . . . . . . . . . . . . .. P.216
Front side marker lights . . . . . . . . . . . . . P.216
Parking lights
*
/daytime running lights
*
. . . . . . ... P.216
Front fog lights
*
. . . . . . . . . . . . . . . . .. P.222
Stop/tail lights . . . . . . . . . . . . . . . . . P.216
Tail lights. . . . . . . . . . . . . . . . . . . . P.216
Back-up lights
Shifting the shift lever to R . . . . . . . . . . . . ... P.206
Light bulbs of the exterior lights for driving
(Replacing method: P.439, Watts: P.507)
15
Pictorial index
License plate lights. . . . . . . . . . . . . . . P.216
Rear turn signal lights . . . . . . . . . . . . . ... P.209
Rear side marker lights . . . . . . . . . . . . . . P.216
Side turn signal lights . . . . . . . . . . . . . ... P.209
*
: If equipped
16
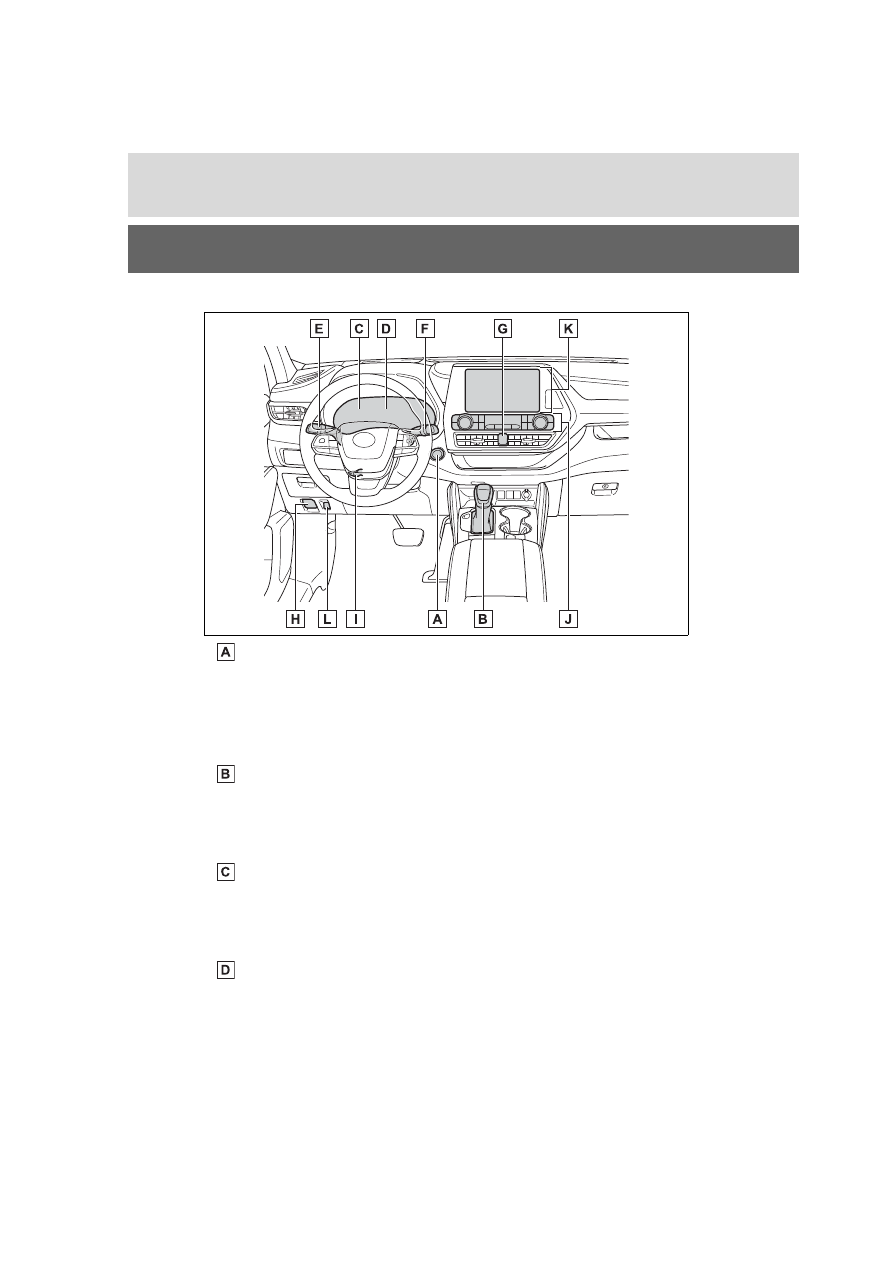
Pictorial index
■
Instrument panel
Engine switch. . . . . . . . . . . . . . . . . . P.202
Starting the engine/changing the modes . . . . . . . . P.202
Emergency stop of the engine . . . . . . . . . . . . P.448
When the engine will not start. . . . . . . . . . . .. P.485
Warning messages . . . . . . . . . . . . . . . .. P.467
Shift lever. . . . . . . . . . . . . . . . . . . P.206
Changing the shift position. . . . . . . . . . . . ... P.207
Precautions for towing . . . . . . . . . . . . . . . P.451
When the shift lever does not move. . . . . . . . . . P.207
Meters . . . . . . . . . . . . . . . . . . . . ... P.81
Reading the meters/adjusting the instrument panel light . P.81, 83
Warning lights/indicator lights . . . . . . . . . . . . P.76
When a warning light turns on . . . . . . . . . . . . P.456
Multi-information display . . . . . . . . . . . .. P.84, 93
Display . . . . . . . . . . . . . . . . . . . . P.84, 93
When the warning messages are displayed . . . . . . P.467
17
Pictorial index
Turn signal lever. . . . . . . . . . . . . . . . . P.209
Headlight switch . . . . . . . . . . . . . . . . P.216
Headlights/side marker lights/parking lights/tail lights/license plate
lights/daytime running lights. . . . . . . . . . . . . P.216
Front fog lights
*1
. . . . . . . . . . . . . . . . ... P.222
Windshield wiper and washer switch. . . . . ... P.222, 225
Usage. . . . . . . . . . . . . . . . . . ... P.222, 225
Adding washer fluid. . . . . . . . . . . . . . . .. P.416
Warning messages . . . . . . . . . . . . . . . .. P.467
Emergency flasher switch. . . . . . . . . . . . . P.448
Hood lock release lever. . . . . . . . . . . . . . P.408
Tilt and telescopic steering lock release lever. . . . P.153
Adjustment . . . . . . . . . . . . . . . . . . ... P.153
Air conditioning system . . . . . . . . . . . P.334, 339
Usage. . . . . . . . . . . . . . . . . . ... P.334, 339
Rear window defogger . . . . . . . . . . . . . P.335, 341
Windshield wiper de-icer
*1
. . . . . . . . . . ... P.336, 341
Audio system
*2
Fuel filler door opener switch. . . . . . . . . . ... P.227
*1
:If equipped
*2
:Refer to “NAVIGATION AND MULTIMEDIA SYSTEM OWNER’S MAN-
UAL”.
18
Pictorial index
■
Switches
Driving position memory switches
*1
. . . . . . . . P.147
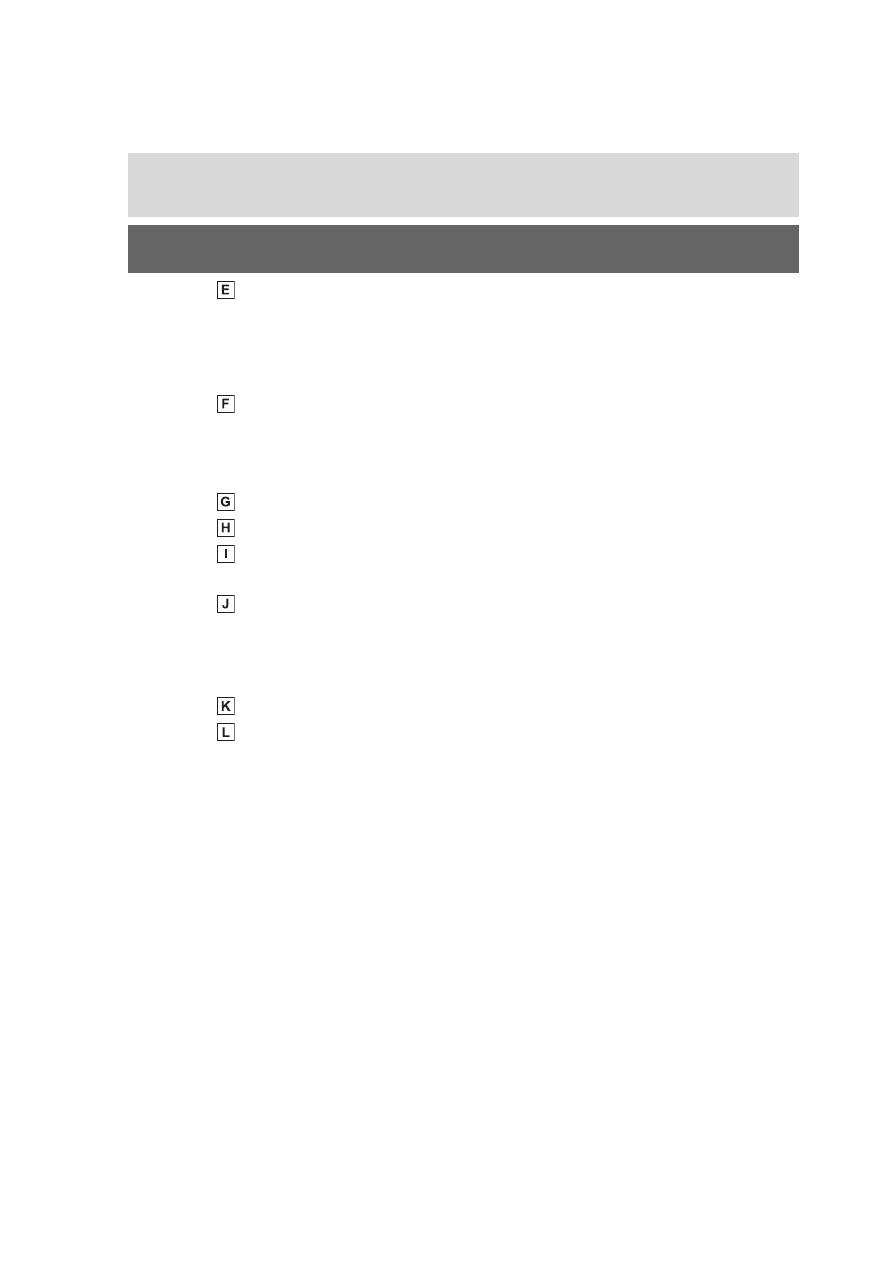
Window lock switch . . . . . . . . . . . . . . ... P.169
Power window switches. . . . . . . . . . . . . P.167
Door lock switches . . . . . . . . . . . . . . . P.120
Outside rear view mirror switches . . . . . . . . ... P.165
“ODO TRIP” switch. . . . . . . . . . . . . . . .. P.83
Instrument panel light control switches . . . . . . . P.83
Automatic High Beam switch . . . . . . . . . . ... P.219
Camera switch
*1, 2
Power back door switch
*1
. . . . . . . . . . . . . P.124
Heated steering wheel switch
*1
. . . . . . . . . . P.358
Windshield wiper de-icer
*1
. . . . . . . . . . . . P.349
*1
:If equipped
*2
:Refer to “NAVIGATION AND MULTIMEDIA SYSTEM OWNER’S MAN-
UAL”.
19
Pictorial index
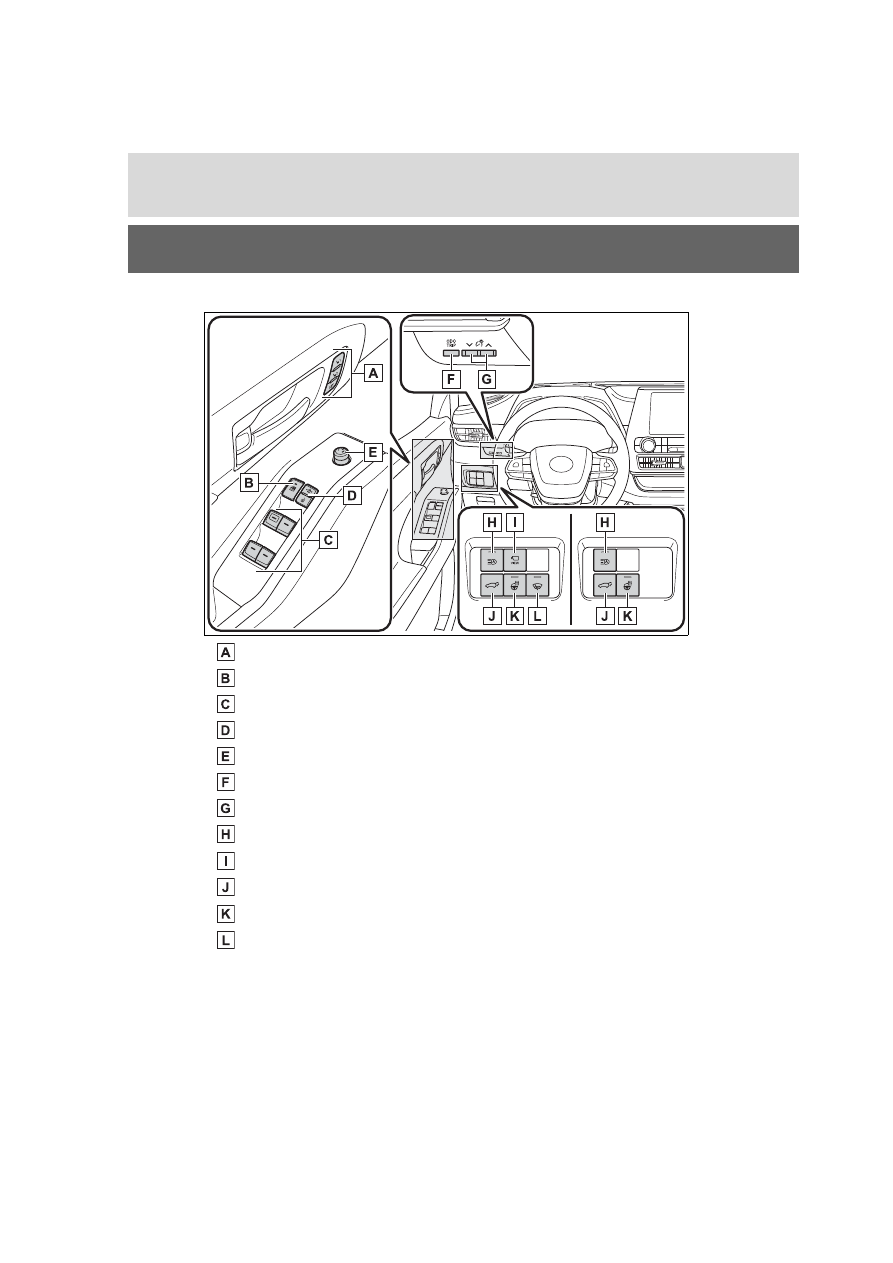
Meter control switches . . . . . . . . . . . . .. P.85, 94
Vehicle-to-vehicle distance switch. . . . . . . . ... P.263
Cruise control switch
Dynamic radar cruise control with full-speed range . . . . P.257
Audio remote control switches
*
LTA (Lane Tracing Assist) switch . . . . . . . . . . P.246
Phone switch
*
Talk switch
*
*
: Refer to “NAVIGATION AND MULTIMEDIA SYSTEM OWNER’S MAN-
UAL”.

20
Pictorial index
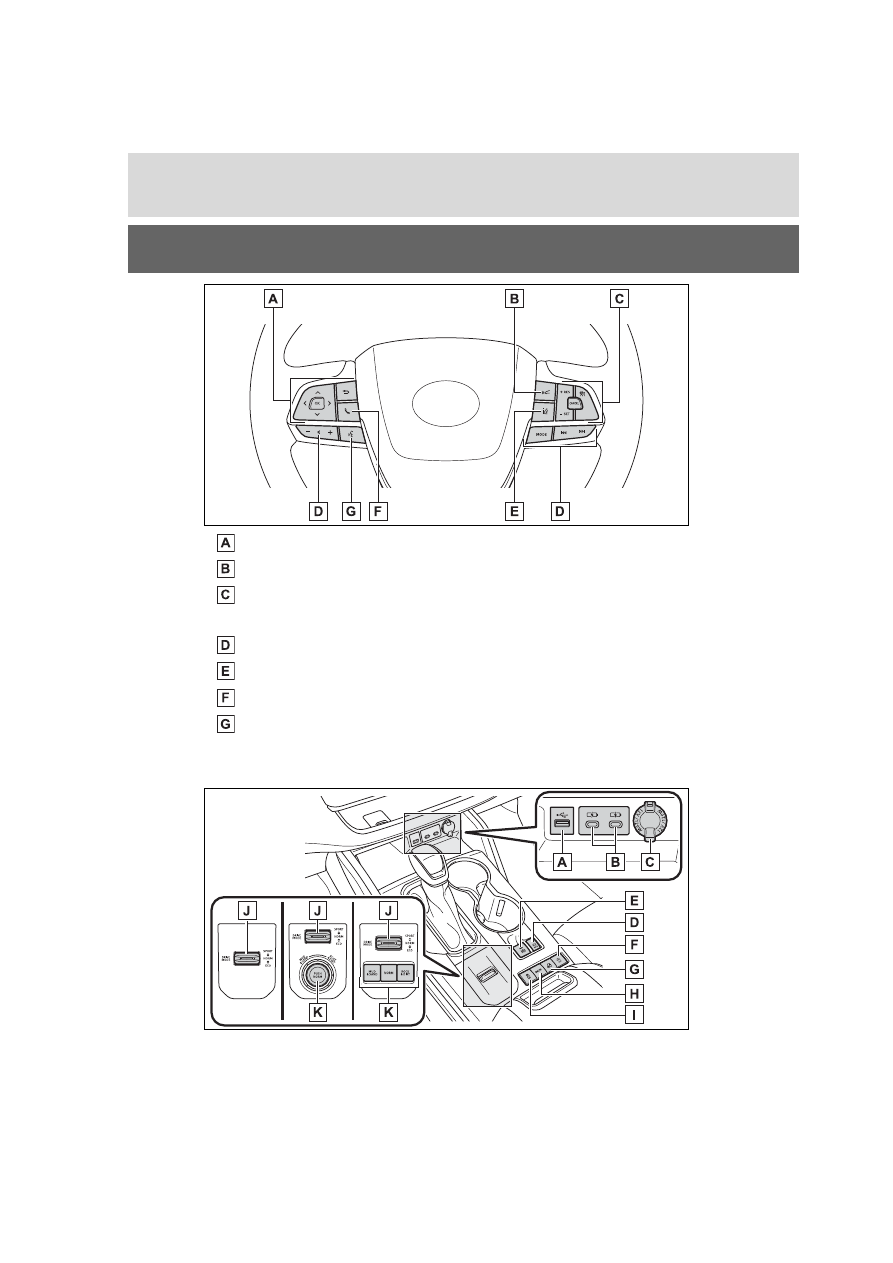
USB port
*1
USB charging ports . . . . . . . . . . . . . . ... P.373
Power outlet . . . . . . . . . . . . . . . . . ... P.382
Brake hold switch . . . . . . . . . . . . . . . .. P.213
Parking brake switch . . . . . . . . . . . . . . . P.210
Applying/releasing. . . . . . . . . . . . . . . . P.210
Precautions against winter season . . . . . . . . . .. P.324
Warning buzzer/light/message. . . . . . . . . . P.456, 467
Stop & Start cancel switch
*2
. . . . . . . . . . . . P.273
Downhill assist control switch
*2
. . . . . . . . . ... P.316
Snow mode switch. . . . . . . . . . . . . . . . P.315
VSC OFF switch . . . . . . . . . . . . . . . . . P.319
Driving mode select switch. . . . . . . . . . . ... P.311
Multi-terrain Select switch
*2
. . . . . . . . . . . .. P.312
*1
:Refer to “NAVIGATION AND MULTIMEDIA SYSTEM OWNER’S MAN-
UAL”.
*2
:If equipped
21
Pictorial index
■
Interior
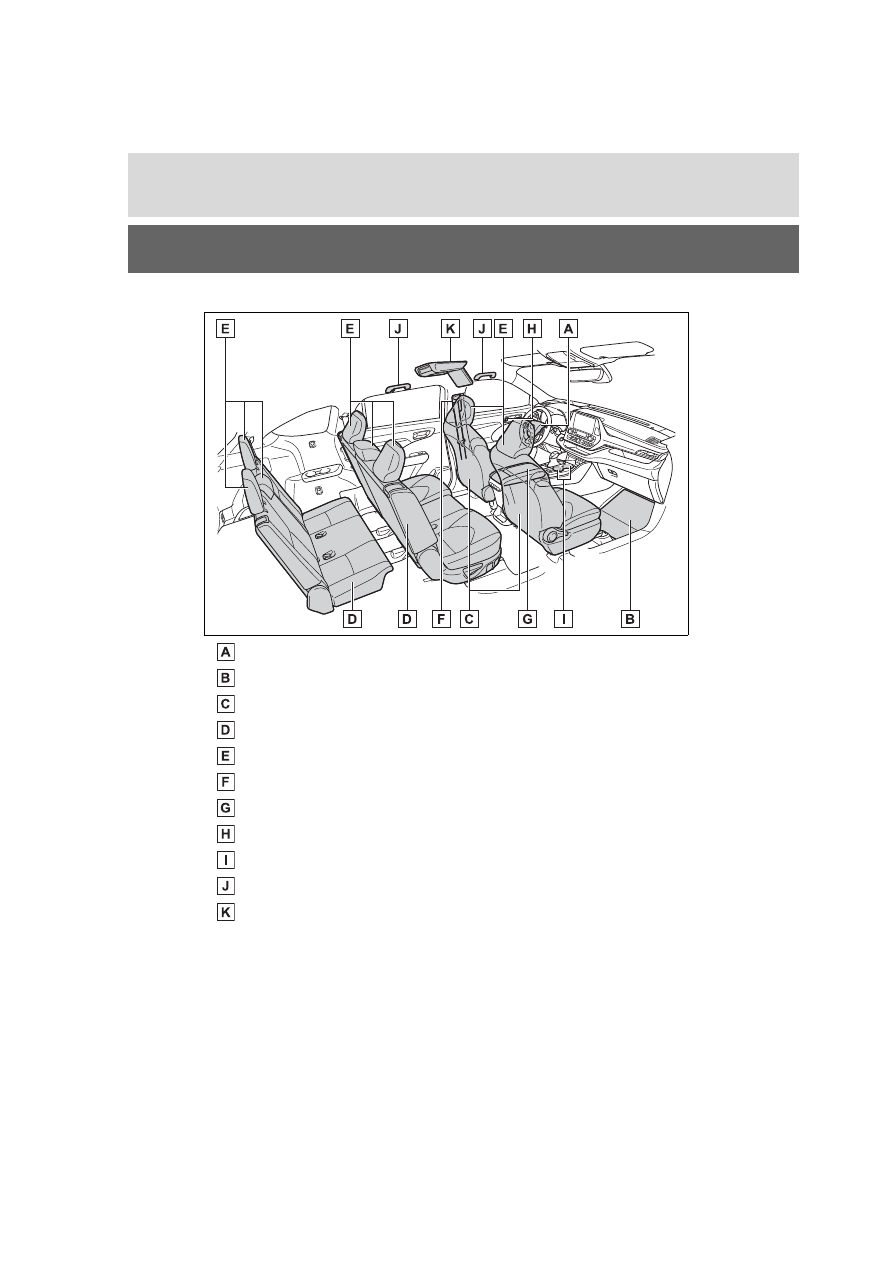
SRS airbags. . . . . . . . . . . . . . . . . . .. P.34
Floor mats. . . . . . . . . . . . . . . . . . . . P.24
Front seats. . . . . . . . . . . . . . . . . . .. P.141
Rear seats. . . . . . . . . . . . . . . . . . ... P.142
Head restraints. . . . . . . . . . . . . . . . ... P.150
Seat belts . . . . . . . . . . . . . . . . . . . .. P.27
Console box . . . . . . . . . . . . . . . . . ... P.365
Inside lock buttons . . . . . . . . . . . . . . . P.120
Cup holders . . . . . . . . . . . . . . . . . . P.366
Assist grips . . . . . . . . . . . . . . . . . . P.381
Rear seat entertainment system
*1, 2
*1
:If equipped
*2
:Refer to “NAVIGATION AND MULTIMEDIA SYSTEM OWNER’S MAN-
UAL”.
22
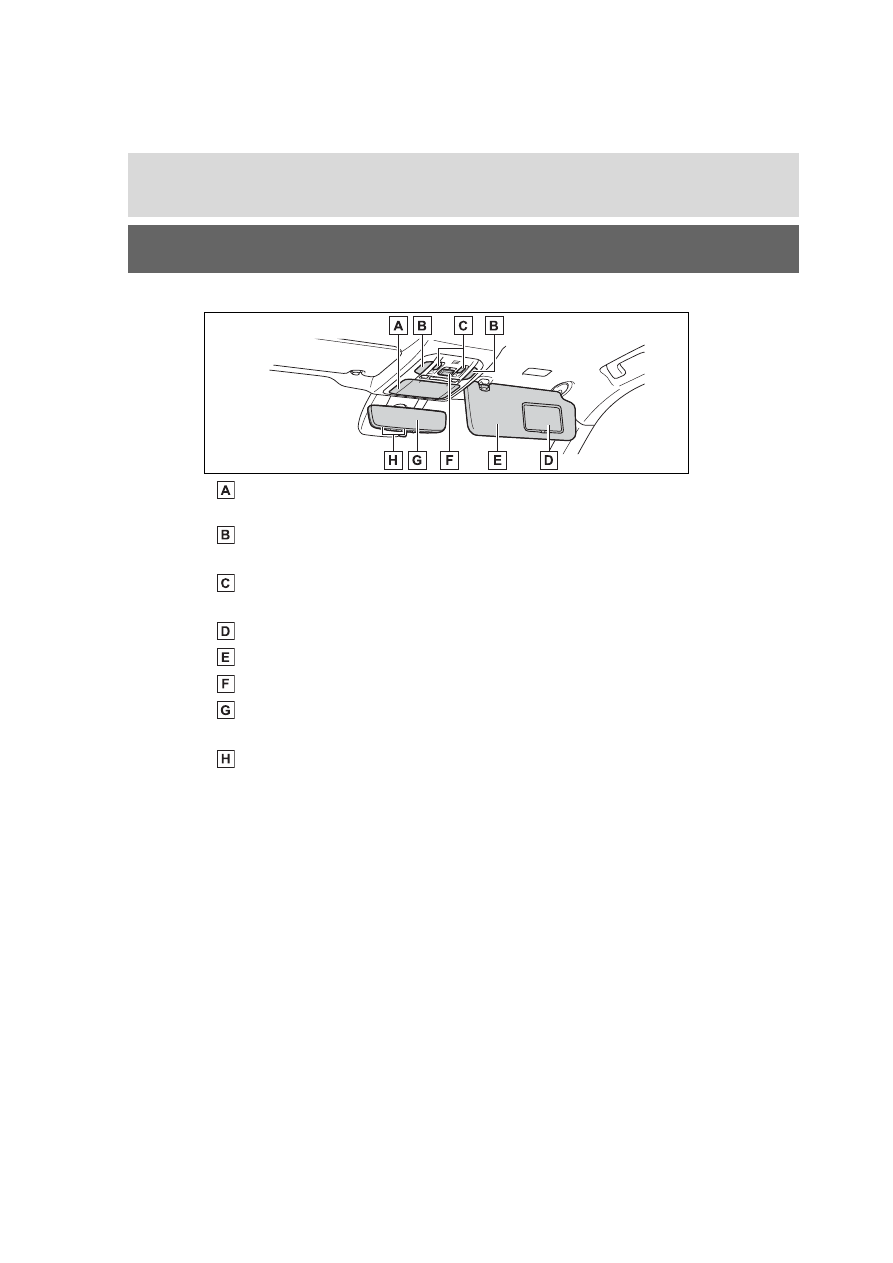
Pictorial index
■
Ceiling
Auxiliary box . . . . . . . . . . . . . . . . . .. P.367
Conversation mirror . . . . . . . . . . . . . . .. P.384
Interior light
*1
. . . . . . . . . . . . . . . . . . P.362
Personal lights
*1
. . . . . . . . . . . . . . . . . P.362
Moon roof switches
*2
. . . . . . . . . . . . . . . P.170
Panoramic moon roof switches
*2
. . . . . . . . . . P.173
Vanity mirrors. . . . . . . . . . . . . . . . . . P.383
Sun visors. . . . . . . . . . . . . . . . . . ... P.383
“SOS” button
*2
. . . . . . . . . . . . . . . . . . P.65
Inside rear view mirror
*2
. . . . . . . . . . . . . P.154
Digital Rearview Mirror
*2
. . . . . . . . . . . . ... P.155
Garage door opener switches
*2
. . . . . . . . . . P.385
*1
:The illustration shows the front, but they are also equipped in the rear.
*2
:If equipped
23
1
1
For safety and secu
rity
For safety and security
.
1-1. For safe use
Before driving. . . . .
For safe driving . . . ..
Seat belts . . . . . ...
SRS airbags. . . . ...
Front passenger occupant
classification system .
Exhaust gas precautions
. . . . . . . . . .
1-2. Child safety
Riding with children. .
Child restraint systems...
1-3. Emergency assistance
Safety Connect . . . ..
1-4. Theft deterrent system
Engine immobilizer system
. . . . . . . . . .
Alarm. . . . . . . ..
24
1-1. For safe use
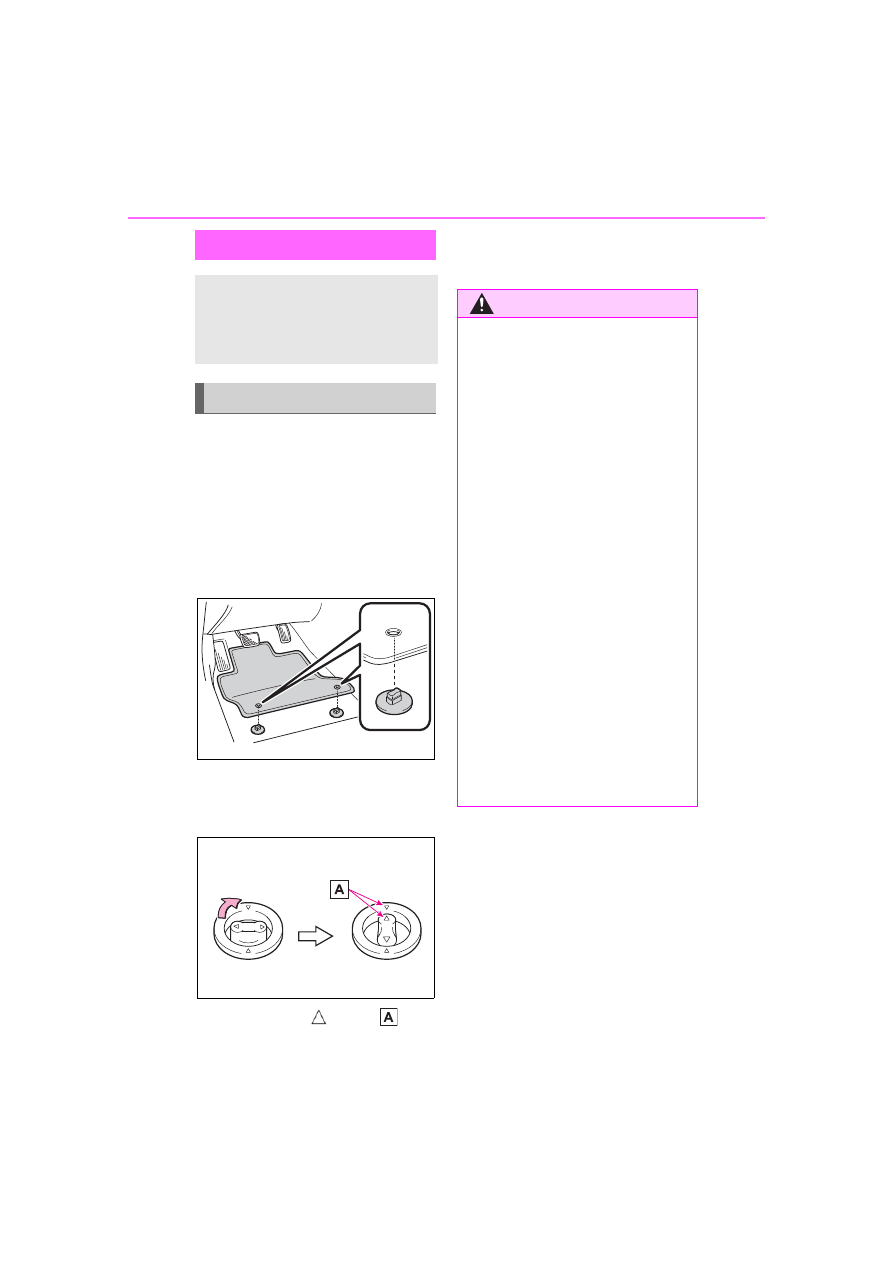
1-1.For safe use
Use only floor mats designed
specifically for vehicles of the
same model and model year as
your vehicle. Fix them securely
in place onto the carpet.
1
Insert the retaining hooks
(clips) into the floor mat eye-
lets.
2
Turn the upper knob of each
retaining hook (clip) to secure
the floor mats in place.
Always align the
marks
.
The shape of the retaining hooks
(clips) may differ from that shown in
the illustration.
Before driving
Observe the following
before starting off in the
vehicle to ensure safety of
driving.
Installing floor mats
WARNING
Observe the following precau-
tions.
Failure to do so may cause the
driver’s floor mat to slip, possibly
interfering with the pedals while
driving. An unexpectedly high
speed may result or it may
become difficult to stop the vehi-
cle. This could lead to an acci-
dent, resulting in death or serious
injury.
■
When installing the driver’s
floor mat
●
Do not use floor mats designed
for other models or different
model year vehicles, even if
they are Toyota Genuine floor
mats.
●
Only use floor mats designed
for the driver’s seat.
●
Always install the floor mat
securely using the retaining
hooks (clips) provided.
●
Do not use two or more floor
mats on top of each other.
●
Do not place the floor mat bot-
tom-side up or upside-down.
25
1-1. For safe use
1
For safety and secu
rity
Adjust the angle of the seat-
back so that you are sitting
straight up and so that you do
not have to lean forward to
steer. (
Adjust the seat so that you
can depress the pedals fully
and so that your arms bend
slightly at the elbow when
gripping the steering wheel.
(
Lock the head restraint in
place with the center of the
head restraint closest to the
top of your ears. (
Wear the seat belt correctly.
(
WARNING
■
Before driving
●
Check that the floor mat is
securely fixed in the correct
place with all the provided
retaining hooks (clips). Be espe-
cially careful to perform this
check after cleaning the floor.
●
With the engine stopped and
the shift lever in P, fully depress
each pedal to the floor to make
sure it does not interfere with
the floor mat.
For safe driving
For safe driving, adjust the
seat and mirror to an appro-
priate position before driv-
ing.
Correct driving posture
26
1-1. For safe use
Make sure that all occupants are
wearing their seat belts before
driving the vehicle. (
Use a child restraint system
appropriate for the child until the
child becomes large enough to
properly wear the vehicle’s seat
belt. (
Make sure that you can see
backward clearly by adjusting
the inside and outside rear view
mirrors properly. (
WARNING
■
For safe driving
Observe the following precau-
tions. Failure to do so may result
in death or serious injury.
●
Do not adjust the position of the
driver’s seat while driving.
Doing so could cause the driver
to lose control of the vehicle.
●
Do not place a cushion between
the driver or passenger and the
seatback. A cushion may pre-
vent correct posture from being
achieved, and reduce the effec-
tiveness of the seat belt and
head restraint.
●
Do not place anything under the
front seats. Objects placed
under the front seats may
become jammed in the seat
tracks and stop the seat from
locking in place. This may lead
to an accident and the adjust-
ment mechanism may also be
damaged.
●
Always observe the legal speed
limit when driving on public
roads.
●
When driving over long dis-
tances, take regular breaks
before you start to feel tired.
Also, if you feel tired or sleepy
while driving, do not force your-
self to continue driving and take
a break immediately.
Correct use of the seat
belts
Adjusting the mirrors
27
1-1. For safe use
1
For safety and secu
rity
Seat belts
Make sure that all occu-
pants are wearing their seat
belts before driving the
vehicle.
WARNING
Observe the following precautions
to reduce the risk of injury in the
event of sudden braking, sudden
swerving or an accident. Failure
to do so may cause death or seri-
ous injury.
■
Wearing a seat belt
●
Ensure that all passengers wear
a seat belt.
●
Always wear a seat belt prop-
erly.
●
Each seat belt should be used
by one person only. Do not use
a seat belt for more than one
person at once, including chil-
dren.
●
Toyota recommends that chil-
dren be seated in the rear seat
and always use a seat belt
and/or an appropriate child
restraint system.
●
To achieve a proper seating
position, do not recline the seat
more than necessary. The seat
belt is most effective when the
occupants are sitting up straight
and well back in the seats.
●
Do not wear the shoulder belt
under your arm.
●
Always wear your seat belt low
and snug across your hips.
■
Pregnant women
Obtain medical advice and wear
the seat belt in the proper way.
(
Women who are pregnant should
position the lap belt as low as
possible over the hips in the same
manner as other occupants,
extending the shoulder belt com-
pletely over the shoulder and
avoiding belt contact with the
rounding of the abdominal area.
If the seat belt is not worn prop-
erly, not only the pregnant
woman, but also the fetus could
suffer death or serious injury as a
result of sudden braking or a colli-
sion.
■
People suffering illness
Obtain medical advice and wear
the seat belt in the proper way.
(
■
When children are in the vehi-
cle
■
Seat belt damage and wear
●
Do not damage the seat belts
by allowing the belt, plate, or
buckle to be jammed in the
door.
28
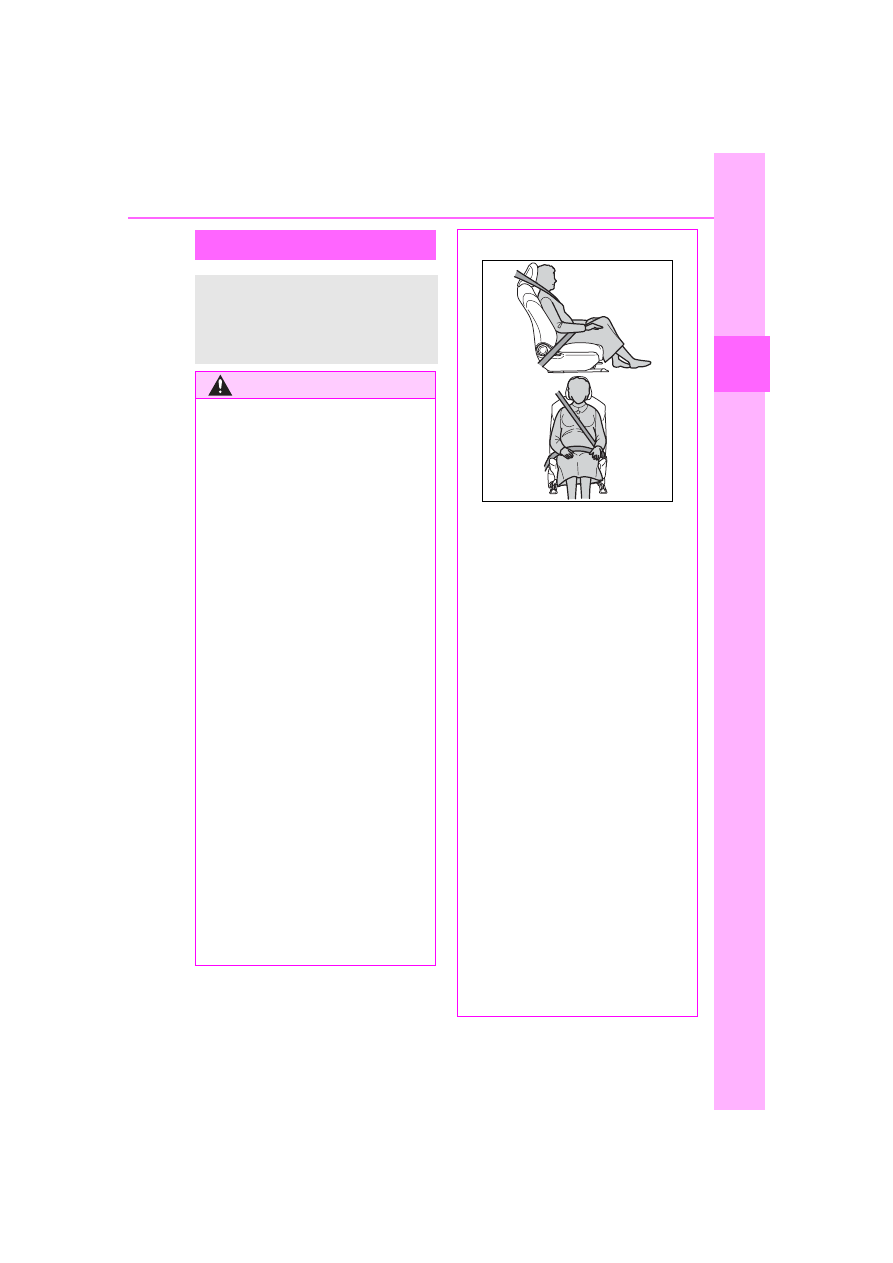
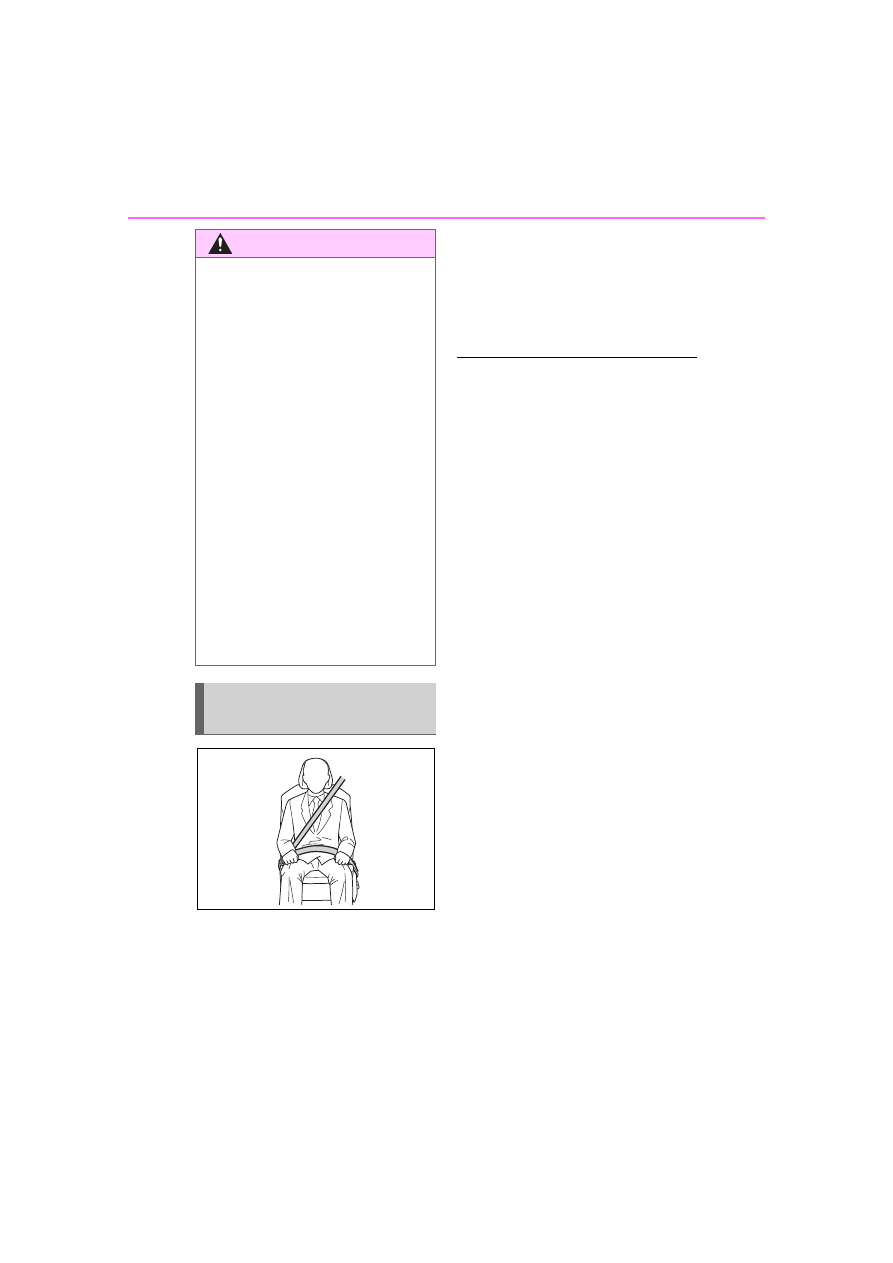
1-1. For safe use
Extend the shoulder belt so
that it comes fully over the
shoulder, but does not come
into contact with the neck or
slide off the shoulder.
Position the lap belt as low as
possible over the hips.
Adjust the position of the
seatback. Sit up straight and
well back in the seat.
Do not twist the seat belt.
■
Emergency locking retractor
(ELR)
The retractor will lock the belt during
a sudden stop or on impact. It may
also lock if you lean forward too
quickly. A slow, easy motion will
allow the belt to extend so that you
can move around fully.
■
Automatic locking retractor
(ALR)
When a passenger’s shoulder belt is
completely extended and then
retracted even slightly, the belt is
locked in that position and cannot
be extended. This feature is used to
hold the child restraint system
(CRS) firmly. To free the belt again,
fully retract the belt and then pull the
belt out once more. (
P.50)
■
Child seat belt usage
The seat belts of your vehicle were
principally designed for persons of
adult size.
●
Use a child restraint system
appropriate for the child, until the
child becomes large enough to
properly wear the vehicle’s seat
belt. (
●
When the child becomes large
enough to properly wear the vehi-
cle’s seat belt, follow the instruc-
tions regarding seat belt usage.
(
P.27)
■
Seat belt extender
If your seat belts cannot be fastened
securely because they are not long
enough, a personalized seat belt
extender is available from your Toy-
ota dealer free of charge.
WARNING
●
Inspect the seat belt system
periodically. Check for cuts,
fraying, and loose parts. Do not
use a damaged seat belt until it
is replaced. Damaged seat belts
cannot protect an occupant
from death or serious injury.
●
Ensure that the belt and plate
are locked and the belt is not
twisted. If the seat belt does not
function correctly, immediately
contact your Toyota dealer.
●
Replace the seat assembly,
including the belts, if your vehi-
cle has been involved in a seri-
ous accident, even if there is no
obvious damage.
●
Do not attempt to install,
remove, modify, disassemble or
dispose of the seat belts. Have
any necessary repairs carried
out by your Toyota dealer. Inap-
propriate handling may lead to
incorrect operation.
Correct use of the seat
belts
Нет комментариевНе стесняйтесь поделиться с нами вашим ценным мнением.
Текст