Toyota Highlander (2022 year). Manual in english — page 7
109
2-1. Instrument cluster
2
Vehicle
statu
s information an
d in
dicator
s
Audio Plus (vehicles with
Data Communication Mod-
ule) or Premium Audio
1
Press the “MENU” button.
2
Select “Info” on the “Menu”
screen.
3
Select “ECO” on the “Infor-
mation” screen.
If a screen other than “Trip Informa-
tion” is displayed, select “Trip Infor-
mation”.
12.3-inch display
1
Select
Toyota multi-oper-
ation touch (
2
Select “TripInfo.”.
The screen position can also be
changed by select a desired infor-
mation in full screen.
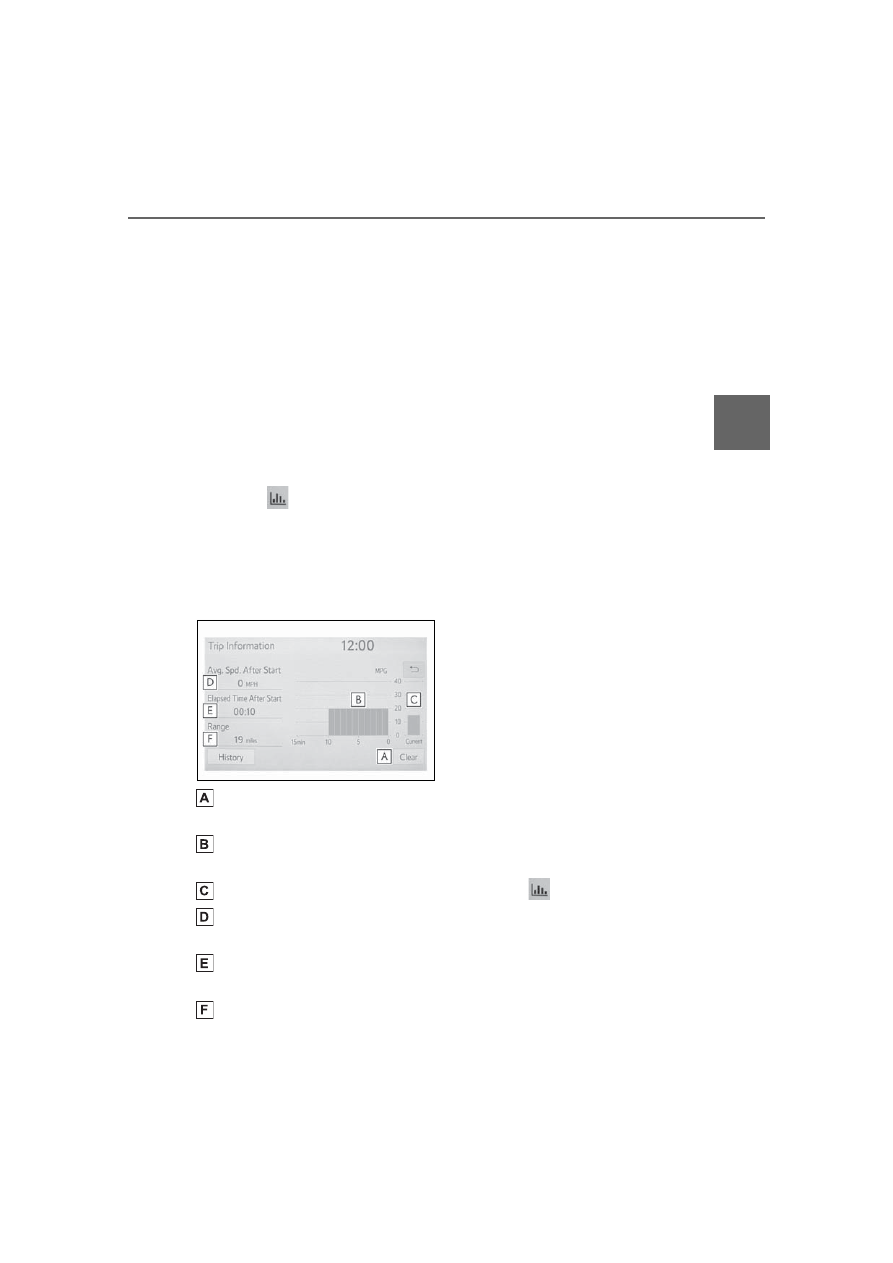
Resetting the consumption
data
Fuel consumption in the past
15 minutes
Current fuel consumption
Average vehicle speed since
the engine was started.
Elapsed time since the
engine was started.
Cruising range
The average fuel consumption
history is divided by color into
past averages and the average
fuel consumption since the last
updated. Use the displayed
average fuel consumption as a
reference.
The image is an example only, and
may vary slightly from actual condi-
tions.
■
History
Audio or Audio Plus (vehicles
without Data Communication
Module)
1
Press the “MENU” button.
2
Select “Info” on the “Menu”
screen.
If a screen other than “History” is
displayed, select “History”.
Audio Plus (vehicles with
Data Communication Mod-
ule) or Premium Audio
1
Press the “MENU” button.
2
Select “Info” on the “Menu”
screen.
3
Select “ECO” on the “Infor-
mation” screen.
If a screen other than “History” is
displayed, select “History”.
12.3-inch display
1
Select
Toyota multi-oper-
ation touch (
2
Select “History”.
The screen position can also be
changed by select a desired infor-
mation in full screen.
110
2-1. Instrument cluster
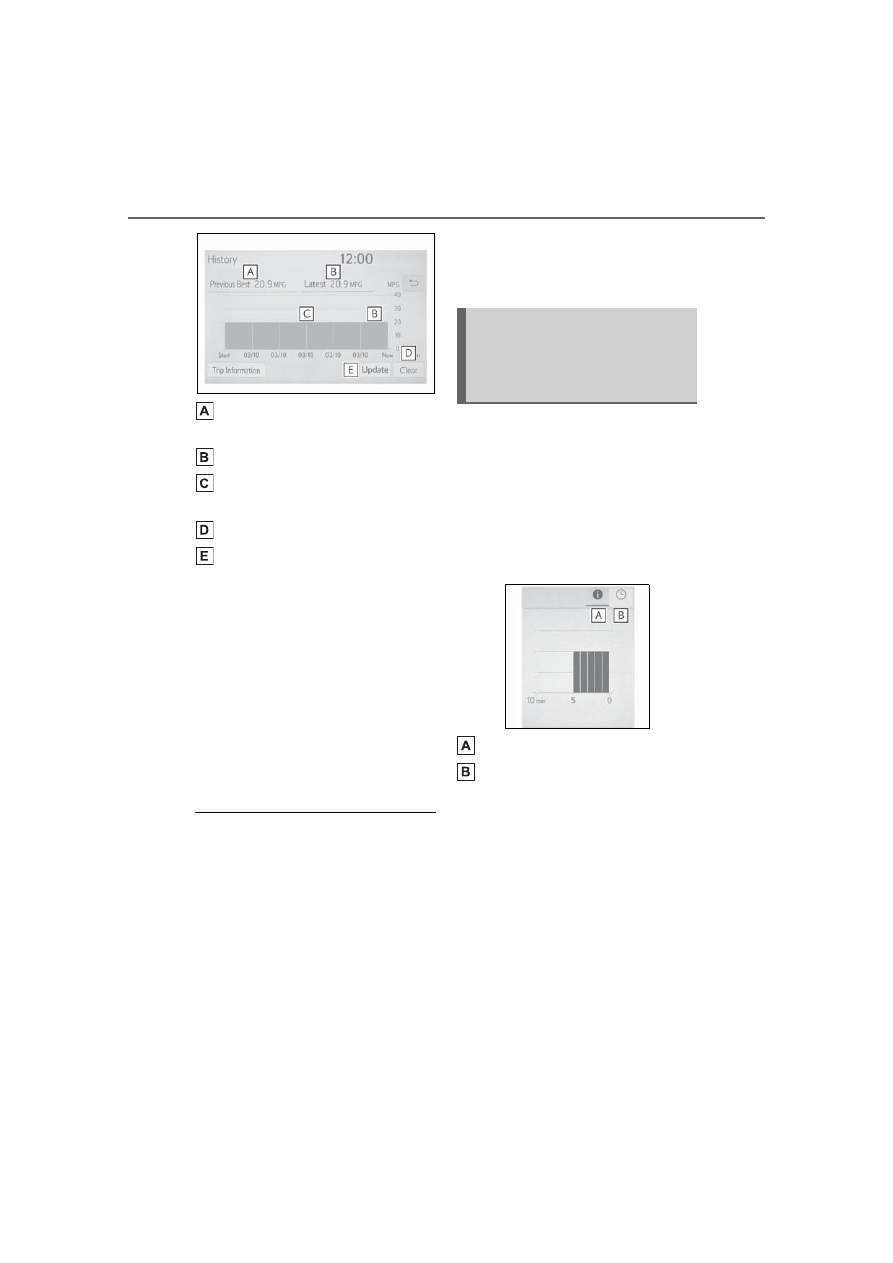
Best recorded fuel consump-
tion
Latest fuel consumption
Previous fuel consumption
record
Resetting the history data
Updating the latest fuel con-
sumption data
The average fuel consumption
history is divided by color into
past averages and the average
fuel consumption since the last
updated. Use the displayed
average fuel consumption as a
reference.
The image is an example only, and
may vary slightly from actual condi-
tions.
■
Updating the history data
Update the latest fuel consumption
by selecting “Update” to measure
the current fuel consumption again.
■
Resetting the data
The fuel consumption data can be
deleted by selecting “Clear”.
■
Cruising range
Displays the estimated maximum
distance that can be driven with the
quantity of fuel remaining.
This distance is computed based on
your average fuel consumption.
As a result, the actual distance that
can be driven may differ from that
displayed.
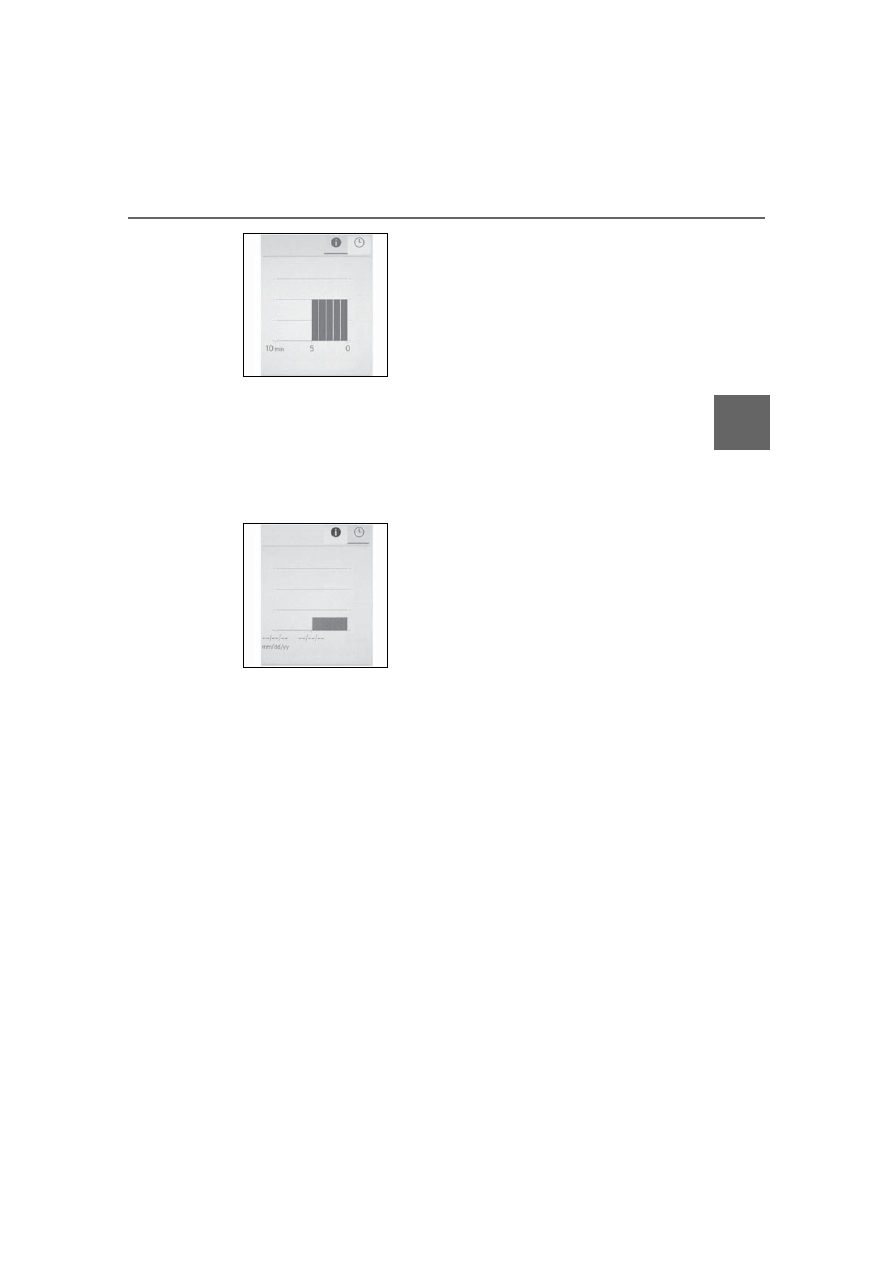
Display the vehicle information
on the Toyota multi-operation
touch (
P.332), and then select
the button to display the desired
screen.
The image is an example only,
and may vary slightly from
actual conditions.
Trip information
History
■
Trip information
Displays the average fuel con-
sumption for the past 10 min-
utes in 1 minute intervals, as
well as the cruising range.
Using the Toyota
multi-operation touch
(vehicles with a 12.3-inch
display)
111
2-1. Instrument cluster
2
Vehicle
statu
s information an
d in
dicator
s
Use the displayed average fuel
consumption as a reference.
■
History
Displays the average fuel con-
sumption and highest fuel con-
sumption.
Use the displayed average fuel
consumption as a reference.
112
2-1. Instrument cluster
113
3
3
Before driv
ing
Before driving
.
3-1. Key information
Keys . . . . . . .
3-2. Opening, closing and
locking the doors
Side doors. . . . ...
Back door. . . . .
Smart key system . ...
3-3. Adjusting the seats
Front seats . . . . ..
Rear seats. . . . ...
Driving position memory
. . . . . . . . ..
Head restraints. . .
3-4. Adjusting the steering
wheel and mirrors
Steering wheel . . .
Inside rear view mirror
. . . . . . . . ..
Digital Rearview Mirror
. . . . . . . . ..
Outside rear view mirrors
. . . . . . . . ..
3-5. Opening, closing the win-
dows and moon roof
Power windows . . ...
Moon roof. . . . .
Panoramic moon roof..
114
3-1. Key information
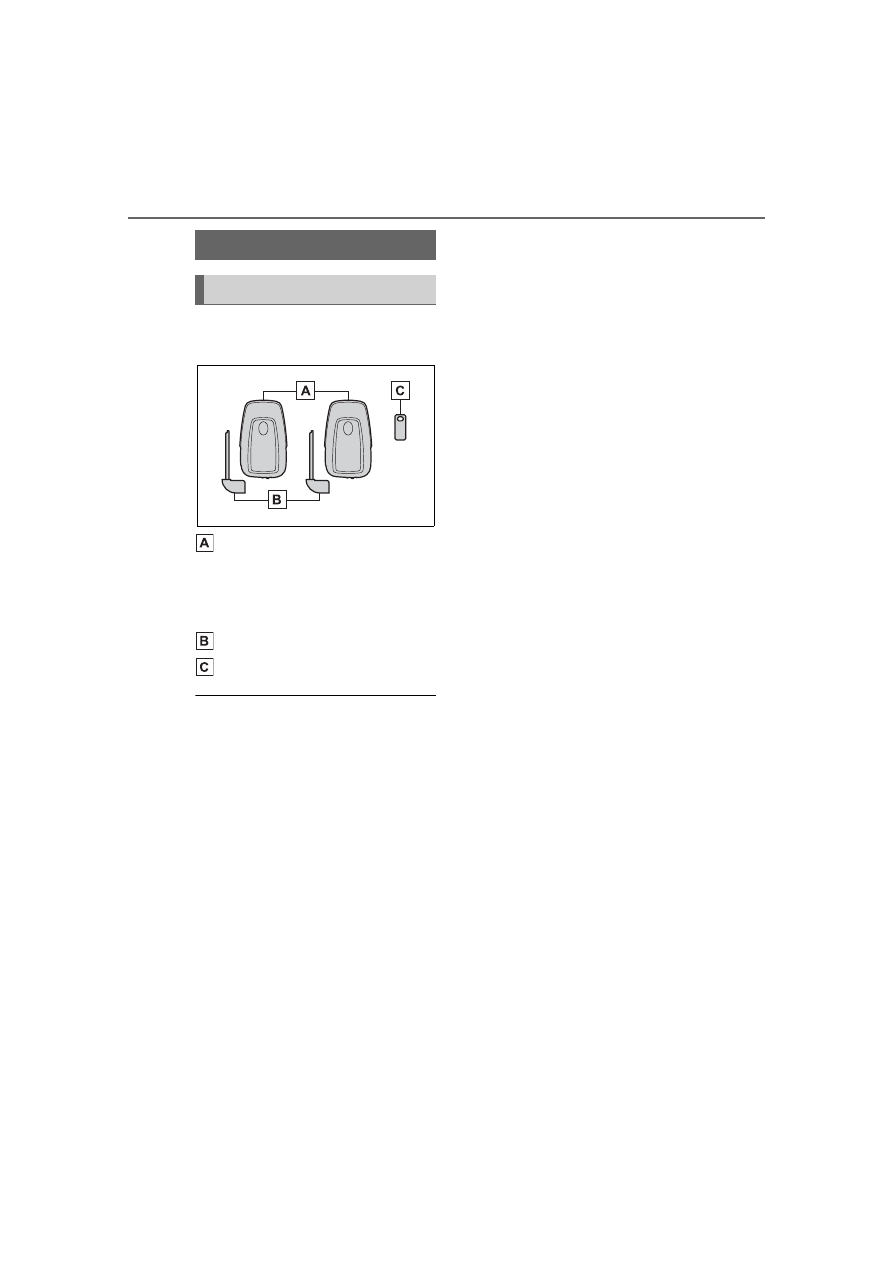
3-1.Key information
The following keys are provided
with the vehicle.
Electronic keys
• Operating the smart key system
(
• Operating the wireless remote
control function (
Mechanical keys
Key number plate
■
When riding in an aircraft
When bringing an electronic key
onto an aircraft, make sure you do
not press any buttons on the elec-
tronic key while inside the aircraft
cabin. If you are carrying an elec-
tronic key in your bag, etc., ensure
that the buttons are not likely to be
pressed accidentally. Pressing a
button may cause the electronic key
to emit radio waves that could inter-
fere with the operation of the air-
craft.
■
Electronic key battery depletion
●
The standard battery life is 1 to 2
years.
●
If the battery becomes low, an
alarm will sound in the cabin when
the engine is stopped.
●
To reduce key battery depletion
when the electronic key is to not
be used for long periods of time,
set the electronic key to the bat-
tery-saving mode. (
●
As the electronic key always
receives radio waves, the battery
will become depleted even if the
electronic key is not used. The fol-
lowing symptoms indicate that the
electronic key battery may be
depleted. Replace the battery
when necessary.
• The smart key system or the wire-
less remote control does not oper-
ate.
• The detection area becomes
smaller.
• The LED indicator on the key sur-
face does not turn on.
●
To avoid serious deterioration, do
not leave the electronic key within
3 ft. (1 m) of the following electri-
cal appliances that produce a
magnetic field:
• TVs
• Personal computers
• Cellular phones, cordless phones
and battery chargers
• Recharging cellular phones or
cordless phones
• Table lamps
• Induction cookers
■
Replacing the battery
■
Confirmation of the registered
key number
The number of keys already regis-
tered to the vehicle can be con-
firmed. Ask your Toyota dealer for
details.
■
If “A New Key has been Regis-
tered Contact Your Dealer for
Details” is shown on the
multi-information display
This message will be displayed
each time the driver’s door is
opened when the doors are
unlocked from the outside for
approximately 10 days after a new
electronic key has been registered.
Keys
The keys
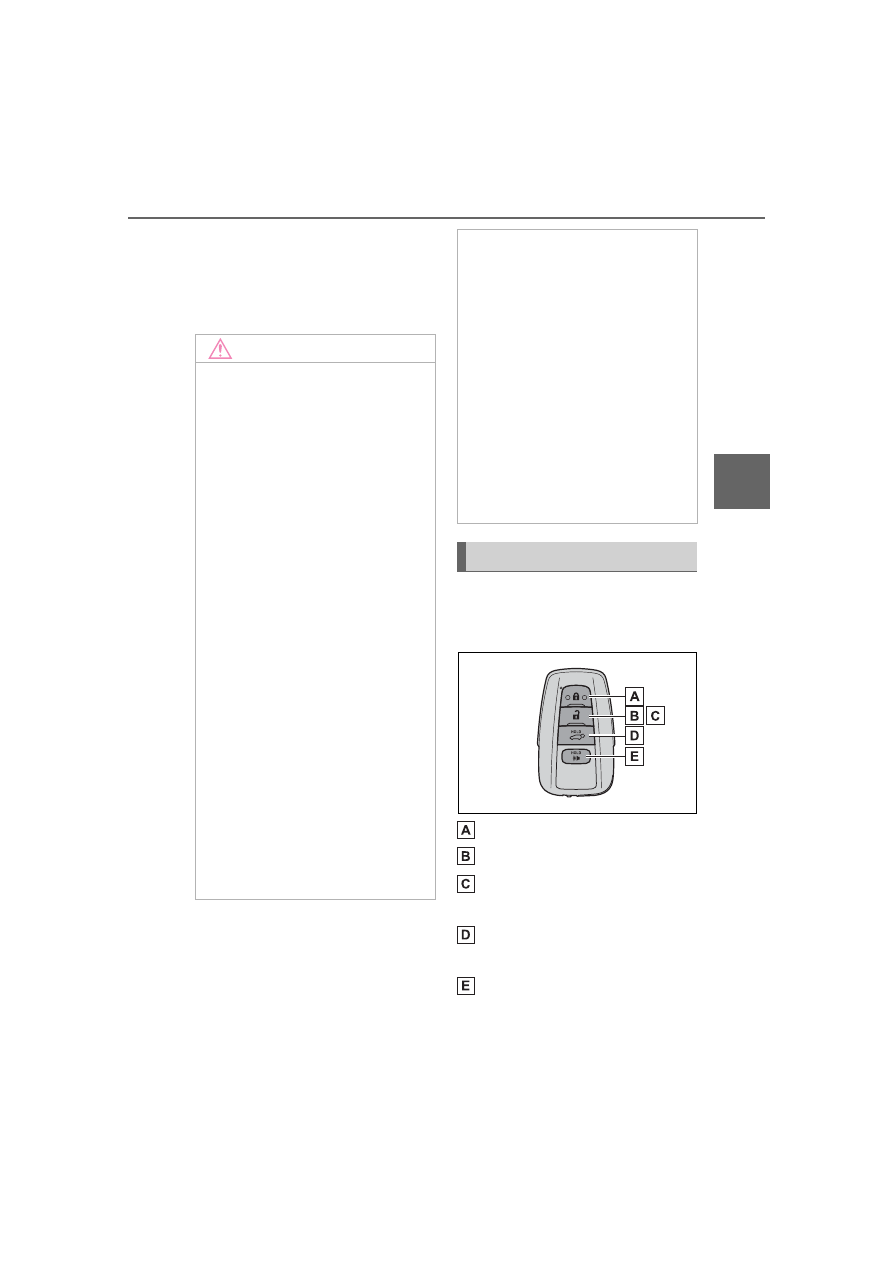
115
3-1. Key information
3
Before driv
ing
If this message is displayed but you
have not had a new electronic key
registered, ask your Toyota dealer to
check if an unknown electronic key
(other than those in your posses-
sion) has been registered.
The electronic keys are
equipped with the following
wireless remote control:
Locks the doors (
Unlocks the doors (
Opens the windows
*1
and
moon roof
*1, 2
(
Opens and closes the power
back door
*2
(
Sounds the alarm
*1
:These settings must be custom-
ized at your Toyota dealer.
NOTICE
■
To prevent key damage
●
Do not drop the keys, subject
them to strong shocks or bend
them.
●
Do not expose the keys to high
temperatures for long periods of
time.
●
Do not get the keys wet or wash
them in an ultrasonic washer,
etc.
●
Do not attach metallic or mag-
netic materials to the keys or
place the keys close to such
materials.
●
Do not disassemble the keys.
●
Do not attach a sticker or any-
thing else to the surface of the
electronic key.
●
Do not place the keys near
objects that produce magnetic
fields, such as TVs, audio sys-
tems and induction cookers.
●
Do not place the keys near
medical electrical equipment
such as low-frequency therapy
equipment or microwave ther-
apy equipment, and do not
receive medical attention with
the keys on your person.
■
Carrying the electronic key
on your person
Carry the electronic key 3.9 in.
(10 cm) or more away from elec-
tric appliances that are turned on.
Radio waves emitted from electric
appliances within 3.9 in. (10 cm)
of the electronic key may interfere
with the key, causing the key to
not function properly.
■
In case of a smart key system
malfunction or other
key-related problems
■
When an electronic key is lost
Wireless remote control
116
3-1. Key information
*2
:If equipped
■
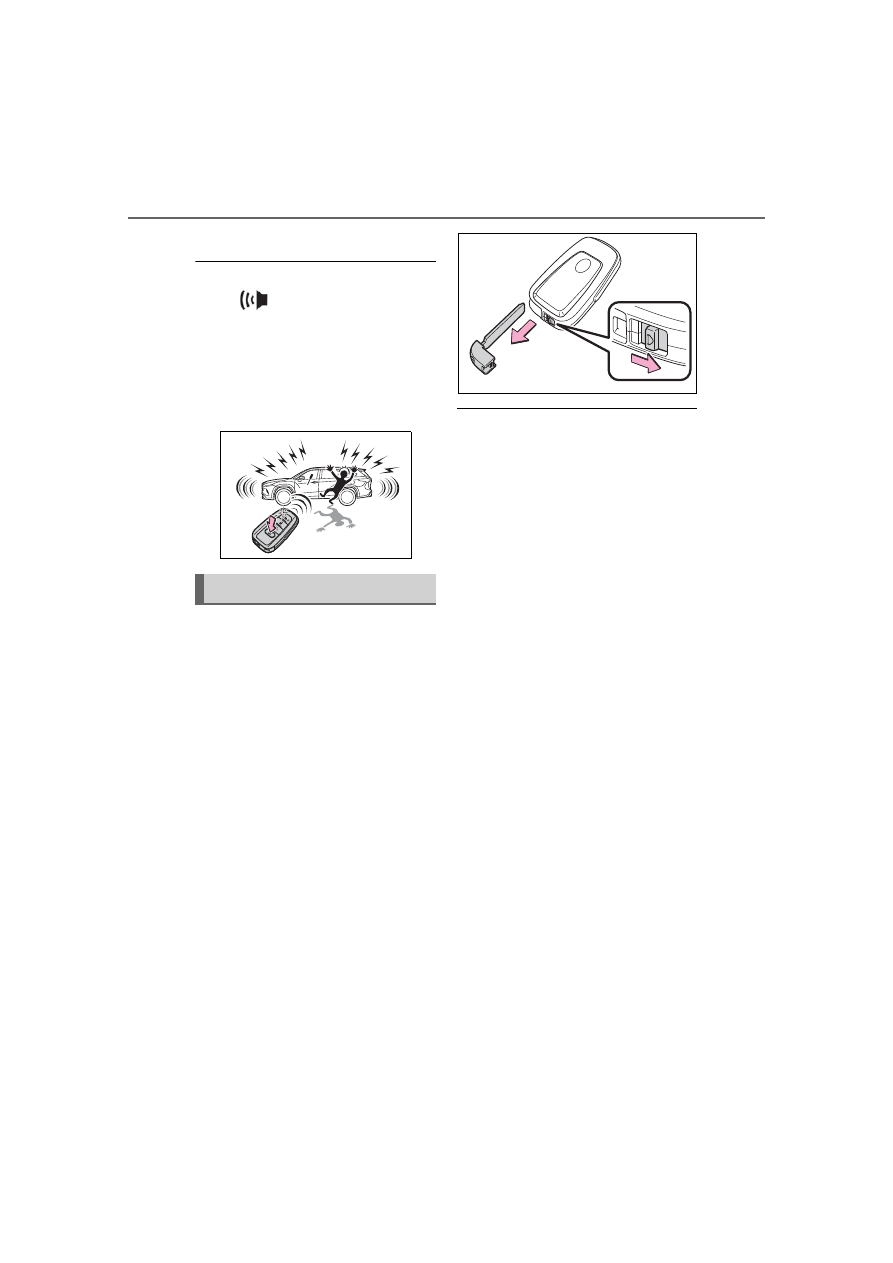
Theft deterrent panic mode
When
is pressed for longer
than about one second, an alarm
will sound intermittently and the
vehicle lights will flash to deter any
person from trying to break into or
damage your vehicle.
To stop the alarm, press any button
on the electronic key.
To take out the mechanical key,
slide the release button and take
the key out.
The mechanical key can only be
inserted in one direction, as the key
only has grooves on one side. If the
key cannot be inserted in a lock cyl-
inder, turn it over and re-attempt to
insert it.
After using the mechanical key,
store it in the electronic key. Carry
the mechanical key together with
the electronic key. If the electronic
key battery is depleted or the entry
function does not operate properly,
you will need the mechanical key.
(
■
When required to leave the
vehicle’s key with a parking
attendant
Lock the glove box as circum-
stances demand. (
Remove the mechanical key for
your own use and provide the atten-
dant with the electronic key only.
■
If you lose your mechanical
keys
■
If a wrong key is used
The key cylinder rotates freely, iso-
lated from the internal mechanism.
Using the mechanical key
117
3-2. Opening, closing and locking the doors
3
Before driv
ing
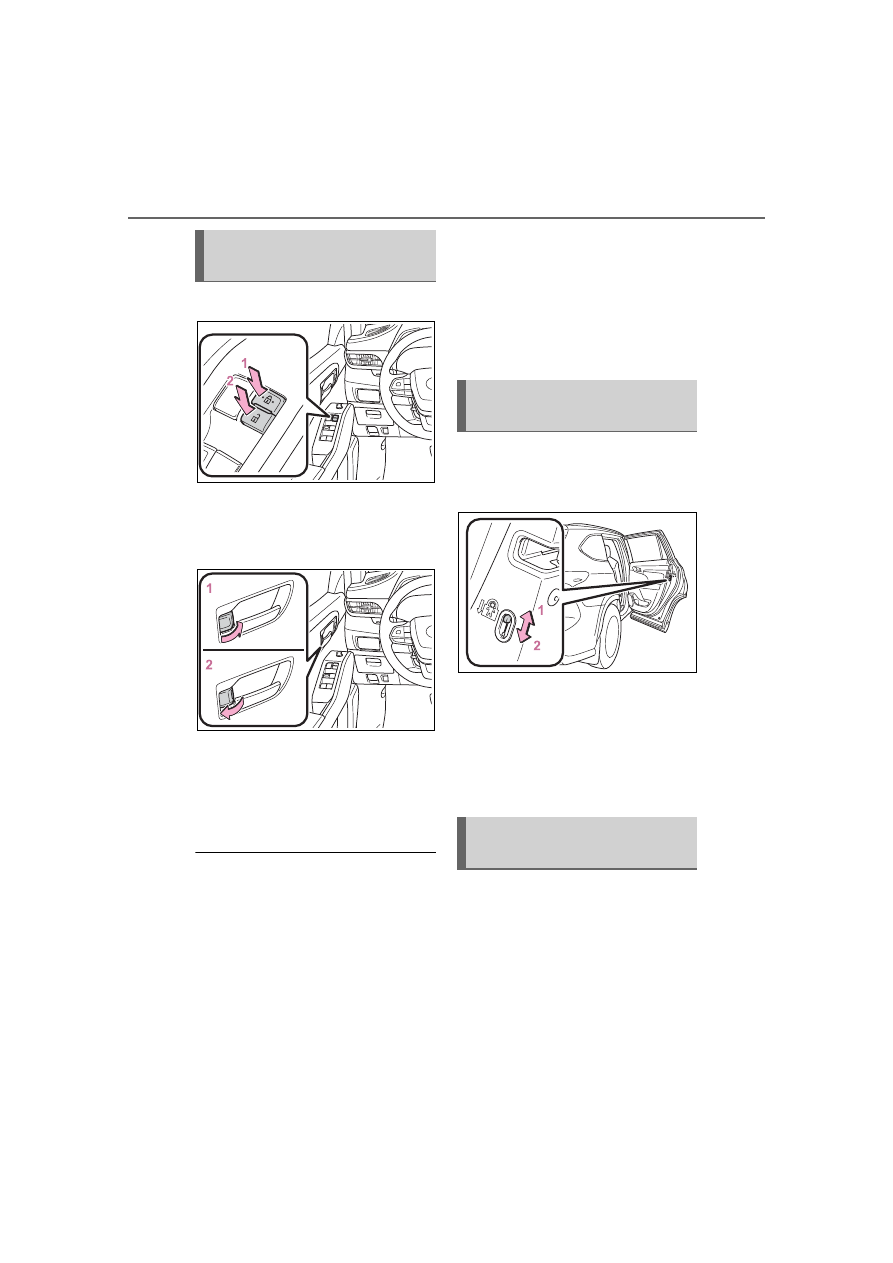
3-2.Opening, closing and locking the doors
■
Smart key system
Carry the electronic key to
enable this function.
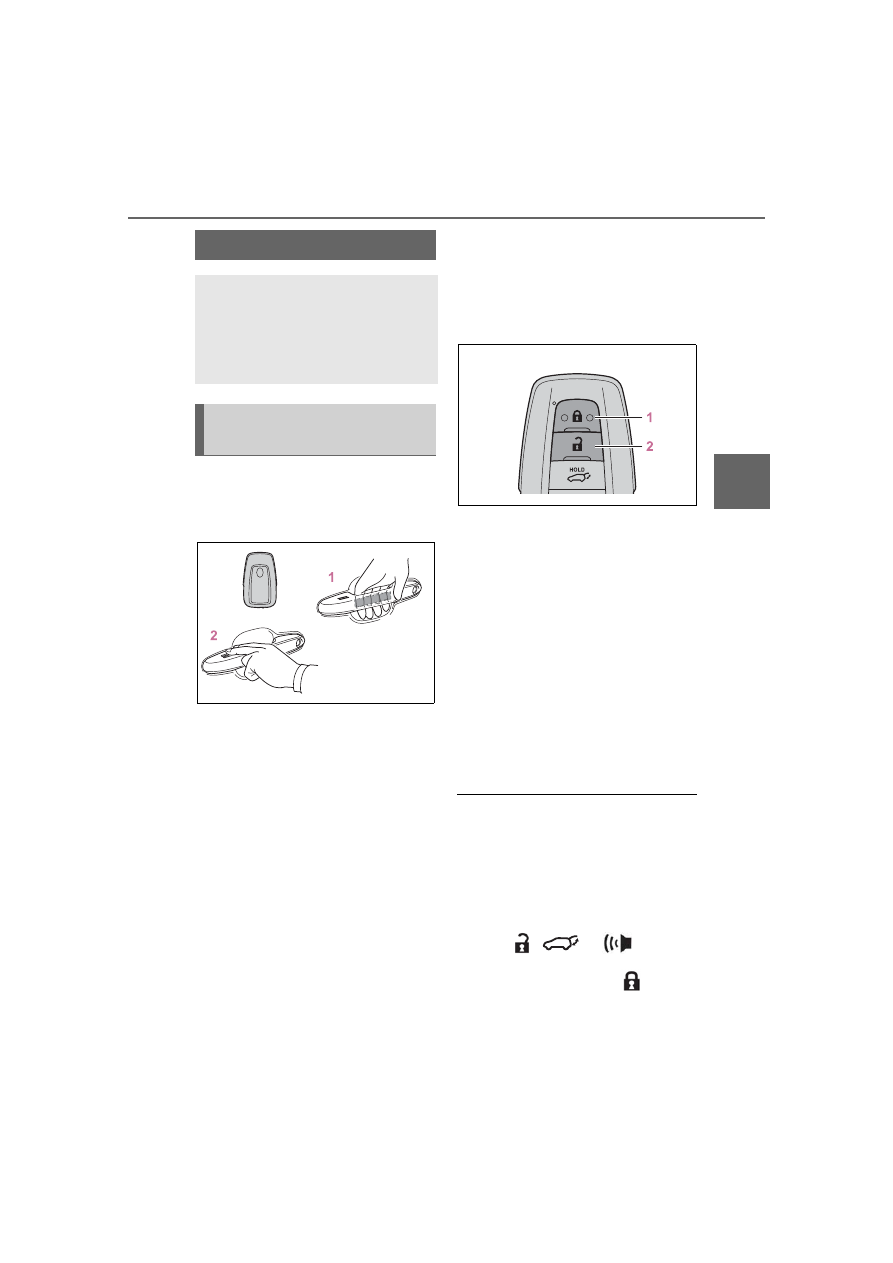
1
Grip the driver’s door handle
to unlock the door. Holding
the driver’s door handle for
approximately 2 seconds
unlocks all the doors. Grip
the front passenger’s door
handle to unlock all the
doors.
*
Make sure to touch the sensor on
the back of the handle.
The doors cannot be unlocked for 3
seconds after the doors are locked.
*
: The door unlock settings can be
changed. (
2
Touch the lock sensor (the
indentation on the upper part
of the front door handle) to
lock all the doors.
Check that the door is securely
locked.
■
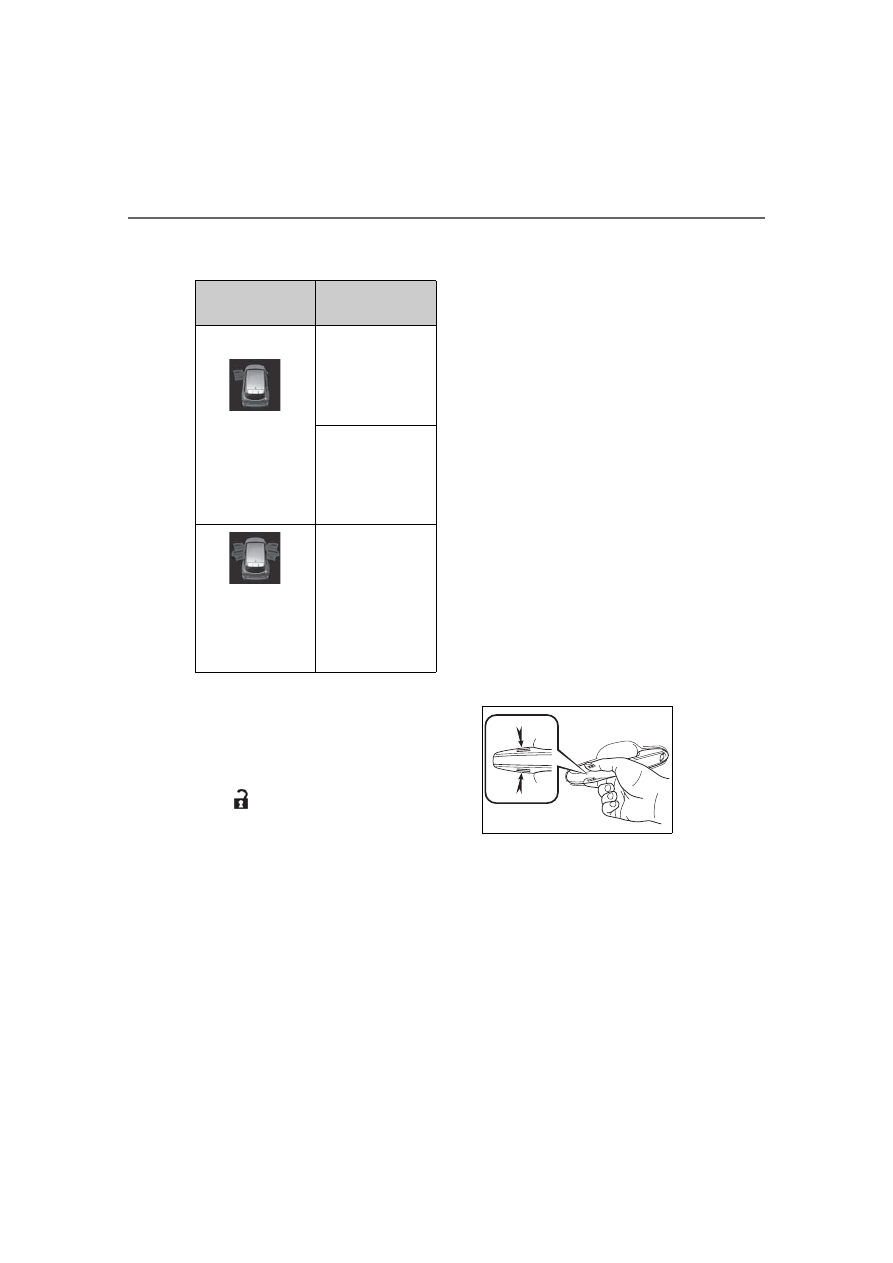
Wireless remote control
1
Locks all the doors
Check that the door is securely
locked.
2
Unlocks all the doors
Pressing the button unlocks the
driver’s door. Pressing the button
again within 5 seconds unlocks the
other doors.
Press and hold to open the win-
dows
*1
and moon roof
*1, 2
*1
:This setting must be customized
at your Toyota dealer.
*2
:If equipped
■
Switching the door unlock func-
tion
It is possible to set which doors the
entry function unlocks using the
wireless remote control.
1
Turn the engine switch off.
2
When the indicator light on the
key surface is not on, press and
hold
,
or
for
approximately 5 seconds while
pressing and holding
.
The setting changes each time an
operation is performed, as shown
below. (When changing the setting
Side doors
The vehicle can be locked
and unlocked using the
entry function, wireless
remote control or door lock
switches.
Unlocking and locking the
doors from the outside
118
3-2. Opening, closing and locking the doors
continuously, release the buttons,
wait for at least 5 seconds, and
repeat step
2
.)
For vehicles with an alarm: To pre-
vent unintended triggering of the
alarm, unlock the doors using the
wireless remote control and open
and close a door once after the set-
tings have been changed. (If a door
is not opened within 60 seconds
after
is pressed, the doors will
be locked again and the alarm will
automatically be set.)
In case that the alarm is triggered,
immediately stop the alarm. (
■
Impact detection door lock
release system
In the event that the vehicle is sub-
ject to a strong impact, all the doors
are unlocked. Depending on the
force of the impact or the type of
accident, however, the system may
not operate.
■
Operation signals
A buzzer sounds and the emer-
gency flashers flash to indicate that
the doors have been
locked/unlocked. (Locked: Once;
Unlocked: Twice)
A buzzer sounds to indicate that the
windows and the moon roof
*
or pan-
oramic moon roof
*
are operating.
*
: If equipped
■
Security feature
If a door is not opened within
approximately 60 seconds after the
vehicle is unlocked, the security fea-
ture automatically locks the vehicle
again.
■
When the door cannot be
locked by the lock sensor on
the surface of the front door
handle
If the door will not lock even when
the topside sensor area is touched,
try touching both the topside and
underside sensor areas at the same
time.
When gloves are being worn,
remove the gloves.
■
Door lock buzzer
If an attempt to lock the doors using
the smart key system is made when
a door is not fully closed, a buzzer
will sound continuously for 5 sec-
onds. Fully close the door to stop
the buzzer, and lock the doors
again.
■
Setting the alarm (if equipped)
Locking the doors will set the alarm
system. (
Multi-informa-
tion display/Beep
Unlocking func-
tion
Exterior: Beeps 3
times
Interior: Pings
once
Holding the
driver’s door
handle unlocks
only the driver’s
door.
Holding the front
passenger’s
door handle
unlocks all the
doors.
Exterior: Beeps
twice
Interior: Pings
once
Holding either
front door handle
unlocks all the
doors.
119
3-2. Opening, closing and locking the doors
3
Before driv
ing
■
Conditions affecting the opera-
tion of the smart key system or
wireless remote control
■
If the smart key system or the
wireless remote control does
not operate properly
Use the mechanical key to lock and
unlock the doors. (
Replace the key battery with a new
one if it is depleted. (
■
If the battery is discharged
The doors cannot be locked and
unlocked using the smart key sys-
tem or wireless remote control. Lock
or unlock the doors using the
mechanical key. (
■
Rear seat reminder function
In order to remind you not to forget
luggage, etc. in the rear seat, when
the engine switch is turned off after
any of the following conditions are
met, a buzzer will sound and a mes-
sage will be displayed on the
multi-information display for approx-
imately 6 seconds.
●
The engine is started within 10
minutes after opening and closing
a rear door.
●
A rear door has been opened and
closed after the engine was
started.
However, if a rear door is opened
and then closed within approxi-
mately 2 seconds, the rear seat
reminder function may not operate.
The rear seat reminder function
determines that luggage, etc. has
been placed in a rear seat based on
opening and closing of a rear door.
Therefore, depending on the situa-
tion, the rear seat reminder function
may not operate and you may still
forget luggage, etc. in the rear seat,
or it may operate unnecessarily.
The rear seat reminder function can
be enabled/disabled. (
■
Customization
Some functions can be customized.
(
WARNING
■
To prevent an accident
Observe the following precautions
while driving the vehicle. Failure
to do so may result in a door
opening and an occupant falling
out, resulting in death or serious
injury.
●
Ensure that all doors are prop-
erly closed and locked.
●
Do not pull the inside handle of
the doors while driving.
Be especially careful for the front
doors, as the doors may be
opened even if the inside lock but-
tons are in locked position.
●
Set the rear door child-protector
locks when children are seated
in the rear seats.
■
When opening or closing a
door
Check the surroundings of the
vehicle such as whether the vehi-
cle is on an incline, whether there
is enough space for a door to
open and whether a strong wind
is blowing. When opening or clos-
ing the door, hold the door handle
tightly to prepare for any unpre-
dictable movement.
120
3-2. Opening, closing and locking the doors
■
Door lock switches
1
Locks all the doors
2
Unlocks all the doors
■
Inside lock buttons
1
Locks the door
2
Unlocks the door
The front doors can be opened by
pulling the inside handle even if the
lock buttons are in the lock position.
■
Locking the front doors from
the outside without a key
1
Move the inside lock button to
the lock position.
2
Close the door.
The door cannot be locked if the
engine switch is in ACC or ON, or
the electronic key is left inside the
vehicle.
The key may not be detected cor-
rectly and the door may be locked.
■
Open door warning buzzer
If a door or the hood is not fully
closed, a buzzer will sound when
the vehicle speed reaches 3 mph (5
km/h).
The open door(s) or hood is dis-
played on the multi-information dis-
play.
The door cannot be opened
from inside the vehicle when the
lock is set.
1
Unlock
2
Lock
These locks can be set to prevent
children from opening the rear
doors. Push down on each rear
door switch to lock both rear doors.
The following functions can be
set or canceled:
For instructions on customizing,
refer to P.521.
Unlocking and locking the
doors from the inside
Rear door child-protector
lock
Automatic door locking
and unlocking systems
121
3-2. Opening, closing and locking the doors
3
Before driv
ing
Function
Operation
Speed linked
door locking
function
All doors are auto-
matically locked
when vehicle
speed is approxi-
mately 12 mph (20
km/h) or higher.
Shift position
linked door
locking func-
tion
All doors are auto-
matically locked
when shifting the
shift lever out of P.
Shift position
linked door
unlocking
function
All doors are auto-
matically unlocked
when shifting the
shift lever to P.
Driver’s door
linked door
unlocking
function
All doors are auto-
matically unlocked
when driver’s door
is opened.
Back door
The back door can be
locked/unlocked and
opened/closed by the fol-
lowing procedures.
WARNING
Observe the following precau-
tions. Failure to do so may result
in death or serious injury.
■
Before driving the vehicle
Before driving the vehicle, make
sure that the back door is fully
closed. If the back door is not fully
closed, it may open unexpectedly
while driving, causing an acci-
dent.
■
Caution while driving
●
Keep the back door closed
while driving.
If the back door is left open, it may
hit near-by objects while driving or
luggage may be unexpectedly
thrown out, causing an accident.
In addition, exhaust gases may
enter the vehicle, causing death
or a serious health hazard. Make
sure to close the back door before
driving.
●
Never let anyone sit in the lug-
gage compartment. In the event
of sudden braking, sudden
swerving or a collision, they are
susceptible to death or serious
injury.
■
When children are in the vehi-
cle
●
Do not allow children to play in
the luggage compartment.
If a child is accidentally locked in
the luggage compartment, they
could have heat exhaustion or
other injuries.
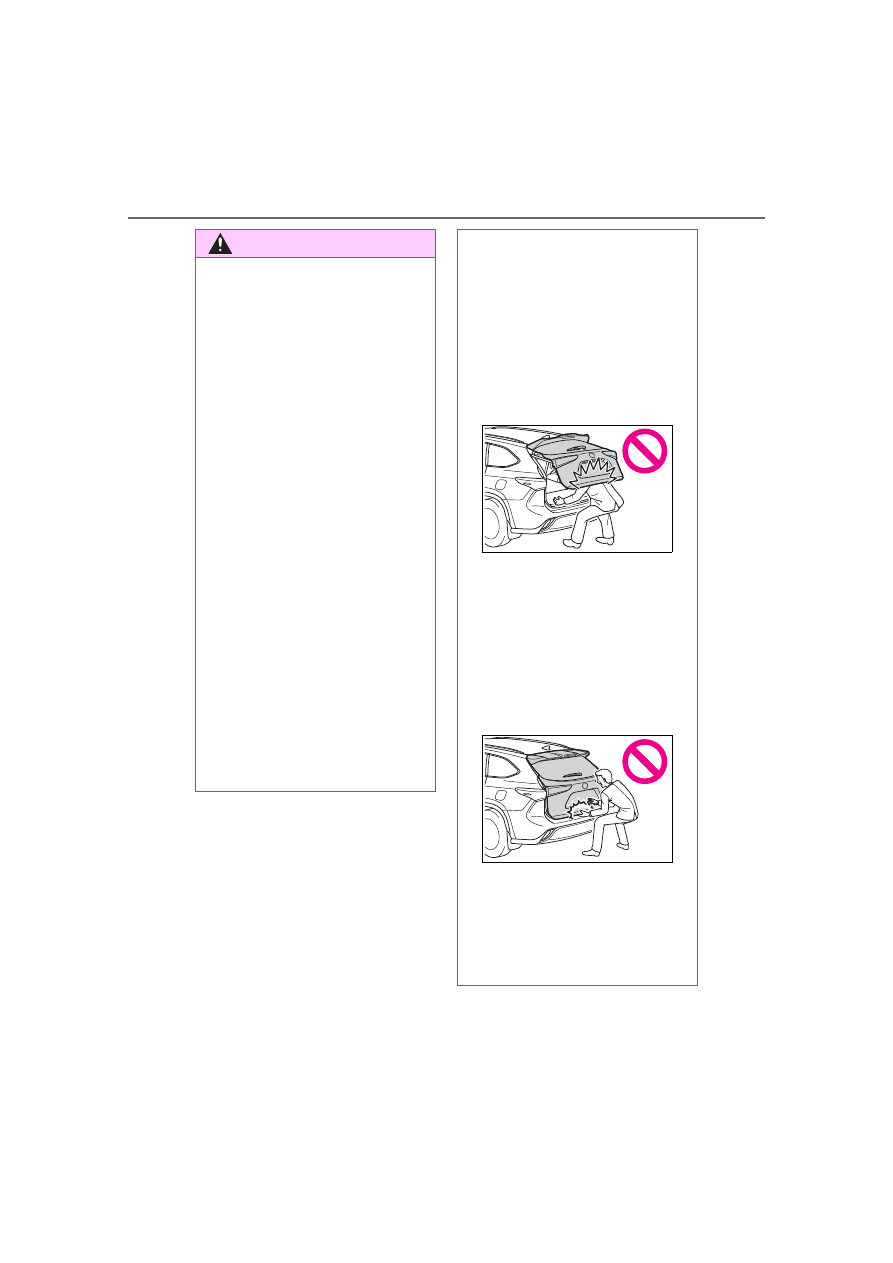
122
3-2. Opening, closing and locking the doors
WARNING
●
Do not allow a child to open or
close the back door.
Doing so may cause the back
door to move unexpectedly, or
cause the child’s hands, arms,
head, or neck to be caught by the
closing back door.
■
Operating the back door
Observe the following precau-
tions. Failure to do so may cause
parts of the body to be caught,
resulting in death or serious injury.
●
Remove any heavy loads, such
as snow and ice, from the back
door before opening it. Failure
to do so may cause the back
door to suddenly shut again
after it is opened.
●
When opening or closing the
back door, thoroughly check to
make sure the surrounding area
is safe.
●
If anyone is in the vicinity, make
sure they are safe and let them
know that the back door is
about to open or close.
●
Use caution when opening or
closing the back door in windy
weather as it may move
abruptly in strong wind.
●
Vehicles without a power back
door: The back door may sud-
denly shut if it is not opened
fully. It is more difficult to open
or close the back door on an
incline than on a level surface,
so beware of the back door
unexpectedly opening or closing
by itself. Make sure that the
back door is fully open and
secure before using the luggage
compartment.
●
Vehicles with a power back
door: The back door may sud-
denly shut if it is not opened
fully while on a steep incline.
Make sure that the back door is
secured before using the lug-
gage compartment.
●
When closing the back door,
take extra care to prevent your
fingers, etc., from being caught.
●
When closing the back door,
make sure to press it lightly on
its outer surface. If the back
door handle is used to fully
close the back door, it may
result in hands or arms being
caught.
123
3-2. Opening, closing and locking the doors
3
Before driv
ing
■
Smart key system
Carry the electronic key to
enable this function.
1
Unlocks all the doors
The doors cannot be unlocked for 3
seconds after the doors are locked.
2
Locks all the doors
Check that the door is securely
locked.
■
Wireless remote control
■
Operation signals
■
Door lock switches
■
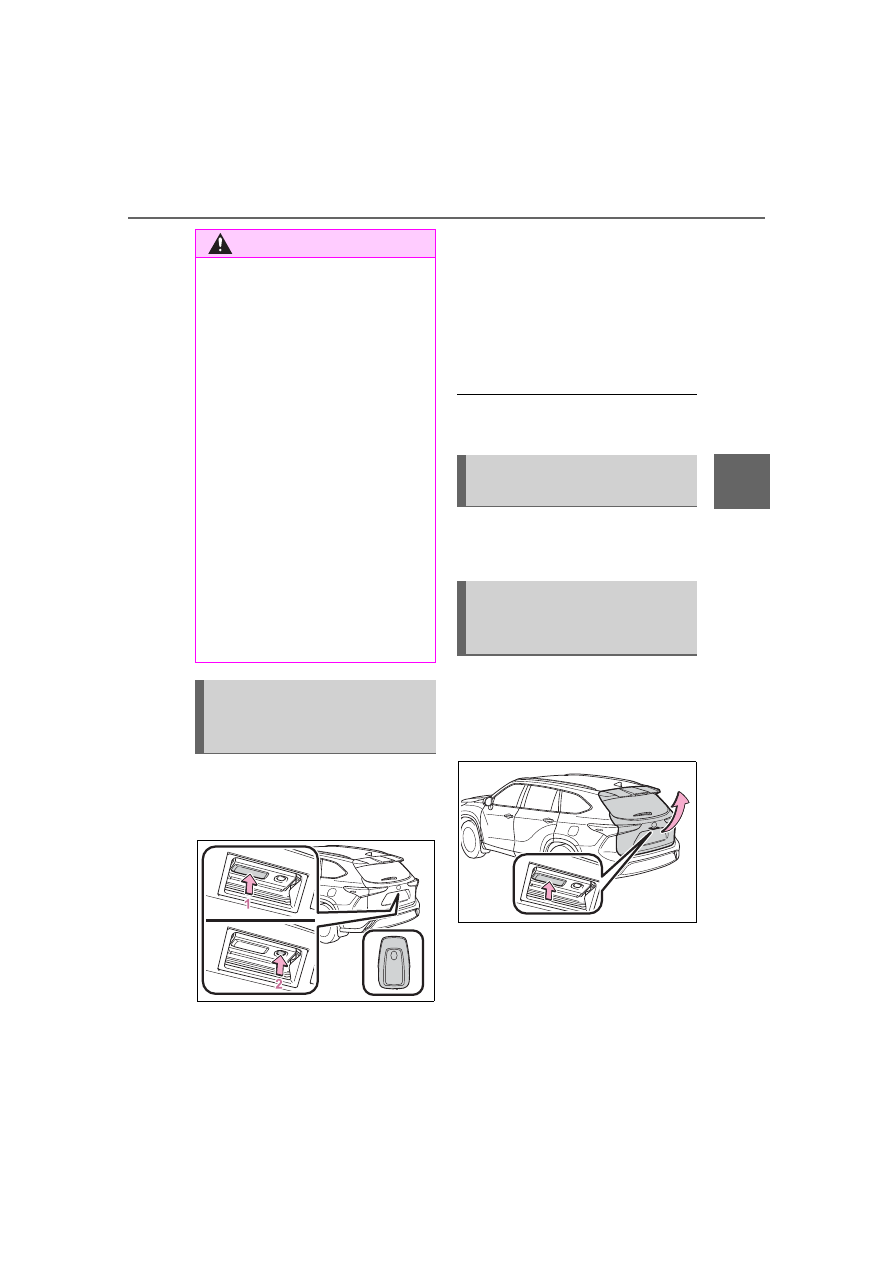
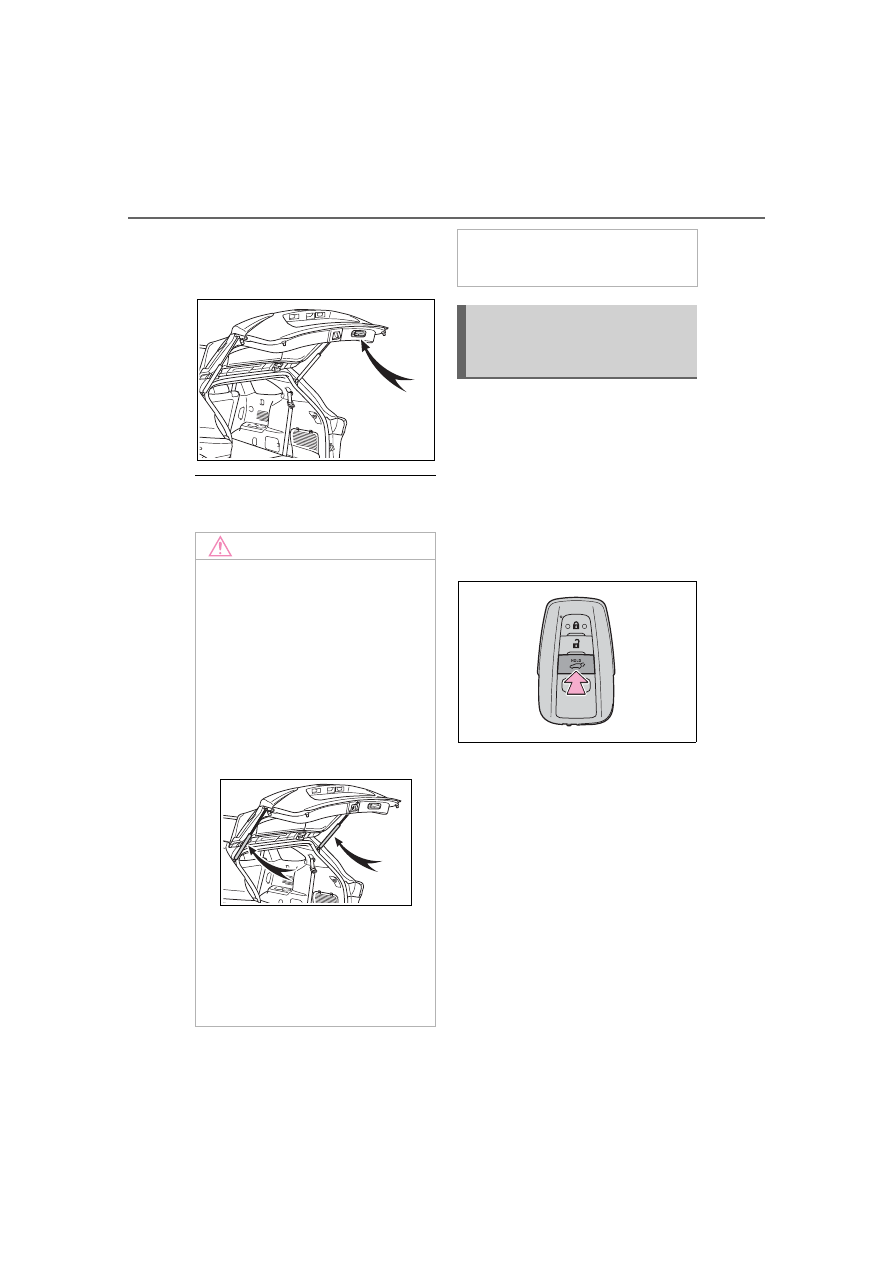
Opening the back door
Raise the back door while push-
ing up the back door opener
switch.
■
Closing the back door
Lower the back door using a
back door handle, and then
push the back door from the out-
side to close it.
WARNING
●
Do not pull on the back door
damper stay (vehicles without a
power back door) (
back door spindle (vehicles with
a power back door) (
P.131) to
close the back door, and do not
hang on the back door damper
stay (vehicles without a power
back door) or back door spindle
(vehicles with a power back
door).
Doing so may cause hands to be
caught or the back door damper
stay (vehicles without a power
back door) or back door spindle
(vehicles with a power back door)
to break, causing an accident.
●
If a heavy object is attached to
the back door, it may suddenly
shut again after being opened,
causing someone’s hands,
arms, head or neck to be caught
and injured. Do not attach any
accessories other than genuine
Toyota parts to the back door.
Unlocking and locking the
back door from the out-
side
Unlocking and locking the
back door from the inside
Opening/closing the back
door (vehicles without a
power back door)
124
3-2. Opening, closing and locking the doors
Be careful not to pull the back
door sideways when using a
handle.
■
Open door warning buzzer
■
Opening/closing the back
door using the wireless
remote control
Press and hold the switch.
Pressing the switch while the back
door is opening/closing will stop the
operation. Pressing and holding the
switch again will operate the back
door in the opposite direction.
■
Opening/closing the back
door using the power back
door switch on the instru-
ment panel
Press and hold the switch.
Unlock the back door before oper-
ating.
Pressing the switch while the back
door is opening/closing will stop the
operation. Pressing and holding the
switch again will operate the back
door in the opposite direction.
NOTICE
■
Back door damper stays
The back door is equipped with
damper stays that hold the back
door in place.
Observe the following precau-
tions. Failure to do so may cause
damage to the back door damper
stay, resulting in malfunction.
●
Do not attach any foreign
objects, such as stickers, plastic
sheets, or adhesives to the
damper stay rod.
●
Do not touch the damper stay
rod with gloves or other fabric
items.
●
Do not attach any accessories
other than genuine Toyota parts
to the back door.
●
Do not place your hand on the
damper stay or apply lateral
forces to it.
Opening/closing the back
door (vehicles with a
power back door)
Нет комментариевНе стесняйтесь поделиться с нами вашим ценным мнением.
Текст