Kia Carnival (2007 year). Manual — part 313
18
Burglar Alarm horn
ON/OFF
Contiuously ON with 60
cycles per minute,
Duty:50%
RAM ACTUATOR LIST
No.
Description
Value
Control
1
Room Lamp LS
ON/OFF
Continuously ON
2
Room Lamp LS Door
ON/OFF
Continuously ON
3
Luggage Lamp LS
ON/OFF
Continuously ON
4
LQG Motor Close
ON/OFF
3 sec ON then OFF (once)
5
LQG Motor Open
ON/OFF
3 sec ON then OFF (once)
6
RQG Motor Close
ON/OFF
3 sec ON then OFF (once)
7
RQG Motor Open
ON/OFF
3 sec ON then OFF (once)
8
RSD Power Window Up
ON/OFF
3 sec ON then OFF (once)
9
RSD Power Window Down
ON/OFF
3 sec ON then OFF (once)
10
LSD Power Window Up
ON/OFF
3 sec ON then OFF (once)
11
LSD Power Window Down
ON/OFF
3 sec ON then OFF (once)
12
LH PSD Open Close Signal
ON/OFF
0.5 sec ON then OFF
(once)
13
RH PSD Open Close Signal
ON/OFF
0.5 sec ON then OFF
(once)
14
PTG Open Close Signal
ON/OFF
0.5 sec ON then OFF
(once)
15
PSD PTG On Off Signal
ON/OFF
Continuously ON
16
Park Signal
ON/OFF
Continuously ON
17
Start Signal
ON/OFF
Continuously ON
18
Rear Defog
ON/OFF
Continuously ON
19
Rear Fog Lamps
ON/OFF
Continuously ON
20
Right Turn Signal Lamp
ON/OFF
Contiuously ON with (80 +/-
5) cycles per minute, Duty:
50%
21
Left Turn Signal Lamp
ON/OFF
Contiuously ON with (80 +/-
5) cycles per minute, Duty:
50%
22
Back Up Lamp Back Up Warning System Unit
ON/OFF
Continuously ON
23
Left/Right Tail Licence Side Marker
ON/OFF
Continuously ON
24
Door Lock
ON/OFF
0.5 sec ON then OFF
(once)
25
Door Unlock
ON/OFF
0.5 sec ON then OFF
(once)
26
Rear Wiper Motor
ON/OFF
5 sec ON then OFF (once)
27
Rear Blower Switch
& Rear Monitor
illumination
ON/OFF
Continuously ON
0.5 sec ON then OFF
28
Fuel Filler Door Solenoid
ON/OFF
0.5 sec ON then OFF
(once)
29
Map Lamp LS
ON/OFF
Continuously ON
DDM ACTUATOR LIST
No.
Description
Value
Control
1
Door Courtesy Lamp
ON/OFF
Continuously ON
2
Door Lock Out
ON/OFF
0.5 sec ON then OFF
(once)
3
Door Unlock Out
ON/OFF
0.5 sec ON then OFF
(once)
4
OSRVM Up
ON/OFF
3 sec ON then OFF (once)
5
OSRVM Down
ON/OFF
3 sec ON then OFF (once)
6
OSRVM Left
ON/OFF
3 sec ON then OFF (once)
7
OSRVM Right
ON/OFF
3 sec ON then OFF (once)
8
OSRVM Defog
ON/OFF
Continuously ON
9
Folding Motor Power Feed
ON/OFF
Continuously ON
10
Safety Power Window Auto Up Out
ON/OFF
0.2 sec ON then OFF
(once)
11
Safety Power Window Up Out
ON/OFF
3 sec ON then OFF (once)
12
Safety Power Window Auto Down Out
ON/OFF
0.2 sec ON then OFF
(once)
13
Safety Power Window Down Out
ON/OFF
3 sec ON then OFF (once)
14
Power Window up Out
ON/OFF
3 sec ON then OFF (once)
15
Power Window Down Out
ON/OFF
3 sec ON then OFF (once)
16
Illumination Out
ON/OFF
Continuously ON
ADM ACTUATOR LIST
No.
Description
Value
Control
1
Door Courtesy Lamp
ON/OFF
Continuously ON
2
Door Lock Out
ON/OFF
0.5 sec ON then OFF
(once)
3
Door Unlock Out
ON/OFF
0.5 sec ON then OFF
(once)
4
OSRVM Up
ON/OFF
3 sec ON then OFF (once)
5
OSRVM Down
ON/OFF
3 sec ON then OFF (once)
6
OSRVM Left
ON/OFF
3 sec ON then OFF (once)
7
OSRVM Right
ON/OFF
3 sec ON then OFF (once)
8
OSRVM Defog
ON/OFF
Continuously ON
9
Power Window up Out
ON/OFF
3 sec ON then OFF (once)
10
Power Window Down Out
ON/OFF
3 sec ON then OFF (once)
11
Illumination Out
ON/OFF
Continuously ON
IMS ACTUATOR LIST
No.
Description
Value
Control
1
Power Seat Slide Forward Motor
ON/OFF
Continuously ON
2
Power Seat Slide Backward Motor
ON/OFF
Continuously ON
3
Power Seat FR Height Up Motor
ON/OFF
Continuously ON
4
Power Seat FR Height Down Motor
ON/OFF
Continuously ON
5
Power Seat RR Height Up Motor
ON/OFF
Continuously ON
6
Power Seat RR Height Down Motor
ON/OFF
Continuously ON
7
Power Seat Recline Forward Motor
ON/OFF
Continuously ON
8
Power Seat Recline Backward Motor
ON/OFF
Continuously ON
9
Pedal Forward Motor
ON/OFF
Continuously ON
10
Pedal Backward Motor
ON/OFF
Continuously ON
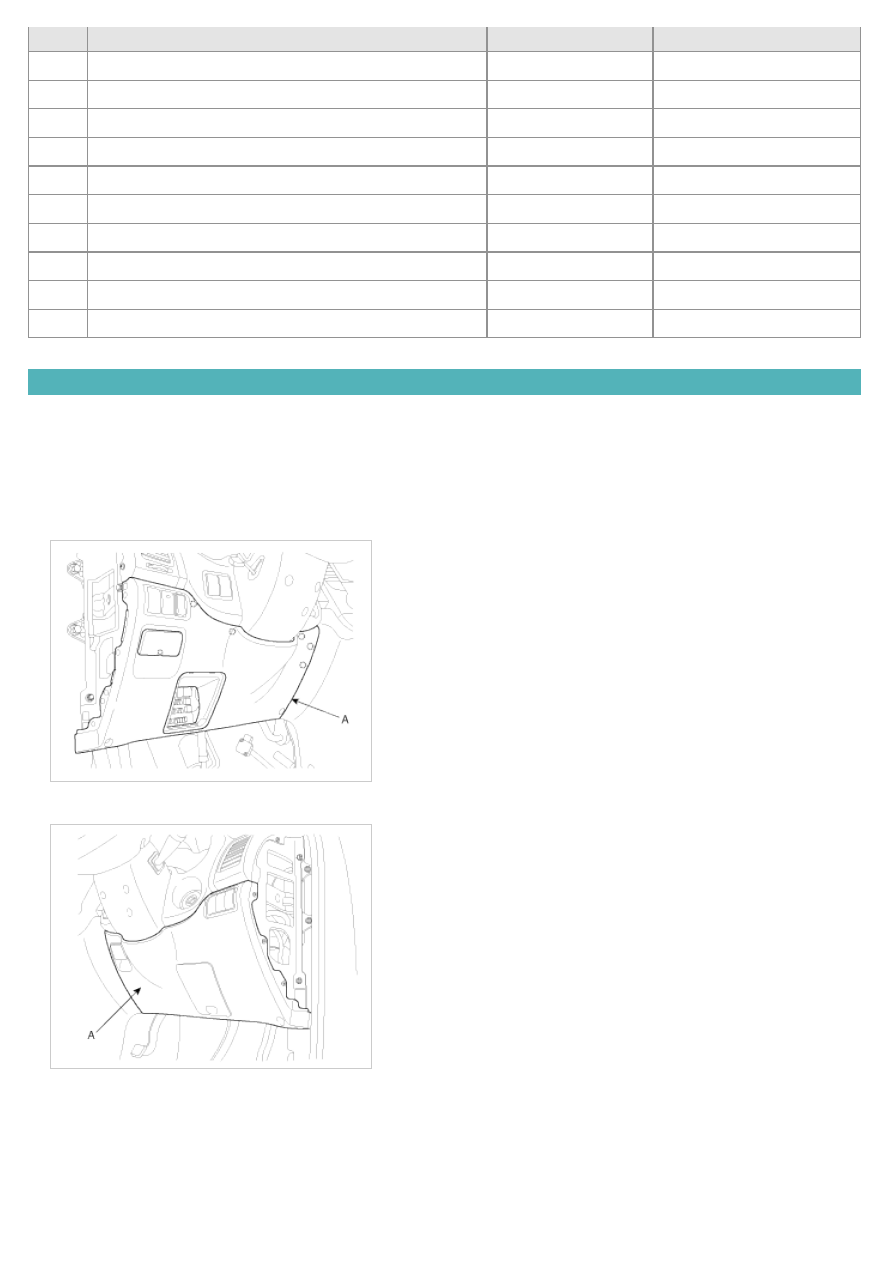
REPLACEMENT
IPM (In-Panel Module)
1. Disconnect the negative (-) battery terminal.
2. Remove the crash pad lower panel (A).
(Refer to the Body group - crash pad)
[LHD]
[RHD]
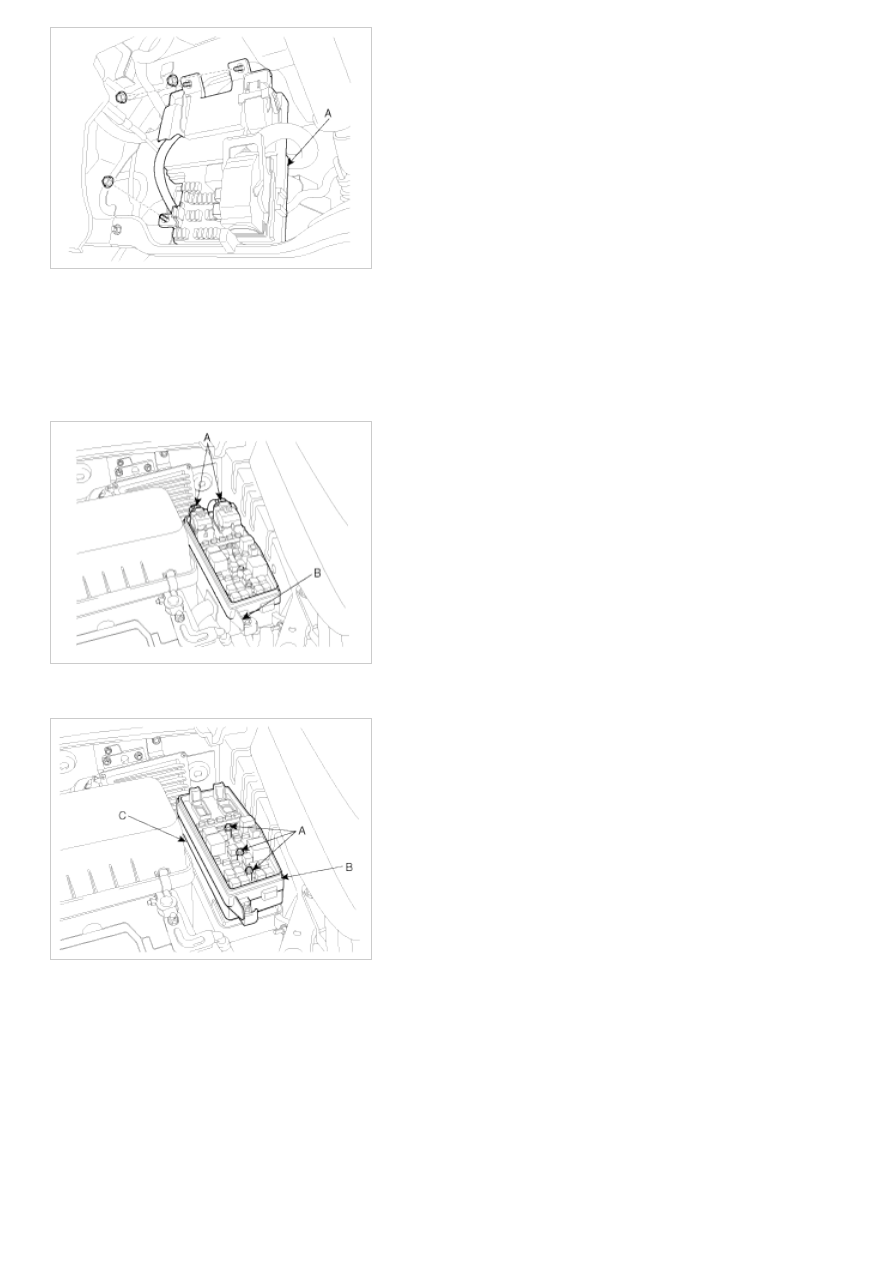
3. Remove the keyless antenna cable and IPM(Instrument Panel Module)(A) after loosening 3 nuts and disconnecting
5 connectors.
4. Installation is the reverse of removal.
FAM (Front Area Module)
1. Disconnect the negative (-) battery terminal.
2. Remove the FAM cover from the engine room.
3. Remove the 2 FAM connectors(A) and battery terminal nut(B).
4. Remove the IPM(B) from the splesh shield(C) after loosening the 3 IPM mounting bolts(A) and the IPM mounting
clip.
5. Disconnect the connector from the splesh shield.
6. Installation is the reverse of removal.
RAM (Rear Area Module)
1. Disconnect the negative (-) battery terminal.
2. Remove the left luggage side trim
(Refer to the Body group - interior trim)
3. Remove the RAM(A) after loosening the 7 connectors and the 3 RAM mounting bolts(A).
Нет комментариевНе стесняйтесь поделиться с нами вашим ценным мнением.
Текст