Freightliner Business Class M2. Manual — part 19

2.
Make sure the tires touch the ground. Do not
raise the vehicle.
3.
Clean off all grease fittings prior to lubrication.
IMPORTANT: Meritor recognizes that industry
trends are moving toward increased selection
and usage of synthetic grease in vehicle mainte-
nance. However, some seals are known to ex-
pand when in contact with synthetic grease.
Consult your local Meritor representative for
synthetic grease application references before
using any synthetic grease when performing
axle service and maintenance.
4.
Using a multipurpose grease, NLGI grade 1 or 2,
lubricate the kingpins through the grease fittings
on the top and bottom of the knuckle. See
5.
Apply lubricant until new lubricant comes from
the thrust bearing seal and the upper shim pack.
6.
Remove the chocks from the tires.
Easy Steer
™
Kingpins—Axles
With Unitized Wheel Ends
NOTE: This procedure applies to Easy Steer
Plus
™
MFS 10-2015-N and MFS 12-2015-N
sealed front axles. Refer to the identification tag
on the front of the axle beam.
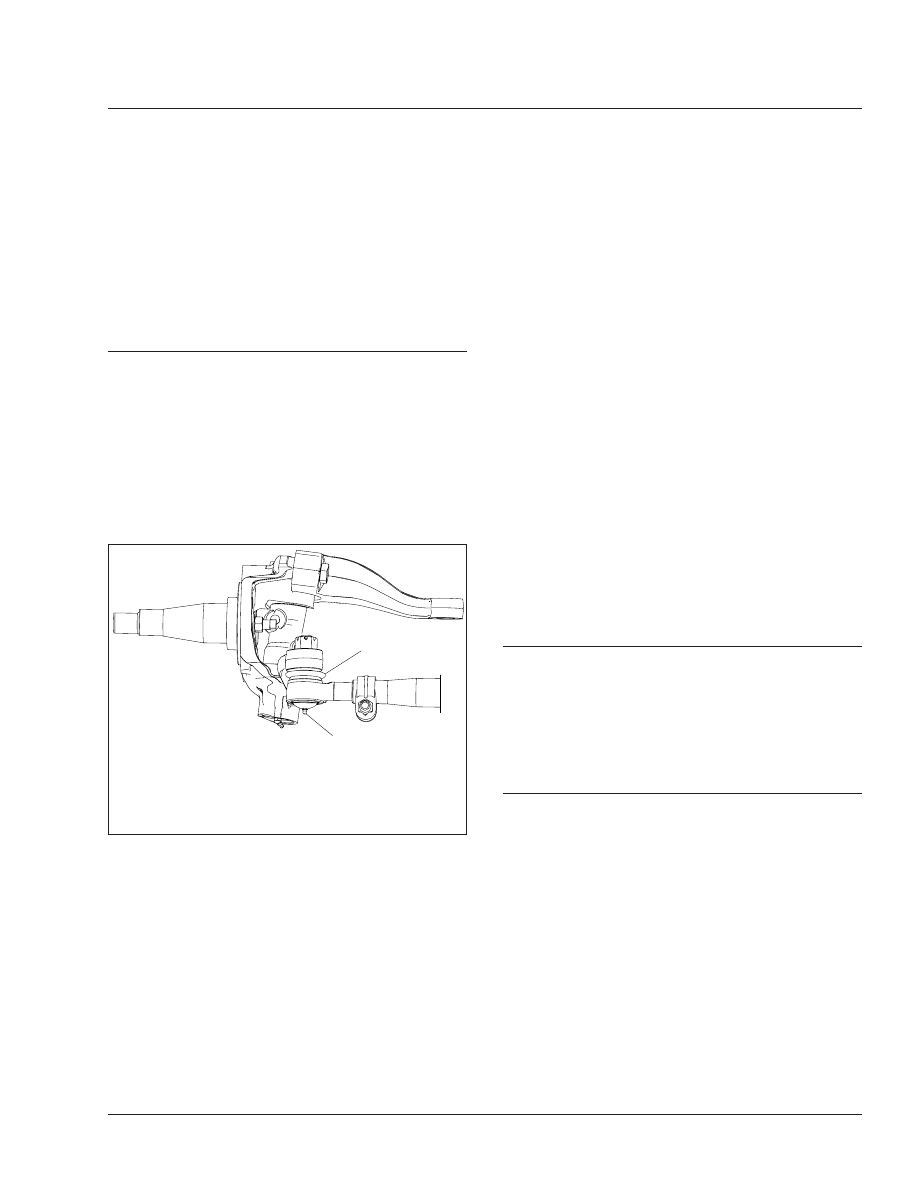
On Easy Steer Plus front axles, the grease fittings
are on the top and bottom kingpin caps of the
knuckle.
1.
Shut off the engine, apply the brakes, and chock
the rear tires.
2.
Make sure the tires touch the ground. Do not
raise the vehicle.
3.
Clean off all grease fittings prior to lubrication.
IMPORTANT: Meritor recognizes that industry
trends are moving toward increased selection
and usage of synthetic grease in vehicle mainte-
nance. However, some seals are known to ex-
pand when in contact with synthetic grease.
Consult your local Meritor representative for
synthetic grease application references before
using any synthetic grease when performing
axle service and maintenance.
4.
Using a multipurpose grease, NLGI grade 1 or 2,
lubricate the kingpins through the grease fittings
on the top and bottom of the knuckle. See
10/10/2001
f330185
1
A
A. Apply lubricant until new lubricant comes from these
areas.
1.
Grease Fitting
Fig. 3, Sealed, Easy Steer Kingpin Lubrication
10/11/2001
f330184
1
A
1
A. Apply lubricant until new lubricant comes from these
areas.
1.
Grease Fitting
Fig. 4, Sealed, Easy Steer Plus Kingpin Lubrication
Front Axle
33
Business Class M2 Maintenance Manual, August 2015
33/2
5.
Force lubricant into the upper and lower kingpin
grease fitting caps until new lubricant flows from
between the upper axle beam end and the
knuckle, and between the lower axle beam end
and the knuckle. See
6.
Remove the chocks from the tires.
33–02 Tie Rod End Lubricating
Detroit Axles
For any Detroit axle that requires lubrication of the
tie-rod ends, wipe the grease fittings clean, then
pump multipurpose chassis grease, NLGI Grade 1
(6% 12-hydroxy lithium stearate grease) or NLGI
Grade 2 (8% 12-hydroxy lithium stearate grease),
into the tie-rod ends until all used grease is forced
out and fresh grease is seen at the ball stud neck.
See
Meritor Axles
This procedure applies to all tie rod ends on Meritor
nondrive steering axles.
1.
Park the vehicle with the wheels in the straight-
ahead position. Turn off the engine, apply the
brakes, and chock the rear tires.
2.
Wipe clean the zerk fitting and the seal or boot.
NOTE: Synthetic lubricants are not approved for
tie rod end lubrication.
3.
Using a grease gun, apply a multipurpose
grease, NLGI grade 1 or 2, to the zerk fitting until
all the old grease is purged from the boot. Dis-
colored old grease should come out of the purge
holes near the boot crimp or bellows area.
Apply grease until all the old grease is purged
from the boot.
NOTE: If using an air pressure grease gun, do
not exceed 150 psi (1035 kPa).
4.
If the tie rod end is designed for lube service and
it does not accept grease, perform the following
substeps.
4.1
Remove the zerk fitting.
4.2
Inspect the threaded zerk fitting hole in
the tie rod end, and remove any obstruc-
tions.
4.3
Install a new zerk fitting.
4.4
Apply lubrication to the new zerk fitting.
5.
Remove the chocks from the tires.
33–03 Draw Key Nut Torque
Checking
Axles With Unitized Wheel Ends
Check the torque of the nut that holds the draw key
on the side of the knuckle. The torque should be 30
to 45 lbf·ft (41 to 61 N·m). See
33–04 Tie Rod End Inspecting
IMPORTANT: If the tie rod end boot is torn or
missing, replace the entire tie rod end. Do not
replace the boot only.
1.
Shut off the engine, apply the brakes, and chock
the rear tires.
2.
Check the tie rod boot for cracks, tears, or other
damage. If the tie rod boot is damaged, replace
the entire tie rod end.
3.
Grasp by hand (or use a pipe wrench with jaw
protectors to avoid gouging the cross tube) and
slightly rotate the cross tube toward the front of
the vehicle and then slightly toward the rear.
Then center the cross tube between the stop po-
06/12/2012
f330273
1
2
NOTE: No grease should emit from the tie-rod boot. If
grease emits from the tie-rod boot, the boot is dam-
aged.
1.
Grease Fitting
2.
Boot
Fig. 5, Grease Fitting and Boot, Detroit Axle
Front Axle
33
Business Class M2 Maintenance Manual, August 2015
33/3
sitions. If the cross tube does not rotate in either
direction, replace both tie rod ends.
4.
Position yourself directly below the ball stud
socket. Using both hands, grab the end as close
to the socket as possible, no more than 6 inches
(15.2 cm) from the end. Firmly apply about 100
pounds of hand pressure in an up and down mo-
tion several times. When moving the assembly,
check for any movement at both tie rod ends.
See
If any movement is detected at one tie rod end,
replace both tie rod ends. Always replace tie rod
ends in pairs, even if only one tie rod end is
damaged.
CAUTION
Do not attempt to straighten a bent cross tube.
Doing so could result in damage to the axle. Be
sure to replace the cross tube with an original
equipment cross tube with the same length, diam-
eter, and thread size as the existing cross tube.
5.
Check the cross tube for cracks or other dam-
age. If the cross tube is bent or damaged, re-
place the cross tube.
6.
Check the clamps for damage. If a clamp is
damaged, replace the clamp. Replace the entire
cross tube assembly if either clamp is welded to
the cross tube.
7.
Check for proper installation of the tie rod end
clamp to the cross tube. Make sure that the tie
rod ends are threaded in the cross tube past the
clamps and the slots at the cross tube ends.
8.
Check the zerk fittings for damage. If a zerk fit-
ting is damaged, replace it.
Some tie rod ends have no zerk fittings because
they are not greaseable. Do not install a zerk
fitting on a nongreaseable tie rod end.
9.
Check that the cotter pin is in place. If it is not,
tighten the tie rod end nut to one of the following
specs depending on the size of the stud.
• 7/8–14, 160 to 300 lbf·ft (217 to 406 N·m)
• 1–14, 250 to 450 lbf·ft (339 to 610 N·m)
• 1-1/8–12, 350 to 650 lbf·ft (475 to 881
N·m)
• 1-1/4–12, 500 to 675 lbf·ft (678 to 915
N·m)
10. Check the steering arm bolts for a minimum
torque of 300 lbf·ft (406 N·m). If the steering arm
bolt torque has fallen below this specification,
remove the bolt, clean all the threads, and apply
new Loctite® 680. Tighten the bolt 300 to 450
lbf·ft (406 to 610 N·m).
11. Remove the chocks from the tires.
10/11/2001
f330186
Fig. 6, Draw Key Nut
10/10/2001
f330195
Fig. 7, Check Movement of Tie Rod End
Front Axle
33
Business Class M2 Maintenance Manual, August 2015
33/4
33–05 Wheel End Inspection
and Maintenance, 6,000-
Pound and 8,000-Pound
Steer Axles with Oil-
Lubricated Hubs
Periodic inspection and maintenance of wheel ends
on 6,000-pound and 8,000-pound steer axles is es-
sential to sound wheel bearing performance. Check
for leaks at the oil seal and hub, and inspect the lu-
bricant per the maintenance intervals provided in
of this manual.
Oil Seal Leak Check
Check for evidence of oil leakage at the oil seal. If a
leak is found, replace the seal. See Section 33.02 of
the Business Class® M2 Workshop Manual for
instructions.
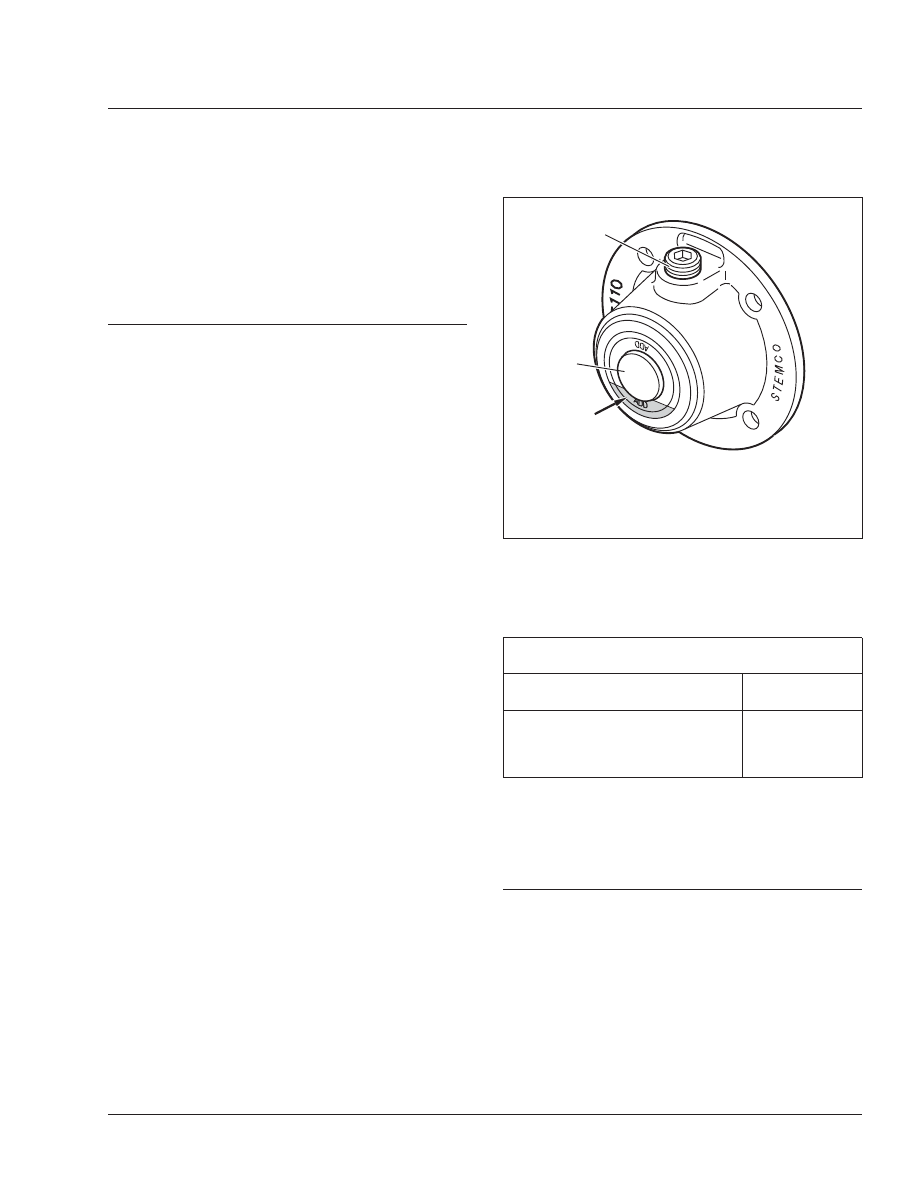
Hub Cap Leak Inspection
Check for evidence of oil leakage between the hub
cap, gasket and hub surface. If leakage is evident,
replace the gasket with a new one. See Section
33.01, Subject 100 of the Business Class® M2
Workshop Manual for instructions.
Check for a missing hub cap fill plug or vent plug.
See
. Replace any missing parts. If a vent plug
is missing, the oil quality is compromised and must
be replaced. See Section 33.01, Subject 100 of the
Business Class® M2 Workshop Manual for
instructions.
Lubricant Inspection
Rotate the hub so that the fill plug is down, and drain
a small sample of hub oil into a plastic container that
is free of debris, especially any metallic particles.
Then use a magnet to probe the sample. Note
whether there is substantial metallic debris present,
and compare the oil color to new approved oil. Ac-
ceptable oil will have a color similar to new oil and
have no water or metal contaminants.
If the oil is not acceptable, inspect the bearings for
damage. Replace the bearings as needed, and install
the hub per Section 33.01, Subject 100 of the
Business Class® M2 Workshop Manual.
If the oil is acceptable, check the oil level. If it is not
full (see
), fill it to the bottom of the vent plug
hole with approved lubricant (see
Lubricant Specifications, Over-the-Road Service
Applications
Lubricant Type
Lubricant SAE
Viscosity Grade
Synthetic Drive Axle Lubricants or
Equivalent with SAE Specification
J2360 or Military Specification MIL-L-
2105E
75W-90
Table 1, Lubricant Specifications, Over-the-Road
Service Applications
33–06 All-Axle Alignment
Check
Drive Axle Alignment Checking
Check the axle alignment, parallelism, and thrust
angle measurements for the rear drive axles. Use the
applicable procedure and specifications in Group 35
of the vehicle Workshop Manual.
f330247a
A
1
2
01/05/2009
A. Hub Cavity Full
1.
Vent Plug
2.
Magnetic Drain/Fill Plug
Fig. 8, Stemco Hub Cap
Front Axle
33
Business Class M2 Maintenance Manual, August 2015
33/5
Нет комментариевНе стесняйтесь поделиться с нами вашим ценным мнением.
Текст