BYD F3DM. Service Manual — part 3
- 33 -
F3DM Owner’s Manual
Specifications of Remote Control
Frequency range: 314.9-315.1MHz
Transmission Power: ≤5500μV/m (field
strength)
Spurious emission limit: ≤610μV/m
Occupied bandwidth: ≤300kHz
NOTICE
y
D o n o t a l t e r t h e e m i s s i o n
frequency, increase the emission
power (including but not limited
to adding emission frequency
amplifiers), equip external
antenna or use other emission
antennas.
y
Do not interfere with wireless
communication; stop using
it immediately is case of any
interference
y
Do not use it near aircrafts or
airports.
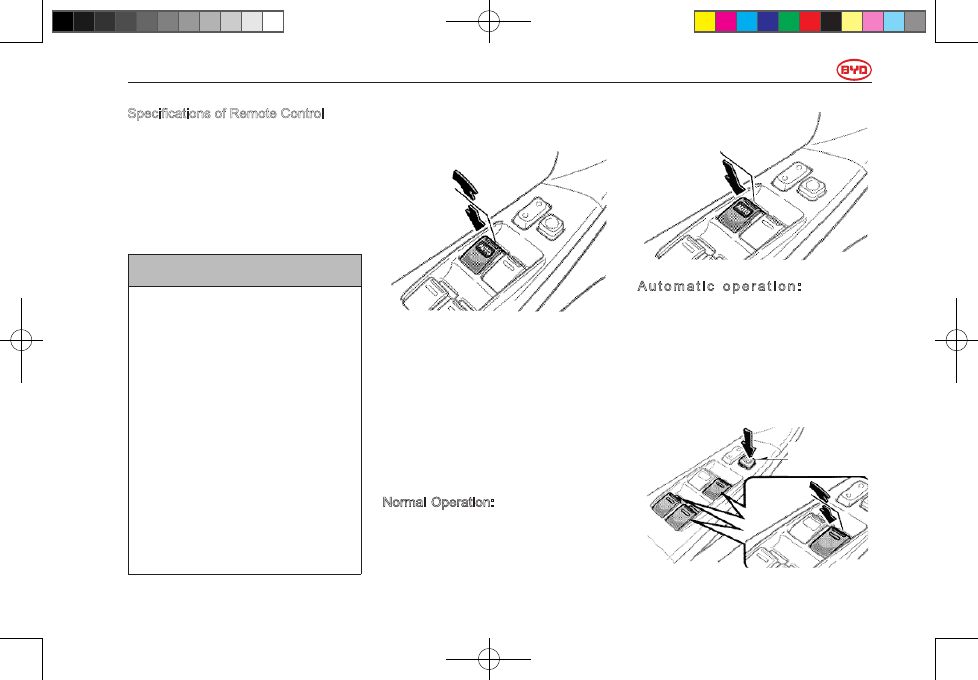
Power Windows
Switch on each door can control the
corresponding window.
The ignition key shall be at “ON”
position.
OPERATING THE DRIVER’S
WINDOW by the switch on the driver’s
door.
Normal Operation: The window moves
as long as you hold the switch.
To open: Lightly push the switch down.
To close: Lightly pull the switch up.
A u t o m a t i c o p e r a t i o n : P u s h t h e
switch down completely or pull it up
completely. The window will open or
close fully. Move the switch in the
opposite direction lightly and then
release it, the window will be stopped.
Door Locking
Switch
使用手册小330.indd 33
2011-4-13 18:36:41
-------------------------------------------------------------------------------------------------------------------------------------------------------------
- 34 -
F3DM Owner’s Manual
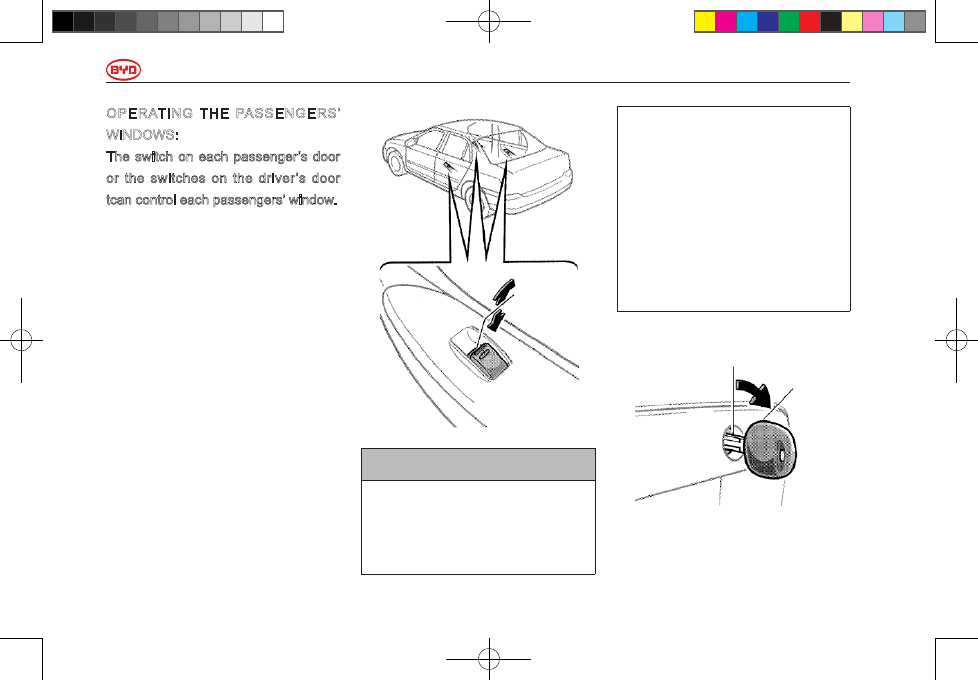
OPERATING THE PASSENGERS’
WINDOWS:
The switch on each passenger’s door
or the switches on the driver’s door
tcan control each passengers’ window.
The window moves as long as you
hold the switch.
To open: Push the switch down.
To close: Pull the switch up.
The passenger’s windows can be
operated if the window lock switch on
the driver’s door is pressed.
NOTICE
y
As the power windiw does not
equip with anti-pinch function.
Use caution when using to avoid
serious injury.
y
When small children are in the
vehicle, prevent them using the
power window switches without
supervision.
Press the window lock switch
to prevent them from making
unexpected use of the switches.
y
Make sure the ignition key is
removed before leaving the car.
Luggage Compartment Lid
To open the luggage compartment
lid outside, insert the key and turn it
clockwise.
使用手册小330.indd 34
2011-4-13 18:36:41
-------------------------------------------------------------------------------------------------------------------------------------------------------------
- 35 -
F3DM Owner’s Manual
For precautions on loading luggage,
please refer to “Precautions on
Loading Luggage” in Chapter 2.
To close the luggage compartment
lid, just pull and press it down. Check
whether it is locked tightly after closing.
WARNING
Keep the back door closed while
driving. This not only keeps the
luggage from being thrown out, but
also prevents exhaust gases from
entering the vehicle.
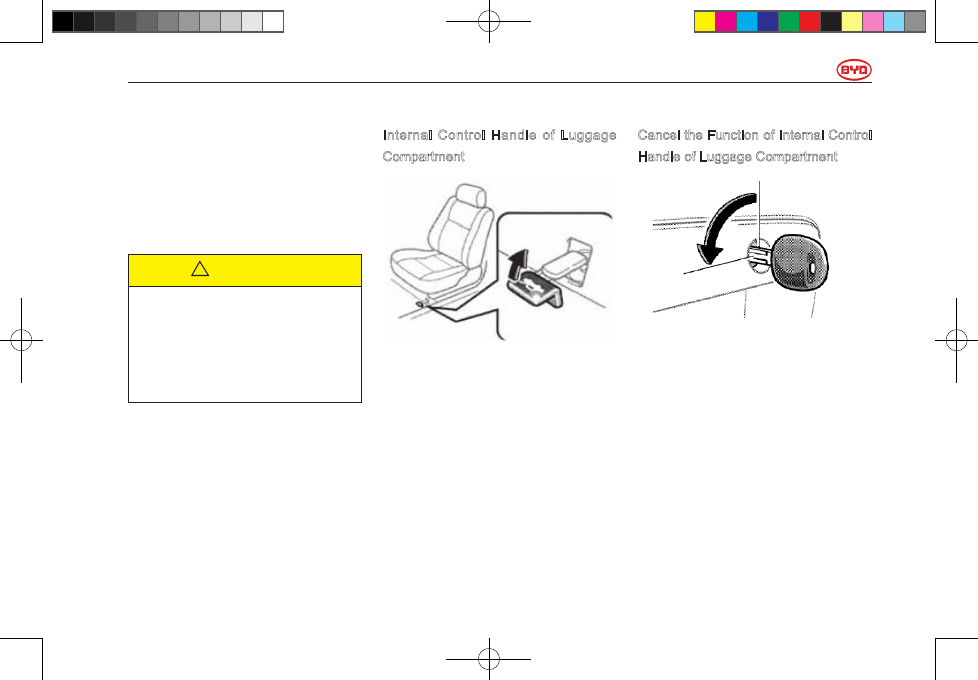
Internal Control Handle of Luggage
Compartment
To open the luggage compartment lid,
pull up the internal control handle of
luggage compartment under the driver
seat.
Cancel the Function of Internal Control
Handle of Luggage Compartment
After closing the luggage compartment,
insert the key and turn it anticlockwise
to disable the internal control handle of
luggage compartment.
!
使用手册小330.indd 35
2011-4-13 18:36:41
-------------------------------------------------------------------------------------------------------------------------------------------------------------
- 36 -
F3DM Owner’s Manual
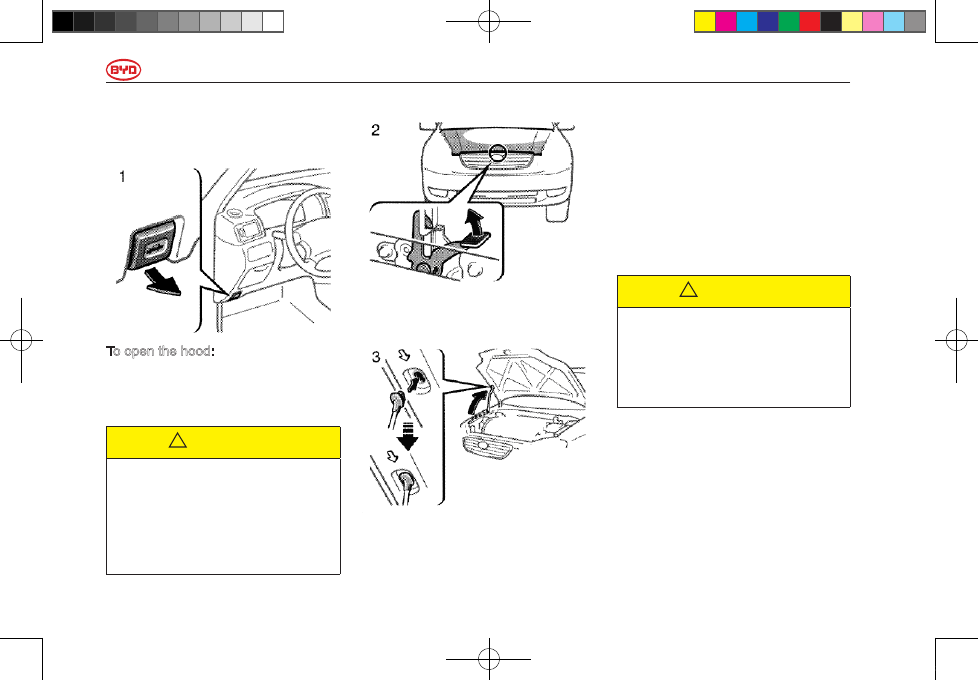
Hood
To open the hood:
1. Pull the hood lock release lever. The
hood will pop up slightly.
WARNING
Before driving, be sure that the hood
is closed and securely locked.
Otherwise, the hood may open
unexpectedly while driving and an
accident may occur.
2. In front of the vehicle, pull up the
auxiliary catch lever and lift up the
hood.
3. Hold the hood open by inserting the
support rod into the slot.
Before closing the hood, ensure you
have not forgotten any tools, rags,etc.
and return the support rod to its clip—
this prevents rattles. Then lower the
hood and make sure it locks into place.
If necessary, press down gently on the
front edge to lock it.
WARNING
After inserting the support rod into
the slot, make sure the rod supports
the hood securely from falling down
on to your head or body.
To deter vehicle theft, the system will
sound an alarm if any of the doors or
hood is forcibly unlocked or the battery
terminal is reconnected when the
vehicle is locked.
!
!
使用手册小330.indd 36
2011-4-13 18:36:42
-------------------------------------------------------------------------------------------------------------------------------------------------------------
- 37 -
F3DM Owner’s Manual
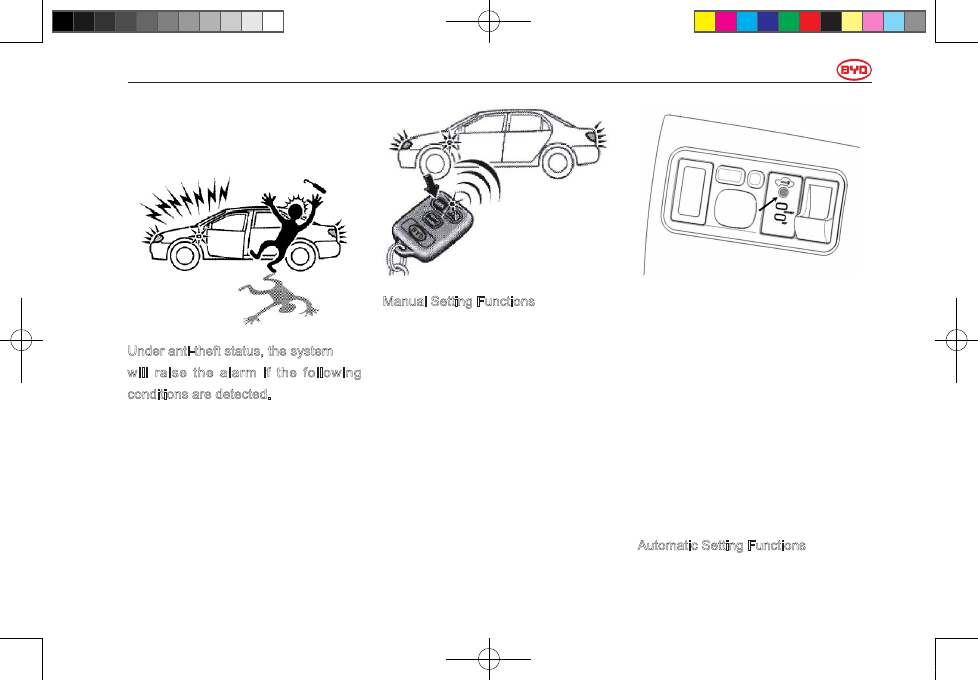
Anti-theft system
Under anti-theft status, the system
will raise the alarm if the following
conditions are detected.
y
Any car door is unlocked.
y
The ignition switch is turned to “ON”.
y
Reconnect the battery or anti-theft
controller after disconnecting.
y
Insert the ignition key.
If someone tries to damage you car
or break in, the system will sound the
alarm and the turn signal lights flash.
Manual Setting Functions
Set the anti-theft system manually with
remote control.
Press LOCK button on the remote
control to enable anti-theft function,
then the turn signal lights flash once
and all the doors will be locked.
About 1 second later, anti-theft function
is enabled, and then anti-theft warning
light (dashed part in the picture) begins
to flash slowly.
If any door is unlocked, press LOCK
button, then the alarm sound a long
tone and the vehicle can not enter anti-
theft function; please follow the steps
below:
y
Close all the doors
y
Reset the anti-theft system.
Automatic Setting Functions
It is optional. You need to change the
使用手册小330.indd 37
2011-4-13 18:36:42
-------------------------------------------------------------------------------------------------------------------------------------------------------------
- 38 -
F3DM Owner’s Manual
function mode; please refer to “Settings
of Optional Functions”.
If no operations on the remote control
within 30 seconds after remove the key
and closing all the doors, the car will
enable anti-theft function automatically.
Under anti-theft status, insert the key
into ignition switch, then the signal
lights flash for caution but the alarm will
not sound; when you turn the ignition
key to “ON”, anti-theft function will be
released (to unlock in anti-theft mode
is only limited to this status); also you
can press UNLOCK button to release
anti-theft function.
Disable Anti-theft Function
Press UNLOCK button on the remote
control, and then all the doors will be
unlocked to disable anti-theft function.
The system will give a sign about the
vehicle conditions as follows:
● If anti-theft function is not enabled,
the turn signal lights flash twice.
● If anti-theft function is enabled, the
turn signal lights flash three times and
anti-theft warning light flashes rapidly;
when you turn the ignition switch to
“ON”, the indicator will go out.
When anti-theft function is disabled,
the rear interior light and ignition key
warning light (optional) will be on for
about 30 seconds, even if no doors are
open. (Delay time for two lights can be
changed. For details, please refer to
“Settings of Optional Functions”).
If anti-theft function can not be disabled
by remote control, you disable it by
the key; just turn the ignition switch
from “ACC” to “ON” ten times within 15
seconds after opening the doors.
After anti-theft function is disabled,
The doors will be unlocked for 30
seconds, all the doors will be locked
again automatically and enter anti-theft
status if no door is opened.
Enable Anti-theft Function
If any abnormalities below are detected
by the anti-theft system, the signal
lights will flash and the alarm will sound
for about 30 seconds.
y
Any doors open.
y
Insert the ignition key.
y
Reconnect the battery or anti-theft
controller.
Restart Alarming
Under the following conditions, alarm
will be enabled again after it stops.
● Any door is opened.
● Insert the key into ignition switch.
The alarm sounds, the turn signal lights
flash for about 30 seconds and then
stop for 15 seconds, which will repeat
continuously three times. The times of
使用手册小330.indd 38
2011-4-13 18:36:42
-------------------------------------------------------------------------------------------------------------------------------------------------------------
- 39 -
F3DM Owner’s Manual
repetition can be changed. For details,
please refer to “Settings of Optional
Functions”.
Reset Anti-theft System
If anti-theft system is not under the
status above, alarm will stop after
the repetition ends. After alarm
stops, the anti-theft system will be
set automatically if the Auto Setting
Functions is selected.
Stop Alarming
When the anti-theft alarm sounds, you
can press LOCK button to stop it, but
the anti-theft function is still enabled.
When anti-theft alarm sounds, you
can press the UNLOCK button to stop
it and the anti-theft function will be
disabled.
Settings of Optional Functions
Optional Anti-theft Functions
● Automatic Setting Functions
For details, please refer to “Steps for
Changing Optional Functions”.
● Auto Lock and Unlock
For details, please refer to “Steps for
Changing Optional Functions”.
● Lighting System on the Car
For details, please refer “Rear Interior
lights” and “Ignition Key Warning Lights
(optional)” in this Chapter.
● Enable Alarm of Six Cycles
When anti-theft alarm is enabled, the
alarm sounds and turn signal lights
flash for about 30 seconds and then
stop for about 15 seconds, which is
regarded as a cycle. Default of auto
setting is to enable alarm of three
cycles, yet which can be changed to
six cycles.
After the alarm of six cycles is set,
alarm of three cycles and nine cycles
will be disabled automatically. When
the alarms of 6 and 9 cycles are
disabled, it will be restored to the
default “alarm of 3 cycles”.
● Enable Alarm of Nine Cycles
Similarly, you can select to change
it into alarm of 9 cycles. When this
function is selected, the default to
enable alarm of three cycles and six
cycles will be disabled automatically.
When the alarms of 6 and 9 cycles
are disabled, it will be restored to the
default setting “alarm of 3 cycles”.
● 15-Second Time Delay for Getting
into the Car
When all the car doors are unlocked
by remote control, the rear interior light
and ignition key warning light (optional)
will be on about 15 seconds (default:
30 seconds). When this function is
selected, about-30-second time delay
使用手册小330.indd 39
2011-4-13 18:36:42
-------------------------------------------------------------------------------------------------------------------------------------------------------------
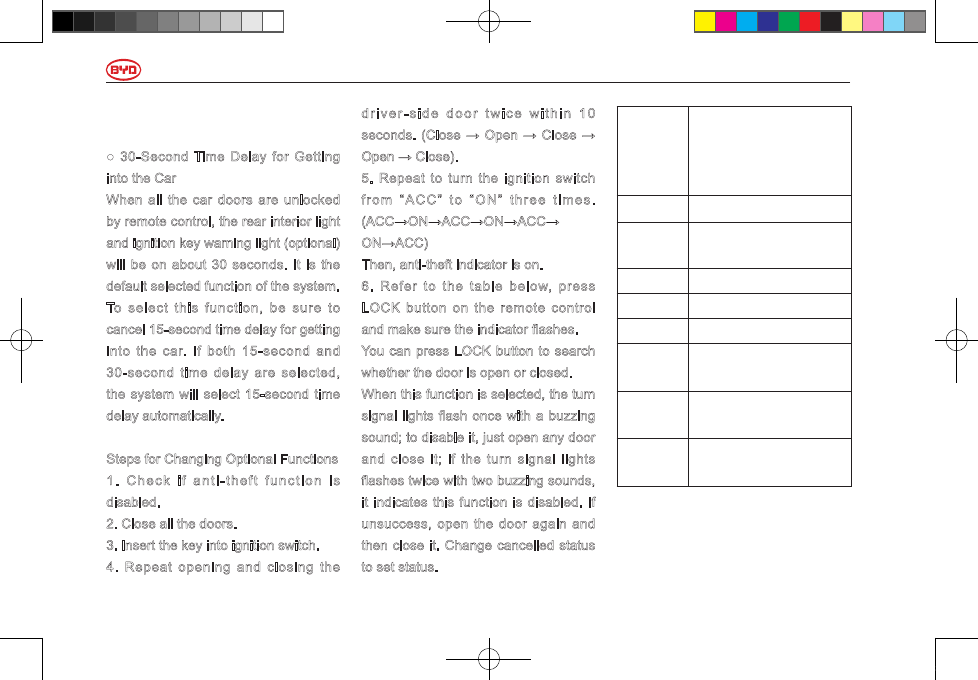
- 40 -
F3DM Owner’s Manual
for getting into the car will be cancelled
automatically.
● 30-Second Time Delay for Getting
into the Car
When all the car doors are unlocked
by remote control, the rear interior light
and ignition key warning light (optional)
will be on about 30 seconds. It is the
default selected function of the system.
To select this function, be sure to
cancel 15-second time delay for getting
into the car. If both 15-second and
30-second time delay are selected,
the system will select 15-second time
delay automatically.
Steps for Changing Optional Functions
1. Check if anti-theft function is
disabled.
2. Close all the doors.
3. Insert the key into ignition switch.
4. Repeat opening and closing the
driver-side door twice within 10
seconds. (Close → Open → Close →
Open → Close).
5. Repeat to turn the ignition switch
from “ACC” to “ON” three times.
(ACC→ON→ACC→ON→ACC→
ON→ACC)
Then, anti-theft indicator is on.
6. Refer to the table below, press
LOCK button on the remote control
and make sure the indicator flashes.
You can press LOCK button to search
whether the door is open or closed.
When this function is selected, the turn
signal lights flash once with a buzzing
sound; to disable it, just open any door
and close it; if the turn signal lights
flashes twice with two buzzing sounds,
it indicates this function is disabled. If
unsuccess, open the door again and
then close it. Change cancelled status
to set status.
Times for
pressing
LOCK
button
Selected Functions
One
Auto setting functions
Two
Door auto lock and
unlock
Three
Lighting system
Four
Enable alarm of 6 cycles
Five
Enable alarm of 9 cycles
Six
15-second time delay for
getting into the car
Seven
30-second time delay for
getting into the car
Eight
Vibration sensitivity
settings (optional)
7. You can complete function setting by
doing any items below.
● Turn the ignition switch to “ON”.
● Close the driver-side door for over
使用手册小330.indd 40
2011-4-13 18:36:42
-------------------------------------------------------------------------------------------------------------------------------------------------------------
- 41 -
F3DM Owner’s Manual
30 seconds.
● Press LOCK button once more on
the remote control.
For more details about this function,
you can consult BYD authorized
service station.
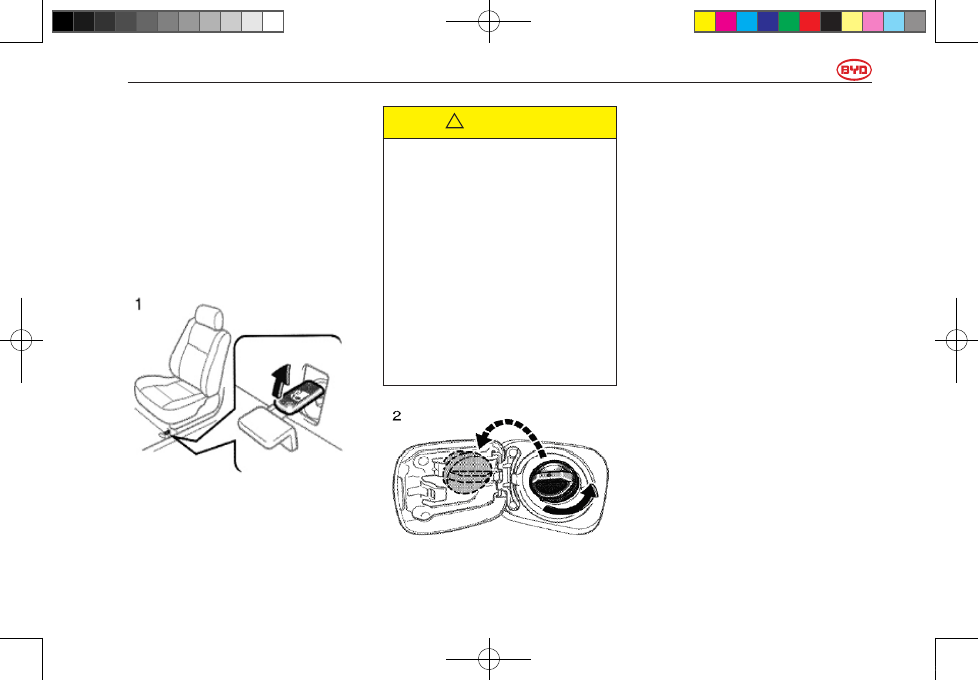
Fuel tank cap
1. To open the fuel filler door, pull the
lever up.
Turn off the hybrid system
duringrefueling.
WARNING
y
Do not smoke, cause spark or allow
open flames when refueling. The
fumes are flammable.
y
When opening the cap, do not
remove the cap quickly. In hot
weather, fuel under pressure could
cause injury by spraying out the
filler neck if the cap is suddenly
removed.
y
Insert the fuel nozzle fully, or fuel
may splash out.
2. To remove the fuel tank cap, turn
the cap counterclockwise by 90
degrees (to the pressure point 1), and
then turn it a additional 30 degrees
(to point 2). Pause slightly before
removing it.
It is not unusual to hear a slight
swoosh when the cap is opened.
!
使用手册小330.indd 41
2011-4-13 18:36:42
-------------------------------------------------------------------------------------------------------------------------------------------------------------
- 42 -
F3DM Owner’s Manual
WARNING
y
Make sure the cap is installed
securely
to prevent fuel spillage in
the event of an accident.
y
Use only a genuine BYD fuel tank
cap for replacement. It is
designed
to regulate fuel tank pressure.
NOTICE
To prevent damage to the cap, apply
force only in the turning direction to
the cap. Do not pull or pry it.
3. The removed cap can be stored on
the back side of the fuel filler door.
Position the cap so that the hooks
point to the left and right, and set it in
the receptacle on the back side of the
door.
When installing the cap, turn the cap
clockwise until you hear a click. And
check whether the cap is tightened
securely Make sure the cap is
tightened securely. If the cap is not
tightened securely, the malfunction
indicator lamp will come on. The
indicator lamp will go off when driving. ,
Contact your Toyota dealer as soon as
possible if the indicator lamp does not
go out.
!
使用手册小330.indd 42
2011-4-13 18:36:42
-------------------------------------------------------------------------------------------------------------------------------------------------------------
- 43 -
F3DM Owner’s Manual
Chapter 1
Section 1-3
—————————————————————————————
Operations of Instruments and Controllers
Seats, Seat Belts, Steering Wheel and
Rear-view Mirrors
Seats . . . . . . . . . . . . 44
Front Seats precautions . . . . . . . . 44
Rear Seats precautions . . . . . . . . 47
Middle Handrail of Rear Folding Seats . . . . . 48
Seat Belts . . . . . . . . . . . 48
SRS for Driver and SRS for Front Seat Passengers . . 52
Steering Wheel . . . . . . . . . . 62
Power Exterior Rearview Mirrors . . . . . . … 63
Interior Rearview Mirror . . . . . . . . … 64
使用手册小330.indd 43
2011-4-13 18:36:42
-------------------------------------------------------------------------------------------------------------------------------------------------------------
- 44 -
F3DM Owner’s Manual
Seats
During driving, all vehicle occupants
should have the seatback upright, sit
well back in the seat and use seat belts
provided correctly.
WARNING
y
Do not drive the vehicle unless
the occupants are properly
seated. Never let passengers
to ride in the cargo area or on
top of a folded–down seatback,
Persons not properly seated and/
or not properly restrained by seat
belts can be seriously injured in
the event of emergency braking
or a crash. During driving,
Passengers should not stand up
or change seats while the vehicle
is moving. Otherwise, severe
injuries can occur in the event of
emergency braking or a crash.
Front seats precautions
Driver seat
WARNING
y
Sitting too close to a front driver
airbag can result in serious injury
or death if the front airbags
inflate. The National Highway
Traffic Safety Administration
“NHTSA” advises: Since the risk
zone for driver airbag is the first
50–75 mm (2–3 in.) of inflation,
placing yourself 250 mm (10 in.)
from your diver airbag provides
you with a clear margin of safety.
This distance is measured from
the center of the steering wheel
to your breastbone. If you sit less
than 250 mm (10 in.) away now,
you can change your driving
position in several ways: _ Move
your seat to the rear as far as you
can while still reaching the pedals
comfortably. Slightly recline the
back of the seat. Although vehicle
designs vary, many drivers can
achieve the 250 mm (10 in.)
distance, even with the driver
seat all the way forward, simply
by reclining the back of the seat
somewhat. If reclining the back
of your seat makes it hard to see
the road, raise yourself by using
a firm, non–slippery cushion, or
raise the seat if your vehicle has
that feature.
y
If your steering wheel is
adjustable, tilt it downward. This
!
!
使用手册小330.indd 44
2011-4-13 18:36:42
-------------------------------------------------------------------------------------------------------------------------------------------------------------
- 45 -
F3DM Owner’s Manual
points the airbag toward your chest
instead of your head and neck.
The seat should be adjusted as
recommended by NHTSA above,
while still maintaining control of the
foot pedals, steering wheel, and
your view of the instrument panel
controls.
Front passenger seat
WARNING
y
Sitting too close to a front
passenger airbag can result
in serious injury or death if the
front airbags inflate. The front
passenger seat should be as far
from the airbag as possible with
the seatback adjusted, so the front
passenger sits upright.
Seat adjustment precautions
WARNING
y
Once a seat is adjusted correctly ,
rock it back and forth to make
sure it is locked in position.
y
Do not adjust the seat in
driving vehicle as the seat may
unexpectedly move and cause
the driver to lose control of the
vehicle.
y
Be careful that the seat does not
hit a passenger or luggage.
y
After adjusting the seatback,
push your body back against the
seat to make sure the seat is
locked in position.
y
Do not put objects under the
seats.
Otherwise, the objects may
interfere with the seat–lock
mechanism or unexpectedly push
up the seat position adjusting
lever and the seat may suddenly
move, causing the driver to lose
control of the vehicle.
y
While adjusting the seat, do
not put your hands under the
seat or near the moving parts.
Otherwise, your hands or fingers
may be caught and injured.
—Adjusting front seats
!
!
使用手册小330.indd 45
2011-4-13 18:36:43
-------------------------------------------------------------------------------------------------------------------------------------------------------------
- 46 -
F3DM Owner’s Manual
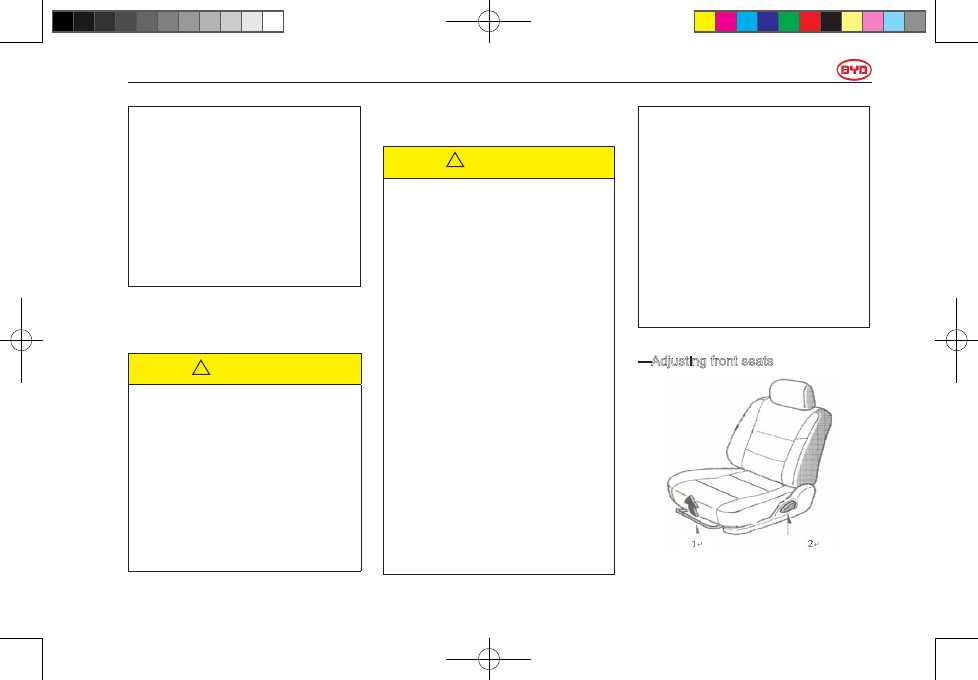
1. SEAT POSITION ADJUSTING
LEVER
Pull up the handle 1, slide the seat
backward and forward to the desired
position. Release handle 1 and ensure
the seat is securely locked in the
position. (Make pedal plate, steering
wheel and instrument panel within the
scope of easy control for the driver).
2. SEATBACK ANGLE ADJUSTING
LEVER
Lean forward and pull the lever 2 up.
Then adjust the seat back to the
desired angle and release the lever.
WARNING
y
Sit
ting too close to a front
passenger airbag can result
in serious injury or death if the
front airbags inflate. The front
passenger seat should be as far
from the airbag as possible with
the seatback adjusted, so the
front passenger sits upright..
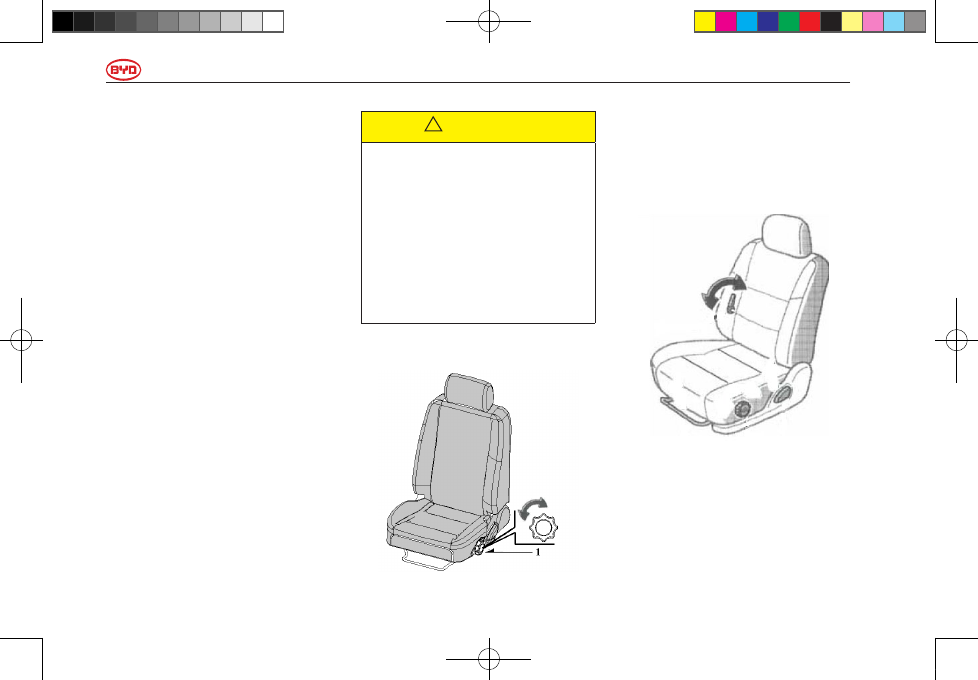
3. SEAT HEIGHT ADJUSTING KNOB
Rotate the knob 1 to adjust to the
desired position.
3. WAIST-HOLDING ADJUSTING
LEVER (Optional)
Turn the lever and adjust seaback
lumbar support to the desired position.
!
使用手册小330.indd 46
2011-4-13 18:36:43
-------------------------------------------------------------------------------------------------------------------------------------------------------------

- 47 -
F3DM Owner’s Manual
4. THE HEAD RESTRAINTS
For your safety and comfort, adjust the
head restraint before driving,
Adjust the head restraints to the
desired position while pressing the lock
release button.
The head restraint is most effective
w h e n i t i s c l o s e t o y o u r h e a d .
Therefore, using a cushion on the
seatback is not recommended
WARNING
y
Adjust the center of the head
restraint so that it is closest to the
top of your ears.
y
After adjusting the head restraint,
make sure it is locked in position.
y
Never remove head restraints while
driving.
Rear Seats
Folding down Rear Seats (optional)
Lower the head restraints to the lowest
position. Unlock release button and
fold the seatback down.
Each seatback can be folded
separately.
This could enlarge the luggage.
WARNING
◆
Never sit on the center seat
because the rear center seat belt
cannot be fastened correctly when
the rear left seat is folded down.
!
!
使用手册小330.indd 47
2011-4-13 18:36:43
-------------------------------------------------------------------------------------------------------------------------------------------------------------
- 48 -
F3DM Owner’s Manual
WARNING
y
When returning the seatback to
the upright position, observe the
following precautions in order
to prevent personal injury in a
collision or sudden stop:
y
Make sure seatback is securely
locked by pushing forward
and rearward on the top of the
seatback.And make sure the red
mark on the button on the top
of seatback can not be seen.
Failure to do so will prevent the
seat belt from operating properly.
y
Make sure the seat belts are not
twisted or caught in the seatback
and are arranged in the proper
position and are ready to use.
I
ntegral Rear Seats (optional)
It can not be folded.
Middle Handrail of Rear
Folding Seats (optional)
The middle handrail of rear seats, pull
it out as shown in the figure above.
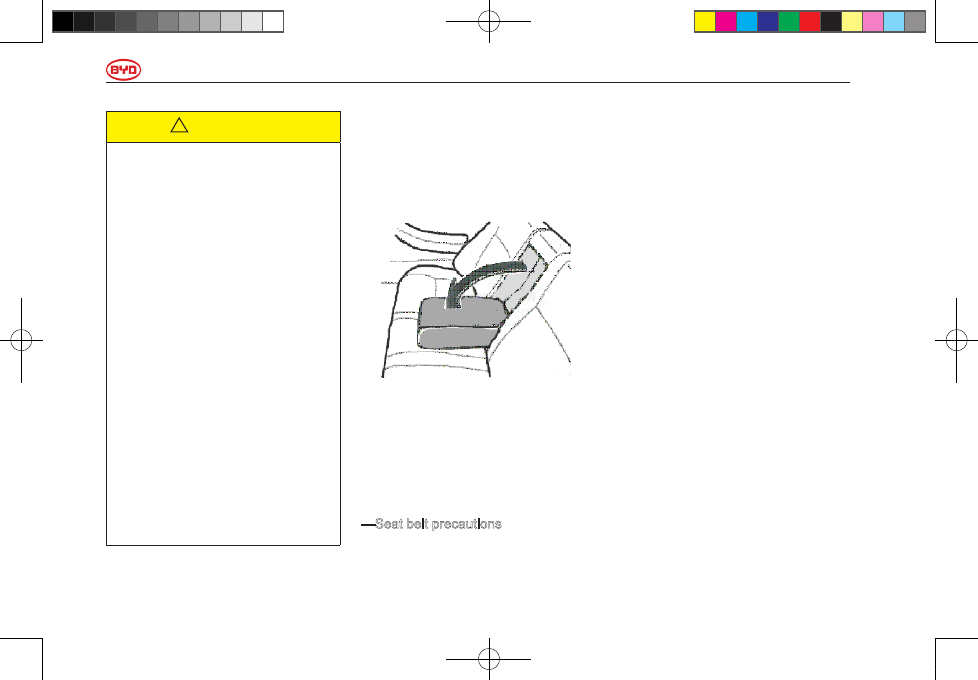
Seat belts—
—Seat belt precautions
BYD strongly urges that the driver and
passengers in the vehicle be properly
restrained at all times with the seat
belts provided. Improperly positioning
the seat belts can cause serious injury
or death in a crash.
The seat belts provided for your vehicle
are designed for people of adult size,
who large enough to properly wear
them.
If a child is large enough to properly
wear seat belts, the child should sit in
the rear seat and must be restrained
using the vehicle’s seat belt. According
to accident statistics, the child is safer
when properly restrained in the rear
seat than in the front seat.
If all children can’t be seated and
restrained properly in a rear seating
position, properly restrain the largest
child in the front seat. If an accident
occurs and seat belts are not worn
properly, the force of the rapid inflation
of the airbag may cause death or
!
使用手册小330.indd 48
2011-4-13 18:36:43
-------------------------------------------------------------------------------------------------------------------------------------------------------------
Нет комментариевНе стесняйтесь поделиться с нами вашим ценным мнением.
Текст