Nissan Rogue Sport (2018 year). Instruction — part 11
3-26
Pre-driving checks and adjustments
CAUTION
Do not use accessory carriers that
attach to the liftgate. Doing so will
cause damage to the vehicle.
JVP0396X
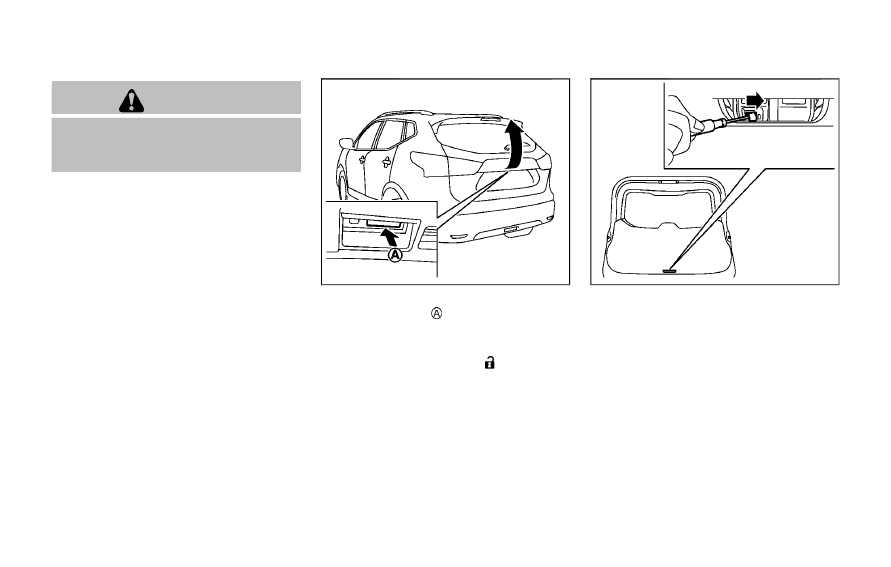
To open the liftgate, unlock it and push
the opener switch
. Pull up the liftgate to
open.
The liftgate can be unlocked by:
. pushing the UNLOCK
button on
the key.
. pushing the liftgate request switch (if
so equipped).
. pushing the door handle request
switch (if so equipped).
. pushing the power door lock switch to
the unlock position.
To close the liftgate, pull down until it
securely locks.
JVP0410X
LIFTGATE RELEASE LEVER
If the liftgate cannot be opened with the
power door lock switch due to a dis-
charged battery, follow these steps.
1.
Fold the rear seats down. See “Seats”
(P.1-2).
2. Remove the cover plate from the lock
using a suitable tool.
3. Move the release lever to the right
using a suitable tool as illustrated. The
liftgate will be unlatched.
4. Push the liftgate up to open.
It is recommended that you visit a NISSAN
dealer as soon as possible for repair.

WARNING
. Fuel is extremely flammable and
highly explosive under certain
conditions. You could be burned
or seriously injured if it is misused
or mishandled. Always stop the
engine and do not smoke or allow
open flames or sparks near the
vehicle when refueling.
. Fuel may be under pressure. Turn
the cap a half of a turn, and wait
for any “hissing” sound to stop to
prevent fuel from spraying out
and possibly causing personal
injury. Then remove the cap.
. Use only an original equipment
type fuel-filler cap as a replace-
ment. It has a built-in safety valve
needed for proper operation of
the fuel system and emission
control system. An incorrect cap
can result in a serious malfunc-
tion and possible injury.
JVP0540X
OPENING THE FUEL-FILLER DOOR
To open the fuel-filler door, pull the
release handle located below the instru-
ment panel. To lock, close the fuel-filler
door securely.
SPA2800
FUEL-FILLER CAP
To remove the fuel-filler cap:
1.
Turn the fuel-filler cap counterclock-
wise
to remove.
2. Put the fuel-filler cap on the cap
holder
while refueling.
To install the fuel-filler cap:
1.
Insert the fuel-filler cap straight into
the fuel-filler tube.
2. Turn the fuel-filler cap clockwise
until a single click is heard.
Pre-driving checks and adjustments
3-27
FUEL-FILLER DOOR
3-28
Pre-driving checks and adjustments
WARNING
. Gasoline is extremely flammable
and highly explosive under cer-
tain conditions. You could be
burned or seriously injured if it is
misused or mishandled. Always
stop engine and do not smoke or
allow open flames or sparks near
the vehicle when refueling.
. Do not attempt to top off the fuel
tank after the fuel pump nozzle
shuts off automatically. Contin-
ued refueling may cause fuel
overflow, resulting in fuel spray
and possibly a fire.
. Use only an original equipment
type fuel-filler cap as a replace-
ment. It has a built-in safety valve
needed for proper operation of
the fuel system and emission
control system. An incorrect cap
can result in a serious malfunc-
tion and possible injury. It could
also cause the malfunction indi-
cator light to come on.
. Never pour fuel into the throttle
body to attempt to start your
vehicle.
. Do not fill a portable fuel contain-
er in the vehicle or trailer. Static
electricity can cause an explosion
of flammable liquid, vapor or gas
in any vehicle or trailer. To reduce
the risk of serious injury or death
when filling portable fuel contain-
ers:
— Always place the container on
the ground when filling.
— Do not use electronic devices
when filling.
— Keep the pump nozzle in con-
tact with the container while
you are filling it.
— Use only approved portable
fuel containers for flammable
liquid.
CAUTION
. If fuel is spilled on the vehicle
body, flush it away with water to
avoid paint damage.
. Insert the cap straight into the
fuel-filler tube, then tighten until
the fuel-filler cap clicks. Failure to
tighten the fuel-filler cap properly
may cause the
malfunction
indicator light (MIL) to illuminate.
If the
light illuminates be-
cause the fuel-filler cap is loose
or missing, tighten or install the
cap and continue to drive the
vehicle. The
light should turn
off after a few driving trips. If the
light does not turn off after a
few driving trips, have the vehicle
inspected. It is recommended you
visit a NISSAN dealer for this
service.
For additional information, see
“Malfunction Indicator Light
(MIL)” (P.2-16).
. The LOOSE FUEL CAP warning
message will be displayed if the
fuel-filler cap is not properly tigh-
tened. It may take a few driving
trips for the message to be dis-
played. Failure to tighten the fuel-
filler cap properly after the LOOSE
FUEL CAP warning message is
displayed may cause the
Malfunction Indicator Light (MIL)
to illuminate.
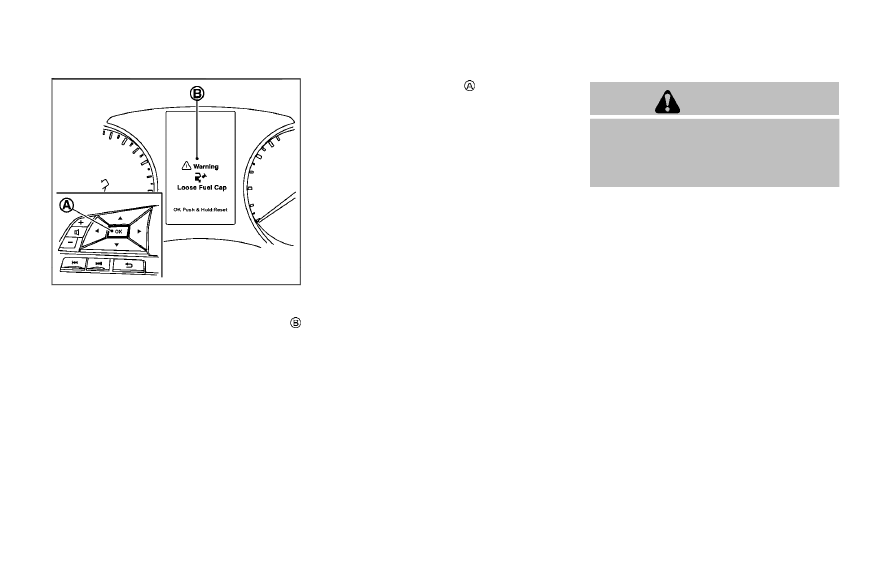
JVP0503X
LOOSE FUEL CAP warning message
The LOOSE FUEL CAP warning message
is displayed on the vehicle information
display when the fuel-filler cap is not
tightened correctly after the vehicle has
been refueled. It may take a few driving
trips for the message to be displayed. To
turn off the warning message, do the
following procedure:
1.
Remove and install the fuel-filler cap
as soon as possible. For additional
information, refer to “Fuel-filler cap”
(P.3-27).
2. Tighten the fuel-filler cap until it clicks.
3. Push the OK button
on the steering
wheel for about 1 second to turn off
the LOOSE FUEL CAP warning mes-
sage after tightening the fuel cap.
WARNING
Do not adjust the steering wheel
while driving. You could lose control
of your vehicle and cause an acci-
dent.
Pre-driving checks and adjustments
3-29
TILT/TELESCOPIC STEERING
3-30
Pre-driving checks and adjustments
JVP0301X
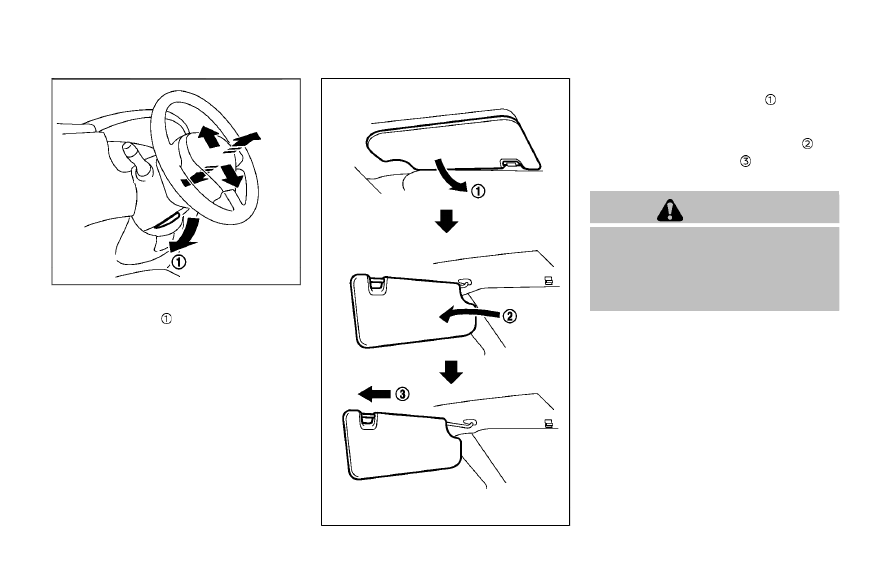
TILT OR TELESCOPIC OPERATION
Pull the lock lever
down and adjust the
steering wheel up, down, forward or
rearward to the desired position. Push
the lock lever up securely to lock the
steering wheel in place.
SIC3739
1.
To block glare from the front, swing
down the main sun visor
.
2. To block glare from the side, remove
the main sun visor from the center
mount and swing it to the side
.
3. Slide the sun visor
in or out as
needed.
CAUTION
. Do not store the sun visor before
returning the extension to its
original position.
. Do not pull the extension sun
visor forcedly downward.
SUN VISORS
SPA2447
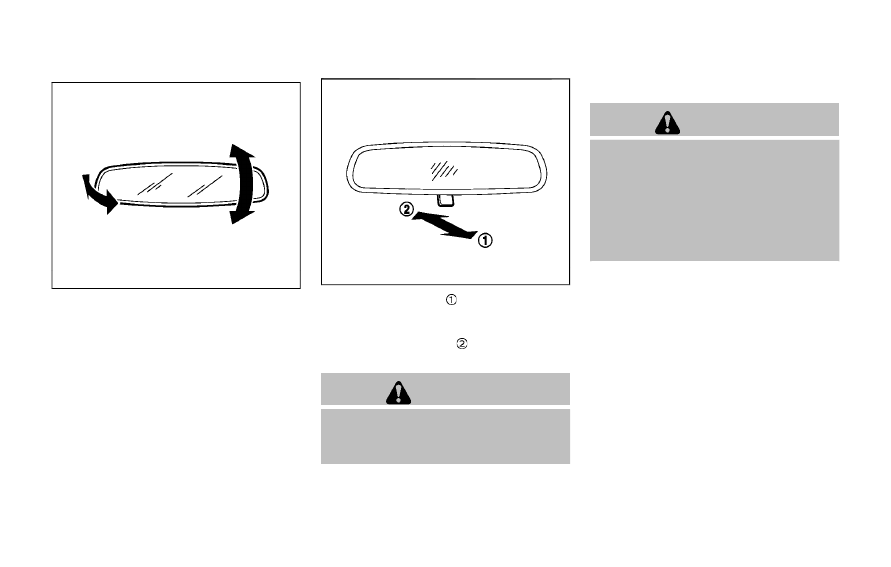
INSIDE MIRROR
Adjust the angle of the inside mirror to
the desired position.
SPA2143
The night position
will reduce glare
from the headlights of vehicles behind
you at night.
Use the day position
when driving in
daylight hours.
WARNING
Use the night position only when
necessary, because it reduces rear
view clarity.
OUTSIDE MIRRORS
WARNING
Objects viewed in the outside mirror
on the passenger side are closer
than they appear. Be careful when
moving to the right. Using only this
mirror could cause an accident. Use
the inside mirror or glance over your
shoulder to properly judge distances
to other objects.
Pre-driving checks and adjustments
3-31
MIRRORS
3-32
Pre-driving checks and adjustments
JVP0395X
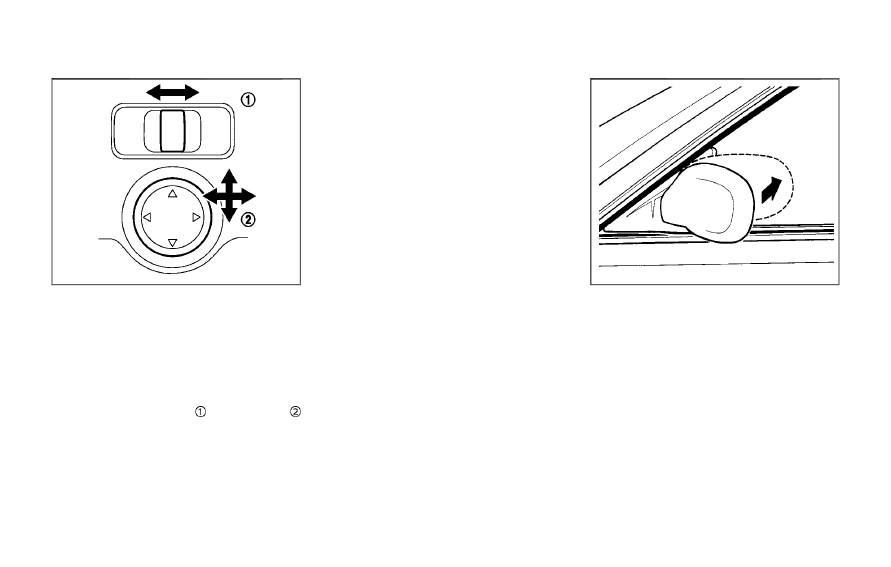
Adjusting outside mirrors
The outside mirror control switch is
located on the driver’s armrest.
The outside mirror will operate only when
the ignition switch is in the ACC or ON
position.
Move the switch right or left to select the
right or left side mirror
, then adjust
using the control switch.
Defrosting outside mirrors (if so
equipped)
The outside mirrors will be heated when
the rear window defroster switch is
operated. (See “Rear window and outside
mirror defroster switch” (P.2-42).)
SPA1829
Foldable outside mirrors
Fold the outside mirror by pushing it
toward the rear of the vehicle.

SIC3869
VANITY MIRROR
To use the front vanity mirror, pull down
the sun visor and pull up the cover.
Pre-driving checks and adjustments
3-33
3-34
Pre-driving checks and adjustments
MEMO
4 Heater, air conditioner, audio and phone
systems
How to use touch screen . . . . . . . . . . . . 4-4
How to use the BACK button . . . . . . . . . .. 4-5
How to use the APPS·i button . . . . . . . . . . 4-5
How to use brightness control button . . . . 4-8
How to use the POWER/VOLUME dial . . . . ... 4-8
How to use the ENTER
AUDIO/TUNE·SCROLL dial . . . . . . . . . . . . 4-8
RearView Monitor (if so equipped) . . . . . . . . . 4-8
RearView Monitor system operation . . . . . . 4-9
How to read the displayed lines . . . . . . . . 4-9
Difference between predictive and
actual distances . . . . . . . . . . . . . . . . ... 4-10
Adjusting the screen . . . . . . . . . . . . . . 4-12
RearView Monitor system limitations . . . . . 4-12
System maintenance . . . . . . . . . . . . . ... 4-13
Intelligent Around View® Monitor (if
so equipped) . . . . . . . . . . . . . . . . . . . . .. 4-14
Intelligent Around View® Monitor
system operation . . . . . . . . . . . . . . . . 4-15
Difference between predictive and
actual distances . . . . . . . . . . . . . . . . ... 4-18
How to park with predictive course lines . ... 4-20
How to switch the display . . . . . . . . . . ... 4-21
Adjusting the screen . . . . . . . . . . . . . .. 4-21
Intelligent Around View® Monitor
system limitations . . . . . . . . . . . . . . . 4-22
System maintenance . . . . . . . . . . . . . 4-24
Moving Object Detection (MOD) (if
so equipped) . . . . . . . . . . . . . . . . . . . . . 4-25
MOD system operation . . . . . . . . . . . . 4-25
Turning MOD on and off . . . . . . . . . . . 4-27
MOD system limitations . . . . . . . . . . . .. 4-27
System maintenance . . . . . . . . . . . . . 4-28
Ventilators . . . . . . . . . . . . . . . . . . . . . .. 4-29
Heater and air conditioner . . . . . . . . . . . . 4-30
Manual air conditioner and heater . . . . . 4-31
Automatic air conditioner and heater . . . 4-35
Operating tips (for automatic
air conditioner) . . . . . . . . . . . . . . . . ... 4-37
Servicing air conditioner . . . . . . . . . . . . 4-37
Audio system . . . . . . . . . . . . . . . . . . . ... 4-38
Audio operation precautions . . . . . . . . .. 4-38
FM-AM radio with Compact Disc
(CD) player . . . . . . . . . . . . . . . . . . . .. 4-48
FM-AM-SAT radio with Compact Disc (CD)
player (Type A) (if so equipped) . . . . . . . 4-55
FM-AM-SAT radio with Compact Disc (CD)
player (Type B) (if so equipped) . . . . . . . ... 4-63
USB (Universal Serial Bus)
connection port . . . . . . . . . . . . . . . . ... 4-74
AUX (Auxiliary) input jack . . . . . . . . . . . .. 4-75
Steering wheel switch for audio control . . . 4-75
Antenna . . . . . . . . . . . . . . . . . . . . . .. 4-77
CD/USB memory care and cleaning . . . . ... 4-77
integration (if so equipped) . . . . . . . . . . . ... 4-78
Registering with NissanConnect
Services (if so equipped) . . .. 4-79
Siri® Eyes Free . . . . . . . . . . . . . . . . . . . .. 4-79
General Information . . . . . . . . . . . . . . .. 4-79
Requirements . . . . . . . . . . . . . . . . . . . 4-79
Siri® Eyes Free Activation . . . . . . . . . . . . 4-80
Operating Siri® Eyes Free . . . . . . . . . . . . 4-80
Changing Siri® Eyes Free Settings
(models with navigation system) . . . . . . ... 4-80
Changing Siri® Eyes Free Settings
(models without navigation system) . . . . .. 4-81
Troubleshooting guide . . . . . . . . . . . . ... 4-82
Car phone or CB radio . . . . . . . . . . . . . . .. 4-83
Bluetooth® Hands-Free Phone System
(models without navigation system) . . . . . . 4-83
Regulatory information . . . . . . . . . . . ... 4-84
Using the system . . . . . . . . . . . . . . . .. 4-85
Bluetooth® Hands-Free Phone System
(models with navigation system) . . . . . . . . . 4-93
Regulatory information . . . . . . . . . . . ... 4-94
Control buttons and microphone . . . . . ... 4-95
Voice command . . . . . . . . . . . . . . . . 4-95
Connecting procedure . . . . . . . . . . . . . 4-96
Vehicle phonebook . . . . . . . . . . . . . . . 4-96
Making a call . . . . . . . . . . . . . . . . . . 4-97
Receiving a call . . . . . . . . . . . . . . . . ... 4-97
During a call . . . . . . . . . . . . . . . . . . .. 4-97
Ending a call . . . . . . . . . . . . . . . . . . . 4-97
Text messaging (if so equipped) . . . . . . .. 4-97
Phone and Bluetooth® settings . . . . . . . 4-99
NISSAN Voice Recognition system
(models with navigation system) . . . . . . . . 4-100
Using the system . . . . . . . . . . . . . . .. 4-101
System features . . . . . . . . . . . . . . . 4-102
Phone voice commands . . . . . . . . . . . 4-103
Navigation system voice commands . . ... 4-103
Audio system voice commands . . . . . ... 4-104
Information voice commands . . . . . . . 4-104
My APPS voice commands . . . . . . . . ... 4-104
Help voice commands . . . . . . . . . . . .. 4-104
Troubleshooting guide . . . . . . . . . . . 4-104
WARNING
. Do not disassemble or modify
this system. If you do, it may
result in accidents, fire, or electric
shock.
. Do not use this system if you
notice any abnormality, such as
a frozen screen or lack of sound.
Continued use of the system may
result in accident, fire or electric
shock.
. In case you notice any foreign
object in the system hardware,
spill liquid on it, or notice smoke
or smell coming from it, stop
using the system immediately. It
is recommended you visit a
NISSAN dealer for servicing.
Ignoring such conditions may
lead to accidents, fire, or electric
shock.
Do not attempt to operate the system in
extreme temperature conditions [below
−4°F (−20°C) and above 158°F (70°C)].
Operating this system under these con-
ditions may result in system malfunc-
tions.
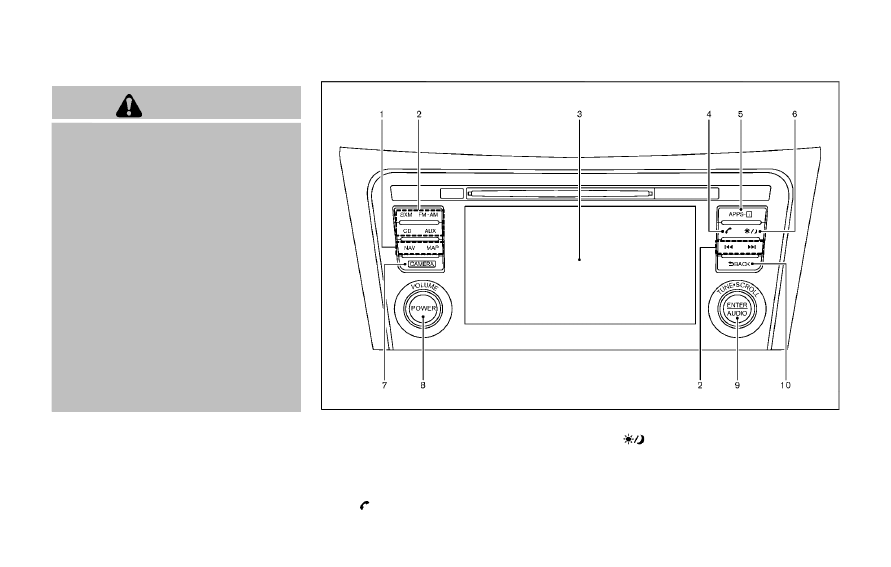
JVH1581X
1.
For information regarding the Navigation
system control buttons, refer to the
separate Navigation System Owner’s
Manual.
2.
Audio control buttons (P.4-63)
3.
Touch screen (P.4-4)
4.
button (P.4-93)
5.
APPS·i button (P.4-5)
6.
(brightness control) button (P.4-8)
7.
CAMERA button (P.4-14)
8.
POWER/VOLUME dial (P.4-8)
9.
ENTER AUDIO/TUNE·SCROLL dial (P.4-8)
10.
BACK button (P.4-5)
Heater, air conditioner, audio and phone systems
4-3
SAFETY NOTE
CONTROL BUTTONS AND FUNCTIONS
(models with navigation system)
4-4
Heater, air conditioner, audio and phone systems
When you use this system, make sure the
engine is running.
If you use the system with the engine
not running for a long time, it will
discharge the battery, and the engine
will not start.
Reference symbols:
“Example” — Words marked in quotes
refer to a key shown only on the display.
These keys can be selected by touching
the screen.
HOW TO USE TOUCH SCREEN
CAUTION
. The glass screen on the liquid
crystal display may break if it is
hit with a hard or sharp object. If
the glass screen breaks, do not
touch it. Doing so could result in
an injury.
. To clean the display, never use a
rough cloth, alcohol, benzine,
thinner or any kind of solvent or
paper towel with a chemical
cleaning agent. They will scratch
or deteriorate the panel.
. Do not splash any liquid such as
water or car fragrance on the
display. Contact with liquid will
cause the system to malfunction.
To help ensure safe driving, some func-
tions cannot be operated while driving.
The on-screen functions that are not
available while driving will be “grayed
out” or muted.
Park the vehicle in a safe location and
then operate the navigation system.
WARNING
. ALWAYS give your full attention to
driving.
. Avoid using vehicle features that
could distract you. If distracted,
you could lose control of your
vehicle and cause an accident.
JVH1582X
Touch screen operation
Selecting the item:
Touch an item to select. To select the
“Audio” key, touch the “Audio” key
on
the screen.
Adjusting the item:
Touch the “+” key or the “−” key to adjust
the settings of an item. Touch the up
arrow to scroll up the page. Touch the
down arrow to scroll down the page.
Inputting characters:
Touch the letter or the number key. There
are some options available when input-
ting characters.
. 123/ABC:
Changes the keyboard between num-
bers and alphabets.
. Space:
Inserts a space.
. Delete:
Deletes the last inputted character
with one touch. Touch and hold the
“Delete” key to delete all of the char-
acters.
. OK:
Completes the character input.
Touch screen maintenance
If you clean the touch screen, use a dry,
soft cloth. If additional cleaning is neces-
sary, use a small amount of neutral
detergent with a soft cloth. Never spray
the screen with water or detergent.
Dampen the cloth first and then wipe
the screen.
HOW TO USE THE BACK BUTTON
Push the BACK button to return to the
previous screen.
JVH1583X
Example
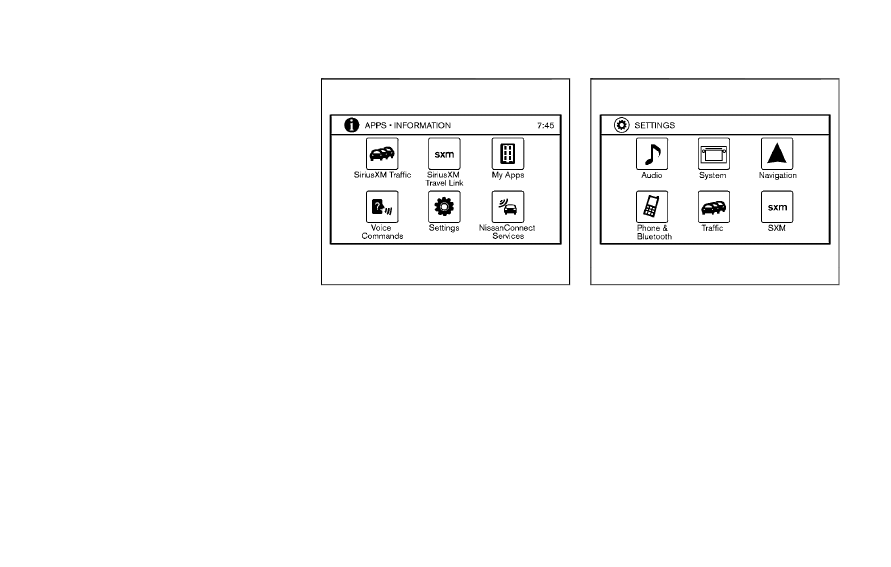
HOW TO USE THE APPS·i BUTTON
For information about the “SiriusXM Tra-
vel Link”, “SiriusXM Traffic” and “Nissan-
Connect Services” (if so equipped)
features, see the separate Navigation
System Owner’s Manual.
For information about the “My Apps” key,
see “NissanConnect
SM
Mobile Apps smart-
phone integration” (P.4-78).
For information about the “Voice Com-
mands” key, see “NISSAN Voice Recogni-
tion system (models with navigation
system)” (P.4-100).
JVH1584X
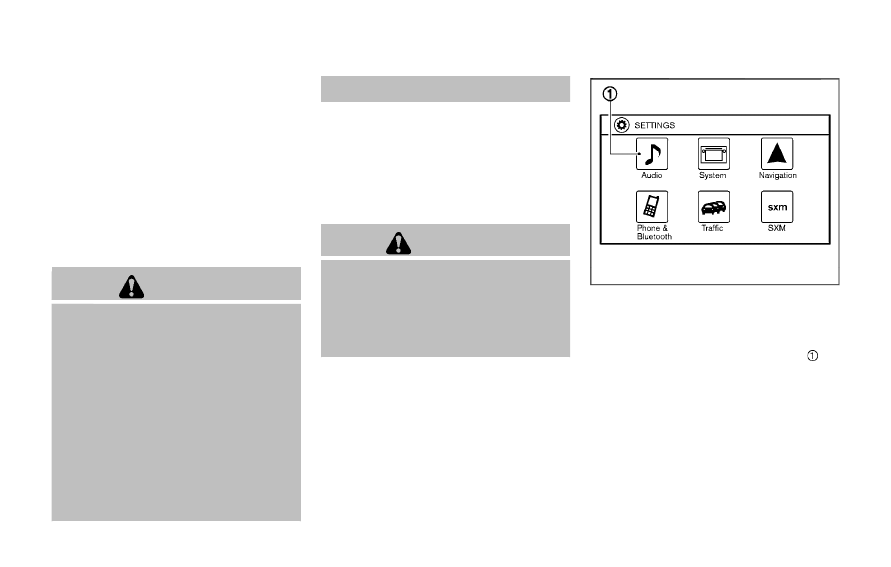
Displaying settings menu
To select and/or adjust several functions,
features and modes that are available for
your vehicle:
1.
Push the APPS·i button.
2. Touch the “Settings” key.
3. Touch the desired item.
Available setting items may vary depend-
ing on models and specifications.
Heater, air conditioner, audio and phone systems
4-5
4-6
Heater, air conditioner, audio and phone systems
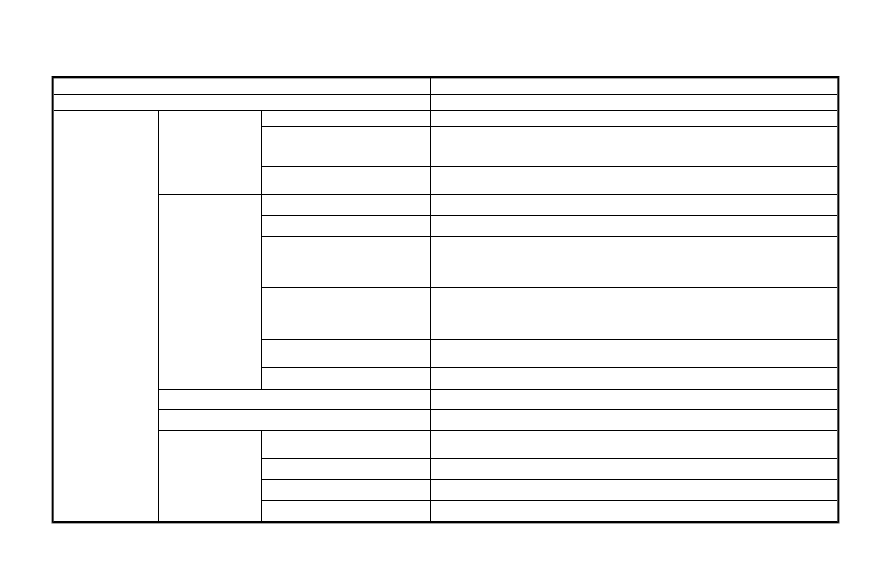
Menu Item
Result
Audio
For more details, see “Audio main operation” (P.4-63).
System
Display
Brightness
Adjusts the brightness of the display.
Display Mode
Adjusts to fit the level of lighting in the vehicle. Touch key to cycle through
options. “Day” and “Night” modes are suited for the respective times of day
while “Auto” controls the display automatically.
Scroll Direction
Adjust the scroll direction of ENTER AUDIO/TUNE·SCROLL dial. Choose to
either move up or down.
Clock/Date
Time Format
The clock can be set to 12 hours or 24 hours.
Date Format
The format of the day, month and year display can be selected.
Clock Mode
Adjust the mode for the clock. “Auto” uses the system’s GPS to automatically
maintain the time. “Manual” allows you to set the clock using the “Set Clock/
Date Manually” key. Select “Time Zone” to have the time set to a specific time
zone.
Set Clock/Date Manually
Adjust the clock manually. Touch the “+” or “-” keys to adjust the hours,
minutes, day, month and year up or down. “Clock Mode” must be set to
“Manual” for this option to be available. When the “Time Format” is set to
“12h”, switching between “AM” and “PM” can be done by touching “MODE”.
Daylight Savings Time
Adjusts the daylight savings time on or off. “Clock Mode” must be set to
“Time Zone” for this option to be available.
Time Zone
Choose the applicable time zone from the list.
Language
Touch this key to change the language on the display.
NissanConnect Services Settings
See the separate Navigation System Owner’s Manual for detail information.
Camera Settings
Display Mode
Touch this key to select the camera screen display mode (day, night, or
automatic).
Brightness
Adjust camera screen brightness.
Contrast
Adjust camera screen contrast.
Color
Adjust camera screen color.
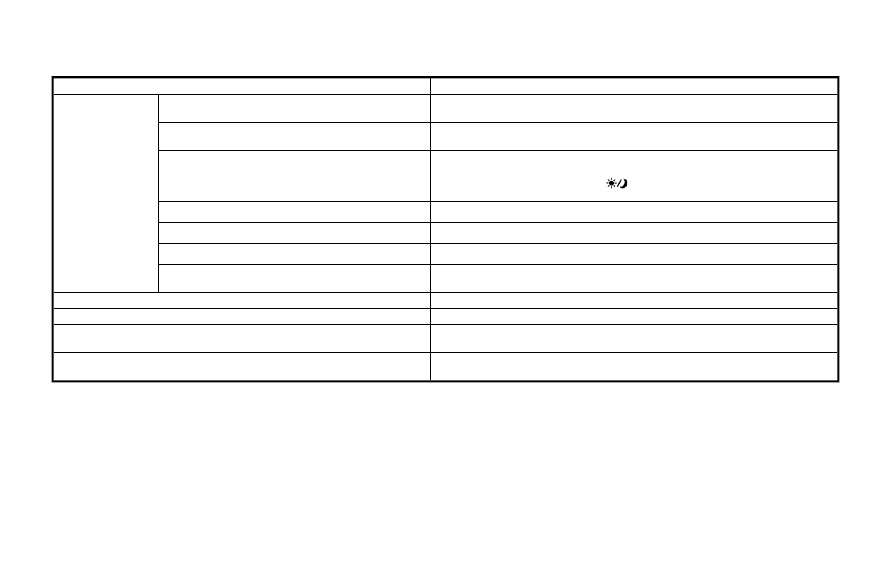
Menu Item
Result
Temperature Unit
Touch this key to change the temperature unit being displayed (Fahrenheit
or Celsius).
Touchscreen Click
Toggles the touch screen click feature on or off. When activated, a click
sound will be heard every time a key on the screen is touched.
System Beeps
Toggle the system beep tones feature on or off. When activated, a beep
sound will be heard when a pop-up message appears on the screen or a
button on the unit (such as the
button) is pushed and held for a few
seconds.
Return to Factory Settings / Clear Memory
Touch this key to return all settings to default and to clear the memory.
Software Licenses
Touch this key to display software licensing information.
Minimize Voice Feedback
Use this function to minimize the amount of prompts spoken by the system.
System Software Version
This displays the software version your navigation system is currently
running.
Navigation
See the separate Navigation System Owner’s Manual for detail information.
Phone & Bluetooth
For more details, see “Phone and Bluetooth® settings” (P.4-99).
Traffic
Touch this key to display traffic settings. See the separate Navigation
System Owner’s Manual for more information.
SXM
Touch this key to display SXM status information. For SXM setup, see “Audio
main operation” (P.4-63).
Heater, air conditioner, audio and phone systems
4-7
Нет комментариевНе стесняйтесь поделиться с нами вашим ценным мнением.
Текст