Nissan Primera P12. Manual — part 162
ENGINE COOLANT
CO-9
[YD]
C
D
E
F
G
H
I
J
K
L
M
A
CO
REFILLING ENGINE COOLANT
1.
Install reservoir tank, radiator lower hose and cylinder block drain plug.
Apply sealant to the thread of cylinder block drain plug.
●
Use Genuine Liquid Gasket or equivalent.
2.
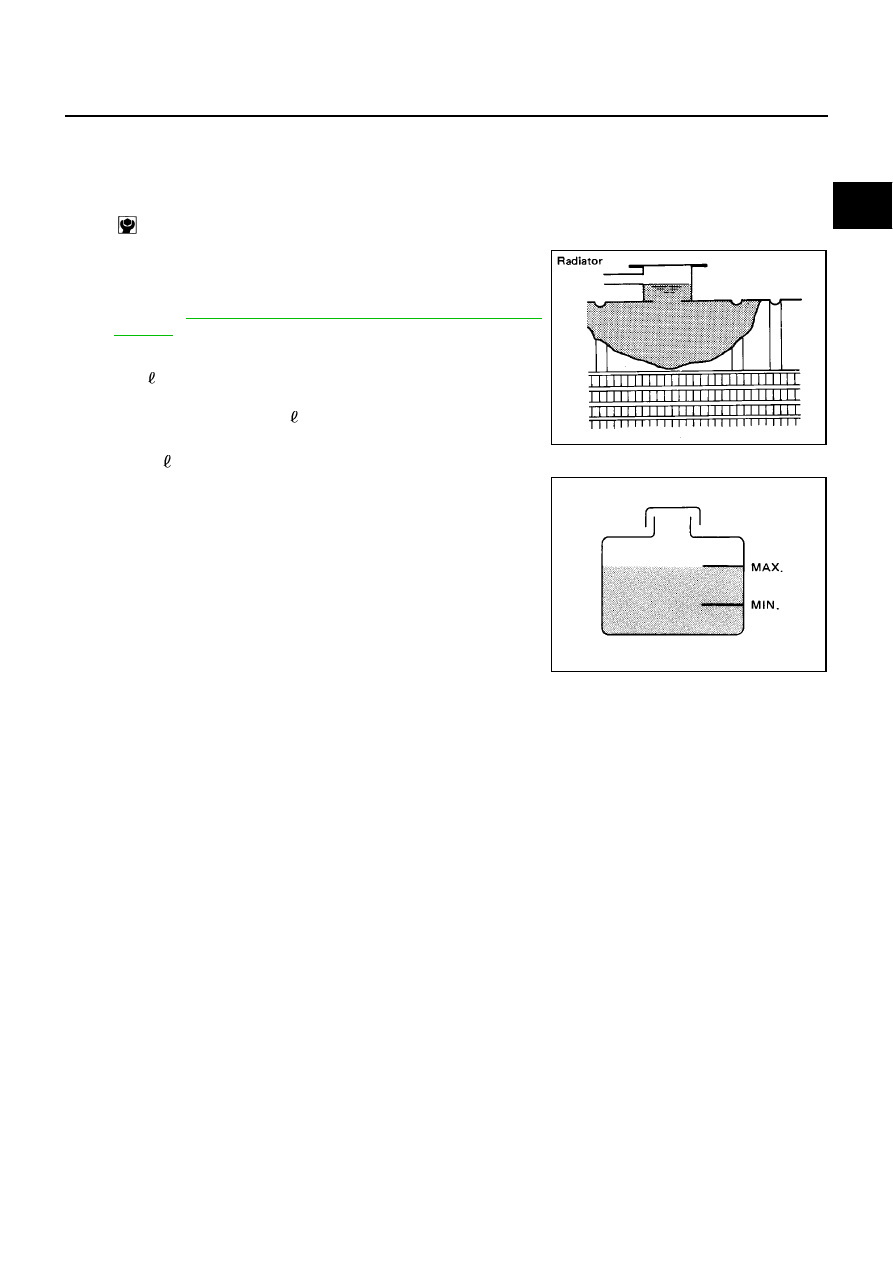
Fill radiator to specifed level.
●
Use genuine Nissan anti-freeze coolant or equivalent
mixed with water (distilled or demineralized).
Refer to
MA-15, "RECOMMENDED FLUIDS AND LUBRI-
●
Pour coolant through coolant filler neck slowly of less
than 2
(1-3/4 lmp qt) a minute to allow air in system to escape.
3.
Fill reservoir tank to specified level.
4.
Warm up engine to normal operating temperature without radia-
tor cap installed.
●
If coolant overflows radiator filler hole, install filler cap.
5.
Run engine at 3,000 rpm for 10 seconds and return to idle speed
with radiator cap installed.
●
Repeat two or three times.
Watch coolant temperature gauge so as not to overheat the
engine.
6.
Stop engine and cool down to less than approximately 50
°
C
(122
°
F).
●
Cool down using a fan to reduce the time.
●
If necessary, refill radiator up to filler neck with coolant.
7.
Refill reservoir tank to MAX level line with coolant.
8.
Repeat steps 5 through 7 two or more times with radiator cap installed until coolant level no longer drops.
9.
Check cooling system for leaks with engine running.
10. Warm up engine, and check for sound of coolant flow while running engine from idle up to 3,000 rpm with
heater temperature controller set at several position between COOL and WARM.
●
Sound may be noticeable at heater unit.
11. If sound is heard, bleed air from cooling system by repeating steps 5 through 7 until coolant level no
longer drops.
●
Clean excess coolant from engine.
FLUSHING COOLING SYSTEM
1.
Fill radiator and reservoir tank with water and reinstall radiator cap.
2.
Run engine and warm it up to normal operating temperature.
3.
Rev engine two or three times under no-load.
4.
Stop engine and wait until it cools down.
5.
Drain water.
6.
Repeat steps 1 through 5 until clear water begins to drain from radiator.
: 7.8 - 11.8 N·m (0.8 - 1.2 kg-m, 69 - 104 in-lb)
Engine coolant capacity (With reservoir tank):
9.5
(8-3/8 Imp qt)
Reservoir tank
: 0.6
(1/2 lmp qt)
SMA182B
SMA412B
CO-10
[YD]
RADIATOR
RADIATOR
PFP:21400
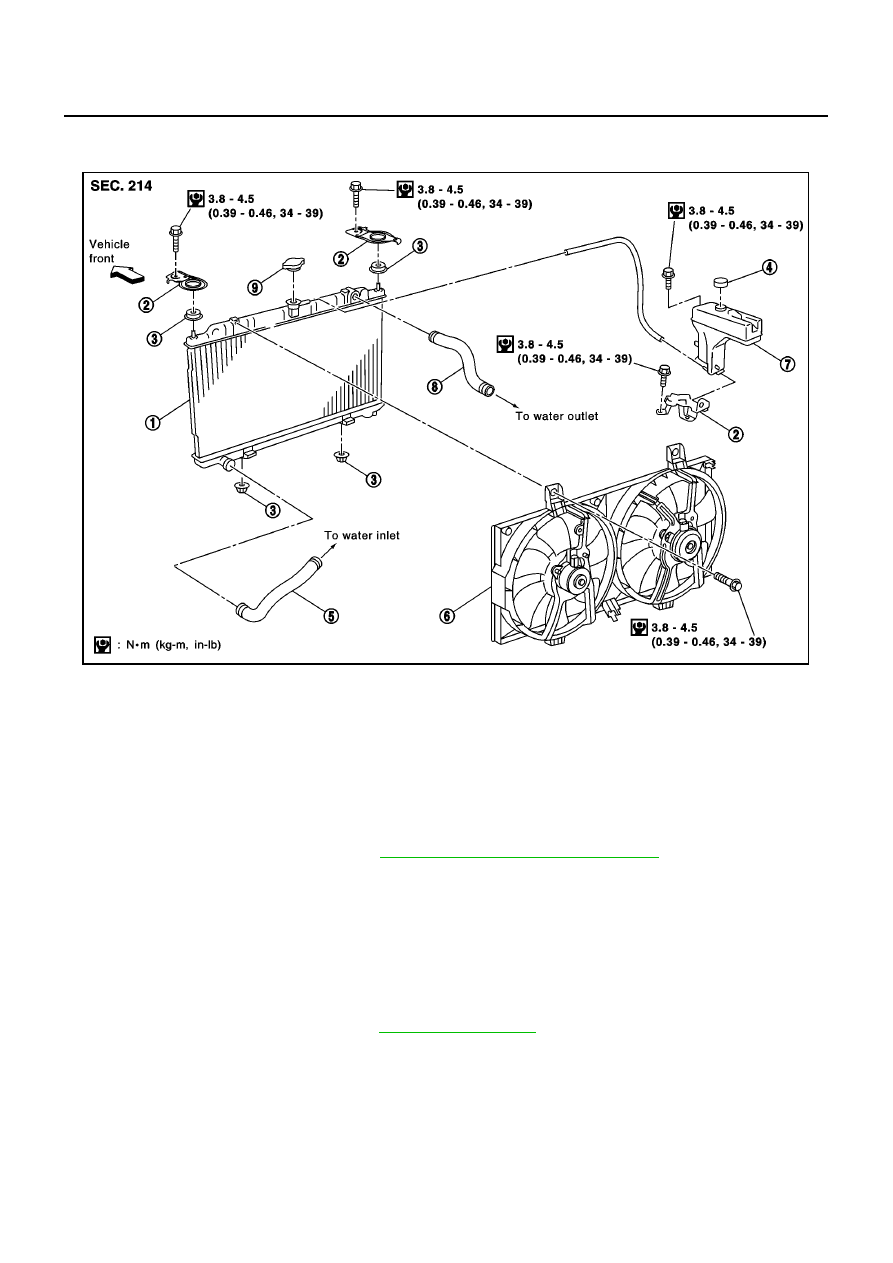
Removal and Installation
EBS00SJQ
WARNING:
Never remove the radiator cap when the engine is hot. Serious burns could occur from high pressure
coolant escaping from the radiator. Wrap a thick cloth around the cap. Slowly turn it a quarter turn to
allow built-up pressure to escape. Carefully remove the cap by turning it all the way.
REMOVAL
1.
Disconnect lower radiator hose. Refer to
CO-8, "DRAINING ENGINE COOLANT"
.
2.
Remove undercover.
3.
Disconnect radiator upper hose, reservoir tank hose and mounting bracket.
4.
Remove radiator and radiator fan assembly.
CAUTION:
●
Do not damage or scratch radiator core when removing.
INSTALLATION
●
Reinstall any parts removed in reverse order of removal.
●
Check for engine coolant leaks. Refer to
.
PBIC0949E
1.
Radiator
2.
Bracket
3.
Mounting rubber
4.
Reservoir tank cap
5.
Radiator hose (lower)
6.
Radiator fan assembly
7.
Reservoir tank
8.
Radiator hose (upper)
9.
Radiator cap
RADIATOR
CO-11
[YD]
C
D
E
F
G
H
I
J
K
L
M
A
CO
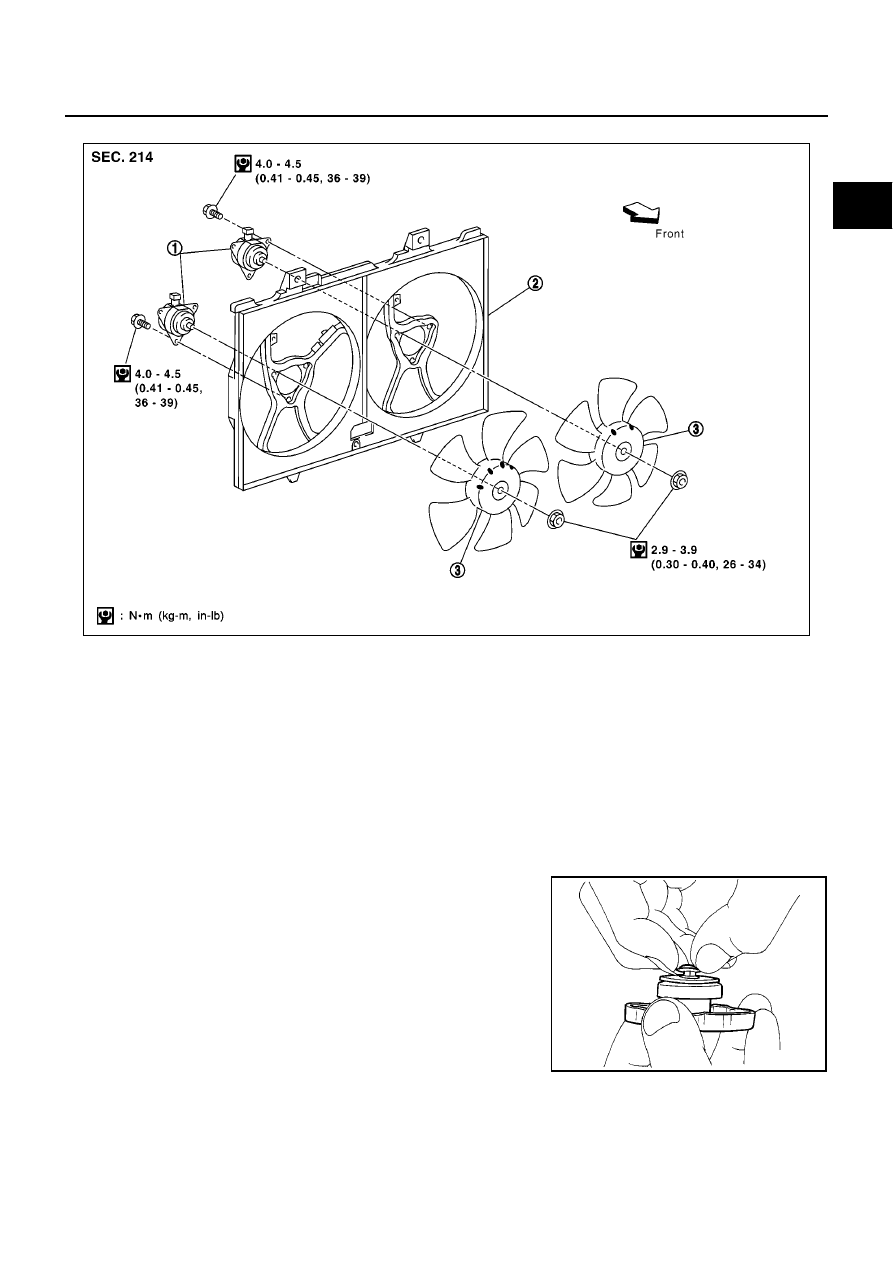
Disassembly and Assembly Radiator Fan
EBS00SJR
DISASSEMBLY
1.
Remove radiator fan and shroud assembly.
2.
Remove radiator fan.
3.
Remove fan motor from fan shroud.
ASSEMBLY
●
Install in the reverse order of removal.
Checking Radiator Cap
EBS00SJS
●
Check that there is no dirt or damage on the valve seat of the radiator cap negative-pressure valve.
●
Check that there are no unusualness in the opening and closing
conditions of the negative-pressure valve.
●
Pull the negative pressure valve to open it.
●
Check that it closes completely when released.
MBIA0057E
1.
Radiator fan motors
2.
Radiator fan shroud
3.
Radiator fan
SMA967B
CO-12
[YD]
RADIATOR
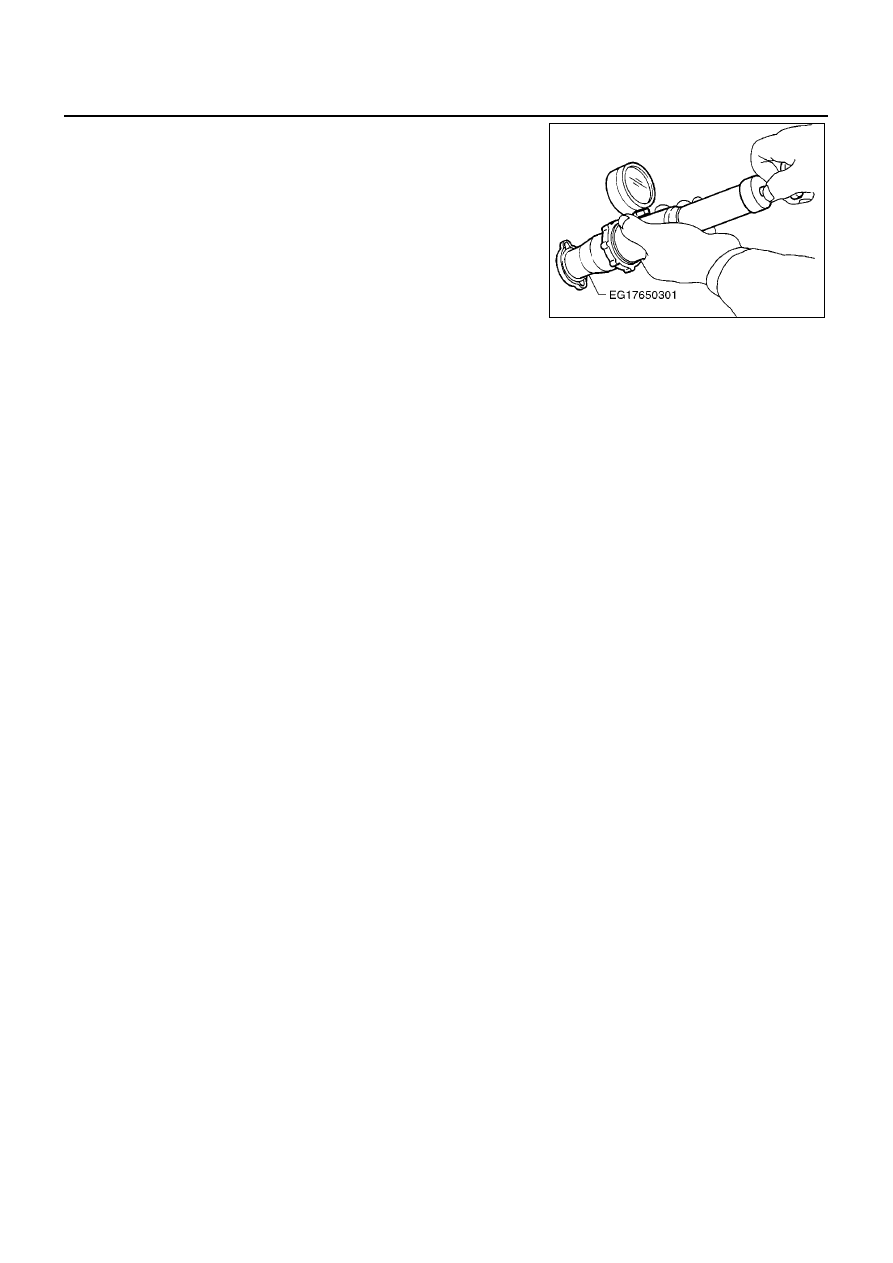
●
Check radiator cap relief pressure.
●
When connecting the radiator cap to the tester, apply water or
LLC to the cap seal part.
●
Replace the radiator cap if there is an unusualness in the nega-
tive-pressure valve, or if the relief pressure is outside of the limit.
Checking Radiator
EBS00SJT
Check radiator for mud or clogging. If necessary, clean radiator as follows.
●
Be careful not to bend or damage the radiator fins.
●
When radiator is cleaned without removal, remove all surrounding parts such as cooling fan, radiator
shroud and horns. Then tape the harness and connectors to prevent water from entering.
1.
Apply water by hose to the back side of the radiator core vertically downwards.
2.
Apply water again to all radiator core surface once per minute.
3.
Stop washing if any stains no longer flow out from the radiator.
4.
Blow air into the back side of radiator core vertically downwards.
●
Use compressed air lower than 490 kpa (4.9 bar 5 kg/cm
2
, 71psi) and keep distance more than 30 cm
(11.8 in).
5.
Blow air again into all the radiator core surface once per minute until no water sprays out.
Standard
: 78 - 98 kpa (0.78 - 0.98 bar, 0.8 - 1.0 kg/
cm
2
, 11 - 14 psi)
Limit
: 59 kpa (0.59 bar, 0.6 kg/cm
2
, 9 psi)
SLC135B
Нет комментариевНе стесняйтесь поделиться с нами вашим ценным мнением.
Текст