Nissan Versa (2022 year). Manual in english — page 8
MEMO
2-64
Instruments and controls
3
Pre-driving checks and adjustments
Keys
3-2
Remote Engine Start (if so equipped)
3-24
Remote Keyless Entry (if so equipped)
3-2
Remote Engine Start operating range
3-24
NISSAN Intelligent Key® (if so equipped)
3-3
Remote starting the vehicle
3-25
NISSAN Vehicle Immobilizer System
Extending engine run time
3-25
keys
3-5
Canceling a Remote Engine Start
3-25
Doors
3-5
Conditions the Remote Engine Start will
Locking with key
3-6
not work
3-26
Locking with inside lock knob
3-6
Hood
3-27
Locking with power door lock switch
3-7
Trunk lid
3-27
Automatic door locks
3-7
Key operation (if so equipped)
3-28
Child safety rear door lock
3-7
Opener operation
3-28
Remote keyless entry system (if so equipped) . . . 3-8
Interior trunk lid release
3-29
How to use remote keyless entry
Interior trunk access (if so equipped)
3-29
system
3-9
Fuel-filler door
3-30
NISSAN Intelligent Key® system (if so
Opener operation
3-30
equipped)
3-11
Fuel-filler cap
3-30
Operating range
3-12
Steering wheel
3-32
Door locks/unlocks precaution
3-13
Tilt and telescopic operation
3-33
NISSAN Intelligent Key® Operation
3-14
Sun visors
3-33
How to use the remote keyless entry
Vanity mirror
3-34
function
3-17
Card holder (driver's side only)
3-34
Warning signals
3-20
Mirrors
3-34
Troubleshooting guide (Manual
Rearview mirror
3-34
Transmission only)
3-21
Outside mirrors
3-35
Troubleshooting guide (Continuously
Variable Transmission only)
3-22

KEYS
A key number is only necessary when you
have lost all your keys. If you still have a key,
it can be duplicated without knowing the
key number.
LPD3504
LPD3294
1. Jackknife type key
Storing remote keyless entry
2. Master key
To lock or unlock the vehicle using the key
1
to unfold the
3. Key number plate
key from the fob.
REMOTE KEYLESS ENTRY (if so
When storing the key press the release but-
equipped)
1
2
to fold the key back
A key number plate is supplied with your
3
keys. Record the key number and keep it in
Never leave keys in vehicle.
a safe place (such as your wallet), not in the
vehicle. If you lose your keys, it is recom-
mended that you visit a NISSAN dealer for
duplicates by using the key number.
NISSAN does not record key numbers so it
is very important to keep track of your key
number plate.
3-2
Pre-driving checks and adjustments

vehicle. If you lose your keys, it is recom-
mended that you visit a NISSAN dealer for
duplicates by using the key number.
NISSAN does not record key numbers so it
is very important to keep track of your key
number plate.
A key number is only necessary when you
have lost all keys and do not have one to
duplicate from. If you still have a key, it can
be duplicated without knowing the key
number.
CAUTION
LPD2874
LPD2875
Listed below are conditions or occur-
Type A (if so equipped)
Type B (if so equipped)
rences which will damage the Intelli-
1.
Intelligent Keys (two sets)
Never leave these keys in the vehicle.
gent Key:
• Do not allow the Intelligent Key,
2.
Mechanical keys
As many as four Intelligent Keys can be
which contains electrical compo-
registered and used with one vehicle. The
3.
Key number plate (one plate)
nents, to come into contact with wa-
new keys must be registered prior to use
ter or salt water. This could affect the
NISSAN INTELLIGENT KEY® (if so
with the Intelligent Key System and NISSAN
system function.
equipped)
Vehicle Immobilizer System of your vehicle.
Since the registration process requires
• Do not drop the Intelligent Key.
Your vehicle can only be driven with the
erasing all memory in the Intelligent Key
• Do not strike the Intelligent Key
Intelligent Keys which are registered to
components when registering new keys,
sharply against another object.
your vehicle’s Intelligent Key System com-
be sure to take all Intelligent Keys that you
• Do not change or modify the Intelli-
ponents and NISSAN Vehicle Immobilizer
have to the NISSAN dealer.
gent Key.
System components.
A key number plate is supplied with your
keys. Record the key number and keep it in
a safe place (such as your wallet), not in the
Pre-driving checks and adjustments
3-3

Use the mechanical key to lock or unlock
• Wetting may damage the Intelligent
the driver’s door and trunk lid
(if so
Key. If the Intelligent Key gets wet,
equipped).
immediately wipe until it is com-
pletely dry.
For additional information, see
“Doors”
• Do not place the Intelligent Key for an
(P. 3-5) and “Trunk lid” (P. 3-27).
extended period in an area where
temperatures exceed 140°F (60°C).
CAUTION
• Do not attach the Intelligent Key with
Always carry the mechanical key in-
a key holder that contains a magnet.
stalled in the Intelligent Key slot.
• Do not place the Intelligent Key near
equipment that produces a magnetic
field, such as a TV, audio equipment
and personal computers.
SPA1951
If an Intelligent Key is lost or stolen, NISSAN
recommends erasing the ID code of that
Mechanical key
Intelligent Key from the vehicle. This may
The Intelligent Key contains the mechani-
prevent the unauthorized use of the Intelli-
cal key.
gent Key to operate the vehicle. For infor-
mation regarding the erasing procedure, it
To remove the mechanical key, release the
is recommended that you visit a NISSAN
lock knob on the back of the Intelligent Key.
dealer.
To install the mechanical key, firmly insert it
into the Intelligent Key until the lock knob
returns to the lock position.
3-4
Pre-driving checks and adjustments

DOORS
NISSAN VEHICLE IMMOBILIZER
When the doors are locked using one of the
•
To help avoid risk of injury or death
following methods, the doors cannot be
SYSTEM KEYS
through unintended operation of the
opened using the inside or outside door
vehicle and/or its systems, including
Additional or replacement keys:
handles. The doors must be unlocked to
entrapment in windows or inadver-
If you still have a key, the key number is not
open the doors.
tent door lock activation, do not
necessary when you need extra NISSAN Ve-
leave children, people who require
hicle Immobilizer System keys. Your existing
WARNING
the assistance of others or pets unat-
key can be duplicated without knowing the
tended in your vehicle. Additionally,
•
Always have the doors locked while
key number. As many as four NISSAN Vehicle
the temperature inside a closed ve-
driving. Along with the use of seat
Immobilizer System keys can be used with
hicle on a warm day can quickly be-
belts, this provides greater safety in
one vehicle. You should bring all NISSAN Ve-
come high enough to cause a signifi-
the event of an accident by helping to
hicle Immobilizer System keys that you have
cant risk of injury or death to people
prevent persons from being thrown
to the NISSAN dealer for registration. This is
and pets.
from the vehicle. This also helps keep
because the registration process will erase
children and others from uninten-
the memory of all key codes previously reg-
tionally opening the doors, and will
istered into the NISSAN Vehicle Immobilizer
help keep out intruders.
System. After the registration process, these
components will only recognize keys coded
•
Before opening any door, always look
into the NISSAN Vehicle Immobilizer System
for and avoid oncoming traffic.
during registration. Any key that is not given
to the dealer at the time of registration will
no longer be able to start your vehicle.
CAUTION
Do not allow the immobilizer system
key, which contains an electrical tran-
sponder, to come into contact with wa-
ter or salt water. This could affect sys-
tem function.
Pre-driving checks and adjustments
3-5

LPD3048
LPD3049
LPD3041
Driver’s side
Selective open (if so equipped)
LOCKING WITH INSIDE LOCK KNOB
LOCKING WITH KEY
The power door lock system allows you to
To lock the door without the key, move the
To lock or unlock the vehicle, turn the key as
lock or unlock all doors at the same time.
1 ,
shown.
then close the door.
1
of the
vehicle locks all doors.
To unlock the door without the key, move
Manual
the inside lock knob to the unlock position
Turning the key one time toward the rear
To lock a door, turn the key toward the front
2
2
of the vehicle unlocks that door. From
1
. To unlock, turn the key
that position, returning the key to neutral
2
3
(where the key can only be removed
and inserted) and turning it toward the rear
again within 5 seconds unlocks all doors
4
3-6
Pre-driving checks and adjustments

Lockout protection
When any door is open and the power door
lock switch is moved to the lock position, all
doors will lock. If the Intelligent Key is left in
the vehicle after all the doors are closed, all
doors will unlock automatically and a
chime will sound.
These functions help to prevent the Intelli-
gent Key from being accidentally locked
inside the vehicle.
AUTOMATIC DOOR LOCKS
All doors lock automatically when the ve-
LPD2309
hicle speed reaches 15 mph (24 km/h).
SPA2037
• Continuously Variable Transmission
LOCKING WITH POWER DOOR
CHILD SAFETY REAR DOOR LOCK
(CVT) (if so equipped)
LOCK SWITCH
Child safety locks help prevent the rear
All doors unlock automatically when the
To lock all the doors without a key, push the
doors from being opened accidentally, es-
transmission is placed in the P (Park) or
door lock switch (driver's or front passen-
pecially when small children are in the
OFF position.
1
. When
vehicle.
• Manual transmission (if so equipped)
locking the door this way, be certain not to
The child safety lock levers are located on
All doors unlock automatically when the
leave the key inside the vehicle.
the edge of the rear doors.
ignition is placed in the OFF position.
To unlock all the doors without a key, push
2 ,
the door lock switch (driver's or front pas-
NOTE:
the door can be opened from the outside
2
The automatic door unlock function can
or the inside.
be changed using the “Vehicle Settings”
1 ,
of the vehicle information display.
the door can be opened only from the
For additional information, see “Vehicle
outside.
information display” (P. 2-24).
Pre-driving checks and adjustments
3-7
REMOTE KEYLESS ENTRY SYSTEM (if
so equipped)
As many as four key fobs can be used with
WARNING
• Do not place the key fob for an ex-
one vehicle. For information concerning
tended period in an area where tem-
•
Radio waves could adversely affect
the purchase and use of additional key
peratures exceed 140°F (60°C).
electric medical equipment. Those
fobs, it is recommended that you visit a
• Do not attach the key fob with a key
who use a pacemaker should contact
NISSAN dealer.
holder that contains a magnet.
the electric medical equipment
The key fob will not function when:
• Do not place the key fob near equip-
manufacturer for the possible influ-
• The battery is discharged.
ment that produces a magnetic field,
ences before use.
• The distance between the vehicle and
such as a TV, audio equipment and
•
The remote keyless entry key fob
the key fob is over 33 ft (10 m).
personal computers.
transmits radio waves when the but-
tons are pressed. The FAA advises ra-
The panic alarm will not activate when
If a key fob is lost or stolen, NISSAN rec-
dio waves may affect aircraft naviga-
the key is in the ignition switch.
ommends erasing the ID code of that
tion and communication systems. Do
key fob. This will prevent the key fob
not operate the remote keyless entry
CAUTION
from unauthorized use to unlock the
key fob while on an airplane. Make
vehicle. For information regarding the
sure the buttons are not operated
Listed below are conditions or occur-
erasing procedure, it is recommended
unintentionally when the unit is
rences which will damage the key fob:
that you visit a NISSAN dealer.
stored for a flight.
• Do not allow the key fob, which con-
tains electrical components, to come
It
is possible to lock/unlock all doors, turn
into contact with water or salt water.
the interior lights on, and activate the panic
This could affect the system
alarm by using the key fob from outside the
function.
vehicle.
• Do not drop the key fob.
Be sure to remove the key from the ve-
• Do not strike the key fob sharply
hicle before locking the doors.
against another object.
The key fob can operate at a distance of
• Do not change or modify the key fob.
approximately 33 ft (10 m) from the vehicle.
• Wetting may damage the key fob. If
The effective distance depends on the
the key fob gets wet, immediately
conditions around the vehicle.
wipe until it is completely dry.
3-8
Pre-driving checks and adjustments

4. Press the
button on the key fob.
Using the interior lights
All the doors lock. The hazard indicator
Press the
button on the key fob once
lights flash twice and the horn beeps
to turn on the interior lights.
once to indicate all doors are locked.
The interior lights can be turned off without
• When the
button is pressed
with all doors locked, the hazard indi-
waiting a period of time by inserting the key
into the ignition switch and placing the ig-
cator lights flash twice and the horn
beeps once as a reminder that the
nition switch in the ON or START position,
locking the doors with the key fob, power
doors are already locked.
door lock switch or pushing the interior
• If a door is open and you press the
light switch to the off position.
button, the doors will lock but
the horn will not beep and the hazard
For additional information, see
“Interior
indicator lights will not flash.
lights” (P. 2-61).
The horn may or may not beep. For addi-
LPD3503
Auto relock
tional information, see “Silencing the horn
HOW TO USE REMOTE KEYLESS
beep feature” (P. 3-10).
When the
button on the key fob is
ENTRY SYSTEM
pressed, all doors will lock automatically
Unlocking doors
within 1 minute unless one of the following
1.
(lock) button
operations is performed:
Press the
button on the key fob once.
2.
(unlock) button
• Any door is opened.
• Only the driver’s door unlocks.
3.
(trunk) button
• A key is inserted into the ignition switch
• The hazard indicator lights flash once if all
and the switch is cycled from OFF to ON.
doors are completely closed with the ig-
4.
(panic) button
nition switch in any position except the
• Press the
button.
ON position.
Locking doors
Press the
button on the key fob again
1. Close all windows.
within 1 minute.
2. Remove the key from the ignition switch.
• All doors unlock.
3. Close all doors.
• The hazard indicator lights flash once if all
doors are completely closed.
Pre-driving checks and adjustments
3-9

Releasing the trunk lid
Silencing the horn beep feature
Press the
button on the key fob for
If desired, the horn beep feature can be
longer than 1 second to open the trunk lid.
deactivated using the key fob.
The trunk release button on the key fob will
To deactivate: Press and hold the
not operate when the ignition switch is in
and
buttons for at least 2 seconds.
the ON position.
The hazard indicator lights will flash three
Using the panic alarm
times to confirm that the horn beep fea-
ture has been deactivated.
If you are near your vehicle and feel threat-
ened, you may activate the panic alarm to
To activate: Press and hold the
and
call attention by pressing and holding the
buttons for at least 2 seconds once
button on the key fob for longer than
more.
0.5 seconds.
The hazard indicator lights will flash once
The panic alarm and headlights will stay on
and the horn will sound once to confirm
LPD3181
for a period of time.
that the horn beep feature has been
Battery indicator light
reactivated.
The panic alarm stops when:
Battery indicator light illuminates when
Deactivating the horn beep feature does
• It has run for a period of time.
you push any button. The number of blink-
not silence the horn if the alarm is
• Any button is pressed on the key fob.
ing is different to identify each registered
triggered.
Intelligent Keys. If the light does not illumi-
nate, the battery is weak or needs
replacement.
For additional information, see “Battery re-
placement” (P. 8-21).
3-10
Pre-driving checks and adjustments
NISSAN INTELLIGENT KEY® SYSTEM
(if so equipped)
In such cases, correct the operating condi-
WARNING
CAUTION
tions before using the Intelligent Key func-
•
Radio waves could adversely affect
• Be sure to carry the Intelligent Key
tion or use the mechanical key.
electric medical equipment. Those
with you when operating the vehicle.
Although the life of the battery varies de-
who use a pacemaker should contact
• Never leave the Intelligent Key in the
pending on the operating conditions, the
the electric medical equipment
vehicle when you leave the vehicle.
battery’s life is approximately two years. If
manufacturer for the possible influ-
the battery is discharged, replace it with a
The Intelligent Key is always communicat-
ences before use.
new one.
ing with the vehicle as it receives radio
•
The Intelligent Key transmits radio
waves. The Intelligent Key transmits weak
When the Intelligent Key battery is low, the
waves when the buttons are pressed.
radio waves. Environmental conditions
NISSAN Intelligent Key® warning light (if so
The FAA advises the radio waves may
may interfere with the operation of the In-
equipped) will blink green for about 30 sec-
affect aircraft navigation and com-
telligent Key under the following operating
onds after the ignition switch is placed in
munication systems. Do not operate
conditions:
the ON position.
the Intelligent Key while on an air-
plane. Make sure the buttons are not
•
When operating near a location where
Since the Intelligent Key is continuously re-
strong radio waves are transmitted, such
operated unintentionally when the
ceiving radio waves, if the key is left near
unit is stored for a flight.
as a TV tower, power station and broad-
equipment which transmits strong radio
casting station.
waves, such as signals from a TV and per-
The Intelligent Key can operate all the door
•
When in possession of wireless equip-
sonal computer, the battery life may be-
locks using the remote control function or
ment, such as a cellular telephone, trans-
come shorter.
pushing the request switch (if so equipped)
ceiver, or a CB radio.
on the vehicle without taking the key out
When the battery is discharged, firmly ap-
•
When the Intelligent Key is in contact with
ply the foot brake and touch the ignition
from a pocket or purse. The operating en-
vironment and/or conditions may affect
or covered by metallic materials.
switch with the Intelligent Key. Then push
the Intelligent Key operation.
•
When any type of radio wave remote con-
the ignition switch while depressing the
trol is used nearby.
brake pedal within 10 seconds after the
Be sure to read the following before using
•
When the Intelligent Key is placed near an
chime sound. For additional information,
the Intelligent Key.
electric appliance such as a personal
see “Push-button ignition switch” (P. 5-13).
computer.
For additional information, see “Battery re-
•
When the vehicle is parked near a parking
placement” (P. 8-21).
meter.
Pre-driving checks and adjustments
3-11

As many as four Intelligent Keys can be
• Do not place the Intelligent Key for an
registered and used with one vehicle. For
extended period in an area where
information about the purchase and use of
temperatures exceed 140°F (60°C).
additional Intelligent Keys, it is recom-
• Do not attach the Intelligent Key with
mended that you visit a NISSAN dealer.
a key holder that contains a magnet.
• Do not place the Intelligent Key near
CAUTION
equipment that produces a magnetic
Listed below are conditions or occur-
field, such as a TV, audio equipment
rences which will damage the Intelli-
and personal computers.
gent Key:
If an Intelligent Key is lost or stolen, NISSAN
•
Do not allow the Intelligent Key,
recommends erasing the ID code of that
which contains electrical compo-
Intelligent Key from the vehicle. This may
nents, to come into contact with wa-
prevent the unauthorized use of the Intelli-
ter or salt water. This could affect the
gent Key to operate the vehicle. For infor-
LPD3043
system function.
mation regarding the erasing procedure, it
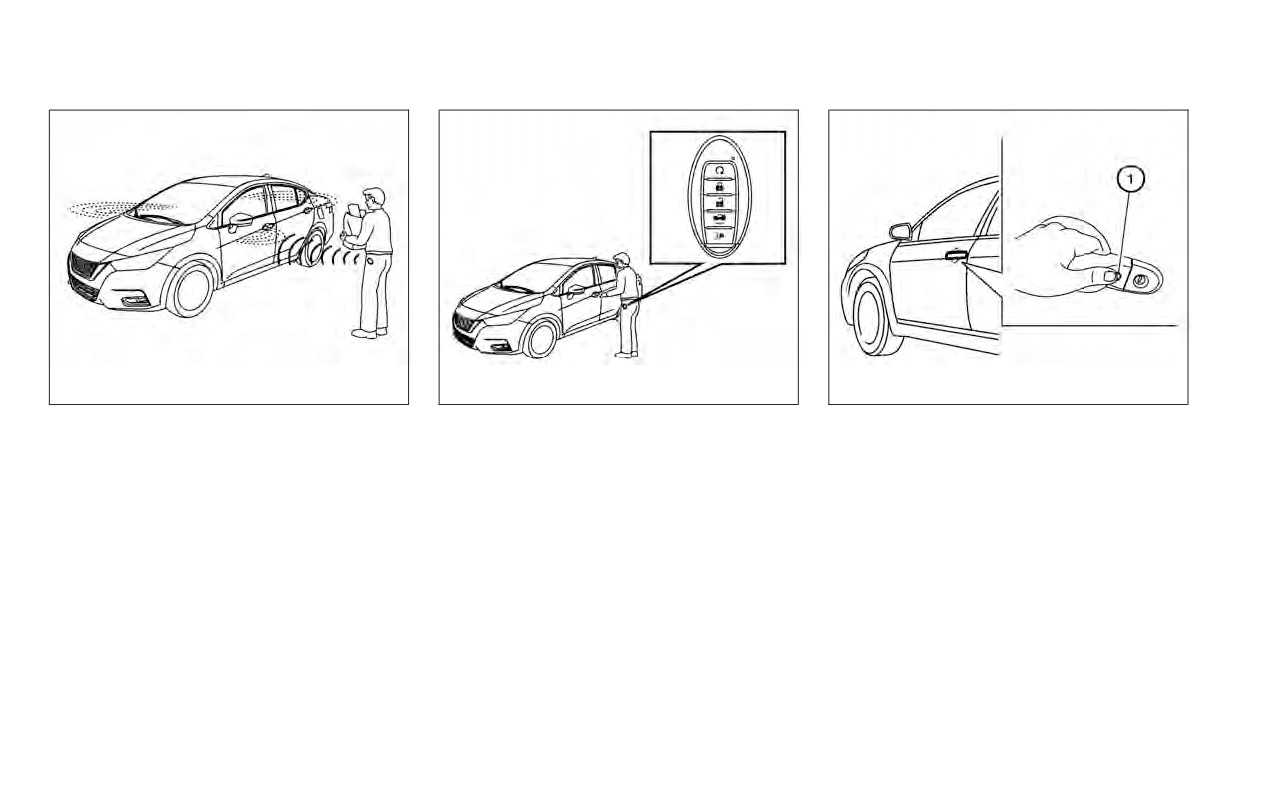
OPERATING RANGE
•
Do not drop the Intelligent Key.
is recommended that you visit a NISSAN
•
Do not strike the Intelligent Key
dealer.
The Intelligent Key functions can only be
used when the Intelligent Key is within the
sharply against another object.
specified operating range from the request
•
Do not change or modify the Intelli-
1
gent Key.
When the Intelligent Key battery is dis-
•
Wetting may damage the Intelligent
charged or strong radio waves are present
Key. If the Intelligent Key gets wet,
near the operating location, the Intelligent
immediately wipe until it is com-
Key operating range becomes narrower,
pletely dry.
and the Intelligent Key may not function
•
If the outside temperature is below
properly.
14°F (-10°C) the battery of the Intelli-
gent Key may not function properly.
The operating range is within 31.5 in (80 cm)
from each request switch (if so equipped)
1
3-12
Pre-driving checks and adjustments

If the Intelligent Key is too close to the door
• To prevent the Intelligent Key from being
glass, handle or rear bumper, the request
left inside the vehicle, make sure you
switches (if so equipped) may not function.
carry the Intelligent Key with you and then
lock the doors.
When the Intelligent Key is within the oper-
ating range, it is possible for anyone, even
• Do not pull the door handle before push-
someone who does not carry the Intelli-
ing the door handle request switch (if so
gent Key, to push the request switch (if so
equipped). The door will be unlocked but
equipped) to lock/unlock the doors.
will not open. Release the door handle
once and pull it again to open the door.
LPD2554
DOOR LOCKS/UNLOCKS
PRECAUTION
• Do not push the door handle request
switch (if so equipped) with the Intelligent
Key held in your hand as illustrated. The
close distance to the door handle will
cause the Intelligent Key system to have
difficulty recognizing that the Intelligent
Key is outside the vehicle.
• After locking with the door handle re-
quest switch (if so equipped), verify the
doors are securely locked by testing
them.
Pre-driving checks and adjustments
3-13
LPD3039
LPD3040
LPD2165
NISSAN INTELLIGENT KEY®
Locking doors
NOTE:
OPERATION
• Doors lock with the door handle re-
1. Move the shift lever to the P (Park) posi-
tion, place the ignition switch in the LOCK
quest switch (if so equipped) while the
You can lock or unlock the doors without
ignition switch is not in the LOCK
taking the Intelligent Key out of your pocket
position and make sure you carry the
Intelligent Key with you.
position.
or bag.
• Doors do not lock by pushing the pas-
When you carry the Intelligent Key with you,
2. Close all doors.
senger door handle request switch (if
you can lock or unlock all doors by pushing
3. Push any door handle request switch (if
so equipped) while any door is open.
the door handle request switch
(if so
1
while carrying the Intel-
However, doors lock with the mechani-
equipped) within the range of operation.
ligent Key with you.
cal key even if any door is open.
4. All doors will lock.
5. The hazard indicator lights flash twice
and the outside buzzer sounds twice.
3-14
Pre-driving checks and adjustments
•
Request switches (if so equipped) for
NOTE:
CAUTION
all doors can be deactivated when the
The doors may not lock when the Intelli-
Ext. Door Switch feature is switched to
• When locking the doors using the re-
gent Key is in the same hand that is op-
OFF using the “Vehicle Settings” menu
quest switch (if so equipped), make
erating the request switch
(if so
in the vehicle information display. For
sure to have the Intelligent Key in
equipped) to lock the door. Put the Intel-
additional information, see “Vehicle in-
your possession before operating
ligent Key in a purse, pocket or your
formation display” (P. 2-24).
the request switch (if so equipped) to
other hand.
•
Doors do not lock with the door handle
prevent the Intelligent Key from be-
request switch (if so equipped) with
ing left in the vehicle.
CAUTION
the Intelligent Key inside the vehicle
• The request switch (if so equipped) is
and a beep sounds to warn you. How-
operational only when the Intelligent
The lockout protection may not func-
ever, when an Intelligent Key is inside
Key has been detected by the Intelli-
tion under the following conditions:
the vehicle, doors can be locked with
gent Key system.
• When the Intelligent Key is placed on
another Intelligent Key.
top of the instrument panel.
Lockout protection
• When the Intelligent Key is placed on
WARNING
To prevent the Intelligent Key from being
top of the rear parcel shelf.
accidentally locked in the vehicle, lockout
After locking the doors using the re-
• When the Intelligent Key is placed in-
protection is equipped with the Intelligent
quest switch, make sure that the doors
side the glove box or a storage bin.
Key.
have been securely locked by operat-
• When the Intelligent Key is placed in-
ing the door handles. Failure to follow
When the driver’s side door is open, the
side the door pockets.
these instructions may result in inad-
doors are locked and then the Intelligent
• When the Intelligent Key is placed on
vertently unlocking the doors, which
Key is put inside the vehicle and all the
or under the spare tire area.
may decrease the safety and security
doors are closed; the lock will automati-
• When the Intelligent Key is placed in-
of your vehicle.
cally unlock and the door buzzer sounds.
side or near metallic materials.
Pre-driving checks and adjustments
3-15

If a door handle is pulled while unlocking
the doors, that door may not be unlocked.
Returning the door handle to its original
position will unlock the door. If the door
does not unlock after returning the door
handle, push the door handle request
switch (if so equipped) to unlock the door.
All doors will be locked automatically un-
less one of the following operations is per-
formed within 1 minute after pushing the
request switch (if so equipped).
• Opening any door.
• Pushing the ignition switch.
LPD3040
LPD2165
Unlocking doors
NOTE:
1. Carry the Intelligent Key.
Request switches (if so equipped) for all
doors can be deactivated when the Ext.
2. Push the door handle request switch (if
Door Switch feature is switched to OFF
1
using the “Vehicle Settings” menu on the
3. The hazard indicator lights flash once
vehicle information display. For addi-
and the outside buzzer sounds once.
tional information, see “Vehicle informa-
tion display” (P. 2-24).
4. Push the door handle request switch (if
1
again within 5 seconds
to unlock all doors.
3-16
Pre-driving checks and adjustments

Using the interior light
When all doors are locked and the trunk lid
is closed with the Intelligent Key inside the
The interior light illuminates for a period of
trunk, a chime will sound and the doors will
time when a door is unlocked and the inte-
unlock.
rior light switch is not in the OFF position.
The light can be turned off without waiting
HOW TO USE THE REMOTE
by performing one of the following
KEYLESS ENTRY FUNCTION
operations:
The remote keyless entry function can op-
• Placing the ignition switch in the ON
erate all door locks using the remote key-
position.
less function of the Intelligent Key. The re-
• Locking the doors with the remote
mote keyless function can operate at a
control.
distance of 33 ft (10 m) away from the ve-
• Switching the interior light switch to the
hicle. The operating distance depends
OFF position.
upon the conditions around the vehicle.
LPD3047
• Switching the Auto Room Lamp feature
The remote keyless entry function may not
to the OFF position in the “Vehicle Set-
Opening the trunk lid
function under the following conditions:
tings” menu on the vehicle information
1. Unlock all doors.
• When the Intelligent Key is not within the
display. For additional information, see
operational range.
“Vehicle information display” (P. 2-24).
2. Push the trunk opener switch
A while
• When the doors or the trunk are open or
carrying the Intelligent Key with you.
For additional information, see
“Interior
not closed securely.
lights” (P. 2-61).
3. The trunk will unlatch. A chime will sound
• When the Intelligent Key battery is
four times.
discharged.
4. Raise the trunk lid to open the trunk.
CAUTION
Lockout protection
When locking the doors using the Intel-
To prevent the Intelligent Key from being
accidentally locked in the trunk, lockout
ligent Key, be sure not to leave the key
in the vehicle.
protection is equipped with the Intelligent
Key system.
Pre-driving checks and adjustments
3-17

3. Press the
button on the Intelli-
gent Key.
4. The hazard indicator lights flash twice
and the horn beeps once.
5. All doors will be locked.
WARNING
After locking the doors using the Intel-
ligent Key, be sure that the doors have
been securely locked by operating the
door handles. Failure to follow these in-
structions may result in inadvertently
unlocking the doors, which may de-
LPD3601
LPD3603
crease the safety and security of your
Type B (if so equipped)
vehicle.
Type A (if so equipped)
1.
(remote engine start) button
1.
(lock) button
Unlocking doors
2.
(lock) button
2.
(unlock) button
1. Press the
button on the Intelligent
3.
(unlock) button
Key to unlock the driver’s door.
3.
(trunk) button
4.
(trunk) button
2. The hazard indicator lights flash once
4.
(panic) button
and the driver’s door unlocks.
5.
(panic) button
3. Press the
button again within 60
Locking doors
seconds to unlock all doors.
1. Place the ignition switch
in the LOCK
position.
2. Close all doors.
3-18
Pre-driving checks and adjustments

NOTE:
• Switching the Auto Room Lamp feature
• The request switch (if so equipped) on the
to the OFF position in the “Vehicle Set-
driver or passenger door is pushed and
The Selective Unlock feature can be
tings” menu on the vehicle information
the Intelligent Key is in range of the door
changed using the “Vehicle Settings”
display. For additional information, see
handle.
menu on the vehicle information display.
“Vehicle information display” (P. 2-24).
For additional information, see “Vehicle
Answer back horn feature
information display” (P. 2-24).
For additional information, see
“Interior
lights” (P. 2-61).
If desired, the answer back horn feature
All doors will be locked automatically un-
can be deactivated using the Intelligent
less one of the following operations is per-
Releasing the trunk lid
Key. When it is deactivated and the
formed within 1 minute after pressing the
button is pressed, the hazard indicator
button:
Press the
button for longer than 0.5
lights flash twice. When the
button is
• Opening any doors.
seconds to open the trunk lid. The trunk
pressed, neither the hazard indicator lights
release button will not operate when the
• Pushing the ignition switch.
nor the horn operates.
ignition switch is placed in the ON position.
Using the interior light
NOTE:
Using the panic alarm
If you change the Answer Back Horn
The interior light illuminates for a period of
If you are near your vehicle and feel threat-
and light flash feature with the Intelli-
time when a door is unlocked and the inte-
ened, you may activate the panic alarm to
gent Key, the vehicle information dis-
rior light switch is not in the OFF position.
call attention by pressing and holding the
play screen will show the current
The light can be turned off without waiting
button on the Intelligent Key for lon-
mode after the ignition switch has
by performing one of the following
ger than 0.5 seconds.
been cycled from the OFF to the ON
operations:
The panic alarm and headlights will stay on
position. The vehicle information dis-
• Placing the ignition switch in the ON
play screen can also be used to
for a period of time.
position.
change the answer back horn mode.
The panic alarm stops when:
• Locking the doors with the remote
For additional information, see “Ve-
control.
• It has run for a period of time.
hicle Settings” (P. 2-24).
• Switching the interior light switch to the
• Any button is pressed on the Intelligent
OFF position.
Key.
Pre-driving checks and adjustments
3-19

To deactivate:
If the light does not blink, your battery may
Press and hold the
and
but-
be too weak to communicate to the ve-
tons for at least 6 seconds. The hazard
hicle. If this occurs, the battery may need to
indicator lights will flash three times to con-
be replaced. For additional information re-
firm that the answer back horn feature has
garding the replacement of a battery, see
been deactivated.
“Battery replacement” (P. 8-21).
To activate:
WARNING SIGNALS
Press and hold the
and
but-
To help prevent the vehicle from moving
tons for at least 6 seconds once more.
The hazard indicator lights will flash once
unexpectedly by erroneous operation of
the Intelligent Key or to help prevent the
and the horn will sound once to confirm
that the horn beep feature has been
vehicle from being stolen, a chime or
buzzer sounds from inside and outside the
reactivated.
vehicle and a warning is displayed in the
Deactivating the horn beep feature does
LPD2836
instrument panel.
not silence
the horn if the alarm is
triggered.
Intelligent Key button operation
When a chime or beep sounds or a warning
is displayed, be sure to check the vehicle
light
and the Intelligent Key.
The light blinks only when you press any
For additional information, see “Trouble-
button on the Intelligent Key. The light illu-
shooting guide
(Manual Transmission
mination only signifies that the key fob has
only)” (P. 3-21), “Troubleshooting guide (Con-
transmitted a signal. You may look and/or
tinuously Variable Transmission only)”
listen to verify that the vehicle has per-
(P. 3-22) and “Vehicle information display”
formed the intended operation. The num-
(P. 2-24).
ber of blinks identifies each registered key
(i.e. 1 blink = 1st key,...,4 blinks = 4th key) for
your own identification purposes.
3-20
Pre-driving checks and adjustments
Большое спасибо!
Ваше мнение очень важно для нас.
Нет комментариевНе стесняйтесь поделиться с нами вашим ценным мнением.
Текст