Nissan March K13. Manual — part 134

FUEL FILLER LID OPENER
DLK-247
< REMOVAL AND INSTALLATION >
[WITHOUT INTELLIGENT KEY SYSTEM]
C
D
E
F
G
H
I
J
L
M
A
B
DLK
N
O
P
9.
Disengage pawls (A) of fuel filler lid lock assembly (1) and push
out fuel filler lid lock assembly toward the vehicle outside.
CAUTION:
Be careful not to damage packing (2) when removing.
10. Remove fuel filler lid opener cable (3) from fuel filler lid lock
assembly.
11. Pull up floor trim. Refer to
INT-32, "LUGGAGE SIDE LOWER FINISHER : Removal and Installation"
.
12. Remove fuel filler lid opener cable mounting clips.
13. Remove fuel filler lid opener cable.
INSTALLATION
Note the following items, and install in the reverse order of removal.
CAUTION:
After installation, check fuel filler lid assembly open/close, lock/unlock operation.
JMKIA5360ZZ
DLK-248
< REMOVAL AND INSTALLATION >
[WITHOUT INTELLIGENT KEY SYSTEM]
DOOR SWITCH
DOOR SWITCH
Removal and Installation
INFOID:0000000005949204
REMOVAL
Remove the door switch mounting bolt, and then remove door switch.
INSTALLATION
Install in the reverse order of removal.
REMOTE KEYLESS ENTRY RECEIVER
DLK-249
< REMOVAL AND INSTALLATION >
[WITHOUT INTELLIGENT KEY SYSTEM]
C
D
E
F
G
H
I
J
L
M
A
B
DLK
N
O
P
REMOTE KEYLESS ENTRY RECEIVER
Removal and Installation
INFOID:0000000005949206
REMOVAL
Remove the remote keyless entry receiver mounting bolt, and then remove remote keyless entry receiver.
INSTALLATION
Install in the reverse order of removal.
DLK-250
< REMOVAL AND INSTALLATION >
[WITHOUT INTELLIGENT KEY SYSTEM]
KEYFOB BATTERY
KEYFOB BATTERY
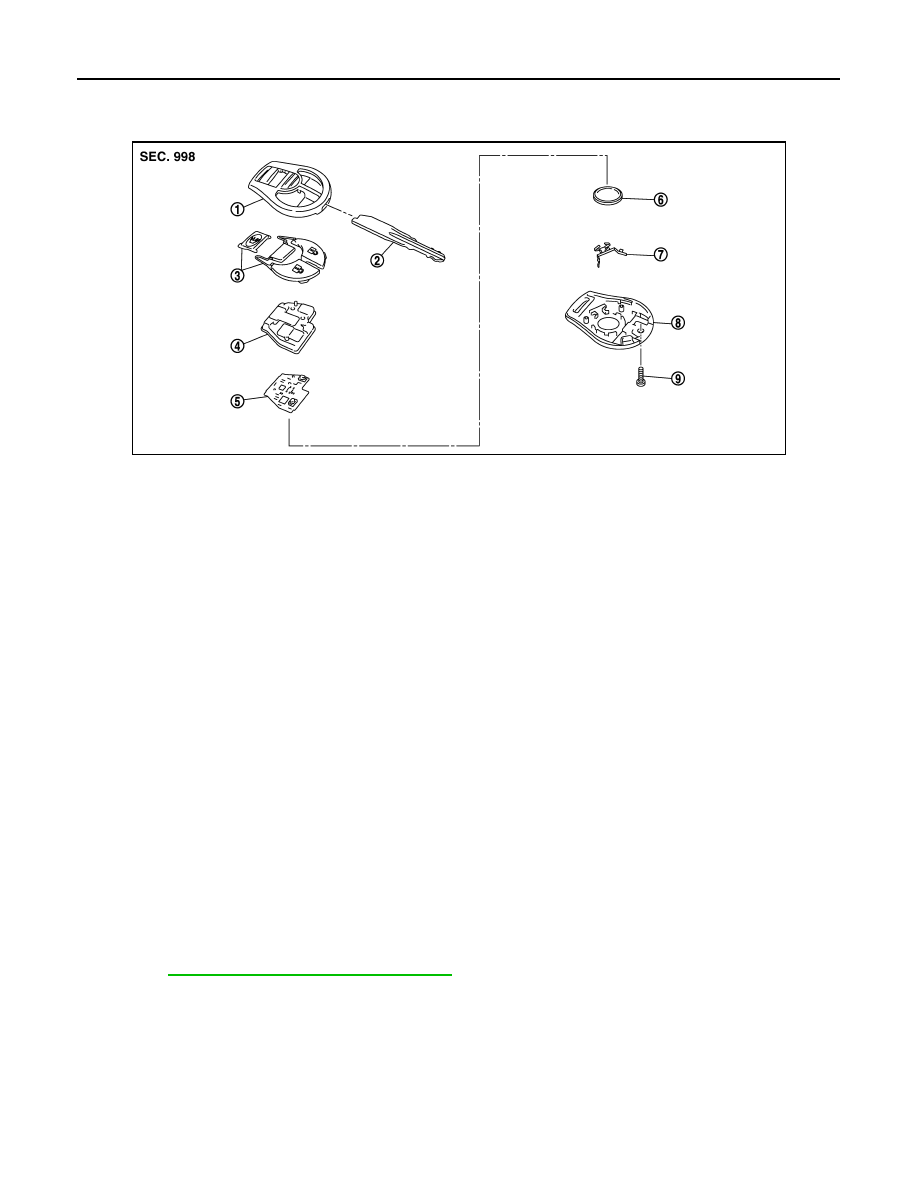
Exploded View
INFOID:0000000005949207
Removal and Installation
INFOID:0000000005949208
REMOVAL
1.
Remove screw (9) on the rear of keyfob.
2.
Place the key with the lower case (8) facing up. Set a screw-driver wrapped with tape between upper case
(1) and lower case (8) and then separate the lower case (8) from the upper case (1).
CAUTION:
• Do not touch the circuit board or battery terminal.
• The keyfob is water-resistant. However, if it does get wet, immediately wipe it dry.
3.
When replacing the circuit board assembly, remove circuit board assembly from the upper case (1).
[Circuit board assembly: Switch rubber (4) + Board surface (5)]
CAUTION:
Do not touch the printed circuits directly.
4.
Remove the battery (6) from the lower case (8) and replace it.
CAUTION:
When replacing battery, keep dirt, grease, and other foreign materials off the electrode contact
area.
5.
After replacement, fit the lower and upper cases together, part (4), (7) and tighten with the screw.
CAUTION:
After replacing the battery, Be sure to check that door locking operates normally using the keyfob.
Refer to
DLK-199, "Component Function Check"
INSTALLATION
Install in the reverse order of removal.
JMKIA1442ZZ
1.
Upper case
2.
Key
3.
Switch cover
4.
Switch rubber
5.
Board surface
6.
Battery
7.
plate
8.
Lower case
9.
Screw
Battery replacement
: Coin-type lithium battery
(CR1620)
Нет комментариевНе стесняйтесь поделиться с нами вашим ценным мнением.
Текст