Nissan March K13. Manual — part 558
SB-6
< REMOVAL AND INSTALLATION >
FRONT SEAT BELT
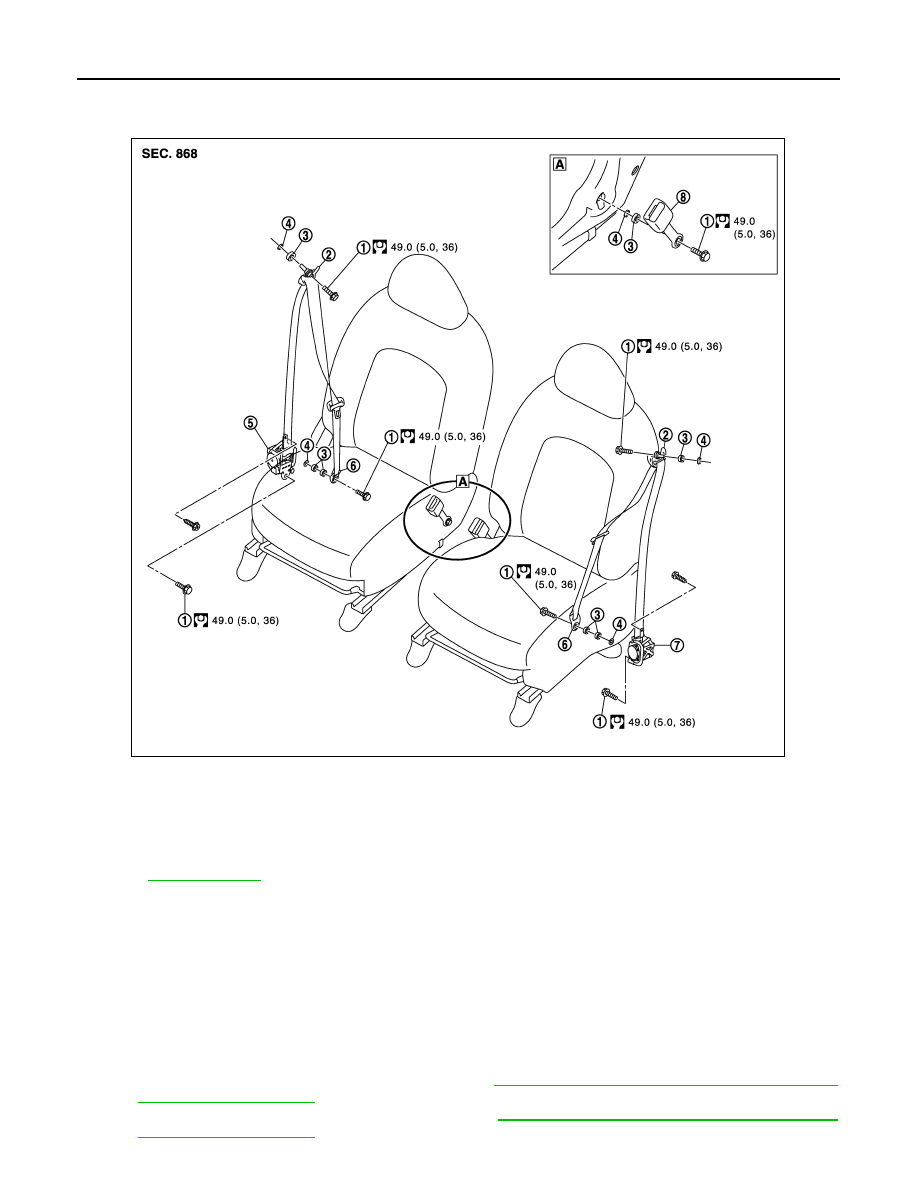
SEAT BELT RETRACTOR : Exploded View
INFOID:0000000005984484
SEAT BELT RETRACTOR : Removal and Installation
INFOID:0000000005984485
REMOVAL
CAUTION:
Before removal or installation, always turn the ignition switch OFF and disconnect the battery nega-
tive terminal, then wait for at least 3 minutes or more.
1.
Remove the outer anchor.
Remove the outer anchor mounting anchor bolt.
2.
Remove the shoulder anchor.
1.
Remove the center pillar lower garnish. Refer to
INT-23, "CENTER PILLAR LOWER GARNISH :
.
2.
Remove the center pillar upper garnish. Refer to
INT-24, "CENTER PILLAR UPPER GARNISH :
.
1.
Anchor bolt
2.
Shoulder anchor
3.
Spacer
4.
Toothed washer
5.
Seat belt pre-tensioner retractor (RH
side)
6.
Outer anchor
7.
Seat belt pre-tensioner retractor (LH
side)
8.
Seat belt buckle
Refer to
for symbols in the figure.
JMHIA1498GB
FRONT SEAT BELT
SB-7
< REMOVAL AND INSTALLATION >
C
D
E
F
G
I
J
K
L
M
A
B
SB
N
O
P
3.
Remove the shoulder anchor mounting anchor bolt.
3.
Remove the seat belt pre-tensioner retractor.
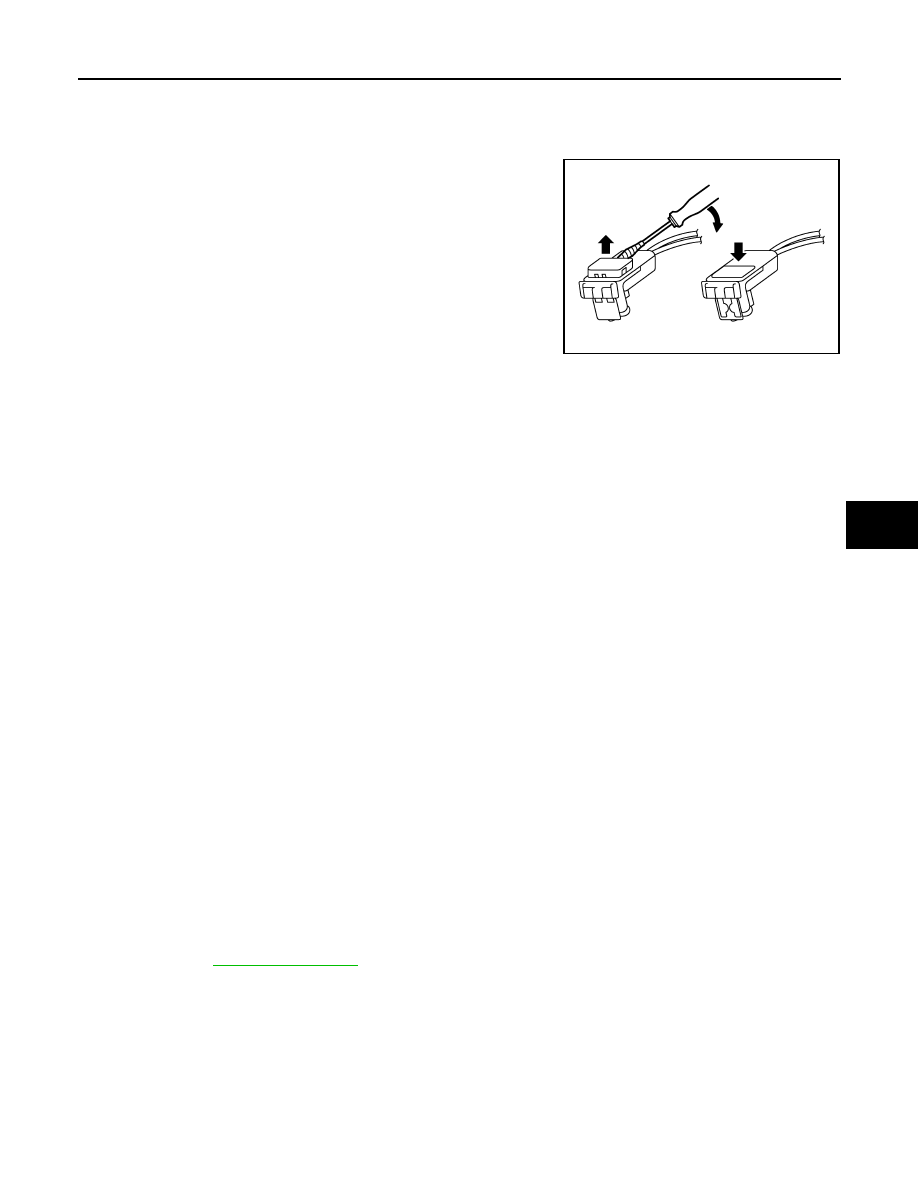
• Disconnect the seat belt pre-tensioner connector.
CAUTION:
• For installing/removing seat belt pre-tensioner connec-
tor, insert thin screwdriver wrapped in tape into notch,
lift lock and remove connector.
• Install connector with lock raised, and push lock into
connector.
• After installing the connector, check that the lock is
pushed securely into it.
• Remove the seat belt pre-tensioner retractor mounting anchor bolt and screw.
INSTALLATION
Install in the reverse order of removal.
SEAT BELT BUCKLE
SEAT BELT BUCKLE : Inspection
INFOID:0000000005984486
AFTER A COLLISION
WARNING:
Inspect all seat belt assemblies including retractors and attached hardware after any collision.
NISSAN/INFINITI recommends that all seat belt assemblies in use during a collision be replaced
unless the collision was minor and the belts show no damage and continue to operate properly. Fail-
ure to do so could result in serious personal injury in an accident. Seat belt assemblies not in use dur-
ing a collision should also be replaced if either damage or improper operation was noted. Seat belt
pre-tensioners should be replaced even if the seat belts were not in use during a frontal collision in
which the air bags were deployed.
Replace any seat belt assembly (including anchor bolts) if:
• The seat belt is in use at the time of a collision (except for minor collisions and the belts, retractors and buck-
les show no damage and continue to operate properly).
• The seat belt is damaged in an accident (i.e. torn webbing, bent retractor or guide, etc.).
• The seat belt attaching point is damaged in an accident. Inspect the seat belt attaching area for damage or
distortion and repair if necessary before installing a new seat belt assembly.
• Anchor bolts are deformed or worn out.
• The seat belt pre-tensioner must be replaced even if the seat belts were not in use during the collision in
which the air bags were deployed.
PRELIMINARY CHECKS
1.
Check the seat belt warning lamp for proper operation as pen the following:
a.
Turn ignition switch ON. The seat belt warning lamp should illuminate.
b.
Fasten driver seat belt. The seat belt warning lamp should turn OFF.
2.
If the air bag warning lamp is blinking, perform self-diagnosis using CONSULT-III and air bag warning
lamp. Refer to
.
3.
Check that the seat belt retractor, seat belt anchor and buckle bolts are tightened firmly.
4.
Repeat steps above if necessary to check the other seat belts.
PHIA0953J
SB-8
< REMOVAL AND INSTALLATION >
FRONT SEAT BELT
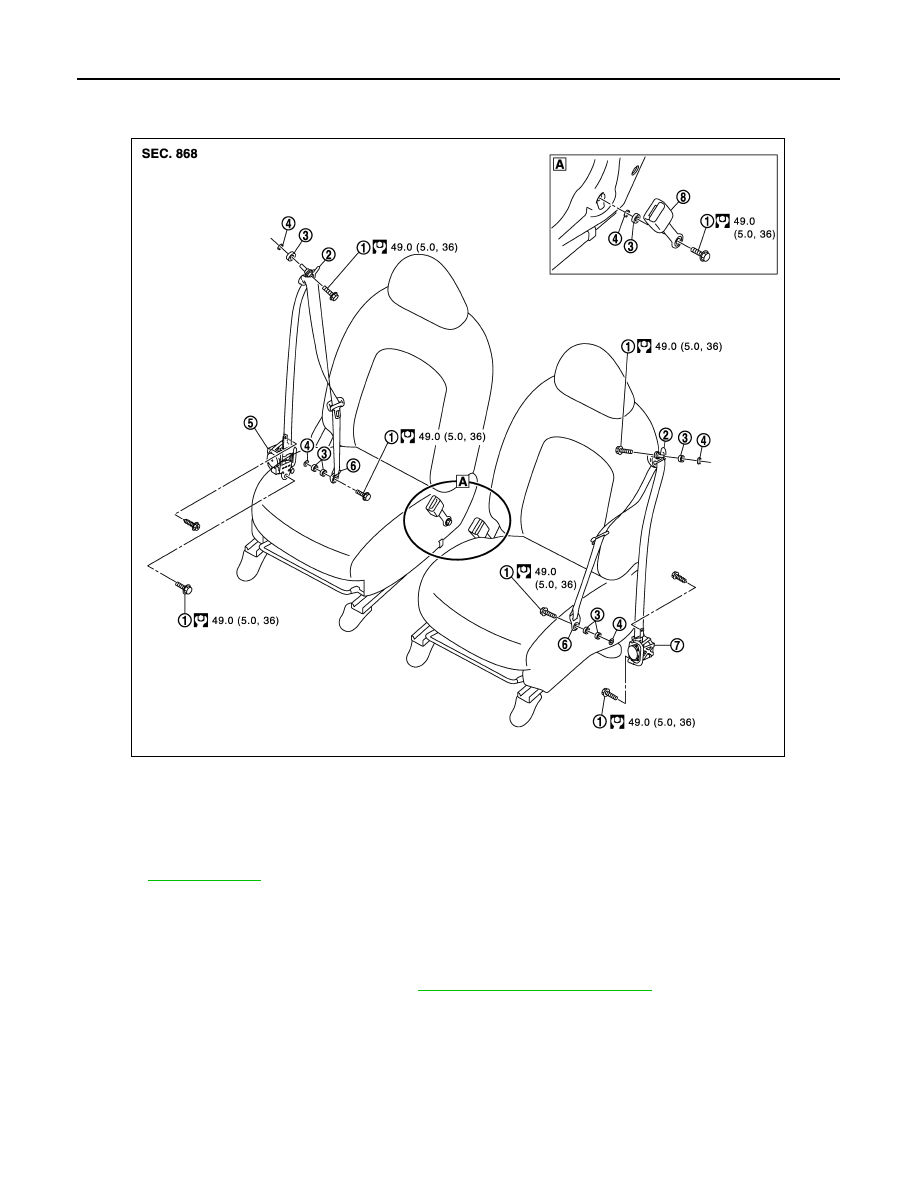
SEAT BELT BUCKLE : Exploded View
INFOID:0000000006039623
SEAT BELT BUCKLE : Removal and Installation
INFOID:0000000005984488
REMOVAL
Remove the seat belt buckle.
1.
Remove the front seat from vehicle. Refer to
SE-15, "Removal and Installation"
. (for ease of tool operation
in narrow space.)
2.
Remove the seat belt buckle mounting anchor bolt.
INSTALLATION
Install in the reverse order of removal.
1.
Anchor bolt
2.
Shoulder anchor
3.
Spacer
4.
Toothed washer
5.
Seat belt pre-tensioner retractor (RH
side)
6.
Outer anchor
7.
Seat belt pre-tensioner retractor (LH
side)
8.
Seat belt buckle
Refer to
for symbols in the figure.
JMHIA1498GB
REAR SEAT BELT
SB-9
< REMOVAL AND INSTALLATION >
C
D
E
F
G
I
J
K
L
M
A
B
SB
N
O
P
REAR SEAT BELT
SEAT BELT RETRACTOR
SEAT BELT RETRACTOR : Inspection
INFOID:0000000005984489
AFTER A COLLISION
WARNING:
Inspect all seat belt assemblies including retractors and attached hardware after any collision.
NISSAN/INFINITI recommends that all seat belt assemblies in use during a collision be replaced
unless the collision was minor and the belts show no damage and continue to operate properly. Fail-
ure to do so could result in serious personal injury in an accident. Seat belt assemblies not in use dur-
ing a collision should also be replaced if either damage or improper operation was noted. Seat belt
pre-tensioners should be replaced even if the seat belts were not in use during a frontal collision in
which the air bags were deployed.
Replace any seat belt assembly (including anchor bolts) if:
• The seat belt is in use at the time of a collision (except for minor collisions and the belts, retractors and buck-
les show no damage and continue to operate properly).
• The seat belt is damaged in an accident (i.e. torn webbing, bent retractor or guide, etc.).
• The seat belt attaching point is damaged in an accident. Inspect the seat belt attaching area for damage or
distortion and repair if necessary before installing a new seat belt assembly.
• Anchor bolts are deformed or worn out.
• The seat belt pre-tensioners must be replaced even if the seat belts were not in use during the collision in
which the air bags were deployed.
PRELIMINARY CHECKS
1.
Check that the seat belt retractor, seat belt anchor and buckle bolts are tightened firmly.
2.
Check retractor operation:
a.
Fully extend the seat belt webbing and check for twists, tears or other damage.
b.
Allow the seat belt to retract. Check that webbing returns smoothly and completely into the retractor. If the
seat belt does not return smoothly, wipe the inside of the loops with a clean paper cloth. Dirt build-up in the
loops of that upper anchors can cause the seat belts to retract slowly.
c.
Fasten the seat belt. Check that seat belt returns smoothly and completely to the retractor. If the webbing
does not return smoothly, the cause may be an accumulation of dust or dirt. Use the “SEAT BELT TAPE
SET” and perform the following steps.
3.
Repeat steps above if necessary to check the other seat belts.
SEAT BELT RETRACTOR ON-VEHICLE CHECK
Emergency Locking Retractors (ELR)
NOTE:
All seat belt retractors are Emergency Locking Retractors (ELR) type.
Check the seat belt retractors with the following test(s) to determine if a retractor assembly is operating prop-
erly.
ELR Function Stationary Check
Grasp the shoulder webbing and pull forward quickly. The retractor should lock and prevent the belt from
extending further.
ELR Function Moving Check
WARNING:
Perform the following test in a safe, open area clear of other vehicles and obstructions (for example, a
large, empty parking lot). Road surface must be paved and dry. Never perform the following test on
wet or gravel roads or on public streets and highways. This could result in an accident and serious
personal injury. The driver and passenger must be prepared to brace themselves in the event that the
retractor does not lock.
1.
Fasten driver seat belt. Buckle a passenger into the seat for the belt that is to be tested.
2.
Proceed to the designated safe area.
Нет комментариевНе стесняйтесь поделиться с нами вашим ценным мнением.
Текст