Nissan Altima (2018 year). Instruction — part 14

CD/MP3 display mode
While listening to an MP3/WMA CD, certain
text may be displayed on the screen if the
CD has been encoded with text informa-
tion. Depending on how the MP3/WMA CD
is encoded, information such as Artist,
Song and Folder will be displayed.
The track number and the total number of
tracks in the current folder or on the cur-
rent disc are displayed on the screen as
well.
SEEK/TRACK (Reverse or
Fast Forward) button
Press
and
hold
the
SEEK
button
or
TRACK button for 1.5 seconds while
the compact disc is playing to reverse or
fast forward the track being played. The
compact disc plays at an increased speed
while reversing or fast forwarding. When
the button is released, the compact disc
returns to normal play speed.
SEEK/TRACK button
Press the
SEEK button while a CD or
MP3/WMA CD is playing to return to the
beginning of the current track. Press
the
SEEK button several times to skip
backward several tracks.
Press the
TRACK button while a CD or
MP3/WMA CD is playing to advance one
track. Press the
TRACK button several
times to skip forward several tracks. If the
last track on a CD is skipped, the first track
on the disc is played. If the last track in a
folder of an MP3/WMA CD is skipped, the
first track of the next folder is played.
TUNE/FOLDER knob (MP3/WMA CD only)
If an MP3/WMA CD with multiple folders is
playing, turn the TUNE/FOLDER knob to
change folders. Turn the knob to the left to
skip back a folder. Turn the knob to the right
to skip ahead a folder.
RPT (repeat) button
When the RPT button is pressed while a
compact disc is playing, the play pattern
can be changed as follows:
CD:
1 Track Repeat
←→ OFF
CD with MP3 or WMA:
1 Folder Repeat
→ 1 Track Repeat → OFF
1 Track Repeat: the current track will be
repeated.
1 Folder Repeat: the current folder will be
repeated.
OFF: No repeat play pattern is applied. The
indicator on the display will turn off.
The current play pattern of the CD is dis-
played on the screen unless no pattern is
applied.
RDM (random) button
When the RDM button is pressed while a
compact disc is playing, the play pattern
can be changed as follows:
CD:
1 Disc Random
←→ OFF
CD with MP3 or WMA:
1 Disc Random
→ 1 Folder Random → OFF
1 Disc Random: all tracks on the disc will be
played randomly.
1 Folder Random: all tracks in the current
folder will be played randomly.
OFF: No random play pattern is applied. The
indicator on the display will turn off.
The current play pattern of the CD is dis-
played on the screen unless no pattern is
applied.
Monitor, climate, audio, phone and voice recognition systems
4-35
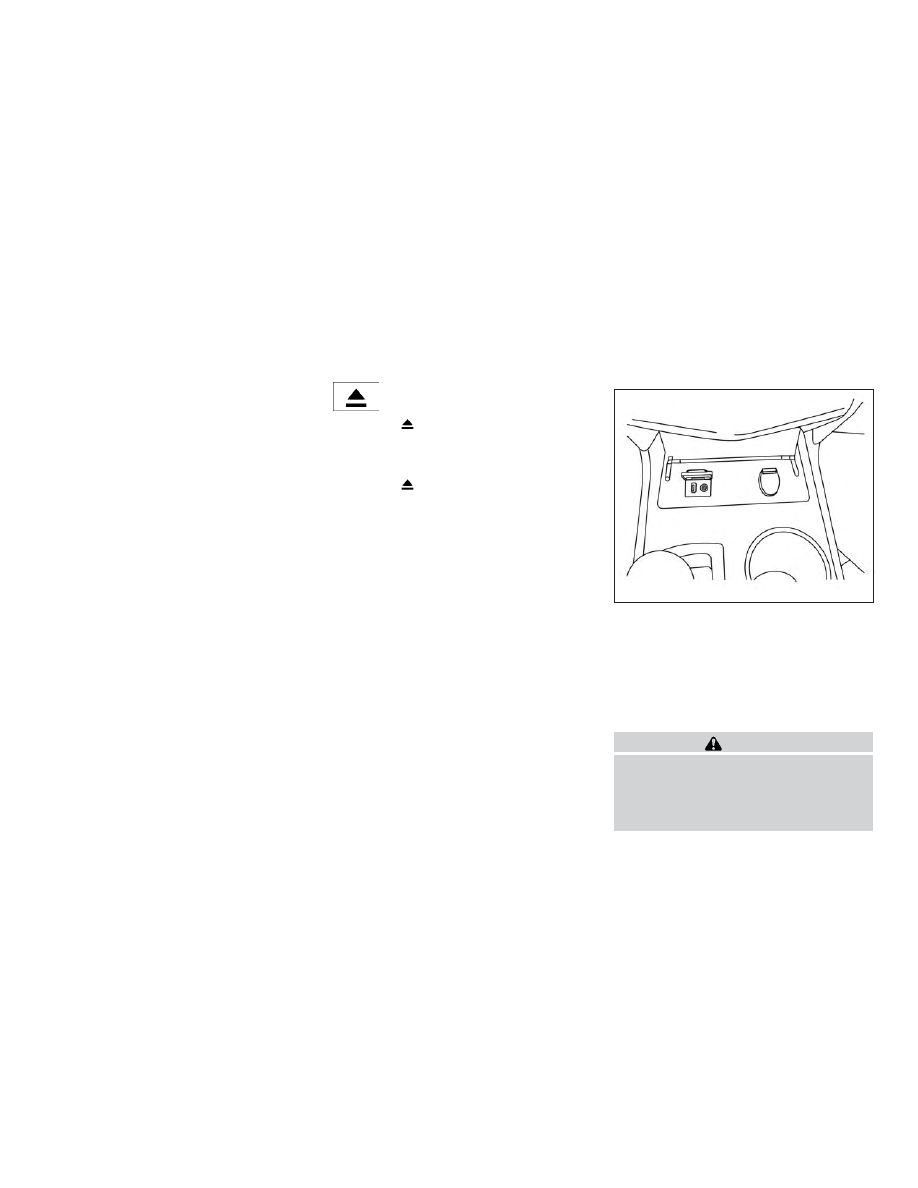
CD EJECT button
When the
CD eject button is pressed
with a compact disc loaded, the compact
disc will eject and the last source will be
played.
When the
CD eject button is pressed
twice with a compact disc loaded, the
compact disc will be ejected further for
easier CD removal. If the disc is not re-
moved within 20 seconds, the disc will re-
load.
Additional features
For additional information about the iPod®
player available with this system, refer to
“iPod® player operation without Navigation
System” in this section.
For additional information about the USB
(Universal Serial Bus) connection port avail-
able with this system, refer to “USB (Univer-
sal Serial Bus) Connection Port (models
without Navigation System)” in this section.
For
additional
information
about
the
Bluetooth® audio interface available with
this system, refer to “Bluetooth® streaming
audio without Navigation System (Type B)”
in this section.
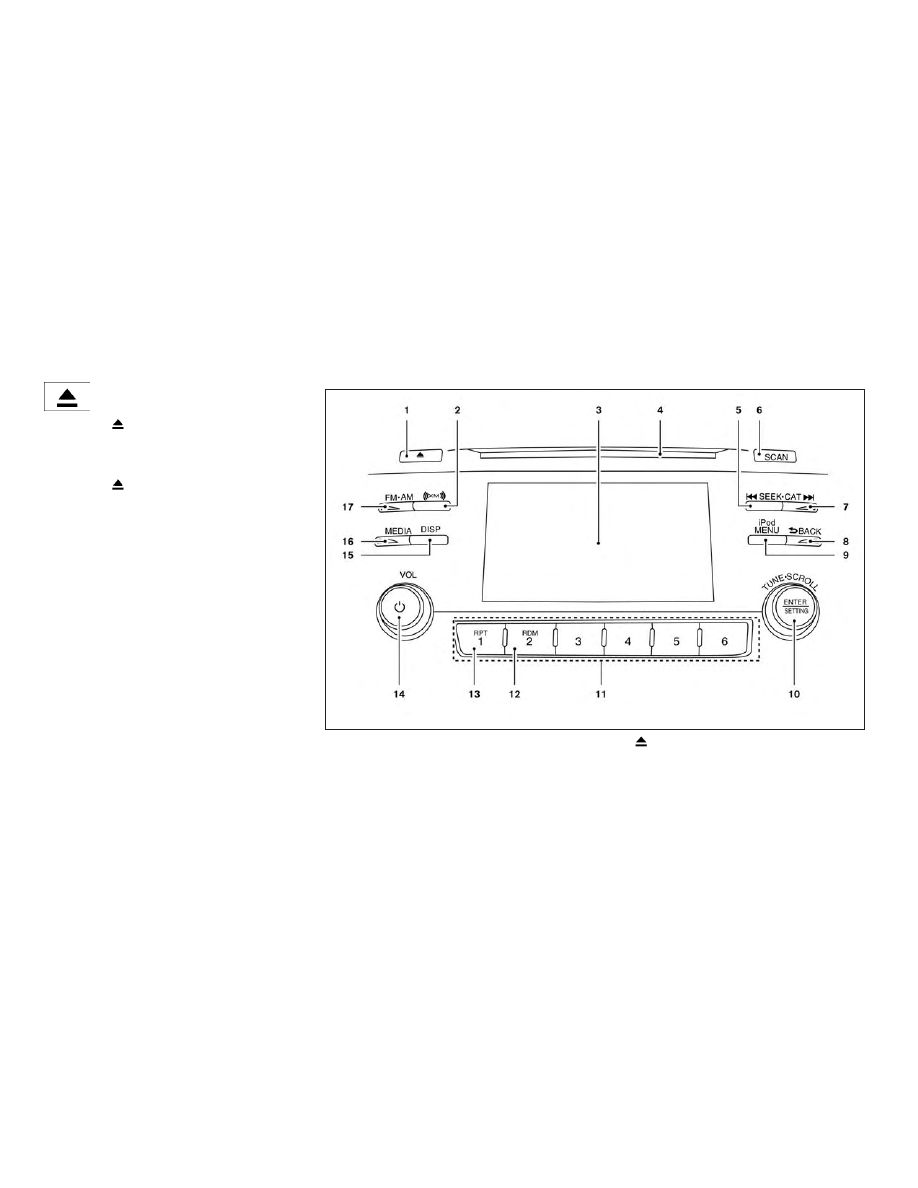
FM/AM/SAT RADIO WITH
COMPACT DISC (CD) PLAYER (if so
equipped)
For all operation precautions, refer to “Au-
dio operation precautions” in this section.
1.
CD eject button
2. XM button*
3. Display screen
4. CD insert slot
LHA4300
4-36
Monitor, climate, audio, phone and voice recognition systems

5.
SEEK button
6. SCAN button
7.
CAT button
8.
BACK button
9. iPod MENU button
10. ENTER/SETTING button /
TUNE/SCROLL knob
11. Station select (1 - 6) buttons
12. RDM (random) button
13. RPT (repeat) button
14.
(power) button / VOL (volume)
control knob
15. DISP (display) button
16. MEDIA button
17. FM•AM button
*No satellite radio reception is available
when the XM button is pressed to access
satellite radio stations unless optional sat-
ellite receiver and antenna are installed
and an SiriusXM® Satellite Radio service
subscription is active. Satellite radio is not
available in Alaska, Hawaii and Guam.
Audio main operation
(power) button / VOL (volume)
control knob
Place the ignition switch in the ACC or ON
position and press the
(power) but-
ton while the system is off to call up the
mode (radio, CD, AUX, Bluetooth® audio,
USB or iPod®) that was playing immediately
before the system was turned off.
To turn the system off, press the
(power) button.
Turn the VOL (volume) control knob to ad-
just the volume.
This vehicle may be equipped with Speed
Sensitive Volume. When this feature is ac-
tive, the audio volume changes as the driv-
ing speed changes.
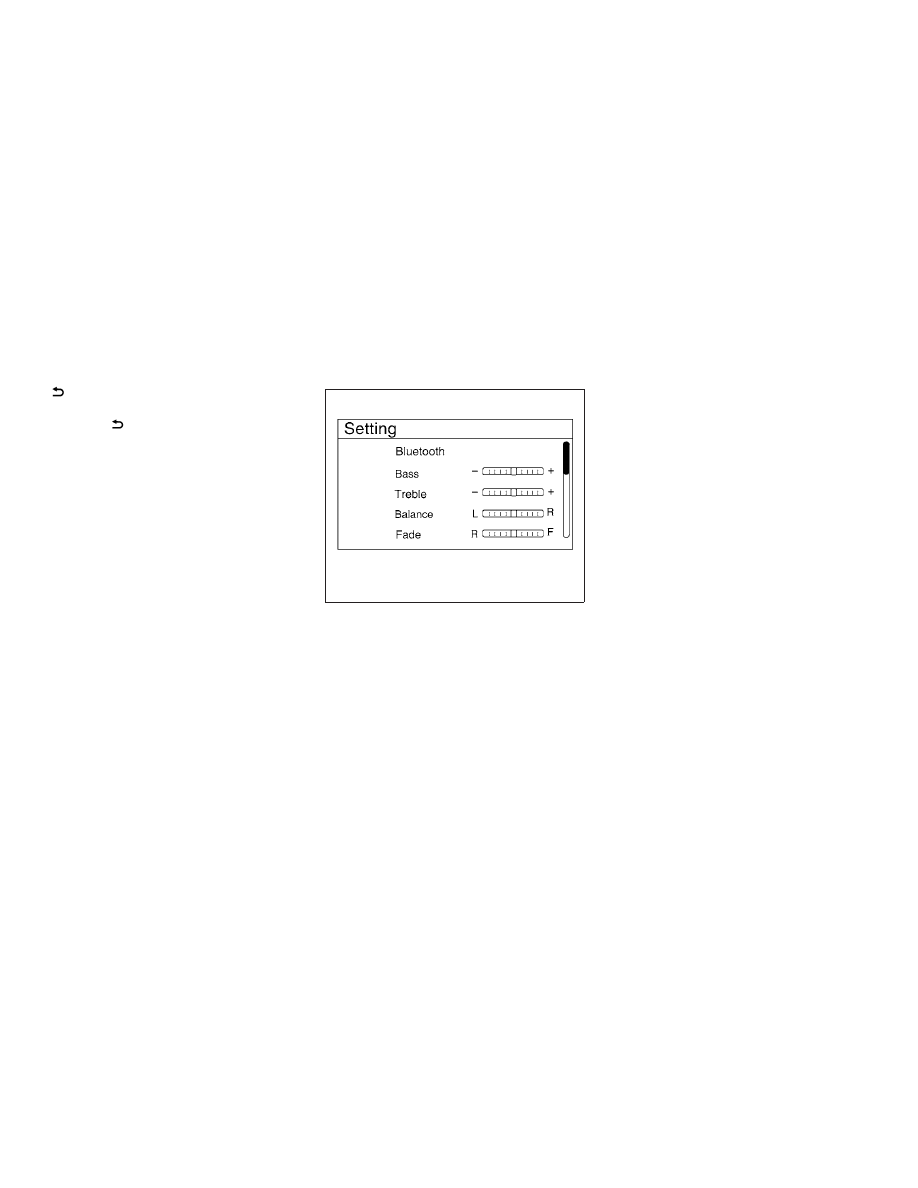
ENTER/SETTING button
Press the ENTER/SETTING button to show
the Settings screen on the display. Turn the
TUNE/SCROLL knob to navigate the op-
tions and then press the ENTER/SETTING
button to make a selection.
Monitor, climate, audio, phone and voice recognition systems
4-37
Audio
Bass
Adjusts the bass to the desired level.
Treble
Adjusts the treble to the desired level.
Balance
Adjusts the balance to the desired level. Balance adjusts the sound level between the left and right
speakers.
Fade
Adjusts the fade to the desired level. Fade adjusts the sound level between the front and rear
speakers.
Brightness
Adjust the brightness to adjust the appearance of the display screen.
Contrast
Adjust the contrast to adjust the appearance of the display screen.
On-Screen Clock
Toggles ON or OFF the clock display on the upper right corner of the display screen.
RDS Display
Toggles ON or OFF the RDS information displayed on the screen while the radio is playing.
Speed Sens Vol. (Speed Sensitive Volume)
Adjusts the Speed Sensitive Volume function, which increases the volume of the audio system as
the speed of the vehicle increases. Set to “OFF” to disable the feature. The higher the setting, the
more the volume increases in relation to vehicle speed.
AUX Vol.
Choose a setting from 0 to +3 to control the boost of incoming auxiliary device volume. A setting of
0 provides no additional boost in volume. A setting of +3 provides the greatest boost in volume.
Language Select
Select the desired language for the system from the available options.
Bass, treble, balance and fade can also be adjusted by pressing the ENTER/SETTING button and turning the TUNE/SCROLL knob to select
the item to adjust. When the desired item is shown on the display, turn the tuning to adjust and then press the ENTER/SETTING button
until the display returns to the main audio screen. If the button is not pressed for approximately 10 seconds, the radio or CD display will
automatically reappear.
4-38
Monitor, climate, audio, phone and voice recognition systems
iPod MENU button
This button can only be used for iPod® op-
erations. For additional information, refer to
“iPod® player operation (models without
navigation system)” in this section.
DISP (display) button
The DISP (display) button turns the display
screen on or off.
FM/AM/SAT radio operation
FM·AM button
Press the FM·AM button to change the
band as follows:
AM
→ FM1 → FM2 → AM
If another audio source is playing when the
FM·AM button is pressed, the audio source
playing will automatically be turned off and
the last radio station played will begin play-
ing.
XM band select
Press the XM button to change the band as
follows:
XM1*
→ XM2* → XM3* → XM1 (satellite, if so
equipped)
When the XM button is pressed while the
ignition switch is in the ACC or ON position,
the radio will come on at the station last
played.
The last station played will also come on
when the
(power) button is pressed
on.
*When the XM button is pressed, the satel-
lite radio reception will not be available un-
less an optional satellite receiver and an-
tenna are installed and a SiriusXM® Satellite
Radio service subscription is active. Satel-
lite radio is not available in Alaska, Hawaii
and Guam.
If a compact disc is playing when the XM
button is pressed, the compact disc will
automatically be turned off and the last
radio station played will come on.
TUNE/SCROLL knob (Tuning)
Turn the TUNE/SCROLL knob to the left or
right for manual tuning.
SEEK/TUNE tuning
Press the
SEEK button or
TUNE
button to tune from low to high or high to
low frequencies and to stop at the next
broadcasting station.
RPT·SCAN (tuning) button:
Press the RPT·SCAN button to stop at each
broadcasting station for 5 seconds. SCAN
will illuminate in the display while scan tun-
ing. Pressing the RPT·SCAN button again
during this 5 second period will stop the
scan tuning and the radio will remain tuned
to that station. If the RPT·SCAN button is
not pressed within 5 seconds, scan tuning
moves to the next station.
1 to 6 Station memory operations
Six stations can be set for the AM band.
Twelve stations can be set for the FM band
(6 for FM1, 6 for FM2). Eighteen channels can
be set for the satellite radio (6 for XM1, 6 for
XM2, 6 for XM3).
1. Choose the radio band AM, FM1 or FM2
using the FM·AM select button, or
choose the satellite band XM1, XM2 or
XM3 using the XM button.
2. Tune to the desired station using
manual, SEEK or SCAN tuning. Press
and hold any of the desired station
memory buttons (1 – 6) until the preset
number is updated on the display and
the sound is briefly muted.
Monitor, climate, audio, phone and voice recognition systems
4-39
3. The channel indicator will then come
on and the sound will resume. Pro-
gramming is now complete.
4. Other buttons can be set in the same
manner.
If the battery cable is disconnected, or if the
fuse opens, the radio memory will be can-
celed. In that case, reset the desired sta-
tions.
Compact disc (CD) player
operation
If the radio is already operating, it automati-
cally turns off and the compact disc begins
to play.
MEDIA button
With a CD loaded, press the MEDIA button
until the CD mode is displayed on the
screen.
CD/MP3 display mode
While listening to an MP3/WMA CD, certain
text may be displayed on the screen if the
CD has been encoded with text informa-
tion. Depending on how the MP3/WMA CD
is encoded, information such as Artist,
Song and Folder will be displayed.
The track number and the total number of
tracks in the current folder or on the cur-
rent disc are displayed on the screen as
well.
SEEK/CAT (Reverse or
Fast Forward) button
Press and hold the SEEK/CAT button
or
for 1.5 seconds while the compact
disc is playing to reverse or fast forward the
track being played. The compact disc plays
at an increased speed while reversing or
fast forwarding. When the button is re-
leased, the compact disc returns to normal
play speed.
SEEK/CAT button
Press the
SEEK/CAT button while a
CD or MP3/WMA CD is playing to return to
the beginning of the current track. Press
the
SEEK/CAT button several times to
skip backward several tracks.
Press the
SEEK/CAT button while a
CD or MP3/WMA CD is playing to advance
one track. Press the
SEEK/CAT button
several times to skip forward several
tracks. If the last track on a CD is skipped,
the first track on the disc is played. If the last
track in a folder of an MP3/WMA CD is
skipped, the first track of the next folder is
played.
TUNE/SCROLL knob (MP3/WMA CD only)
If a MP3/WMA CD with multiple folders is
playing, turn the TUNE/SCROLL knob to
change folders. Turn the knob to the left to
skip back a folder. Turn the knob to the right
to skip ahead a folder.
RPT (repeat) button
When the RPT button is pressed while a
compact disc is playing, the play pattern
can be changed as follows:
CD:
1 Track Repeat
←→ OFF
CD with MP3 or WMA:
1 Folder Repeat
→ 1 Track Repeat → OFF
1 Track Repeat: the current track will be
repeated.
1 Folder Repeat: the current folder will be
repeated.
OFF: No repeat play pattern is applied. The
indicator on the display will turn off.
4-40
Monitor, climate, audio, phone and voice recognition systems
The current play pattern of the CD is dis-
played on the screen unless no pattern is
applied.
RDM (random) button
When the RDM button is pressed while a
compact disc is playing, the play pattern
can be changed as follows:
CD:
1 Disc Random
←→ OFF
CD with MP3 or WMA:
1 Disc Random
→ 1 Folder Random → OFF
1 Disc Random: all tracks on the disc will be
played randomly.
1 Folder Random: all tracks in the current
folder will be played randomly.
OFF: No random play pattern is applied. The
indicator on the display will turn off.
The current play pattern of the CD is dis-
played on the screen unless no pattern is
applied.
CD EJECT button
When the
CD eject button is pressed
with a compact disc loaded, the compact
disc will eject and the last source will be
played.
When the
CD eject button is pressed
twice with a compact disc loaded, the
compact disc will be ejected further for
easier CD removal. If the disc is not re-
moved within 20 seconds, the disc will re-
load.
Additional features
For additional information about the iPod®
player available with this system, refer to
“iPod® player operation without Navigation
System” in this section.
For additional information about the USB
(Universal Serial Bus) connection port avail-
able with this system, refer to “USB (Univer-
sal Serial Bus) Connection Port (models
without Navigation System)” in this section.
For
additional
information
about
the
Bluetooth® audio interface available with
this system, refer to “Bluetooth® streaming
audio without Navigation System (Type B)”
in this section.
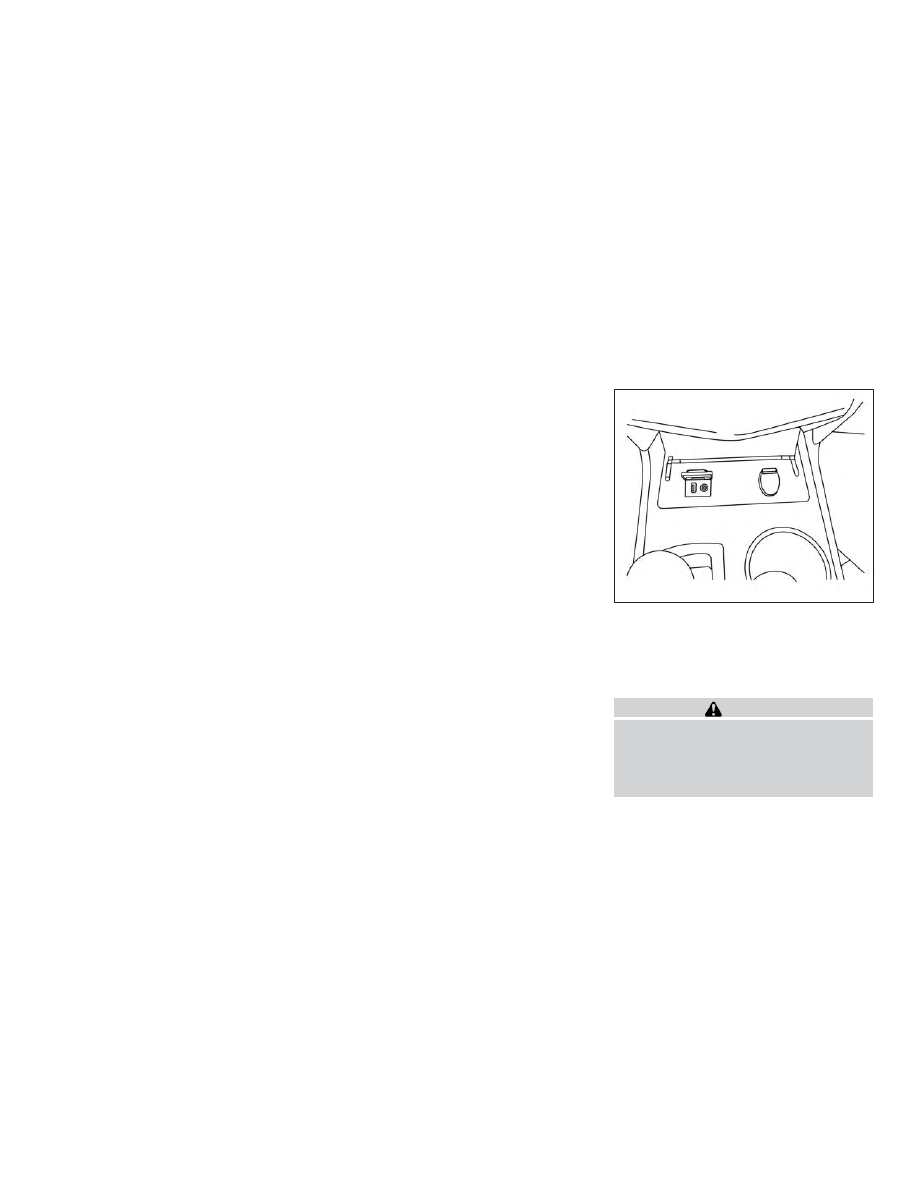
USB (Universal Serial Bus)
CONNECTION PORT (models
without Navigation System) (if so
equipped)
Connecting a device to the USB
Connection Port
WARNING
Do not connect, disconnect, or operate
the USB device while driving. Doing so
can be a distraction. If distracted you
could lose control of your vehicle and
cause an accident or serious injury.
LHA3077
Monitor, climate, audio, phone and voice recognition systems
4-41
CAUTION
∙ Do not force the USB device into the
USB connection port. Inserting the
USB device tilted or up-side-down
into the port may damage the port.
Make sure that the USB device is con-
nected correctly into the USB connec-
tion port.
∙ Do not grab the USB port cover (if so
equipped) when pulling the USB de-
vice out of the port. This could dam-
age the port and the cover.
∙ Do not leave the USB cable in a place
where it can be pulled unintentionally.
Pulling the cable may damage the
port.
For additional information, refer to your de-
vice manufacturer’s owner information re-
garding the proper use and care of the
device.
The USB port is located in the center con-
sole. Insert the USB device into the connec-
tion port.
When a compatible storage device is
plugged into the connection port, compat-
ible audio files on the storage device can be
played through the vehicle’s audio system.
Audio file operation
MEDIA button
Place the ignition switch in the ON or ACC
position and press the MEDIA button to
switch to the USB input mode. If a CD is
playing or another audio source is plugged
in through the AUX IN jack, the MEDIA but-
ton toggles between the three sources.
Play information
Information about the audio files being
played can be displayed on the display
screen of the vehicle’s audio system. De-
pending on how the audio files are en-
coded, information such as Folder, Song
and Artist will be displayed.
The track number and number of total
tracks in the folder are displayed on the
screen as well.
SEEK/CAT and TRACK
(Reverse or Fast
Forward) buttons
Press and hold the
or
SEEK/CAT
and TRACK buttons for 1.5 seconds while an
audio file on the USB device is playing to
reverse or fast forward the track being
played. The track plays at an increased
speed while reversing or fast forwarding.
When the button is released, the audio file
returns to normal play speed.
SEEK/CAT and TRACK
buttons
Press
the
SEEK/CAT
and
TRACK
buttons
while an audio file on the
USB device is playing to return to the begin-
ning of the current track. Press the
SEEK/CAT and TRACK buttons
sev-
eral times to skip backward several tracks.
Press
the
SEEK/CAT
and
TRACK
buttons
while an audio file on the
USB device is playing to advance one track.
Press
the
SEEK/CAT
and
TRACK
buttons
several times to skip forward
several tracks. If the last track in a folder on
the USB device is skipped, the first track of
the next folder is played.
RDM (random) button
When the RDM button is pressed while an
audio file on the USB device is playing, the
play pattern can be changed as follows:
All Random
→ 1 Folder Random → OFF
All Random: all tracks on the USB device will
be played randomly.
1 Folder Random: all tracks in the current
folder will be played randomly.
4-42
Monitor, climate, audio, phone and voice recognition systems
OFF: No random play pattern is applied. The
indicator on the display will turn off.
The current play pattern of the USB device
is displayed on the screen unless no pat-
tern is applied.
RPT (repeat) button
When the RPT button is pressed while an
audio file on the USB device is playing, the
play pattern can be changed as follows:
1 Folder Repeat
→ 1 Track Repeat → OFF
1 Track Repeat: the current track will be
repeated.
1 Folder Repeat: the current folder will be
repeated.
OFF: No repeat play pattern is applied. The
indicator on the display will turn off.
The current play pattern of the USB device
is displayed on the screen unless no pat-
tern is applied.
TUNE/FOLDER or TUNE/SCROLL knob
If there are multiple folders with audio files
on the USB device, turn the TUNE/FOLDER
or TUNE/SCROLL knob to change folders.
Turn the knob to the left to skip back a
folder. Turn the knob to the right to skip
ahead a folder. If there is only one folder of
audio files on the USB device, turning the
TUNE/FOLDER or TUNE/SCROLL knob in ei-
ther direction will return to the first track on
the USB device.
iPod®* PLAYER OPERATION
WITHOUT NAVIGATION SYSTEM (if
so equipped)
Connecting iPod®
WARNING
Do not connect, disconnect or operate
the USB device while driving. Doing so
can be a distraction. If distracted you
could lose control of your vehicle and
cause an accident or serious injury.
LHA3077
Monitor, climate, audio, phone and voice recognition systems
4-43
CAUTION
∙ Do not force the USB device into the
USB port. Inserting the USB device
tilted or up-side-down into the port
may damage the port. Make sure that
the USB device is connected correctly
into the USB connection port.
∙ Do not grab the USB port cover (if so
equipped) when pulling the USB de-
vice out of the port. This could dam-
age the port and the cover.
∙ Do not leave the USB cable in a place
where it can be pulled unintentionally.
Pulling the cable may damage the
port.
For additional information, refer to your de-
vice manufacturer’s owner information re-
garding the proper use and care of the
device.
To connect an iPod® to the vehicle so that
the iPod® can be controlled with the audio
system controls and display screen, use
the USB connection port located in the
center console. Connect the iPod®-specific
end of the cable to the iPod® and the USB
end of the cable to the USB connection
port. on the vehicle. If your iPod® supports
charging via a USB connection, its battery
will be charged while connected to the ve-
hicle with the ignition switch in the ACC or
ON position.
While connected to the vehicle, the iPod®
can only be operated by the vehicle audio
controls.
To disconnect the iPod® from the vehicle,
remove the USB end of the cable from the
USB connection port. on the vehicle, then
remove the cable from the iPod®.
* iPod® is a trademark of Apple Inc., regis-
tered in the U.S. and other countries.
Compatibility
The following models are compatible:
∙ iPod® Classic - 5th Generation (firmware
version 1.3.0 or later)
∙ iPod® Classic - 6th Generation (firm-
ware version 2.0.1 or later)
∙ iPod® Classic - 7th Generation (firmware
version 2.0.4 or later)
∙ iPod® nano - 1st generation (firmware
version 1.3.1 or later)
∙ iPod® nano - 2nd generation (firmware
version 1.1.3 or later)
∙ iPod® nano - 3rd generation (firmware
version 1.1.3 or later)
∙ iPod® nano - 4th generation (firmware
version 1.0.4 or later)
∙ iPod® nano - 5th generation (firmware
version 1.0.2 or later)
∙ iPod® nano - 6th generation (firmware
version 1.1 or later)
∙ iPod® Touch - 2nd generation (firmware
version 4.2.1 or later)
∙ iPod® Touch - 3rd generation (firmware
version 5.1 or later) (minimum iOS 5.0
required for smartphone integration)
∙ iPod® Touch - 4th generation (firmware
version 5.1 or later) (minimum iOS 5.0
required for smartphone integration)
∙ iPhone® 3G (firmware version 4.2.1 or
later)
∙ iPhone® 3GS (firmware version 5.1 or
later) (minimum iOS 5.0 required for
smartphone integration)
∙ iPhone® 4 (firmware version 5.1 or later)
(minimum iOS 5.0 required for smart-
phone integration)
4-44
Monitor, climate, audio, phone and voice recognition systems

∙ iPhone® 4S (firmware version 5.1 or later)
(minimum iOS 5.0 required for smart-
phone integration)
∙ iPhone®5 (firmware version 5.1 or later)
(minimum iOS 5.0 required for smart-
phone integration)
Make sure that your iPod® firmware is up-
dated to the version indicated above.
Audio main operation
Place the ignition switch in the ACC or ON
position. Press the MEDIA button repeat-
edly to switch to the iPod® mode.
If the system has been turned off while the
iPod®
was
playing,
pressing
the
ENTER/SETTING or MENU button will start
the iPod®.
iPod MENU button
Press the iPod MENU button while the
iPod® is connected to show the iPod® op-
eration menu on the audio display. Scroll
through
the
menu
list
using
the
TUNE/FOLDER or TUNE/SCROLL control
dial. Press ENTER/SETTING button to select
a menu item. Items in the iPod® menu ap-
pear on the display in the following order:
∙ Now playing
∙ Playlists
∙ Artists
∙ Albums
∙ Songs
∙ Podcasts
∙ Genres
∙ Composers
∙ Audiobooks
∙ Shuffle songs
For additional information about each
item, refer to the iPod® Owner’s Manual.
SEEK/CAT and TRACK buttons
When the
SEEK or
CAT/TRACK
button is pressed for less than 1.5 seconds
while the iPod® is playing, the next track or
the beginning of the current track on the
iPod® will be played.
When the
SEEK or
CAT/TRACK
button is pressed for more than 1.5 sec-
onds while the iPod® is playing, the iPod®
will play while fast forwarding or rewinding.
When the button is released, the iPod® will
return to the normal play speed.
REPEAT (RPT)
When the RPT button is pressed while a
track is being played, the play pattern can
be changed as follows:
Repeat Off
→ 1 Track Repeat → All Repeat →
Repeat Off
1 Track Repeat: the current track will be
repeated.
All Repeat: all songs in the current list are
repeated.
Repeat Off: no repeat play pattern is ap-
plied.
RANDOM (RDM)
When the RDM button is pressed while a
track is being played, the play pattern can
be changed as follows:
Shuffle Off
→ Track Shuffle → Album Shuffle
→ Shuffle Off
Track Shuffle: the tracks in the current list
will be played randomly.
Album Shuffle: the albums in the current list
will be played randomly.
Shuffle Off: no random play pattern is ap-
plied.
Monitor, climate, audio, phone and voice recognition systems
4-45
BACK button
When the
BACK button is pressed, it
returns to the previous menu.
BLUETOOTH® STREAMING AUDIO
WITHOUT NAVIGATION SYSTEM
If you have a compatible Bluetooth® audio
device that is capable of playing audio files,
the device can be connected to the vehi-
cle’s audio system so that the audio files on
the device play through the vehicle’s
speakers. For additional information, refer
to “FM/AM radio with compact disc (CD)
player” or “FM/AM/SAT radio with compact
disc (CD) player” in this section.
Connecting Bluetooth® audio
To connect your Bluetooth® audio device
to the vehicle, follow the procedure below:
1. Press the ENTER/SETTING button.
2. Select the “Bluetooth” key.
3. Select the “Add Phone or Device” key.
This same screen can be accessed to
remove, replace or select a different
Bluetooth® device.
4. The system acknowledges the com-
mand and asks you to initiate connect-
ing from the phone handset. The con-
necting
procedure
of
the
cellular
phone varies according to each cellular
phone model. For additional informa-
tion, refer to the cellular phone Owner’s
Manual.
You
can
also
visit
www.nissanusa.com/bluetooth
or
www.nissan.ca/bluetooth for instruc-
tions on connecting NISSAN recom-
mended cellular phones.
Audio main operation
To switch to the Bluetooth® audio mode,
press the MEDIA button repeatedly until the
Bluetooth® audio mode is displayed on the
screen.
The controls for the Bluetooth® audio are
displayed on the screen. Use the Preset 3
button for play and the Preset 4 button for
pause.
LHA2775
4-46
Monitor, climate, audio, phone and voice recognition systems

CD CARE AND CLEANING
∙ Handle a CD by its edges. Do not bend
the disc. Never touch the surface of the
disc.
∙ Always place the discs in the storage
case when they are not being used.
∙ To clean a disc, wipe the surface from
the center to the outer edge using a
clean, soft cloth. Do not wipe the disc
using a circular motion.
∙ Do not use a conventional record
cleaner or alcohol intended for indus-
trial use.
∙ A new disc may be rough on the inner
and outer edges. Remove the rough
edges by rubbing the inner and outer
edges with the side of a pen or pencil as
illustrated.
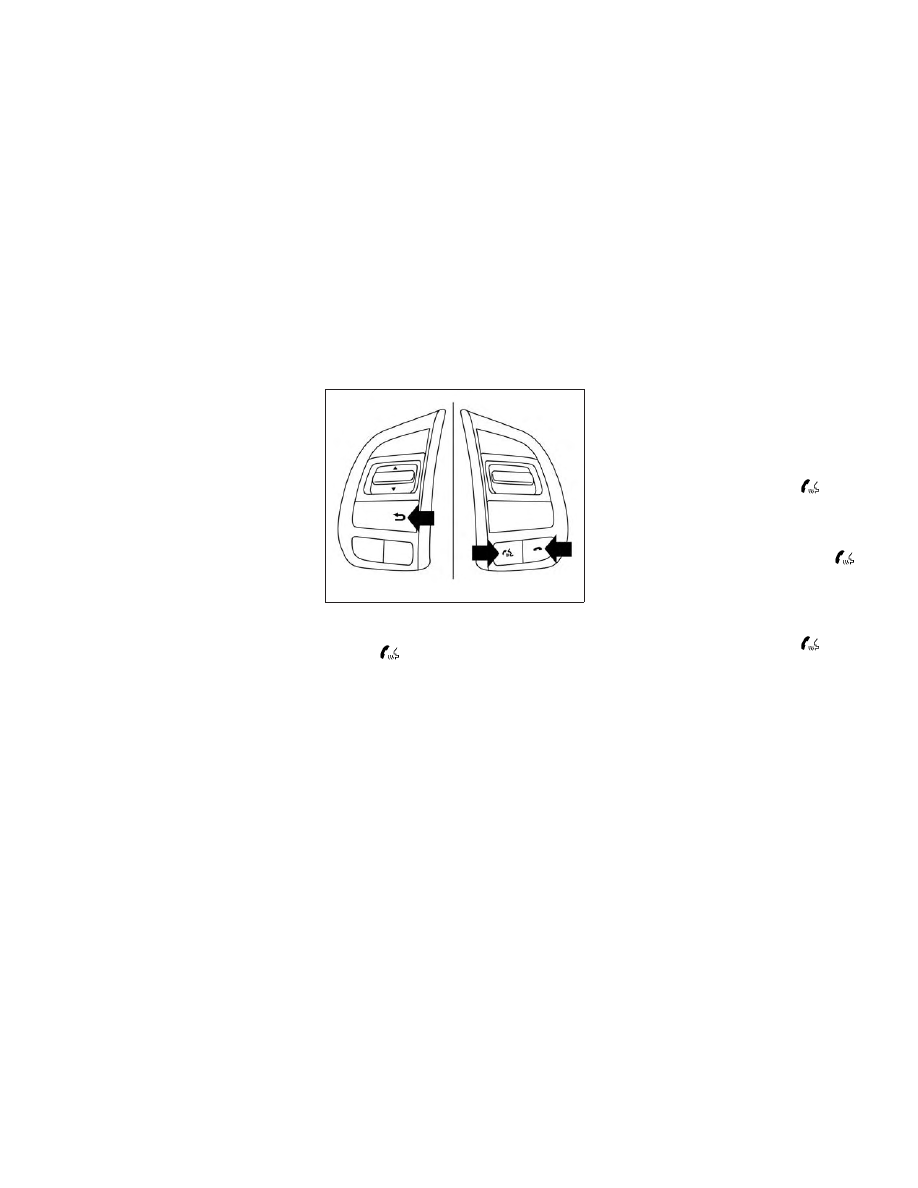
STEERING WHEEL SWITCH FOR
AUDIO CONTROL
1. SOURCE switch
2.
Menu
control
switch/ENTER button
3.
(back) switch
4. Volume control switch
LHA0049
LHA2266
Monitor, climate, audio, phone and voice recognition systems
4-47

SOURCE switch
With the ignition switch in the ACC or ON
position, push the SOURCE switch to turn
the audio system on.
Push the source select switch to change
the mode in the following sequence:
AM
→ FM1 → FM2 (if so equipped) → XM1 (if
so equipped)
→ XM2 (if so equipped) → XM3
(if so equipped)
→ SXM1 (if so equipped) →
SXM2 (if so equipped)
→ SXM3 (if so
equipped)
→CD* → USB/iPod®* (if so
equipped)
→ Bluetooth® Audio* (if so
equipped)
→ AUX* → AM.
* These modes are only available when
compatible media storage is inserted into
the device or connected to the system.
Volume control switch
Push the volume control switch to increase
or decrease the volume.
Menu control
switch/ENTER
button
While the display is showing a map or audio
screen, tilt the Menu Control switch upward
or downward to select a station, track, CD
or folder. For most audio sources, tilting the
switch up/down for more than 1.5 seconds
provides a different function than a tilting
up/down for less than 1.5 seconds.
AM and FM:
∙ Tilt up/down for less than 1.5 seconds to
increase or decrease the preset station.
∙ Tilt up/down for more than 1.5 seconds
to seek up or down to the next station.
∙ Press the ENTER button to show the list
of preset stations.
XM/SXM:
∙ Tilt up/down for less than 1.5 seconds to
increase or decrease the preset station.
∙ Tilt up/down for more than 1.5 seconds
to go to the next or previous channel.
∙ Press the ENTER button to show the
XM/SXM Menu.
iPod®:
∙ Tilt up/down for less than 1.5 seconds to
increase or decrease the track number.
∙ Press the ENTER button to show the
iPod Menu.
CD:
∙ Tilt up/down for less than 1.5 seconds to
increase or decrease the track number.
∙ Tilt up/down for more than 1.5 seconds
to increase or decrease the folder num-
ber (if playing compressed audio files).
∙ Press the ENTER button to show the CD
Menu.
USB:
∙ Tilt up/down for less than 1.5 seconds to
increase or decrease the track number.
∙ Tilt up/down for more than 1.5 seconds
to increase or decrease the folder num-
ber.
∙ Press the ENTER button to show the
USB Menu.
Bluetooth® Streaming Audio:
∙ Tilt up/down for less than 1.5 seconds to
skip ahead or back to the next song.
∙ Tilt up/down for more than 1.5 seconds
to reverse or fast forward the current
song.
4-48
Monitor, climate, audio, phone and voice recognition systems
AUX:
∙ Press the ENTER button to show the
AUX Menu.
(back) switch
Push the
(back) switch to return to
the previous screen or cancel the current
selection.
ANTENNA
The antenna cannot be shortened, but can
be removed. When you need to remove the
antenna, turn the antenna rod counter-
clockwise.
To install the antenna rod, turn the antenna
rod clockwise and hand tighten.
CAUTION
∙ Always properly tighten the antenna
rod during installation or the antenna
rod
may
break
during
vehicle
operation.
∙ Be sure that the antenna is removed
before the vehicle enters an auto-
matic car wash.
Window antenna (if so equipped)
The antenna pattern is printed inside the
rear window.
CAUTION
∙ Do not place metalized film near the
rear window glass or attach any metal
parts to it. This may cause poor recep-
tion or noise.
∙ When cleaning the inside of the rear
window, be careful not to scratch or
damage the rear window antenna.
Lightly wipe along the antenna with a
dampened soft cloth.
Apple Siri® Eyes Free personal assistant
can be accessed from the vehicle. Siri Eyes
Free can be accessed in Siri Eyes Free
mode to reduce user distraction. In this
mode, Siri Eyes Free is available for interac-
tion by voice control. After connecting a
compatible
Apple
device
by
using
Bluetooth®, Siri Eyes Free can be activated
from the
TALK switch on the steering
wheel.
Siri® is a trademark of Apple Inc., registered
in the U.S. and other countries.
∙ Some Siri Eyes Free functions, such as
displaying pictures or opening apps,
may not be available while driving.
∙ For best results, always update your de-
vice to the latest software version.
∙ Keep the interior of the vehicle as quiet
as possible. Close the windows to elimi-
nate the surrounding noises (traffic
noises, vibration sounds, etc.), which
may prevent the system from recogniz-
ing the voice commands correctly.
∙ For functions that can be used in Siri
Eyes Free, please refer to the Apple
website.
SIRI® EYES FREE (if so equipped)
Monitor, climate, audio, phone and voice recognition systems
4-49
REQUIREMENTS
Siri is only available on the iPhone® 4S or
later. Devices released before iPhone® 4S
are not supported by the Siri Eyes Free sys-
tem. Visit www.apple.com/ios/siri for de-
tails about device compatibility.
Siri must be enabled on the phone. Please
check phone settings.
If the device has a lock screen, Siri must be
accessible from the lock screen. Please
check phone settings.
For best results, always update your device
to the latest software version.
SIRI® ACTIVATION
Siri® Eyes Free function can be activated by
pushing
TALK switch on the steering
wheel.
1. Connect a Siri Eyes Free enabled
iPhone® to the vehicle. For additional
information, refer to “Initialization” in
this section.
2. After the Bluetooth® connection is es-
tablished, the switch operation select
screen is displayed.
3. Select “Short Press” or “Long Press” for
Siri Eyes Free activation Switch action
can
also
be
changed
from
the
Bluetooth® settings menu. For addi-
tional information, refer to “Changing
Siri Eyes Free Settings (models without
navigation system)” in this section.
OPERATING SIRI® EYES FREE
1. Push or push and hold the
TALK
switch.
2. Speak your command and then listen
to the Siri® Eyes Free reply.
After starting Siri Eyes Free, push the
TALK switch again within 5 seconds of the
end of the Siri Eyes Free announcement to
extend the session.
Example 1 – Playing music
1. Push or push and hold the
TALK
switch.
2. Say “Play (artist name, song name,
etc.)”.
3. Your vehicle will automatically change
to Bluetooth® Audio or iPod® mode*
when the music starts playing. Mode
selection is determined by the phone.
* If the iPhone® is also connected with the
USB cable.
LHA2282
4-50
Monitor, climate, audio, phone and voice recognition systems
Нет комментариевНе стесняйтесь поделиться с нами вашим ценным мнением.
Текст