Nissan Altima (2018 year). Instruction — part 7

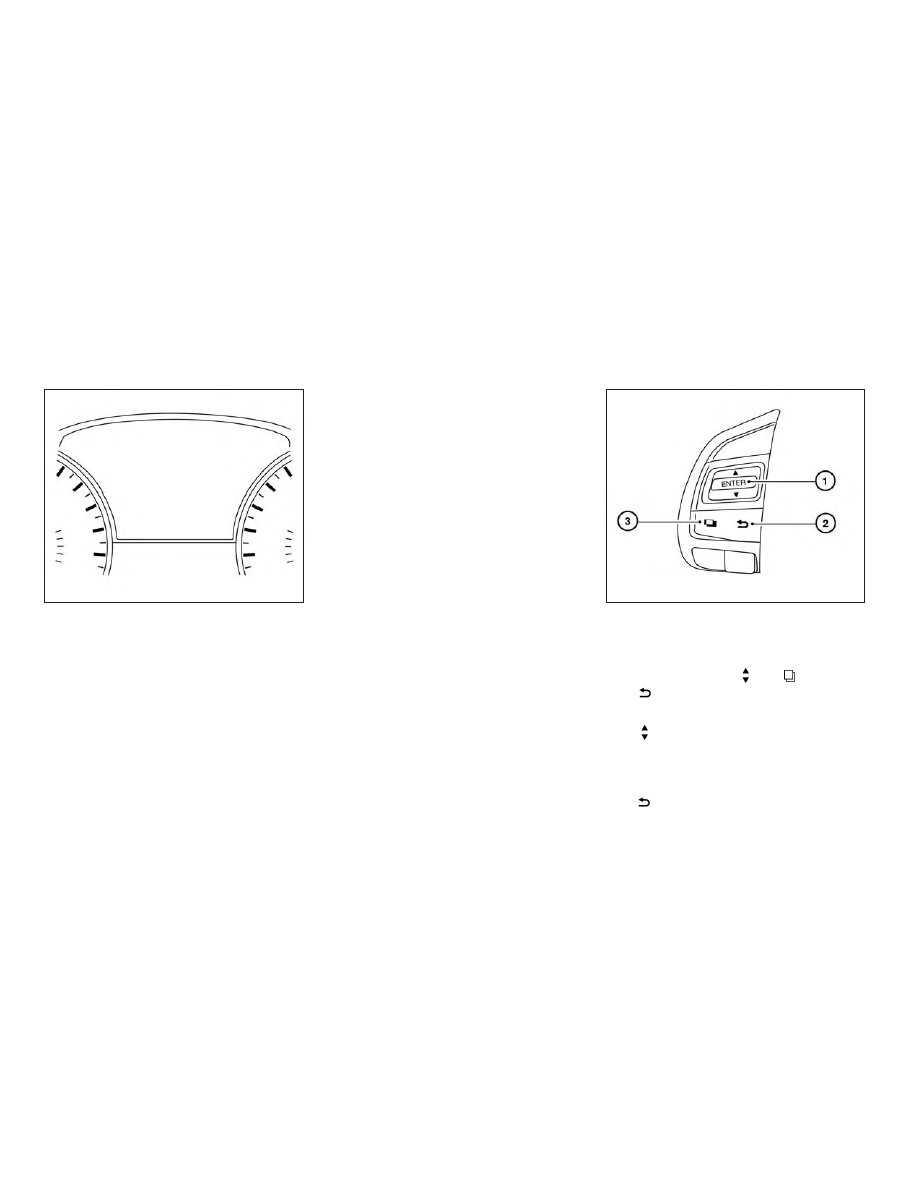
Side light and headlight
indicator light (green)
The side light and headlight indicator light
illuminates when the side light or headlight
position is selected. For additional informa-
tion, refer to “Headlight and turn signal
switch” in this section.
Slip indicator light
This indicator will blink when the Vehicle
Dynamic Control (VDC) system is operat-
ing, thus alerting that the vehicle is nearing
its traction limits. The road surface may be
slippery.
Turn signal/hazard
indicator lights
The appropriate light flashes when the turn
signal switch is activated.
Both lights flash when the hazard switch is
turned on.
Vehicle Dynamic Control
(VDC) OFF indicator light
This indicator light comes on when the
VDC OFF switch is pushed to off. This indi-
cates the VDC system has been turned off.
Push the VDC OFF switch again or restart
the engine and the system will operate
normally. For additional information, refer
to “Vehicle Dynamic Control (VDC) system”
in the “Starting and driving” section of this
manual.
The VDC indicator light also comes on
when you place the ignition switch in the
ON position. The light will turn off after
about 2 seconds if the system is opera-
tional. If the light stays on or comes on
along with the
indicator light while
you are driving, have the VDC system
checked. It is recommended that you visit a
NISSAN dealer for this service.
While the VDC system is operating, you
might feel a slight vibration or hear the sys-
tem working when starting the vehicle or
accelerating, but this is normal.
AUDIBLE REMINDERS
Brake pad wear warning
The disc brake pads have audible wear
warnings. When a disc brake pad requires
replacement, it makes a high pitched
scraping sound when the vehicle is in mo-
tion, whether or not the brake pedal is de-
pressed. Have the brakes checked as soon
as possible if the warning sound is heard.
Light reminder chime
With the ignition switch placed in the OFF
position, a chime sounds when the driver’s
door is opened if the headlights or parking
lights are on.
Turn the headlight control switch off before
leaving the vehicle.
NISSAN Intelligent Key® door
buzzer
The Intelligent Key door buzzer sounds if
the Intelligent Key is left inside the vehicle
when locking the doors. When the buzzer
sounds, be sure to check both the vehicle
and the Intelligent Key. For additional infor-
mation, refer to “NISSAN Intelligent Key®” in
the “Pre-driving checks and adjustments”
section of this manual.
Instruments and controls
2-17
The vehicle information display is located
to the left of the speedometer. It displays
such items as:
∙ Vehicle settings
∙ Trip computer information
∙ Drive system warnings and settings (if
so equipped)
∙ Cruise control system information (if so
equipped)
∙ NISSAN Intelligent Key® operation infor-
mation
∙ Indicators and warning
∙ Tire pressure information
∙ Audio information
∙ Navigation information (if so equipped)
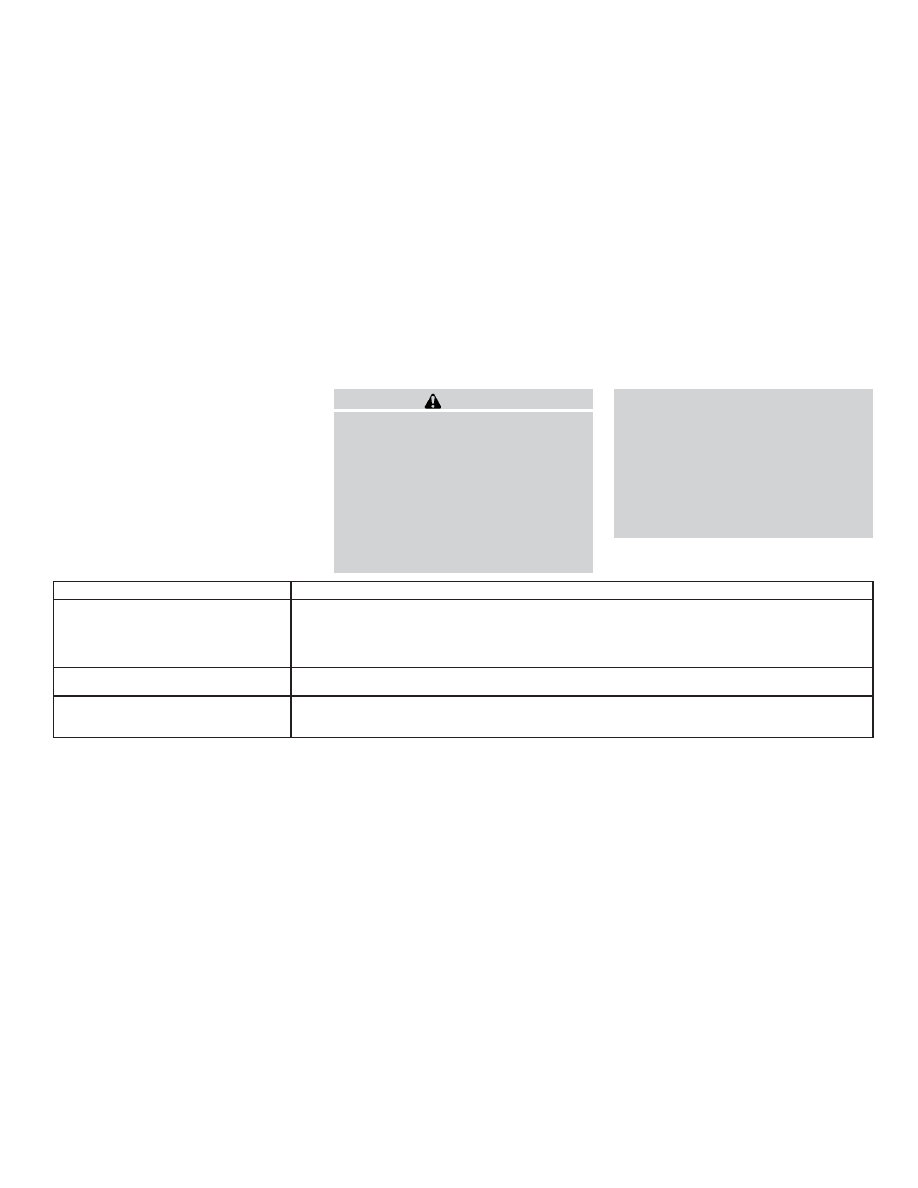
HOW TO USE THE VEHICLE
INFORMATION DISPLAY
The vehicle information display can be
changed using the
,
, ENTER
and
switches located on the steering
wheel.
䊊
1
— navigate through the items in
the vehicle information display
ENTER — change or select an item in
the vehicle information display
䊊
2
— go back to the previous menu
LIC2205
LIC2322
VEHICLE INFORMATION DISPLAY
2-18
Instruments and controls

䊊
3
— select/enter the vehicle infor-
mation display menu items or to
change from one display screen to the
next (i.e. trip, Fuel economy)
The ENTER and
buttons also control
audio and control panel functions. For ad-
ditional information, refer to “Steering
wheel switch for audio control” in the “Moni-
tor, climate, audio, phone and voice recog-
nition systems” section of this manual.
STARTUP DISPLAY
When the vehicle in placed in the ON or ACC
position the screens that display in the ve-
hicle information include:
∙ Active system status
∙ Tire pressures
∙ Trip computer
∙ Audio
∙ Navigation (if so equipped)
∙ Driver Assistance (if so equipped)
∙ Fuel economy
∙ Warnings
Warnings will only display if there are any
present. For additional information, refer to
“Vehicle information display warnings and
indicators” in this section.
To control what items display in the vehicle
information display, refer to “How to use the
vehicle information display” in this section.
RESETTING THE TRIP COMPUTER
1. Press the
button until you reach
the trip computer mode.
2. Press the
button again for more
than 1.5 seconds to reset average fuel
consumption, average speed, distance
to empty, and journey time.
SETTINGS
The setting mode allows you to change the
information displayed in the vehicle infor-
mation display:
∙ Driver Assistance (if so equipped)
∙ Vehicle Settings
∙ Main Menu Selection
∙ Body Color
∙ Maintenance
∙ Alarms
∙ Language
∙ Unit
∙ Welcome Effects
∙ Factory Reset
Instruments and controls
2-19

Driver Assistance
The driver assistance menu allows the user
to change the settings for driving, parking,
and braking aids.
Menu item
Result
Driving Aids (if so equipped)
Displays available driving aids.
Blind Spot
Allows user to turn Blind Spot Warning (BSW) and Rear Cross Traffic Alert (RCTA) systems on or off. For additional
information, refer to “Blind Spot Warning (BSW)” and “Rear Cross Traffic Alert (RCTA)” in the “Starting and driving”
section of this manual.
Parking Aids (if so equipped)
Displays available parking aids.
Sensor
Allows user to turn the parking sensors on, off, or have only the front sensors on. For additional information, refer
to “Front and rear sonar system” in the “Starting and driving” section of this manual.
Display
Allows user to turn the parking aids display on or off.
Volume
Allows user to set the parking sensor chime volume to Low/Med./High.
Range
Allows the user to set the parking sensor range to Near/Mid/Far.
Emergency Braking
Displays available emergency braking options.
System
Allows user to turn the emergency braking system on or off. For additional information, refer to “Automatic Emer-
gency Braking (AEB)” and “Intelligent Forward Collision Warning (I-FCW)” in the “Starting and driving” section of this
manual.
2-20
Instruments and controls

Vehicle Settings
The vehicle settings allow the user to
change the settings for lights, wipers, lock-
ing, keys, and other vehicle settings.
Menu item
Result
Auto Room Lamp
Allows user to turn the auto room lamp on or off.
Light Sensitivity
Allows user to change when the lights illuminate based on the brightness outside the vehicle.
Light Off Delay
Allows user to change the duration of time that the automatic headlights stay on after the vehicle is shut off.
Welcome Light (if so equipped)
Allows user to turn the welcome light on or off.
Wiper with Speed
Allows user to turn wiper with speed on or off.
I-Key Door Lock
Allows user to turn I-Key door lock on or off. When turned on, the request switch on the door is activated.
Selective Unlock
Allows user to turn selective unlock on or off. When turned on, only the driver’s door is unlocked after the
door unlock operation. When the door handle request switch on the driver’s or front passenger’s side door is
pushed to be unlocked, only the corresponding door is unlocked first. All the doors can be unlocked if the
door unlock operation is performed again within 1 minute. When this item is turned off, all the doors will be
unlocked after the door unlock operation is performed once.
Auto Door Unlock
Displays available options for the auto door unlock.
Off
Doors will have to be manually unlocked.
IGN Off
Doors will unlock when the ignition is turned off.
Shift into P
Doors will unlock when the vehicle is shifted into P (Park).
Answer Back Horn
Allows user to turn answer back horn on or off. When turned on, the horn will chirp and the hazard indicators
will flash once when locking the vehicle with the Intelligent Key.
Remote Start (if so equipped)
Allows user to turn the Remote Engine Start on or off. When turned on, the engine can be restarted remotely.
For additional information, refer to “Remote Engine Start” in the “Pre-driving checks and adjustments” section
of this manual.
Battery Saver
Allows user to turn the battery saver on or off. When turned on, the battery saver automatically turns off the
ignition after a period of time when the ignition switch is left in the ACC or ON position.
Instruments and controls
2-21

Main Menu Selection
The main menu selection menu allows the
user to customize the information that ap-
pears in the vehicle information display.
Menu item
Result
Tire Pressures
Allows user to turn the tire pressures display on or off.
Trip Computer
Allows user to turn the trip computer display on or off.
Audio
Allows user to turn the audio display on or off.
Navigation (if so equipped)
Allows user to turn the navigation display on or off.
Driver Assistance (if so equipped)
Allows user turn the driver assistance display on or off.
Fuel Economy
Allows user to turn the fuel economy display on or off.
Body Color
The body color menu allows the user to
customize the information that appears in
the vehicle information display.
Menu item
Result
Body Color
Allows user to select the color of the vehicle that appears in the vehicle information display.
2-22
Instruments and controls
Maintenance
The maintenance menu allows the user to
set reminders for various vehicle mainte-
nance items.
WARNING
The tire replacement indicator is not a
substitute for regular tire checks, in-
cluding tire pressure checks. For addi-
tional information, refer to “Changing
wheels and tires” in the “Do-it-yourself ”
section of this manual. Many factors in-
cluding tire inflation, alignment, driving
habits and road conditions affect tire
wear and when tires should be re-
placed. Setting the tire replacement in-
dicator for a certain driving distance
does not mean your tires will last that
long. Use the tire replacement indicator
as a guide only and always perform
regular tire checks. Failure to perform
regular tire checks, including tire pres-
sure checks could result in tire failure.
Serious vehicle damage could occur
and may lead to a collision, which could
result in serious personal injury or
death.
Menu item
Result
Service
This indicator appears when the customer set distance is reached for checking or replacing maintenance items
other than the engine oil, oil filter and tires. Other maintenance items can include such things as air filter or tire
rotation. You can set or reset the distance for checking or replacing the items. You can set or reset the distance
for service type items.
For scheduled maintenance items and intervals, refer to the “Maintenance and schedules” section of this manual.
Tire
This indicator appears when the customer set distance is reached for replacing tires. You can set or reset the dis-
tance for replacing tires.
Other
This indicator appears when the customer set distance is reached for checking or replacing maintenance items
other than the engine oil, oil filter and tires. Other maintenance items can include such things as air filter or tire
rotation. The distance for checking or replacing the items can be set or reset.
Instruments and controls
2-23

Alarms
The alarms menu allows the user to set
various alerts.
Menu item
Result
Outside Temp.
Allows user to turn the outside temp. alarm on or off.
Timer Alert
Allows user to set the timer alert for a specific interval.
Navigation (if so equipped)
Allows user to turn the navigation alarm on or off.
Language
The language menu allows the user to
change the languages displayed in the ve-
hicle information display.
Menu item
Result
Language
Allows user to select a language in which the vehicle information display will be shown.
Unit
The Unit menu allows the user to change
the units shown in the vehicle information
display.
Menu item
Result
Mileage
Allows user to select different mileage display units.
Tire Pressures
Allows user to select different pressure display units.
Temperature
Allows user to select different temperature display units.
2-24
Instruments and controls

Welcome Effect
The welcome effect menu allows the user
to control the welcome effect feature.
Menu item
Result
Welcome Effect
Allows user to turn the welcome effect feature on or off.
Factory Reset
The factory reset menu allows the user to
restore the vehicle information display set-
tings to factory status.
Menu item
Result
Factory Reset
Allows user to reset the vehicle information display settings to the original factory settings. Once selected,
the user can confirm or deny the reset.
Instruments and controls
2-25
LIC3757
2-26
Instruments and controls
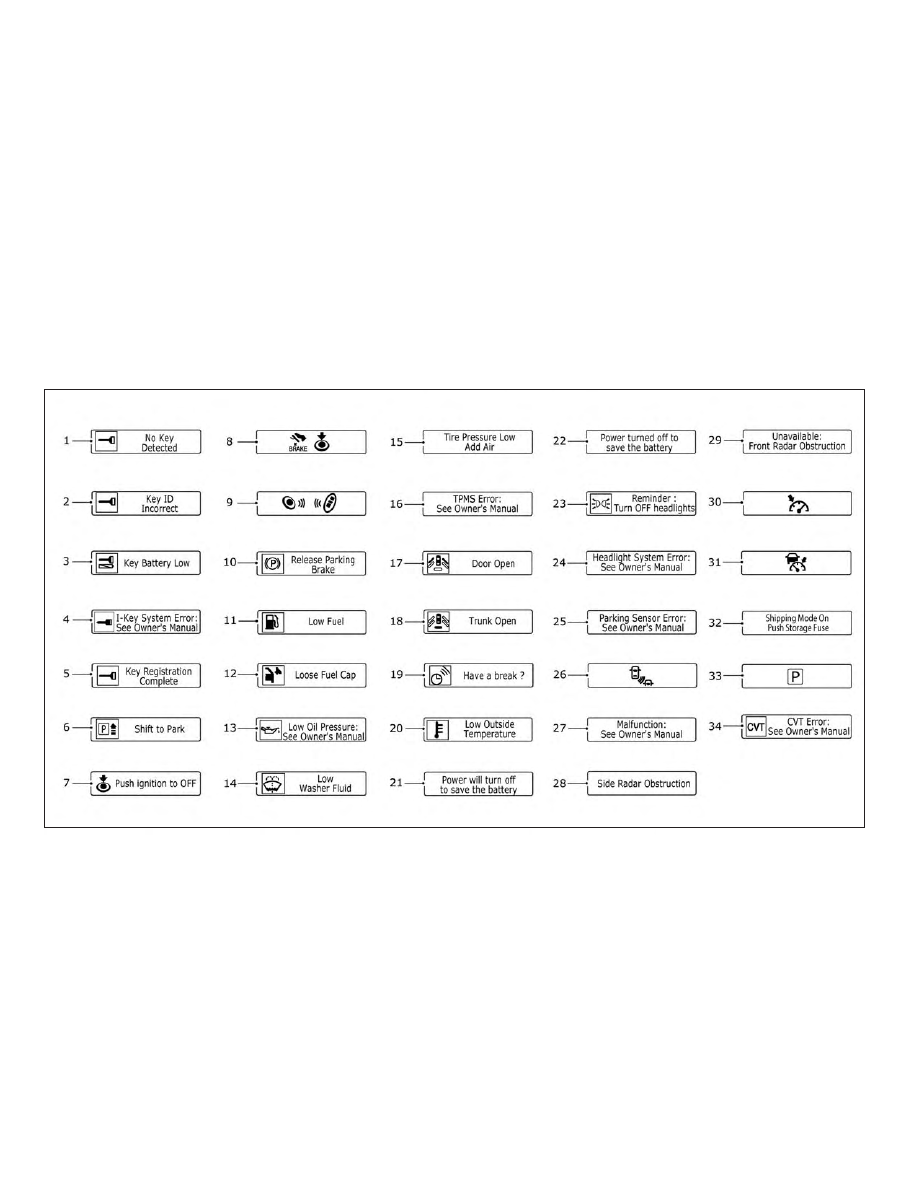
VEHICLE INFORMATION DISPLAY
WARNINGS AND INDICATORS
1. No Key Detected
2. Key ID Incorrect
3. Key Battery Low
4. I-Key
System
Error:
See
Owner’s
Manual
5. Key Registration Complete
6. Shift to Park
7. Push ignition to OFF
8. Push brake and start switch to drive
9. Engine start operation for Intelligent
Key system (if I-Key battery level is low)
10. Release Parking Brake
11. Low Fuel
12. Loose Fuel Cap
13. Low Oil Pressure: See Owner’s Manual
14. Low Washer Fluid
15. Tire Pressure Low - Add Air
16. TPMS Error: See Owner’s Manual
17. Door Open
18. Trunk Open
19. Timer Alert – Have a break?
20. Low Outside Temperature
21. Power will turn off to save the battery
22. Power turned off to save the battery
23. Reminder: Turn OFF headlights
24. Headlight System Error: See Owner’s
Manual (if so equipped)
25. Parking Sensor Error: See Owner’s
Manual (if so equipped)
26. Blind Spot Warning (BSW) and Rear
Cross Traffic Alert (RCTA) indicator (if so
equipped)
27. Malfunction: See Owner’s Manual (if so
equipped)
28. Side Radar Obstruction (if so equipped)
29. Unavailable: Front Radar Obstruction (if
so equipped)
30. Cruise control indicator (if so equipped)
31. Intelligent Cruise Control (ICC) indicator
(if so equipped)
32. Shipping Mode On Push Storage Fuse
33. Transmission Shift Position indicator
34. CVT Error: See Owner’s Manual
No Key Detected
This warning appears when the Intelligent
Key is left outside the vehicle with the igni-
tion switch in the ON position. Make sure
the Intelligent Key is inside the vehicle.
For additional information, refer to “NISSAN
Intelligent Key®” in the “Pre-driving checks
and adjustments” section of this manual.
Key ID Incorrect
This warning appears when the ignition
switch is placed from the OFF position and
the Intelligent Key is not recognized by the
system. You cannot start the engine with
an unregistered key.
For additional information, refer to “NISSAN
Intelligent Key®” in the “Pre-driving checks
and adjustments” section of this manual.
Key Battery Low
This indicator illuminates when the Intelli-
gent Key battery is running out of power.
If this indicator illuminates, replace the bat-
tery with a new one. For additional infor-
mation, refer to “Battery replacement” in
the “Do-it-yourself ” section of this manual.
Instruments and controls
2-27
I-Key System Error: See Owner’s Manual
After the ignition switch is pushed to the
ON position, this light comes on for a period
of time and then turns off.
The I-Key System Error message warns of
a malfunction with the Intelligent Key sys-
tem. If the light comes on while the engine
is stopped, it may be impossible to start
the engine.
If the light comes on while the engine is
running, you can drive the vehicle. However,
in these cases, have the system checked. It
is recommended that you visit a NISSAN
dealer for this service.
Key Registration Complete
This appears when a new Intelligent Key is
registered to the vehicle.
Shift to Park
This warning illuminates when the ignition
switch is in the ACC or OFF position and the
shift lever is not in the P (Park) position. Also,
a chime sounds when the ignition switch is
in the ACC or OFF position.
If this warning illuminates, move the shift
lever to the P (Park) position and start the
engine.
Push ignition to OFF
After the Push ignition to OFF warning illu-
minates, the warning will illuminate if the
ignition switch is placed in the ACC position
when the shift lever is moved to the P (Park)
position.
To turn off the Push warning, place the ig-
nition switch in the ON position and then in
the LOCK position.
Push brake and start switch to drive
This indicator appears when the shift lever
is in the P (Park) position.
This indicator also appears when the ve-
hicle has been started using the Remote
Engine Start (if so equipped) function.
This indicator means that the engine will
start by pushing the ignition switch with
the brake pedal depressed. You can start
the engine from any position of the ignition
switch.
Engine start operation for Intelligent
Key system (if I-Key battery level is low)
This indicator appears when the battery of
the Intelligent Key is low and when the In-
telligent Key system and the vehicle are not
communicating normally.
If this appears, touch the ignition switch
with the Intelligent Key while depressing
the brake pedal. For additional information,
refer to “NISSAN Intelligent Key® battery dis-
charge” in the “Starting and driving” section
of this manual.
Release Parking Brake
This warning illuminates in the message
area of the vehicle information display
when the parking brake is set and the ve-
hicle is driven.
Low Fuel
This warning illuminates when the fuel level
in the fuel tank is getting low. Refuel as
soon as it is convenient, preferably before
the fuel gauge reaches 0 (Empty). There
will be a small reserve of fuel in the tank
when the fuel gauge needle reaches 0
(Empty).
Loose Fuel Cap
This warning appears when the fuel-filler
cap is not tightened correctly after the ve-
hicle has been refueled. For additional in-
formation, refer to “Fuel-filler cap” in the
“Pre-driving checks and adjustments” sec-
tion of this manual.
2-28
Instruments and controls
Low Oil Pressure: See Owner’s Manual
This warning appears in the message area
of the vehicle information display if low oil
pressure is detected. This gauge is not de-
signed to indicate low oil level. The low oil
pressure warning is not designed to indi-
cate a low oil level. Use the dipstick to
check the oil level. For additional informa-
tion, refer to “Engine oil” in the “Do-it-
yourself ” section of this manual.
Low Washer Fluid
This
warning
illuminates
when
the
windshield-washer fluid is at a low level.
Add windshield-washer fluid as necessary.
For
additional
information,
refer
to
“Windshield-washer fluid” in the “Do-it-
yourself ” section of this manual.
Tire Pressure Low - Add Air
This warning appears when the low tire
pressure warning light in the meter illumi-
nates and low tire pressure is detected. The
warning appears each time the ignition
switch is placed in the ON position as long
as the low tire pressure warning light re-
mains illuminated. If this warning appears,
stop the vehicle and adjust the tire pres-
sures of all four tires to the recommended
COLD tire pressure shown on the Tire and
Loading Information label. For additional
information, refer to “Low tire pressure
warning light” in this section and “Tire Pres-
sure Monitoring System (TPMS)” in the
“Starting
and
driving”
section
of
this
manual.
TPMS Error: See Owner’s Manual
This warning appears when there is an er-
ror with your TPMS. If this warning comes
on, have the system checked. It is recom-
mended that you visit a NISSAN dealer for
this service.
Door Open
This warning illuminates when a door has
been opened.
Trunk Open
This warning illuminates when the trunk
has been opened.
Timer Alert — Have a break?
This indicator appears when the set time is
reached. The time can be set up to six
hours. For additional information, refer to
“Settings” in this section.
Low Outside Temperature
This warning appears if the outside tem-
perature is below 37°F (3°C). The tempera-
ture can be changed to display in Celsius or
Fahrenheit. For additional information, re-
fer to “Settings” in this section.
Power will turn off to save the battery
This message appears in the vehicle infor-
mation display after a period of time if the
ignition switch is in the ACC or the ON po-
sition and if the vehicle is in P (Park). For
additional information, refer to “Push-
button ignition switch positions” in the
“Starting
and
driving”
section
of
this
manual.
Power turned off to save the battery
This message appears after the ignition
switch is automatically turned off. For addi-
tional information, refer to “Push-button ig-
nition switch positions” in the “Starting and
driving” section of this manual.
Reminder: Turn OFF headlights
This warning appears when the headlights
are left in the ON position when exiting the
vehicle. Place the headlight switch in the
OFF or AUTO position. For additional infor-
mation, refer to “Headlight and turn signal
switch” in this section.
Instruments and controls
2-29
Headlight System Error: See Owner’s
Manual (if so equipped)
This warning illuminates when there is an
error with the system. For additional infor-
mation, refer to “Headlight and turn signal
switch” in this section.
Parking Sensor Error: See Owner’s
Manual (if so equipped)
This warning illuminates when there is an
error with the system. For additional infor-
mation, refer to “Front and rear sonar sys-
tem” in the “Starting and driving” section of
this manual.
Blind Spot Warning (BSW) and Rear
Cross Traffic Alert (RCTA) indicator (if so
equipped)
This indicator shows when the BSW and
RCTA systems are engaged.
For additional information, refer to “Blind
Spot Warning (BSW)” and “Rear Cross Traffic
Alert (RCTA)” in the “Starting and driving”
section of this manual.
Malfunction: See Owner’s Manual (if so
equipped)
This warning appears when one or more of
the following systems (if so equipped) is
not functioning properly:
∙ Blind Spot Warning (BSW)
∙ Rear Cross Traffic Alert (RCTA)
If one or more of these warning appears,
have the system checked. It is recom-
mended that you visit a NISSAN dealer for
this service.
Side Radar Obstruction (if so equipped)
This message appears when the Blind
Spot Warning (BSW) or Rear Cross Traffic
Alert (RCTA) systems become unavailable
because a radar blockage is detected. For
additional information, refer to “Blind Spot
Warning (BSW)” or “Rear Cross Traffic Alert
(RCTA)” in the “Starting and driving” section
of this manual.
Unavailable: Front Radar Obstruction (if
so equipped)
This message appears when the Intelligent
Cruise Control (ICC), Automatic Emergency
Braking (AEB), or Intelligent Forward Colli-
sion Warning (I-FCW) systems become un-
available because the front radar is ob-
structed. For additional information, refer
to “Intelligent Cruise Control (ICC)”, “Auto-
matic Emergency Braking (AEB)”, or “Intelli-
gent Forward Collision Warning (I-FCW)” in
the “Starting and driving” section of this
manual.
Cruise control indicator (if so equipped)
This indicator shows the cruise control sys-
tem status.
When cruise control is activated, a green
circle will illuminate to indicate it is set. The
vehicle information display will also display
the speed the cruise control was set at. If
you accelerate past the set speed, the
speed will blink until you either cancel
cruise control or go back to the set speed. If
cruise control is on and canceled, the
speed will be displayed to show the speed
the vehicle will return to if the resume but-
ton is activated.
Intelligent Cruise Control (ICC) indicator
(if so equipped)
This indicator shows the Intelligent Cruise
Control (ICC) system status. The status is
shown by the color. For additional informa-
tion, refer to “Intelligent Cruise Control (ICC)”
in the “Starting and driving” section of this
manual.
2-30
Instruments and controls
Shipping Mode On Push Storage Fuse
This warning may appear if the extended
storage switch is not pushed in. When this
warning appears, push in the extended
storage switch to turn off the warning. For
additional information, refer to “Extended
storage switch” in this section.
Transmission Shift Position indicator
This indicator shows the transmission shift
position.
CVT Error: See Owner’s Manual
This warning illuminates when there is a
problem with the CVT system. If this warn-
ing comes on, have the system checked. It
is recommended that you visit a NISSAN
dealer for this service.
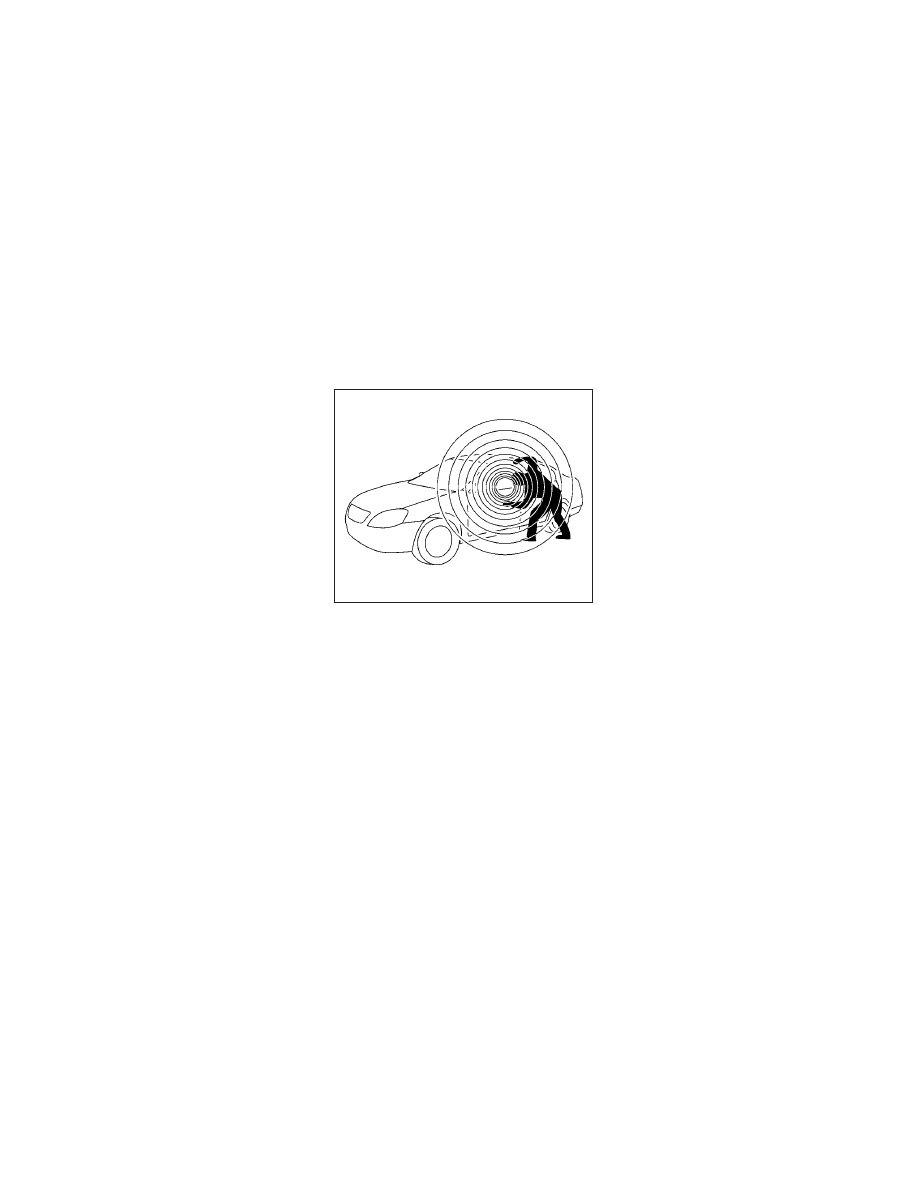
Your vehicle may have two types of security
systems:
∙ Vehicle security system
∙ NISSAN Vehicle Immobilizer System
VEHICLE SECURITY SYSTEM
The vehicle security system provides visual
and audible alarm signals if someone
opens the doors or trunk when the system
is armed. It is not, however, a motion detec-
tion type system that activates when a ve-
hicle is moved or when a vibration occurs.
The system helps deter vehicle theft but
cannot prevent it, nor can it prevent the
theft of interior or exterior vehicle compo-
nents in all situations. Always secure your
vehicle even if parking for a brief period.
Never leave your keys in the vehicle, and
always lock the vehicle when unattended.
Be aware of your surroundings, and park in
secure, well-lit areas whenever possible.
Many devices offering additional protec-
tion, such as component locks, identifica-
tion markers, and tracking systems, are
available at auto supply stores and spe-
cialty shops. A NISSAN dealer may also offer
such equipment. Check with your insur-
ance company to see if you may be eligible
for discounts for various theft protection
features.
How to arm the vehicle security
system
1. Close all windows. (The system can be
armed even if the windows are open.)
2. Remove the Intelligent Key from the ve-
hicle.
3. Close all doors. Lock all doors. The
doors can be locked with the Intelligent
Key, door handle request switch, or me-
chanical key.
LIC0301
SECURITY SYSTEMS
Instruments and controls
2-31

4. Confirm that the
security indica-
tor light stays on for about 30 seconds.
The vehicle security system is now pre-
armed. The vehicle security system will
automatically shift into the armed
phase. The
security light begins
to flash once every three seconds. If
during the pre-armed phase one of the
following occurs, the system will not
arm:
∙ Any door is unlocked with the mechani-
cal key, the Intelligent Key or door re-
quest switch.
∙ Ignition switch is placed in ACC or ON
position.
∙ If the key is turned slowly when lock-
ing the door, the system may not arm.
Furthermore, if the key is turned be-
yond the vertical position toward the
unlock position to remove the key,
the system may be disarmed when
the key is removed. If the indicator
light fails to glow for a period of time,
unlock the door once and lock it
again.
∙ Even when the driver and/or passen-
gers are in the vehicle, the system will
activate with all the doors closed and
locked with the ignition switch placed
in the LOCK position. When placing
the ignition switch in the ACC or ON
position, the system will be released.
Vehicle security system activation
The vehicle security system will give the
following alarm:
∙ The headlights blink and the horn
sounds intermittently.
∙ The alarm automatically turns off after
a period of time. However, the alarm
reactivates if the vehicle is tampered
with again. The alarm can be shut off by
unlocking the driver’s door or trunk lid
with the key, or by pressing the
button on the Intelligent Key.
The alarm is activated by:
∙ opening the door or trunk lid without
using the key or Intelligent Key (even if
the door is unlocked by releasing the
door inside lock switch).
How to stop an activated alarm
The alarm stops only by unlocking a door
or the trunk with the mechanical key, push-
ing the
button on the Intelligent Key,
or pushing the request switch on the driv-
er’s or passenger’s door with the Intelligent
Key in range of the door handle.
NISSAN VEHICLE IMMOBILIZER
SYSTEM
The NISSAN Vehicle Immobilizer System
will not allow the engine to start without
the use of a registered key.
If the engine fails to start using a registered
key (for example, when interference is
caused by another registered key, an auto-
mated toll road device or automatic pay-
ment device on the key ring), restart the
engine using the following procedures:
1. Leave the ignition switch placed in the
ON position for approximately 5 sec-
onds.
2. Place the ignition switch in the OFF or
LOCK position, and wait approximately
10 seconds.
3. Repeat Steps 1 and 2.
4. Restart the engine while holding the
device (which may have caused the in-
terference) separate from the regis-
tered key.
2-32
Instruments and controls
Нет комментариевНе стесняйтесь поделиться с нами вашим ценным мнением.
Текст