Nissan Qashqai (2022 year). Manual in english — page 26
may damage the lens cover.
AIR FRESHENERS
Most air fresheners use a solvent that
could affect the vehicle interior. If you use
an air freshener, take the following pre-
cautions:
.
Hanging-type air fresheners can
cause permanent discoloration when
they contact vehicle interior surfaces.
Place the air freshener in a location
that allows it to hang free and not
contact an interior surface.
.
Liquid-type air fresheners typically clip
on the vents. These products can
cause immediate damage and disco-
loration when spilled on interior sur-
faces.
Carefully read and follow the manufac-
turer’s instructions before using air fresh-
eners.
FLOOR MATS
WARNING
To avoid potential pedal interference
that may result in a collision, injury
or death:
.
NEVER place a floor mat on top of
another floor mat in the driver
front position or install them up-
side down or backwards.
.
It is recommended that you use
only genuine NISSAN floor mats
specifically designed for use in
your vehicle model and model
year.
.
Properly position the mats in the
floorwell using the floor mat po-
sitioning hooks. See “Floor mat
installation” (P.7-5).
.
Make sure the floor mat does not
interfere with pedal operation.
.
Periodically check the floor mats
to make sure they are properly
installed.
.
After cleaning the vehicle interior,
check the floor mats to make
sure they are properly installed.
The use of genuine NISSAN floor mats can
extend the life of your vehicle carpet and
make it easier to clean the interior. Mats
should be maintained with regular clean-
ing and replaced if they become exces-
sively worn.
JVA0018X
Floor mat installation
Your vehicle is equipped with floor mat
positioning hook(s). The number and
shape of the floor mat positioning hook
(s) for each seating position varies de-
pending on the vehicle.
When installing genuine NISSAN floor
mats, follow the installation instructions
provided with the floor mat and the
following:
1. Position the floor mat in the floorwell
so that the floor mat grommet holes
are aligned with the hook(s).
2. Secure the grommet holes into the
hook(s) and ensure that the floor mat
Appearance and care
7-5
-------------------------------------------------------------------------------------------------------------------------------------------------------------
7-6
Appearance and care
is properly positioned.
3. Make sure the floor mat does not
interfere with pedal operation. With
the ignition in the OFF position and
the shift lever in the P (Park) position
(Continuously Variable Transmission
(CVT) models) or the shift lever in the
N (Neutral) position (Manual Transmis-
sion (MT) models), fully apply and
release all pedals. The floor mat must
not interfere with pedal operation or
prevent the pedal from returning to its
normal position. It is recommended
you see a NISSAN dealer for details
about installing the floor mats in your
vehicle.
JVA0031X
Positioning hook(s)
The illustration shows the location of the
floor mat positioning hook(s).
SEAT BELTS
The seat belts can be cleaned by wiping
them with a sponge dampened in a mild
soap solution. Allow the belts to dry
completely in the shade before using
them.
See “Seat belts” (P.1-12).
WARNING
Do not allow wet seat belts to roll up
in the retractor. NEVER use bleach,
dye, or chemical solvents to clean
the seat belts, since these materials
may severely weaken the seat belt
webbing.
CLEANING THE SEAT TRACKS
CAUTION
Periodically clean the seat tracks to
prevent reduction of ability to move
the seats.
Clean periodically with a high-powered
vacuum cleaner. Dirt and debris may
reduce the ability to adjust the seat. A
wet cleansing agent may be used if
necessary.
-------------------------------------------------------------------------------------------------------------------------------------------------------------
MOST COMMON FACTORS CON-
TRIBUTING TO VEHICLE CORRO-
SION
.
The accumulation of moisture-retain-
ing dirt and debris in body panel
sections, cavities, and other areas.
.
Damage to paint and other protective
coatings caused by gravel and stone
chips or minor traffic accidents.
ENVIRONMENTAL FACTORS INFLU-
ENCE THE RATE OF CORROSION
Moisture
Accumulation of sand, dirt and water on
the vehicle body underside can acceler-
ate corrosion. Wet floor coverings will not
dry completely inside the vehicle, and
should be removed for drying to avoid
floor panel corrosion.
Relative humidity
Corrosion will be accelerated in areas of
high relative humidity, especially those
areas where the temperatures stay above
freezing where atmospheric pollution ex-
ists, or where road salt is used.
Temperature
A temperature increase will accelerate
the rate of corrosion to those parts which
are not well ventilated.
Air pollution
Industrial pollution, the presence of salt in
the air in coastal areas, or heavy road salt
use will accelerate the corrosion process.
Road salt will also accelerate the disin-
tegration of paint surfaces.
TO PROTECT YOUR VEHICLE FROM
CORROSION
.
Wash and wax your vehicle often to
keep the vehicle clean.
.
Always check for minor damage to the
paint and repair it as soon as possible.
.
Keep drain holes at the bottom of the
doors open to avoid water accumula-
tion.
.
Check the underbody for accumula-
tion of sand, dirt or salt. If present,
wash with water as soon as possible.
CAUTION
.
NEVER remove dirt, sand or other
debris from the passenger com-
partment by washing it out with a
hose. Remove dirt with a vacuum
cleaner.
.
Never allow water or other liquids
to come in contact with electronic
components inside the vehicle as
this may damage them.
Chemicals used for road surface deicing
are extremely corrosive. They accelerate
corrosion and deterioration of underbody
components such as the exhaust system,
fuel and brake lines, brake cables, floor
pan and fenders.
In winter, the underbody must be
cleaned periodically.
For additional protection against rust and
corrosion, which may be required in some
areas, it is recommended you consult a
NISSAN dealer.
Appearance and care
7-7
CORROSION PROTECTION
-------------------------------------------------------------------------------------------------------------------------------------------------------------
7-8
Appearance and care
MEMO
-------------------------------------------------------------------------------------------------------------------------------------------------------------
8 Do-it-yourself
Maintenance precautions . . . . . . . . . . . . . .. 8-2
Engine compartment check locations . . . . . . 8-3
MR20DD engine model . . . . . . . . . . . . . . 8-4
Engine cooling system . . . . . . . . . . . . . . . . 8-4
Checking engine coolant level . . . . . . . . . 8-5
Changing engine coolant . . . . . . . . . . . . 8-6
Engine oil . . . . . . . . . . . . . . . . . . . . . . . . 8-6
Continuously Variable Transmission
(CVT) fluid . . . . . . . . . . . . . . . . . . . . . . . 8-9
Brake and clutch (if so equipped) fluid . . . . . ... 8-9
Window washer fluid . . . . . . . . . . . . . . . .. 8-10
Battery . . . . . . . . . . . . . . . . . . . . . . . . 8-11
Jump starting. . . . . . . . . . . . . . . . . . . 8-12
Variable voltage control system . . . . . . . . ... 8-13
Drive belt . . . . . . . . . . . . . . . . . . . . . . .. 8-13
Spark plugs . . . . . . . . . . . . . . . . . . . . . . 8-14
Replacing spark plugs . . . . . . . . . . . . . . 8-14
Air cleaner . . . . . . . . . . . . . . . . . . . . . ... 8-15
Windshield wiper blades . . . . . . . . . . . . . . 8-16
Fuses . . . . . . . . . . . . . . . . . . . . . . . . ... 8-18
Engine compartment . . . . . . . . . . . . . 8-18
Passenger compartment . . . . . . . . . . ... 8-20
Key fob battery replacement . . . . . . . . . . .. 8-21
Intelligent Key battery replacement . . . . . . .. 8-23
Lights . . . . . . . . . . . . . . . . . . . . . . . . .. 8-25
Headlights . . . . . . . . . . . . . . . . . . . .. 8-25
Exterior and interior lights . . . . . . . . . . 8-27
Wheels and tires . . . . . . . . . . . . . . . . . . 8-29
Tire pressure . . . . . . . . . . . . . . . . . . 8-29
Tire labeling . . . . . . . . . . . . . . . . . . .. 8-33
Types of tires . . . . . . . . . . . . . . . . . ... 8-35
Tire chains . . . . . . . . . . . . . . . . . . . .. 8-36
Changing wheels and tires . . . . . . . . . .. 8-37
-------------------------------------------------------------------------------------------------------------------------------------------------------------
8-2
Do-it-yourself
When performing any inspection or main-
tenance work on your vehicle, always
take care to prevent serious accidental
injury to yourself or damage to the
vehicle. The following are general precau-
tions which should be closely observed.
WARNING
.
Park the vehicle on a level sur-
face, apply the parking brake
securely and block the wheels to
prevent the vehicle from moving.
Move the shift lever to the P
(Park) position (CVT model) or
the shift lever to the N (Neutral)
position (MT model).
.
Be sure the ignition switch is in
the OFF or LOCK position when
performing any parts replace-
ment or repairs.
.
If you must work with the engine
running, keep your hands, cloth-
ing, hair and tools away from
moving fans, belts and any other
moving parts.
.
It is advisable to secure or re-
move any loose clothing and
remove any jewelry, such as
rings, watches, etc. before work-
ing on your vehicle.
.
Always wear eye protection
whenever you work on your ve-
hicle.
.
If you must run the engine in an
enclosed space such as a garage,
be sure there is proper ventilation
for exhaust gases to escape.
.
Never get under the vehicle while
it is supported only by a jack. If it
is necessary to work under the
vehicle, support it with safety
stands.
.
Because the fuel lines are under
high pressure even when the
engine is off, it is recommended
you visit a NISSAN dealer for
service of the fuel filter or fuel
lines.
.
Do not work under the hood while
the engine is hot. Always turn off
the engine and wait until it cools
down.
.
If you must work with the engine
running, keep your hands, cloth-
ing, hair and tools away from
moving fans, belts and any other
moving parts.
.
Keep smoking materials, flame
and sparks away from fuel and
the battery.
.
On gasoline engine models with
the Multiport Fuel Injection (MFI)
system, the fuel filter and fuel
lines should be serviced because
the fuel lines are under high
pressure even when the engine
is turned off. It is recommended
that you visit a NISSAN dealer for
this service.
.
Your vehicle is equipped with an
automatic engine cooling fan. It
may come on at any time without
warning, even if the ignition
switch is in the OFF position and
the engine is not running. To
avoid injury, always disconnect
the negative battery cable before
working near the fan.
.
Avoid direct contact with used
engine oil and coolant. Impro-
perly disposed engine oil, engine
coolant, and/or other vehicle
fluids can hurt the environment.
Always conform to local regula-
tions for disposal of vehicle fluids.
CAUTION
.
Do not work under the hood while
the engine is hot. Turn the engine
MAINTENANCE PRECAUTIONS
-------------------------------------------------------------------------------------------------------------------------------------------------------------
off and wait until it cools down.
.
Avoid direct contact with used
engine oil and coolant. Impro-
perly disposed engine oil, and
engine coolant and/or other ve-
hicle fluids can damage the en-
vironment. Always conform to
local regulations for disposal of
vehicle fluid.
.
Never leave the engine or the CVT
related component harnesses
disconnected while the ignition
switch is in the ON position.
.
Never connect or disconnect the
battery or any transistorized
component while the ignition
switch is in the ON position.
.
Your vehicle is equipped with an
automatic engine cooling fan. It
may come on at any time without
warning, even if the ignition key is
in the OFF position and the en-
gine is not running. To avoid
injury, always disconnect the ne-
gative battery cable before work-
ing near the fan.
This “8. Do-it-yourself” section gives in-
structions regarding only those items
which are relatively easy for an owner to
perform.
A genuine NISSAN Service Manual is also
available. (See “Owner’s manual/service
manual order information” (P.10-21).)
You should be aware that incomplete or
improper servicing may result in operat-
ing difficulties or excessive emissions, and
could affect your warranty coverage.
If in
doubt about any servicing, it is recom-
mended you have it done by a NISSAN
dealer.
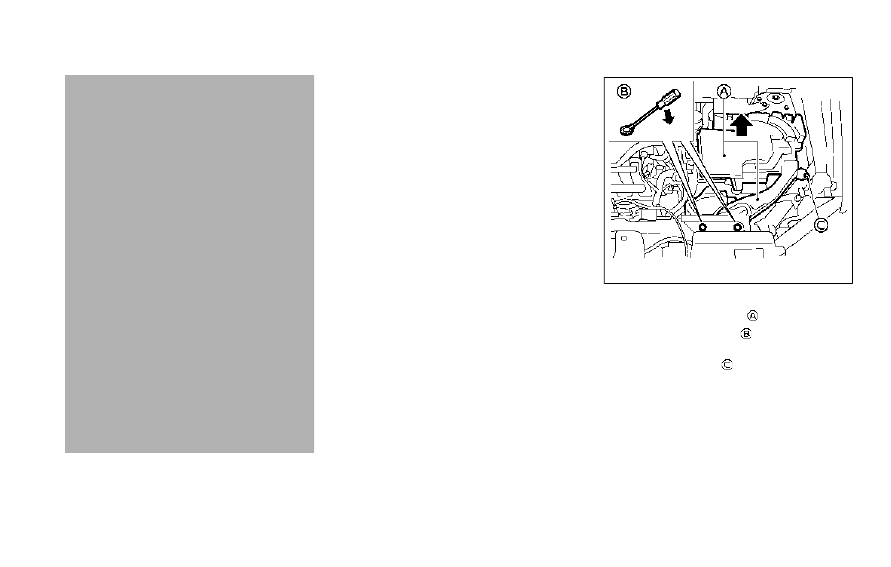
WAA0212X
Remove the air duct if necessary.
To remove the air duct
:
1. Remove the clips
with a suitable
tool.
2. Loosen the bolt
with a suitable tool.
3. Pull the air duct upward and then
sideways.
To install the air duct, perform the in-
stallation procedure in reverse order.
Do-it-yourself
8-3
ENGINE COMPARTMENT CHECK LOCATIONS
-------------------------------------------------------------------------------------------------------------------------------------------------------------
8-4
Do-it-yourself
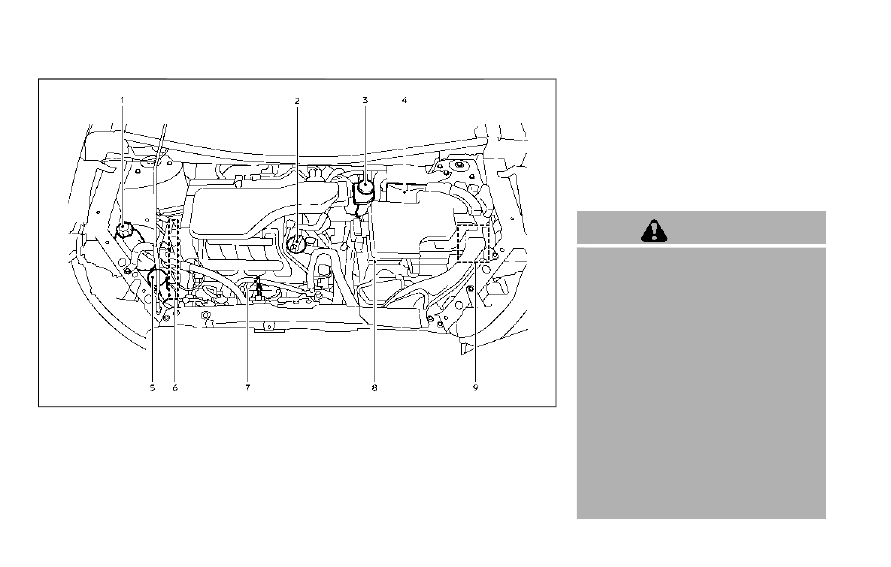
WAA0211X
MR20DD ENGINE MODEL
1.
Engine coolant reservoir
2.
Engine oil filler cap
3.
Brake and clutch* fluid reservoir
4.
Air cleaner
5.
Window washer fluid reservoir
6.
Drive belt
7.
Engine oil dipstick
8.
Battery
9.
Fuse/fusible link box
*:
For Manual Transmission (MT) Model
The engine cooling system is filled at the
factory with a pre-diluted mixture of 50%
Genuine NISSAN Long Life Antifreeze/
Coolant (blue) and 50% water to provide
year-round anti-freeze and coolant pro-
tection. The anti-freeze solution contains
rust and corrosion inhibitors. Additional
engine cooling system additives are not
necessary.
WARNING
.
Never remove the radiator or
coolant reservoir cap when the
engine is hot. Wait until the en-
gine and radiator cool down.
Serious burns could be caused
by high pressure fluid escaping
from the radiator. See precau-
tions in “If your vehicle overheats”
(P.6-16) of this manual.
.
The radiator is equipped with a
pressure type radiator cap. To
prevent engine damage, use only
a genuine NISSAN radiator cap.
.
If the engine was stopped soon
when the engine is hot, the cool-
ing fan may operate for approxi-
mately 10 minutes after the
engine was stopped to cool the
components in the engine com-
ENGINE COOLING SYSTEM
-------------------------------------------------------------------------------------------------------------------------------------------------------------

partment. When the cooling fan is
operating, be sure that hands or
other items do not get caught in
it.
CAUTION
.
Never use any cooling system
additives such as radiator sealer.
Additives may clog the cooling
system and cause damage to
the engine, transmission and/or
cooling system.
.
When adding or replacing cool-
ant, be sure to use only Genuine
NISSAN Long Life Antifreeze/
Coolant (blue) or equivalent. Gen-
uine NISSAN Long Life Antifreeze/
Coolant (blue) is pre-diluted to
provide antifreeze protection to
-34°F(-37°C). If additional freeze
protection is needed due to
weather where you operate your
vehicle, add Genuine NISSAN Long
Life Antifreeze/Coolant (blue)
concentrate following the direc-
tions on the container. If an
equivalent coolant other than
Genuine NISSAN Long Life Anti-
freeze/Coolant (blue) is used, fol-
low the coolant manufacture’s
instructions to maintain mini-
mum antifreeze protection to
-34°F (-37°C). The use of other
types of coolant solutions other
than Genuine NISSAN Long Life
Antifreeze/Coolant (blue) or
equivalent may damage the en-
gine cooling system.
.
The life expectancy of the fac-
tory-fill coolant is 105,000 miles
(168,000 km) or 7 years. Mixing
any other type of coolant other
than Genuine NISSAN Long Life
Antifreeze/Coolant (blue) (or
equivalent coolant), including
Genuine NISSAN Long Life Anti-
freeze/Coolant (green), or the use
of non-distilled water will reduce
the life expectancy of the factory-
fill coolant. Refer to the “9. Main-
tenance and schedules” section
of this manual for more details.
JVM0438X
CHECKING ENGINE COOLANT LEVEL
Check the coolant level
in the reservoir
when the engine is cold.
If the coolant
level is below the MIN level
, open the
reservoir cap and add coolant up to the
MAX level
. If the reservoir is empty,
check the coolant level in the radiator
when the engine is cold.
If there is
insufficient coolant in the radiator, fill the
radiator with coolant up to the filler
opening and also add it to the reservoir
up to the MAX level
.
Tighten the cap securely after adding
engine coolant.
If the cooling system frequently re-
quires coolant, have it checked. It is
Do-it-yourself
8-5
-------------------------------------------------------------------------------------------------------------------------------------------------------------
8-6
Do-it-yourself
recommended you visit a NISSAN dealer
for this service.
CHANGING ENGINE COOLANT
A NISSAN dealer can change the engine
coolant. The service procedure can be
found in the NISSAN Service Manual.
Improper servicing can result in re-
duced heater performance and engine
overheating.
WARNING
.
To avoid being scalded, never
change the coolant when the
engine is hot.
.
Never remove the radiator or
coolant reservoir cap when the
engine is hot. Serious burns could
be caused by high pressure fluid
escaping from the radiator.
.
Avoid direct skin contact with
used coolant. If skin contact is
made, wash thoroughly with soap
or hand cleaner as soon as pos-
sible.
.
Keep coolant out of the reach of
children and pets.
Engine coolant must be disposed of
properly. Check your local regulations.
SDI1993
CHECKING ENGINE OIL LEVEL
1. Park the vehicle on a level surface and
apply the parking brake.
2. Run the engine until it reaches oper-
ating temperature.
3. Turn off the engine.
Wait more than
10 minutes for the oil to drain back
into the oil pan.
4. Remove the dipstick and wipe it clean.
Reinsert it all the way.
5. Remove the dipstick again and check
the oil level. It should be within the
range
. If the oil level is below
,
remove the oil filler cap and pour
recommended oil through the open-
ing.
Do not overfill
.
6. Recheck oil level with the dipstick.
It is normal to add some oil between oil
maintenance intervals or during the
break-in period, depending on the se-
verity of operating conditions.
CAUTION
Oil level should be checked regularly.
Operating the engine with an insuffi-
cient amount of oil can damage the
engine, and such damage is not
covered by the warranty.
CHANGING ENGINE OIL AND FILTER
WARNING
.
Used oil must be disposed of
properly. Never pour or dump oil
into the ground, canals, rivers,
etc. It should be disposed of at
proper waste facilities. NISSAN
recommends having your oil
changed by a NISSAN dealer.
.
Be careful not to burn yourself, as
the engine oil may be hot.
ENGINE OIL
-------------------------------------------------------------------------------------------------------------------------------------------------------------
.
Prolonged and repeated contact
with used engine oil may cause
skin cancer.
.
Avoid direct skin contact with
used oil. If contacted, wash thor-
oughly with soap or hand cleaner
and plenty of water as soon as
possible.
.
Store used engine oil in marked
containers out of the reach of
children.
Vehicle set-up
1. Park the vehicle on a level surface and
apply the parking brake.
2. Run the engine until it reaches the
operating temperature.
3. Turn the engine off and wait more
than 10 minutes.
4. Raise and support the vehicle using a
suitable floor jack and safety jack
stands.
.
Place the safety jack stands under
the vehicle jack-up points.
.
A suitable adapter should be at-
tached to the jack stand saddle.
CAUTION
Make sure the correct lifting and
support points are used to avoid
vehicle damage.
JVM0414X
Do-it-yourself
8-7
-------------------------------------------------------------------------------------------------------------------------------------------------------------

8-8
Do-it-yourself
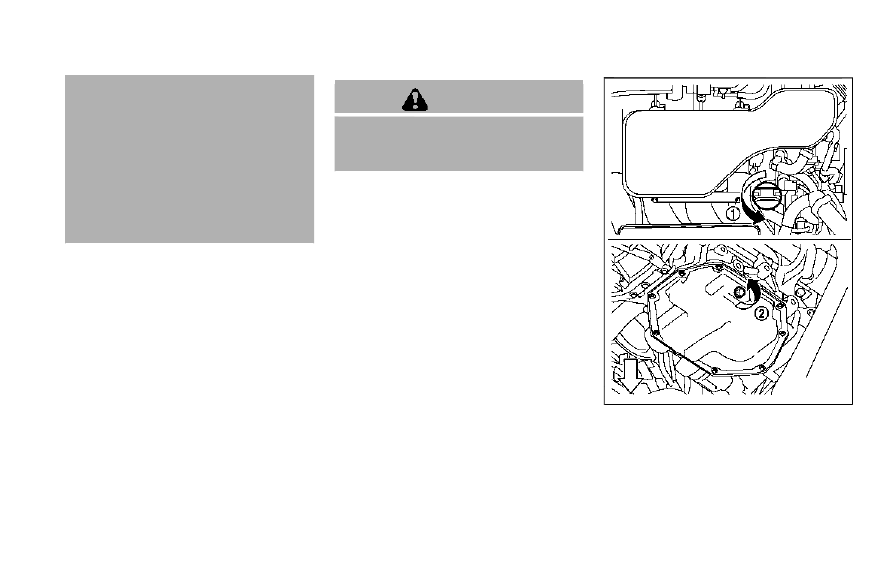
JVM0421X
1.
Oil filler cap
2.
Oil drain plug
3.
Oil filter
Engine oil and filter
1. Place a large drain pan under the
drain plug.
2. Remove the oil filler cap.
3. Remove the drain plug with a wrench
and completely drain the oil.
CAUTION
Be careful not to burn yourself, as
the engine oil is hot.
.
Waste oil must be disposed of
properly.
.
Check your local regulations.
(Perform steps 4 to 7 only when the
engine oil filter change is needed.)
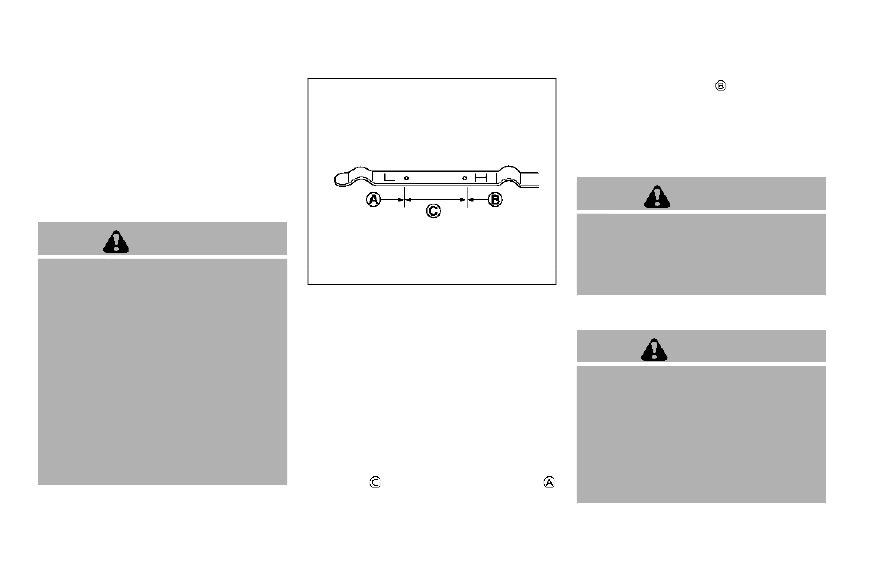
4. Loosen the oil filter with an oil filter
wrench. Remove the oil filter by turn-
ing it by hand.
5. Wipe the engine oil filter mounting
surface with a clean rag.
CAUTION
Be sure to remove any old gasket
material remaining on the mounting
surface of the engine. Failure to do
so could lead to engine damage.
6. Coat the gasket on the new filter with
clean engine oil.
7. Screw in the oil filter clockwise until a
slight resistance is felt, then tighten
additionally more than 2/3 turn.
Oil filter tightening torque:
11 to 15 ft-lb
(14.7 to 20.5 N·m)
8. Clean and re-install the drain plug
with a new washer. Securely tighten
the drain plug with a wrench.
Drain plug tightening torque:
22 to 29 ft-lb
(29 to 39 N·m)
Do not use excessive force.
9. Refill the engine with the recom-
mended oil through the oil filler open-
ing, and install the oil filler cap
securely.
See “Capacities and recommended
fluids/lubricants” (P.10-2) for drain
and refill capacity. The drain and refill
capacity depends on the oil tempera-
ture and drain time. Use these speci-
fications for reference only. Always
use the dipstick to determine the
proper amount of oil in the engine.
10. Start the engine and check for leak-
age around the drain plug and the oil
filter. Correct as required.
11. Turn the engine off and wait more
than 10 minutes. Check the oil level
with the dipstick. Add engine oil if
necessary.
After the operation
1. Lower the vehicle carefully to the
ground.
2. Dispose of waste oil and filter properly.
-------------------------------------------------------------------------------------------------------------------------------------------------------------
WARNING
.
Prolonged and repeated contact
with used engine oil may cause
skin cancer.
.
Try to avoid direct skin contact
with used oil. If skin contact is
made, wash thoroughly with soap
or hand cleaner as soon as pos-
sible.
.
Keep used engine oil out of reach
of children.
When checking or replacement is re-
quired, we recommend a NISSAN dealer
for servicing.
CAUTION
.
NISSAN recommends using Gen-
uine NISSAN CVT Fluid NS-3 (or
equivalent) ONLY in NISSAN CVTs.
Do not mix with other fluids.
.
Do not use Automatic transmis-
sion fluid (ATF) or Manual Trans-
mission fluid in a NISSAN CVT, as
it may damage the CVT. Damage
caused by the use of fluids other
than as recommended is not
covered by the NISSAN’s New
Vehicle Limited Warranty.
.
Using fluids that are not equiva-
lent to Genuine NISSAN CVT Fluid
NS-3 may also damage the CVT.
Damage caused by the use of
fluids other than as recom-
mended is not covered by the
NISSAN’s New Vehicle Limited
Warranty.
For additional brake and clutch fluid
information, see “Capacities and recom-
mended fluids/lubricants” (P.10-2) of this
manual.
WARNING
.
Use only new fluid from a sealed
container. Old, inferior or con-
taminated fluid may damage the
brake and clutch systems. The
use of improper fluids can da-
mage the brake and clutch sys-
tems, and affect the vehicle’s
stopping ability.
.
Clean the filler cap before remov-
ing.
.
Brake and clutch fluid is poiso-
nous and should be stored care-
fully in marked containers out of
the reach of children.
CAUTION
Do not spill the fluid on any painted
surfaces. This will damage the paint.
If fluid is spilled, immediately wash
the surface with water.
Do-it-yourself
8-9
CONTINUOUSLY VARIABLE
TRANSMISSION (CVT) FLUID
BRAKE AND CLUTCH (if so equipped) FLUID
-------------------------------------------------------------------------------------------------------------------------------------------------------------
8-10
Do-it-yourself
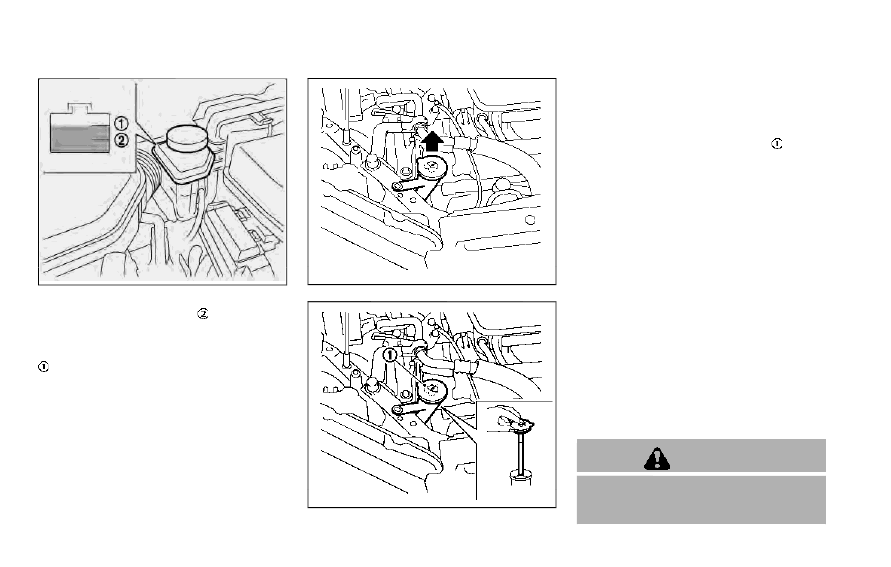
JVM0789X
Check the fluid level in the reservoir. If the
fluid is below the MIN line
or the brake
warning light comes on, add Genuine
NISSAN Super Heavy Duty Brake Fluid or
equivalent
DOT 3
fluid up to the MAX line
. If fluid must be added frequently, the
system should be checked. It is recom-
mended you visit a NISSAN dealer for this
service.
JVM0788X
Type A
JVM0380X
Type B
Type A: Check the fluid level in the
window washer reservoir. If the fluid level
is low, add window washer fluid.
Type B: To check the fluid level, use your
finger to plug the center hole
of the
cap/tube assembly, then remove it from
the reservoir. If there is no fluid in the
tube, add fluid.
Add a washer solvent to the washer for
better cleaning. In the winter season, add
a windshield washer antifreeze. Follow
the manufacturer’s instructions for the
mixture ratio.
Fill the window washer fluid reservoir
periodically.
Add fluid when the low washer fluid
warning appears (if so equipped).
Refill the reservoir more frequently when
driving conditions require an increased
amount of window washer fluid.
Recommended fluid:
Genuine NISSAN Windshield Washer Con-
centrate Cleaner & Antifreeze or equiva-
lent
CAUTION
.
Do not substitute engine anti-
freeze coolant for window
washer solution. This may result
WINDOW WASHER FLUID
-------------------------------------------------------------------------------------------------------------------------------------------------------------
in damage to the paint.
.
Do not fill the window washer
reservoir tank with washer fluid
concentrates at full strength.
Some methyl alcohol based
washer fluid concentrates may
permanently stain the grille if
spilled while filling the window
washer reservoir tank.
.
Pre-mix washer fluid concen-
trates with water to the manu-
facturer’s recommended levels
before pouring the fluid into the
window washer reservoir tank. Do
not use the window washer re-
servoir tank to mix the washer
fluid concentrate and water.
.
Keep the battery surface clean and
dry. Clean the battery with a solution
of baking soda and water.
.
Make certain the terminal connec-
tions are clean and securely tightened.
.
If the vehicle is not to be used for 30
days or longer, disconnect the nega-
tive
7
battery terminal cable to pre-
vent discharging it.
NOTE:
Care should be taken to avoid situations
that can lead to potential battery dis-
charge and potential no-start condi-
tions such as:
1.
Installation or extended use of elec-
tronic accessories that consume
battery power when the engine is
not running (Phone chargers, GPS,
DVD players, etc.)
2.
Vehicle is not driven regularly and/
or only driven short distances.
In these cases, the battery may need to
be charged to maintain battery health.
WARNING
.
Do not expose the battery to
flames or electrical sparks. Hy-
drogen gas generated by the
battery is explosive. Do not allow
battery fluid to contact your skin,
eyes, fabrics or painted surfaces.
After touching a battery or bat-
tery cap, do not touch or rub your
eyes. Thoroughly wash your
hands. If the acid contacts your
eyes, skin or clothing, immedi-
ately flush with water for at least
15 minutes and seek medical
attention.
.
Do not operate the vehicle if the
fluid in the battery is low. Low
battery fluid can cause a higher
load on the battery which can
generate heat, reduce battery life,
and in some cases lead to an
explosion.
.
When working on or near a bat-
tery, always wear suitable eye
protection and remove all jew-
elry.
.
Battery posts, terminals and re-
lated accessories contain lead
and lead compounds. Wash
hands after handling.
.
Keep the battery out of the reach
of children.
Do-it-yourself
8-11
BATTERY
-------------------------------------------------------------------------------------------------------------------------------------------------------------
8-12
Do-it-yourself
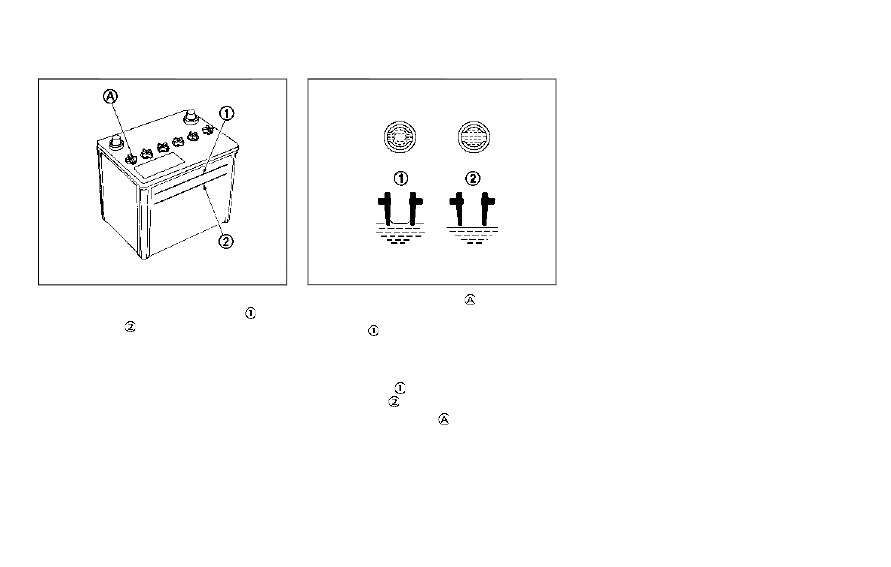
DI0137MA
Check the fluid level in each cell. It should
be between the UPPER LEVEL
and
LOWER LEVEL
lines.
If it is necessary to add fluid, add only
distilled water to bring the level to the
indicator in each filler opening.
Do not
overfill.
SDI1480C
1. Remove the cell plugs
.
2. Add distilled water up to the UPPER
LEVEL
line.
If the side of the battery is not clear,
check the distilled water level by
looking directly above the cell; the
condition
indicates OK and the
condition
needs more to be added.
3. Tighten cell plugs
.
Vehicles operated in high temperatures
or under severe conditions require fre-
quent checks of the battery fluid level.
JUMP STARTING
If jump starting is necessary, see “Jump
starting” (P.6-14). If the engine does not
start by jump starting, the battery may
have to be replaced. It is recommended
you visit a NISSAN dealer for this service.
-------------------------------------------------------------------------------------------------------------------------------------------------------------
Нет комментариевНе стесняйтесь поделиться с нами вашим ценным мнением.
Текст