Nissan Qashqai (2022 year). Manual in english — page 19
JVS0942X
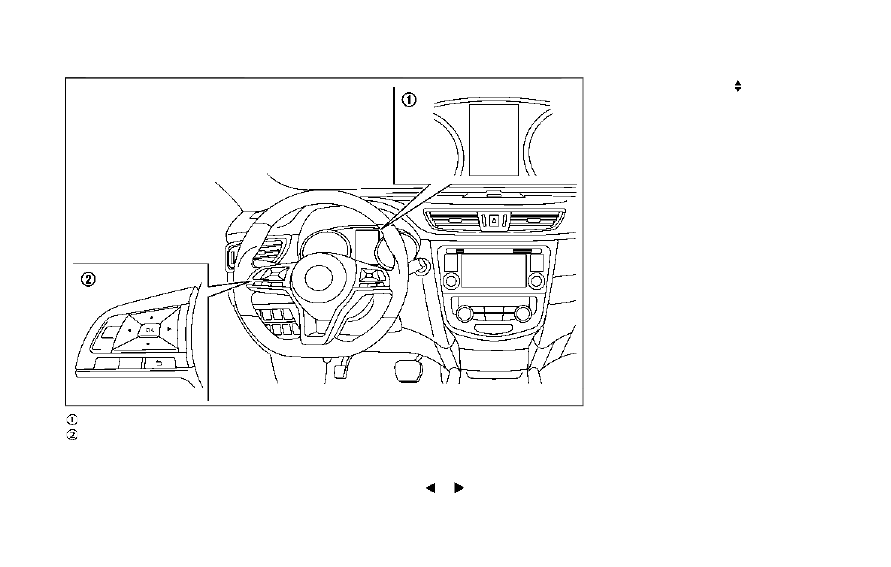
Vehicle information display
Steering-wheel-mounted controls (left
side)
HOW TO ENABLE/DISABLE THE
RCTA SYSTEM
Perform the following steps to enable or
disable the RCTA system.
1. Press the
button until “Set-
tings” appears in the vehicle informa-
tion display and then press “OK”
button. Use the
button to select
“Driver Assistance”. Then press the
“OK” button.
2. Use the button to select “Parking Aids”
then press the OK button.
3. Select “Cross Traffic” and press the
“OK” button.
4. Use the “OK” button to enable or
disable the system.
NOTE:
The system setting will be retained
even if the engine is restarted.
Starting and driving
5-57
-------------------------------------------------------------------------------------------------------------------------------------------------------------

5-58
Starting and driving
JVS0479X
RCTA SYSTEM LIMITATIONS
WARNING
Listed below are the system limita-
tions for the RCTA system. Failure to
operate the vehicle in accordance
with these system limitations could
result in serious injury or death.
.
Always check surroundings and
turn to check what is behind you
before backing up. The radar
sensors detect approaching
(moving) vehicles. The radar sen-
sors cannot detect every object
such as:
— Pedestrians, bicycles, motor-
cycles, animals or child-oper-
ated toy vehicles
— A vehicle that is passing at
speeds greater than approxi-
mately 19 MPH (30 km/h)
— A vehicle that is passing at
speeds lower than approxi-
mately 5 MPH (8 km/h)
.
The radar sensors may not detect
approaching vehicles in certain
situations:
-------------------------------------------------------------------------------------------------------------------------------------------------------------
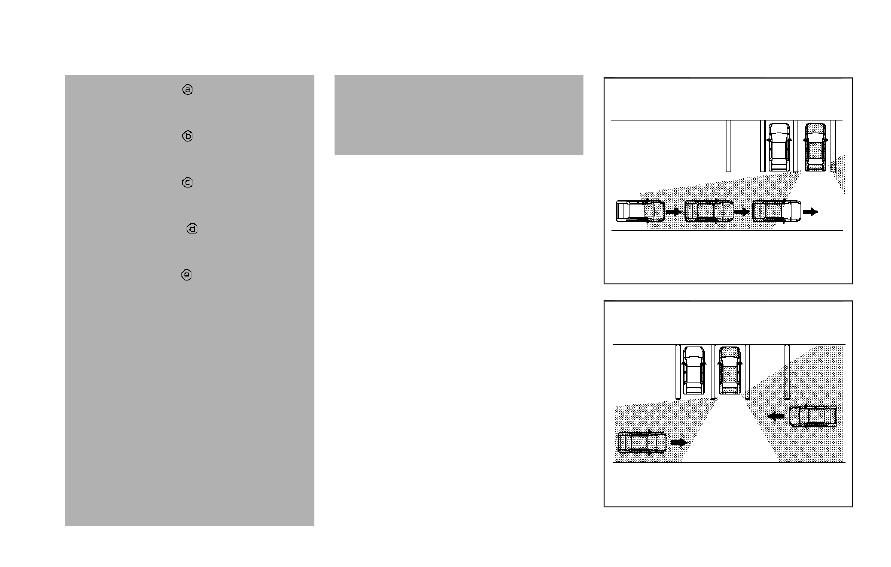
— Illustration
: When a vehicle
parked next to you obstructs
the beam of the radar sensor.
— Illustration
: When the vehi-
cle is parked in an angled
parking space.
— Illustration
: When the vehi-
cle is parked on inclined
ground.
— Illustration
: When an ap-
proaching vehicle turns into
your vehicle’s parking lot aisle.
— Illustration
: When the angle
formed by your vehicle and
approaching vehicle is small
.
The following conditions may re-
duce the ability of the radar to
detect other vehicles:
— Severe weather
— Road spray
— Ice/frost/dirt build-up on the
vehicle
.
Do not attach stickers (including
transparent material), install ac-
cessories or apply additional
paint near the radar sensors.
These conditions may reduce the
ability of the radar to detect other
vehicles
.
Excessive noise (e.g. audio sys-
tem volume, open vehicle win-
dow) will interfere with the
chime sound, and it may not be
heard.
JVS0172X
Illustration 1
JVS0173X
Illustration 2
Starting and driving
5-59
-------------------------------------------------------------------------------------------------------------------------------------------------------------

5-60
Starting and driving
NOTE:
In the case of several vehicles ap-
proaching in a row (Illustration 1) or in
the opposite direction (Illustration 2), a
chime may not be sounded by the RCTA
system after the first vehicle passes the
sensors.
JVS1090X
Vehicle information display
SYSTEM TEMPORARILY UNAVAIL-
ABLE
When radar blockage is detected, the
system will be deactivated automatically.
The “Unavailable: Side Radar Obstruction”
warning message will appear in the
vehicle information display.
The system is not available until the
conditions no longer exist.
The radar sensors may be blocked by
temporary ambient conditions such as
splashing water, mist or fog.
The blocked condition may also be
-------------------------------------------------------------------------------------------------------------------------------------------------------------
caused by objects such as ice, frost or dirt
obstructing the radar sensors.
NOTE:
If the BSW system stops working, the
RCTA system will also stop working.
Action to take:
When the above conditions no longer
exist, the system will resume automati-
cally.
SYSTEM MALFUNCTION
When the RCTA system malfunctions, it
will turn off automatically. The system
malfunction warning message will appear
in the vehicle information display.
NOTE:
If the BSW system stops working, the
RCTA system will also stop working.
Action to take:
Stop the vehicle in a safe location, turn
the engine off and restart the engine. If
the message continues to appear, have
the system checked. It is recommended
that you visit a NISSAN dealer for this
service.
JVS0649X
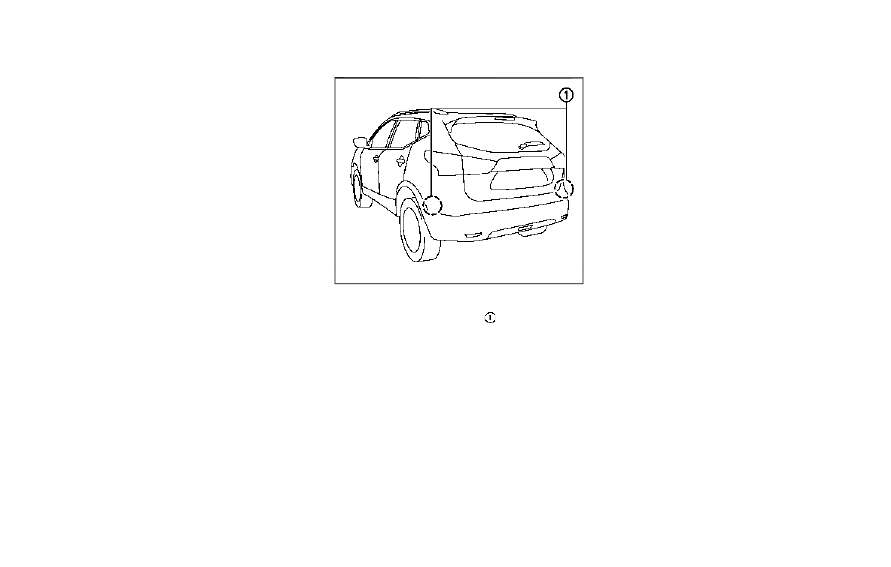
SYSTEM MAINTENANCE
The two radar sensors
for the RCTA
system are located near the rear bumper.
Always keep the area near the radar
sensors clean.
The radar sensors may be blocked by
temporary ambient conditions such as
splashing water, mist or fog.
The blocked condition may also be
caused by objects such as ice, frost or
dirt obstructing the radar sensors.
Check for and remove objects obstruct-
ing the area around the radar sensors.
Do not attach stickers (including trans-
parent material), install accessories or
apply additional paint near the radar
sensors.
Do not strike or damage the area around
the radar sensors. It is recommended that
you visit a NISSAN dealer if the area
around the radar sensors is damaged
due to a collision.
Radio frequency statement
For USA
FCC : OAYSRR3B
This device complies with part 15 of the
FCC Rules. Operation is subject to the
following two conditions:
(1) This device may not cause harmful
interference, and (2) this device must
accept any interference received, in-
cluding interference that may cause
undesired operation.
FCC Warning
Changes or modifications not expressly
approved by the party responsible for
compliance could void the user’s
authority to operate the equipment
For Canada
This device complies with Industry Ca-
nada licence-exempt RSS standard(s).
Operation is subject to the following
two conditions: (1) this device may not
cause interference, and (2) this device
must accept any interference, including
Starting and driving
5-61
-------------------------------------------------------------------------------------------------------------------------------------------------------------

5-62
Starting and driving
interference that may cause undesired
operation of the device.
Frequency bands: 24.05 – 24.25 Ghz
The field strength of SRR3-B is below
250 millivolts/m measured at 3 metres
with an average detector.
This device contains licence-exempt
transmitter(s)/receiver(s) that comply
with Innovation, Science and Economic
Development Canada’s licence-exempt
RSS(s). Operation is subject to the fol-
lowing two conditions:
1. This device may not cause interfer-
ence.
2. This device must accept any inter-
ference, including interference that may
cause undesired operation of the de-
vice.
Radiofrequency radiation exposure in-
formation:
This equipment complies with radiation
exposure limits set forth for an uncon-
trolled environment. This equipment
should be installed and operated with
minimum distance of 20 cm between
the radiator and your body.
JVS1005X
1.
RES/+ switch
2.
CANCEL switch
3.
SET/- switch
4.
Cruise ON/OFF switch
WARNING
.
Always observe the posted speed
limits and do not set the speed
over them.
.
Do not use the cruise control
when driving under the following
conditions. Doing so could cause
a loss of vehicle control and result
in an accident.
— When it is not possible to keep
the vehicle at a constant
speed
— When driving in heavy traffic
— When driving in traffic that
varies speed
— When driving in windy areas
— When driving on winding or
hilly roads
— When driving on slippery (rain,
snow, ice, etc.) roads
CAUTION
On Manual Transmission (MT) model,
do not shift to the N (Neutral) posi-
tion without depressing the clutch
pedal when the cruise control is
operated. Should this occur, depress
the clutch pedal and turn the Cruise
ON/OFF switch off immediately. Fail-
ure to do so may cause engine
damage.
CRUISE CONTROL (if so equipped)
-------------------------------------------------------------------------------------------------------------------------------------------------------------
PRECAUTIONS ON CRUISE CON-
TROL
.
If the cruise control system malfunc-
tions, it will cancel automatically. The
CRUISE indicator in the vehicle infor-
mation display will then blink to warn
the driver.
.
If the CRUISE indicator blinks, turn the
Cruise ON/OFF switch off and have
the system checked. It is recom-
mended that you visit a NISSAN dealer
for this service.
.
The CRUISE indicator may blink when
the Cruise ON/OFF switch is turned
ON while pushing the RES/+, SET/-, or
CANCEL switch. To properly set the
cruise control system, perform the
following procedures.
CRUISE CONTROL OPERATIONS
The cruise control allows driving at
speeds above 25 MPH (40 km/h) without
keeping your foot on the accelerator
pedal.
The cruise control will automatically be
canceled if the vehicle slows down more
than approximately 8 MPH (13 km/h)
below the set speed.
Moving the shift lever to the N (Neutral)
position will cancel the cruise control.
Turning on cruise control
Push the Cruise ON/OFF switch. The
CRUISE indicator in the vehicle informa-
tion display will appear.
Setting cruising speed
1. Accelerate to the desired speed.
2. Push the SET/- switch and release it.
3. Take your foot off the accelerator
pedal.
The vehicle will maintain the set speed.
Passing another vehicle:
Depress the accelerator pedal to accel-
erate. After releasing the accelerator
pedal, the vehicle will return to the pre-
viously set speed.
The vehicle may not maintain the set
speed when going up or down steep hills.
In such cases, drive without the cruise
control.
Resetting to slower speed:
Use any one of the following methods to
reset to a slower speed.
.
Lightly tap the foot brake pedal. When
the vehicle reaches the desired speed,
push and release the SET/- switch.
.
Push and hold the SET/- switch. When
the vehicle reaches the desired speed,
release the SET- switch.
.
Quickly push and release the SET/-
switch. This will reduce the vehicle
speed by about 1 MPH (1.6 km/h).
Resetting to faster speed:
Use any one of the following methods to
reset to a faster speed.
.
Depress the accelerator pedal. When
the vehicle reaches the desired speed,
push and release the SET/- switch.
.
Push and hold the RES/+switch. When
the vehicle reaches the desired speed,
release the RES/+ switch.
.
Quickly push and release the RES/+
switch. This will increase the vehicle
speed by about 1 MPH (1.6 km/h).
Resuming at preset speed:
Push and release the RES/+ switch.
The vehicle will resume the last set
cruising speed when the vehicle speed is
over 25 MPH (40 km/h).
Cancelling cruising speed
Use any one of the following methods to
cancel the set speed.
.
Push the CANCEL switch.
.
Tap the foot brake pedal.
.
Push the Cruise ON/OFF switch. The
CRUISE indicator will turn off.
Starting and driving
5-63
-------------------------------------------------------------------------------------------------------------------------------------------------------------
5-64
Starting and driving
WARNING
Failure to follow the warnings and
instructions for proper use of the
ProPILOT assist system could result
in serious injury or death.
.
ProPILOT assist is not a self-driv-
ing system. Within the limits of its
capabilities, as described in this
manual, it helps the driver with
certain driving activities.
.
The ProPILOT assist system is not
a replacement for proper driving
procedures and is not designed
to correct careless, inattentive or
absentminded driving. ProPILOT
assist will not always steer the
vehicle to keep it in the lane. The
ProPILOT assist system is not
designed to prevent loss of con-
trol. It is the driver’s responsibility
to stay alert, drive safely, keep
the vehicle in the traveling lane,
and be in control of the vehicle at
all times.
.
There are limitations to the Pro-
PILOT assist system capability.
The ProPILOT assist system does
not function in all driving, traffic,
weather, and road conditions. It is
the driver’s responsibility to stay
alert, drive safely, keep the vehi-
cle in the traveling lane, and be in
control of the vehicle at all times.
.
The ProPILOT assist system is
only an aid to assist the driver
and is not a collision warning or
avoidance device.
.
The ProPILOT assist system is for
highway use only and is not
intended for city driving. Failure
to apply the brakes or steer the
vehicle when necessary may re-
sult in a serious accident.
.
Always observe posted speed
limits and do not set the speed
over them.
.
Never take your hands off the
steering wheel when driving. Al-
ways keep your hands on the
steering wheel and drive your
vehicle safely.
.
Never unfasten your safety belt
when using ProPILOT assist.
Doing so automatically cancels
the ProPILOT assist system.
.
The ProPILOT assist system does
not react to stationary and slow
moving vehicles.
.
Always drive carefully and atten-
tively when using the ProPILOT
assist system. Read and under-
stand the Owner’s Manual thor-
oughly before using the ProPILOT
assist system. To avoid serious
injury or death, do not rely on the
system to prevent accidents or to
control the vehicle’s speed in
emergency situations. Do not
use the ProPILOT assist system
except in appropriate road and
traffic conditions.
PROPILOT ASSIST (if so equipped)
-------------------------------------------------------------------------------------------------------------------------------------------------------------

WAF0286X
The ProPILOT assist system is intended to
enhance the operation of the vehicle
when following a vehicle traveling in the
same lane and direction.
The ProPILOT assist system uses a multi-
sensing front camera
installed behind
the windshield and a radar sensor located
on the front of the vehicle
to measure
the distance to the vehicle ahead in the
same lane and to monitor the lane
markers. If the vehicle detects a slower
moving vehicle ahead, the system will
reduce the vehicle speed so that your
vehicle follows the vehicle in front at the
selected distance. The system will also
help keep the vehicle centered in the
traveling lane when clear lane markings
are detected.
Starting and driving
5-65
-------------------------------------------------------------------------------------------------------------------------------------------------------------
5-66
Starting and driving
WAF0046X
Steering-wheel-mounted control (left)
Vehicle information display
Steering-wheel-mounted control (right)
ProPILOT assist switch
Steering assist switch
PROPILOT ASSIST SYSTEM OPERA-
TION
The ProPILOT assist system has the
following two functions:
1. Intelligent Cruise Control (ICC)
The ICC system can be set to one of two
cruise control modes:
.
Conventional (fixed speed) cruise con-
trol mode:
For cruising at a preset speed
NOTE:
Steering Assist is not available in the
conventional (fixed speed) cruise con-
trol mode.
.
Vehicle-to-vehicle distance control
mode:
The ICC system maintains a selected
distance from the vehicle in front of
you within the speed range of 0 to 90
MPH (0 to 144 km/h) up to the set
speed. The set speed can be selected
by the driver between 20 to 90 MPH
(32 to 144 km/h). When the vehicle
ahead slows to a stop, your vehicle
gradually decelerates to a standstill.
When the vehicle is stopped, the ICC
system maintains braking force to
keep your vehicle stopped.
NOTE:
When your vehicle is stopped for less
than 3 seconds and the vehicle ahead
begins to move, your vehicle will start
moving again automatically.
-------------------------------------------------------------------------------------------------------------------------------------------------------------

.
When your vehicle is at a standstill for
more than 3 seconds and the vehicle
ahead begins to accelerate, push the
RES+ switch or lightly depress the
accelerator pedal. The ICC system
starts to follow the vehicle ahead.
.
When no vehicle is detected ahead
within the driver selected distance, the
vehicle travels at the speed set by the
driver. The speed must be above 20
MPH (32 km/h) to use this function.
NOTE:
Even if the Automatic Emergency Brak-
ing (AEB) setting is turned off by the
driver using the “Settings” menu in the
vehicle information display, AEB will be
automatically turned on when ICC is
used.
2. Steering assist
The steering assist function controls the
steering system to help keep your vehicle
within the traveling lane.
When there is no vehicle ahead, steering
assist is not available at speeds under 37
MPH (60 km/h).
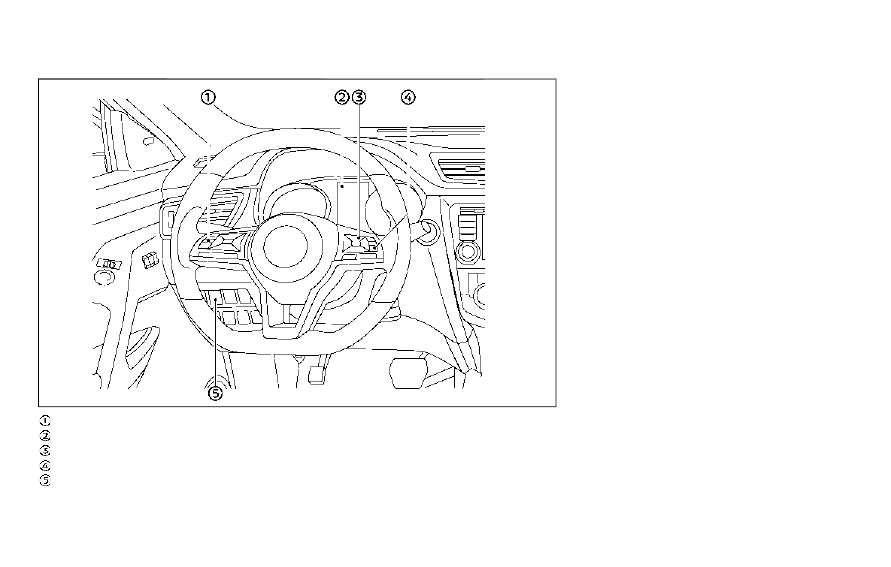
WAF0047X
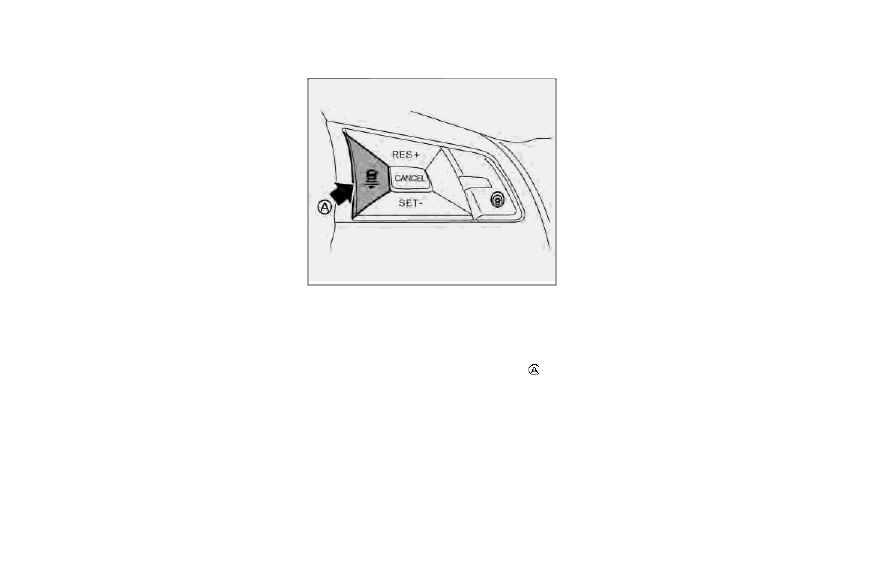
PROPILOT ASSIST SWITCHES
1. DISTANCE switch:
.
Long
.
Middle
.
Short
2. RES+ switch:
Resumes set speed or increases speed
incrementally
3. CANCEL switch:
Deactivates the ProPILOT assist sys-
tem
4. ProPILOT assist switch:
Turns the ProPILOT assist system on
or off
5. SET- switch:
Sets desired cruise speed or reduces
speed incrementally
6. Steering assist switch:
Turns the steering assist function on
or off
Starting and driving
5-67
-------------------------------------------------------------------------------------------------------------------------------------------------------------
5-68
Starting and driving
WAF0049X
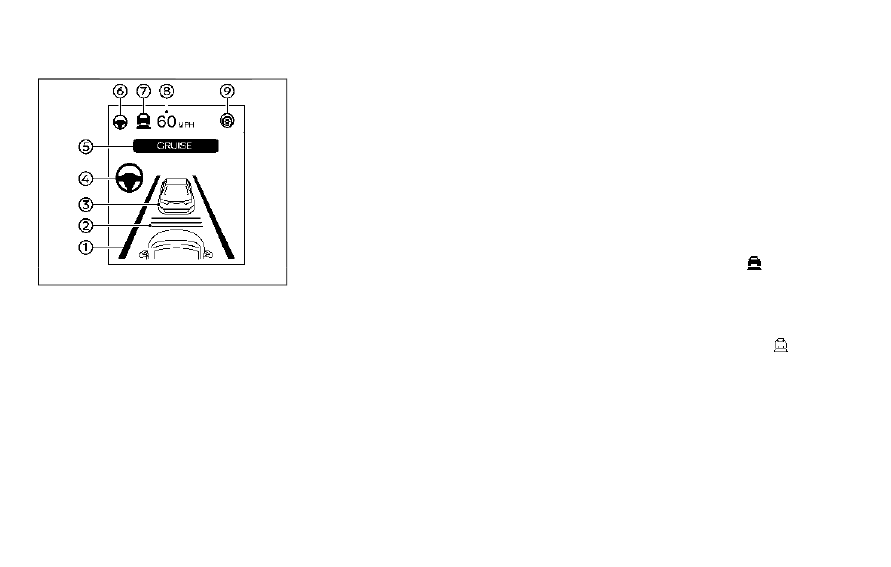
PROPILOT ASSIST SYSTEM DISPLAY
AND INDICATORS
1. Lane marker indicator
Indicates whether the system detects
lane markers
.
No lane markers displayed: Steering
assist is turned off
Lane marker indicator (gray): No
lane markers detected
— Lane marker indicator (green): Lane
markers detected
— Lane marker indicator (yellow):
Lane departure is detected
2. Set distance indicator
Displays the selected distance
3. Vehicle ahead detection indicator
Indicates whether the system detects
a vehicle in front of you
4. Steering assist indicator
Indicates the status of the Steering
assist function by the color of the
indicator
.
Steering assist indicator (gray):
Steering assist standby
.
Steering assist indicator (green):
Steering assist active
.
Steering assist indicator (orange):
Steering assist malfunction
5. ProPILOT assist activation
Displays once the ProPILOT assist
system is activated
6. Steering assist status indicator/warn-
ing
Displays the status of the Steering
assist by the color of the indicator/
warning
.
No Steering assist status indicator
displayed: Steering assist is turned
off
Steering assist status indicator
(gray): Steering assist standby
— Steering assist status indicator
(green): Steering assist active
— Steering assist status indicator (or-
ange): Steering assist malfunction
7. Speed control status indicator/warn-
ing
Displays the status of speed control by
the color and shape of the indicator/
warning
.
Speed control status indicator/
warning (gray): ICC standby
.
Speed control status indicator/
warning (solid green
): ICC (dis-
tance control mode) is active (ve-
hicle detected ahead). Your vehicle
matches the speed of the vehicle
ahead.
.
Speed control status indicator/
warning (green outline
): ICC
(maintain speed control mode) is
active (no vehicle detected ahead).
Your vehicle maintains the driver-
selected set speed.
.
Speed control status indicator/
warning (orange): Indicates an ICC
malfunction
8. Set vehicle speed indicator
Indicates the set vehicle speed
9. ProPILOT assist status indicator
Indicates the status of the ProPILOT
-------------------------------------------------------------------------------------------------------------------------------------------------------------

assist system by the color of the
indicator
.
ProPILOT assist status indicator
(white): ProPILOT assist is on but
in standby.
.
ProPILOT assist status indicator
(blue): ProPILOT assist active
TURNING THE CONVENTIONAL
(fixed speed) CRUISE CONTROL
MODE ON
NOTE:
ProPILOT assist provides no approach
warnings, automatic braking, or steer-
ing assist in the conventional (fixed
speed) cruise control mode.
To choose the conventional (fixed speed)
cruise control mode, push and hold the
ProPILOT assist switch for longer than
approximately 1.5 seconds. For additional
information, see “Conventional (fixed
speed) cruise control mode” (P.5-91).
WAF0050X
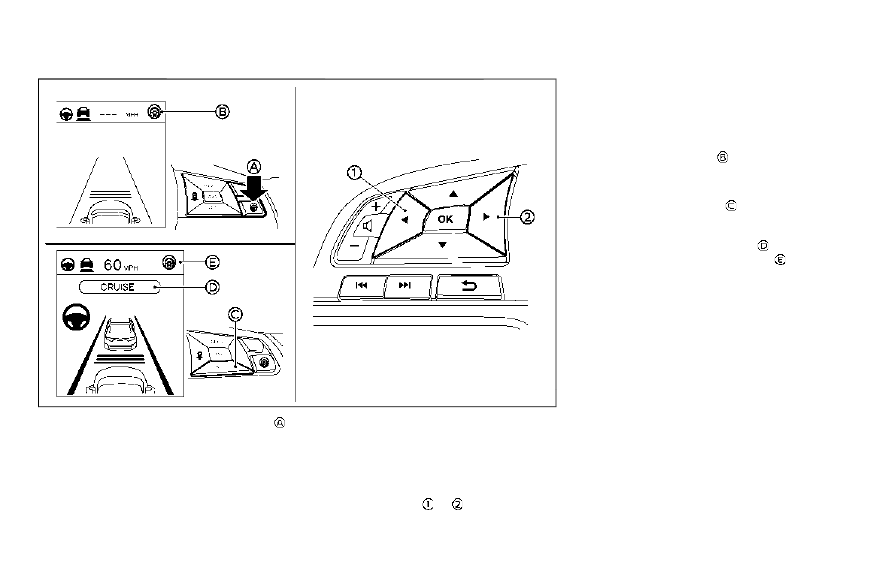
OPERATING PROPILOT ASSIST
1. Automatic Emergency Braking (AEB)
with Pedestrian Detection
2. Lane Departure Warning (LDW) when
shaded and Intelligent Lane Interven-
tion (I-LI) when solid
3. Blind Spot Warning (BSW)
Starting and driving
5-69
-------------------------------------------------------------------------------------------------------------------------------------------------------------
5-70
Starting and driving
WAF0051X
1. Push the ProPILOT assist switch
.
This turns on the ProPILOT assist
system.
2. A screen is displayed for a period of
time that indicates the status of the
Driving Aid functions.
.
AEB, LDW, and BSW are enabled
when the specified Driving Aid is
shaded.
.
I-LI is enabled when the Driving Aid
is solid.
.
To change the status of the Driving
Aids, use the
or
to navigate the
settings screen. For additional in-
formation, see “How to use the
vehicle information display” (P.2-
20).
3. The status of the ProPILOT assist
system is displayed in the vehicle
information display
.
4. Accelerate or decelerate your vehicle
to the desired speed.
5. Push the SET- switch
. The ProPILOT
assist system begins to automatically
maintain the set speed. The ProPILOT
assist activation indicator
and Pro-
PILOT assist status indicator
illumi-
nate (blue). When a vehicle ahead is
traveling at a speed of 20 MPH (32
km/h) or below and the SET- switch is
pushed, the set speed of your vehicle
is 20 MPH (32 km/h).
NOTE:
When “Prevention (LDP)” is selected in
the settings menu, turning the ProPILOT
assist system on will activate the I-LI
system at the same time. For additional
information, see “Intelligent Lane Inter-
vention (I-LI)” (P.5-40).
-------------------------------------------------------------------------------------------------------------------------------------------------------------
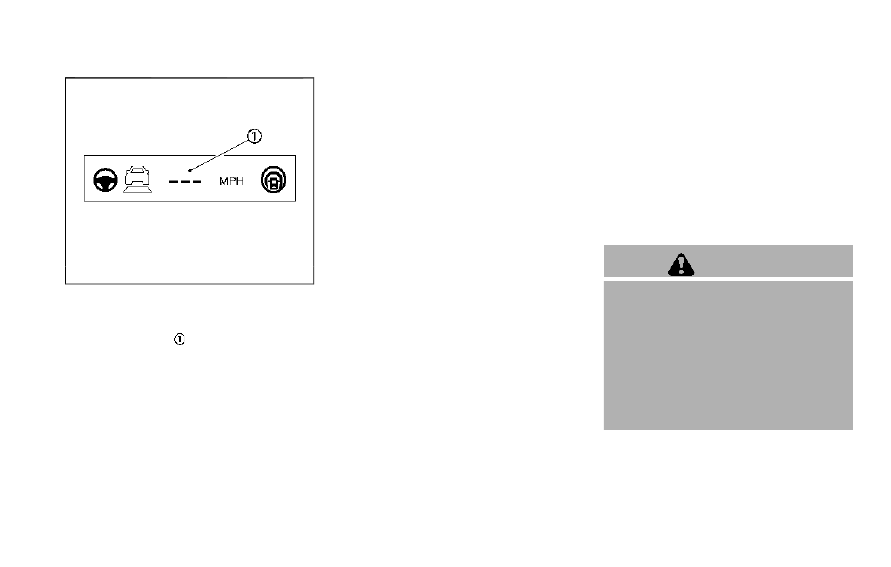
WAF0052X
When the SET- switch is pushed under the
following conditions, the ProPILOT assist
system cannot be set and the set vehicle
speed indicator
blinks for approxi-
mately 2 seconds:
.
When traveling below 20 MPH (32
km/h) and the vehicle ahead is not
detected
.
When the shift lever is not in the D
(Drive) position or manual shift mode
.
When the parking brake is applied
.
When the brakes are operated by the
driver
.
When the VDC system is off. For
additional information, see “Vehicle
Dynamic Control (VDC) system” (P.5-
131).
.
When the VDC system (including the
traction control system) is operating
.
When a wheel is slipping
.
When any door is open
.
When the driver’s seat belt is not
fastened
How to change the set vehicle
speed
The set vehicle speed can be adjusted.
To change to a faster cruising speed:
.
Push and hold the RES+ switch. The
set vehicle speed increases by ap-
proximately 5 MPH (5 km/h).
.
Push, then quickly release, the RES+
switch. Each time you do this, the set
speed increases by approximately 1
MPH (1 km/h).
To change to a slower cruising speed:
.
Push and hold the SET- switch. The
set vehicle speed decreases by ap-
proximately 5 MPH (5 km/h).
.
Push, then quickly release, the SET
switch. Each time you do this, the set
speed decreases by approximately 1
MPH (1 km/h).
How to momentarily accelerate or
decelerate
.
Depress the accelerator pedal when
acceleration is required. Release the
accelerator pedal to resume the pre-
viously set vehicle speed.
.
Depress the brake pedal when decel-
eration is required. Control by the
ProPILOT Assist system is canceled.
Push the RES+ switch to resume the
previously set vehicle speed.
WARNING
When the accelerator pedal is de-
pressed and you are approaching
the vehicle ahead, the ICC system
will neither control the brake nor
warn the driver with the chime and
display. The driver must manually
control the vehicle speed to maintain
a safe distance to the vehicle ahead.
Failure to do so could result in severe
personal injury or death.
Starting and driving
5-71
-------------------------------------------------------------------------------------------------------------------------------------------------------------
5-72
Starting and driving
NOTE:
When you accelerate by depressing the
accelerator pedal or decelerate by
pushing the SET- switch and the vehicle
travels faster than the speed set by the
driver, the set speed vehicle indicator
will blink.
WAF0053X
How to change the set distance to
the vehicle ahead
The distance to the vehicle ahead can be
selected at any time.
Each time the DISTANCE switch
is
pushed, the set distance will change to
“long”, “middle”, “short” and back to “long”
again in that sequence.
-------------------------------------------------------------------------------------------------------------------------------------------------------------
Нет комментариевНе стесняйтесь поделиться с нами вашим ценным мнением.
Текст