Nissan NV200 Taxi (2017 year). Instruction — part 16
CAUTION
● NEVER remove dirt, sand or other de-
bris from the passenger compartment
by washing it out with a hose. Remove
dirt with a vacuum cleaner or broom.
● Never allow water or other liquids to
come in contact with electronic compo-
nents inside the vehicle as this may
damage them.
Chemicals used for road surface de-icing are
extremely corrosive. They accelerate corrosion
and deterioration of underbody components
such as the exhaust system, fuel and brake lines,
brake cables, floor pan and fenders.
In winter, the underbody must be cleaned
periodically.
For additional protection against rust and corro-
sion, which may be required in some areas, it is
recommended that you consult a NISSAN dealer.
Appearance and care
7-7
MEMO
7-8
Appearance and care
8 Do-it-yourself
Maintenance precautions . . . . . . . . . . . . . . . . . . . . . . . . . . . 8-2
Engine compartment check locations . . . . . . . . . . . . . . . . 8-3
Engine cooling system . . . . . . . . . . . . . . . . . . . . . . . . . . . . . 8-4
Engine oil. . . . . . . . . . . . . . . . . . . . . . . . . . . . . . . . . . . . . . . . . 8-6
Checking engine oil level . . . . . . . . . . . . . . . . . . . . . . . . 8-6
Changing engine oil . . . . . . . . . . . . . . . . . . . . . . . . . . . . 8-7
Changing engine oil filter . . . . . . . . . . . . . . . . . . . . . . . . 8-8
Continuously Variable Transmission (CVT) fluid . . . . . . . 8-9
Brake fluid . . . . . . . . . . . . . . . . . . . . . . . . . . . . . . . . . . . . . . . . 8-9
Windshield-washer fluid. . . . . . . . . . . . . . . . . . . . . . . . . . . 8-10
Windshield-washer fluid reservoir . . . . . . . . . . . . . . . 8-10
Battery . . . . . . . . . . . . . . . . . . . . . . . . . . . . . . . . . . . . . . . . . . 8-10
Jump starting . . . . . . . . . . . . . . . . . . . . . . . . . . . . . . . . . 8-12
Variable voltage control system. . . . . . . . . . . . . . . . . . . . . 8-12
Drive belt . . . . . . . . . . . . . . . . . . . . . . . . . . . . . . . . . . . . . . . . 8-13
Spark plugs. . . . . . . . . . . . . . . . . . . . . . . . . . . . . . . . . . . . . . 8-14
Replacing spark plugs . . . . . . . . . . . . . . . . . . . . . . . . . 8-14
Air cleaner . . . . . . . . . . . . . . . . . . . . . . . . . . . . . . . . . . . . . . . 8-14
Windshield wiper blades . . . . . . . . . . . . . . . . . . . . . . . . . . 8-15
Brakes . . . . . . . . . . . . . . . . . . . . . . . . . . . . . . . . . . . . . . . . . . 8-16
Fuses . . . . . . . . . . . . . . . . . . . . . . . . . . . . . . . . . . . . . . . . . . . 8-17
Engine compartment . . . . . . . . . . . . . . . . . . . . . . . . . . . 8-17
Passenger compartment . . . . . . . . . . . . . . . . . . . . . . . 8-19
Battery replacement . . . . . . . . . . . . . . . . . . . . . . . . . . . . . . 8-20
Key fob (if so equipped) . . . . . . . . . . . . . . . . . . . . . . . . 8-20
Lights . . . . . . . . . . . . . . . . . . . . . . . . . . . . . . . . . . . . . . . . . . . 8-21
Headlights . . . . . . . . . . . . . . . . . . . . . . . . . . . . . . . . . . . . 8-21
Park/turn signal lights . . . . . . . . . . . . . . . . . . . . . . . . . . 8-24
Exterior and interior lights. . . . . . . . . . . . . . . . . . . . . . . 8-26
Wheels and tires . . . . . . . . . . . . . . . . . . . . . . . . . . . . . . . . . 8-30
Tire pressure. . . . . . . . . . . . . . . . . . . . . . . . . . . . . . . . . . 8-30
Tire labeling. . . . . . . . . . . . . . . . . . . . . . . . . . . . . . . . . . . 8-33
Types of tires. . . . . . . . . . . . . . . . . . . . . . . . . . . . . . . . . . 8-35
Tire chains . . . . . . . . . . . . . . . . . . . . . . . . . . . . . . . . . . . . 8-36
Changing wheels and tires . . . . . . . . . . . . . . . . . . . . . 8-36
When performing any inspection or maintenance
work on your vehicle, always take care to prevent
serious accidental injury to yourself or damage to
the vehicle. The following are general precau-
tions which should be closely observed.
WARNING
● Park the vehicle on a level surface, ap-
ply the parking brake securely and
block the wheels to prevent the vehicle
from moving. Move the shift lever to P
(Park).
● Be sure the ignition key is in the OFF or
LOCK position when performing any
parts replacement or repairs.
● If you must work with the engine run-
ning, keep your hands, clothing, hair
and tools away from moving fans, belts
and any other moving parts.
● It is advisable to secure or remove any
loose clothing and remove any jewelry,
such as rings, watches, etc. before
working on your vehicle.
● Always wear eye protection whenever
you work on your vehicle.
● Your vehicle is equipped with an auto-
matic engine cooling fan. It may come on
at any time without warning, even if the
ignition key is in the OFF position and the
engine is not running. To avoid injury,
always disconnect the negative battery
cable before working near the fan.
● If you must run the engine in an en-
closed space such as a garage, be sure
there is proper ventilation for exhaust
gases to escape.
● Never get under the vehicle while it is
supported only by a jack. If it is neces-
sary to work under the vehicle, support
it with safety stands.
● Keep smoking materials, flame and
sparks away from the fuel tank and
battery.
● On gasoline engine models, the fuel
filter or fuel lines should be serviced. It
is
recommended
that
you
visit
a
NISSAN dealer for this service because
the fuel lines are under high pressure
even when the engine is off.
CAUTION
● Do not work under the hood while the
engine is hot. Turn the engine off and
wait until it cools down.
● Avoid contact with used engine oil and
coolant. Improperly disposed engine
oil, engine coolant and/or other vehicle
fluids can damage the environment. Al-
ways conform to local regulations for
disposal of vehicle fluid.
● Never leave the engine or the transmis-
sion related component harness con-
nector disconnected while the ignition
switch is in the ON position.
● Never connect or disconnect the battery
or any transistorized component while
the ignition switch is in the ON position.
This “Do-it-yourself” section gives instructions
regarding only those items which are relatively
easy for an owner to perform.
A Genuine NISSAN service manual is also avail-
able. For additional information, refer to “Owner’s
Manual/Service Manual order information” in the
“Technical and consumer information” section of
this manual.
You should be aware that incomplete or improper
servicing may result in operating difficulties or
excessive emissions, and could affect warranty
coverage. If in doubt about any servicing, it
is recommended that you have it done by a
NISSAN dealer.
MAINTENANCE PRECAUTIONS
8-2
Do-it-yourself

MR20DE engine
1.
Engine coolant reservoir
2.
Engine oil filler cap
3.
Brake fluid reservoir
4.
Air cleaner
5.
Fuse and relay box
6.
Battery
7.
Radiator cap
8.
Engine oil dipstick
9.
Drive belt location
10. Windshield-washer fluid reservoir
LDI2279
ENGINE COMPARTMENT CHECK
LOCATIONS
Do-it-yourself
8-3
The engine cooling system is filled at the factory
with a pre-diluted mixture of 50% Genuine
NISSAN Long Life Antifreeze/Coolant (blue) and
50% water to provide year-round antifreeze and
coolant protection. The antifreeze solution con-
tains rust and corrosion inhibitors. Additional en-
gine cooling system additives are not necessary.
WARNING
● Never remove the radiator or coolant
reservoir cap when the engine is hot.
Wait until the engine and radiator cool
down. Serious burns could be caused
by high pressure fluid escaping from
the radiator. For additional information
on precautions, refer to “If your vehicle
overheats” in the “In case of emer-
gency” section of this manual.
● The radiator is equipped with a pres-
sure type radiator cap. To prevent en-
gine damage, use only a Genuine
NISSAN radiator cap.
CAUTION
● Never use any cooling system additives
such as radiator sealer. Additives may
clog the cooling system and cause dam-
age to the engine, transmission and/or
cooling system.
● When adding or replacing coolant, be
sure to use only Genuine NISSAN Long
Life
Antifreeze/Coolant
(blue)
or
equivalent. Genuine NISSAN Long Life
Antifreeze/Coolant (blue) is pre-diluted
to provide antifreeze protection to -34°
F (-37° C). If additional freeze protection
is needed due to weather where you
operate your vehicle, add Genuine
NISSAN Long Life Antifreeze/Coolant
(blue) concentrate following the direc-
tions on the container. If an equivalent
coolant other than Genuine NISSAN
Long Life Antifreeze/Coolant (blue) is
used, follow the coolant manufacturer’s
instructions to maintain minimum anti-
freeze protection to -34° F (-37° C). The
use of other types of coolant solutions
other than Genuine NISSAN Long Life
Antifreeze/Coolant (blue) or equivalent
may
damage
the
engine
cooling
system.
● The life expectancy of the factory-fill
coolant is 105,000 miles (168,000 km) or
7 years. Mixing any other type of cool-
ant other than Genuine NISSAN Long
Life Antifreeze/Coolant (blue), includ-
ing
Genuine
NISSAN
Long
Life
Antifreeze/Coolant (green), or the use
of non-distilled water will reduce the
life expectancy of the factory-fill cool-
ant. For additional information, refer to
the “Maintenance and schedules” sec-
tion in this book.
ENGINE COOLING SYSTEM
8-4
Do-it-yourself
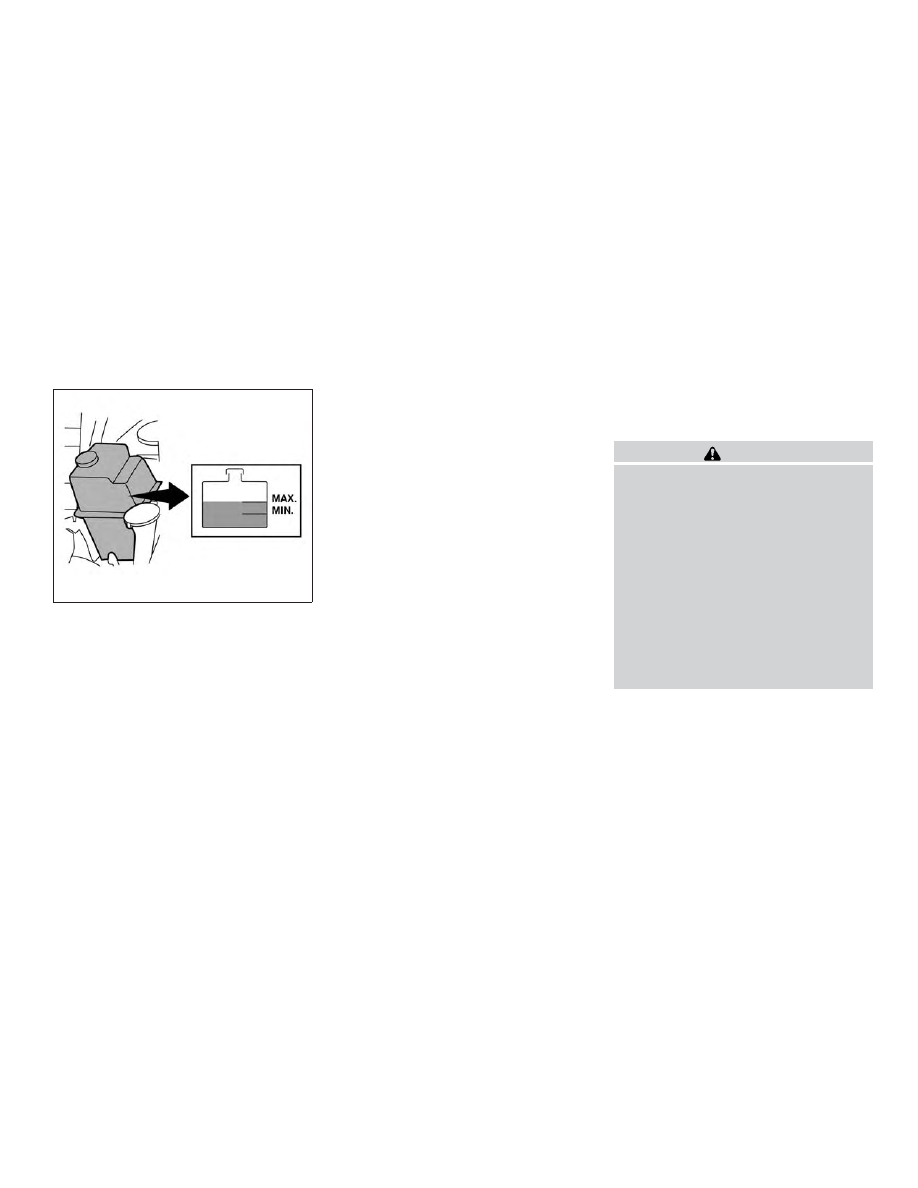
CHECKING ENGINE COOLANT
LEVEL
Check the coolant level in the reservoir when
the engine is cold. If the coolant level is below
the MIN level, add coolant to the MAX level. If the
reservoir is empty, check the coolant level in the
radiator when the engine is cold. If there is
insufficient coolant in the radiator, fill the radiator
with coolant up to the filler opening and also add
it to the reservoir up to the MAX level.
This vehicle contains Genuine NISSAN Long Life
Antifreeze/Coolant (blue). The life expectancy of
the
factory-fill
coolant
is
105,000
miles
(168,000 km) or 7 years. Mixing any other type of
coolant or the use of non-distilled water will re-
duce the life expectancy of the factory-fill coolant.
For additional information, refer to the “Mainte-
nance and schedules” section of this manual.
The engine coolant reservoir is a pressur-
ized tank. When installing the cap, tighten.
If the cooling system frequently requires
coolant, have it checked. It is recom-
mended that you visit a NISSAN dealer for
this service.
For additional information on the location of the
engine coolant reservoir, refer to
⬙Engine com-
partment check locations
⬙ in this section.
CHANGING ENGINE COOLANT
A NISSAN dealer can change the engine coolant.
The service procedure can be found in the
NISSAN Service Manual.
Improper servicing can result in reduced
heater performance and engine overheat-
ing.
WARNING
● To avoid the danger of being scalded,
never change the coolant when the en-
gine is hot.
● Never remove the radiator or engine
coolant reservoir cap when the engine
is hot. Serious burns could be caused by
high pressure fluid escaping from the
radiator.
● Avoid direct skin contact with used
coolant. If skin contact is made, wash
thoroughly with soap or hand cleaner as
soon as possible.
● Keep coolant out of the reach of chil-
dren and pets.
Engine coolant must be disposed of properly.
Check your local regulations.
LDI2508
Do-it-yourself
8-5
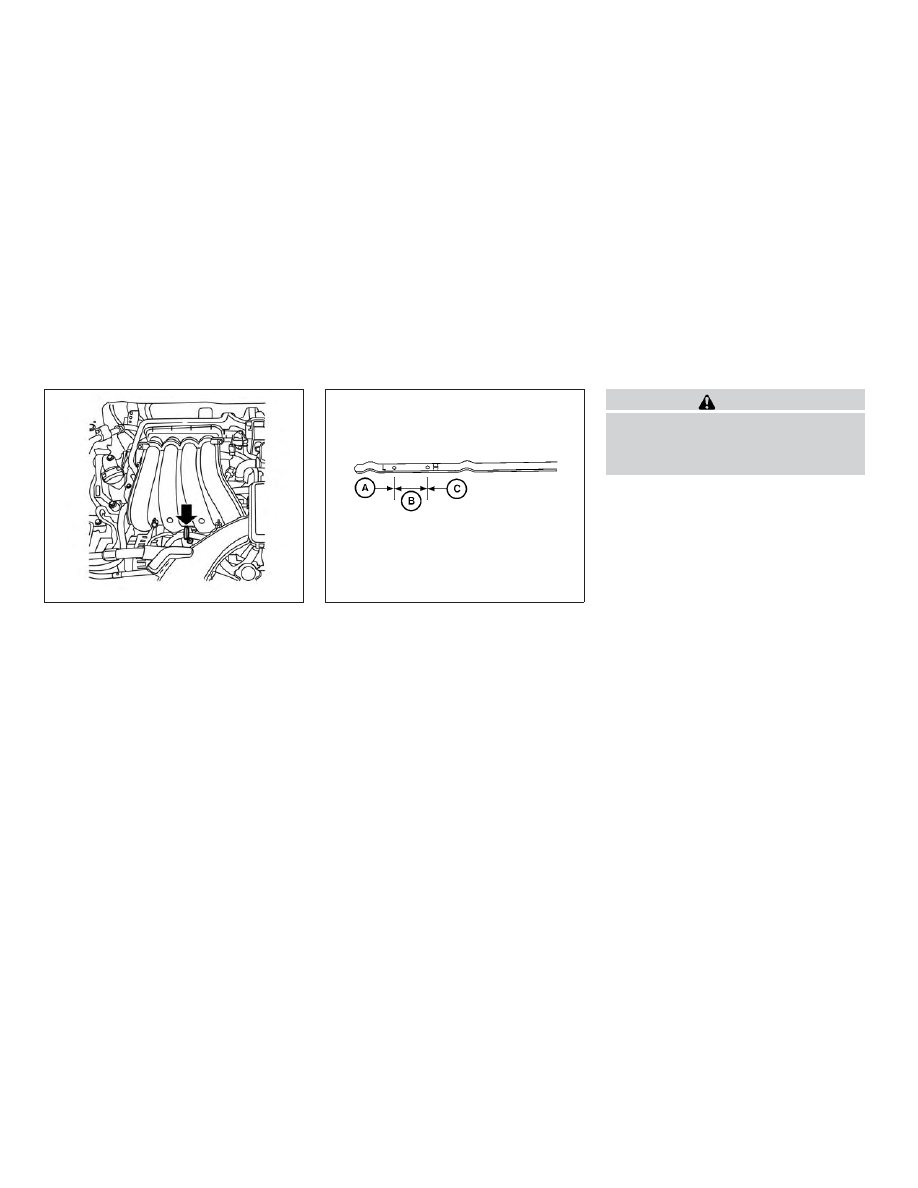
CHECKING ENGINE OIL LEVEL
1. Park the vehicle on a level surface and apply
the parking brake.
2. Start the engine and let it idle until it reaches
operating temperature.
3. Turn off the engine. Wait more than
10 minutes for the oil to drain back into
the oil pan.
4. Remove the dipstick and wipe it clean. Re-
insert it all the way.
5. Remove the dipstick again and check the oil
level. It should be between the H (High) and
L (Low) marks
䊊
B
. This is the normal oper-
ating oil level range. If the oil level is below
the L (Low) mark
䊊
A
, remove the oil filler cap
and pour recommended oil through the
opening. Do not overfill
䊊
C
.
6. Recheck oil level with the dipstick.
It is normal to add some oil between oil
maintenance
intervals
or
during
the
break-in period, depending on the severity
of operating conditions.
CAUTION
Oil level should be checked regularly. Op-
erating the engine with an insufficient
amount of oil can damage the engine, and
such damage is not covered by warranty.
Make sure to follow the engine oil changing inter-
vals in the maintenance booklet. Operating under
the following conditions may require more fre-
quent oil change:
● Repeated short distance driving
● Driving in dusty conditions
● Stop and go commuting
LDI2203
LDI0371
ENGINE OIL
8-6
Do-it-yourself
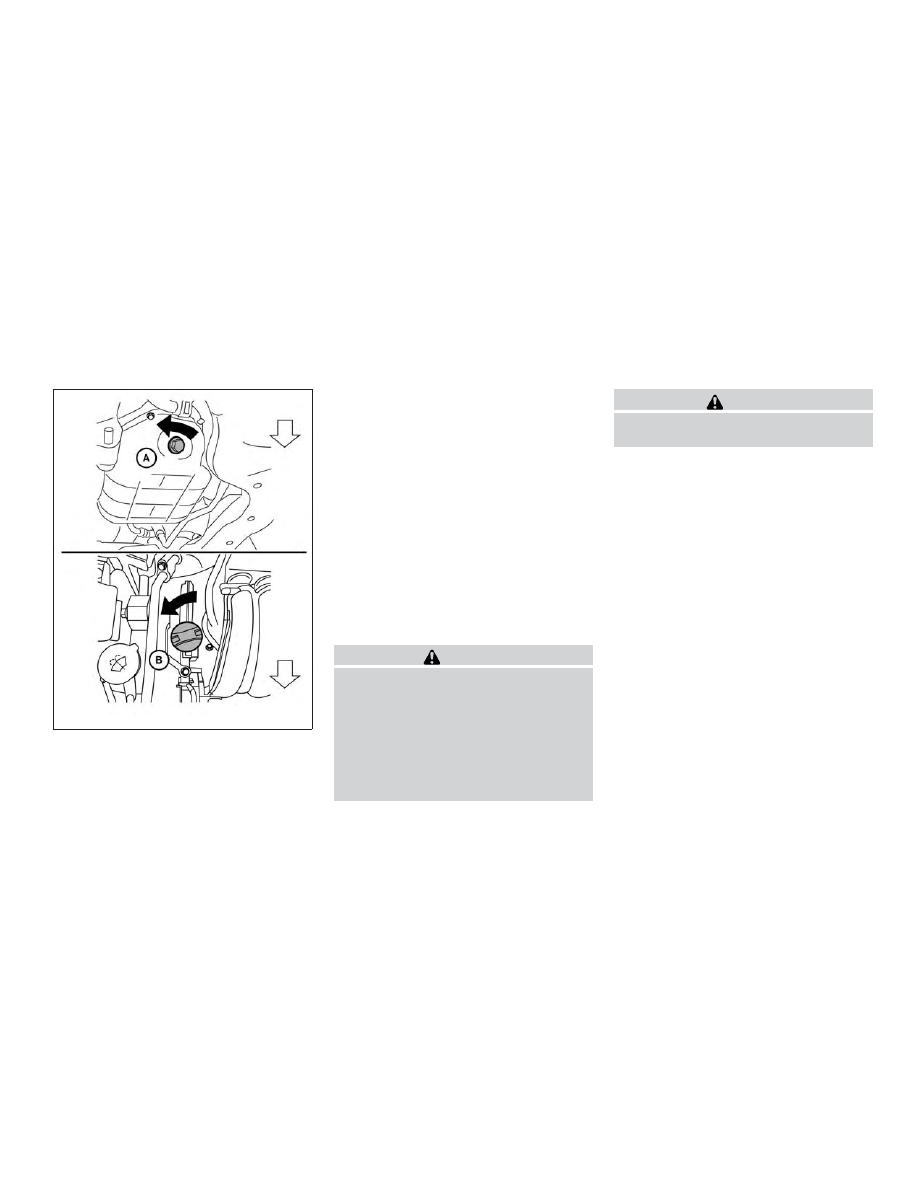
CHANGING ENGINE OIL
1. Park the vehicle on a level surface and apply
the parking brake.
2. Start the engine and let it idle until it reaches
operating temperature, then turn it off.
3. Remove the oil filler cap
䊊
B
by turning it
counterclockwise.
4. Place a large drain pan under the drain plug
䊊
A
.
5. Remove the drain plug
䊊
A
with a wrench by
turning it counterclockwise and completely
drain the oil.
If the oil filter is to be changed, remove and
replace it at this time. For additional informa-
tion, refer to “Changing engine oil filter” in
this section.
● Waste oil must be disposed of prop-
erly.
● Check your local regulations.
WARNING
● Prolonged and repeated contact with
used engine oil may cause skin cancer.
● Try to avoid direct skin contact with
used oil. If skin contact is made, wash
thoroughly with soap or hand cleaner as
soon as possible.
● Keep used engine oil out of reach of
children.
CAUTION
Be careful not to burn yourself. The engine
oil may be hot.
6. Clean and reinstall the drain plug and a new
washer. Securely tighten the drain plug with
a wrench. Do not use excessive force.
Drain plug tightening torque:
25 ft-lb (34 N·m)
7. Refill engine with recommended oil through
the oil filler opening, then install the oil filler
cap securely.
For additional information, refer to “Recom-
mended fluids/lubricants and capacities” in
the “Technical and consumer information”
section of this manual for drain and refill
capacity.
The drain and refill capacity depends on the
oil temperature and drain time. Use these
specifications for reference only. Always use
the dipstick to determine when the proper
amount of oil is in the engine.
8. Start the engine. Check for leakage around
the drain plug and oil filter. Correct as re-
quired.
LDI2680
Do-it-yourself
8-7
9. Turn the engine off and wait more than
10 minutes. Check the oil level with the
dipstick. Add engine oil if necessary.
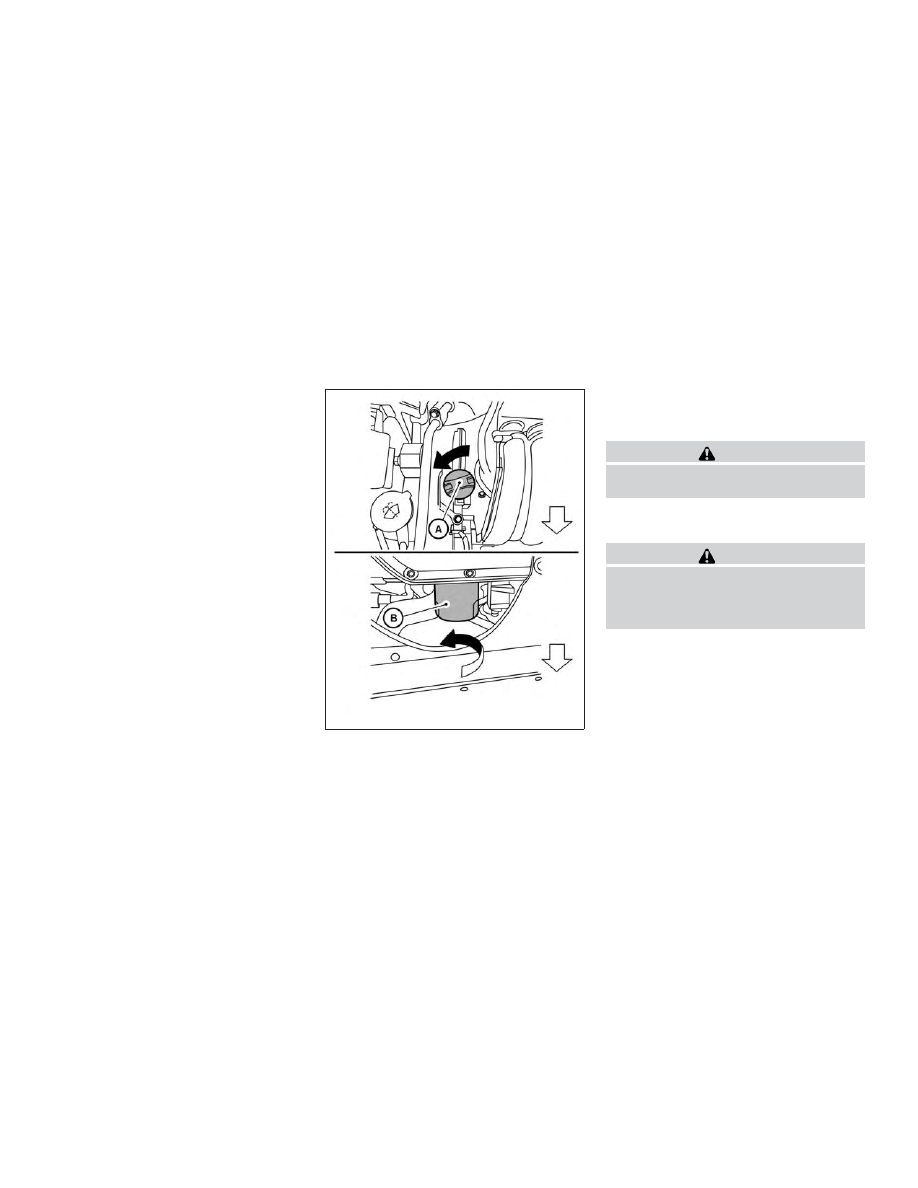
CHANGING ENGINE OIL FILTER
1. Park the vehicle on a level surface and apply
the parking brake.
2. Turn the engine off.
3. Place a large drain pan under the oil filter
䊊
B
.
4. Loosen the oil filter with an oil filter wrench
by turning it counterclockwise. Then remove
the oil filter by turning it by hand.
CAUTION
Be careful not to burn yourself. The engine
oil may be hot.
5. Wipe the engine oil filter sealing surface with
a clean rag.
CAUTION
Be sure to remove any old gasket material
remaining on the sealing surface of the
engine. Failure to do so could lead to
engine damage.
6. Coat the gasket on the new filter with clean
engine oil.
7. Screw on the oil filter until a slight resistance
is felt, then tighten an additional 2/3 turn.
8. Start the engine and check for leakage
around the oil filter. Correct as required.
9. Turn the engine off and wait more than
10 minutes. Check the oil level. Add engine
oil by removing the oil filler cap
䊊
A
if neces-
sary.
LDI2724
8-8
Do-it-yourself

CAUTION
● NISSAN recommends using Genuine
NISSAN
CVT
Fluid
NS-3
ONLY
in
NISSAN CVTs. Do not mix with other
fluids.
● Do not use Automatic transmission
fluid (ATF) or Manual transmission fluid
in a NISSAN CVT, as it may damage the
CVT. Damage caused by the use of flu-
ids other than as recommended is not
covered under NISSAN’s New Vehicle
Limited Warranty.
● Using fluids that are not equivalent to
Genuine NISSAN CVT Fluid NS-3 may
also damage the CVT. Damage caused
by the use of fluids other than as recom-
mended is not covered under NISSAN’s
New Vehicle Limited Warranty.
When checking or replacement of CVT fluid is
required, we recommend your NISSAN dealer for
servicing.
WARNING
● Use only new fluid from a sealed con-
tainer. Old, inferior or contaminated
fluid may damage the brake system.
The use of improper fluids can damage
the brake system and affect the vehi-
cle’s stopping ability.
● Clean the filler cap before removing.
● Brake fluid is poisonous and should be
stored carefully in marked containers
out of reach of children.
CAUTION
Do not spill the fluid on any painted sur-
faces. This will damage the paint. If fluid is
spilled, immediately wash the surface with
water.
Check the fluid level in the reservoir. If the brake
fluid is below the MIN line
䊊
B
, the brake warning
light will illuminate. Add brake fluid up to the MAX
line
䊊
A
. For additional information on recom-
mended brake fluid type, refer to “Recommended
fluids/lubricants and capacities” in the “Technical
and consumer information” section of this
manual.
If the brake fluid must be added frequently, the
brake system should be thoroughly checked. It is
recommended that you visit a NISSAN dealer for
this service.
LDI2677
CONTINUOUSLY VARIABLE
TRANSMISSION (CVT) FLUID
BRAKE FLUID
Do-it-yourself
8-9
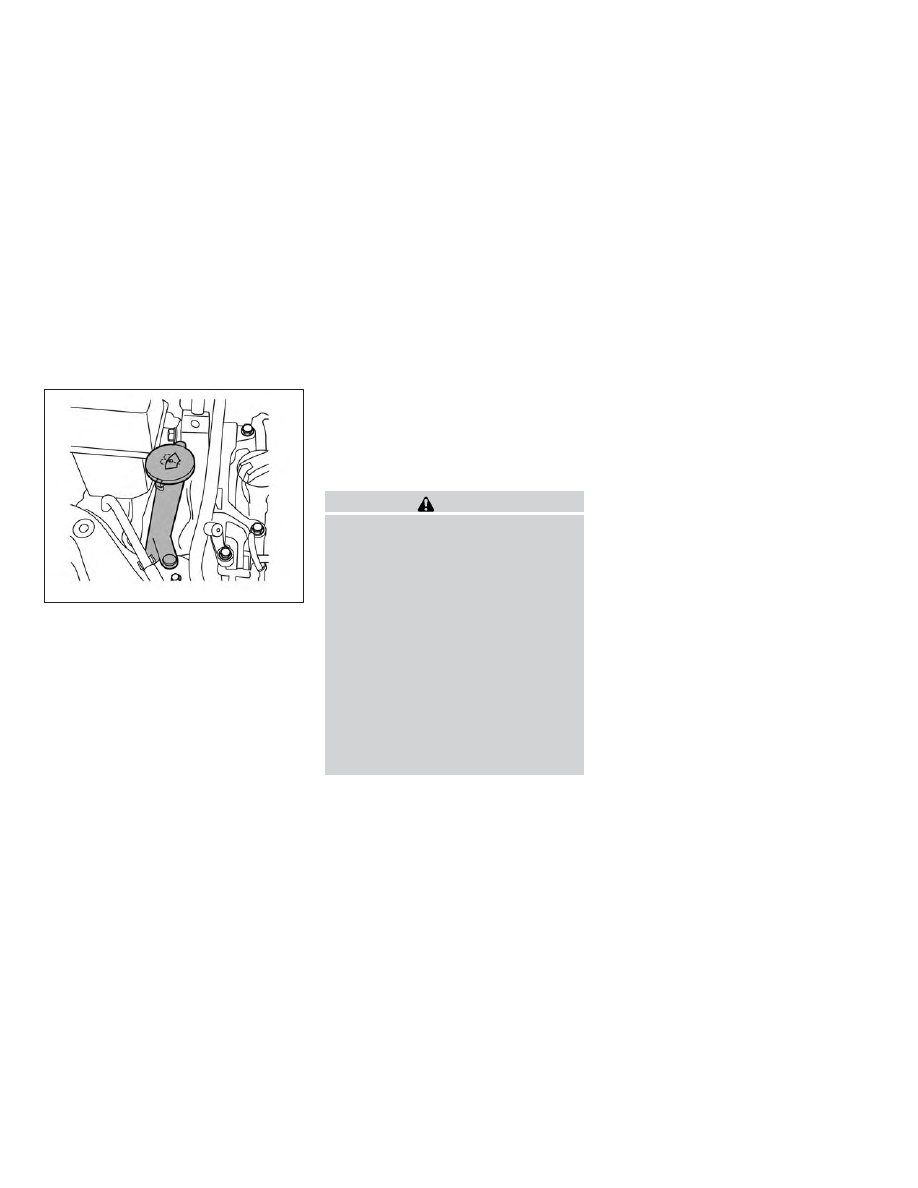
WINDSHIELD-WASHER FLUID
RESERVOIR
Fill the windshield-washer fluid reservoir periodi-
cally. Add windshield-washer fluid when the low
windshield-washer fluid warning light comes on.
To fill the windshield-washer fluid reservoir, lift
the cap off the reservoir and pour the windshield-
washer fluid into the reservoir opening.
Add a washer solvent to the washer for better
cleaning. In the winter season, add a windshield-
washer antifreeze. Follow the manufacturer’s in-
structions for the mixture ratio.
Refill the reservoir more frequently when driving
conditions require an increased amount of
windshield-washer fluid.
Recommended fluid is Genuine NISSAN Wind-
shield Washer Concentrate Cleaner & Antifreeze
or equivalent.
CAUTION
● Do not substitute engine antifreeze
coolant for windshield-washer fluid.
This may result in damage to the paint.
● Do not fill the windshield-washer fluid
reservoir with washer fluid concen-
trates at full strength. Some methyl al-
cohol based washer fluid concentrates
may permanently stain the grille if
spilled while filling the windshield-
washer fluid reservoir.
● Pre-mix washer fluid concentrates with
water to the manufacturer’s recom-
mended levels before pouring the fluid
into the windshield-washer fluid reser-
voir. Do not use the windshield-washer
fluid reservoir to mix the washer fluid
concentrate and water.
● Keep the battery surface clean and dry.
Clean the battery with a solution of baking
soda and water.
● Make certain the terminal connections are
clean and securely tightened.
● If the vehicle is not to be used for 30 days or
longer, disconnect the negative (-) battery
terminal cable to prevent discharge.
NOTE:
Care should be taken to avoid situations
that can lead to potential battery discharge
and potential no-start conditions such as:
1. Installation or extended use of elec-
tronic accessories that consume bat-
tery power when the engine is not run-
ning
(Phone
chargers,
GPS,
DVD
players, etc.).
2. Vehicle is not driven regularly and/or
only driven short distances.
In these cases, the battery may need to be
charged to maintain battery health.
LDI2678
WINDSHIELD-WASHER FLUID
BATTERY
8-10
Do-it-yourself
WARNING
● Do not expose the battery to flames, an
electrical spark or a cigarette. Hydrogen
gas generated by the battery is explo-
sive. Explosive gases can cause blind-
ness or injury. Do not allow battery fluid
to contact your skin, eyes, fabrics or
painted surfaces. Sulfuric acid can
cause blindness or injury. After touch-
ing a battery or battery cap, do not
touch or rub your eyes. Thoroughly
wash your hands. If the acid contacts
your eyes, skin or clothing, immediately
flush with water for at least 15 minutes
and seek medical attention.
● Do not operate the vehicle if the fluid in
the battery is low. Low battery fluid can
cause a higher load on the battery
which can generate heat, reduce battery
life, and in some cases lead to an
explosion.
● When working on or near a battery, al-
ways wear suitable eye protection and
remove all jewelry.
● Battery posts, terminals and related ac-
cessories contain lead and lead com-
pounds. Wash hands after handling.
● Keep battery out of the reach of
children.
● Do not tip the battery. Keep the vent
caps tight and the battery level.
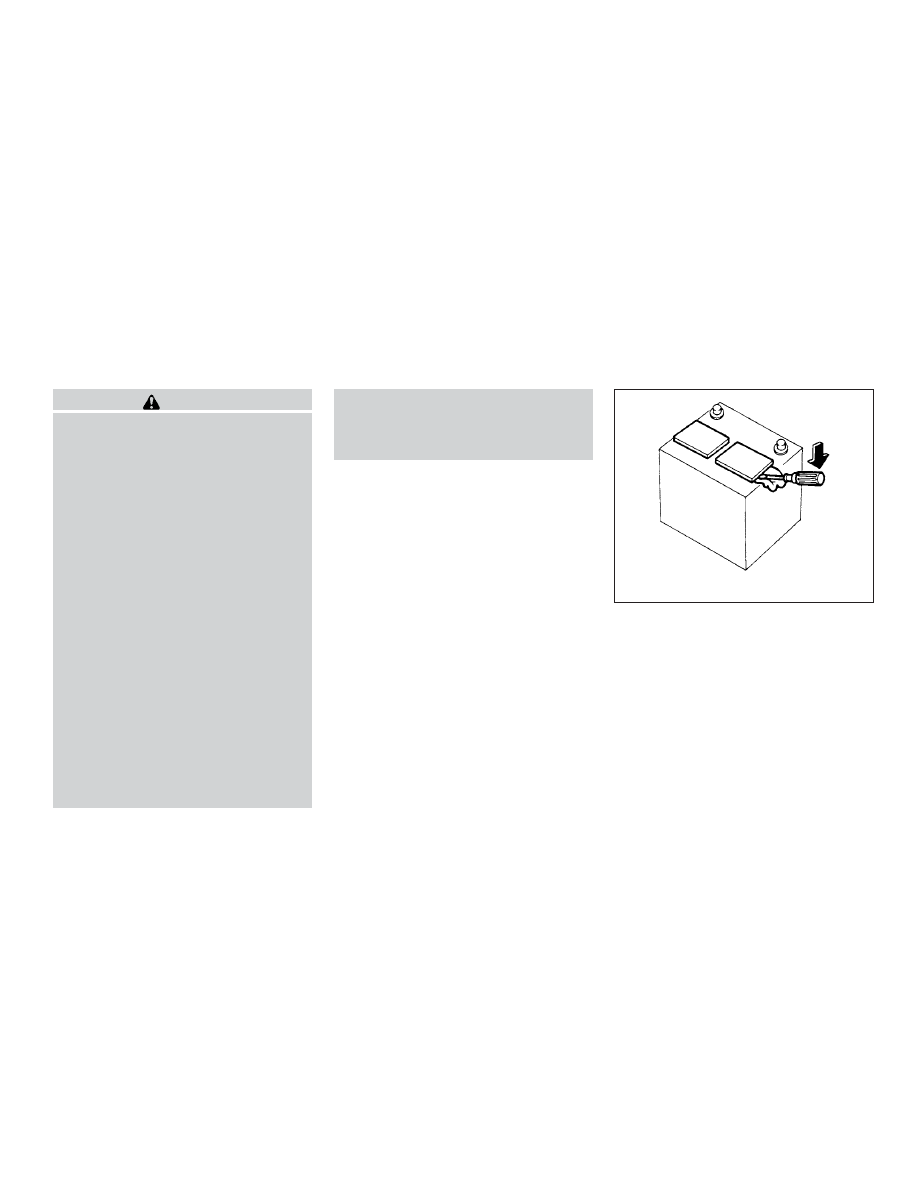
1. Remove the vent caps with a screwdriver as
shown. Use a cloth to protect the battery
case.
WDI0224
Do-it-yourself
8-11
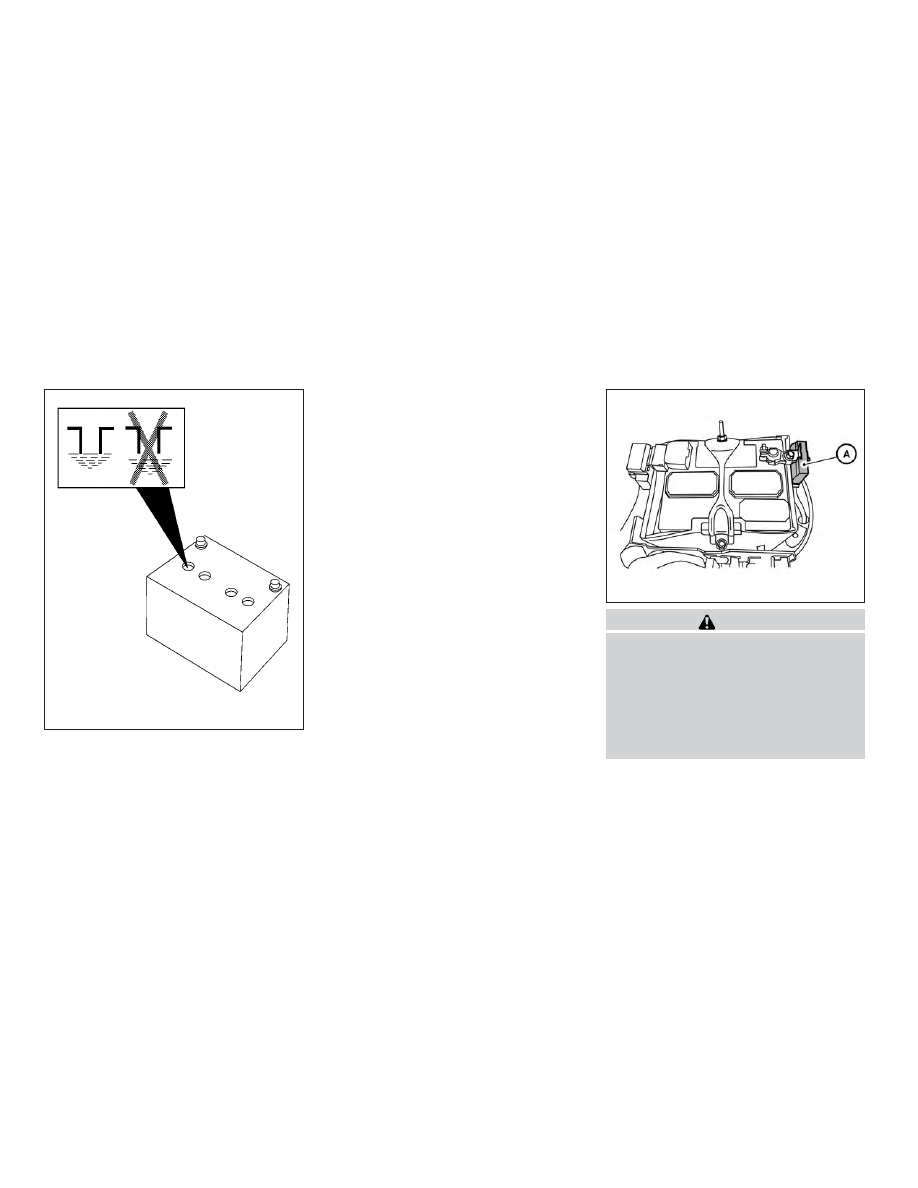
2. Check the fluid level in each cell. If it is
necessary to add fluid, add only distilled
water to bring the level up to the bottom of
the filler opening. Do not overfill. Reinstall
the vent caps.
Vehicles operated in high temperatures or under
severe conditions require frequent checks of the
battery fluid level.
JUMP STARTING
If jump starting is necessary, refer to “Jump start-
ing” in the “In case of emergency” section of this
manual. If the engine does not start by jump
starting, the battery may have to be replaced. It is
recommended that you visit a NISSAN dealer for
this service.
CAUTION
● Do not ground accessories directly to
the battery terminal. Doing so will by-
pass the variable voltage control sys-
tem and the vehicle battery may not
charge completely.
● Use electrical accessories with the en-
gine running to avoid discharging the
vehicle battery.
LDI0302
LDI2178
VARIABLE VOLTAGE CONTROL
SYSTEM
8-12
Do-it-yourself
Your vehicle is equipped with a variable voltage
control system. This system measures the
amount of electrical discharge from the battery
and controls voltage generated by the generator.
The current sensor
䊊
A
is located near the battery
along the negative battery cable. If you add elec-
trical accessories to your vehicle, be sure to
ground them to a suitable body ground such as
the frame or engine block area.
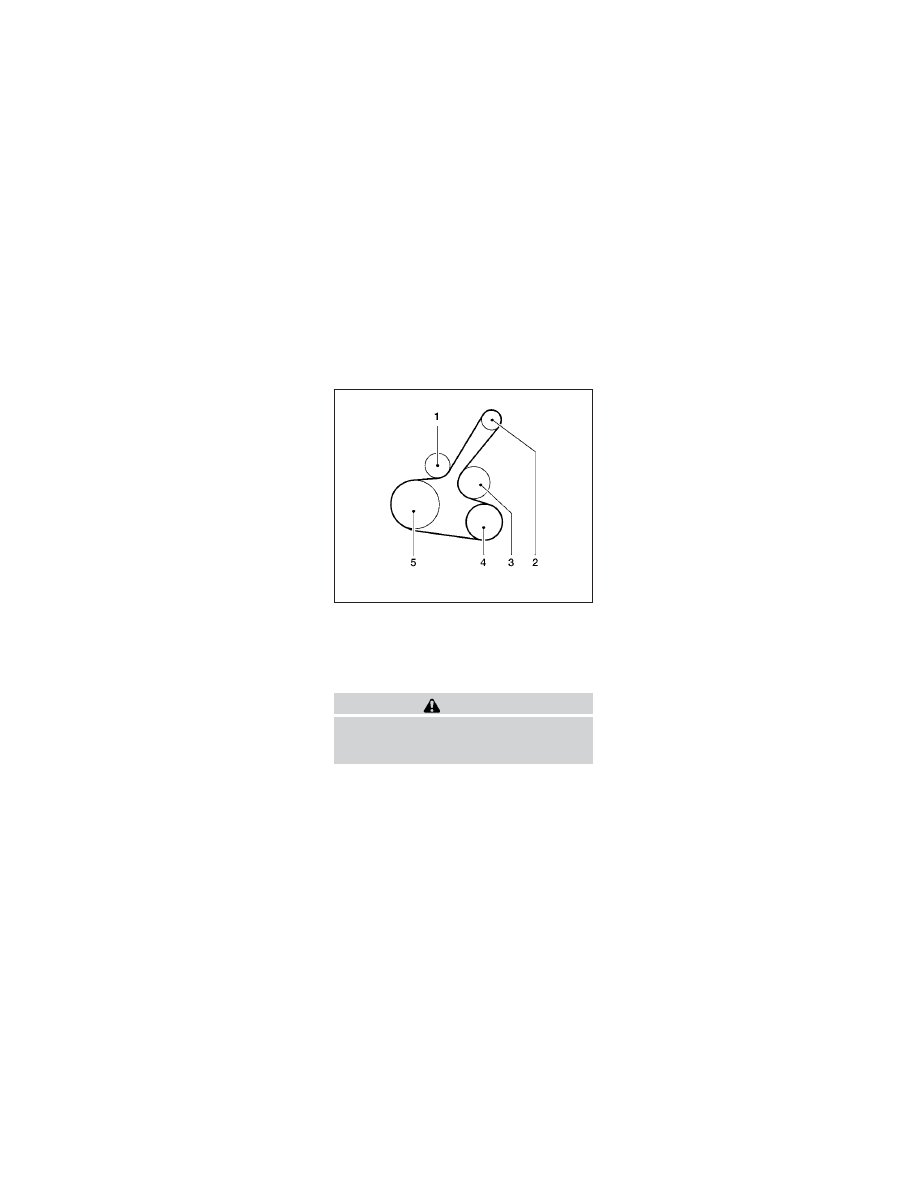
1.
Automatic tensioner pulley
2.
Generator pulley
3.
Water pump pulley
4.
Air conditioner compressor pulley
5.
Crankshaft pulley
WARNING
Be sure the ignition switch is in the OFF or
LOCK position before servicing drive belt.
The engine could rotate unexpectedly.
1. Visually inspect the belt for signs of unusual
wear, cuts, or fraying. If the belt is in poor
condition, have it replaced or adjusted. It is
recommended that you visit a NISSAN
dealer for this service.
2. Have the belt checked regularly for condi-
tion.
WDI0638
DRIVE BELT
Do-it-yourself
8-13
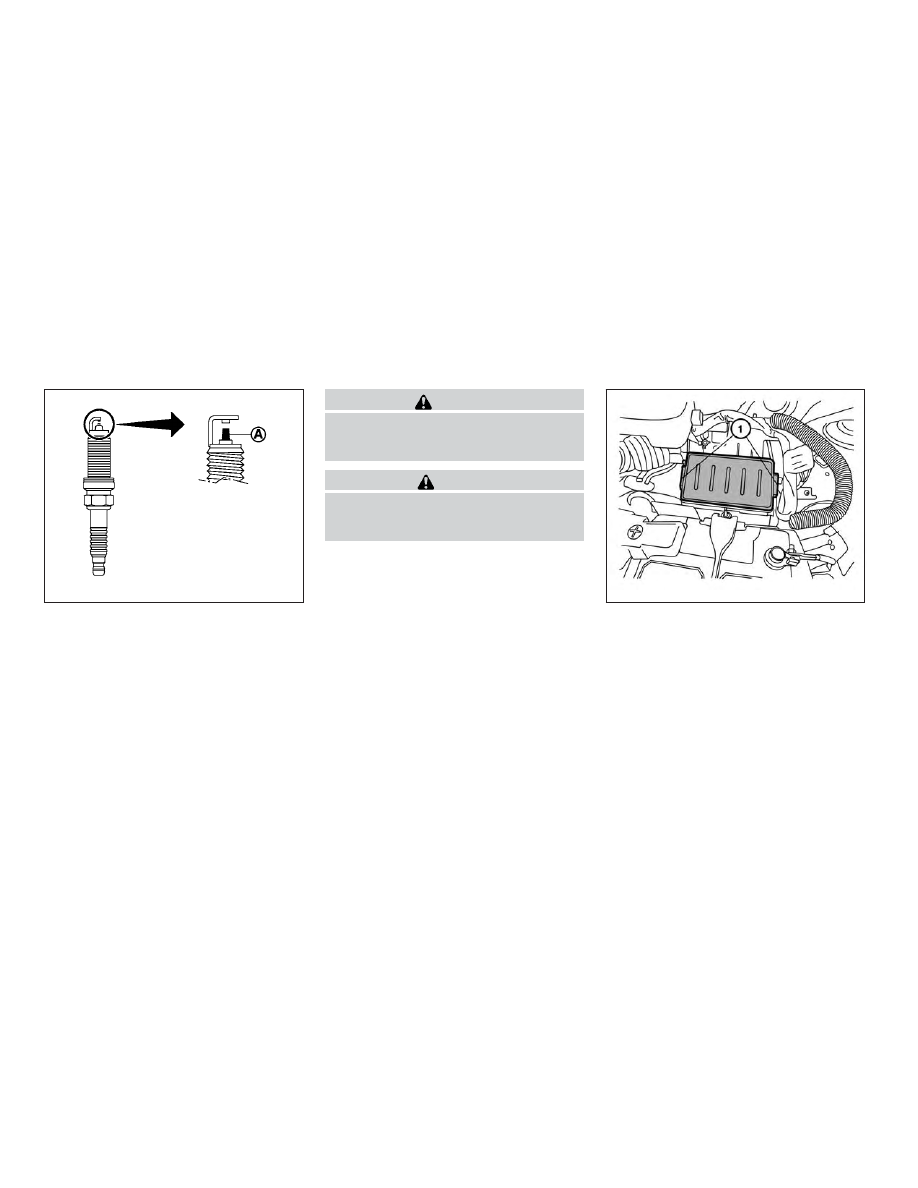
REPLACING SPARK PLUGS
Iridium-tipped spark plugs
It is not necessary to replace iridium-tipped
䊊
A
spark plugs as frequently as conventional type
spark plugs because they last much longer. Fol-
low the maintenance log shown in the “Mainte-
nance and schedules” section of this manual. Do
not service iridium-tipped spark plugs by clean-
ing or regapping.
● Always replace spark plugs with rec-
ommended or equivalent ones.
WARNING
Be sure the engine and ignition switch are
off and that the parking brake is engaged
securely.
CAUTION
Be sure to use the correct socket to re-
move the spark plugs. An incorrect socket
can damage the spark plugs.
If replacement is required, it is recommended that
you visit a NISSAN dealer for this service.
The air cleaner filter should not be cleaned and
reused. Replace it according to the maintenance
log shown in the “Maintenance and schedules”
section of this manual.
To remove the air cleaner filter:
1. Push in the tabs
䊊
1
and move the air cleaner
cover upward.
2. Remove the air cleaner filter.
3. Wipe the inside of the air cleaner filter hous-
ing and the cover with a damp cloth.
SDI1895
LDI2209
SPARK PLUGS
AIR CLEANER
8-14
Do-it-yourself
Нет комментариевНе стесняйтесь поделиться с нами вашим ценным мнением.
Текст