Nissan Qashqai J11. Manual — part 83

PREPARATION
EM-271
< PREPARATION >
[K9K]
C
D
E
F
G
H
I
J
K
L
M
A
EM
N
P
O
KV113B0090
(Mot. 1335)
Valve seal remover
Tool for removing valve stem seals
KV113B0180
(Mot. 1511-01)
Valve seal drift
Tool for installing valve stem seals
KV113B0200
(Mot. 1573)
Cylinder head stand
Cylinder head support
KV113E0010
(Mot. 1566)
Fuel spill tube spanner
Spanner for installing and removing high pres-
sure pipes
WS39930000
(
—
)
Tube presser
Pressing the tube of liquid gasket
Manual lift table caddy
Removing and installing engine
Piston ring expander
Removing and installing piston ring
NISSAN tool number
(RENAULT tool No.)
Tool name
Description
MBIB0370E
MBIB0378E
MBIB0380E
MBIB0379E
NT052
ZZA1210D
NT030

EM-272
< PREPARATION >
[K9K]
PREPARATION
(Mot. 588)
Liner retaining strap
(664000)
Cylinder head test container
Tool for testing the cylinder head, including: a
tray and the various kits suited for each model
of cylinder head (plug, sealing plate, blanking
plate).
Torx socket
Standard 1/2" (12.7 mm) square drive 8/12 /14
female torx socket.
(Mot. 1505)
(Mot. 1715)
Frequency meter
Tool for belt tension checking with frequency
Glow plug wrench
Articulated wrench for removing and installing
the glow plugs
Main bearing wrench
Wrench for removing main bearings
NISSAN tool number
(RENAULT tool No.)
Tool name
Description
MBIB0364E
MBIB0383E
MBIB1423E
MBIB0387E
MBIB0388E
DRIVE BELT
EM-273
< PERIODIC MAINTENANCE >
[K9K]
C
D
E
F
G
H
I
J
K
L
M
A
EM
N
P
O
PERIODIC MAINTENANCE
DRIVE BELT
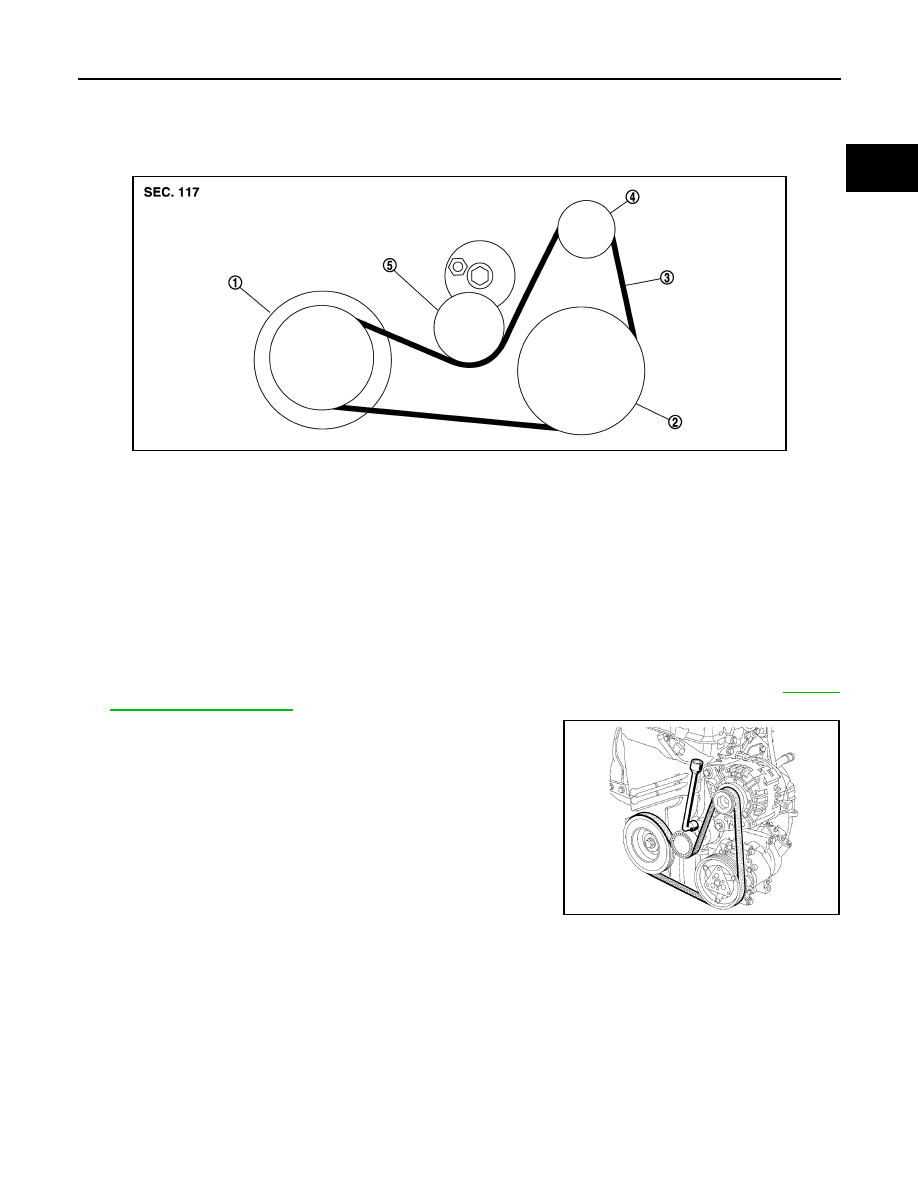
Exploded View
INFOID:0000000010287182
Removal and Installation
INFOID:0000000010287183
CAUTION:
• Replace any belt that has been removed with a new one.
• Auto-tensioner must be replaced with new ones when the belt is replaced.
• Never run the engine without the drive belts to avoid damaging the crankshaft pulley.
REMOVAL
1.
Remove RH front wheel.
2.
Remove front fender protector (RH) front side bolts and clips. And keep a service area. Refer to
3.
Remove drive belt.
• Turn clockwise adjusting bolt.
4.
If necessary, remove auto-tensioner.
INSTALLATION
1.
Install auto-tensioner mounting bolt.
2.
Install the drive belt.
CAUTION:
• Make sure belt is correctly engaged with the pulley groove.
• Check for oil and coolant on belt and each pulley groove.
E1BIA0021ZZ
1.
Crankshaft pulley
2.
A/C compressor or Idler pulley
3.
Drive belt
4.
Alternator
5.
Drive belt auto-tensioner
MBIB0353E
Auto-tensioner mounting bolt
: 40 N·m (4.1 kg-m, 30 ft-lb)
EM-274
< PERIODIC MAINTENANCE >
[K9K]
DRIVE BELT
3.
Make sure that tension of each belt is within the standard.
Inspection
INFOID:0000000010287184
INSPECTION
WARNING:
Be sure to perform when the engine is stopped.
1.
Inspect drive belt for cracks, fraying, wear and oil. Replace drive belt if necessary.
2.
Manually evaluate the drive belt tension (tension cannot be measured using frequency meter).
3.
Replace drive belt when tension is beyond normal operating limit.
CAUTION:
Auto-tensioner must be replaced with a new one when the belt is replaced.
Adjustment
INFOID:0000000010287186
Belt tensioning is not necessary, as it is automatically adjusted by auto-tensioner.
Нет комментариевНе стесняйтесь поделиться с нами вашим ценным мнением.
Текст