Nissan Qashqai J11. Manual — part 2277

SERVICE DATA AND SPECIFICATIONS (SDS)
MA-143
< SERVICE DATA AND SPECIFICATIONS (SDS)
C
D
E
F
G
H
I
J
K
L
M
B
MA
N
O
A
Unit:
(lmp qt)
SPARK PLUG (HRA2DDT)
SPARK PLUG (HRA2DDT) : Spark Plug
INFOID:0000000010503188
SPARK PLUG (PLATINUM-TIPPED TYPE)
Unit: mm (in)
SPARK PLUG (MR20DD)
SPARK PLUG (MR20DD) : Spark Plug
INFOID:0000000010735715
SPARK PLUG
Unit: mm (in)
ROAD WHEEL
ROAD WHEEL : Road Wheel
INFOID:0000000010503197
Drain and refill
With oil filter change
5.5 (4-7/8)
Without oil filter change
5.1 (4-1/2)
Dry engine (Overhaul)
6.6 (5-7/8)
Make
NGK
Standard type
ILKAR7F7G
Gap (Nominal)
0.65 (0.026)
Make
NGK
Standard type
DILKAR7D11H
Gap (Nominal)
Standard
1.1 (0.043)
Limit
1.3 (0.051)
Kind of wheel
Aluminum
Steel
Conventional
For temporary use
Maximum radial runout limit
Lateral deflection
Less than 0.3 mm
(0.012 in)
Less than 0.8 mm
(0.031 in)
Less than 1.2 mm
(0.047 in)
Vertical deflection
Less than 0.7 mm
(0.028 in)
Less than 1.3 mm
(0.051 in)
Maximum allowable unbalance limit
Dynamic (At flange)
Less than 10 g (0.35 oz) (one side)
Static (At flange)
Less than 20 g (0.71 oz)
Wheel nuts tightening torque
112.6 N·m (11 kg–m, 83 ft–lb)

MA-144
< PERIODIC MAINTENANCE >
CHASSIS MAINTENANCE
Be sure to tighten to the specified torque. If it is not tightened to the specified torque, the tube may
be damaged.
19. Install the charging pipe set (KV311039S0) (A) into the drain
hole.
CAUTION:
Tighten the charging pipe by hand.
20. Install the ATF changer hose (B) to the charging pipe.
CAUTION:
Press the ATF changer hose all the way onto the charging
pipe until it stops.
21. Fill approximately 3 liter (2-5/8 lmp qt) of the CVT fluid.
22. Remove the ATF changer hose and charging pipe, then install
the drain plug.
NOTE:
Perform this work quickly because CVT fluid leaks.
23. Lift down the vehicle.
24. Start the engine.
25. While depressing the brake pedal, shift the selector lever to the entire position from “P” to “L”, and shift it
to the “P” position.
NOTE:
Hold the lever at each position for 5 seconds.
26. Check that the CONSULT “Data monitor” in “FLUID TEMP” is 35
°
C (95
°
F) to 45
°
C (113
°
F).
27. Lift up the vehicle.
28. Remove the drain plug and confirm that the CVT fluid is drained from the overflow tube.
CAUTION:
Perform this work with the vehicle idling.
NOTE:
If the CVT fluid is not drained, refer to “Adjustment” and refill with the CVT fluid.
29. When the flow of CVT fluid slows to a drip, tighten the drain plug to the specified torque. Refer to
CAUTION:
Never reuse drain plug gasket.
30. Lift down the vehicle.
31. Select “Work Support” in “TRANSMISSION” using CONSULT.
32. Select “CONFORM CVTF DETERIORTN”.
33. Select “Erase”.
34. Stop the engine.
CVT FLUID (RE0F11A) : Adjustment
INFOID:0000000011496796
CAUTION:
• Use only recommended CVT fluid. Using transmission fluid other than recommended CVT fluid will
damage the CVT, which is not covered by the (NISSAN new vehicle limited) warranty.
• During adjustment of the CVT fluid level, check CONSULT so that the oil temperature may be main-
tained from 35 to 45
°
C (95 to 113
°
F).
• Use caution when looking into the drain hole as there is a risk of dripping fluid entering the eye.
1.
Check that the selector lever is in the “P” position, then completely engage the parking brake.
2.
Start the engine.
3.
Adjust the CVT fluid temperature to be approximately 40
°
C (104
°
F).
NOTE:
The CVT fluid is largely affected by temperature. Therefore be sure to use CONSULT and check the
“FLUID TEMP” under “TRANSMISSION” in “Data Monitor” while adjusting.
4.
While depressing the brake pedal, shift the selector lever to the entire position from “P” to “L”, and shift it
to the “P” position.
JSDIA1876ZZ
Recommended CVT fluid and fluid capacity
: Refer to
MA-64, "Fluids and Lubricants"
.

CHASSIS MAINTENANCE
MA-145
< PERIODIC MAINTENANCE >
C
D
E
F
G
H
I
J
K
L
M
B
MA
N
O
A
NOTE:
Hold the lever at each position for 5 seconds.
5.
Lift up the vehicle.
6.
Check that there is no CVT fluid leakage.
7.
Remove the drain plug. Refer to
TM-898, "Removal and Installation"
.
8.
Install the charging pipe set (KV311039S0) (A) into the drain
plug hole.
CAUTION:
Tighten the charging pipe by hand.
9.
Install the ATF changer hose (B) to the charging pipe.
CAUTION:
Press the ATF changer hose all the way onto the charging
pipe until it stops.
10. Fill approximately 0.5 liter (1/2 lmp qt) of the CVT fluid.
11. Remove the ATF changer hose from the charging pipe, and
check that the CVT fluid drains out from the charging pipe. If it
does not drain out, perform charging again.
CAUTION:
Perform this work with the vehicle idling.
12. When the flow of CVT fluid slows to a drip, remove the charging pipe from the oil pan.
13. Tighten the drain plug to the specified torque. Refer to
TM-898, "Removal and Installation"
CAUTION:
Never reuse drain plug gasket.
14. Lift down the vehicle.
15. Stop the engine.
GEAR OIL (RS6F94R)
GEAR OIL (RS6F94R) : Exploded View
INFOID:0000000011497356
.
GEAR OIL (RS6F94R) : Draining
INFOID:0000000011497353
1.
Start engine and let it run to warm up transaxle.
2.
Stop engine. Remove drain plug (1) and then drain gear oil.
3.
Set a gasket on drain plug and install it to clutch housing.
Tighten drain plug to the specified torque.
CAUTION:
Never reuse gasket.
JSDIA1876ZZ
SCIA7622E
MA-146
< PERIODIC MAINTENANCE >
CHASSIS MAINTENANCE
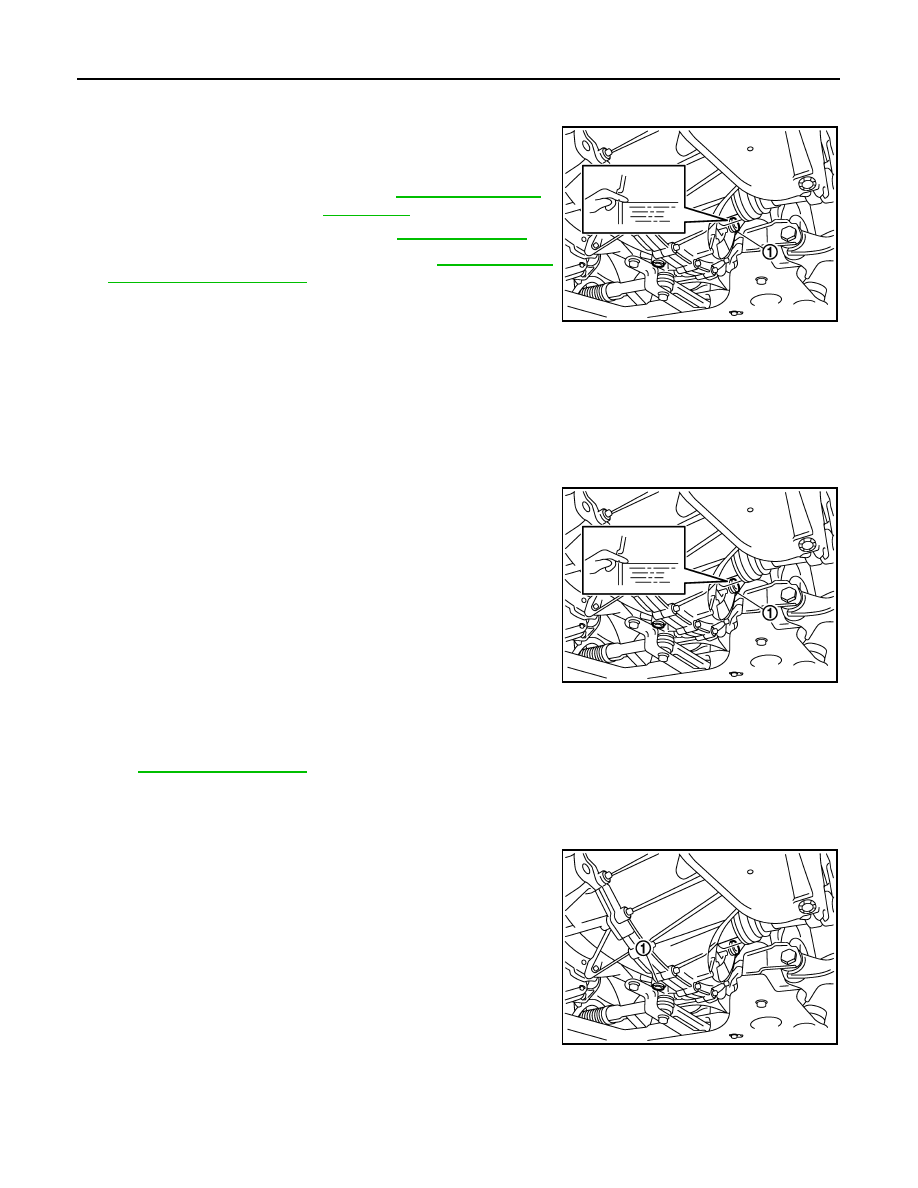
GEAR OIL (RS6F94R) : Refilling
INFOID:0000000011497354
1.
Remove filler plug (1). Fill with new gear oil until oil level reaches
the specified limit at filler plug hole as shown.
2.
After refilling gear oil, check oil level. Refer to
.
3.
Set a gasket on filler plug and then install it to transaxle case.
CAUTION:
Never reuse gasket.
4.
Tighten filler plug to the specified torque.
GEAR OIL (RS6F94R) : Inspection
INFOID:0000000011497355
LEAKAGE
Make sure that gear oil is not leaking from transaxle or around it.
LEVEL
1.
Remove filler plug (1) and check oil level at filler plug hole as
shown.
CAUTION:
Never start engine while checking oil level.
2.
Set a gasket on filler plug and then install it to transaxle case.
CAUTION:
Never reuse gasket.
3.
Tighten filler plug to the specified torque.
GEAR OIL (RS6F95R)
GEAR OIL (RS6F95R) : Exploded View
INFOID:0000000011497360
.
GEAR OIL (RS6F95R) : Draining
INFOID:0000000011497361
1.
Start engine and let it run to warm up transaxle.
2.
Stop engine. Remove drain plug (1) and then drain gear oil.
3.
Set a gasket on drain plug and install it to clutch housing.
Tighten drain plug to the specified torque.
CAUTION:
Never reuse gasket.
Oil grade and viscosity
: Refer to
.
Oil capacity
: Refer to
.
SCIA7623E
SCIA7623E
SCIA7622E
Нет комментариевНе стесняйтесь поделиться с нами вашим ценным мнением.
Текст