Nissan Qashqai J11. Manual — part 1172

FLOOR TRIM
INT-23
< REMOVAL AND INSTALLATION >
C
D
E
F
G
H
I
K
L
M
A
B
INT
N
O
P
8.
Remove instrument stay mounting nuts (A), and then remove instrument stay LH (1) and RH (2).
9.
Remove steering column hole cover fixing clips (A) and then
steering column hole cover.
10. Remove dash side finisher. Refer to
INT-18, "Removal and Installation"
11. Remove center pillar lower garnish (LH/RH). Refer to
INT-18, "Removal and Installation"
.
12. Remove luggage side lower finisher (front) LH/RH. Refer to
.
13. Remove floor carpet.
CAUTION:
Be careful not to damage the body panel.
INSTALLATION
Install in the reverse order of removal.
CAUTION:
• When replacing the floor carpet with a new one, install by cutting the front end like the old one. After
that, ensure matching quality between floor trim and instrument lower cover, etc. by tucking.
• Joints both new floor carpet and old front carpet ends by using a tucker.
JMJIA9615ZZ
JMJIA9616ZZ

INT-24
< REMOVAL AND INSTALLATION >
HEADLINING
HEADLINING
Exploded View
INFOID:0000000010351296
WITHOUT SUNROOF GLASS
E1JIA0279ZZ
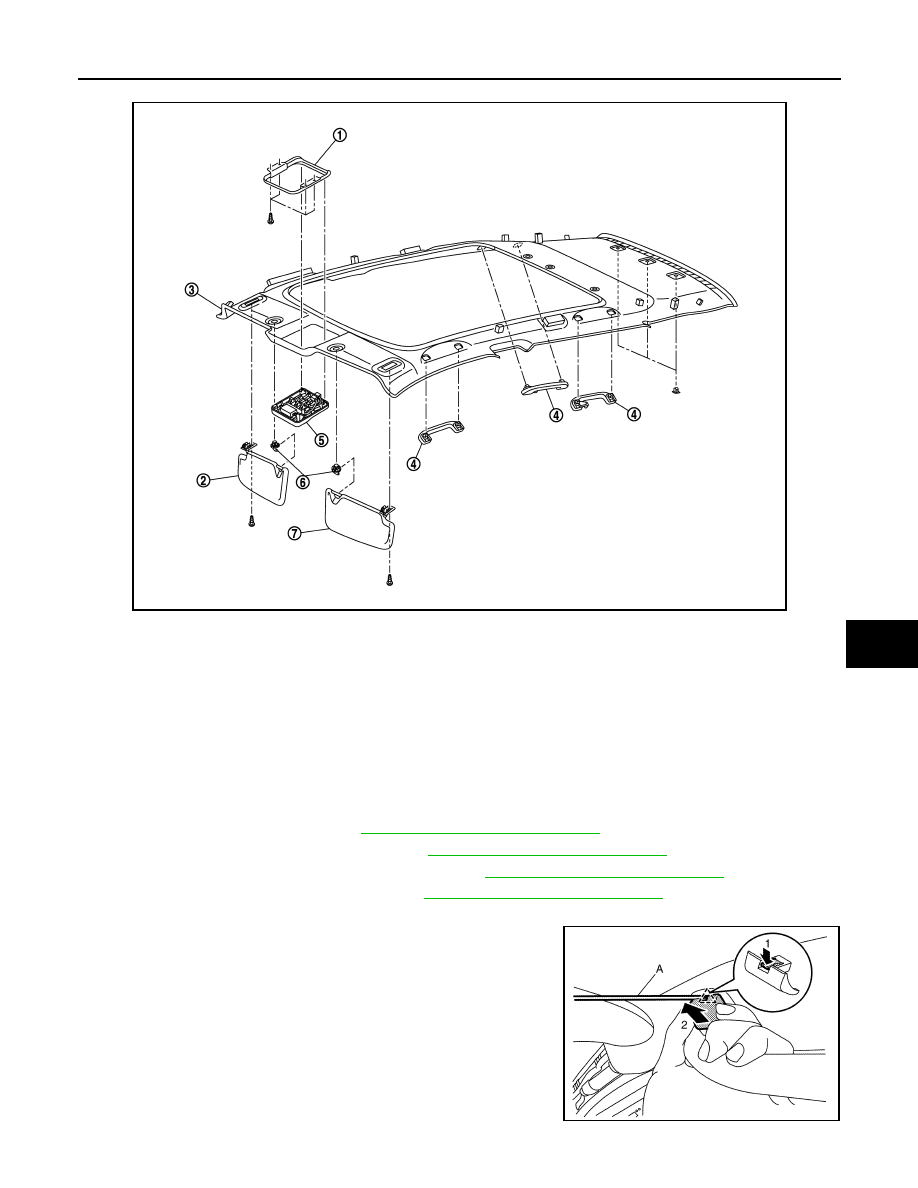
1.
Map lamp bracket
2.
Roof insulators
3.
Headlining
4.
Assist grip
5.
Map lamp
6.
Sun visor holder (LH/RH)
7.
Sun visor (RH)
8.
Room lamp
9.
Sun visor (LH)
HEADLINING
INT-25
< REMOVAL AND INSTALLATION >
C
D
E
F
G
H
I
K
L
M
A
B
INT
N
O
P
WITH SUNROOF GLASS
Removal and Installation
INFOID:0000000010351297
REMOVAL
WARNING:
Before servicing the SRS, turn ignition switch OFF, disconnect both battery cables then wait at least
three minutes.
1.
Remove all body side welt. Refer to
INT-18, "Removal and Installation"
2.
Remove front pillar garnish (LH/RH). Refer to
INT-18, "Removal and Installation"
.
3.
Remove center pillar upper garnish (LH/RH). Refer to
INT-18, "Removal and Installation"
4.
Remove rear pillar finisher (LH/RH). Refer to
INT-18, "Removal and Installation"
5.
Remove all assist grips.
• Disengage assist grip cap fixing pawl using a remover tool (A),
and then slide assist grip cap and remove it according to
numerical order indicated by arrows in the figure.
E1JIA0280ZZ
1.
Map lap bracket
2.
Sun visor (RH)
3.
Headlining
4.
Assist grip
5.
Map lamp
6.
Sun visor holder (LH/RH)
7.
Sun visor (LH)
8.
Sun visor holder (LH/RH)
JMJIA8937ZZ

INT-26
< REMOVAL AND INSTALLATION >
HEADLINING
• Slide assist grip forward and remove it.
6.
Remove map lamp finisher. Refer to
.
7.
Remove sunroof welt (With sunroof models).
8.
Remove personal lamp (LH/RH). Refer to
INL-77, "Removal and Installation"
(With sunroof models).
9.
Remove room lamp. Refer to
INL-75, "Removal and Installation"
(Without sunroof models).
10. Remove sunvisor assembly (LH/RH):
• Remove sunvisor assembly fixing screw (A).
• Remove sunvisor assembly according to numerical order indi-
cated by arrows in the figure.
• Disconnect vanity mirror lamp harness connector (if equipped).
11. Remove sun visor holder (LH/RH) using a remover tool (A)
according to numerical order indicated by arrows as shown in
the figure.
12. Remove headlining clips (A).
JMJIA7980ZZ
JMJIA7981ZZ
JMJIA9251ZZ
JMJIA9638ZZ
Нет комментариевНе стесняйтесь поделиться с нами вашим ценным мнением.
Текст