Isuzu KB P190. Manual — part 999

7A2-30 TRANSMISSION CONTROL SYSTEM (AW30–40LE)
Service Programming System (SPS)
The procedure to program the control unit by using the
Service Programming System (SPS) software
contained in TIS2000 is explained below.
NOTE:
• Should Tech2 display “SPS Procedure was not
successful”, engine will not start, but no DTCs are
present, low battery voltage or poor electrical
connections should be the primary suspects.
Perform the SPS procedure again after rectifying
the fault/s.
IMPORTANT:
Perform the following checks before attempting to
program the control unit:
•••• The Tech2 PCMCIA card is programmed with
the latest software release.
•••• The latest release of TIS2000 is loaded on the
PC.
•••• The vehicle battery is fully charged.
•••• The control unit to be programmed is
connected to the vehicle.
1. Preparations of TIS 2000
1. Connect Tech 2 to P/C.
2. Check to see if Hardware Key is plugged into Port.
3. Activate TIS 2000 by P/C.
4. On the activating screen of TIS2000, choose
“Service Programming System”.
5. On the screen of “Diagnostic Tester and
Processing Program Selection”, choose the one
that will comply with the following.
• Diagnostic tester in use
• New programming by the existing module or new
programming by the replaced/new module.
• Fixing position of the control unit.
6. Upon completion of the selection, push the button
of “Continue”.

TRANSMISSION CONTROL SYSTEM (AW30–40LE) 7A2-31
2.Demand of Data
1. Connect Tech 2 to the vehicle. When activated by
turning on the power of Tech 2, push the "Enter"
switch.
2. Turn on the ignition switch (without starting the
engine)
3. In the main menu of Diagnostic Tester, push "F1:
Service Programming System (SPS)".
4. Push “F0: Request Info” of Tech 2.
5. Where vehicle data has been already saved in
Tech 2, the existing data come on display. In this
instance, as Tech 2 starts asking whether to keep
the data or to continue obtaining a new data from
the control unit, choose either of them.
6. If you select “continue”, you have to select “Model
Year”, “Vehicle Type”, “Controller Type (Engine)”.
7. After that. then push button and turn Ignition switch
tuned on, off, on following Tech 2 display. Tech 2
will read information from controller after this
procedure.
8. During obtaining information, Tech 2 is receiving
information from the control unit chosen. In
replacing the control unit, please be sure to
undertake “Obtaining Information” from the new
unit. With VIN not being programmed into the new
control unit at the time of shipment, "obtaining
information" is not complete (because the vehicle
model, engine model and model year are specified
from VIN). For the procedure get additional
information on vehicles, instruction will be provided
in dialog form, when TIS2000 is in operation.
9. Following instructions by Tech 2, push the “Exit”
switch of Tech 2, turn off the ignition of the vehicle
and turn off the power of Tech 2, thereby removing
from the vehicle.
3.Data Exchange
1. Connect Tech 2 to P/C, turn on the power and
click the “Next” button of P/C.
2. Check VIN of the vehicle and choose “Next”.
3. When a lack of data is asked from among the
following menu, enter accordingly.
Select following Menu
• Model Year
• Model
• Engine type
• Transmission type
• Destination code (vehicles for general export)*1
• Immobiliser
* 1: How to read the destination code
"Destination code can be read from ID Plate affixed on
vehicles, while on VIN plate the destination code is
described at the right-hand edge of Body Type line. In
Fig.-3, the destination code can be read as “EK4”
(Europe).

7A2-32 TRANSMISSION CONTROL SYSTEM (AW30–40LE)
4. After choosing the data, click the “Next” button.
5. When all the necessary information is entered, the
“details” of software within the database that match
the entered data will appear for confirmation. Click
the “Program” switch and then download the new
software onto Tech 2.
6. “Data Transfer” comes on display. The progress of
downloading will be displayed on the screen in the
form of bar graph.
7. Upon finishing the data transfer, turn off the power
of Tech-2, removing from P/C.
4. Programming of TCM
1. Check to see if batteries are fully charged.
2. Connect Tech 2 to Vehicle Diagnostic Connectors.
3. Turn on the power of Tech 2 and the title screen
comes on display.
4. Turn on the ignition (without allowing the engine to
start)
5. On the title screen of Tech 2, push the "Enter"
button.
6. Choose “F: Service Programming System” on the
main screen and then choose “F1: Programming”.
7. While data is being transferred, “Downloading” will
be displayed on the Tech 2 screen.
8. Upon finishing the data transfer, Tech 2 will display
“Reprogramming Successful”. Push the “Exit”
button to bring program to completion.
9. Following “Procedure 2: Demand of Data”, try over
again "Information Obtaining" and check to confirm
if the data has been correctly re-loaded.
10. Upon finishing confirmation, turn off the ignition of
the vehicle and then turn off the power of Tech 2,
removing from the vehicle.
TRANSMISSION CONTROL SYSTEM (AW30–40LE) 7A2-33
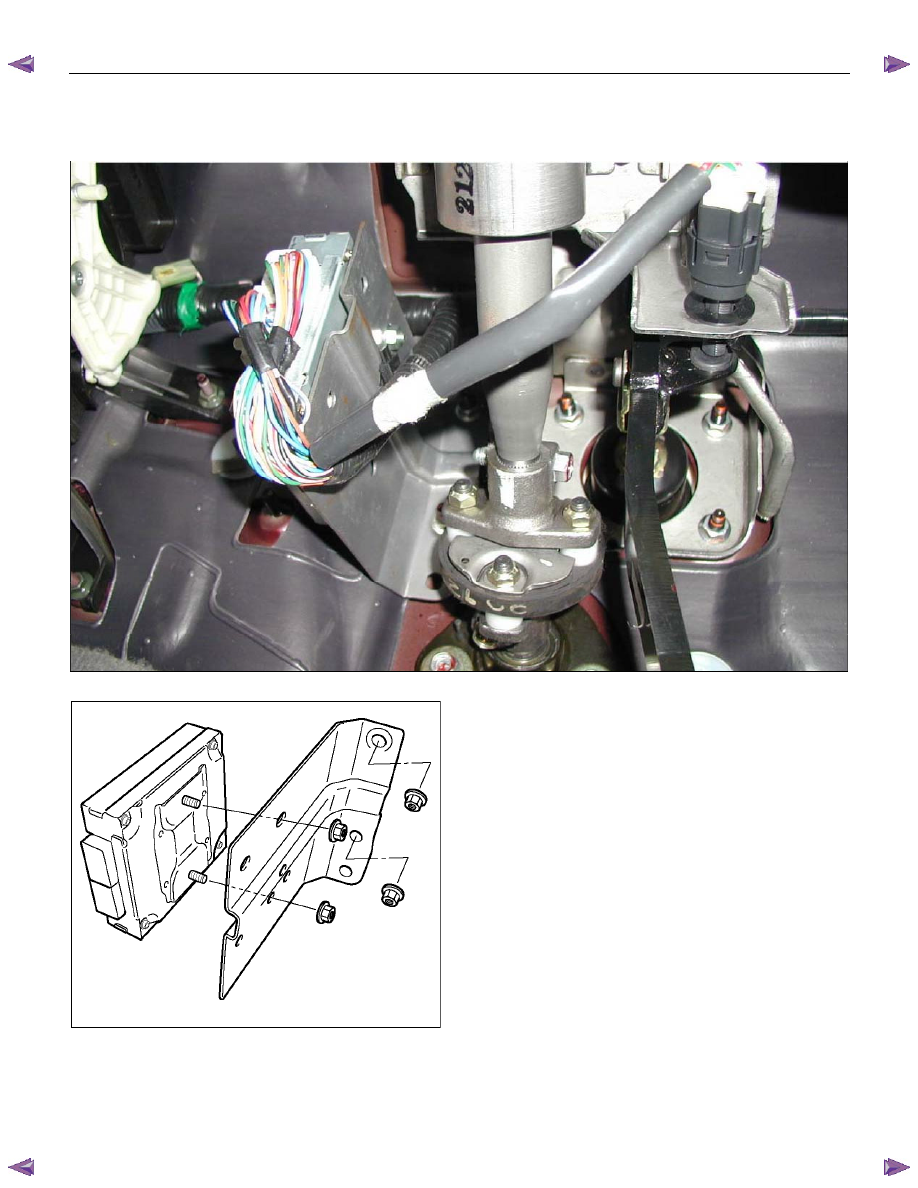
OBD Diagnostic Management System
Transmission Control Module (TCM) Location
P1010052
RTW37ASH000301
Нет комментариевНе стесняйтесь поделиться с нами вашим ценным мнением.
Текст