Isuzu Rodeo UE. Manual — part 111
5C–5
POWER–ASSISTED BRAKE SYSTEM
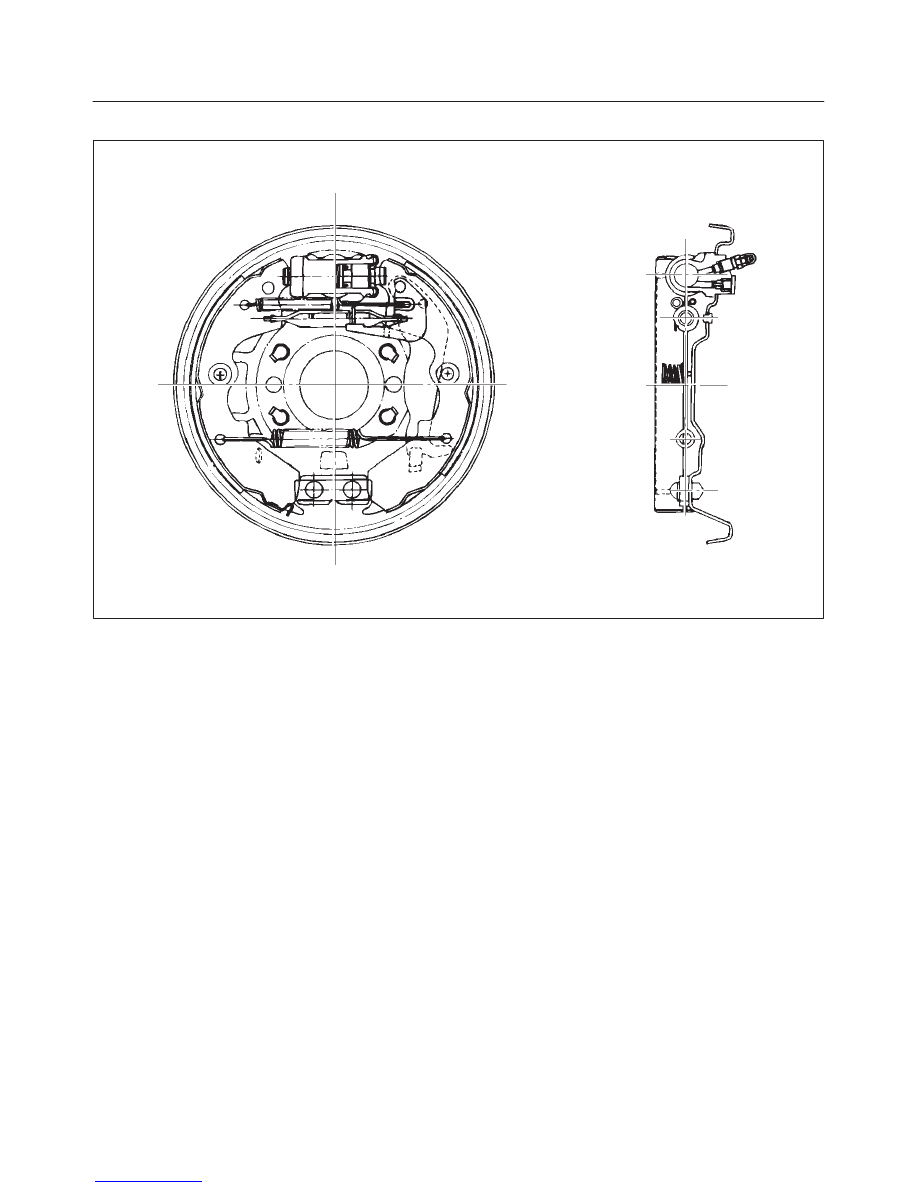
Leading/Trailing Drum Brakes (4
×
2 Model)
A05RS003
This drum brake assembly is a leading/trailing shoe
design. Both brake shoes are held against the wheel
cylinder pistons by the upper return spring and to the fixed
anchor plate by the lower return spring. When the brakes
are applied, the wheel cylinder pistons move both shoes
out contact the drum.
With forward wheel rotation, the forward brake shoe will
wrap into the drum and became self-energized.
With reverse wheel rotation, the rear brake shoe is
self-energized. Force from the brake shoes is transferred
to the anchor plate through the braking plate to the axle
flange. Adjustment is automatic and occurs on any
service brake application. Also, with leading/trailing
brakes, it is normal for the front shoe to wear at a faster
rate than the rear shoe.
5C–6
POWER–ASSISTED BRAKE SYSTEM
Diagnosis
Road Testing The Brakes
Brake Test
Brakes should be tested on a dry, clean, reasonably
smooth and level roadway. A true test of brake
performance cannot be made if the roadway is wet,
greasy or covered with loose dirt so that all tires do not
grip the road equally. Testing will also be adversely
affected if the roadway is crowned so as to throw the
weight of the vehicle toward wheels on one side or if the
roadway is so rough that wheels tend to bounce. Test the
brakes at different vehicle speeds with both light and
heavy pedal pressure; however, avoid locking the wheels
and sliding the tires. Locked wheels and sliding tires do
not indicate brake efficiency, since heavily braked but
turning wheels will stop the vehicle in less distance than
locked wheels. More tire–to–road friction is present with a
heavily braked turning tire then with a sliding tire.
The standard brake system is designed and balanced to
avoid locking the wheels except at very high deceleration
levels.
It is designed this way because the shortest stopping
distance and best control is achieved without brake
lock–up.
Because of high deceleration capability, a firmer pedal
may be felt at higher deceleration levels.
External Conditions That Affect Brake Performance
1. Tires: Tires having unequal contact and grip on the
road will cause unequal braking. Tires must be
equally inflated, identical in size, and the thread
pattern of right and left tires must be approximately
equal.
2. Vehicle Loading: A heavily loaded vehicle requires
more braking effort.
3. Wheel Alignment: Misalignment of the wheels,
particularly in regard to excessive camber and caster,
will cause the brakes to pull to one side.
Brake Fluid Leaks
With engine running at idle and the transmission in
“Neutral”, depress the brake pedal and hold a constant
foot pressure on the pedal. If pedal gradually falls away
with the constant pressure, the hydraulic system may be
leaking.
Check the master cylinder fluid level. While a slight drop in
the reservoir level will result from normal lining wear, an
abnormally low level in reservoir indicates a leak in the
system. The hydraulic system may be leaking internally
as well as externally. Refer to “Master Cylinder
Inspection”. Also, the system may appear to pass this test
but still have slight leakage. If fluid level is normal, check
the vacuum booster push rod length. If an incorrect length
push rod is found, adjust or replace the push rod. Check
the brake pedal travel and the parking brake adjustment.
When checking the fluid level, the master cylinder fluid
level may be low from the “MAX” mark if the front and rear
linings are worn. This is not abnormal.
Warning Light Operation
When the ignition switch is in the START position, the
“BRAKE” warning light should turn on and go off when the
ignition switch returns to the ON position.
The following conditions will activate the “BRAKE” light:
1. Parking brake applied. The light should be on
whenever the parking brake is applied and the ignition
switch is on.
2. Low fluid level. A low fluid level in the master cylinder
will turn the “BRAKE” light on.
3. During engine cranking the “BRAKE” light should
remain on. This notifies the driver that the warning
circuit is operating properly.
5C–7
POWER–ASSISTED BRAKE SYSTEM
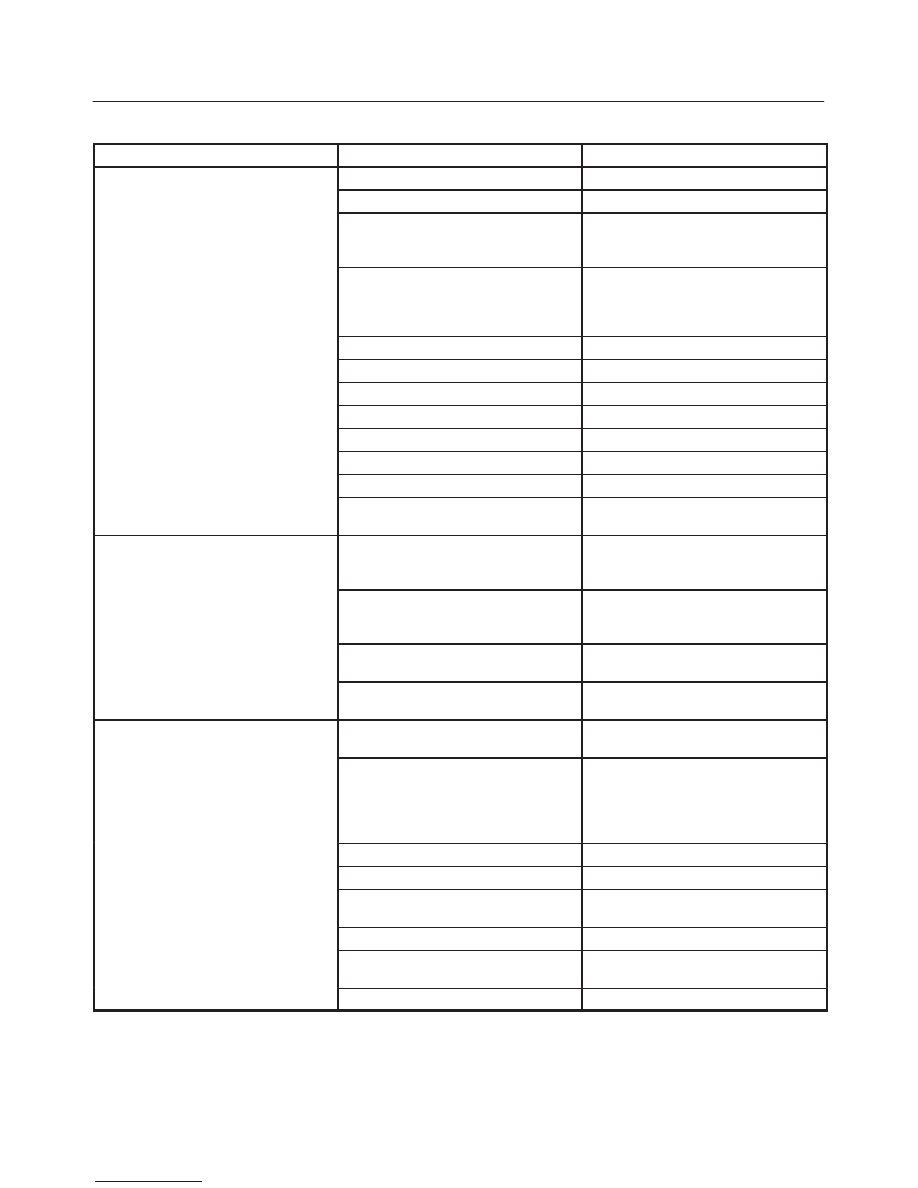
General Diagnosis
Condition
Possible cause
Correction
Brake Pull
Tire inflation pressure is unequal.
Adjust
Front wheel alignment is incorrect.
Adjust
Unmatched tires on same axle.
Tires with approx. the same amount
of tread should be used on the same
axle.
Restricted brake pipes or hoses.
Check for soft hoses and damaged
lines. Replace with new hoses and
new double“walled steel brake
piping.
Water or oil on the brake pads.
Clean or replace.
Brake pads hardened.
Replace
Brake pads worn excessively.
Replace
Brake rotor worn or scored.
Grind or replace.
Disc brake caliper malfunctioning.
Clean or replace.
Front hub bearing preload incorrect.
Adjust or replace.
Loose suspension parts.
Check all suspension mountings.
Loose calipers.
Check and tighten the bolts to
specifications.
Brake Roughness or Chatter
(Pulsates)
Excessive lateral runout.
Check per instructions. If not within
specifications, replace or machine
the rotor.
Parallelism not within specifications.
Check per instructions. If not within
specifications, replace or machine
the rotor.
Wheel bearings not adjusted.
Adjust wheel bearings to correct
specifications
Pad reversed (steel against iron).
Replace the brake pad and machine
rotor to within specifications.
Excessive Pedal Effort
Malfunctioning vacuum booster.
Check the vacuum booster operation
and repair, if necessary.
Partial system failure.
Check the front and rear brake
system for failure and repair. Also,
check the brake warning light. If a
failed system is found, the light
should indicate failure.
Excessively worn pad.
Check and replace pads in sets.
Piston in caliper stuck or sluggish.
Remove caliper and rebuild.
Fading brakes due to incorrect pad.
Remove and replace with original
equipment pad or equivalent.
Vacuum leak to vacuum booster.
Check for ruptured or loose hose.
Check the direction of check valve
within vacuum hose.
Correct vacuum hose direction.
Grease on the brake pads.
Replace or clean.
5C–8
POWER–ASSISTED BRAKE SYSTEM
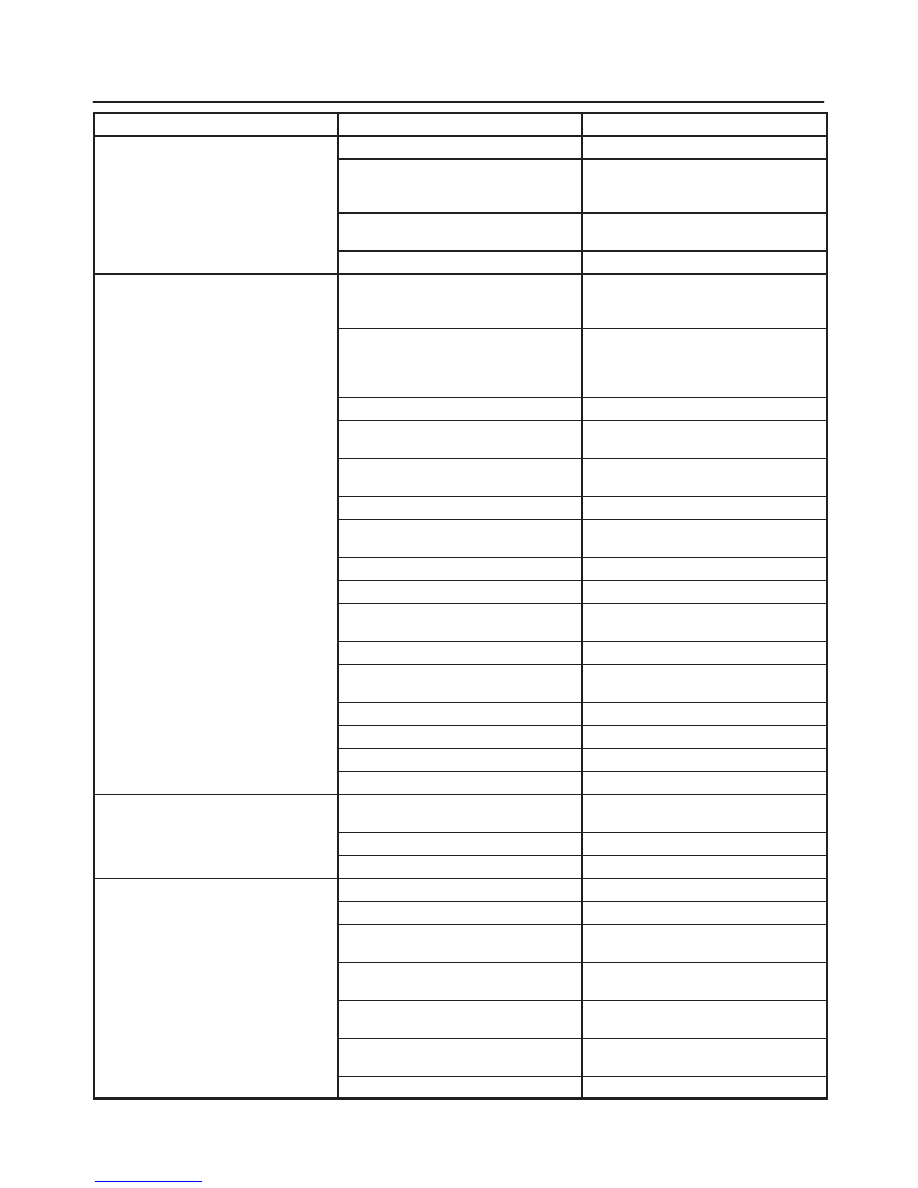
Condition
Correction
Possible cause
Excessive Brake Pedal Travel
Air in hydraulic circuit.
Bleed the hydraulic circuit.
Level of brake fluid in the reservoir
too low.
Replenish brake fluid reservoir to
specified level and bleed hydraulic
circuit as necessary.
Master cylinder push rod clearance
excessive.
Adjust
Leakage in hydraulic system.
Correct or replace defective parts.
Brake Drag
Master cylinder pistons not returning
correctly.
Adjust the stop light switch and
vacuum booster push rod. If
necessary, rebuild.
Restricted brake pipes or hoses.
Check for soft hoses or damaged
pipes, and replace with new hoses
and new double–walled steel brake
piping.
Parking brake maladjusted.
Adjust
Parking brake lining clearance
insufficient.
Adjust
Brake pedal free play insufficient.
Adjust the brake pedal height or
power cylinder operating rod.
Piston in the master cylinder sticking.
Replace
Piston in the disc brake caliper
sticking.
Replace piston seals.
Brake pads sticking in caliper.
Clean
Return spring weakened.
Replace
Parking brake binding.
Overhaul the parking brakes and
correct.
Front hub bearing preload incorrect.
Adjust or replace.
Parking brake shoes not returning.
Correct or replace the brake back
plate and brake shoe as necessary.
Obstructions in hydraulic circuit.
Clean
Rotor warped excessively.
Grind or replace.
Rear brake drum distorted.
Grind or replace.
Parking cable sticking.
Grind or replace.
Grabbing or Uneven Braking Action
(All conditions listed under “Pulls”)
Malfunctioning vacuum booster.
Check operation and correct as
necessary.
Binding brake pedal mechanism.
Check and lubricate, if necessary.
Corroded caliper assembly.
Clean and lubricate.
Brake Noisy
Brake pads are worn.
Replace
Brake pads are hardened.
Replace
Brake pads are in poor contact with
rotor.
Correct
Brake disc(s) warped, worn or
damaged.
Grind or replace.
Disc brake anti–squeak shims
fatigued.
Replace
Front hub bearings are loose or
preload is incorrect.
Adjust or replace.
Brake disc is rusted.
Grind or replace.
Нет комментариевНе стесняйтесь поделиться с нами вашим ценным мнением.
Текст