
Chrysler Stratus Convertible. Manual — part 282
switch input, key-in-switch and driver’s door input
and Chime Output Test.
(3) Check key-in switch.
(4) Inspect Body Control Module connectors and
wires for proper connection.
(5) Remove Body Control Module from Junction
Block. Check for battery voltage at terminal JB-12
and ignition feed at terminal JB-6 of Body Control
Module. Refer to Group 8W, Wiring Diagrams for ter-
minal location.
(6) If voltage not OK, repair as necessary.
CHIMES CONTINUE WHEN HEADLAMPS ARE
TURNED OFF AND/OR KEY IS REMOVED FROM
IGNITION
(1) Use DRB lll
t scan tool to perform CCD diag-
nostics on Body Control Module for headlamp or key-
in-ignition inputs.
(2) Check wiring for a grounded condition between
key-in switch and Body Control Module. Check head-
lamp switch to Body Control Module wiring for short
to battery.
(3) Inspect Body Control Module connectors and
wires for proper connection.
EXTERIOR LAMPS LEFT ON
To test the headlamps left on function, turn igni-
tion off, turn exterior lamps on with driver’s door
open. Chime should sound until headlamps are
turned off or drivers door is closed.
FASTEN SEAT BELTS
To test, the ignition switch must be in the off posi-
tion before testing the fasten seat belts. Turn the
ignition switch to the ON position with the driver’s
seat belt unbuckled and fully retracted. The seat belt
warning lamp should light for 4 to 8 seconds and the
tone should sound 4 to 8 seconds.
KEY LEFT IN IGNITION SWITCH
To test the key left in ignition function:
• The ignition switch must be in the OFF position
with key in ignition.
• Driver’s door open.
• Chime should sound until key is removed from
ignition or drivers door is closed.
REMOVAL AND INSTALLATION
BODY CONTROL MODULE (BCM)
Refer to Group 8E, Instrument Panel and Systems
for Removal and Installation.
HEADLAMP SWITCH
Refer to Group 8E, Instrument Panel and Systems.
JUNCTION BLOCK (JB)
Refer to Group 8O, Power Distribution Systems for
Removal and Installation.
KEY-IN SWITCH
The Key-in switch is built into the ignition switch
assembly. Should the Key-in switch require service,
the ignition switch assembly must be replaced. Refer
to Group 8D, Ignition System for service procedures.
SEAT BELT BUCKLE
Refer to Group 23, Body for service procedures.
JX
CHIME/BUZZER WARNING SYSTEMS
8U - 3
DIAGNOSIS AND TESTING (Continued)
CHIME WARNING/REMINDER SYSTEM
TABLE OF CONTENTS
page
page
DESCRIPTION AND OPERATION
HIGH SPEED WARNING CHIME . . . . . . . . . . . . . . 1
DIAGNOSIS AND TESTING
CHIME CONDITIONS . . . . . . . . . . . . . . . . . . . . . . 2
DESCRIPTION AND OPERATION
DESCRIPTION
WARNING: ON VEHICLES EQUIPPED WITH AIR-
BAGS, DISCONNECT AND ISOLATE THE NEGATIVE
BATTERY CABLE BEFORE BEGINNING ANY AIR-
BAG
OR
STEERING
WHEEL
COMPONENT
REMOVAL OR INSTALLATION PROCEDURE. THIS
WILL DISABLE THE AIRBAG SYSTEM.
FAILURE
TO
DISCONNECT
BATTERY
COULD
RESULT IN ACCIDENTAL AIRBAG DEPLOYMENT
AND POSSIBLE PERSONAL INJURY. ALLOW SYS-
TEM CAPACITOR TO DISCHARGE FOR 2 MINUTES
BEFORE REMOVING ANY COMPONENTS.
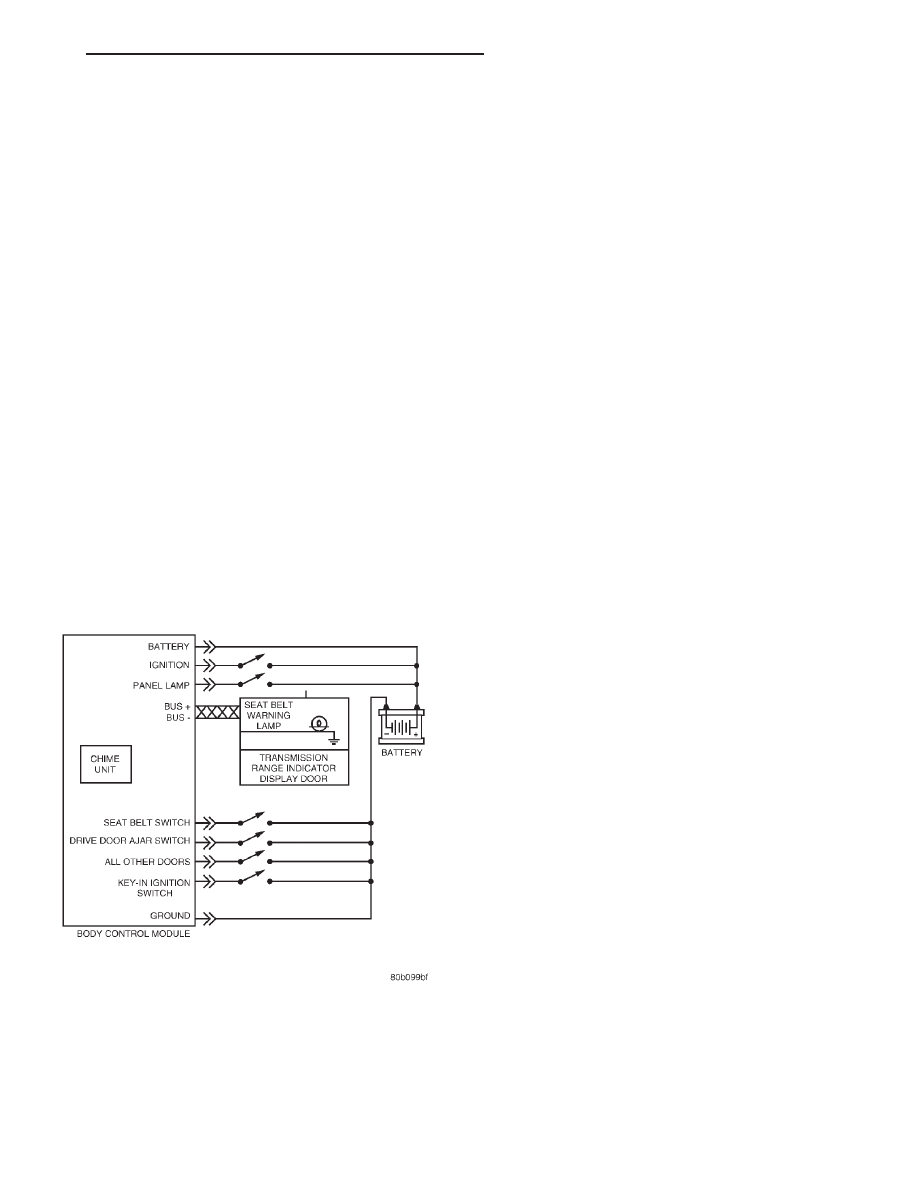
The chime warning/reminder system provides audi-
ble and/or visual signals to remind the driver of
unfastened seat belts, exterior lamps left ON, key
left in ignition, door ajar and if equipped, high vehi-
cle speed.
FASTEN SEAT BELTS
A warning lamp on the instrument panel, and if
equipped an audible chime tone are used as the fas-
ten seat belt warning/reminder.
EXTERIOR LAMPS LEFT ON
An audible chime tone that indicates the exterior
lamps were left on.
KEY LEFT IN IGNITION
An audible chime tone that indicates the key was
left in ignition.
DOOR AJAR
A warning lamp on the instrument panel, and if
equipped an audible chime tone are used as the door
ajar warning/reminder.
HIGH VEHICLE SPEED WARNING CHIME
If equipped, an audible chime will sound continu-
ously any time the vehicle speed is 120 Km/h or
faster.
FASTEN SEAT BELT WARNING CHIME/LAMP
On some vehicles the seat belt indicator lamp will
remain on continuously anytime the ignition switch
is on and the driver is not wearing the seat belt.
When using the (DRB III) scan tool, refer to the
appropriate Body Chassis Diagnostic Manual for the
diagnostic procedure.
To test, the ignition switch must be in the off posi-
tion before testing the fasten seat belts. Turn the
ignition switch to the ON position with the driver’s
seat belt unbuckled and fully retracted. The seat belt
warning lamp should light for 4 to 8 seconds and if
equipped a tone should sound 4 to 8 seconds.
HIGH SPEED WARNING CHIME
Some vehicles are equipped with an audible high
speed warning chime that will sound continuously
any time the vehicle speed reaches 120 Km/h or
faster.
Fig. 1 Chime Warning / Reminder System
JX
CHIME WARNING/REMINDER SYSTEM
8U - 1
DIAGNOSIS AND TESTING
CHIME CONDITIONS
NO TONE WHEN IGNITION SWITCH IS TURNED ON
AND DRIVERS SEAT BELT IS UNBUCKLED AND
FULLY RETRACTED
(1) Check driver’s seat belt retractor switch for a
ground when belt is retracted.
(2) Use scan tool to perform CCD diagnostics on
Body Control Module for battery, ignition and seat
belt switch inputs.
(3) Use scan tool to perform actuator diagnostics
on Body Control Module Chime.
(4) Check for tone in any other function.
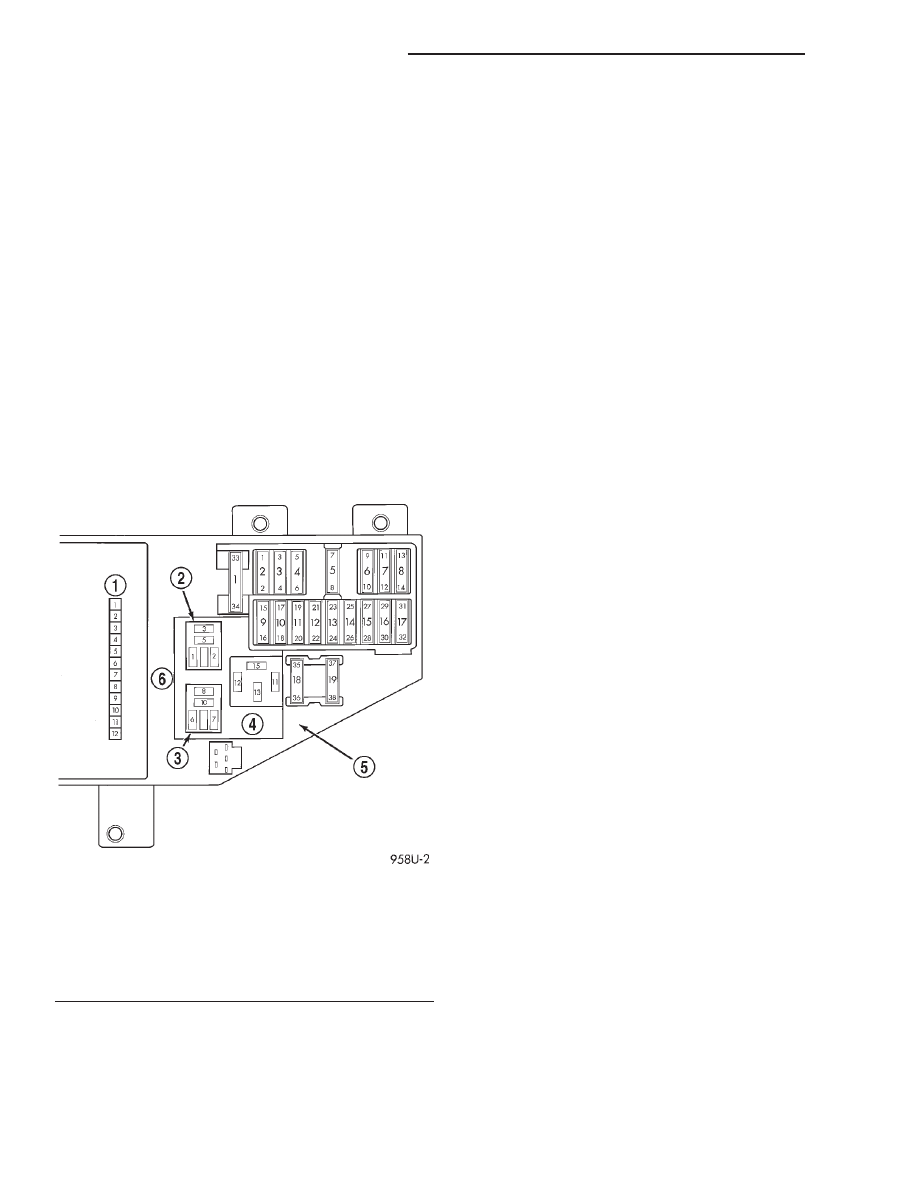
(5) Remove Body Control Module from Junction
Block. Check for battery voltage at terminal JB-12
and ignition feed at terminal JB-6 of Body Control
Module (Fig. 2). Refer to Group 8W, Wiring Diagrams
for terminal location.
(6) If voltage not OK, repair as necessary.
NO FASTEN SEAT BELT LAMP WHEN IGNITION
SWITCH IS TURNED ON
(1) Use scan tool to perform CCD diagnostics on
Body Control Module for battery and ignition switch
inputs.
(2) Check for burned out bulb.
(3) Using the scan tool, do the actuator test on
cluster. Refer to proper Body Diagnostic Manual.
(4) Remove Body Control Module from Junction
Block. Check for battery voltage at terminal JB-12
and ignition feed at terminal JB-6 of Body Control
Module. Refer to Group 8W, Wiring Diagrams for ter-
minal location.
(5) If voltage not OK, repair as necessary.
FASTEN SEAT BELT LAMP OR TONE CONTINUE
FOR MORE THAN 10 SECONDS AFTER SEAT
BELTS ARE FASTENED AND IGNITION ON
NOTE: On vehicles so equipped no audible chime
tone will sound or the seat belt indicator lamp will
remain on continuously anytime the ignition switch
is on and the driver is not wearing the seat belt.
(1) Use scan tool to perform CCD diagnostics on
Body Control Module for battery and ignition switch
input.
(2) Inspect Body Control Module connectors and
wires for proper connection.
NO TONE OR DOOR INDICATED IN PLACE OF
ODOMETER WHEN A DOOR IS AJAR AND VEHICLE
BEGINS MOVING
The vehicle must be moving for the chime to occur.
However the door indicator will come ON regardless
of the vehicle movement. The CCD bus, Transmission
Control Module (TCM) and Powertrain Control Mod-
ule (PCM) must be operational.
(1) Check all door jamb switches.
(2) Use scan tool to perform CCD diagnostics on
Body Control Module for battery and ignition switch
input
(3) Inspect Body Control Module connectors and
wires for proper connection.
(4) Remove Body Control Module from Junction
Block. Check for battery voltage at terminal JB-12
and ignition feed at terminal JB-6 of Body Control
Module. Refer to Group 8W, Wiring Diagrams for the
location of the terminals.
(5) If voltage not OK, repair as necessary.
NO TONE WHEN HEADLAMPS ARE ON, IGNITION
SWITCH IS OFF AND DRIVER’S DOOR IS OPEN.
(1) Check left door jamb switch for good ground
when driver’s door is open.
(2) Use scan tool to perform CCD diagnostics on
Body Control Module for battery, ignition switch
input, headlamp and driver’s door input and Chime
Output Test.
(3) Check headlamp switch.
Fig. 2 Junction Block Connector to the BCM
1 – BODY CONTROL MODULE
2 – H/LP RELAY
3 – HORN RELAY
4 – EBL
5 – CIRCUIT BREAKERS
6 – HORN
8U - 2
CHIME WARNING/REMINDER SYSTEM
JX
Нет комментариевНе стесняйтесь поделиться с нами вашим ценным мнением.
Текст