
Chrysler Stratus Convertible. Manual — part 130
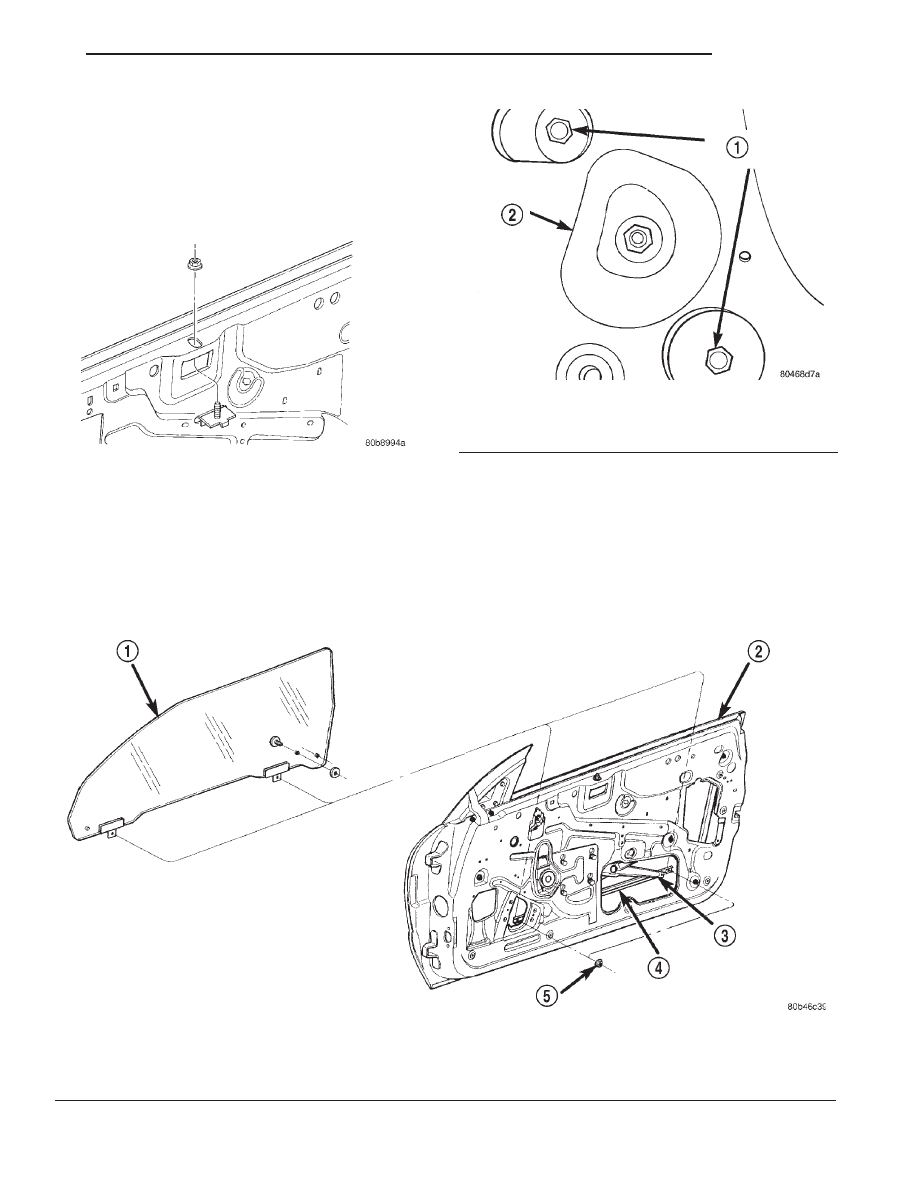
(6) Remove bolts attaching regulator lift channel
to door glass (Fig. 44).
(7) Remove bolts attaching rear guide plate to door
glass (Fig. 45).
(8) Remove rear guide plate from door glass.
(9) Lift door glass upward and out of opening at
top of door (Fig. 44).
INSTALLATION
(1) Carefully lower door glass through opening in
top of door. Verify that the front edge of the glass is
in the mirror flag glass channel.
(2) Position rear guide plate onto door glass and
install bolts.
(3) Install nuts attaching regulator lift channel to
door glass.
(4) Tighten all door glass fasteners.
(5) Install door speaker, if so equipped.
(6) Tighten window inner belt stabilizer.
(7) Install inner door belt weatherstrip.
(8) Install door trim panel and watershield.
Fig. 43 Inner Belt Stabilizer
Fig. 44 Regulator Lift Channel
1 – DOOR GLASS
2 – DOOR
3 – WINDOW REGULATOR
4 – LIFT CHANNEL
5 – ROLLER CHANNEL NUT
Fig. 45 Rear Guide Bolts
1 – REAR GUIDE BOLTS
2 – INNER DOOR PANEL
JX
BODY
23 - 53
REMOVAL AND INSTALLATION (Continued)
DOOR WINDOW REGULATOR
NOTE: For power window motor service proce-
dures, refer to Group 8S, Power Windows.
REMOVAL
(1) Remove door trim panel and water shield.
(2) Disconnect wire connector to power window
motor.
(3) Remove nuts attaching regulator lift channel to
door glass (Fig. 44).
(4) Secure door glass in upward position.
(5) Mark position of rear bolt of roller channel to
inner door panel to aid in installation.
(6) Remove bolt attaching rear of roller channel to
door panel.
(7) Loosen bolt attaching front of roller channel to
door panel.
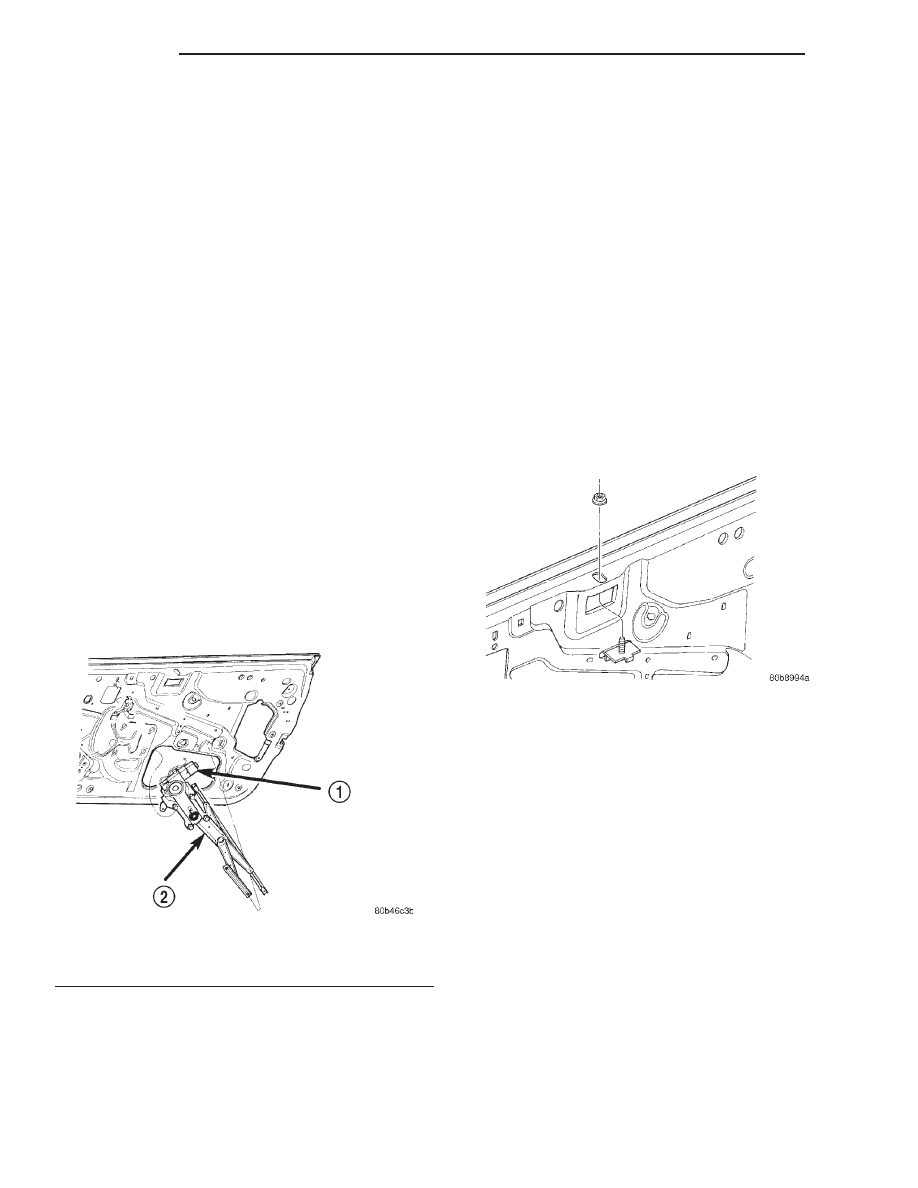
(8) Remove roller channel from door panel (Fig.
46).
(9) Loosen bolts attaching window regulator to
inner door panel reinforcement.
(10) Remove bolt heads from key hole slots in
inner door panel.
(11) Remove window regulator through large hole
in inner door panel (Fig. 46).
(12) Remove power window motor from regulator.
Refer to Group 8S, Power Windows, for motor proce-
dure.
INSTALLATION
(1) Install power window motor on regulator. Refer
to group 8S, Power Windows, for motor procedures.
(2) Move window regulator into position in door
and engage bolt heads into key hole slots in inner
door panel reinforcement and tighten bolts.
(3) Install roller channel to door panel.
(4) Install bolt at rear of roller channel. Make sure
that bolt is aligned to mark on inner door panel
made previously.
(5) Tighten front and rear bolts of roller channel.
(6) Install nuts attaching regulator lift channel to
door glass.
(7) Verify glass fit and operation. Adjust door
glass, if necessary.
(8) Connect wire connector to power window motor.
(9) Install door trim panel and water shield.
DOOR GLASS INNER BELT STABILIZER
REMOVAL
(1) Remove door trim panel.
(2) Remove nut attaching inner belt stabilizer to
door panel.
(3) Remove inner belt stabilizer from door (Fig.
47).
INSTALLATION
(1) Place inner belt stabilizer into position.
(2) Install nut attaching inner belt stabilizer to
door panel. Adjust inner belt stabilizer against glass
with enough tension to allow free up and down move-
ment.
(3) Install door trim panel.
REAR VERTICAL GUIDE BAR
REMOVAL
(1) Remove door trim panel and watershield.
(2) Remove nut attaching top of guide bar to inner
door panel.
(3) Using a suitable allen wrench, hold jack screw
stationary while removing nut attaching bottom of
guide bar to inner door panel.
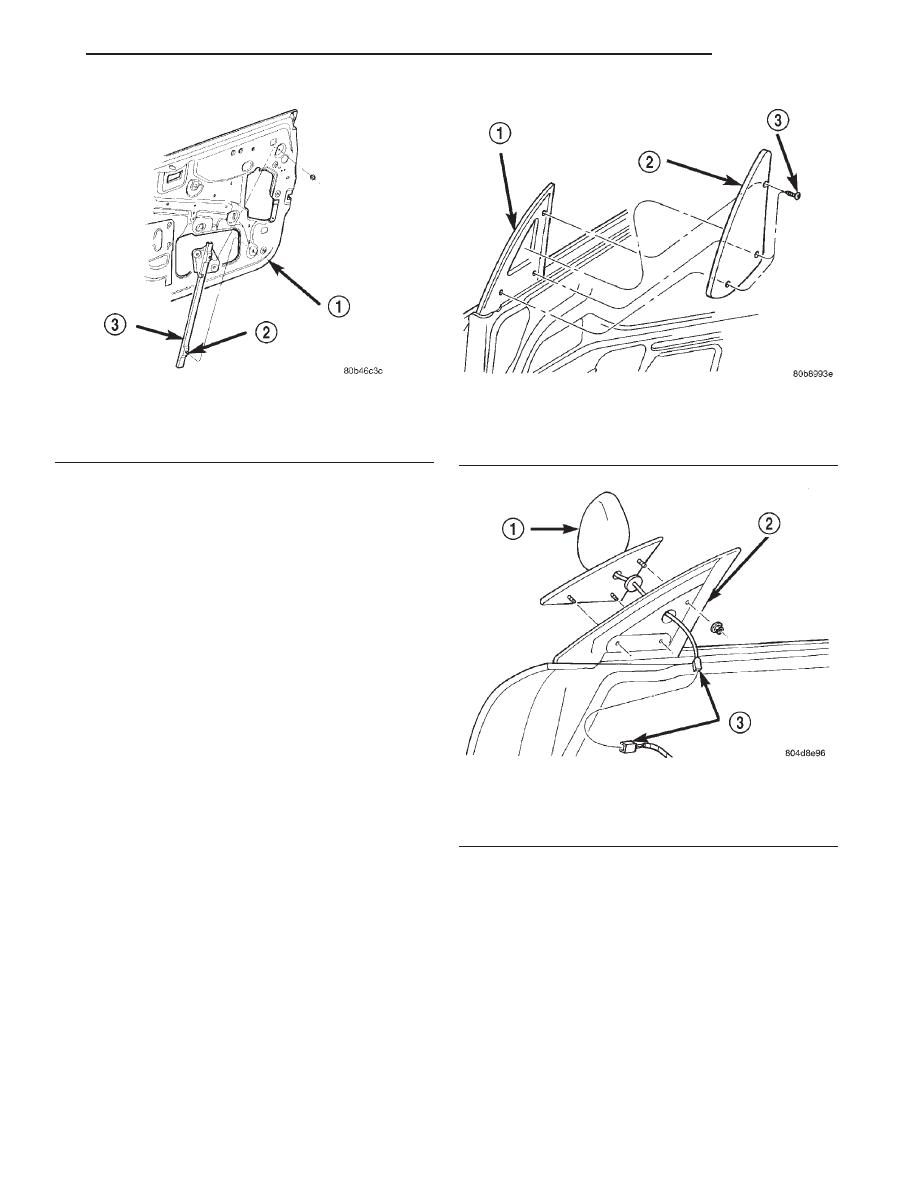
(4) Remove guide bar from vehicle and remove
through access hole in inner door panel (Fig. 48).
Fig. 46 Power Window Regulator
1 – POWER WINDOW MOTOR
2 – POWER WINDOW REGULATOR
Fig. 47 Inner Belt Stabilizer
23 - 54
BODY
JX
REMOVAL AND INSTALLATION (Continued)
INSTALLATION
(1) If a new guide bar is being installed, preset
bottom jack screw using old guide bar as a reference.
(2) Position rear guide bar on vehicle.
(3) Using a suitable allen wrench, hold jack screw
stationary while installing nut attaching bottom of
guide bar to inner door panel.
(4) Install nut attaching top of rear guide bar to
inner door panel.
(5) Verify glass fit and operation. Adjust door glass
as necessary.
(6) Install door trim panel and watershield.
SIDE VIEW MIRROR
REMOVAL
(1) Remove side view mirror cover (Fig. 49).
(2) Remove the door trim panel.
(3) Disconnect power window mirror motor wire
connector, if so equipped.
(4) Disengage wire harness grommet from mirror
flag, if so equipped.
(5) Remove nuts attaching side view mirror to mir-
ror flag (Fig. 50).
(6) Remove side view mirror from vehicle.
INSTALLATION
(1) Feed power mirror wire harness through hole
in mirror flag and seat grommet. Do not pull on wire
harness to seat grommet.
(2) Position side view mirror to vehicle.
(3) Install nuts attaching side view mirror to mir-
ror flag.
(4) Engage push in fastener attaching power mir-
ror wire connector to inner door panel, if so equipped.
(5) Engage power mirror motor wire connector, if
so equipped.
(6) Install side view mirror cover.
SIDE VIEW MIRROR FLAG/DOOR GLASS
CHANNEL
REMOVAL
(1) Remove side view mirror.
(2) Remove door trim panel.
(3) Remove door glass.
(4) Remove door outer belt weatherstrip.
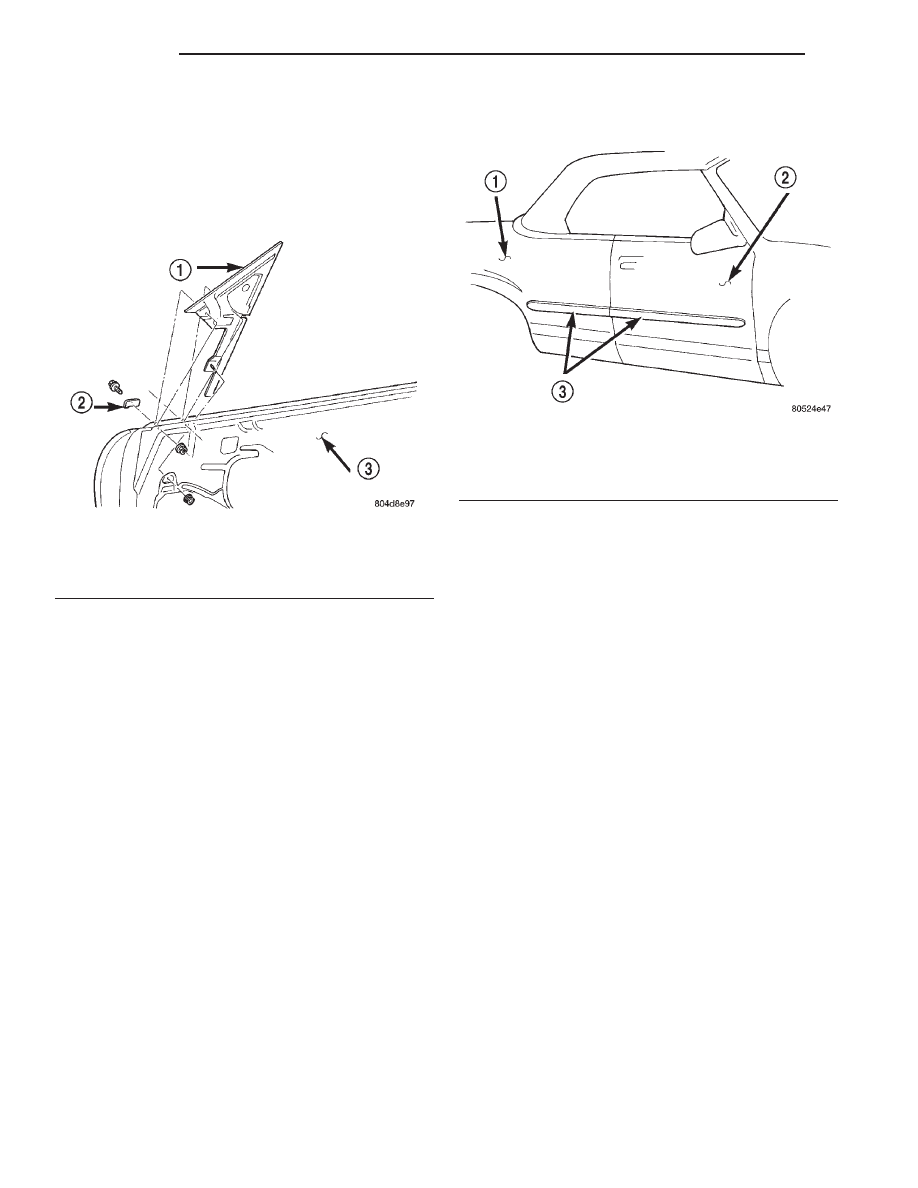
(5) Remove screws attaching mirror flag/door glass
channel to outer door panel (Fig. 51).
Fig. 48 Rear Vertical Guide Bar
1 – DOOR
2 – JACK SCREW
3 – REAR VERTICAL GUIDE BAR
Fig. 49 Side View Mirror Cover
1 – MIRROR FLAG
2 – SIDE VIEW MIRROR COVER
3 – FASTENERS
Fig. 50 Side View Mirror
1 – SIDE VIEW MIRROR
2 – MIRROR FLAG/GLASS CHANNEL
3 – WIRE CONNECTOR
JX
BODY
23 - 55
REMOVAL AND INSTALLATION (Continued)
(6) Remove nut attaching top of mirror flag/door
glass channel to inner door panel.
(7) Using a suitable allen wrench, hold jack screw
stationary while removing nut attaching bottom of
mirror flag/door glass channel to inner door panel.
(8) Remove from vehicle and remove through open-
ing in top of door.
INSTALLATION
(1) If installing a new mirror flag/door glass chan-
nel, preset jackscrew using old flag/channel as a ref-
erence.
(2) Position mirror flag/door glass channel on vehi-
cle.
(3) Using a suitable allen wrench, hold jack screw
stationary while installing nut attaching bottom of
mirror flag/door glass channel to inner door panel.
(4) Install nut attaching top of mirror flag/door
glass channel to inner door panel.
(5) Install screws attaching mirror flag/door glass
channel to outer door panel.
(6) Install door outer belt weatherstrip.
(7) Install door glass.
(8) Install side view mirror.
(9) Verify glass fit and operation. Adjust door glass
as necessary.
(10) Install door trim panel.
BODY SIDE MOLDING
REMOVAL
(1) Warm the affected body side molding and body
metal to approximately 38° C (100° F) using a suit-
able heat lamp or heat gun.
(2) Pull body side molding from vehicle (Fig. 52).
(3) Remove adhesive tape residue from surface of
vehicle.
INSTALLATION
(1) If molding is to be reused, remove tape residue
from molding. Clean back of molding with Mopar
t
Super Kleen solvent or equivalent. Wipe molding dry
with lint free cloth. Apply new body side molding
(two sided adhesive) tape to back of molding.
(2) Clean body surface with Mopar
t Super Kleen
solvent or equivalent. Wipe surface dry with a lint
free cloth.
(3) Apply a length of masking tape on the body
parallel to the top edge of the molding to use as a
guide, if necessary.
(4) Remove protective cover from tape on back of
molding. Apply molding to body below the masking
tape guide.
(5) Remove masking tape guide. Heat body metal
and body side molding to approximately 38° C (100°
F) using a suitable heat lamp or heat gun.
(6) Firmly press body side molding to body surface
to insure adhesion.
DECKLID
REMOVAL
(1) Release decklid latch and open decklid.
(2) Mark outline of hinge on decklid to aid in
installation (Fig. 53).
(3) Disconnect all wire connectors from decklid
latch and disconnect wire harness from decklid.
(4) Place suitable padding between decklid and
deck panel to protect paint finish.
(5) With aid of a helper, remove bolts attaching
decklid to decklid hinge.
Fig. 51 Side View Mirror Flag/Door Glass Channel
1 – MIRROR FLAG/GLASS CHANNEL
2 – CLIP
3 – DOOR
Fig. 52 Body Side Molding
1 – QUARTER PANEL
2 – DOOR
3 – BODYSIDE MOLDING
23 - 56
BODY
JX
REMOVAL AND INSTALLATION (Continued)
Нет комментариевНе стесняйтесь поделиться с нами вашим ценным мнением.
Текст