
Chrysler Stratus Convertible. Manual — part 53
(2) Install the heat shield for the lower control
arm ball joint grease seal before beginning the instal-
lation of the steering knuckle on the vehicle.
(3) Slide drive shaft back into front hub/bearing
assembly. Then install steering knuckle onto the ball
joint stud in lower control arm.
(4) Install the steering knuckle to lower ball joint
stud castle nut.
(5) Install upper ball joint in steering knuckle.
Install the steering knuckle to upper ball joint nut.
Tighten the upper ball joint castle nut (Fig. 23) to a
torque of 54 N·m (40 ft. lbs.). Then, using a crowfoot
and torque wrench, tighten the lower ball joint nut
(Fig. 20) to a torque of 75 N·m (55 ft. lbs.). Install
cotter pins in upper and lower ball joint studs.
(6) Install the speed sensor cable routing bracket
on the steering knuckle (Fig. 19) and securely tighten
the attaching bolt.
CAUTION: When
installing
tie
rod
on
steering
knuckle the heat shield (Fig. 25) must be installed.
If heat shield is not installed, tie rod seal boot can
fail due to excessive heat from brake rotor.
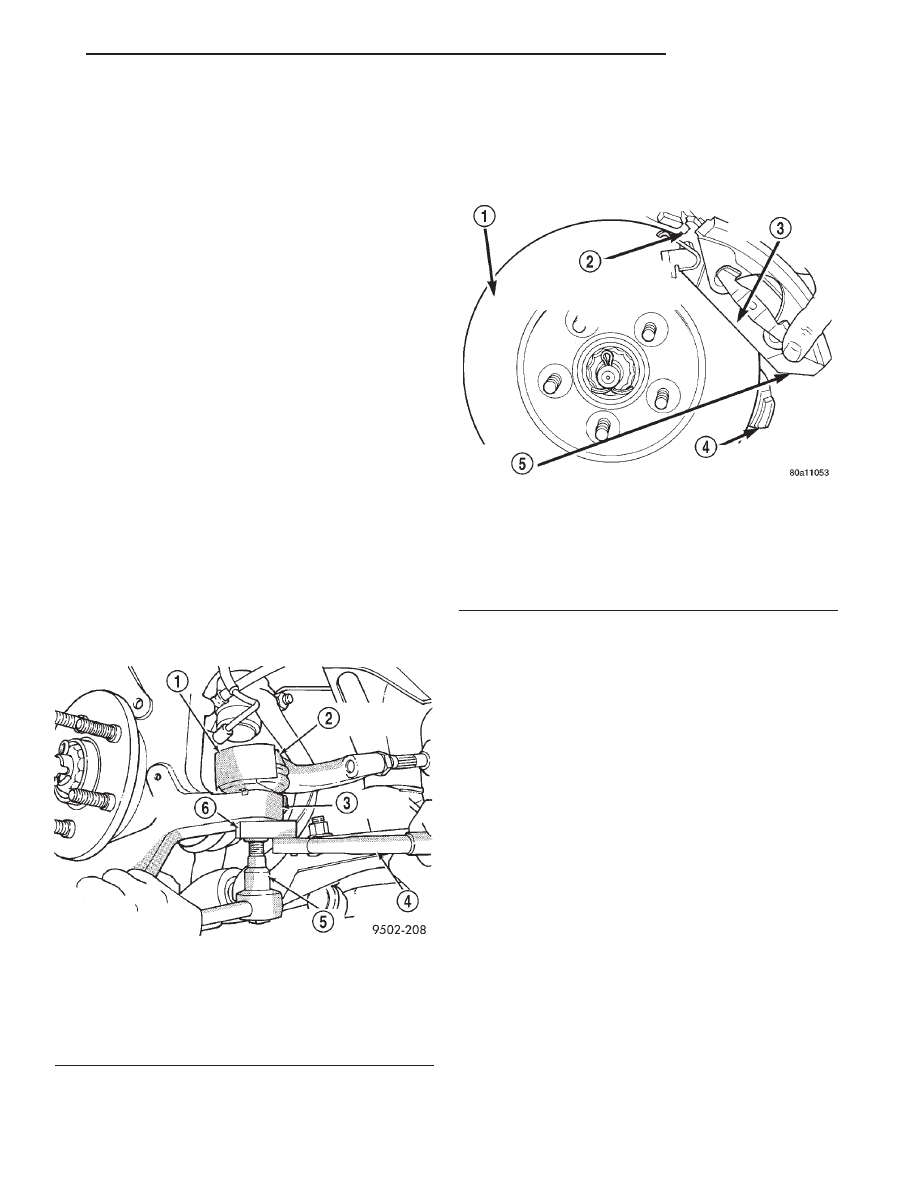
(7) Install tie rod end into the steering knuckle.
Start tie rod end to steering knuckle attaching nut
onto stud of tie rod end. While holding stud of tie rod
end stationary, tighten tie rod end to steering
knuckle attaching nut (Fig. 17). Then using a crow-
foot and 11/32 socket tighten the attaching nut to a
torque of 61 N·m (45 ft. lbs.) (Fig. 25).
(8) Install braking disc back on hub and bearing
assembly.
(9) Install disc brake caliper assembly on steering
knuckle. Caliper is installed by first sliding top of
caliper under top abutment on steering knuckle.
Then installing bottom of caliper against bottom
abutment of steering knuckle (Fig. 26).
(10) Install the disc brake caliper guide pin bolts
(Fig. 14). Tighten caliper assembly guide pin bolts to
a torque of 31 N·m (23 ft. lbs.).
(11) Clean all foreign matter from the threads of
the outer C/V joint stub axle. Install hub nut onto
driveshaft stub axle.
(12) With vehicle brakes applied to keep braking
disc from turning, tighten hub nut to 142 N·m (105
ft. lbs.) of torque.
(13) Install front wheel and tire assembly. Install
front wheel lug nuts and tighten in correct sequence.
Then tighten to a torque of 135 N·m (100 ft.lbs.).
(14) Lower vehicle.
(15) Set front Toe on vehicle to required specifica-
tion. Use procedure listed under Wheel Alignment in
this service manual group.
HUB AND BEARING (FRONT)
REMOVAL
(1) Raise vehicle on jack stands or centered on a
frame contact type hoist. See Hoisting in the Lubri-
cation and Maintenance section of this manual, for
the required lifting procedure to be used for this
vehicle.
(2) Remove front tire and wheel assembly from the
hub.
Fig. 25 Torquing Tie Rod End Attaching Nut
1 – HEAT SHIELD
2 – TIE ROD END
3 – STEERING KNUCKLE
4 – TORQUE WRENCH
5 – 11/32 SOCKET
6 – CROWFOOT
Fig. 26 Installing Brake Caliper
1 – ROTOR
2 – INSTALL THIS END OF CALIPER UNDER STEERING
KNUCKLE FIRST
3 – OUTBOARD BRAKE SHOE
4 – STEERING KNUCKLE
5 – DISC BRAKE CALIPER
JX
SUSPENSION
2 - 21
REMOVAL AND INSTALLATION (Continued)
CAUTION: Wheel bearing damage will result if hub
nut is loosened, then vehicle is rolled on the
ground or the weight of the vehicle is allowed to be
supported by the tires.
(3) Loosen hub nut with the brakes applied. The
hub
and
driveshaft
are
splined
together
through the knuckle (bearing) and retained by
the hub nut.
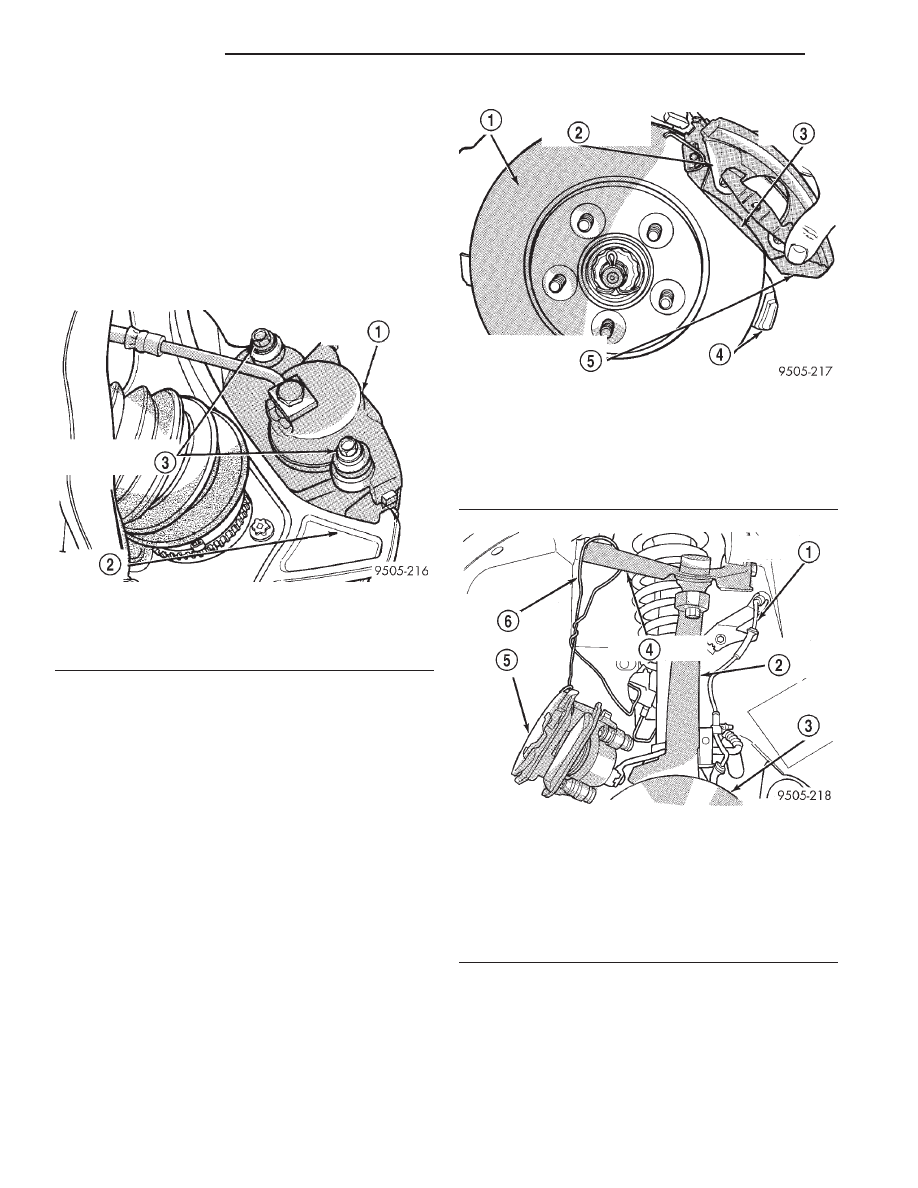
(4) Remove front disc brake caliper to steering
knuckle guide pin attaching bolts (Fig. 27).
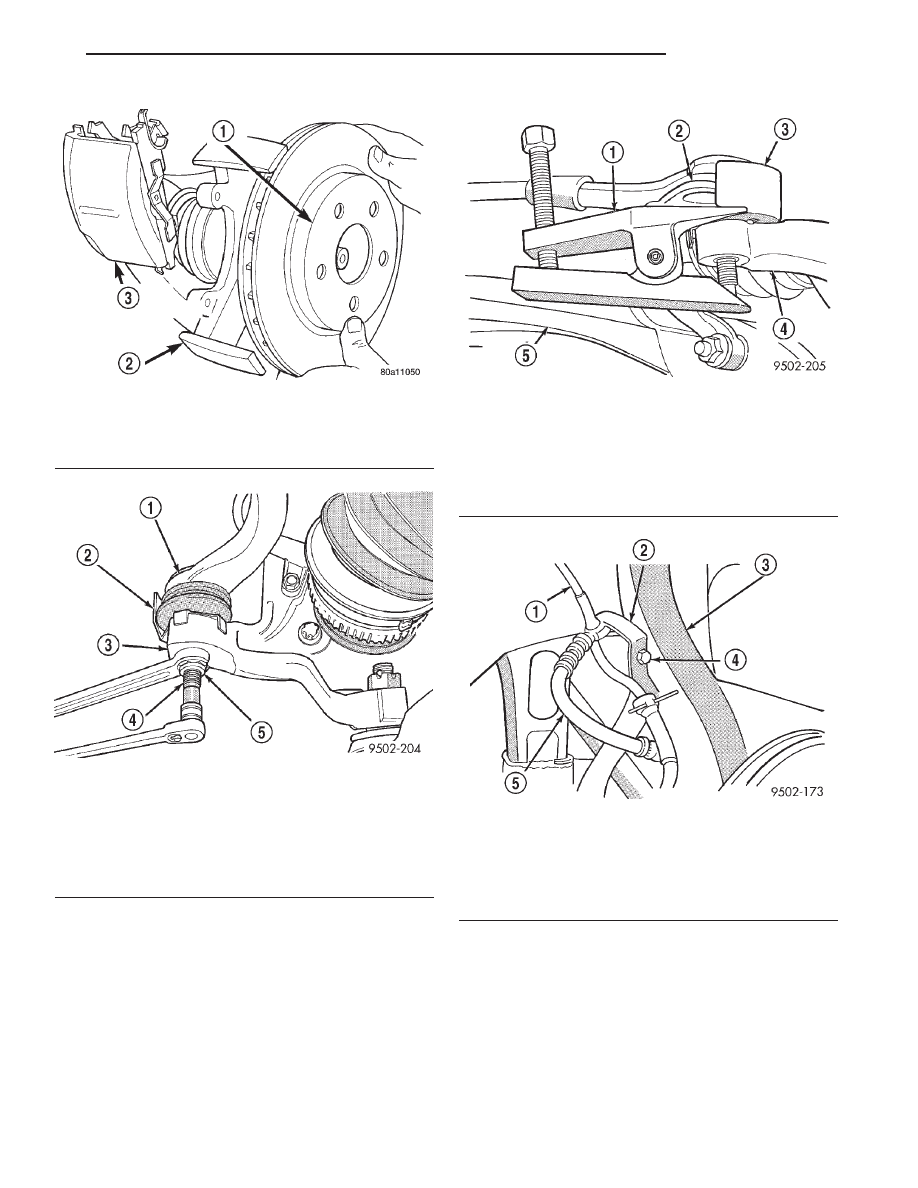
(5) Remove disc brake caliper assembly from steer-
ing knuckle. Caliper is removed by first lifting bot-
tom of caliper away from steering knuckle, and then
removing top of caliper out from under steering
knuckle (Fig. 28).
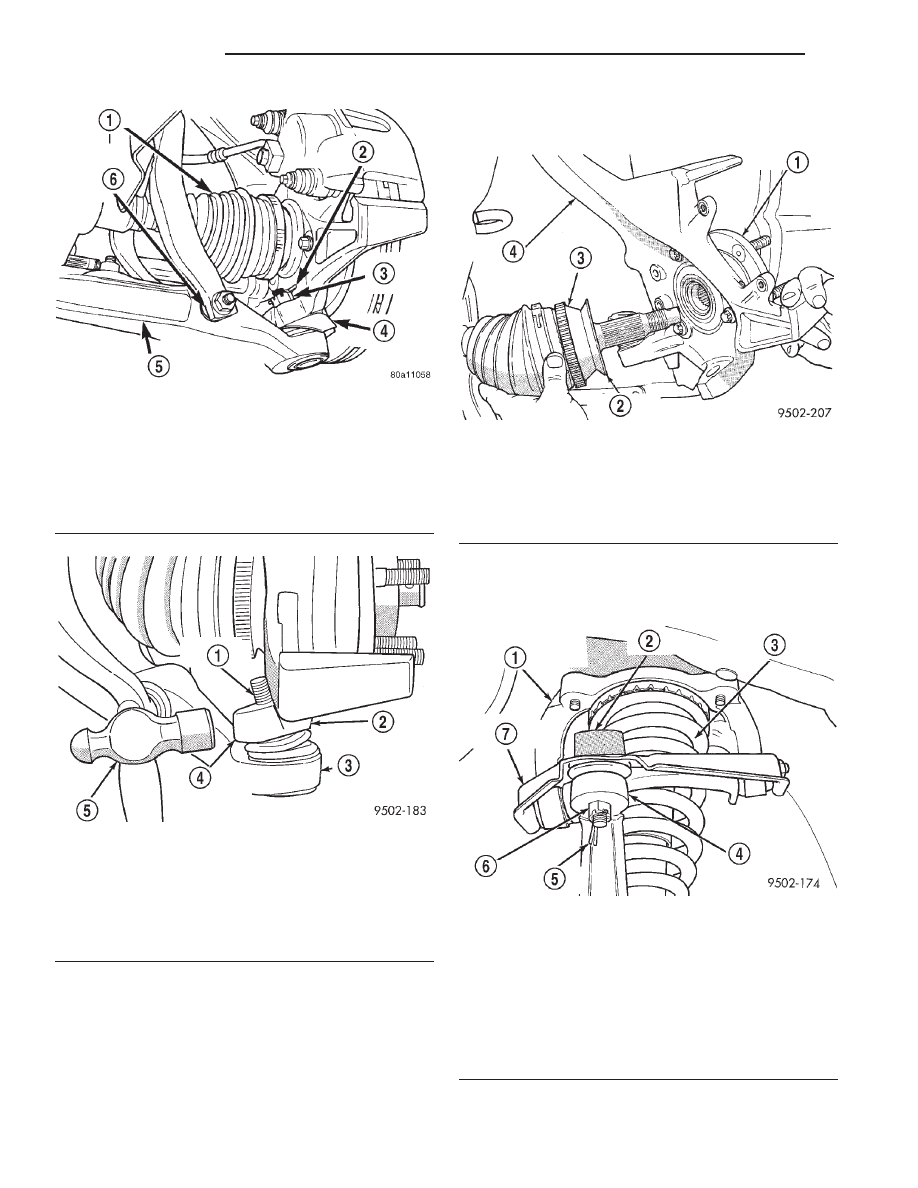
(6) Support brake caliper/adapter assembly using a
wire hook (Fig. 29) and not by hydraulic hose.
(7) Remove the braking disc from the front hub/
bearing assembly (Fig. 30).
(8) Remove nut attaching the outer tie rod end to
the steering knuckle (Fig. 31). Nut is to be
removed from tie rod end using the following
procedure, hold tie rod end stud with a 11/32
socket while loosening and removing nut with
wrench (Fig. 31).
(9) Remove the tie rod end from the steering
knuckle arm, using Remover, Special Tool MB-991113
(Fig. 32).
(10) If equipped with antilock brakes remove the
speed sensor cable routing bracket (Fig. 33) from the
steering knuckle.
(11) Remove cotter pin and castle nut (Fig. 34)
from the stud of the lower ball joint.
CAUTION: No tool is to be inserted between the
steering knuckle and the lower ball joint to separate
stud of lower ball joint from the steering knuckle.
The steering knuckle is to be separated from the
stud of the ball joint only using the procedure as
described in step Step 12 below.
Fig. 27 Front Disc Brake Caliper Mounting
1 – DISC BRAKE CALIPER ASSEMBLY
2 – STEERING KNUCKLE
3 – CALIPER ASSEMBLY GUIDE PIN BOLTS
Fig. 28 Caliper Removal From Steering Knuckle
1 – ROTOR
2 – DISC BRAKE CALIPER ASSEMBLY
3 – OUTBOARD BRAKE SHOE
4 – STEERING KNUCKLE
5 – LIFT THIS END OF CALIPER AWAY FROM STEERING
KNUCKLE FIRST
Fig. 29 Correctly Supported Front Disc Brake
Caliper
1 – ABS SPEED SENSOR CABLE
2 – STEERING KNUCKLE
3 – ROTOR
4 – UPPER CONTROL ARM
5 – DISC BRAKE CALIPER ASSEMBLY
6 – WIRE HANGER
2 - 22
SUSPENSION
JX
REMOVAL AND INSTALLATION (Continued)
(12) Turn steering knuckle so the front of the
steering knuckle is facing as far outboard in the
wheel well as possible. Using a hammer strike the
boss on the steering knuckle, (Fig. 35) until steering
knuckle separates from stud of lower ball joint.
When striking steering knuckle, care MUST be
taken not to hit lower control arm or ball joint
grease seal.
CAUTION: Pulling steering knuckle out from vehi-
cle after releasing from ball joint can separate inner
C/V joint. See Driveshafts.
(13) Lift up on steering knuckle separating it from
the lower ball joint stud. Use caution when sepa-
rating ball joint stud from steering knuckle, so
ball joint seal does not get cut.
Fig. 30 Removing/Installing Front Braking Disc
1 – BRAKING DISC
2 – STEERING KNUCKLE
3 – DISC BRAKE CALIPER ASSEMBLY (STORED)
Fig. 31 Tie Rod End Attaching Nut Removal/
Installation
1 – TIE ROD END
2 – HEAT SHIELD
3 – STEERING KNUCKLE
4 – TIE ROD END STUD
5 – NUT
Fig. 32 Tie Rod End Removal From Steering
Knuckle
1 – SPECIAL TOOL MB-991113
2 – TIE ROD END
3 – HEAT SHIELD
4 – STEERING KNUCKLE
5 – LOWER CONTROL ARM
Fig. 33 Speed Sensor Cable Routing Bracket
1 – WHEEL SPEED SENSOR CABLE
2 – SPEED SENSOR CABLE ROUTING BRACKET
3 – STEERING KNUCKLE
4 – ATTACHING BOLT
5 – BRAKE CALIPER FLEX HOSE
JX
SUSPENSION
2 - 23
REMOVAL AND INSTALLATION (Continued)
NOTE: Care must be taken not to separate the
inner C/V joint during this operation. Do not allow
driveshaft to hang by inner C/V joint, driveshaft
must be supported.
(14) Separate the steering knuckle from the outer
C/V joint. Separate steering knuckle from outer C/V
joint, by supporting the driveshaft while pulling
steering knuckle away from the outer C/V joint (Fig.
36).
(15) Remove the cotter pin and nut (Fig. 37) from
the upper ball joint stud to steering knuckle attach-
ment.
Fig. 34 Lower Ball Joint Attachment To Steering
Knuckle
1 – DRIVESHAFT
2 – COTTER PIN
3 – CASTLE NUT
4 – HEAT SHIELD
5 – LOWER CONTROL ARM
6 – SHOCK ABSORBER CLEVIS
Fig. 35 Separating Ball Joint Stud From Steering
Knuckle
1 – BALL JOINT STUD
2 – STEERING KNUCKLE
3 – LOWER CONTROL ARM
4 – STEERING KNUCKLE BOSS
5 – HAMMER
Fig. 36 Separating Steering Knuckle From Outer C/V
Joint
1 – HUB/BEARING
2 – BEARING SHIELD
3 – OUTER C/V JOINT
4 – STEERING KNUCKLE
Fig. 37 Upper Ball Joint Attachment To Steering
Knuckle
1 – UPPER CONTROL ARM SHOCK ABSORBER MOUNTING
BRACKET
2 – BALL JOINT
3 – SHOCK ABSORBER ASSEMBLY
4 – STEERING KNUCKLE
5 – COTTER PIN
6 – CASTLE NUT
7 – UPPER CONTROL ARM
2 - 24
SUSPENSION
JX
REMOVAL AND INSTALLATION (Continued)
Нет комментариевНе стесняйтесь поделиться с нами вашим ценным мнением.
Текст