
Chrysler Stratus Convertible. Manual — part 48
SUSPENSION
TABLE OF CONTENTS
page
page
WHEEL ALIGNMENT . . . . . . . . . . . . . . . . . . . . . . . . 1
FRONT SUSPENSION . . . . . . . . . . . . . . . . . . . . . . . 9
REAR SUSPENSION . . . . . . . . . . . . . . . . . . . . . . . 46
WHEEL ALIGNMENT
TABLE OF CONTENTS
page
page
DESCRIPTION AND OPERATION
WHEEL ALIGNMENT . . . . . . . . . . . . . . . . . . . . . . . 1
DIAGNOSIS AND TESTING
SUSPENSION AND STEERING DIAGNOSIS . . . . . 3
SERVICE PROCEDURES
PRE-WHEEL ALIGNMENT INSPECTION . . . . . . . . 5
SPECIFICATIONS
WHEEL ALIGNMENT SPECIFICATIONS . . . . . . . . . 8
DESCRIPTION AND OPERATION
WHEEL ALIGNMENT
DESCRIPTION
Vehicle wheel alignment is the proper adjustment
of all interrelated front and rear suspension angles.
These angles are what affects the handling and
steering of the vehicle when it is in motion.
The method of checking a vehicle’s front and rear
wheel alignment will vary depending on the type and
manufacturer of the equipment being used. Instruc-
tions furnished by the manufacturer of the equip-
ment being used should always be followed to ensure
accuracy of the alignment, except when alignment
specifications recommended by DaimlerChrysler dif-
fer.
Typical wheel alignment angles and measurements
are camber, caster, toe, and thrust angle.
• Camber is the number of degrees the top of the
tire and wheel are tilted either inward or outward
(Fig. 1). Camber is a tire wearing angle. Excessive
negative camber will cause tread wear at the inside
of the tire, while excessive positive camber will cause
outside tire wear.
• Caster is the number of degrees of forward or
rearward tilt of the steering knuckle (Fig. 2). For-
ward tilt provides a negative caster angle, while rear-
ward tilt provides a positive caster angle. Caster is
not adjustable on this vehicle.
• Cross Camber is the difference between left and
right camber. To achieve the cross camber reading,
subtract the right side camber reading from the left.
For example, if the left camber is +0.3° and the right
camber is 0.0°, the cross camber would be +0.3°.
• Toe is measured in degrees or inches and is the
difference in width between the centered leading and
trailing edges of the tires on the same axle (Fig. 3).
Toe-in means that the front width is more narrow
than the rear. Toe-out means that the front width is
wider than the rear.
• Thrust Angle is defined as the average of the toe
settings on each rear wheel. If this measurement is
out of specification, readjust the rear wheel toe so
that each wheel has 1/2 of the total toe measure-
ment. When readjusting, do not exceed the total toe
specification.
Wheel alignment on this vehicle is to be checked
and all alignment adjustments are to be made with
the vehicle standing at its curb height specification.
Curb height is the riding height of the vehicle mea-
sured from a certain point on the vehicle to the
ground while the vehicle is setting on a flat, level
surface.
JX
SUSPENSION
2 - 1
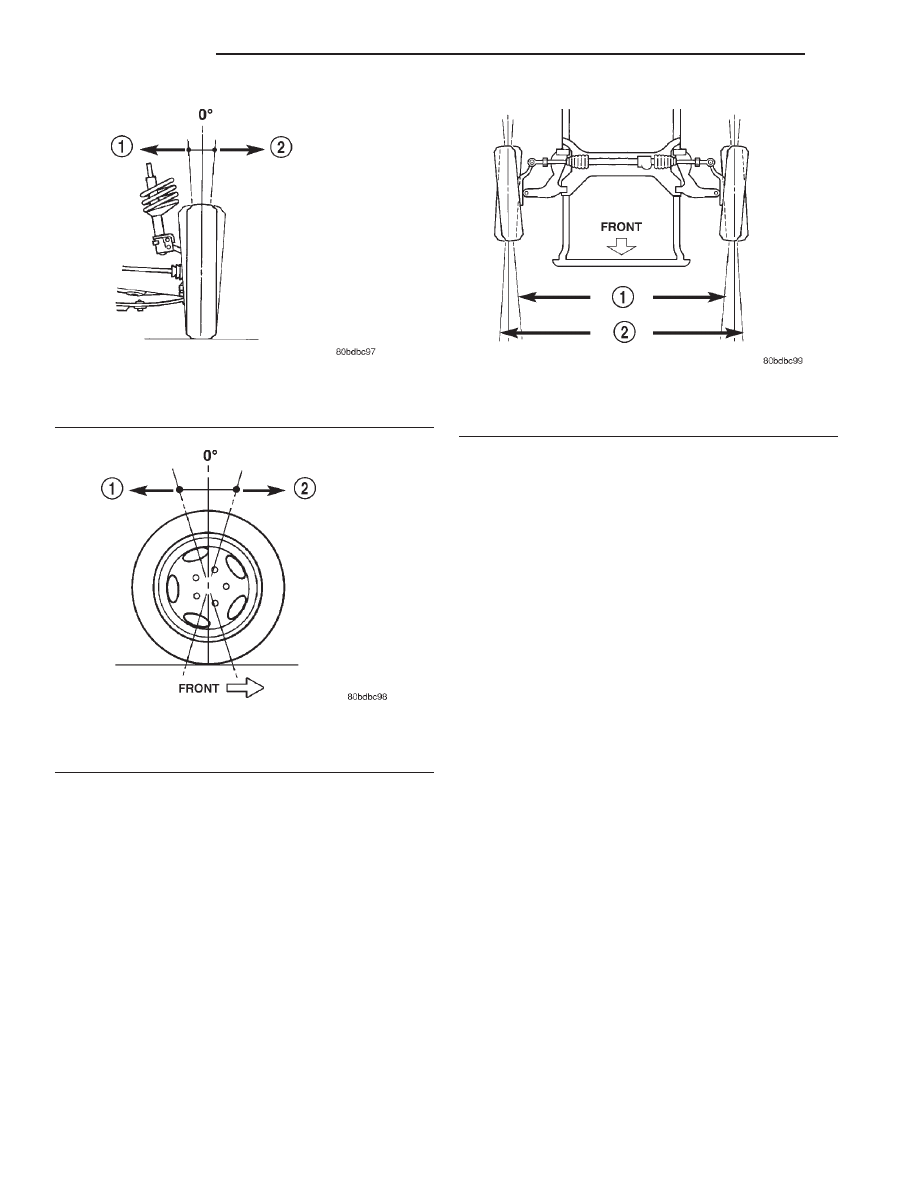
Fig. 1 Camber
1 – NEGATIVE
2 – POSITIVE
Fig. 2 Caster
1 – POSITIVE
2 – NEGATIVE
Fig. 3 Toe
1 – TOE-IN
2 – TOE-OUT
2 - 2
SUSPENSION
JX
DIAGNOSIS AND TESTING (Continued)
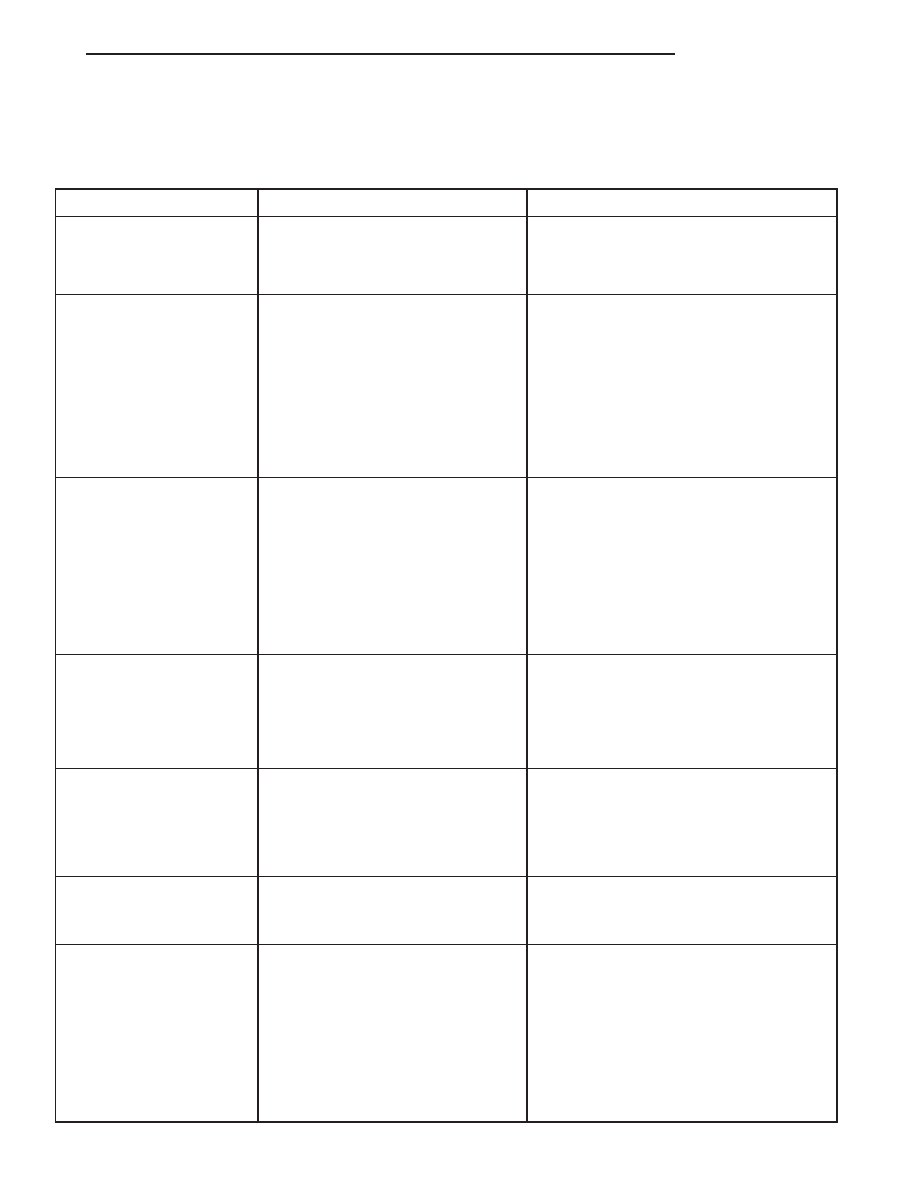
DIAGNOSIS AND TESTING
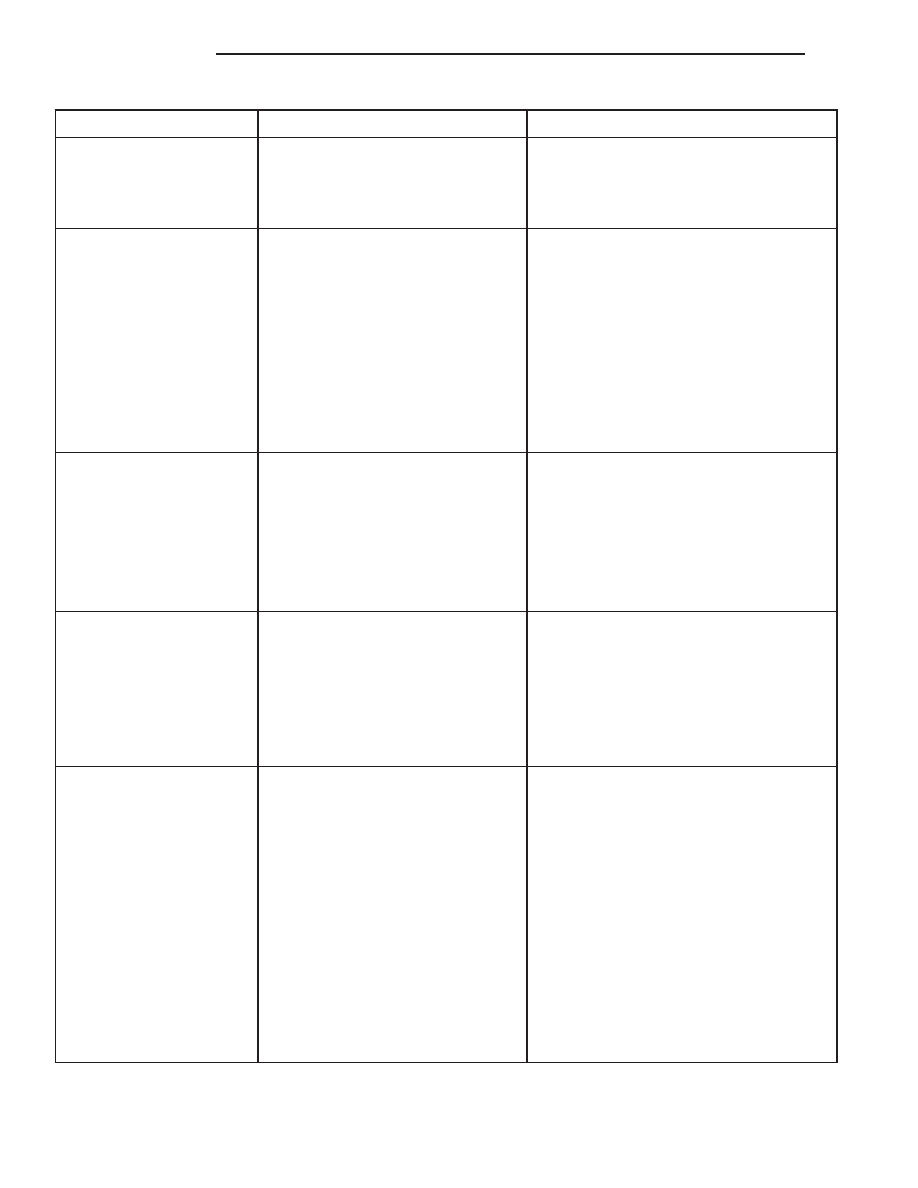
SUSPENSION AND STEERING DIAGNOSIS
CONDITION
POSSIBLE CAUSES
POTENTIAL CORRECTIONS
Front End Whine On Turns
1. Defective Wheel Bearing
1. Replace Wheel Bearing
2. Incorrect Wheel Alignment
2. Check And Reset Wheel Alignment
3. Worn Tires
3. Replace Tires
Front End Growl Or
Grinding On Turns
1. Defective Wheel Bearing
1. Replace Wheel Bearing
2. Engine Mount Grounding
Against Frame Or Body Of Vehicle.
2. Check For Motor Mount Hitting Frame
Rail And Reposition Engine As Required
3. Worn Or Broken C/V Joint
3. Replace C/V Joint
4. Loose Wheel Lug Nuts
4. Verify Wheel Lug Nut Torque
5. Incorrect Wheel Alignment
5. Check And Reset Wheel Alignment
6. Worn Tires
6. Replace Tires
Front End Clunk Or Snap
On Turns
1. Loose Wheel Lug Nuts
1. Verify Wheel Lug Nut Torque
2. Worn Or Broken C/V Joint
2. Replace C/V Joint
3. Worn Or Loose Tie Rod Or Ball
Joint
3. Tighten Or Replace Tie Rod End Or Ball
Joint
4. Worn Control Arm Bushing
4. Replace Control Arm Bushing
5. Loose Sway Bar Or Upper Strut
Attachment
5. Tighten Sway Bar Or Upper Strut
Attachment To Specified Torque
Front End Whine With
Vehicle Going Straight At A
Constant Speed
1. Defective Wheel Bearing
1. Replace Wheel Bearing
2. Incorrect Wheel Alignment
2. Check And Reset Wheel Alignment
3. Worn Tires
3. Replace Tires
Front End Growl Or
Grinding With Vehicle
Going Straight At A
Constant Speed
1. Engine Mount Grounding
1. Reposition Engine As Required
2. Worn Or Broken C/V Joint
2. Replace C/V Joint
Front End Whine When
Accelerating Or
Decelerating
1. Worn Or Defective Transaxle
Gears Or Bearings
1. Replace Transaxle Gears Or Bearings
Front End Clunk When
Accelerating Or
Decelerating
1. Worn Or Broken Engine Mount
1. Replace Engine Mount
2. Worn Or Defective Transaxle
Gears Or Bearings
2. Replace Transaxle Gears Or Bearings
3. Loose Wheel Lug Nuts
3. Verify Wheel Lug Nut Torque
4. Worn Or Broken C/V Joint
4. Replace C/V Joint
5. Worn Or Loose Ball Joint
5. Tighten Or Replace Ball Joint
JX
SUSPENSION
2 - 3
CONDITION
POSSIBLE CAUSES
POTENTIAL CORRECTIONS
6. Worn Or Loose Control Arm
Bushing
6. Tighten To Specified Torque Or Replace
Control Arm Bushing
7. Loose Crossmember Bolts
7. Tighten Crossmember Bolts To Specified
Torque
Road Wander
1. Incorrect Tire Pressure
1. Inflate Tires To Rcommended Pressure
2. Incorrect Front Or Rear Wheel Toe
2. Check And Reset Front Wheel Toe
3. Worn Wheel Bearings
3. Replace Wheel Bearing
4. Worn Control Arm Bushings
4. Replace Control Arm Bushing
5. Excessive Friction In Steering
Gear
5. Replace Steering Gear
6. Excessive Friction In Steering
Shaft Coupling
6. Replace Steering Coupler
7. Excessive Friction In Strut Upper
Bearing
7. Replace Strut Bearing
Lateral Pull
1. Unequal Tire Pressure
1. Inflate All Tires To Recommended
Pressure
2. Radial Tire Lead
2. Perform Lead Correction Procedure
3. Incorrect Front Wheel Camber
3. Check And Reset Front Wheel Camber
4. Power Steering Gear Imbalance
4. Replace Power Steering Gear
5. Wheel Braking
5. Correct Braking Condition Causing
Lateral Pull
Excessive Steering Free
Play
1. Incorrect Steering Gear
Adjustment
1. Adjust Or Replace Steering Gear
2. Worn Or Loose Tie Rod Ends
2. Replace Or Tighten Tie Rod Ends
3. Loose Steering Gear Mounting
Bolts
3. Tighten Steering Gear Bolts To The
Specified Torque
4. Loose Or Worn Steering Shaft
Coupler
5. Replace Steering Shaft Coupler
Excessive Steering Effort
1. Low Tire Pressure
1. Inflate All Tires To Recommended
Pressure
2. Lack Of Lubricant In Steering
Gear
2. Replace Steering Gear
3. Low Power Steering Fluid Level
3. Fill Power Steering Fluid Reservoir To
Correct Level
4. Loose Power Steering Pump Belt
4. Check and replace automatic belt
tensioner as necessary. If drive belt is worn
or glazed, replace belt.
5. Lack Of Lubricant In Steering Ball
Joints
5. Lubricate Or Replace Steering Ball Joints
6. Steering Gear Malfunction
6. Replace Steering Gear
7. Lack Of Lubricant In Steering
Coupler
7. Replace Steering Coupler
2 - 4
SUSPENSION
JX
DIAGNOSIS AND TESTING (Continued)
Нет комментариевНе стесняйтесь поделиться с нами вашим ценным мнением.
Текст