Daewoo Matiz (2003 year). Manual — part 246

9E – 18 INSTRUMENT/DRIVER INFORMATION
D109B706
8. Remove the glove box striker and bracket from the
instrument panel.
D
Remove the screws (1).
D
Remove the glove box striker and bracket (2).
D109B707
9. Remove the instrument panel guide from the instru-
ment panel.
D
Remove the screws (1).
D
Remove the instrument panel guide (2).
D109B708
10. Remove the defroster grilles and the demister grilles
from the instrument panel.
a. Defroster grille.
b. Demister grille.
D109B521
Installation Procedure
1. Install the defroster grilles and the demister grilles to
the instrument.
2. Install the instrument panel guide to the instrument
panel with the screws.
3. Install the glove box striker and the bracket to the in-
strument panel with the screws.
4. Install the cigar lighter housing to the instrument pan-
el with the screws.
5. Install the ventilation grilles to the instrument panel
with the screws.
6. Install the ventilation duct to the instrument panel with
the screws.
INSTRUMENT/DRIVER INFORMATION 9E – 19
D19B710A
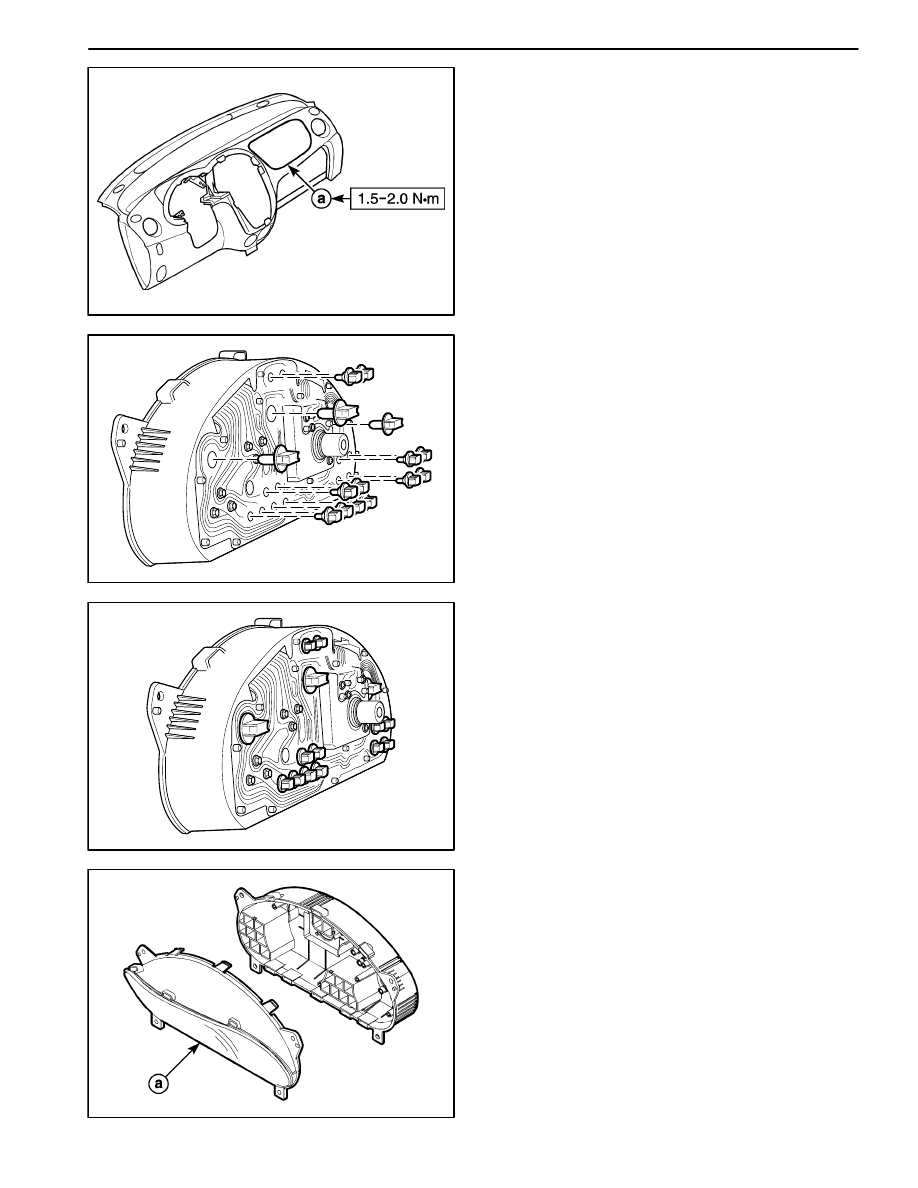
7. Install the passenger’s airbag module blank cover to
the instrument panel with the screws.
Tighten
Tighten the screws to 1.5–2 N.m (13–18 lb-in).
a. Passenger’s airbag module blank cover screw
8. Install the instrument cluster brackets to the instru-
ment panel with the screws.
9. Install the instrument panel assembly. Refer to “In-
strument Panel” in this section.
10. Connect the negative battery cable.
D109B711
INSTRUMENT CLUSTER INDICATOR
LAMPS
Removal Procedure
1. Disconnect the negative battery cable.
2. Remove the instrument cluster from the instrument
panel. Refer to “Instrument Cluster” in this section.
3. Remove the indicator bulbs from the rear of the clus-
ter.
D109B712
Installation Procedure
1. Install the indicator bulb.
2. Install the instrument cluster to the instrument panel.
Refer to “Instrument Cluster” in this section.
3. Connect the negative battery cable.
D109B713
SPEEDOMETER/ODOMETER/TRIP
ODOMETER
Removal Procedure
1. Disconnect the negative battery cable.
2. Remove the instrument cluster from the instrument
panel. Refer to “Instrument Cluster” in this section.
3. Remove the instrument cluster lens and the face
plate.
a. Window plate.

9E – 20 INSTRUMENT/DRIVER INFORMATION
D109B714
4. Remove the speedometer/odometer/trip odometer.
D
Remove the screws on the circuit plate (1).
D
Remove the speedometer/odometer/trip odometer
(2).
D19B715A
Installation Procedure
1. Install the speedometer/odometer/trip odometer with
the screws.
2. Install the instrument cluster lens and the face plate.
3. Install the instrument cluster. Refer to “Instrument
Cluster” in this section.
4. Connect the negative battery cable.
D109B713
FUEL GAUGE/TEMPERATURE
GAUGE
Removal Procedure
1. Disconnect the negative battery cable.
2. Remove the instrument cluster. Refer to “Instrument
Cluster” in this section.
3. Remove the instrument cluster lens and the face
plate.
a. Window plate.
D109B716
4. Remove the fuel gauge/temperature gauge from the
cluster assembly.
D
Remove the screws on the circuit plate (1).
D
Remove the fuel gauge (2).
D
Remove the temperature gauge (3).

INSTRUMENT/DRIVER INFORMATION 9E – 21
D19B717A
Installation Procedure
1. Install the fuel gauge/temperature gauge to the clus-
ter assembly with the screws.
2. Install the instrument cluster lens and the face plate.
3. Install the instrument cluster. Refer to “Instrument
Cluster” in this section.
4. Connect the negative battery cable.
Нет комментариевНе стесняйтесь поделиться с нами вашим ценным мнением.
Текст